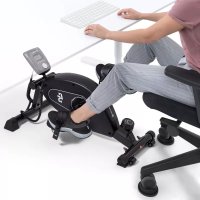
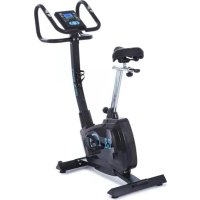
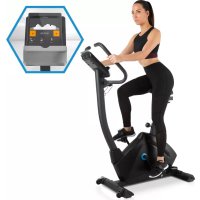
Stormstrike - Indoor bike trainer Capital Sports - Free user manual and instructions
Find the device manual for free Stormstrike Capital Sports in PDF.
| Product Type | Indoor Bike Trainer |
| Brand | Capital Sports |
| Model | Stormstrike |
| Item Number | 10030433, 10030434 |
| Maximum User Weight | 110 kg |
| Power Supply | 2 AA batteries (not included) |
| Computer Functions | Time display, speed, distance, calories, scan |
| Resistance | Adjustable (unspecified) |
| Seat | Standard, height adjustable |
| Pedals | Standard with cages |
| Assembly | Required, see detailed manual |
| Use | Household use only |
| Maintenance | Clean with a damp cloth and mild detergent. Do not use solvents. |
| Safety | Consult a doctor before use. Do not use in humid environments. Keep children away. |
| Spare Parts | Parts list provided in the manual |
| Recycling | Do not dispose of with household waste. Take to a collection point for electronic waste. |
Frequently Asked Questions - Stormstrike Capital Sports
User questions about Stormstrike Capital Sports
0 question about this device. Answer the ones you know or ask your own.
Ask a new question about this device
Download the instructions for your Indoor bike trainer in PDF format for free! Find your manual Stormstrike - Capital Sports and take your electronic device back in hand. On this page are published all the documents necessary for the use of your device. Stormstrike by Capital Sports.
USER MANUAL Stormstrike Capital Sports
| NO.1 | NO.2 | NO.3/4 |
| NO.5 | NO.6/10 | NO.7 |
| NO.8 | NO.22 | NO.26 |
| NO.29/30 | NO.32 |
Kleinteile
2. Cardio-Trainingsphase
Member of Berlin Brands Group
Handwerkerstr. 11
15366 Dahlwitz-Hoppegarten
Deutschland
Berlin Brands Group UK Ltd
PO Box 1145
Oxford, Otx1 9UW
United Kingdom
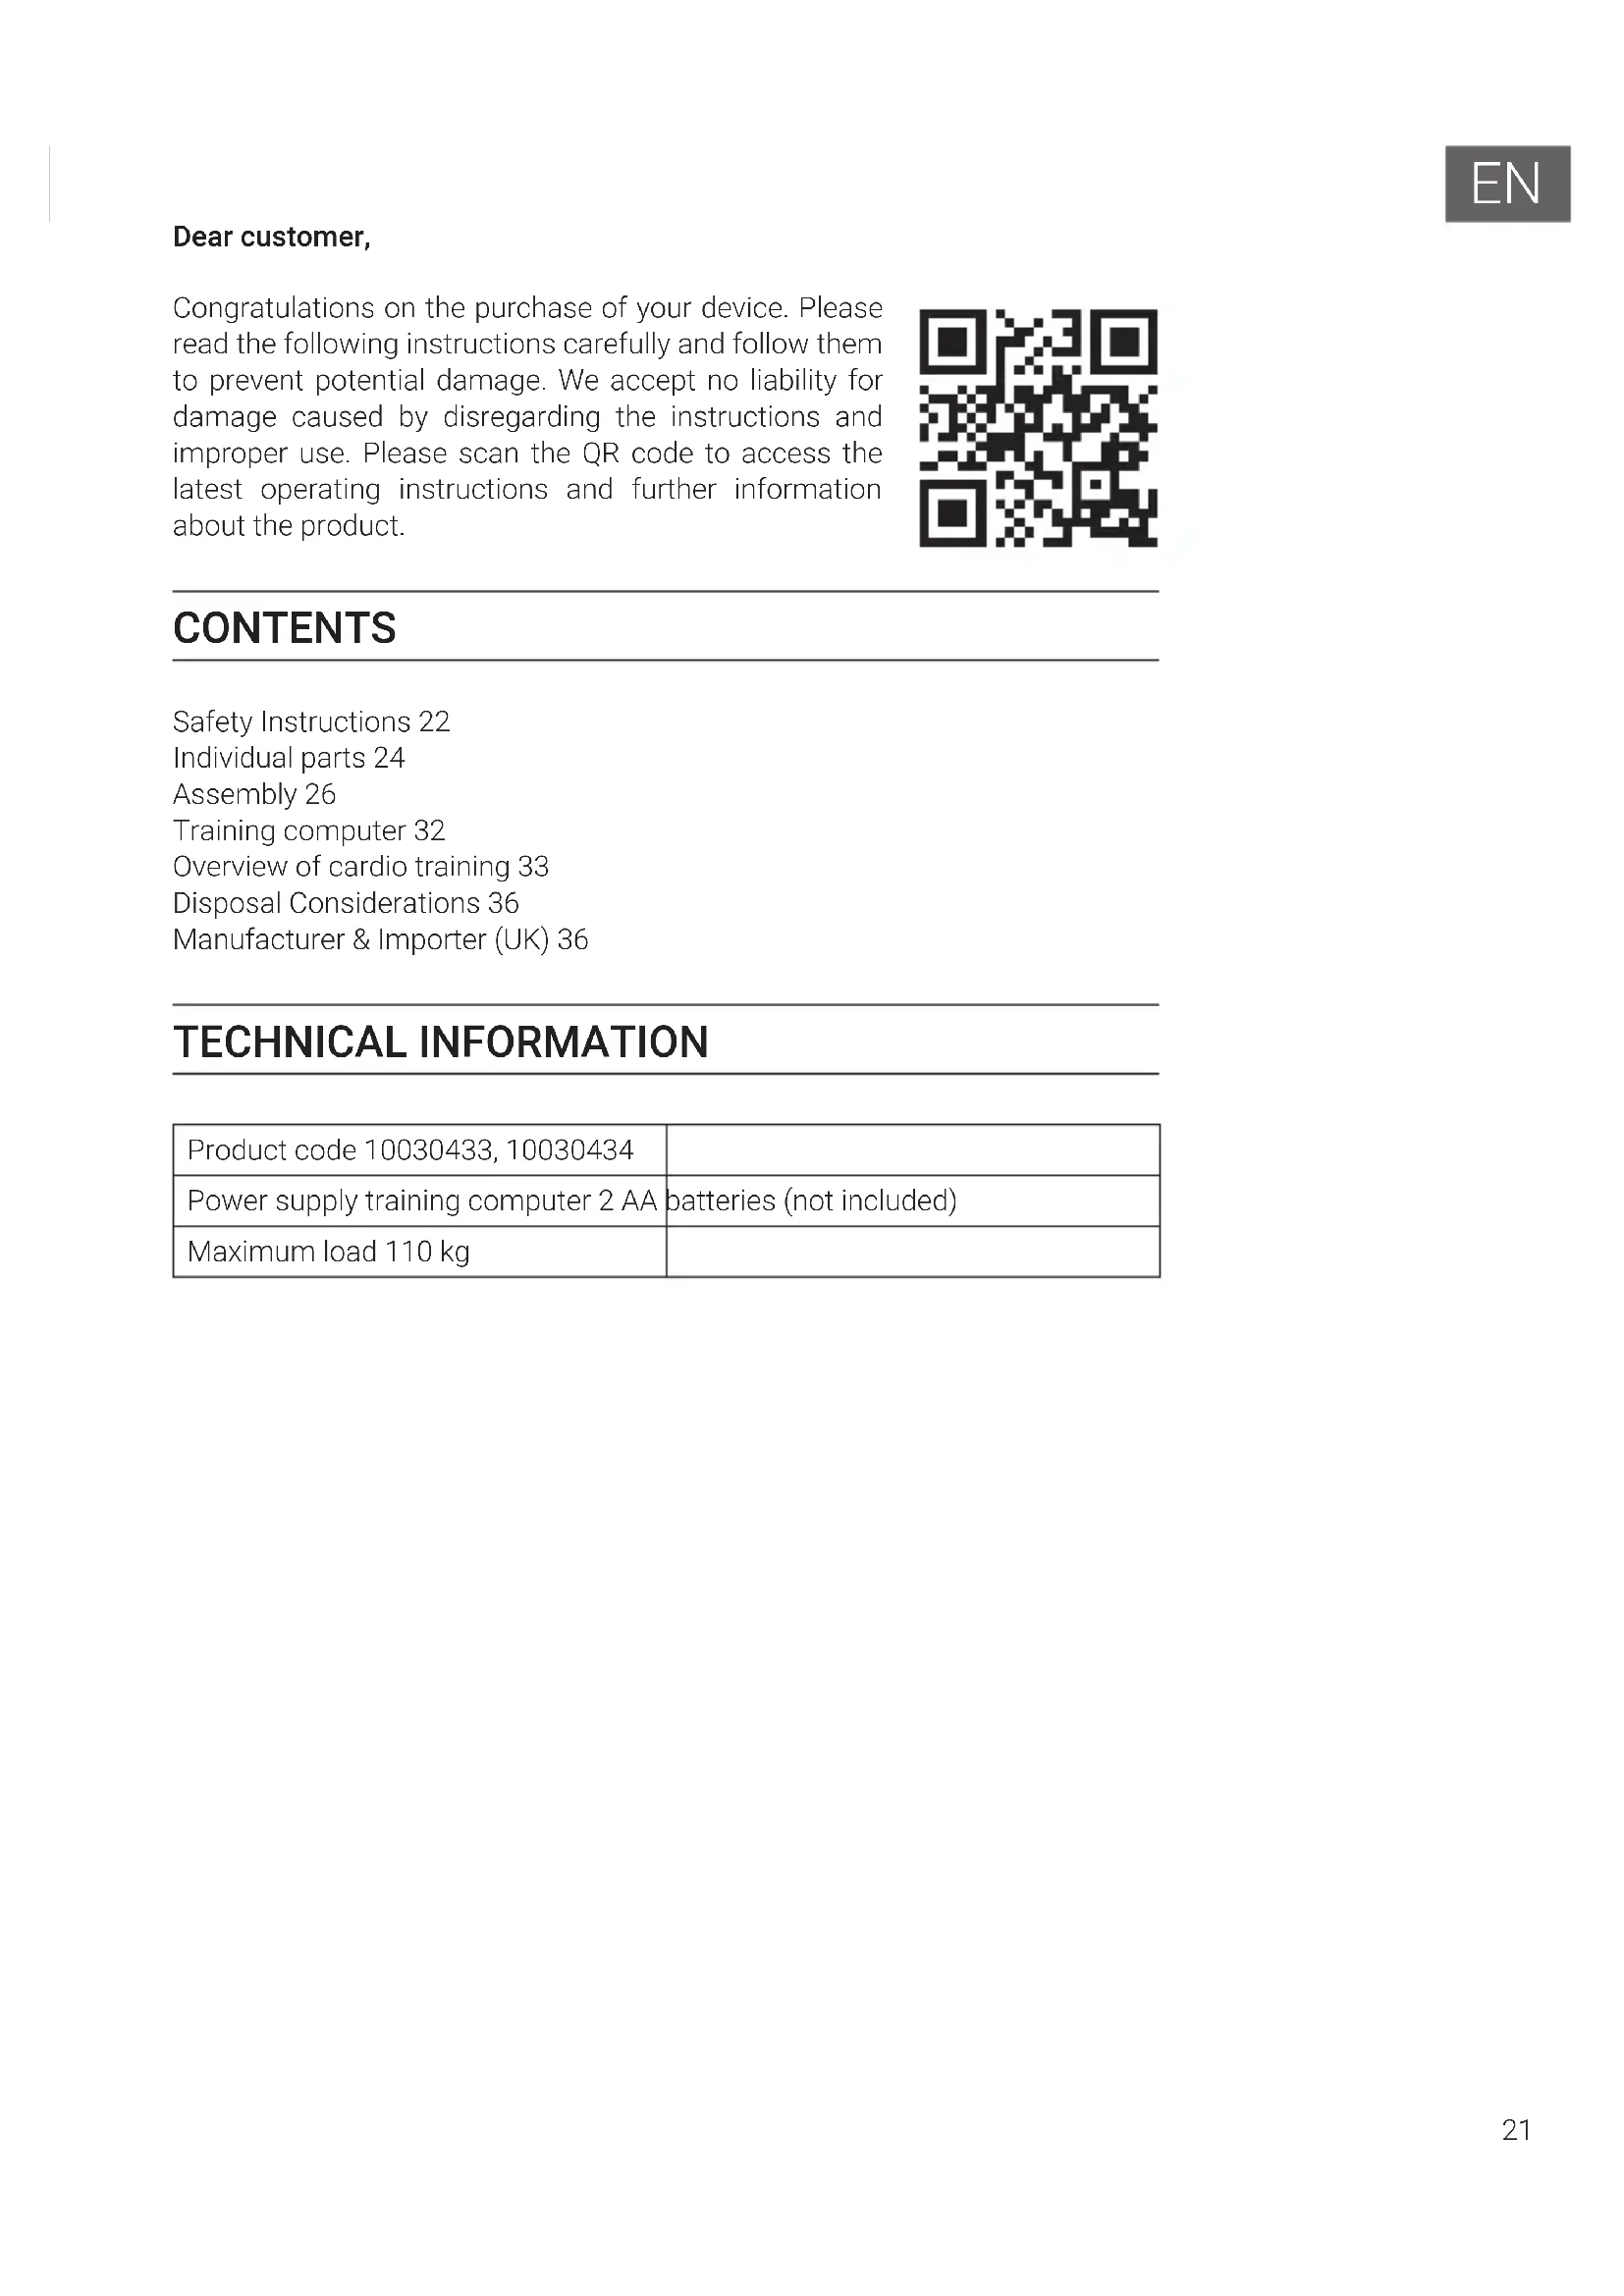
Dear customer,
Congratulations on the purchase of your device. Please read the following instructions carefully and follow them to prevent potential damage. We accept no liability for damage caused by disregarding the instructions and improper use. Please scan the QR code to access the latest operating instructions and further information about the product.

CONTENTS
Safety Instructions 22
Individual parts 24
Assembly 26
Training computer 32
Overview of cardio training 33
Disposal Considerations 36
Manufacturer & Importer (UK) 36
TECHNICAL INFORMATION
| Product code 10030433, 10030434 | |
| Power supply training computer 2 AA | batteries (not included) |
| Maximum load 110 kg |
SAFETY INSTRUCTIONS
Read the operating instructions carefully before using the appliance and keep them for future use. Product features may differ slightly from those shown in the illustrations. Changes can be made by the manufacturer without notification.
- Keep the operating instructions in a safe place so that you can access them at any time.
- Do not assemble the appliance until you have read the operating instructions completely. The safety and efficiency of the appliance can only be guaranteed if the appliance has been correctly assembled and is properly maintained and used. It is your own responsibility to ensure that all users of the appliance are informed of warnings and precautions.
- The appliance must be placed on a stable and straight surface to be used safely. Protect the floor with a mat. Do not use the appliance in humid environments, such as pools, etc. The safety distance around the appliance must be at least 0.6 metres.
- Before using the exercise programmes, it is essential that you consult a doctor to determine whether you have any physical or health problems that could pose a risk to your health and safety by using the machine or prevent you from using the machine properly. Your doctor's advice is vital if you are taking medication that affects your pulse, blood pressure or cholesterol levels.
- Pay attention to your body's signals. Exercising incorrectly or excessively can be detrimental to your health. Stop exercising if any of the following symptoms occur: pain, tightness in the chest, irregular heartbeat, extreme shortness of breath, dizziness or nausea. If you experience any of these conditions, you must consult a doctor before continuing your training.
- Do not exercise directly after meals.
- The appliance may only be assembled by adults. Keep children and pets away from the appliance.
- The appliance may only be used in domestic areas.
- The device is not suitable for therapeutic use. It can only be used for the exercises shown in the instructions.
- Wear adequate exercise clothing and exercise shoes when using the machine. Avoid loose clothing as it may get caught in the appliance or clothing that may restrict your movement.
-
Keep your back straight during exercise.
-
Before each use of the unit, always check that the handles, saddle, nuts and bolts have been properly tightened.
- Observe the maximum position for adjustable parts of the appliance and never go beyond the "Stop" mark as this would pose a risk.
- Only use the appliance as shown. If you notice any defective parts during assembly or inspection, or if you hear strange noises coming from the appliance during use, stop use immediately. Do not use the machine again until the problem has been corrected.
- Take care when lifting or moving the unit so that you do not injure your back. Always use back-friendly lifting techniques and seek help from another person if necessary.
- All moving parts of the device (e.g. pedals, handles, saddle... etc.) must be serviced weekly. Check these before each use. If something is broken or loose, repair or fix the relevant part immediately. Do not continue using the appliance until you have restored it to a good initial condition.
- Keep the power cord away from heat sources.
- Do not insert any objects into the machine openings.
- Switch off and unplug the appliance before moving or cleaning the appliance. To clean, rub the surfaces with a mild detergent and a damp cloth. Do not use solvents under any circumstances.
- Do not use the appliance in places that are not temperature-controlled, such as garages, verandas, bathrooms, carports or outdoors.
- Only use the appliance as described in the operating instructions.
- Incorrect repair and structural modifications (e.g. removal or replacement of original parts) may put the user of the appliance at risk.
- Children from the age of 8, mentally and physically impaired persons may only use the device if they have been familiarised in detail with the functions and safety precautions by a supervisor responsible for them beforehand.
- Make sure that children do not play with the appliance.
- Check the voltage on the product label before use. Ensure that you only connect the appliance to sockets with the appropriate voltage.
| NO.1 | NO.2 | NO.3/4 |
| NO.5 | NO.6/10 | NO.7 |
| NO.8 | NO.22 | NO.26 |
| NO.29/30 | NO.32 |
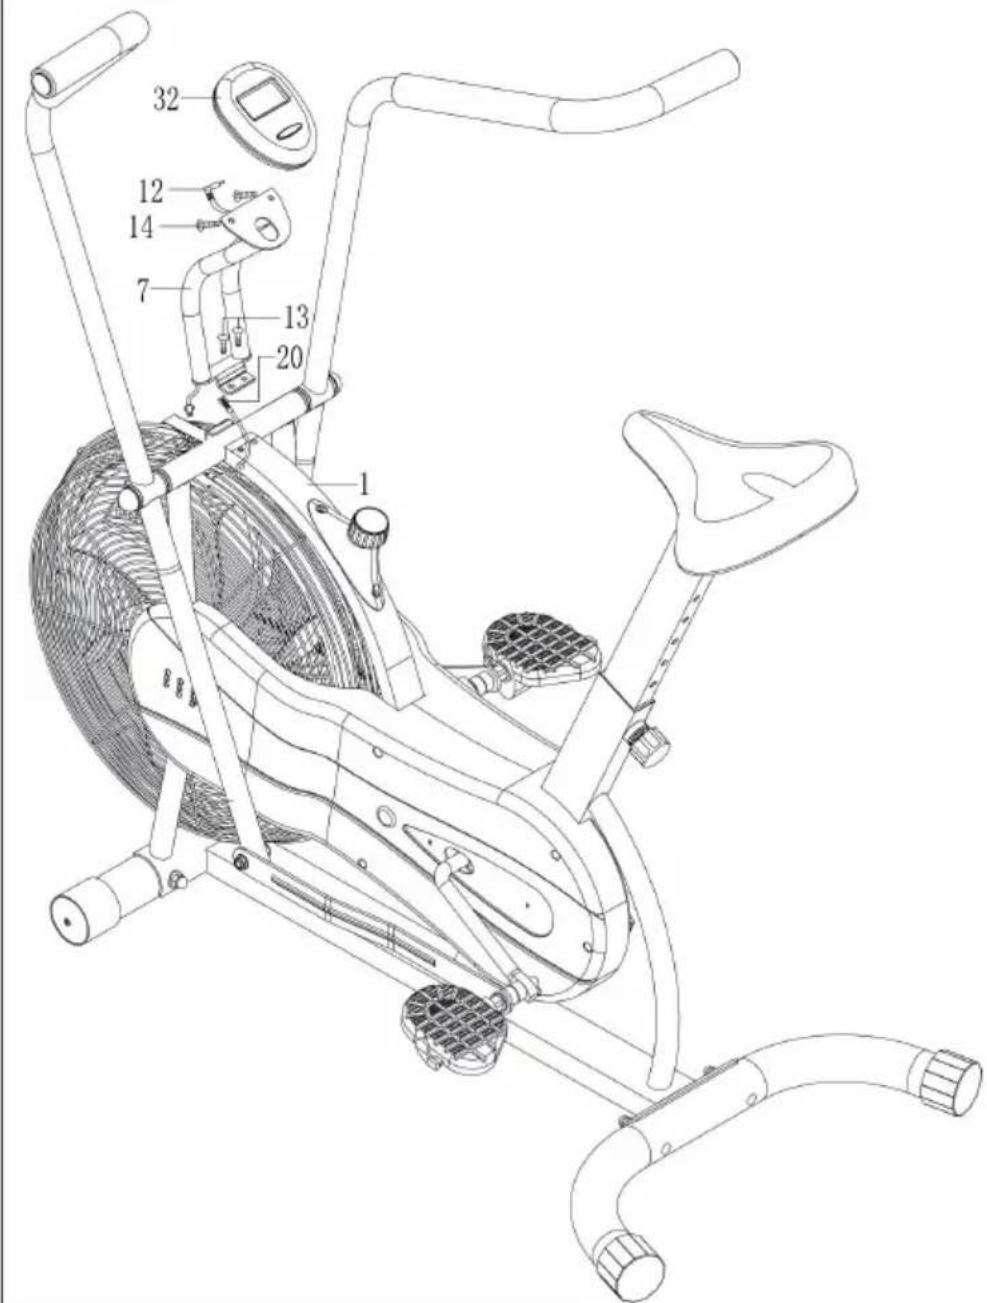
Small parts
| No. Description Pc. | |
| 1 Main part 1 | |
| 2 Foot, rear 1 | |
| 3/4 Handles (L/R) 1/1 | |
| 5 Seat post 1 | |
| 6/10 Lower handle and connecting rods (L/R) 1/1 | |
| 7 Clamp for training computer 1 | |
| 8 Foot, front 1 | |
| 22 Axle 1 | |
| 26 Saddle 1 | |
| 29/30 | Pedals (L/R) 1/1 |
| 32 Training computer 1 |
| No. | Picture | Description | Pc. |
| 11 | Lock screw | 4 | |
| 13 | Hexagon socket screw | 6 | |
| 19 | Cap nut | 4 | |
| 23 | Bow disc | 4 | |
| 24 | Bow disc | 4 | |
| 25 | Lock Pin | 1 | |
| 31 | End cap | 2 | |
| 57 | Spanner | 2 | |
| 58 | Allen key | 1 |
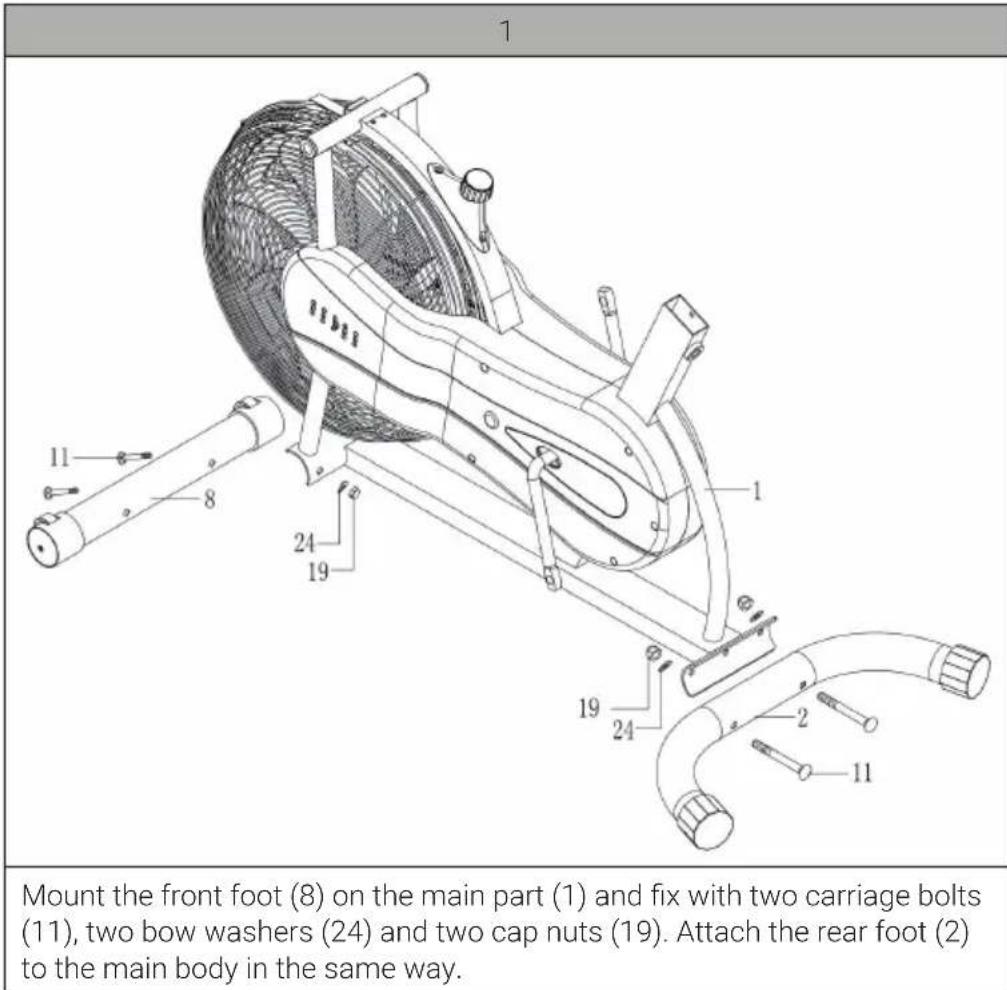
ASSEMBLY
2
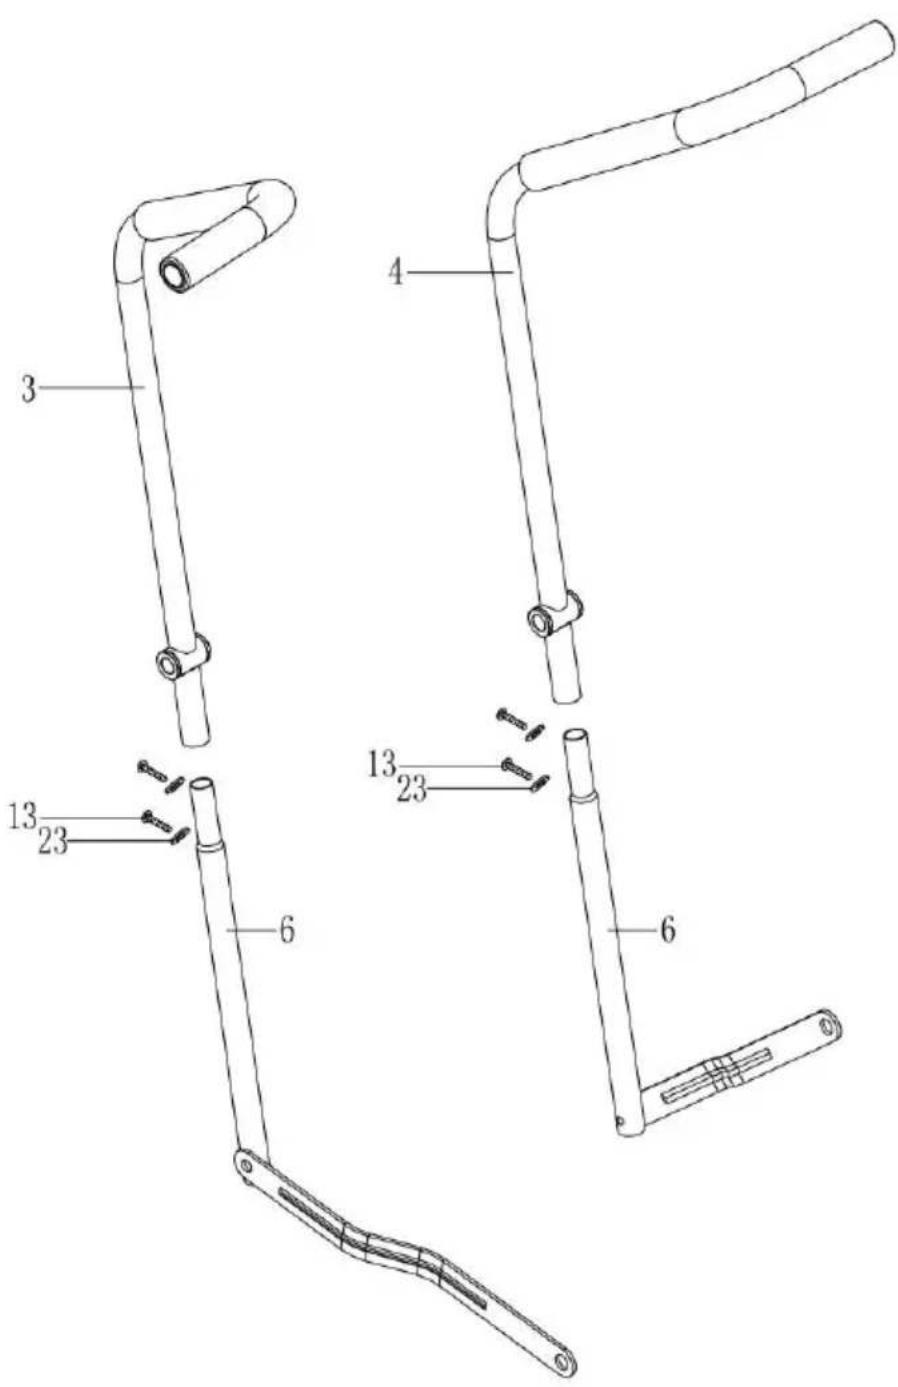
Put the upper and lower handle bar parts (3 / 4 and 6) together. Screw them together with two hexagon socket screws (13) and washers (23) each.
| 3 |
| Remove the washer and plastic nut (21+18) from one side of the hub (22).Pass the hub (22) through the hole in the right handlebar (4), through the main part and finally through the left handlebar (3). Secure on both sides with washers (21) and plastic nuts (18).Place the end caps (31) on the nuts (18) for protection. |
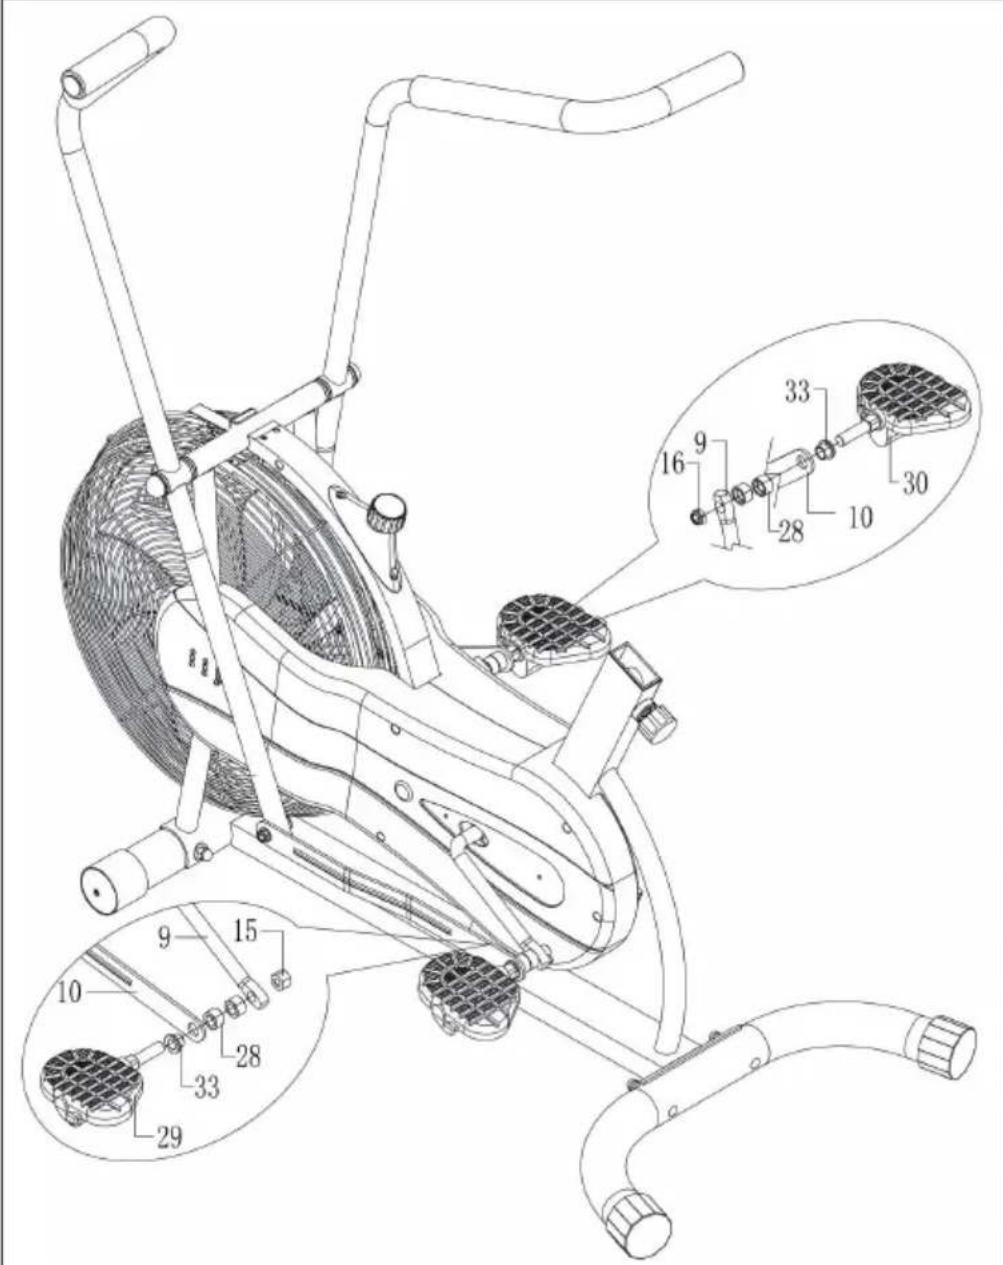
4
Remove the plastic nut (15) and the collars (33 + 28) from the left pedal (29).
Slide the left pedal onto the cuff (33), the connecting rod (10), the second cuff (28) and the crank (9). Fix with the previously removed plastic nut (Attention: Turn the left-hand thread anti-clockwise!).
Repeat on the other side (note: NO left-hand thread here).
5
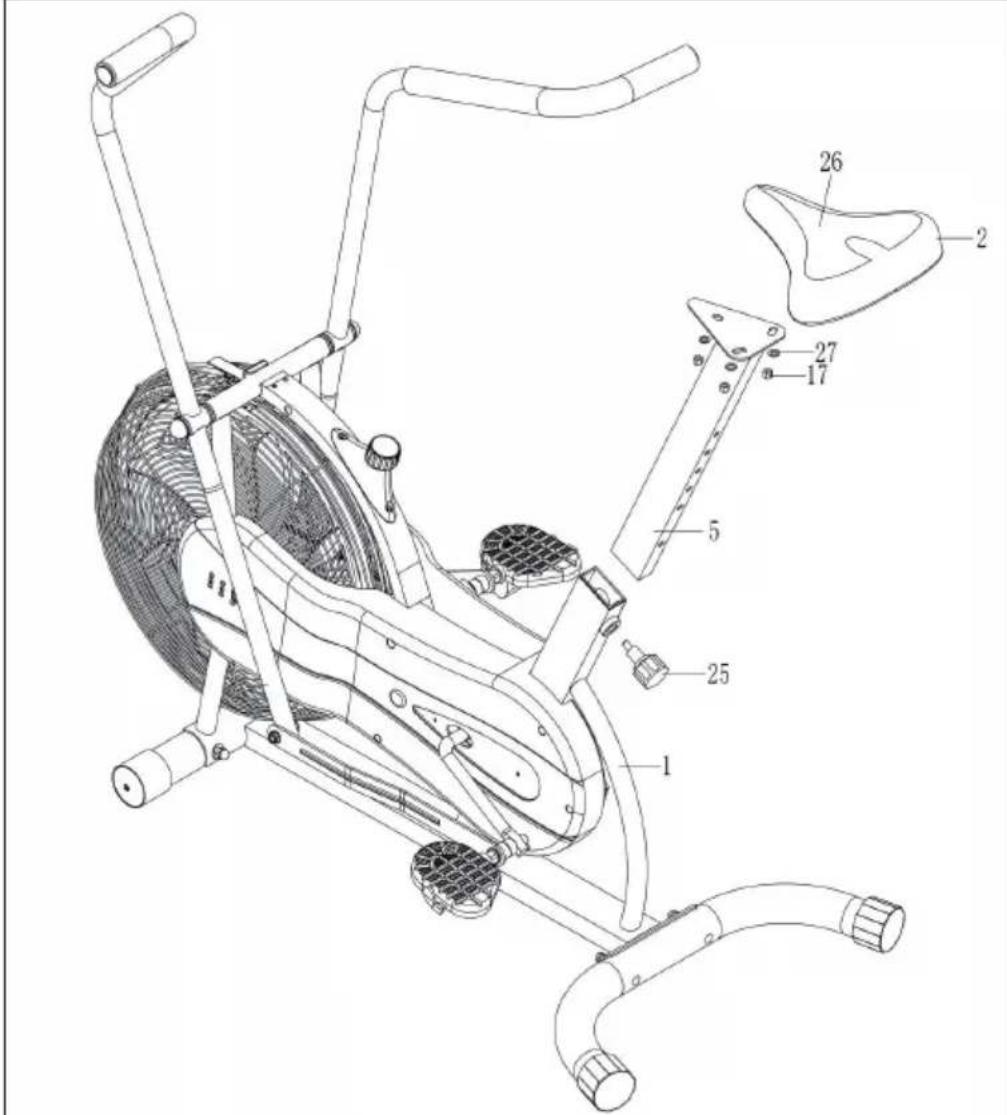
Remove the three nuts (27) and washers (27) from the saddle (26).
Mount the saddle on the seat post (5) with it and fix the nuts again.
Slide the seat post into the receptacle in the main part (1). Slide to the desired position and finally fix with the lock pin (25).
6
Join the two ends of the sensor cable (12 + 20) together.
Mount the bracket (7) on the main part and fix it with two Allen screws (13).
Remove the two screws (14) from the back of the training computer.
Use these to mount the training computer on the bracket.
Connect the plug of the sensor cable (12) to the back of the training computer.
TRAINING COMPUTER
The training computer requires two AA batteries. Insert them according to the polarity shown inside the battery compartment.
Functions
Press the MODE button several times or simply press the RESET button to cycle through the following functions:
| MODE | TIME Display of the past training time 0:00 - 99.59 min | ||
| SPEED Speed travelled 0.0 - 999.9 km/h | |||
| DISTANCE Distance travelled 0.0 - 9999 km | |||
| CALORIES Calories consumed (estimated approximate value) | 0.0 - 9999 kcal | ||
| SCAN | All values are displayed in 4-second intervals. | ||
| RESET Reset all values | |||
Regular cardio training stimulates the cardiovascular system (heart and respiration). You improve your fitness, lose weight and burn fat. So this is the recommended workout if you want to lose weight. During exercise, glucose is burnt first, then the fats stored in the body are burnt through the exercises.
Demanding cardio training (e.g. interval training, training with high resistance and over a longer period of time) requires more effort and also trains the muscles in addition to endurance. As a rule, the more regular the training, the more efficient it is (even for short 20-minute sessions).
During the training
The resistance during the cardio training phase decisively determines the training intensity and the related training results.
Optimal training includes a warm-up phase (1), a more intense cardio training phase (2) and the final recovery phase (3). If you want to make progress or burn calories, you should go through these 3 phases and train on the ergometer for at least 20 - 30 minutes.
1. Warm-up phase
Always start your workout with a low resistance. A warm-up of 5-10 minutes is important because your muscles need to be warmed up. Especially during the warm-up phase, you should give the circulation and muscle groups time to adjust to the subsequent workout. As a beginner, you can train for the first 3 minutes at the easiest level and increase gradually according to your personal well-being.
2. Cardio training phase
After about 10 minutes you can then switch to the cardio training phase. If you are using interval training programmes, the training computer controls the resistance according to the type of interval, simulating changing demands.
The cardio training phase is assigned to the aerobic or anaerobic training range depending on the energy consumption. These areas are defined as follows:
Aerobic training area
In this zone you improve your cardiovascular system and burn fat.
Despite the slight exertion with increased heart rate, deeper breathing, getting warm and light sweating, you do not feel very exerted, however, breathing is not significantly accelerated so that you could still have a good conversation with someone without getting out of breath, and you feel that you could sustain this exertion for a longer time without getting exhausted. It is like walking uphill at a leisurely pace.
The muscles and heart work more intensively and can obtain the majority of their energy requirements from aerobic energy production using oxygen. Anaerobic energy production is activated to a small amount, but only to the extent that all the lactic acid produced can be broken down again at the same time. You should do the majority of your training in this aerobic training zone.
If you continue to increase the load, then at some point you will reach a limit where oxygen-based energy production is no longer able to increase energy production, so anaerobic energy production has to join in to a greater extent. You are now entering the anaerobic training zone.
Anaerobic training area
In this zone you improve your performance and speed.
Once you increase your training again in this phase, the physical activity becomes much more strenuous because of the rising lactate level, you start to sweat more, your breathing speeds up, and after more or less time, depending on the training condition, the muscles get tired, you feel exhausted overall and can no longer continue at this level.
3. Recovery phase
Finally, remain in the recovery phase for at least 5 minutes and again use low resistance levels without high effort. The recovery or recuperation phase is also helpful in preventing possible muscle soreness after training. After an intensive training session, active regeneration is also highly advisable, such as a hot bath, a visit to the sauna or a massage.
Training progress
Your training can be increased monthly in this way, especially by extending the cardio training phase or performing a higher resistance level (or more challenging interval training).
Food and drink
- Drink before, during and after exercise.
- Drink at least 2 sips of water (10 to 20 cl) every 10-15 minutes during exercise.
- If your workout lasts longer than 1 hour, you should drink a sports drink to prevent the body from becoming dehydrated during exercise.
- For optimal cardio training, it is very important to have an aligned diet both before and after physical activity.
Before training, you should preferably eat carbohydrates, which can be found in rice and pasta, for example, as they provide the body with an important amount of energy.
After training, you need to "refuel" with proteins, which you can find in eggs, yoghurt and dried fruits. Even if you want to lose weight, it is absolutely necessary to eat after training so that your body regenerates.
DISPOSAL CONSIDERATIONS
If there is a legal regulation for the disposal of electrical and electronic devices in your country, this symbol on the product or on the packaging indicates that this product must not be disposed of with household waste. Instead, it must be taken to a collection point for the recycling of electrical and electronic equipment. By disposing of it in accordance with the rules, you are protecting the environment and the health of your fellow human beings from negative consequences. For information about the recycling and disposal of this product, please contact your local authority or your household waste disposal service.
This product contains batteries. If there is a legal regulation for the disposal of batteries in your country, the batteries must not be disposed of with household waste. Find out about local regulations for disposing of batteries. By disposing of them in accordance with the rules, you are protecting the environment and the health of your fellow human beings from negative consequences.
MANUFACTURER & IMPORTER (UK)
Manufacturer:
Chal-Tec GmbH, Wallstrasse 16, 10179 Berlin, Germany.
Importer for Great Britain:
Berlin Brands Group UK Ltd
PO Box 1145
Oxford, OX1 9UW
United Kingdom
Estimado cliente:
| NO.1 | NO.2 | NO.3/4 |
| NO.5 | NO.6/10 | NO.7 |
| NO.8 | NO.22 | NO.26 |
| NO.29/30 | NO.32 |
Piezas grandes
Berlin Brands Group UK Ltd
PO Box 1145
Oxford, OX1 9UW
United Kingdom
Cher client, chere clientele,
| NO.1 | NO.2 | NO.3/4 |
| NO.5 | NO.6/10 | NO.7 |
| NO.8 | NO.22 | NO.26 |
| NO.29/30 | NO.32 |
Petites pieces
Berlin Brands Group UK Ltd
PO Box 1145
Oxford, OX1 9UW
United Kingdom
Gentile clientele,
| NO.1 | NO.2 | NO.3/4 |
| NO.5 | NO.6/10 | NO.7 |
| NO.8 | NO.22 | NO.26 |
| NO.29/30 | NO.32 |
Partic piccole
PRODUTTORE E IMPORTATORE (UK)
Produtlore:
Chal-Tec GmbH, Wallstraße 16, 10179 Berlin, Germania.
Berlin Brands Group UK Ltd
PO Box 1145
Oxford, OX1 9UW
United Kingdom