
PC 20 - Freezer Kärcher - Free user manual and instructions
Find the device manual for free PC 20 Kärcher in PDF.
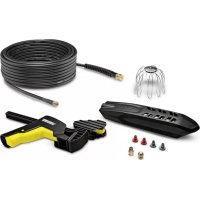


| Product type | Gutter and pipe cleaning kit |
| Use | With Kärcher domestic high-pressure cleaners classes K2 to K7 |
| Compatibility | Kärcher high-pressure cleaners K2, K3, K4, K5, K6, K7 |
| Nozzles included | 2 red nozzles (K1-K2), 2 grey nozzles (K3-K5), 2 yellow nozzles (K6-K7, pre-assembled) |
| Maximum water temperature | 60 °C |
| Minimum pipe diameter | 40 mm |
| Minimum pipe radius | 70 mm |
| Weight | Approx. 1.5 kg |
| Dimensions (L × W × H) | Approx. 50 × 30 × 10 cm |
| Main material | Plastic, brass, stainless steel |
| Color | Black and yellow |
| Main functions | Cleaning of gutters and drainage pipes |
| Maintenance and cleaning | Rinse nozzles after use; clean the strainer regularly; store dry |
| Safety | Do not use on a ladder; keep people at a distance; do not exceed 60 °C |
| Spare parts and repairability | High-pressure hose, nozzles, cleaning trolley, strainer |
| General information | Warranty according to distributor's terms; non-industrial use |
Frequently Asked Questions - PC 20 Kärcher
User questions about PC 20 Kärcher
0 question about this device. Answer the ones you know or ask your own.
Ask a new question about this device
Download the instructions for your Freezer in PDF format for free! Find your manual PC 20 - Kärcher and take your electronic device back in hand. On this page are published all the documents necessary for the use of your device. PC 20 by Kärcher.
USER MANUAL PC 20 Kärcher
The roof gutter and pipe cleaning set can be used with all KARCHER high-pressure cleaners for private households of the unit classes K2 to K7.
Observe the information in the operating instructions of the high-pressure cleaner!
The set is not suitable for commercial use.
- The roof gutter cleaning set is used to clean common house roof gutters.
- The pipe cleaning kit is ideally suited for the cleaning of pipes and drains with a diameter of at least 40 mm (1.5") and a radius of at least 70 mm (2.75").
Illustration 11
General information
Illustrations on fold-out pages!
Environmental protection

The packaging material can be recycled. Please do not place the packaging into the ordinary refuse for disposal, but arrange for the proper recycling.
Old appliances contain valuable materials that can be recycled. Please arrange for the proper recycling of old appliances. Please dispose your old appliances using appropriate collection systems.
Old appliances contain valuable materials that can be recycled. Please arrange for the proper recycling of old appliances. Please dispose of your old appliances using the appropriate collection system.
tems.
Notes about the ingredients (REACH)
You will find current information about the ingredients at:
www.kaercher.com/REACH
Warranty
The warranty terms published by our competent sales company are applicable in each country. We will repair potential failures of your appliance within the warranty period free of charge, provided that such failure is caused by faulty material or defects in fabrication. In the event of a warranty claim please contact your dealer or the nearest authorized Customer Service center.
Please submit the proof of purchase.
Danger or hazard levels
DANGER
Immediate danger that can cause severe injury or even death.
WARNING
Possible hazardous situation that could lead to severe injury or even death.
CAUTION
Pointer to a possibly dangerous situation, which can lead to minor injuries.
ATTENTION
Pointer to a possibly dangerous situation, which can lead to property damage.
Safety instructions
△DANGER
Observe safety instructions on the high-pressure cleaner. When cleaning pipes and roof gutters by means of a hose line, the accident prevention regulation VGB 87 "Working with liquid sprayers", as per Section 13 Paragraph 8, must be complied with. Only trigger the high-pressure jet when the nozzle has been inserted into the pipe to be cleaned at least up to the red marking. Never pull the inserted pipe cleaning hose out of the pipe to be cleaned any further than the red mark during the high-pressure operation. In unfavourable conditions, the pipe cleaning hose can change direction inside the pipe and come back out of it. This risk grows with the diameter of the pipe to be cleaned. If this occurs, immediately release the lever of the hand spray gun. If the cleaning operation has been completed, turn off the high-pressure cleaner and disconnect the pipe cleaner from the high-pressure gun.
△ WARNING
This appliance is not intended for use by persons with reduced physical, sensory or mental capabilities.
duced physical, sensory or mental capabilities.
The appliance must not be operated by children or persons who have not been instructed accordingly. Children should be supervised to prevent them from playing with the appliance.
Maximum water temperature 60°C (please observe the instructions of your high pressure cleaner). The cleaning sled can become detached from the roof gutter during operation. Keep all persons and objects clear of the danger zone.
△DANGER
When cleaning the insides of pipes with a hose line, the accident prevention regulation BGR 500, Chapter 2.3.6 must be adhered to!
When cleaning the insides of pipes with a hose line, the accident prevention regulation BGR 500, Chapter 2.3.6 must be adhered to!
Description of the Appliance
Illustration 1
1 Adapter to connect to the high pressure hose to the cleaning sled 2 High pressure hose (pipe cleaning hose) 3 Red mark 4 Cleaning sled 5 Red high pressure nozzles (2 pieces) 6 Grey high-pressure nozzles (2 pieces) 7 Clamping unit with hose guide 8 Sieve to cover the drop pipe
1 Adapter to connect the high-pressure hose to the cleaning sled 2 High-pressure hose (pipe cleaning hose) 3 Red mark 4 Cleaning sled 5 Red high-pressure nozzles (2 pieces) 6 Grey high-pressure nozzles (2 pieces) 7 Clamping unit with hose guide 8 Sieve to cover the drop pipe
Preparing the Appliance
Installing the nozzles
Illustration 2
Select the nozzles to match the high pressure cleaner used.
K1 Red
K2 Red
K3 Grey
K4 Grey
K5 Grey
K6 Yellow
K7 Yellow
Note: At delivery, the yellow nozzles are preinstalled.
Remove the clips. Pull out the unneeded high-pressure nozzles. Select the high-pressure nozzles needed to match the high-pressure cleaner used and press them in. Secure with clips.
Install the adapter to the high-pressure hose and connect the cleaning sled
Illustration 3
Screw the brazen adapter onto the high-pressure hose.
Use open-ended spanner SW12.
Illustration 4
Insert the high pressure hose into the hose guide of the clamping unit as shown.
Illustration 5
Press the adapter with the high pressure hose into the cleaning sled intake, secure with clip. Press the high pressure hose into the fixing of the cleaning sled.
Operations
Operate the high pressure cleaner as instructed in the operating instructions.
DANGER
Risk of falling! If you use a ladder, make sure it is positioned securely.
Do not operate the high pressure gun on the ladder. Keep persons out of the cleaning area while cleaning.
Note
Close windows and shutters prior to cleaning.
Repark cars that are parked in the vicinity of the cleaning area.
Check the roof gutter prior to cleaning; remove solids such as shingle remains or mortar clumps. Always work away from the drop pipe when cleaning the roof gutter.
Illustration 6
Insert the sieve into the drop pipe of the roof gutter (if not yet installed).
Illustration 7
Fasten the clamping unit with the hose guide to the side of the roof gutter.
Note: If necessary, the clamping unit can also be attached to the front of the roof gutter.
Illustration 8
Align the hose guide and insert the sled (at least to the red mark).
Illustration 9
Press the coupling of the high pressure hose into the bayonet connection of the high pressure gun. Turn the coupling part by 90° until it locks into place. Turn on the high-pressure cleaner. Press the lever on the hand spray gun and begin cleaning. Manually guide the high pressure hose with driven advance.
Note: In order to increase the rinsing effect, slowly withdraw the high pressure hose from time to time against the driven advance; then release again. Repeat this cleaning process if necessary or with severe contamination!
After cleaning, switch off the high pressure cleaner. Remove the dirt from the sieve area. Remove the sieve.
Pipe cleaning kit
Description of the Appliance
Illustration 10
2 High pressure hose (pipe cleaning hose)
3 Red mark
9 High pressure nozzle for pipe cleaning
Illustration 11
The pipe cleaning kit is ideally suited for the cleaning of pipes and drains with a diameter of at least 40 mm (1.5") and a radius of at least 70 mm (2.75").
Preparing the Appliance
Note: If you have already worked with the roof gutter set, you must first pull the high pressure hose with its adapter out of the cleaning sled:
Loosen the clip and pull the high pressure hose off. Unscrew the adapter from the high-pressure hose. Use open-ended spanner SW12.
Illustration 12
Screw the high-pressure nozzle for pipe cleaning onto the high-pressure hose. Use open-ended spanner SW13.
Operations
Operate the high pressure cleaner as instructed in the operating instructions.
Illustration 13
Press the coupling of the pipe cleaning hose into the bayonet connection of the high-pressure gun. Turn the coupling part by 90° until it locks into place.
Illustration 14
Insert the pipe cleaning hose at least up to the red marking into the pipe to be cleaned.
Illustration 11
Turn on the high-pressure cleaner. Press the lever of the high-pressure gun and manually guide the pipe cleaning hose with the automatic advance. If the high pressure hose for pipe cleaning meets an obstruction, repeatedly press and release the high pressure gun lever.
Repeat this cleaning process if necessary or with severe contamination!
After cleaning, switch off the high pressure cleaner. Pull the pipe cleaning hose out of the pipe.

www.kaercher.com/REACH
Warranty
www.kaercher.com/REACH
Warranty
www.kaercher.com/REACH
Warranty
www.kaercher.com/REACH
Warranty
www.kaercher.com/REACH
Warranty
www.kaercher.com/REACH
Warranty
www.kaercher.com/REACH
Warranty
www.kaercher.com/REACH
Warranty
www.kaercher.com/REACH
Warranty
www.kaercher.com/REACH
Warranty
The set is not intended for professional use.
- The set for cleaning drains is intended for cleaning household drains.
- The set for cleaning pipes is ideally suited for cleaning pipes with a diameter of at least 40 mm (1.5") and a radius of at least 70 mm (2.75").
Figure 11
General instructions
Figures see on the fold-out pages!
Ambient conditions

Packaging materials are recyclable. Please do not dispose of packaging with household waste, but
take it to one of the collection points for recyclable materials.
Old appliances contain recyclable materials that should be recycled. Therefore, dispose of old appliances through
appropriate collection systems.
Current information on components is available on the website at the following address:
Information about components is available on the website at the following address:
Warranty
In each country, the warranty conditions published by our authorized sales organization apply.
Possible malfunctions of the device during the warranty period are repaired free of charge if they are due to material defects or manufacturing errors. In case of complaints during the warranty period, please contact the dealer who sold you the device or the nearest authorized customer service.
The date of manufacture is shown on the type plate
in encoded form.
Spare parts have the following meaning:
Example: 30190
Example: 30190
3rd digit of issue: 0 = decade of issue, 1 = decade of issue, 9 = second decade of issue, 0 = first decade of issue
Thus, in this example, code 30190 indicates the issue date 09/2013.
Degree of danger
DANGER
Immediate danger that leads to serious injury or death.
WARNING
For a potentially dangerous situation that could lead to serious injury or death.
CAUTION
Indicates a potentially dangerous situation that could lead to minor injury.
ATTENTION
Indicates a potentially dangerous situation that could cause material damage.
Safety instructions
DANGER
Follow the safety instructions when working with high-pressure cleaning devices. When cleaning pipes and water lines with high-pressure hoses, observe the regulations for accident prevention VGB 87 "Working with high-pressure jet devices" in accordance with §13, paragraph 8!
High-pressure jet can be supplied only after the nozzle is inside the hose at least up to the red marking.
When working under high pressure, the hose cleaning nozzle should never be pulled out of the hose further than up to the red marking.
Under unfavorable conditions, the hose cleaning nozzle may change its direction in the hose and be ejected. This risk increases with decreasing diameter of the hose. In case of such a situation, immediately release the trigger of the spray gun.
After completing cleaning work, switch off the high-pressure device and disconnect the hose cleaner from the high-pressure gun.
WARNING
These devices are not intended for use by persons with limited physical, sensory
or mental capabilities.
Operation of the device by children or persons who have not received instruction is prohibited.
Children must be supervised to ensure that they do not play with the device.
Maximum temperature 60°C (follow the instructions for the high-pressure model). The cleaning nozzles may be out of the water tank during operation. People and objects must be kept away from the danger zone.
Only for professionals:
DANGER
When cleaning pipes from the inside with the nozzle, follow the safety regulations BGR 500, chapter 2.3.6!
Set for cleaning water pipes
Description of the device
Figure 1
Chapter 1: High-pressure fittings for cleaning hoses 2 High-pressure fittings (hose cleaning fittings) 3 Marking, red paint 4 Cleaning hoses 5 Red high-pressure nozzles (two pieces) 6 Gray high-pressure nozzles (two pieces) 7 Clamping element with guide device 8 Filter screens for protecting the hose
Preparation
Mount the nozzles
Figure 2
It is necessary to select the nozzles according to the high-pressure cleaning device used.
K1 red K2 red K3 gray K4 gray K5 gray K6 yellow K7 yellow
Note: The yellow nozzles are pre-mounted at the factory.
→ Remove the clamps → Remove the unnecessary high-pressure nozzles. Select and insert the required high-pressure nozzles according to the high-pressure cleaning device used. Secure with the clamps.
Install the adapter on the high-pressure
fitting and connect it to the cleaning hoses
Figure 3
→ Press the brass adapter onto the high-pressure fitting.
Use wrench SW12.
Figure 4
Insert the high-pressure hose according to the drawing in the direction of the arrow for the high-pressure hose of the locking element.
Figure 5
Insert the adapter with the high-pressure hose into the receiving device of the cleaning gun, secure it with the clamp. Insert the high-pressure hose into the clamp of the cleaning gun.
Operation
Use the high-pressure cleaner in accordance with the operating instructions.
DANGER
Danger of tipping! When using the spray lance, maintain a stable position. Do not operate the high-pressure cleaner on stairs. During cleaning, do not allow anyone in the cleaning zone.
Note
Before cleaning, close windows and doors.
Cover vehicles and objects in the immediate vicinity of the cleaning area.
Before cleaning, check the drain channel and remove any hard elements such as mortar or concrete residue. When cleaning the drain channel, always work from the drain pipe.
Figure 6
Insert the filter into the drain pipe of the channel (if not already inserted).
Figure 7
Install the locking element with the guide for the hose on the side of the drain channel.
Note: If necessary, the protective element can be secured to the end part of the water heater.
Figure 8
Align the guide plate and install the skids (at least up to the red marking).
Figure 9
Insert the high-pressure hose connector into the high-pressure outlet fitting. → Turn the connector 90° until it clicks. → Turn on the high-pressure washer. Insert the trigger gun lance and start the cleaning process. Slowly push the lance forward.
Note: To increase the cleaning effect, slowly pull the lance back, then release it again.
If necessary, or in case of heavy soiling, repeat the cleaning process several times!
→ After cleaning, turn off the high-pressure washer. → Remove dirt from the sieve filter. → Remove the sieve filter.
Pipe cleaning set
Description of the device
Figure 10
2 high-pressure lance (pipe cleaning lance) 3 marking, red color 4 nozzle for high-pressure pipe cleaning
Figure 11
The pipe cleaning set is ideally suited for cleaning pipes and downpipes with a diameter of at least 40 mm (1.5") and a radius of at least 70 mm (2.75").
Preparation
Note: If a nozzle for cleaning the drain hose was selected, it is necessary to remove the high-pressure hose from the shoe for cleaning:
Loosen the clamps and remove the high-pressure hose. Disconnect the hose from the high-pressure hose. Use the SW12 wrench.
Figure 12
→ Connect the high-pressure nozzle for cleaning the pipes to the high-pressure hose. Use the SW13 wrench.
Operation
→ Use the high-pressure cleaner according to the operating instructions.
Figure 13
Insert the connecting element of the hose for cleaning the pipes into the bayonet connection of the high-pressure gun. → Turn the connecting element 90° until it clicks. Figure 14
Insert the hose for cleaning the pipes into the drain pipe to a depth of at least up to the red marking.
Figure 11
→ Switch on the high-pressure cleaner. → Press the trigger of the high-pressure gun and hold it pressed while pushing the hose for cleaning the pipes forward. → If the nozzle for cleaning the pipes hits a clogged spot, press the trigger of the high-pressure gun several times in succession and release it again.
If necessary, in case of heavy soiling, repeat the cleaning process several times!
→ After cleaning, switch off the high-pressure cleaner. → Pull the cleaning hose out of the pipe.
www.kaercher.com/REACH
Warranty
Warranty
Warranty
Warranty
Warranty
Instructions for composition (REACH)
Current information on the composition can be found at:
www.kaercher.com/REACH
Warranty
Warranty
In each country, the warranty conditions issued by our responsible distribution organization apply. We will repair any faults on the machine free of charge during the warranty period, provided that the cause is a material or manufacturing defect. In the event of a warranty claim, please contact your dealer or the nearest authorized service center, presenting your proof of purchase.
Hazard levels
DANGER
www.kaercher.com/REACH
Warranty
In every country, the warranty conditions issued by our responsible distribution organization apply. We will remedy any faults on the device free of charge during the warranty period, provided that the cause is a material or manufacturing defect. In the event of a warranty claim, please contact your dealer or the nearest authorized service center with your proof of purchase.
Hazard levels
DANGER
Indicates an imminent threat of danger that leads to serious injuries or death.
WARNING
Indicates a potentially dangerous situation that could lead to serious injuries or death.
CAUTION
Note indicating a potentially dangerous situation that may cause minor injuries. ATTENTION
Note indicating a potentially dangerous situation that may cause property damage.
Safety notes
DANGER
Please observe the safety notes relating to the operation of the high-pressure cleaning unit.
When cleaning pipes and gutters with the help of hoses, the provisions of Article 13, Paragraph 8 of the German Regulation on Safety at Work VGB 87 "Work with liquid sprayers" must be observed!
www.kaercher.com/REACH
For every country, the warranty conditions issued by our responsible sales organization apply.
Possible malfunctions of your unit will be repaired free of charge within the warranty period, provided that such a defect is due to a material or manufacturing fault.
In case you need to assert a claim under the warranty, please contact the specialized dealer from whom you purchased the unit or the nearest authorized service center, presenting the purchase documents.
Hazard levels
DANGER
For an imminent danger that leads to serious injuries or death. WARNING
For a potentially dangerous situation that could lead to serious injuries or death. CAUTION
For a potentially dangerous situation that may lead to minor injuries. ATTENTION
For a potentially dangerous situation that may lead to material damage.
Information about
safety
DANGER
Follow the safety instructions for the high-pressure cleaning device. When cleaning pipes and fittings, the regulations for prevention of accidents from VGB 87, "Working with high-pressure devices" according to § 13 paragraph 8 must be observed. High-pressure operation is only activated when the device is at minimum distance from the marking line required for cleaning. The high-pressure time must never exceed the marking time for cleaning pipes more than the specified marking from the cleaning pipe. Under unfavorable conditions, the marking for cleaning pipes may change direction and come out again. The danger increases with the diameter of the cleaning pipe. If this happens, immediately switch the device to the nozzle for rapid flushing. When using the cleaning regime, exclude the cleaning device under
high pressure and separate the cleaning device for pipes from the nozzle for working under high pressure.
INTENDED USE
This device is not intended for use by persons with reduced physical, sensory or mental capabilities. The device must not be used by children, young people or unauthorized persons. Children must be supervised to ensure they do not play with the device.
Maximum water temperature 60 °C (follow the instructions on your device for high-pressure cleaning).
The cleaning nozzle can be separated from the hose during operation. The hose and objects must be kept away from the danger zone.
Important for thermal:
DANGER
■ When cleaning pipes with the high-pressure device, the regulations for prevention of accidents from BGR 500, chapter 2.3.6 must be observed!
Cleaning kit for pipes
Description of the device
Figure 1
1 Connection hose for the marking for working under high pressure (marking for cleaning pipes) 2 Marking for working under high pressure (marking for cleaning pipes) 3 Marking, red 4 Cleaning nozzle 5 Red nozzle for high pressure (2 pieces) 6 Blue nozzle for high pressure (2 pieces) 7 Clamp for adjusting the marking 8 Brush for covering the inclined drain pipe
Preparation
Mounting the filter
Figure 2
Select the filter according to the intended use for high pressure cleaning.
K1 Red
K2 Red
K3 Blue
K4 Blue
K5 Blue
K6 Black
K7 Black
Note: The filters are factory pre-mounted.
Remove the cover. → Remove the unnecessary high pressure filters. → Select the required high pressure filter according to the intended use for high pressure cleaning and press it into the cover.
Mounting the adapter to the high pressure cleaning and suction connection
Figure 3
Remove the protective cap from the high pressure connection. Use the supplied wrench SW12.
Figure 4
Insert the work label under tension in accordance with the figure in the guide for marking the stone element.
Figure 5
→ Insert the work label under tension into the opening of the support bracket with the clamp. → Insert the work label under tension into the fixing of the support bracket.
Maintenance
→ Use the operating pressure for high-pressure work in accordance with the operating instructions.
DANGER
Danger of falling! When using a ladder, ensure that it stands stably.
Do not operate the high-pressure washer while on the ladder.
During cleaning work, keep people away from the cleaning area.
Note
Before cleaning, close the windows and doors of the windows.
Remove nearby objects from the cleaning area before cleaning.
→ Before cleaning, check the nozzle, remove any hard deposits or residues from the nozzle opening. → When cleaning the nozzle, do not point it at yourself or others.
Figure 6
→ The plug must be removed from the socket (if there is one).
Figure 7
→ Mount the chain link guide for the marking of the pipe.
Note: The chain link can be fixed and non-removable on the pipe.
Figure 8
→ Adjust the guides for the marking and set the pressure (minimum to the marking level).
Figure 9
Press the marking trigger for work under pressure in the piston valve of the tool for work under high pressure. → Turn the trigger 90° until it locks. → Turn on the device for cleaning under high pressure. → Press the tool lever for smooth pressing and start the cleaning. → With automatic continuous movement, guide the marking tool for work under pressure.
Note: To increase the effect when cleaning from time to time, turn the marking tool for work under pressure against the automatic continuous movement, then release it again.
If necessary, for stronger cleaning, repeat the cleaning process several times!
After cleaning, turn off the device for work under pressure. Remove the tool from the pipe. Remove the plug.
Cleaning kit for pipes
Description of the device
Figure 10
2 marking tools for work under pressure (marking tools for cleaning pipes) 3 marking, supplied with high-pressure cleaning for pipes
Figure 11
The pipe cleaning kit is suitable for cleaning pipes and channels with a diameter of at least 40 mm (1.5") and a radius of at least 70 mm (2.75").
Preparation
Note: If you are already working with a cleaning kit, the pressure washer must first be switched to high-pressure mode:
Release the clamp and remove the high-pressure nozzle. Unscrew the adapter from the high-pressure nozzle. Use the open-end wrench SW12.
Figure 12
Screw the high-pressure nozzle for pipe cleaning onto the high-pressure nozzle. Use the open-end wrench SW13.
Operation
Connect the high-pressure hose to the pressure washer according to the operating instructions.
Figure 13
Press the coupling of the pipe cleaning nozzle into the bayonet coupling of the high-pressure gun. Turn the coupling 90° until it locks. Figure 14 Insert the pipe cleaning nozzle at least up to the red marking on the pipe cleaning hose.
Figure 11
Switch on the pressure washer. Press the trigger of the high-pressure gun and insert the pipe cleaning nozzle into the pipe while the automatic feed is active. If the high-pressure nozzle for pipe cleaning does not advance automatically, press the trigger of the high-pressure gun several times in succession and release it again.
If necessary, repeat the cleaning process several times for a stronger cleaning effect!
After cleaning, switch off the pressure washer. Remove the pipe cleaning nozzle from the hose.

Warranty
Warranty conditions
Warranty
Warranty
In every country, the warranty conditions issued by our responsible sales company apply. We will remedy possible malfunctions of the device free of charge within the warranty period, provided that such malfunctions are caused by material or manufacturing defects. In the event of a warranty claim, please contact your dealer or the nearest authorized Customer Service center with the purchase receipt.
Hazard levels
DANGER
DANGER - Immediate danger that can lead to severe injuries or death. WARNING
WARNING - Possible dangerous situation that can lead to severe injuries or death.
CAUTION
CAUTION - Indicates a potentially dangerous situation that can lead to minor injuries. ATTENTION
Failure to follow safety instructions may cause material damage.
Safety rules
DANGER
Use personal protective equipment according to safety regulations when working with high-risk equipment. When cleaning pipes and accessories with a pressure washer, it is necessary to follow the instructions from the manufacturer's manual VGB 87 "Working with high-pressure water jet systems" in accordance with the regulation §13, paragraph 8! The jet under pressure may only be directed after the nozzle is positioned at the pipe to be cleaned, without changing their marking. When working under high risk, the operator of the pipe cleaning must never leave the pipe being cleaned, even for a short time. In unfavorable conditions, the pipe cleaning lance may change the direction of the pipe outward. This risk increases with the diameter of the pipe to be cleaned. In case of such a situation, immediately release the hand lever of the pressure washer.
When finishing work with high-pressure cleaning equipment, disconnect the cleaning pipes from the high-pressure hose.
WARNING
The device is not intended for use by persons with limited physical, sensory, or mental capabilities. It is forbidden to allow children or unqualified persons to use the device. It is necessary to monitor children to ensure they do not play with the device.
Maximum supply temperature is 60 °C (follow the instructions for use of the cleaner)
The cleaning hose can be moved from its storage position during operation. People and objects must be at a safe distance from the danger zone.
These instructions for use:
DANGER
When cleaning pipes internally with a pressure washer, follow the safety rules BGR 500, section 2.3.6.
Set of accessories
Description of the device
Figure 1
1. Anti-tep 3'eHaHHaHbBnAHO TnCKy 3 NOO3kAMn DnYuueHH 2 WJnH BrCOKO TCKy (WJnH DnA YnueHHa Tpy6) 3 MapkipyBaHHa, YepBOHn KOJip 4NoJIO3KnIJIaYUHcEHn 5 ChepBoHI φopcyHKn BnCOKOro TnCKy (2 WtYkn) 6 Cipi φopcyHKn BnCOKOro TnCKy (2 WtYkn) 7 3aTnckHn eIeMeHT 3 HaprrMHOIO JIJI WJHaHra 8 Cituactn iInbTp dnn 3aKpTTB BOOCTiHoi Tpy6n
Preparation
Mounting the nozzles
Figure 2
Select the nozzles according to the applied high-pressure spraying.
K1 Red-
Hn
K2 Red-
Hn
K3 Gray
K4 Gray
K5 Gray
K6 Yellow
K7 Yellow
Note: The color code indicates the nozzles installed at the factory.
Remove the high-pressure nozzle from the bracket, but select the high-pressure nozzle according to the high-pressure washer being used. Close the bracket.
Install the adapter on the high-pressure flange and remove the plugs for cleaning.
Figure 3
Press the adapter nut onto the high-pressure flange. Use a SW12 wrench.
Figure 4
Insert the high-pressure flange according to the figure, directly for the flange of the locking element.
Figure 5
Remove the adapter from the high-pressure flange into the receiver of the cleaning gun, close with the bracket. Insert the high-pressure flange into the positioner of the cleaning gun.
Operation
Start the high-pressure washer according to the operating instructions.
SAFETY
Danger of electric shock! When using the device, it is necessary to protect the power plug.
Do not expose the high-pressure hose to the device. During work with the washer, keep bystanders away from the work area.
Maintenance
Before cleaning, close the cover and switch off.
Iepenapkyamu mpaHcnopmHi 3ac06u, npunapkoeaHi y 6e3nocepedHIu 6lu3bKocmi Bid oBnacmi OuyueHna.
→ PpeoouHnHm nepeBipNTu BOOCTiHn KO- no6, BuaaHTu Taki TBepdi enemeHTN, k3aIIuKu ceRn a60 rpydkn 6yDIBeNbHoro po3uHy. →Пд уас Oчишени BODoctiHOrO JKOJIo6a 3aBxJIN NOHNITnpaIIOBaTn BiD BOIDoctiHoiI Tpy6n.
MaHIOHO6
Bctabtn ciTcuactn pijbtp y BODocTiy Tpy6y kJIO6a (AIOo Bin He 6yB BCTabneHn paHiwe). MaJIHOHOK 1 BCTaHOBtI 3aTnCKHn eJemeHT 3 HapPmHO DnIaHaIra 360ky BiD BOIOCTiHORO KONo6a. PpIMrKa: Y paazi Heo6XiHOCTI 3aTnCKHn eJe-MeHT MoKe TAKoK 6yTu 3akpinNeHn 3 TopcEBOrO 60ky BOIOCTiHORO KONo6y.
MaJIHOHOK 8
BupiBHTn HanpymHy dIy IJHaHra Ta BCTaBHTn NOJIO3K (UOHaIMeHwe Do UepBOHOr MapkyBaHH). MaJIHOHOK 9 BCTaBtIu 3'6dHyBaJIbHn eIeMeHT IuaHry BucOKoro TcCKy uTNIKOBe 3'6dHaHHra BUCOKOHiPHoro nictOJeTy. → Πовернтуз'eДнУВальний eЛeMeHT ha 90°do Klaцаня. → BBimKHyTn OuyuBaU BNCOKOrTo TnCKy. → HaTnCHyTuHa BaXiNb pyHOro nicToJeTa-po3nIIOBauTa Ta noaTu npOec OuIeHHr. BpyHy npocyBaTu Bnpeed uHaHr BucOKoro TnCKy. PpIMiTka: Dna 36IbWeHHeEeKty npOMBaHHaC BiD yacy NobIbHO BnTaryTuBaTu WnA Hr BucOKoTOnCKy Ha3ad, a NOTIM 3HOBy BiDnyCKatN. PpHne0xIdNocti a6o CnIbHomy 3acMieHHi NOBtOpHTn pOuec OuNHeHHaKeINbKa pa3IB! →Пия Oушьнг BIMKHyTn OuHyBaU BnCOKOrToNCKy. → Buaanntn 6pyd 3 ciTcaCToro foinbtpy. → Buaanntn ciuactn pfnbtp.
Ha6ip dIyOuIeHnY Tpy6
Onnc npncptpo
ManHOHOK 10
2 ⅡlaHr BncoKoro TnCKy (IJIaHr IJIa YIeHHa Tpy6) 3 MapkipyBaHHa, YepBOHn KoJip 9ΦOpcyHka BnCOKOTo TnCKy DnO OuNtEHHa Tpy6
MaHIOHOK 11
Ha6ip DnA YuIeHnT py6 iIealbNo nixoDHT bIy HUeHHa Tpy6 n CTiHnx Tpy6 3 diametpom He MeHs 40 MM (1,5") Ta paaiycom He meHs 70 MM (2,75").
PiIroTobKa
Pnmitka: Kkuo cnoaatky BnKOpncTOByBabcHa6ip dna OunuehHbOoctiuHx Xono6iB, Heo6XiHO BV- Tarynt uHaHR BucOKOrTocky pa3om 3 aadantepom 3 nOIO3OK dJa OUnueeHH:
→ Nocna6ntu CkO6n Ta BNTaHyTu WlaHr BnCOKOro TnCKy. → BiDrBnHTnTu aJaTep BiD IJuaHaRa BnCOKOro TnCKy. BnKOpNCtAtu raiKObN KInOu SW12.
→ Turn the high-pressure nozzle for cleaning pipes to the high-pressure position. Use SW13 wrench.
Operation
Start the high-pressure cleaner according to the operating instructions. Figure 13: Insert the connecting element for cleaning pipes into the high-pressure connection. → Turn the connecting element 90° to the valve.
Figure 14
→ Insert the pipe cleaning nozzle into the pipe to be cleaned, at least up to the red marking. Figure 11: Pull out the high-pressure cleaner. → Press the trigger on the high-pressure gun and slowly push the nozzle forward into the pipe. If the nozzle gets stuck, press the trigger on the high-pressure gun several times in succession and release it again.
If necessary, or if heavily soiled, repeat the cleaning process several times!
→ After cleaning, pull out the high-pressure cleaner. → Pull the pipe cleaning nozzle out of the pipe.
Intended use
www.kaercher.com/REACH
Quality assurance
j2 = Δ
1
6
7 0g
8 agg
g g b jll s jll a>gg p < 00001 Jyogj01Jc) a0g01
∴ ( 0,| a1| = 1)
9 ojg
JlJIJIbIaII pIgbrj alog bIol < JJIJI bIaII wIaI aIawll alogll
al/0j> a>
jLg aol/11 1s l y /0c/10
(yjyjlljlejjbsjllc
Jaswylcll dai jSay bull a
1/1c 1.aa//joo gai
j11 j1i j0 11
:laill
2b 个
p/12wU 1/1/1111111111
a1g// aXy p/2N// 2e, yab// al
12cyl
K1
K2
[{S} {S} = {S} {1} + {S}_{2}]
K5
K6
J7
.
←
Register your product and benefit from many advantages.
www.kaercher.com/welcome ★★★★★
Rate your product and tell us your opinion.
www.kaercher.com/dealersearch
Alfred Kärcher SE & Co. KG
Alfred-Karcher-Str.28-40
71364 Winnenden (Germany)
Tel.: +49 7195 14-0
Fax: +49 7195 14-2212


- GENERAL INFORMATION
- ENVIRONMENTAL PROTECTION
- NOTES ABOUT THE INGREDIENTS (REACH)
- WARRANTY
- DANGER OR HAZARD LEVELS
- DANGER
- WARNING
- CAUTION
- ATTENTION
- SAFETY INSTRUCTIONS
- △DANGER
- △ WARNING
- WHEN CLEANING THE INSIDES OF PIPES WITH A HOSE LINE, THE ACCIDENT PREVENTION REGULATION BGR 500, CHAPTER 2.3.6 MUST BE ADHERED TO
- DESCRIPTION OF THE APPLIANCE
- ILLUSTRATION
- ADAPTER TO CONNECT TO THE HIGH PRESSURE HOSE TO THE CLEANING SLED 2 HIGH PRESSURE HOSE (PIPE CLEANING HOSE) 3 RED MARK 4 CLEANING SLED 5 RED HIGH PRESSURE NOZZLES (2 PIECES) 6 GREY HIGH-PRESSURE NOZZLES (2 PIECES) 7 CLAMPING UNIT WITH HOSE GUIDE 8 SIEVE TO COVER THE DROP PIPE
- PREPARING THE APPLIANCE
- INSTALLING THE NOZZLES
- INSTALL THE ADAPTER TO THE HIGH-PRESSURE HOSE AND CONNECT THE CLEANING SLED
- OPERATIONS
- NOTE
- PIPE CLEANING KIT
- GENERAL INSTRUCTIONS
- AMBIENT CONDITIONS
- CURRENT INFORMATION ON COMPONENTS IS AVAILABLE ON THE WEBSITE AT THE FOLLOWING ADDRESS
- IN EACH COUNTRY, THE WARRANTY CONDITIONS PUBLISHED BY OUR AUTHORIZED SALES ORGANIZATION APPLY
- EXAMPLE
- DEGREE OF DANGER
- SET FOR CLEANING WATER PIPES
- DESCRIPTION OF THE DEVICE
- FIGURE
- PREPARATION
- MOUNT THE NOZZLES
- INSTALL THE ADAPTER ON THE HIGH-PRESSURE
- FITTING AND CONNECT IT TO THE CLEANING HOSES
- OPERATION
- PIPE CLEANING SET
- IF NECESSARY, IN CASE OF HEAVY SOILING, REPEAT THE CLEANING PROCESS SEVERAL TIMES
- HAZARD LEVELS
- SAFETY NOTES
- INFORMATION ABOUT
- SAFETY
- INTENDED USE
- CLEANING KIT FOR PIPES
- MOUNTING THE FILTER
- MOUNTING THE ADAPTER TO THE HIGH PRESSURE CLEANING AND SUCTION CONNECTION
- MAINTENANCE
- IF NECESSARY, REPEAT THE CLEANING PROCESS SEVERAL TIMES FOR A STRONGER CLEANING EFFECT
- WARRANTY CONDITIONS
- SAFETY RULES
- SET OF ACCESSORIES
- MOUNTING THE NOZZLES
- INSTALL THE ADAPTER ON THE HIGH-PRESSURE FLANGE AND REMOVE THE PLUGS FOR CLEANING
- HA6IP DIYOUIEHNY TPY
- ONNC NPNCPTPO
- PIIROTOBKA
- QUALITY ASSURANCE
- CYL
Brand : Kärcher
Model : PC 20
Category : Freezer