
Aquaklar - Pump Waldbeck - Free user manual and instructions
Find the device manual for free Aquaklar Waldbeck in PDF.
| Product type | Pressure filter with UVC lamp for pond |
| Brand | Waldbeck |
| Model | Aquaklar |
| Power supply | 220-240 V ~ 50/60 Hz |
| Pump power | 35 W |
| UV lamp power | 11 W |
| Maximum water flow | 2000 L/h |
| Filtration type | Mechanical and biological |
| Integrated UV-C lamp | Yes, lifespan 8000 hours |
| Permissible water temperature | +4°C to +35°C |
| Maximum operating pressure | 0.2 bar |
| Function selector | Filtration / Cleaning |
| Mechanical sponge cleaning | By pumping handle |
| Automatic shutdown in case of overheating | Yes, integrated temperature sensor |
| Minimum distance from pond | 2 meters |
| Maintenance of filter sponges | Every 2 weeks, clean with clear water |
| Replacement of UV lamp | After 8000 hours of operation |
| Recommended use | Ponds with or without fish |
| Frost protection | Remove the filter in case of frost |
| Article number | 10033393 |
Frequently Asked Questions - Aquaklar Waldbeck
User questions about Aquaklar Waldbeck
0 question about this device. Answer the ones you know or ask your own.
Ask a new question about this device
Download the instructions for your Pump in PDF format for free! Find your manual Aquaklar - Waldbeck and take your electronic device back in hand. On this page are published all the documents necessary for the use of your device. Aquaklar by Waldbeck.
USER MANUAL Aquaklar Waldbeck
Congratulations on purchasing this equipment. Please read this manual carefully and take care of the following hints to avoid damages. Any failure caused by ignoring the items and cautions mentioned in the instruction manual are not covered by our warranty and any liability. Scan the QR code to get access to the latest user manual and other information about the product.

CONTENTS
Declaration of Conformity 17
Safety Instructions 18
Operation 20
Connection to Water Supply 23
Maintenance and Cleaning 24
Disposal Considerations 29
Deutsch 3
English 17
Français 31
Italiano 45
Espanol 59
TECHNICAL DATA
| Item number 10033393 | |
| Power supply 220-240 V ~ 50/60 Hz | |
| Power | |
| Pump | 35 W |
| UV lamp | 11 W |
| Flow rate 2000 L/h |
DECLARATION OF CONFORMITY

Producer:
Chal-Tec GmbH, Wallstraße 16, 10179 Berlin, Germany.
This product is conform to the following European Directives:
2014/30/EU (EMC)
2014/35/EU (LVD)
2011/65/EU (RoHS)
SAFETY INSTRUCTIONS
The pressure filter with integrated UVC lamp is a closed system for the biological and mechanical filtering of pond water with a temperature between +4^ and +35^ . It was designed exclusively for household use to clean ponds with and without fish.
- Dangerous ultraviolet radiation. The rays of the UVC lamp are harmful to eyes and skin. Never use the lamp outside of the housing.
- The pond pressure filter should be set up at least two metres away from the pond to prevent it from falling in.
- The filter should be turned on in front of the UVC lamp and the lamp should never be active without running water.
- Do not use the device if the connection cable, the UVC lamp or the housing appears to be damaged.
- Do not use the appliance while people are in the water.
- Should overheating occur, the built-in temperature sensor will automatically shut off the UV lamp. It will turn the device back on after the temperature returns to normal.
- Never open the case or the lamp unless explicitly stated in this manual.
- Make sure that a fuse with max. 30mA with a safety switch (FI or RCDI) is installed.
- Always unplug all plugs before working on the filter.
- For your own safety, consult an electrician if you are unsure about connecting the electrical parts.
- Never immerse the device in water.
- Never use connections, adapters, extensions or connection cables without a fuse.
- Keep the connection parts dry.
- Never pull or carry the device by the power cord. Do not allow the power cord to come into contact with sharp objects or heat.
- Place the cables in such a way that they do not obstruct the way and so that they cannot be damaged.
- The water pressure in the filter must not exceed 0.2 bar.
- Only operate the filter with hoses that are designed for a pressure of at least 0.2 bar.
- Check and clean the drain towards the pond at regular intervals.
- Always keep free of debris, otherwise there might be an increase in pressure, which can lead to leakage and drainage of the pond.
- As long as the filter is being operated in 'filter mode', all connections of the hoses must be sealed with a sealing cap.
- Before turning on the filter, make sure all connections are correctly made and that all connections are tight.
- Never filter liquids other than water.
- If it is frosty, you must remove the filter.
- Place the filter so that it is not exposed to direct sunlight.
OPERATION
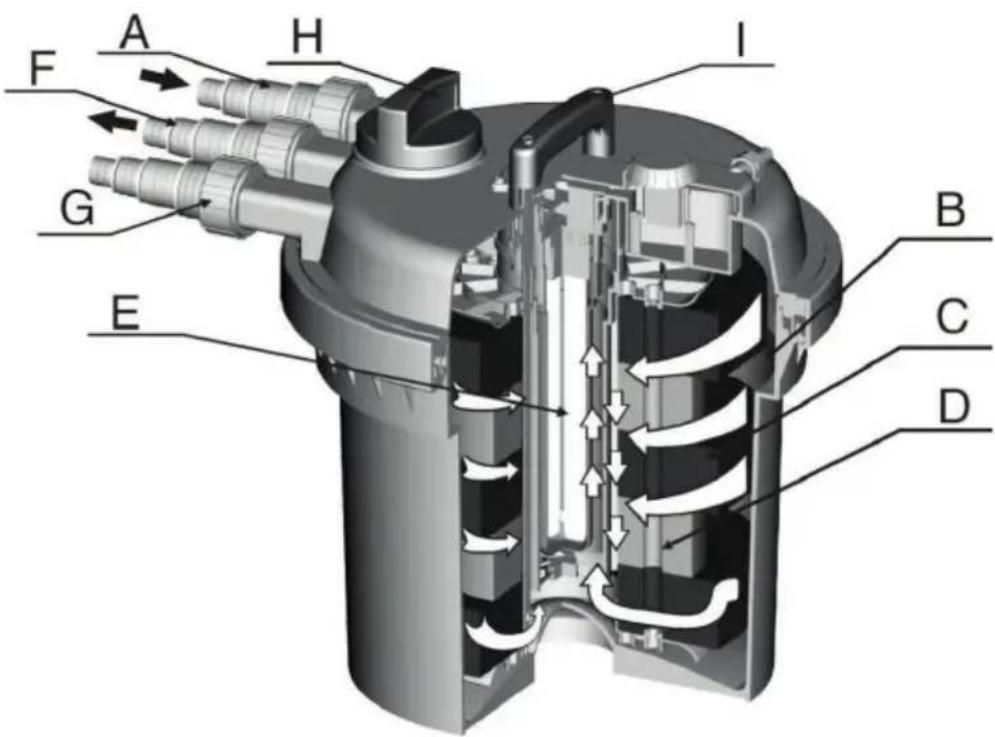
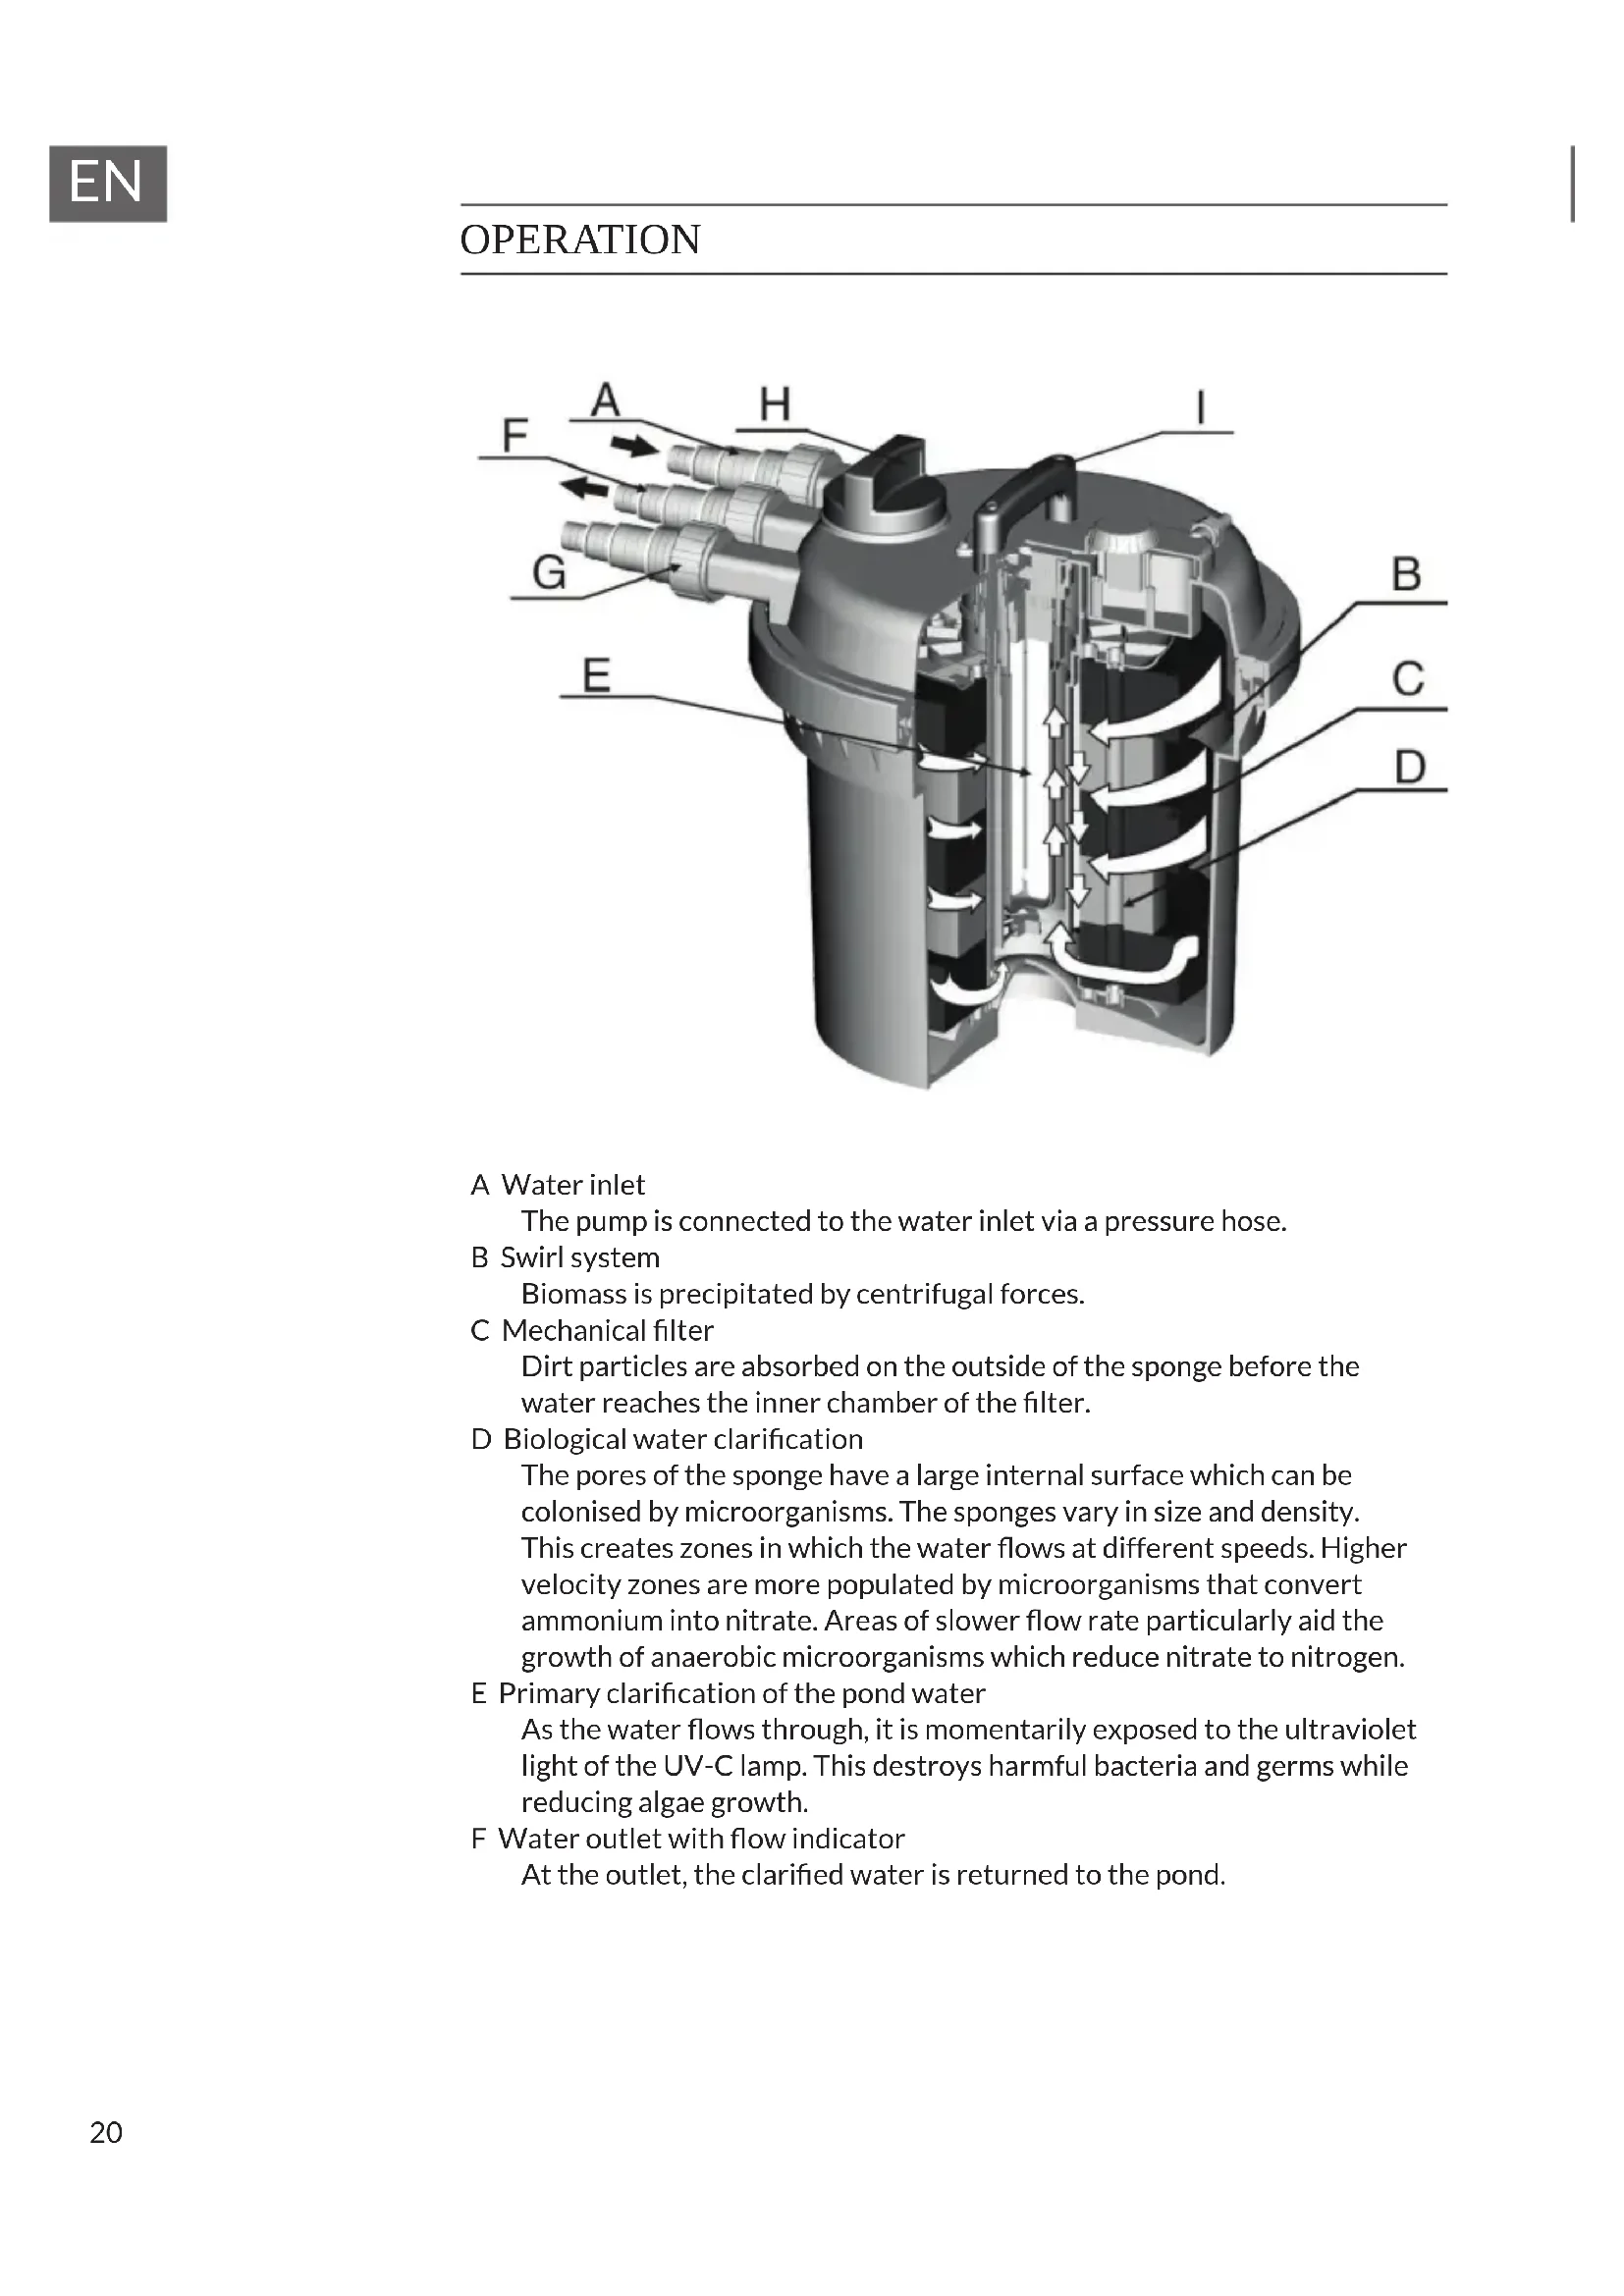
A Water inlet
The pump is connected to the water inlet via a pressure hose.
B Swirl system
Biomass is precipitated by centrifugal forces.
C Mechanical filter
Dirt particles are absorbed on the outside of the sponge before the water reaches the inner chamber of the filter.
D Biological water clarification
The pores of the sponge have a large internal surface which can be colonised by microorganisms. The sponges vary in size and density.
This creates zones in which the water flows at different speeds. Higher velocity zones are more populated by microorganisms that convert ammonium into nitrate. Areas of slower flow rate particularly aid the growth of anaerobic microorganisms which reduce nitrate to nitrogen.
E Primary clarification of the pond water
As the water flows through, it is momentarily exposed to the ultraviolet light of the UV-C lamp. This destroys harmful bacteria and germs while reducing algae growth.
F Water outlet with flow indicator
At the outlet, the clarified water is returned to the pond.
G Cleaning connection
A hose can be connected for cleaning the filter itself, via which the accumulated dirt can be drained off, for example to fertilise a flowerbed or simply dispose of it.
H Function switch
The function switch is used to switch between the normal water outlet and the cleaning outlet.
I Cleaning the filter sponges with the handle function.
The filter sponges can be cleaned while the filter is in operation by 'pumping' and pressing the cleaning handle hard. The following installation instructions must be observed.
Pressure drop due to the height difference
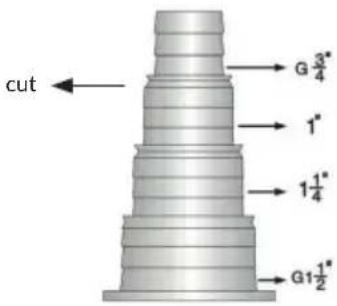
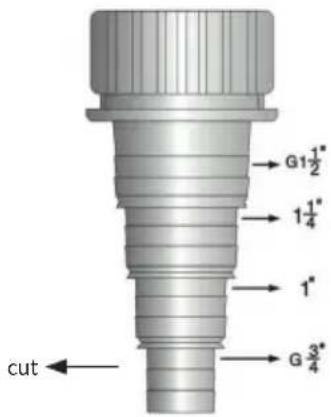
The selection table is based on a maximum height difference of water surface to the highest point of the filter of 1 metre. If the difference in height exceeds 1 metre, you will need to use a larger pump in your system. To avoid pressure loss, trim the adapter to the appropriate size.
Avoid unnecessary corners and pressure points, which also lead to pressure loss. For hoses over 4 metres, use the type with the upper values of the scale.
To avoid a pressure drop, cut the step-shaped adapter at the correct points for each hose.
Assembly and connection of the pressure filter
Choose a suitable location for the pressure filter. Please note the following points.
Install the filter so that it is protected from flooding. Secure your filter so that it does not fall into the pond. It should be placed at least 2m from the edge of the pond.
Place the filter on a firm and level surface, for example, on a plate. The filter can also be buried up to the level with the filter box.
Ensure that there is unobstructed access to the lid when working on the filter, as well as when cleaning the filter sponges and connecting hoses.
Connecting hoses
Use the selection chart to decide which tubing diameter you need. Operate the filter only with pressure hoses approved for a pressure of 0.2 bar, or the maximum pressure of the pump.
We recommend warming the hose with hot water, pushing it onto the spiral hose adapter and securing it with a hose clamp. This makes the connection more watertight.
To avoid pressure loss, cut the spiral graduated hose adapter into the appropriate location for each hose.
CONNECTION TO WATER SUPPLY
Slide the nut onto the black spiral-shaped hose adapter. Insert the flat gasket into the nut and screw it firmly onto the water inlet nozzle.
We recommend that you divert the cleaned water, for example over a small stream, rather than leading it directly back into the pond. This enriches the water with additional oxygen.
Connecting to cleaning connection You can have a drainage hose permanently connected to the cleaning connection. This allows you to drain the dirty water directly into the sewerage system or onto a flower bed.
Connection of pressure filter
Before putting your new pond filter into operation, make sure that all cable and hose connections are correct and that the sealing rings are not tilted. The switch must be set to 'filter function' and you should follow the instructions below.
- Switch on the pump.
Attention: The UV-C lamp must not be put into operation before the pump is pumping water.
- Check that all connections are waterproof.
- Connect the filter. The indicator light now illuminates with a blue light.
During the first or a new installation, full cleaning performance will only develop after a few weeks after the necessary microorganisms have formed. This occurs particularly quickly at ambient temperatures above 10^ .
Choose a suitable location for the pressure filter. Please observe the installation guidelines regarding the clear water guarantee as well as the following guidelines. Install the filter so that it is protected from flooding. Secure your filter so that it does not fall into the pond. It should be located at least 2 metres from the pond.
MAINTENANCE AND CLEANING
The pressure filter is largely maintenance-free. The filter sponges should be cleaned regularly.
Suspended matter and dirt are deposited in the filter sponges over time. These deposits reduce the effectiveness of the filter, so the filter sponges should be cleaned regularly, about every two weeks.
The filter sponges must be cleaned when cloudy or even polluted water from the water outlet flows back into the pond.
- Remove the cap from the cleaning port or from the drain hose connected to the cleaning port. There will be a small water flow.
- Pull the function switch slightly upwards and turn it clockwise until it locks in the 'clean' position.
- Tighten the cleaning handle and 'pump' several times. This will compress and mechanically clean the filter sponges.
- Push the cleaning handle down to the lid.
- As soon as only clean water has been seen through the transparent spiral-shaped hose adapter on the cleaning connection, pull the function switch slightly upwards and turn it counterclockwise until it locks in the 'filter' position.
- Firmly screw the cap with the flat gasket inserted onto the cleaning port or drain hose connected to the cleaning port.
- The filter will start running again. Check the water flow in the pond.
Cleaning the filter sponges
If the flow of water through dirty filter sponges is too low and cannot be improved by cleaning with the handle function, the filter sponges must be washed or replaced. To avoid killing the microorganisms in the filter sponges, please do not use chemical cleaning agents.
- Disconnect the mains plug of the filter.
- Turn off the pump and make sure that it cannot be turned on accidentally.
- Remove all hoses by unscrewing the nuts.
- Remove the clamping ring. Open the clamping ring.
- Lift the lid off with the filter sponge. Lay the lid upside down on another top. The filter sponges are on the filter. The plate will be pointing upwards.
Wear indicator
The filter sponges are pre-installed. The filter sponges may fall apart due to mechanical stress and normal aging. This can lead to a short circuit in the filter. To check the filter sponges, they must be placed one above the other on the lower filter plate without 'air gaps'. The distance between the filter sponges and the filter plate must be less than 1cm .
- Remove the upper filter plate by loosening the two screws.
- Remove the filter sponges and clean them under running water. Wring out the filter sponges vigorously.
- Pull on the lower filter plate.
- Clean the filter box, the lid with grid tube, the two filter plates and the clamping ring by spraying them with a water hose.
- Lightly lift the bypass valve and clean the inlet comb of the filter (see illustration).
- Clean the cover gasket and the edge of the filter box.
- Slide the filter plate with the collar up on the mesh tube and cleaning rods.
- The filter sponges will be pushed out from the housing cover, starting with a large blue filter sponge and always alternating with a small yellow filter sponge. The cleaning rods are located in the two openings of the large chamber of the filter sponges.
- Place the filter plate with the collar down, fasten the cleaning rods flush with the two screws on the filter plate.
- Place the lid gasket on the top of the filter box and allow the gasket to get wet for easy installation.
- Place the lid with the filter sponge unit onto the filter box.
- Place the clamping ring on the edge of the filter box and lid, push the lid down and click to fix into place.

Push in the safety lock.
- Secure all hoses with flat gaskets or flow blades to the appropriate port by tightening the nuts.
- Switch on the pressure filter again
Cleaning the quartz tube
- Diconnect the mains plug of the filter.
- Open the lid of the filter.
- Remove upper filter plate and filter sponges.
- Remove the upper container.
- Clean the quartz tube with a damp cloth.
- Set up all part of the filter as follows.
- Put the pressure filter back into operation.
Replacing the UVC lamp
The UVC lamp must be replaced after 8,000 hours of operation in order to ensure that the filter continues to operate with optimum effectiveness.
- Loosen the 8 screws of the filter cover and the handle. Remove the lamp from the filter cover.
- Pull out the UVC lamp and replace the lamp.
- Insert the UVC filter into the filter cover and fasten the 8 screws.
- Restart the filter.
| Problem Possible cause | Steps to resolution | |
| Water does not become clear. | The device has not been in operation for long enough. | The full effectiveness of biological purification will only be achieved after a few weeks of operation. |
| The pump capacity is insufficient Adjust the pump capacity. | ||
| The water is very dirty... Remove algae and leaves from the pond, change the water. | ||
| The fish are too big or there are too many fish. | Guideline: approx 1 kg fish to every 1000 m³ of pond watter. | |
| The filter sponge or the quartz tube are dirty. | Take out the UVC filter. Clean the quartz tube. | |
| UVC lamp indicator is not on | The power plug and the UVC filter are not connected. | Connect the power plug and the UVC filter. |
| Defective UVC lamp. Replace the UVC lamp. | ||
| Faulty electrical connection. Check the electrical connections. | ||
| The UV light bulb is defective. Replace the UV light bulb. | ||
| The protective tube is not inserted. Swap out the UV lamp. | ||
| The UVC filter has overheated. After it cools off, the UV filter will start again. | ||
| There is no water coming from the pond inlet. | The function switch is set to 'clean'. Set the function switch to 'filter'. | |
| The power plug of the pump is not plugged in. | Connect the power plug to a power supply. | |
| The pond inlet is blocked. Clean the pond inlet. | ||
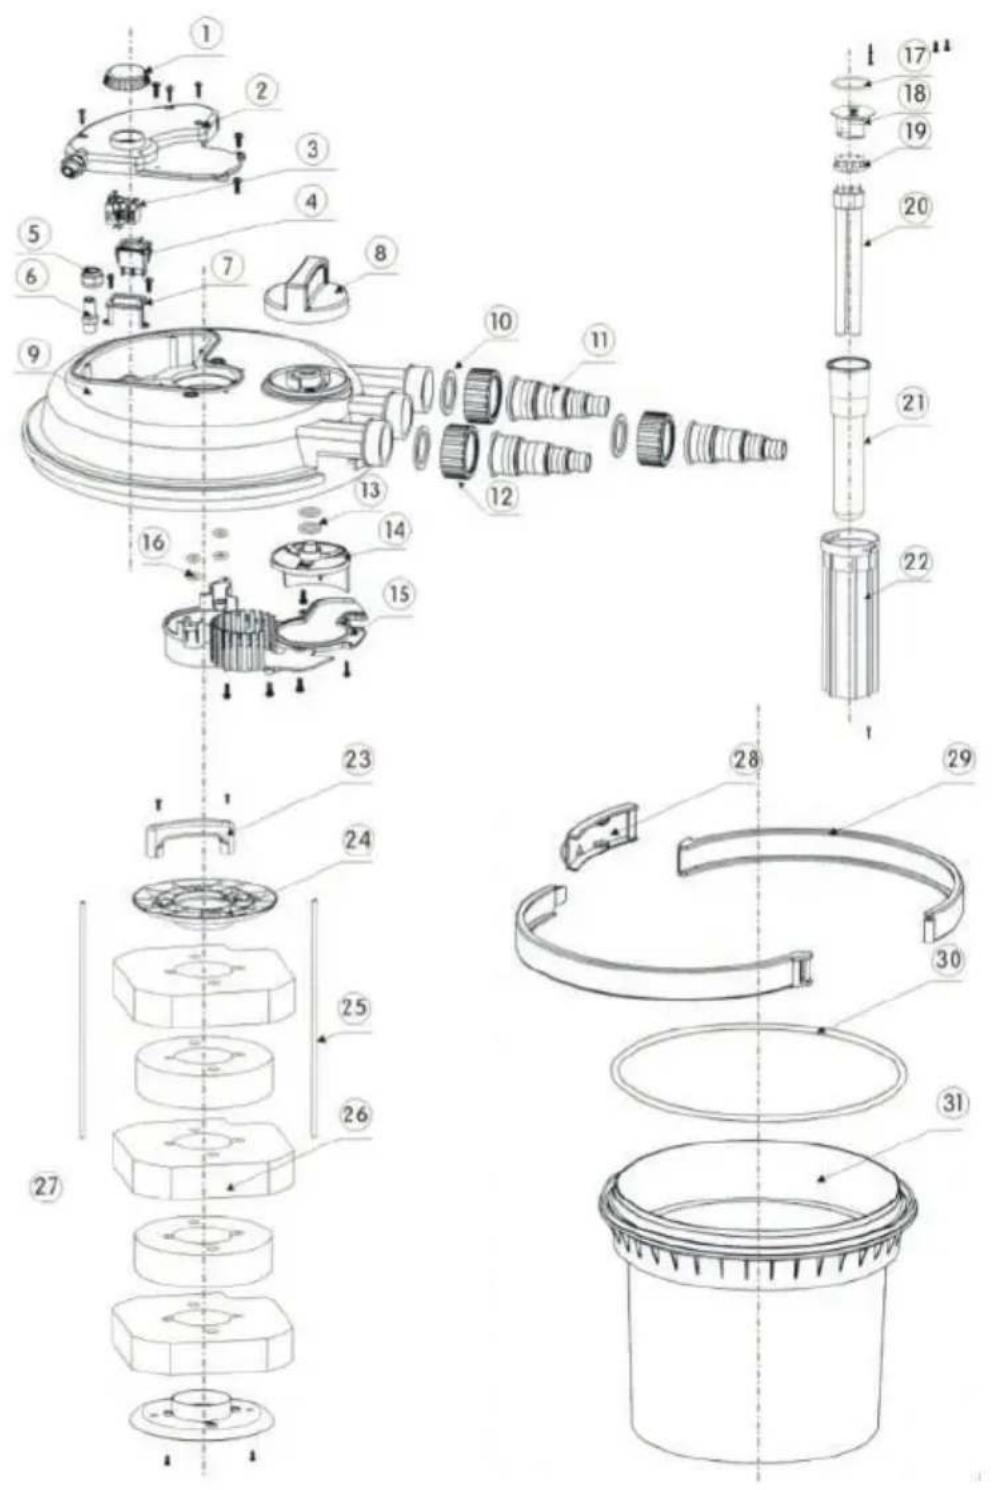
EXPLODED VIEW
The image at left (crossed out waste bin on wheels) appears on this product, indicating that the European waste regulation 2012/19/EU applies. These products may not be disposed of with normal household waste. Check your local regulations for the separate collection of electronics and electronic equipment. Please follow local regulations and do not dispose of old appliances via household waste. By ensuring this product is disposed of correctly, you will help prevent potential negative consequences for the environment and human health. Material recycling helps to reduce the consumption of raw materials.
Chere cliente, cher client,


- CONTENTS
- TECHNICAL DATA
- DECLARATION OF CONFORMITY
- SAFETY INSTRUCTIONS
- OPERATION
- Pressure drop due to the height difference
- Assembly and connection of the pressure filter
- Connecting hoses
- CONNECTION TO WATER SUPPLY
- Connection of pressure filter
- MAINTENANCE AND CLEANING
- Cleaning the filter sponges
- Wear indicator
- Push in the safety lock.
- Cleaning the quartz tube
- Replacing the UVC lamp
- EXPLODED VIEW
- Chere cliente, cher client,
Brand : Waldbeck
Model : Aquaklar
Category : Pump