
SEW121821 - Sewing machine Emerio - Free user manual and instructions
Find the device manual for free SEW121821 Emerio in PDF.
| Product type | Sewing machine |
| Brand | Emerio |
| Model | SEW121821 |
| Power supply | AC adapter 100-240 V AC, 50/60 Hz, output 12 V DC, 1500 mA |
| Sewing speed | Adjustable: low (L) and high (H) |
| Stitch types | 12 stitch patterns to choose from |
| Reverse sewing | Yes, to reinforce seams (stitches 1 to 4) |
| Bobbin winder | Integrated, with spindle and winder stop |
| Work light | Yes, on/off button (not user-replaceable) |
| Thread cutter | Yes, on the left side |
| Free arm | Yes, for sleeve sewing (removable drawer) |
| Presser foot | Removable, with locking lever |
| Needle | Standard, replaceable (flat side to the back) |
| Bobbin (lower) | Metal recommended, storage in drawer |
| Foot pedal | Yes, with dedicated plug (do not use with switch) |
| Suitable fabrics | Cotton, linen, polyester, elastic (depending on thickness) |
| Warranty | 2 years from purchase date |
| Maintenance | Clean after use, unplug before any handling |
| Safety | Notice must be read, unplug to change parts |
| Included accessories | Presser foot, needles, bobbins, foot pedal, AC adapter |
Frequently Asked Questions - SEW121821 Emerio
User questions about SEW121821 Emerio
0 question about this device. Answer the ones you know or ask your own.
Ask a new question about this device
Download the instructions for your Sewing machine in PDF format for free! Find your manual SEW121821 - Emerio and take your electronic device back in hand. On this page are published all the documents necessary for the use of your device. SEW121821 by Emerio.
USER MANUAL SEW121821 Emerio
Before use make sure to read all of the below instructions in order to avoid injury or damage, and to get the best results from the appliance. Make sure to keep this manual in a safe place. If you give or transfer this appliance to someone else make sure to also include this manual.
In case of damage caused by user failing to follow the instructions in this manual the warranty will be void. The manufacturer/importer accepts no liability for damages caused by failure to follow the manual, a negligent use or use not in accordance with the requirements of this manual.
- This appliance can be used by children aged from 8 years and above and persons with reduced physical, sensory or mental capabilities or lack of experience and knowledge if they have been given supervision or instruction concerning use of the appliance in a safe way and understand the hazards involved.
- Children shall not play with the appliance.
- Cleaning and user maintenance shall not be made by children without supervision.
- The appliance is only to be used with the power supply unit provided with the appliance.

- Always switch off the appliance, disconnect from the power supply and remove foot pedal when:
changing the needle;
threading the needle;
changing bottom bobbin;
changing any parts;
cleaning the machine;
after each use.
- Never run the machine when there's thread in the needle,
but no fabric on the machine. This could damage the machine.
- Always keep your hands away from the needle, hand wheel, upper thread tension dial and pattern selection dial when the appliance is running.
- Never attempt to open the housing of the appliance, or to repair the appliance yourself. This could cause electric shock.
- Never leave the appliance unattended during use.
- Switch off or unplug the appliance when leaving it unattended.
- Unplug the appliance before carrying out maintenance.
- This appliance is not designed for commercial use.
- Do not use the appliance outdoors.
- Do not use the appliance for other than intended use.
- Never use the appliance if damaged in anyway.
- Whenever the sewing machine is not in use make sure it is switched off and unplugged from the power supply and remove the foot pedal.
- Keep the machine in a dry and ventilated place.
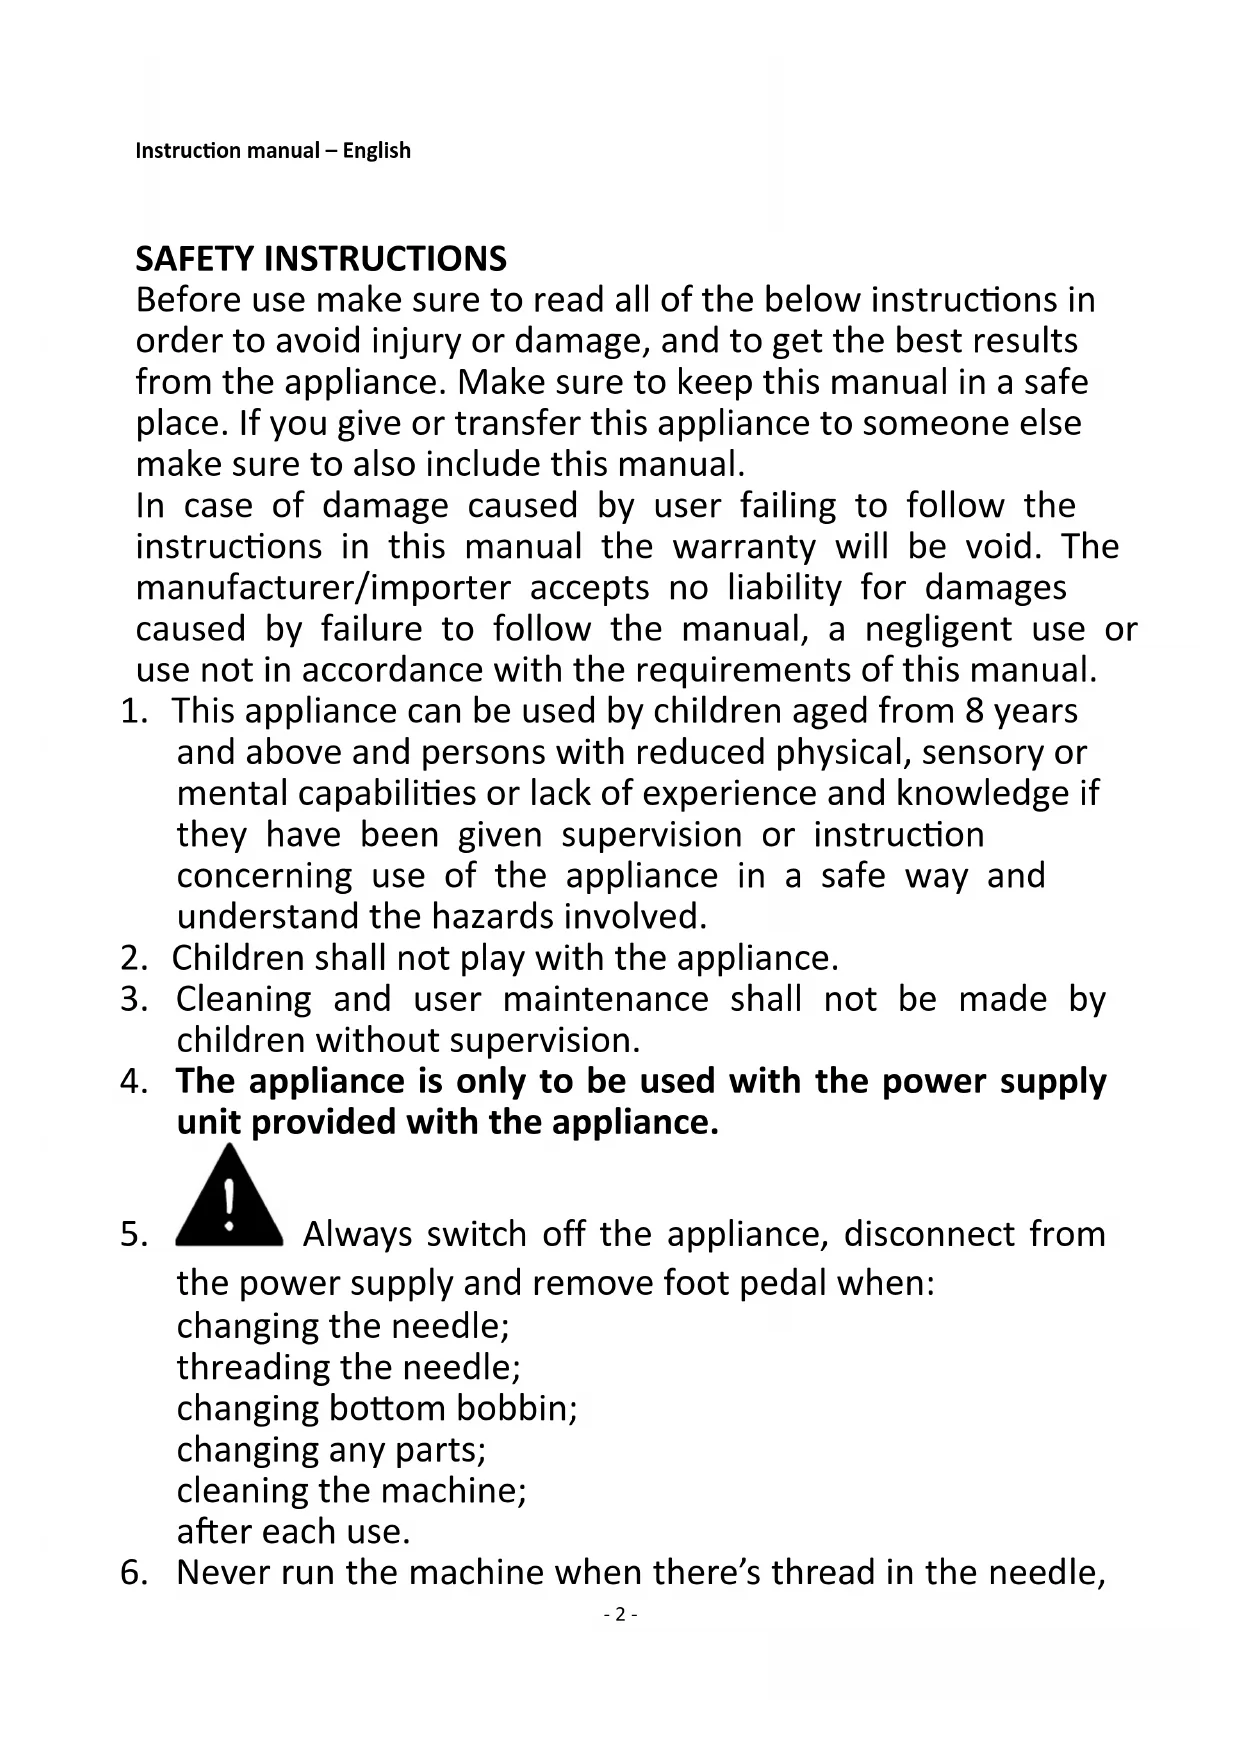
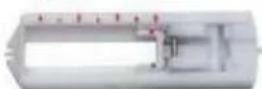
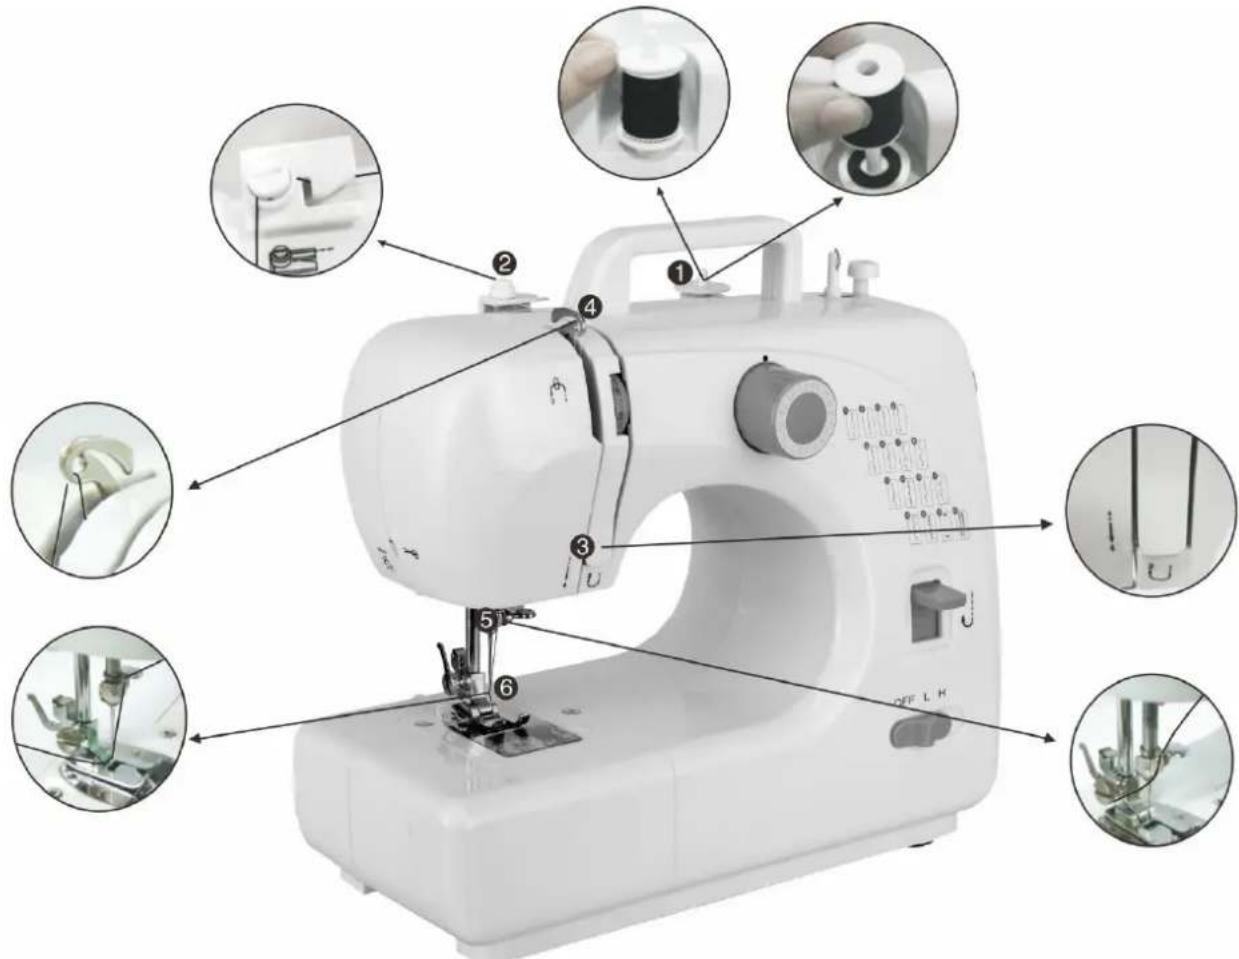
PARTS IDENTIFICATION
Front view
- Take-up lever
- Upper thread tension dial
- Pattern selection dial
- Thread cutter
- Light
- Needle clamp screw
- Bottom bobbin
- Drawer
- Hand wheel
- Reverse button
- Power & speed switch
Back view
- Bobbin winder pin
- Bobbin winder stop
- Foot pedal input
- Bobbin winder tension disk
- Presser foot lifter
- Presser foot
- DC input

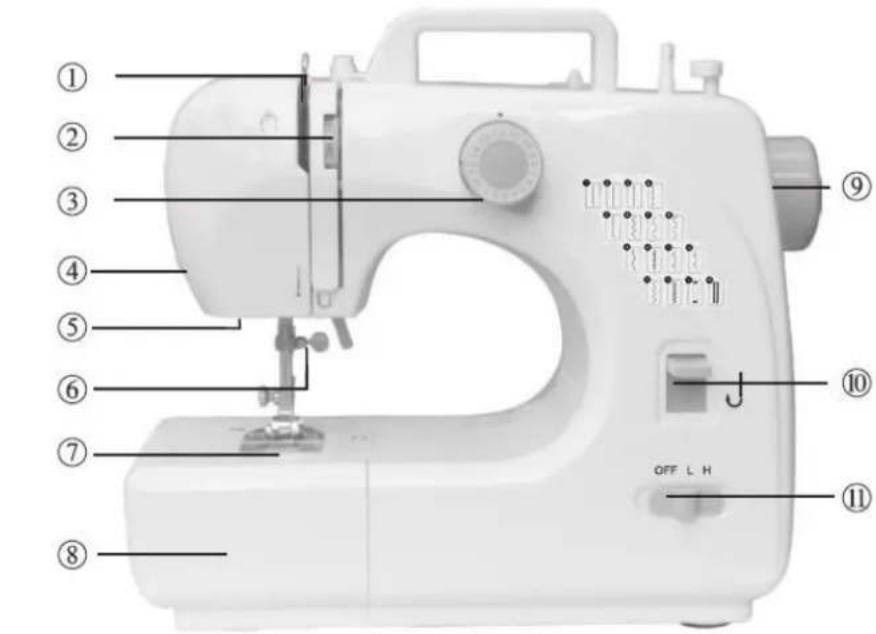
USING THE FOOT PEDAL (A) AND ADAPTOR (B)
- Connect the foot pedal by inserting the jack into the foot pedal input socket. Then you can use the foot pedal to turn on the machine instead of using the hand switch (Power & speed switch).
- Connect the adaptor's jack to the DC input socket on the back of the machine, and connect the plug to the main power supply.
Caution:
- Make sure the foot pedal is unplugged from the machine when you are not using it, so the sewing machine won't accidentally start up.
- The foot pedal cannot be used together with the power & speed switch.
Make sure the switch is placed at the position "OFF". - There is no speed selection when using foot pedal to control the machine.
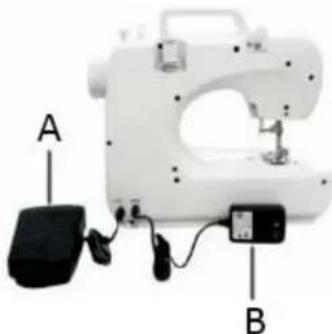
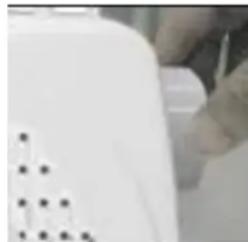
NEEDLE REPLACEMENT
If the needle breaks, or you need a different needle to sew a different kind of fabric, just follow these steps: Caution: To prevent injury from accidentally starting up the machine, make sure to turn off the switch, remove the foot pedal and the adaptor plug first.
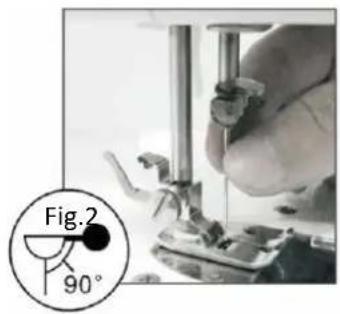
- Turn the hand wheel to raise the needle to its highest position. Hold the old needle and loosen the needle clamp screw. Remove the old needle and discard it properly. (Fig.1)
- Insert the new needle into the clamp with the flat side toward the correct direction (to the back). Be sure to push the needle completely into the clamp before tightening the needle clamp screw.
- Tighten the needle clamp screw.
Caution: Needle direction must be correct, and be sure to tighten the thimble screw, to avoid needle falling by accident.
Fig.1
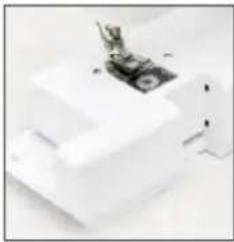
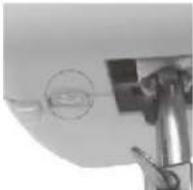
PRESSER FOOT REPLACEMENT
1. Removing the presser foot
Turn the hand wheel counterclockwise to raise the needle to its highest position. Raise the presser foot lifter, and press the presser foot locking lever. The presser foot will drop off automatically from the locking device. (Fig.3; Fig.4)
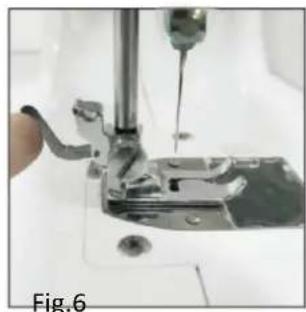
2. Installing the presser foot
Put the presser foot under the presser foot locking device, lower the presser foot lifter, press the presser foot locking device to reset the foot, and lift the presser foot lifter. (Fig.5; Fig.6)
Caution:
Always switch off the appliance, disconnect it from the power supply and remove the foot pedal when replacing the presser foot.
- When replacing the presser foot, please place the machine on a stable platform.
- When putting down the presser foot, please do not put your hand or finger under it to avoid injuring fingers.
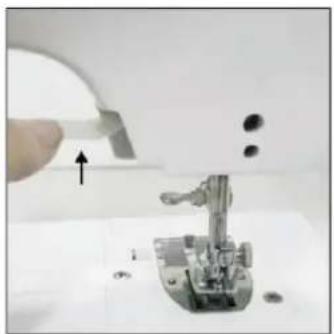
Fig.3
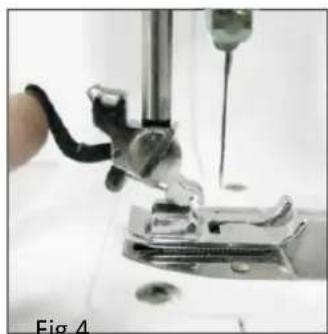
Fig.4
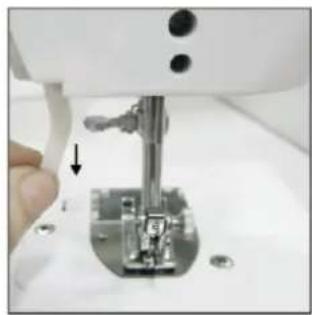
Fig.5
THREADING THE SEWING MACHINE
1. Threading upper thread
Caution: Always switch off the appliance, disconnect the appliance from the power supply and remove the foot pedal when threading the machine.
1) Turn the hand wheel to raise the needle to its highest position.
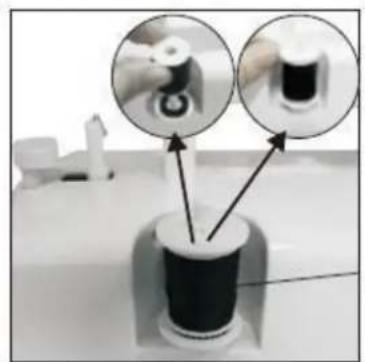
2) Put a spool on the thread spindle, put on the thread spindle cover and then pull out the thread.
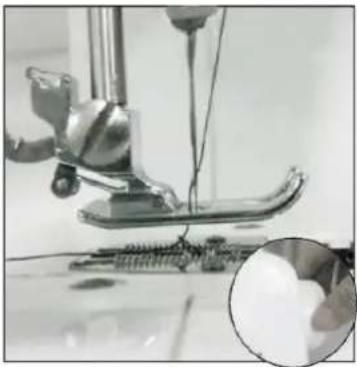
3) Pull the thread and let it pass through the bobbin winder tension disk. (mark ② in the pic. below)
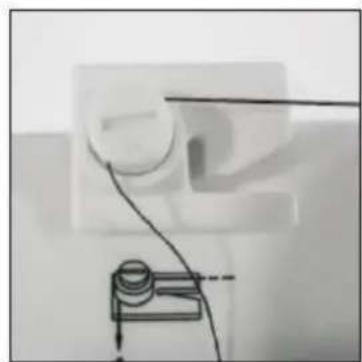
4) Guide the thread through the groove and pull it up towards the chromed take-up lever. (marks ③ & ④ in the pic. below)
5) Feed the thread through the hole in the chromed lever and pull it straight down towards the needle. (marks 4 & 5 in the pic. below)
6) Feed the thread through the hole in the needle holder, then through the eye of the needle from the front side to the back and pull out 10cm to the back. (mark ⑥ in the pic. below)
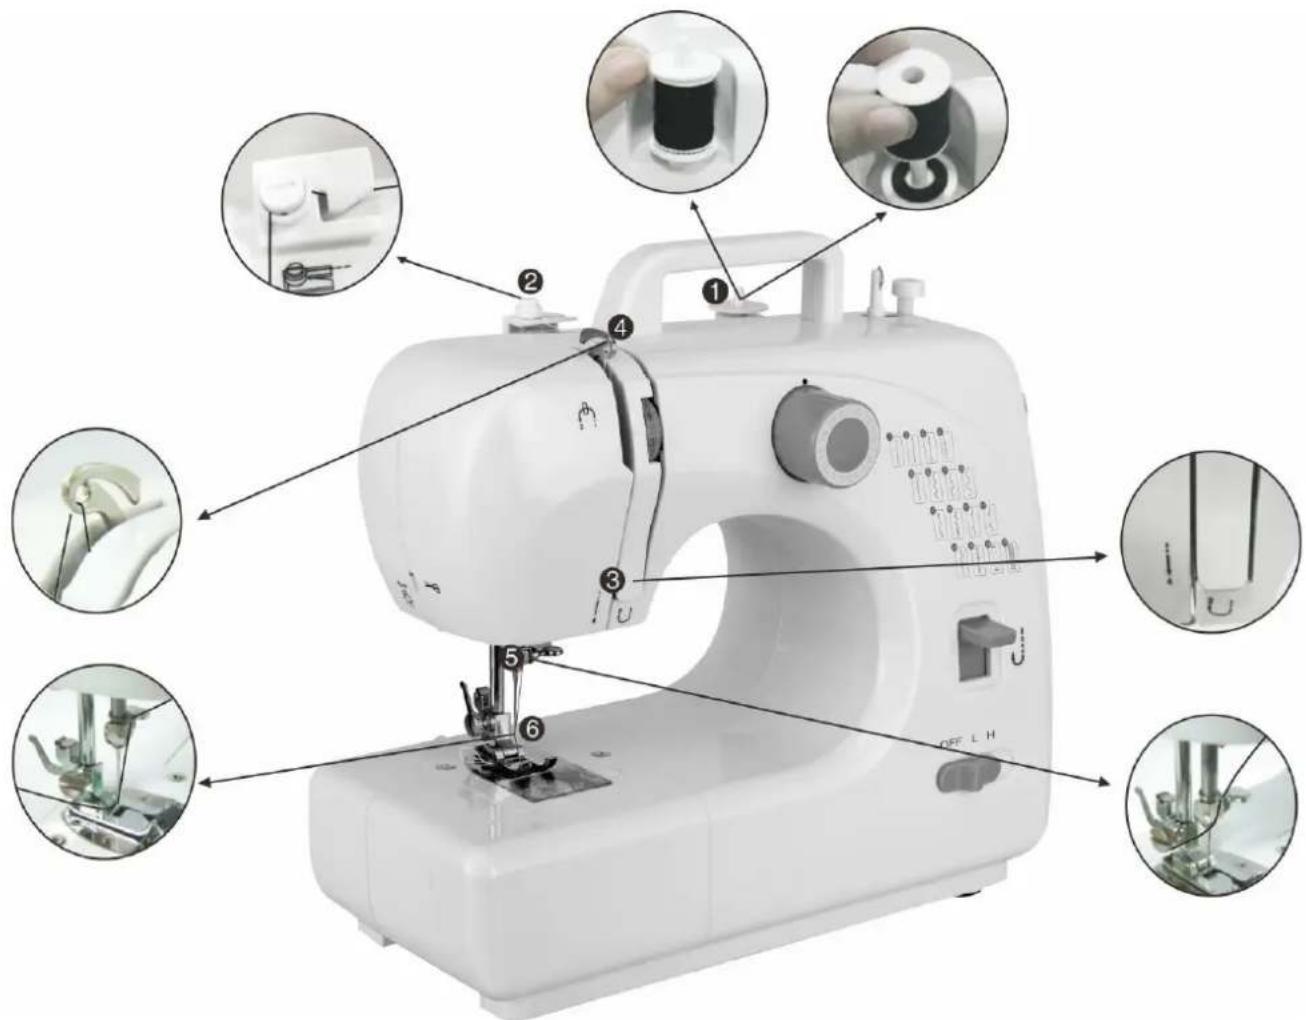
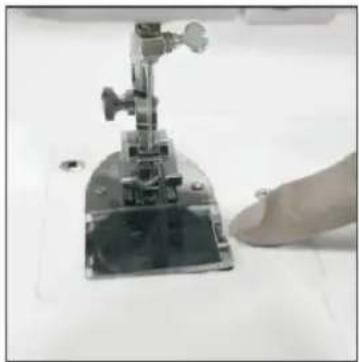
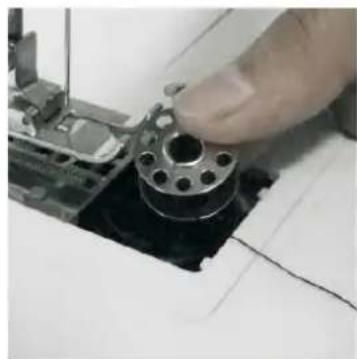
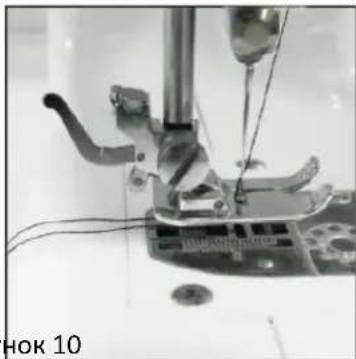
2. Replacing the bottom bobbin
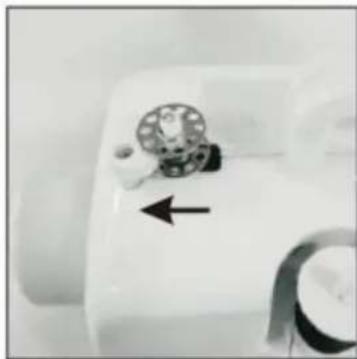
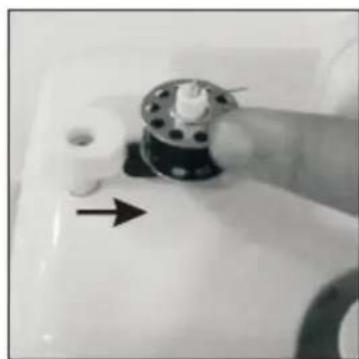
1) Slide the bobbin cover button to the right and remove the bobbin cover (Fig.7).
2) Put the new bobbin in the holder, with the thread going clockwise. Leave 10cm of thread hanging out (Fig.8).
3) Make a loop and put it in the hole under the needle.
4) Hold the end of the upper thread with one hand, and turn the hand wheel counterclockwise with the other hand, the needle thread will pick up the bobbin thread and pull it up through the hole under the needle (Fig.9).
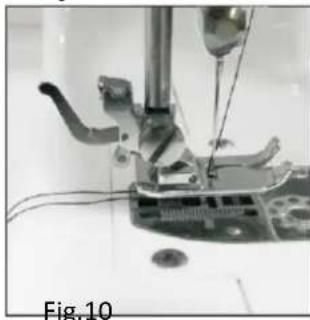
5) Replace the bobbin cover and separate the two threads and pull them to the back of the machine under the presser foot, leaving about 15cm hanging there. (Fig. 10)
Caution:
Always switch off the appliance, disconnect it from the power supply and remove the foot pedal when replacing the bottom bobbin.
- Please use metal bobbins, otherwise the magnetic holder cannot tense the bobbin thread and work rightly.
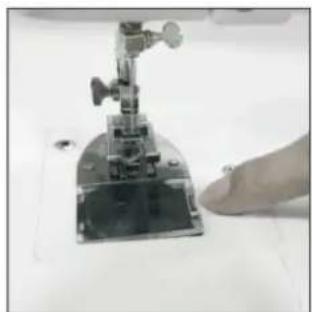
Fig.7
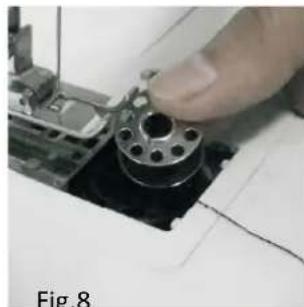
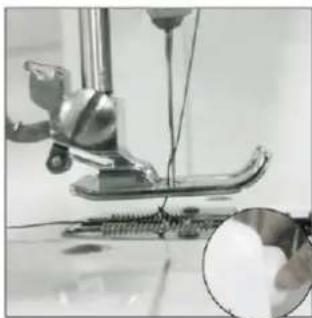
Fig.9
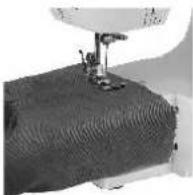
SEWING
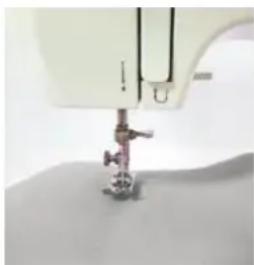
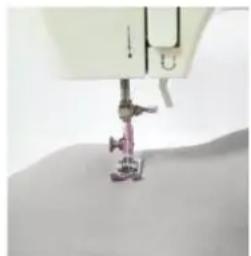
- Turn the hand wheel counterclockwise to raise the needle to its highest position.
- Raise the presser foot lifter and place the fabric you want to sew under the presser foot (Fig.11).
- Lower the presser foot. (Fig.12).
- Rotate the pattern selection dial to select the stitch pattern you wanted.
Caution:
Before you change the stitch pattern, please turn off the switch and turn the hand wheel to raise the needle all the way up so it doesn't get stuck and bent.
- Changing the stitch pattern is not allowed when the machine is running, otherwise the needle and/or machine may damage.
- Turn the hand wheel several times to make sure there is no jamming in the stitches.
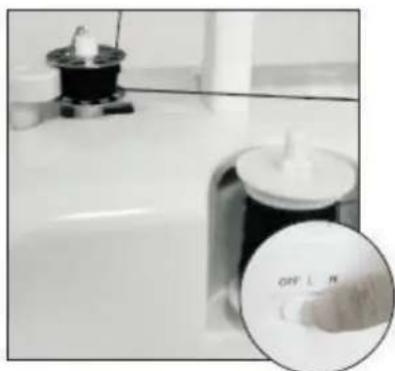
- Slide the power switch to the position "L" (meaning low speed) or "H" (meaning high speed), and the machine will automatically start sewing. We recommend the low speed for beginners (Fig.13).
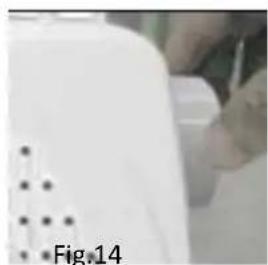
- When you finish the sewing, turn off the switch, unplug the adapter, turn the hand wheel to raise the needle all the way up, lift the presser foot, and then gently remove the fabric from the sewing machine, and cut the thread with the thread cutter (Fig.14).
Tips:
Please turn the hand wheel if it is difficult to remove the fabric, and then pull out the fabric gently.
- If the thread had tangled or jammed, please turn the hand wheel and simultaneously pull the thread slightly to release the thread. Bottom bobbin mechanism is a more precise part, inappropriate actions may damage it. Please to not push or pull it by finger or any tools.
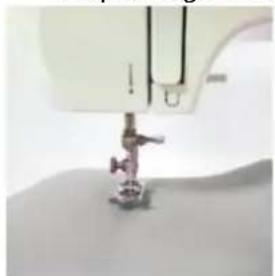
Fig.11
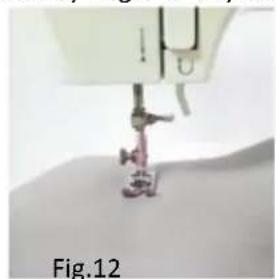
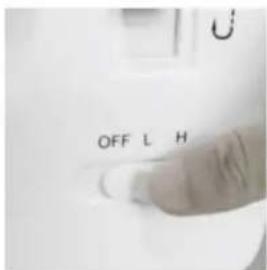
Fig.13
FEATURES
1. Selection of stitch pattern
Rotate the pattern selection dial to select one pattern you want from the 12 stitch patterns. There are pattern illustrations on the surface of machine body for your reference.
Caution:
Before you change the stitch pattern, please turn off the switch and turn the hand wheel to raise the needle all the way up so it doesn't get stuck and bent.
- Changing the stitch pattern is not allowed when the machine is running, otherwise the needle and/or machine may damage.
2. Reverse sewing
Reverse sewing (back stitching) is useful for reinforcing the beginning and end of seams. To use this function proceed as follows:
1) Sew forwards as normal, and then press and hold down the reverse stitch button on the front of the sewing machine to sew backwards.
2) To sew forwards again simply release the reverse stitch button.
Note: Reverse sewing is applicable only to stitch patterns 1 to 4.
3. Setting the sewing speed
Slide the power switch to "L" or "H" position. ("L" = low speed; "H" = High speed)
4. Working lamp
If additional light is needed, press the light switch to turn the light on. Press the switch again to turn it off. The working lamp cannot be replaced yourself.

5. Thread cutter
The machine has a thread cutter on the central left side of the machine, it can cut off the thread after sewing or winding thread.

6. Sewing sleeves
This sewing machine has been designed to sew sleeves or any narrow openings in garment. Pull out the drawer and position the garment over the sewing arm if you want to sew the sleeves.
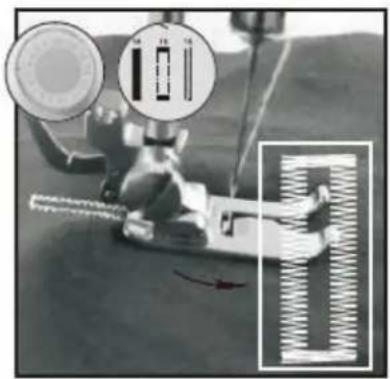
7. Manual buttonhole
1) Pull the cloth under the presser foot and lower the presser foot on the cloth where you need to sew buttonhole, then choose the 15^th stitch.
2) Turn on the switch and sew 5-6 stitches in low speed, then turn off the switch (Fig.15).
3) Choose the 16^th stitch, turn on switch and sew on the cloth in suitable length, then turn off switch. Note that try to keep sewed stitches in straight line (Fig.16).
4) Choose the 15^th stitch, then turn on switch and sew 5-6 stitches in low speed, then turn off switch (Fig.17).
5) Raise the presser foot, rotating the cloth for 180^ (Fig.18).
6) Choose the 16^th stitch, then turn on switch and sew till buttonhole is fully sewed (Fig.19).
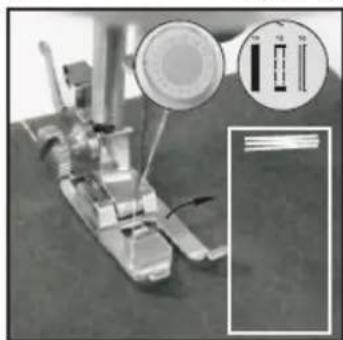
Fig.15
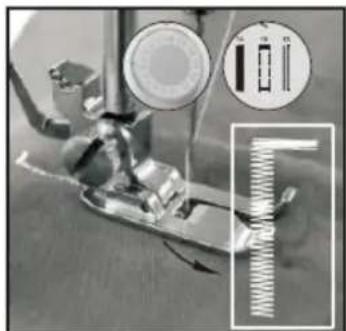
Fig.16
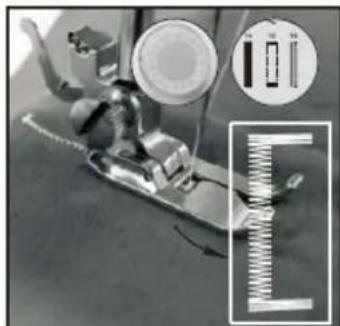
Fig.17
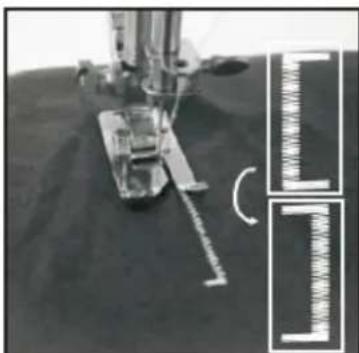
Fig.18
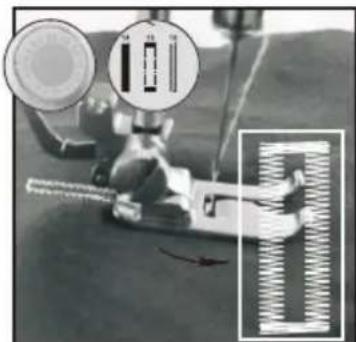
Fig.19
Note:
The presser foot shown as below can facilitate the buttonhole sewing.
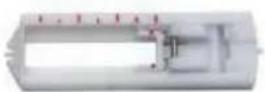
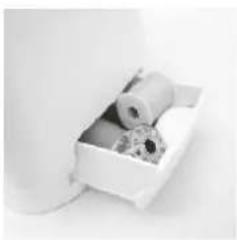
8. Drawer
This drawer is an accessory storage compartment, which can be slid out and you can store spare bobbins, needles, etc. in it.
WINDING THE BOBBIN
- Put a spool of thread on spool pin. (Fig.20)
- Guide the thread through the bobbin winder tension disk on the upper side of the machine. (Fig.21)
- Put the bobbin on the bobbin winder pin, wind thread clockwise around bobbin several times. (Fig.22)
- Push bobbin to the left. (Fig.23)
- Switch on the machine to start winding. (Fig.24)
- Switch off the machine to stop winding after appropriate volume of thread you had been winded on bobbin.
- Push bobbin away from bobbin winder stop, take bobbin off the pin and cut the thread. (Fig.25)
Caution:
Before winding the bobbin, raise the presser foot, take out the bottom bobbin and the upper thread.
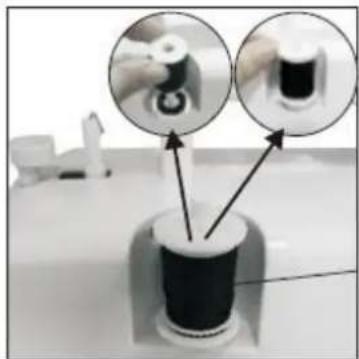
Fig.20
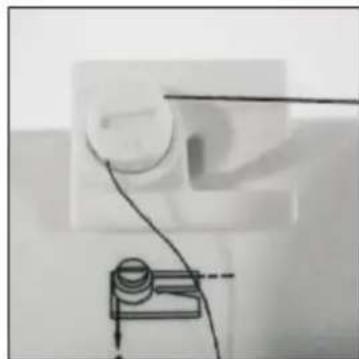
Fig.21
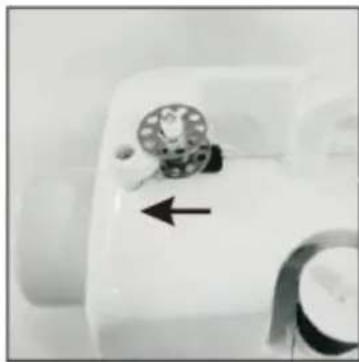
Fig.22

Fig.23
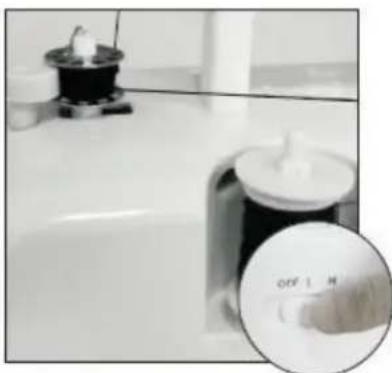
Fig.24
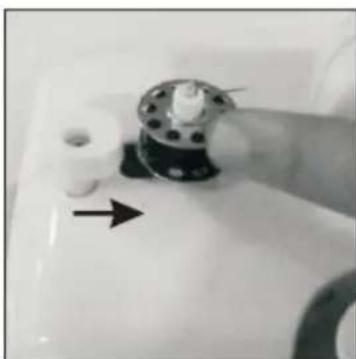
Fig.25
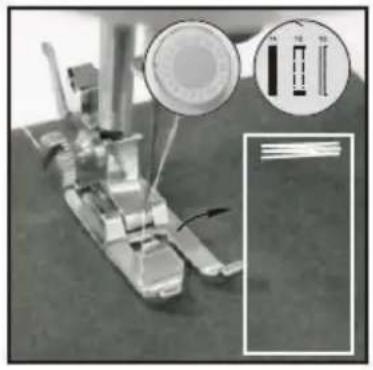
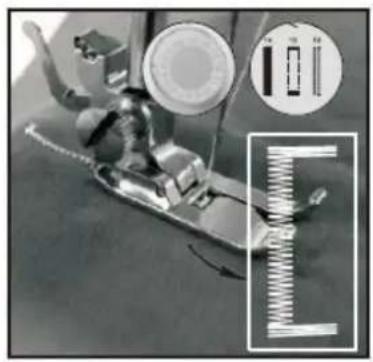
ADJUSTING STITCHING
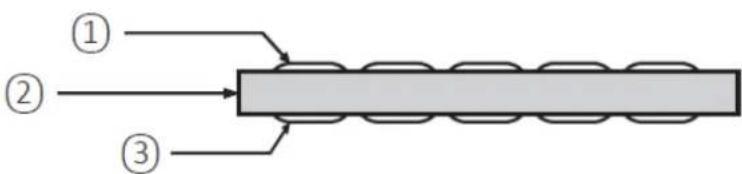
- As shown in the Fig.A, normal stitching shall have top and bottom threading evenly, neither over tight nor loose. (① = Top thread; ② = Cloth; ③ = Bottom thread)
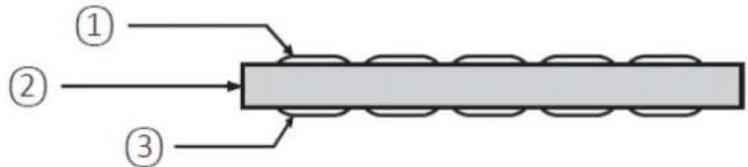
Fig.A
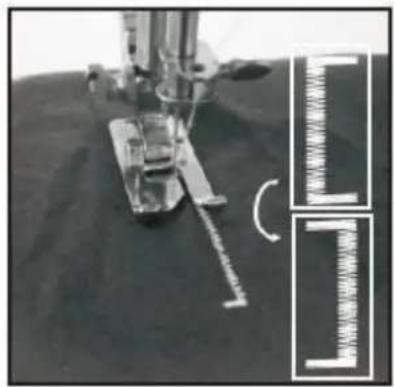
- If the bottom threading looks like a straight line (Fig.B), which indicates the top thread is too loose. Please turn upper thread tension dial to direction with bigger number to increase pressure until the stitching returns to normal.

Fig.B
- If the top thread looks like a straight line (Fig.C), which indicates an over-tight top thread. Please turn the upper thread tension dial to the direction with smaller number to reduce pressure until the stitching back to normal.

Fig.C
APPLICABLE CLOTH FOR SEWING
| Sewing Cloth Presentation Fabric specification | Cotton/Linen | Silk/Wool | Polyester | Elastic |
| Regular | ✓ | × | ✓ | △ |
| Thick | ✓ | × | ✓ | △ |
| Thin | ✓ | × | × | × |
| Hard | ✓ | ✓ | ✓ | △ |
| Soft | × | × | × | × |
Sewing effective:
V : means easy to sew
× : means difficult to sew
: means not smooth to sew
Note:
- The definition of the fabric thickness:
Thin (fabric): two layers of the fabric thickness < 0.35mm
Thick (fabric): two layers of the fabric thickness >0.8mm
Regular (fabric): two layers of the fabric thickness ≥ 0.35mm and ≤ 0.8mm .
- The definition of elastic cloth:
If the cloth, which size is "100mm x 30mm", is extending to over 106mm under 0.5KG tension force, then the cloth is defined elastic, otherwise it is inelastic.
-
Hard fabric: such as Jeans, fine canvas, etc.
-
Soft fabric: such as towel, duster, etc.
MORE TIPS
-
Make sure there is fabric under the needle when the machine is working and needle is moving, otherwise the machine will get stuck and the thread will be jammed.
-
Turn the hand wheel for 2 to 3 circles by hand to test if it goes smoothly or not before starting the machine. Direction to turn the hand wheel should be the same as the arrow's direction on the hand wheel.
- Make sure the machine was threaded correctly (do not forget any step or have wrong threading).
- Do not sew the cloth with too much elasticity, neither too thin (like silk) nor too thick cloth, please follow the IM for the applicable cloth.
- If the machine gets stuck or jammed due to wrong operation, turn off the power & speed switch immediately.
- Before winding the bobbin, please take out the bottom bobbin and the upper thread.
TECHNICAL DATA:
Adapter input: 100-240 V AC, 50/60 Hz, 0.5A Max
Adapter output: 12 V DC, 1500 mA
Sewing Machine: 12 V DC, 1500 mA
GUARANTEE AND CUSTOMER SERVICE
Before delivery our devices are subjected to rigorous quality control. If, despite all care, damage has occurred during production or transportation, please return the device to your dealer. In addition to statutory legal rights, the purchaser has an option to claim under the terms of the following guarantee:
For the purchased device we provide 2 years guarantee, commencing from the day of sale. If you have a defective product, you can directly go back to the point of purchase.
Defects which arise due to improper handling of the device and malfunctions due to interventions and repairs by third parties or the fitting of non-original parts are not covered by this guarantee. Always keep your receipt, without the receipt you can't claim any form of warranty. Damage caused by not following the instruction manual, will lead to a void of warranty, if this results in consequential damages then we will not be liable.
Neither can we hold responsible for material damage or personal injury caused by improper use if the instruction manual is not properly executed. Damage to accessories does not mean free replacement of the whole appliance. In such case please contact our service department. Broken glass or breakage of plastic parts is always subject to a charge. Defects to consumables or parts subjected to wearing, as well as cleaning, maintenance or the replacement of said parts are not covered by the warranty and are to be paid.
ENVIRONMENT FRIENDLY DISPOSAL
Recycling - European Directive 2012/19/EU
This marking indicates that this product should not be disposed with other household wastes. To prevent possible harm to the environment or human health from uncontrolled waste disposal, recycle it responsibly to promote the sustainable reuse of material resources. To return your used device, please use the return and collection systems or contact the retailer where the product was purchased. They can take this product for environmental safe recycling.
Emerio Holland B.V.
Zomervaart 1A
2033 DA Haarlem
The Netherlands
Customer service:
T: +31(0)23 3034369
E: info.nl@emerio.eu
SICHERHEITSHINWEISE
ATT ANVANDA FOTPEDAL (A) OCH ADAPTER (B)
GEPASTE KLEDING OM TE NAAIEN
BHHMaHHe: Bcerda BbIKIOuaTe np6op, OTCoeHNrTe np6op OT nCTOuHnKa NtAHn I CHMaTe HOXHyO neaIb npN 3a npabKe HHTN.
1) NOBEPHnTe MaxOBnK, YTO6bI NOHrTb INry B KpaHHee BepXHee noIOxHeHne.
2)HaedeHbTe KaTyUkHy Ha WnyIbKy,HaedeHbTe KpbIwKy WnyIbKnY N BbITAHHTe HHTb.
3) Notaryte 3a HHTky i daite ein npoTn Ypee3 HATXHOH DNCK HAOTOCHOR YoCTPOIcTBa (OTMeTKa ② Ha KaptnHke HNKe).
4)Прпсгnte HHTb chepe3 KaHaBky I NOTHnTe ee BBepx K npHmHomy pbuary (OTMeTkn ③ n ④ Ha KapTHnKe Hnke)
5) Ipnocytte Hntb chepe3 OTBepCTne B xpomnpoBaHHOM pbiue n notaHnte ee npma Bn3 K nIe (OTMeTKn 4) n ⑤ Ha KaptnHke HnKe).
6) Ipnocytte Hntb chepe3 OTBepctne B depkatae nflbl, 3aTeM chepe3 yko nflbl OT nepeDHei CTOpohbK 3aHne uactn N bItAHnte Ha 10 cm HHTn H3aD (OTMeTKa ⑥ Ha KaptnHke HnKe).
2. 3aMeHa HxKHei uynbKn
1) CdbnHbTe KhoNk Ky KpbIuK NoTcKa WnyLeK BnpaBO N CHMmTe KpbIuKy (PncyHOK 7).
2) BCTaBte HOByIO uynIbky B depKataIb TaK, TTo6bI HHTb Ila no YacOBoi cTpeNke. OcTaBbTe 10 cm HHTn CBO6OJHO CBuCaTb (PncyHok.8).
3) CdaaIte netIO u BCTabbTe ee B OTBepctne eo ngio.
4) YdepKINBA KOHeu BepXHeH HHTN ODHo pyko, a dpyro pyko NOBepHnTe MAXOBn IpOTNB YacOBn CTpeKN, IROJbHaH HHTb 3aXbATNT WnylbHyIO HHTb N BbITaHET ee Hepe3 OTBepCTne IOd INrIo (PncyHOK 9).
5) YcTaHOBInTe Ha MeTo KpbIshky OTeCeKa, OTdeJIte DBe HHTKn I NOTaHIne INK 3aDHeN YaCTn MaunHbI NOd JAnKy. OCTaBIAJ OKOJO 15 cm CBO6oJHO CBNCaTb. (PcCyHOK 10).
BHHMaHHe:
Bcerda BbIKIOuayTe npnbop,OTcoeINHnTe erO OT nCToOHnKa nHTaHnI CHMaTe HOKHyIO neaJIb npN 3ameHe HIXKHe IyNbKn.
- POKaIyIcTa, IcNoJIb3yIte MeTaJIInueckne ⅢnyIbKn, INaYe MaHHTbI depKaTeIb He CMOKeT HaTAYt b HHTb ⅢNVbKn pa6OtaTb npabNlbHO.
PncyHOK7
PcCyHOK 8
PncyHOK 9 PncyHOK 10
ПОШИВ
- NOBepHnTe MAXOBnK npOTnB YacOBn CTpeLKn, YTObbl NODHrTb INy B KpaHHe BepXHee NoIooKeHne.
- ПОДНИМТЕ NOДБЕМнИК ИРNUЖМHоЛЯANKИ N OMECTHTe TkaHb, KOTOPYIO Bbl XOTHTe WHTb, NOД ПОПNUЖМHуLO JANky (Pnc. 11).
- Onvctnte npnKmHyo Janky.(Pnc.12).
- NOBepHnTe DnCK BbIbOpa PnCYHkA, YTO6bl BblbPaTb HxKhbl pncvHOK CTPOuKn.
BHHMaHHe:
Ipejde yem MeHrtb pncyHOK cTPOUKN, BbIKIOHTe nepeKIOUaTeJIb NITAHN I NOBepHNTe MAXOBNK, TTO6bl NDHtB Hny DO YNopa, UTO6bl OHa He 3aCTPraJa I He norHyJAcB.
I3MeHeHne pucyHa cTpOckn He dOnyckaetc BO BpeMaOnHb, B npOTnbHom Clyae nla n /nn MaunHa MOrVT NOBpeNTb.
5. IOBepHnTe MaxOBnK HeCKoJIbKO pa3, YTO6bl V6eHNtCBa B OTCVTCTBn 3aCTpeBaHnA CTeKKOB.
6. YctahOBtTe nepeKJIouaTeIb nITaHn B noJIoKeHne «L» (O3Haayet «Hn3Kaag CKOpocTb) ) nn «H» (O3Haayet «BbICOKaagCKOpocTb}), m MaunHa aBTOMaTHueckn HaHT HeT WHTb. Mbl peKomeHdyem Hn3KyHOCKOpocTb dA NaHauHApUxN (PncvHok 13).
- По Okончанн Bыкючтпе NepeКючаль ПИТАнь, OTCоeДиНe aДaNTep, NOBepHnTe МaxOBnK, YTO6bl NODHЯгу Do KOHua, POnDnHmITE PrnKHMHy IaNky, a 3aTeM OCTOpOxH O ChmIte TkaHb CO WBeHNo MaunHbI n OБржьт HnTb c NOMoUbIO o6pe3aTeJnHTn (PncyHok 14).
ПовскаЗк:
- PtoKnyIcTa, NOBepHnTe MAXOBnK, ecIn TpyDnHO ydaJIHTb TkaHb, a 3aTeMaKKypaTHo BbITrHnTe TkaHb.
- Ecnn Hntb 3anytaIacb nn 3aklnHnlo, noxayncTa, nobepHnte MaxOBnK n OndHOpeMeHHo cIerKa NotAHnTe Hntb, yTo6bl ocBODHTb Hntb. HxKnHn IyNbHbI MExaHN3M rBnEe TcBone ToHou cactbIO, He npabNbHbIe DeICTBnA MORyt NOBpeHtB erO. NoxayncTa, He hAnmaiTe n He TaHnTe erO naIbem nn KaKmN-Jn60 IHcTpymeHTamn.
PncyHok 11
PncyHOK 12

PucyHOK 13
PncyHok 14
OCOBEHHOCTN
1. Bb6op pucyHka cTeXkA
IIOBepHnTe DnCK BbIbopa 7a6LHOHa CTeKOB, YTO6bl BbIbpaTb OIN H 7a6LHO, KOtOpbI Bbl XOTnTe n3 12 7a6LHOB CTeKOB. PncyHKn CTeKOB npNBenDeHbI Ha KOpnyce MaunHbI dJa BaWei cnpaBKn.
BHHMaHHe:
- Npeed n3MeHeHem pncyHka cTeKka, noKaIyIcTa, BbIKIOHTe nepeKIOHTeJIb I NOBepHNTe MAXOBNK, TTO6bl NODHrtb ngly do KOHua, yTO6bl OHa He 3actprJa H He corHyIacb.
- I3MeHeHHe pncyHka cTeKka He dOnyckaetc, KOrda MaunHa pa6oTaET, B npOTNBOM cIyae Nrla n/nnMaunHa MoKeT 6bItb nobpeXkeHa.
2. PeBepchoe wntbe
Pebepchoe uHTbe (o6paTHa cTPOUka) noJe3HO dIyucJIeHn Haaya n KOHca wBOB. IJra nCpOJIb3OBAHn 3TOJ yHKcHn BblONHnTe CneDyIOuNe DeiCTBn:
1) 1)
2) Yto6bI cHOBa npoWntb Bnpei, npocTo OTnyCTte KHOkky o6paTHoro CTekka.
PpmeHHe: 6paTHoe WntBe npMeHMO ToIbKO K pncyHKam cTpoyeK c 1 no 4.
3. Hactpoika ckopoctn wntb
IpepeBte BbIKIOuateIb NHTAHnB NIOLOXeHne «L» HIN «H».(«L» = Hn3KaJ CKOpocTb; «H» = BblCOKaJCKOpocTb)
4. Повсевка
Ecnn Tpe6yeTc DOONHnTeIbHbI CBeT, HaxMMte BbIKIOuAteIb, YTO6bl BKIOUHTb CBeT. HaxMMte BbIKIOuAteIb eue pa3, YTO6bl BbIKIOuHTb erO. Pa60taIoUyI IamNy HeIb3aMeHNTb cMOCToTeIbHO.
5. Hnteo6pe3aTeIb
Y MaunHbI ecTb HnteO6pe3aTeB B ceHTpaIbHOJ leBOJ qacTN MaunHbI, OH MOKeT 6pe3aTb HHTb NocLe

6. Пошнв рукавов
3Ta 1a MaunHa 6bIa pa3pa6oTHa dIy 7tBpyKaBO Hn IIO6bIX y3Knx OTBepCTN B OdeJx. JIcunBaHn pyKaBO n3BLeKeTIe aun K n HaedeHbTe pykAB Ha nlaTphiOpMy.
7. BbIiBaaHne neTn
1) ПразанITE Ткань под ппхимную лankу и onyctinte ппхимную лankу на Ткань, Где вam Heo6xodmoСипь.netлio, 3aTeM bblберпte 15-юстpoчky.
2) BkIIOHTe BbIKIOHTeJI n npOWeIte 5-6 CTeKOB Ha Hn3KOckOpocTN, 3aTeM BbIKIOHTe nepeKIOHTeJI (PncyHOK 15).
3) BbIbepHTe 16-IO CTPOUky, BkJIIOHTe nepeKJIIOHTeJIb I npHSeIte TKAHb NOxOJaIeN DInHbI, 3aTeM BblKIOHTe nepeKJIIOHTeJIb. O6paTHe BHNMaHne, Heo6xOIMO DePkaTb CTeKKn No npraMoJ LHHN (PcCyHOK 16).
4) BbI6epHTe 15-IO CTPOUky, 3aTeM BkJIIOUHTe nepeKJIIOUaTeIb I npOSeIte 5-6 CTeJIKOB Ha Hn3KoN cKOpocTn, 3aTeM BblKIIIOUHTe nepeKJIIOUaTeIb (PncyHOK 17).
5)ПОДнIMNTe npnxMHyO JAnKy, NOBepHyB TkaHb Ha 180° (PucyHOK 18).
6) BbIbepnTe 16-IO cTPOuyK, 3aTeM BKJIouHrTe nepeKJIouHaTeIb I weIe Do Tex nop, noka neTJr He 6yJeT NOJIHOCTbIO BbIuHTa (PcCyHOK 19).
PncyHOK 15

PncyHOK 16
PncyHOK 17
PncyHok 18
PcyHOK 19
PpmeaHne.
Pnixmna Jana, noka3aHna Hnke, no3BolreT o6nBaHne neTeJb.
8. BbIbNHHoJ R
3TOT RAUNK npecdtablaet co6oN OTeJeHne dIa XpaHeHnA KCeCCyapOB, KOtOpoe MOxHO BbIDBHyTb, N B HEM MOxHO xpaHHTb 3anaChble KaTyuKN, INblI NT. d.
HAMOTKA UnybKN
- NomeCTnTe KaTyUkC HHTbIO Ha CtePKeHb UnyIbKn. (PncyHok 20)
- Побевпент Нов чебец Настяжни СК Намочно устюctва Stnyьк Ha BepxHe CTopoHeme MaunHbI. (PucyHok 21)
- Hanehbe Tnybky Ha TnT yctpoCTBa HAMOTK NynbKn, 6MOTAe ee HeckoBko pa3 no Yacobov CTpeKe. (PucyHok 22)
- HaxmTe Ha unyIbky BLeBO. (PucyHok 23)
- BkInoute MaunHy, yTo6bl Haayt bHaMOTky. (PucyHok 24)
-
BbIKHouHte MaunHy, yTo6bl OCTaHOBnTb HAMOTKy nOcne TOrO, KaK Ha KaTyuKe HAOMTaHa COOTBETCTBVIOUaH HNTb.
-
OToaBnHbTe uynbky ot ynopa HAMOTOHOro yCTpOcTBa, CHMNTe uynbky co cTepeKHa n o6peKbTe HHTb. (PncyHOK 25)
BHHMaHHe:
IpeedHAMOTKoN uynbKn noDHNMnTe npnKmHyIO JAnKy, BbIHbTe HxHIOO uynlbKy n BepXHOIO HHTb.
PncyHok 20
PucyHOK 21
PncyHok 22

PncyHOK 23
PucyHOK 24
PucyHok 25
PERYUNPOBKACTPOUKN
- KaK noka3aHO Ha pnc. A, HopMaIbHna cTpoUka DOJIxHa HMeTb BepXHOIO HIXHOIO HHTb paBHomepHO, Hn nepetaryTO, HN CBO6OdHO. (① = BepXHra HtB; ② = TKAHb; ③ = HIXHra HtB)
PucyHOK A
- Ecn HnKnHn Hntb BbIgIaHT kak npmaJ nnHn (PucyHcB), 3TO yKa3bIbaeT Ha To, qTo BepxHn HnTb cInskom Cbo6oHa. IooKanyIcTa, nobepHnte pyuKy hataKeHn BepxHe nHTn B HnPaBneHn 6oJIbWero Homepa, yTo6bl yBeIuHt bDaIbeHne, noka cTpoUka He BepHeTcK HopMe.

PcCyHOKB
- EcIn BepxHn Hntb BblrAHT, KaK npMaJ LHNn (PncyHOK C), 3TO yKa3bIbaeT Ha Ype3MePHyO HataKeHne BepxHe HtN. PoxaIyIcTa, NOBepHnte pykU HataKeHn BepxHe HtN B HapBaJIeHm C MeHbIIM HomepOM, UTo6bI yMeHbWntb DaJIeHne, Noka WOB He BepHETCa K HopMe.

TKAHb, INPIMEHMMAДЯ NOUHBA
The Netherlands (HnepnaHdbi)
Cnyk6a npdeppKKn KInHeHToB
TeN.: +31(0)23 3034369
3n.nouTa:info.nl@emerio.eu


- PARTS IDENTIFICATION
- Front view
- Back view
- USING THE FOOT PEDAL (A) AND ADAPTOR (B)
- Caution:
- NEEDLE REPLACEMENT
- PRESSER FOOT REPLACEMENT
- Removing the presser foot
- Installing the presser foot
- THREADING THE SEWING MACHINE
- Threading upper thread
- Replacing the bottom bobbin
- SEWING
- Tips:
- FEATURES
- Selection of stitch pattern
- Reverse sewing
- Setting the sewing speed
- Working lamp
- Thread cutter
- Sewing sleeves
- Manual buttonhole
- Note:
- Drawer
- WINDING THE BOBBIN
- ADJUSTING STITCHING
- Sewing effective:
- MORE TIPS
- TECHNICAL DATA:
- GUARANTEE AND CUSTOMER SERVICE
- ENVIRONMENT FRIENDLY DISPOSAL
- Customer service:
- SICHERHEITSHINWEISE
- ATT ANVANDA FOTPEDAL (A) OCH ADAPTER (B)
- 3aMeHa HxKHei uynbKn
- BHHMaHHe:
- ПОШИВ
- ПовскаЗк:
- OCOBEHHOCTN
- Bb6op pucyHka cTeXkA
- PeBepchoe wntbe
- Hactpoika ckopoctn wntb
- Повсевка
- Hnteo6pe3aTeIb
- Пошнв рукавов
- BbIiBaaHne neTn
- PpmeaHne.
- BbIbNHHoJ R
- HAMOTKA UnybKN
- PERYUNPOBKACTPOUKN
- Cnyk6a npdeppKKn KInHeHToB
Brand : Emerio
Model : SEW121821
Category : Sewing machine