
VCE121218 - Vacuum Cleaner Emerio - Free user manual and instructions
Find the device manual for free VCE121218 Emerio in PDF.
| Brand | Emerio |
| Model | VCE121218 |
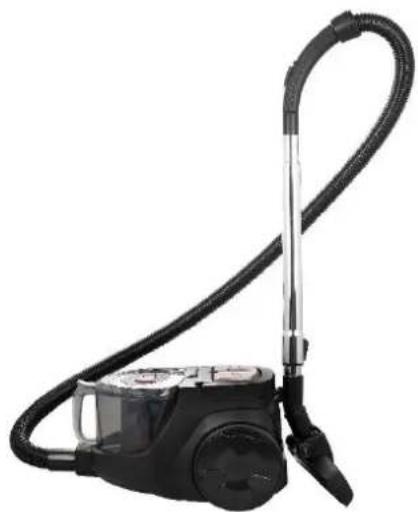
| Vacuum cleaner type | Canister (with dustbin) |
| Collection type | Bagless (dustbin) |
| Power supply | Mains (220-240 V, 50/60 Hz) |
| Suction power | Adjustable (min, medium, max) |
| Filtration | Washable HEPA filter and motor protection filter |
| Dustbin capacity | Approximately 1.5 L (MAX level) |
| Cord length | Approximately 6 m (with yellow and red marks) |
| Automatic cord rewind | Yes (rewind button) |
| Included accessories | Floor brush, telescopic tube, flexible hose |
| Usage | Hard floors, carpets, rugs, furniture |
| Filter maintenance | Regular cleaning (dustbin, motor filter every 6 months, HEPA filter every 6 months or as needed) |
| Safety | Unplug before maintenance, do not vacuum hot or sharp objects |
| Warranty | 2 years |
| Standards | Compliant with EN 60312-1 and EU regulation 666/2013 |
| Storage | Vertical position to save space |
| Weight | Approximately 4.5 kg |
Frequently Asked Questions - VCE121218 Emerio
User questions about VCE121218 Emerio
0 question about this device. Answer the ones you know or ask your own.
Ask a new question about this device
Download the instructions for your Vacuum Cleaner in PDF format for free! Find your manual VCE121218 - Emerio and take your electronic device back in hand. On this page are published all the documents necessary for the use of your device. VCE121218 by Emerio.
USER MANUAL VCE121218 Emerio
natural_image
White and black vacuum cleaner with blue filter and yellow top (no visible text or symbols)Instruction manual – English ...... - 9 -
Navodila za uporabo – Slovenian.... - 16 -
natural_image
Black vacuum cleaner with attached hose and control panel (no visible text or symbols)natural_image
Three views of a black vacuum cleaner with labeled components: handle, fan, and lid (no text or symbols on the device itself)MOTORSCHUTZFILTER REINIGEN
natural_image
Interior view of a black handheld device with labeled component A (no text or symbols beyond label)HEPA-FILTER DES LUFTAUSLASSES REINIGEN.
natural_image
Close-up of a black electric heater with a hand inserting a grid into its side panel (no visible text or symbols)
natural_image
Close-up of a black electronic device with internal components and a grid of small accessories (no visible text or symbols)natural_image
Black vacuum cleaner with coiled hose and control panel (no visible text or symbols)TECHNISCHE DATEN
Before use make sure to read all of the below instructions in order to avoid injury or damage, and to get the best results from the appliance. Make sure to keep this manual in a safe place. If you give or transfer this appliance to someone else make sure to also include this manual.
In case of damage caused by user failing to follow the instructions in this manual the warranty will be void. The manufacturer/importer accepts no liability for damages caused by failure to follow the manual, a negligent use or use not in accordance with the requirements of this manual.
-
This appliance can be used by children aged from 8 years and above and persons with reduced physical, sensory or mental capabilities or lack of experience and knowledge if they have been given supervision or instruction concerning use of the appliance in a safe way and understand the hazards involved.
-
Children shall not play with the appliance.
-
Cleaning and user maintenance shall not be made by children without supervision.
-
If the supply cord is damaged, it must be replaced by the manufacturer, its service agent or similarly qualified persons in order to avoid a hazard.
-
Before inserting the plug into the mains socket, please check that the voltage and frequency comply with the specifications on the rating label.
-
Disconnect the mains plug from the socket when the appliance is not in use and before cleaning.
-
Ensure that the mains cable is not hung over sharp edges and keep it away from hot objects and open flames.
-
Do not immerse the appliance or the mains plug in water or other liquids. There is danger to life due to electric shock!
-
To remove the plug from the plug socket, pull the plug. Do not pull the power cord.
-
Do not touch the appliance if it falls into water. Remove the plug from its socket, turn off the appliance and send it to an authorized service center for repair.
- Do not plug or unplug the appliance from the electrical outlet with a wet hand.
- Never attempt to open the housing of the appliance, or to repair the appliance yourself. This could cause electric shock.
- Never leave the appliance unattended during use.
- This appliance is not designed for commercial use.
- Do not use the appliance for other than intended use.
- Do not wind the cord around the appliance and do not bend it.
- The use of accessory attachment not recommended by the appliance manufacturer may cause injuries.
- Do not put any object into openings. Do not use with any opening blocked. Keep free of dust, lint, hair and anything that may reduce airflow.
- Do not pick up hard or sharp objects such as glass, nails, screws, coins, etc.
- Do not pick up hot coals, cigarette, matches or any hot, smoking, or burning objects.
- Do not use this appliance without filters in place.
- Use extra care when vacuuming on stairs.
- Do not pick up flammable or combustible materials (lighter fluid, gasoline, etc.) or use in the presence of explosive liquids or vapor.
- Do not pick up toxic material (chlorine bleach, ammonia, drain cleaner, etc.).
- Do not operate the appliance in an enclosed space filled with vapors given off by oil based paints, paint thinner, moth proofing, flammable dust, or other explosive or toxic vapors.
- Keep your work area well dry.
- Do not use the cleaner to clean your pets or any animal.
- When using and you hear a squeaking sound from the
vacuum cleaner, or suction power appears to be reduced, stop the machine immediately and clean all filters.
-
WARNING: Hold the plug when rewinding the cord. Do not allow the cord to whip when rewinding.
-
Tip: By reducing the suction power you can move the floor brush easier on the floor. Set the suction power to minimal for furniture, to medium for carpet and hard floors. Only use the maximum setting on hard floors in combination with a brush for hard floors.
The general purpose vacuum cleaner (model 89980104), has been tested according to EN 60312-1 and complies with the essential requirements of regulation (EU) 666/2013 for vacuum cleaners.
USE AND FUNCTION
Assembling vacuum cleaner
Note:
Always remove the power plug from the wall outlet before assembling or removing accessories.
- Attaching the Flexible Hose into the vacuum cleaner. Align the rim and insert the flexible hose into the air inlet socket.
natural_image
Black vacuum cleaner with attached hose and control panel (no visible text or symbols)-
Fitting the tube to the curved wand/hose extension. Push the tube into the curved wand/hose extension.
-
Fitting the floor brush to the tube. Push the tube into the floor brush. Adjust the tube to the desired length. Tip: By reducing the suction power you can move the floor brush easier on the floor. Set the suction power to minimal for furniture, to medium for carpet and hard floors. Only use the maximum setting on hard floors in combination with a brush for hard floors.
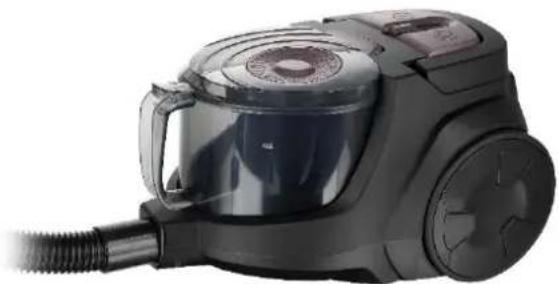
BUTTON FUNCTION INTRODUCTION
Note:
Once all attachments are in place, unwind a sufficient length of cable and insert the plug into the wall outlet. A yellow mark on the power cord shows the ideal cable length. Do not pull the power cord beyond the red mark.
-
Insert the power plug into the wall outlet.
-
Press the on/off button located on the unit to turn the vacuum cleaner "on". To adjust the suction, slide the speed control button to control the suction power of the vacuum cleaner.
-
To rewind the power cord, press the cord rewind button with one hand and guide the power cord with the other hand to ensure that it does not whip causing damage or injury.
CLEAN THE DUST CUP
Note the MAX level on the dust cup in case it becomes too full. To clean the dust cup, follow the steps below.
Warning: Always unplug the unit from electrical outlet before getting out the dust cup.
- Press the dust cup release button and hold the dust cup out.
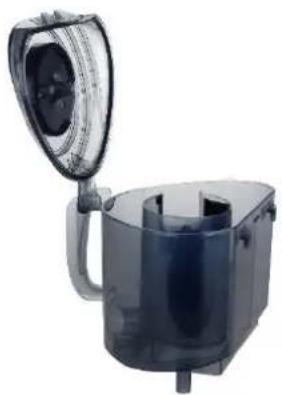
- Pull out the clip of the dust cup to open the dust cup cover.

natural_image
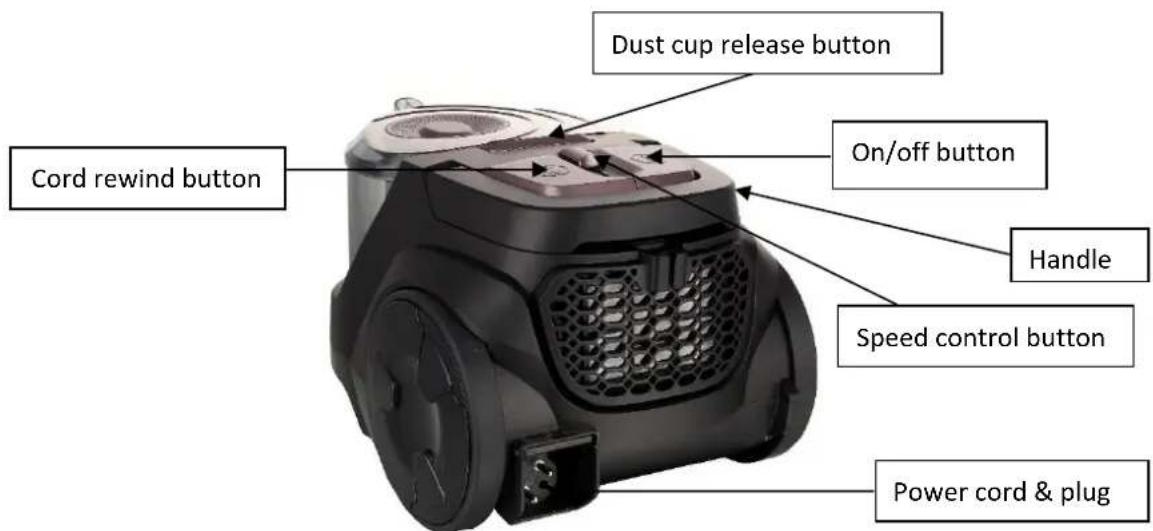
Three views of a black vacuum cleaner with labeled clip and open lid (no text or symbols on device)CLEAN THE MOTOR PROTECTION FILTER
- First, take out the dust cup.
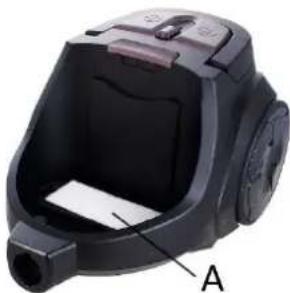
- You will find the motor protection filter (A) on the machine. Take the filter out for cleaning. Dry it thoroughly before placing it back.
- The motor protection filter should be removed and rinsed twice a year or whenever it is visibly clogged.
- If the filter is damaged, a new filter should be replaced.
natural_image
Interior view of a black handheld device with labeled component A (no text or symbols beyond label)CLEAN THE HEPA AIR OUTLET FILTER
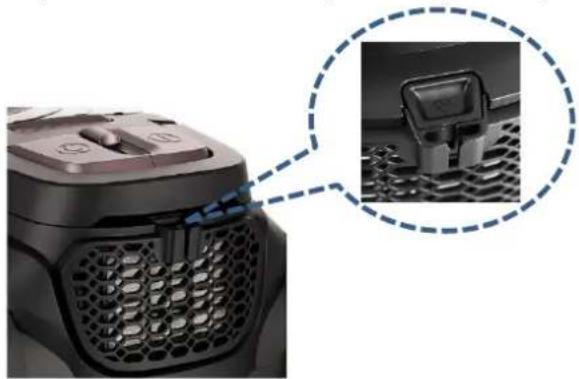
- Press the top of the air outlet cover to unclip the cover.
- Press and unclip the Hepa air outlet filter from the side.
- Clean the Hepa air outlet filter. Dry it thoroughly before placing it back.
- Put back the air outlet cover after the filter is placed back.

natural_image
Close-up of a black industrial air purifier with mesh grille and control panel, showing a close-up inset of its device (no text or symbols visible)
natural_image
Close-up of a hand inserting a grid into a black plastic component (no visible text or symbols)
Please note:
The Hepa filter in the cleaner will become dusty over time. This is normal and will not affect the performance of the filter. If the Hepa filter is so dusty that suction does not return to 100%, we suggest that the filter be removed then rinsed under the faucet and allowed to dry for 24 hours by airing not near the fire or some high temperature objects before refitting into the vacuum. This should be done at least every six months or when suction appears to be reduced obviously.
Note:
The suction hole must be open, free of any obstructions at all times. Otherwise, the motor will overheat and could become damaged.
Important:
All filters should be checked regularly for signs of damage, preferably after each cleaning task. The filters must be replaced immediately if they become damaged. Always disconnect the vacuum from the electrical outlet when checking the filters.
Parking:
This vacuum cleaner can be parked as below style to save your room space.
natural_image
Black vacuum cleaner with coiled hose and control panel (no visible text or symbols)TECHNICAL DATA
Voltage: 220-240V \~ 50-60Hz
Power: 800W
GUARANTEE AND CUSTOMER SERVICE
Before delivery our devices are subjected to rigorous quality control. If, despite all care, damage has occurred during production or transportation, please return the device to your dealer. In addition to statutory legal rights, the purchaser has an option to claim under the terms of the following guarantee:
For the purchased device we provide 2 years guarantee, commencing from the day of sale. If you have a defective product, you can directly go back to the point of purchase.
Defects which arise due to improper handling of the device and malfunctions due to interventions and repairs by third parties or the fitting of non-original parts are not covered by this guarantee. Always keep your receipt, without the receipt you can't claim any form of warranty. Damage caused by not following the instruction manual, will lead to a void of warranty, if this results in consequential damages then we will not be liable. Neither can we hold responsible for material damage or personal injury caused by improper use if the instruction manual is not properly executed. Damage to accessories does not mean free replacement of the whole appliance. In such case please contact our service department. Broken glass or breakage of plastic parts is always subject to a charge.
Defects to consumables or parts subjected to wearing, as well as cleaning, maintenance or the replacement of said parts are not covered by the warranty and are to be paid.
ENVIRONMENT FRIENDLY DISPOSAL
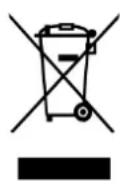
Recycling – European Directive 2012/19/EU
This marking indicates that this product should not be disposed with other household wastes. To prevent possible harm to the environment or human health from uncontrolled waste disposal, recycle it responsibly to promote the sustainable reuse of material resources. To return your used device, please use the return and collection systems or contact the retailer where the product was
purchased. They can take this product for environmental safe recycling.
natural_image
Black vacuum cleaner with attached hose and filter (no visible text or symbols)natural_image
Close-up of hands operating a black vacuum cleaner with control panel (no visible text or symbols)

natural_image
Exterior view of a modern office building (no signage)ČIŠČENJE ZAŠČITNEGA FILTRA MOTORJA
natural_image
Interior view of a black vacuum cleaner device with labeled component A (no text or symbols beyond label)ČIŠČENJE HEPA FILTRA ODPRTINE ZA ODVOD ZRAKA
- Pritisnite na zgornjo stran pokrova odprtine za odvod zraka, da jo odprete.
- Pritisnite na hepa filter odvoda zraka in ga odstranite s strani.
- Očistite hepa filter. Preden ga ponovno vstavite ga temeljito posušite.
- Po ponovni namestitvi filtra ponovno pritrdite pokrov odvoda zraka.
natural_image
Close-up of a black industrial air purifier with mesh grille and control panel, showing a close-up inset of its internal components (no text or symbols visible)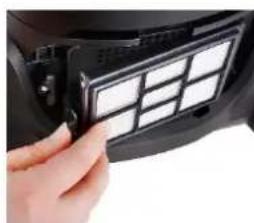
natural_image
Close-up of a hand inserting a grid into a black plastic component (no visible text or symbols)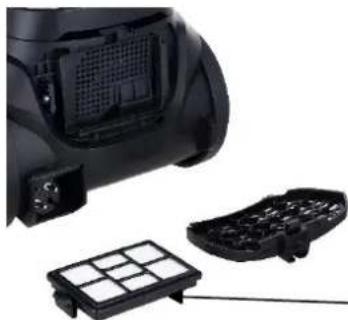
natural_image
Close-up of a black industrial device with internal components and a grid-patterned base (no visible text or symbols)natural_image
Black vacuum cleaner with coiled hose and control panel (no visible text or symbols)TEHNIČNI PODATKI
Delovna napetost: 220-240 V \~ 50-60 Hz
Moč: 800 W
GARANCIJA IN SERVIS
natural_image
Black vacuum cleaner with attached hose and filter (no visible text or symbols)natural_image
Interior view of a black vacuum cleaner device with labeled component A (no text or symbols beyond label)natural_image
Close-up of a black electric heater with a hand inserting a grid into its back panel (no visible text or symbols)
natural_image
Close-up of a black industrial device with internal components and a grid-patterned base (no visible text or symbols)natural_image
Black vacuum cleaner with coiled hose and handle (no visible text or symbols)MÜSZAKI ADATOK
natural_image
Black vacuum cleaner with attached hose and control panel (no visible text or symbols)natural_image
Close-up of hands operating a black vacuum cleaner with control panel (no visible text or symbols)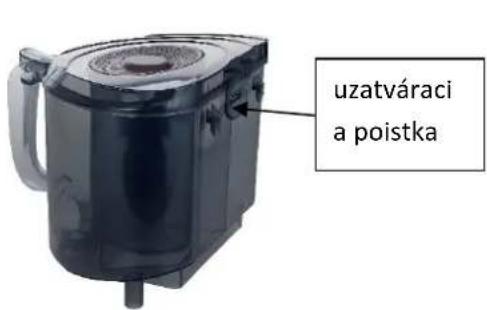

natural_image
Exterior view of a modern office building (no signage)ČISTENIE OCHRANNÉHO FILTRA MOTORA
natural_image
Interior view of a black handheld device with labeled component A (no text or symbols beyond label)ČISTENIE HEPA FILTRA A VÝPUSTU VZDUCHU
natural_image
Close-up of a black electric vehicle hood with mesh grille and control buttons, accompanied by an inset close-up of the seat (no text or symbols visible)
natural_image
Close-up of a hand inserting a grid into a device panel (no visible text or symbols)
natural_image
Close-up of a black industrial device with internal components and a grid of small electronic modules (no visible text or symbols)natural_image
Black vacuum cleaner with coiled hose and handle (no visible text or symbols)TECHNICKÉ ÚDAJE
natural_image
Black vacuum cleaner with attached hose and filter (no visible text or symbols)natural_image
Close-up of hands operating a black vacuum cleaner with control panel (no visible text or symbols)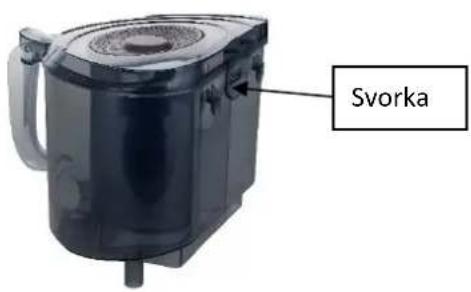
natural_image
Exterior view of a modern office building (no signage)ČIŠTĚNÍ OCHRANNÉHO FILTRU MOTORU
natural_image
Close-up of a black vacuum cleaner head with labeled component A (no text or symbols beyond label)ČIŠTĚNÍ HEPA FILTRU VÝSTUPU VZDUCHU
natural_image
Close-up of a black electric heater with mesh grille and control panel, showing a close-up of its internal components (no text or symbols visible)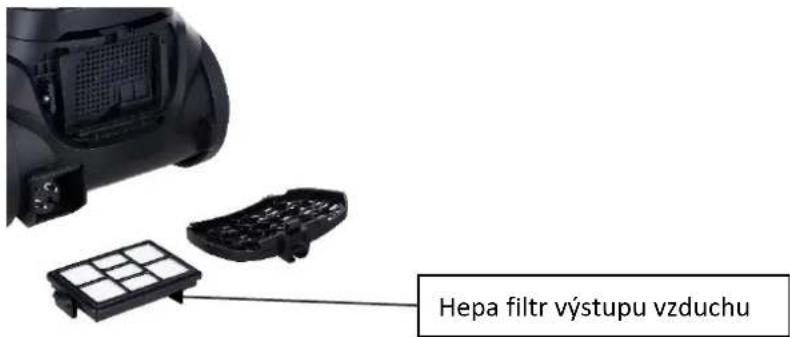
natural_image
Black vacuum cleaner with coiled hose and handle (no visible text or symbols)TECHNICKÉ ÚDAJE
natural_image
Black vacuum cleaner with attached hose and filter (no visible text or symbols)natural_image
Close-up of hands operating a black vacuum cleaner with control panel (no visible text or symbols)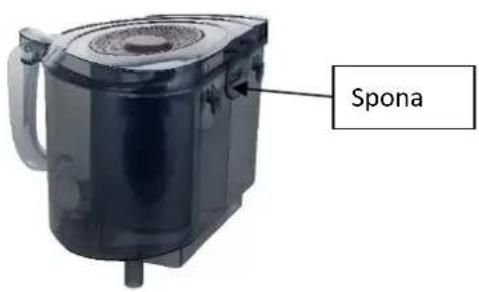

natural_image
Exterior view of a modern office building (no signage)ČIŠĆENJE FILTERA ZAŠTITNOG MOTORA
- Prvo uklonite spremnik za prašinu.
- Zaštitni filter motora (A) nalazi se na uređaju. Uklonite filter za čišćenje. Temeljito osušite prije nego što ga vratite na mjesto.
- Filter za zaštitu motora treba uklanjati i ispirati dva puta godišnje ili kad je vidljivo začepljen.
- Ako je filter oštećen, mora se zamijeniti.

natural_image
Black and white photo of a vacuum cleaner's head with labeled component A (no text or symbols beyond label)OČISTITE HEPA FILTER ZRAČNOG IZLAZA.
natural_image
Close-up of a black electric heater with mesh grille and control panel, showing a close-up of its internal components (no text or symbols visible)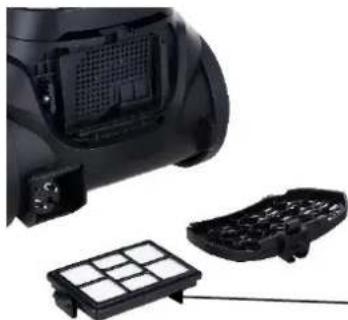
natural_image
Close-up of a black industrial device with internal components and a grid-patterned base (no visible text or symbols)natural_image
Black vacuum cleaner with coiled hose and control panel (no visible text or symbols)TEHNIČKI PODACI
Nazivni napon: 220-240 V \~ 50-60 Hz
Nazivna snaga: 800 W
JAMSTVO I SERVIS
natural_image
Black vacuum cleaner with attached hose and filter (no visible text or symbols)natural_image
Interior view of a black and white handheld device with labeled component A (no text or symbols beyond label)CURĂȚARE FILTRU HEPA PENTRU ORIFICIUL DE ELIBERARE A AERULUI.
natural_image
Close-up of a black industrial device with a mesh grille and control panel, accompanied by an inset photo of a mechanical device (no visible text or symbols)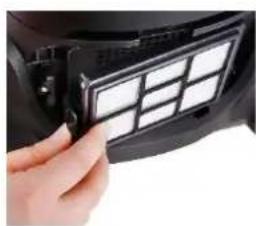
natural_image
Close-up of a hand inserting a grid into a device panel (no visible text or symbols)
natural_image
Close-up of a black electronic device with internal components and a grid of small accessories (no visible text or symbols)natural_image
Black vacuum cleaner with coiled hose and handle (no visible text or symbols)DATE TEHNICE
Tensiune de functionare: 220-240 V \~ 50-60 Hz
Putere: 800 W
GARANTIE ŞI SERVICIU CLIENTI
natural_image
Black vacuum cleaner with attached hose and control panel (no visible text or symbols)natural_image
Interior view of a black mechanical device with labeled component A (no text or symbols beyond label)CZYSZCZENIE FILTRA HEPA WYLOTU POWIETRZA
natural_image
Close-up of a black electric heater with mesh grille and control panel, showing internal components and a close-up of its device (no text or symbols visible)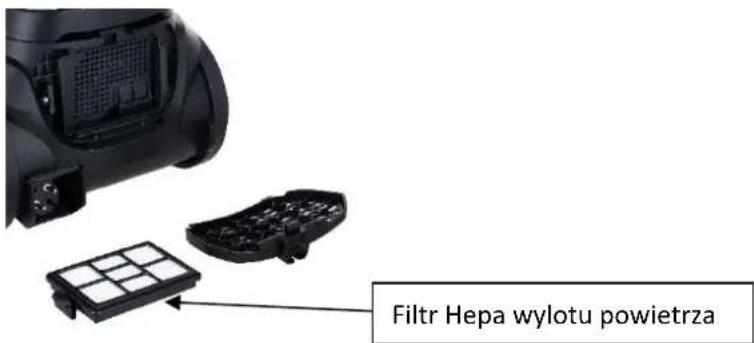
natural_image
Black vacuum cleaner with coiled hose and control panel (no visible text or symbols)DANE TECHNICZNE
natural_image
Black vacuum cleaner with attached hose and filter (no visible text or symbols)natural_image
Three views of a black vacuum cleaner with labeled parts: handle, lid, and lid clamp (no text or symbols on the devices themselves)NETTOYAGE DU FILTRE DE PROTECTION DU MOTEUR
natural_image
Interior view of a black vacuum cleaner device with labeled component A (no text or symbols beyond label)NETTOYAGE DU FILTRE DE LA SORTIE D'AIR HEPA
natural_image
Close-up of a black electric heater with a hand inserting a grid into its air vent (no text or symbols visible)
natural_image
Black vacuum cleaner with coiled hose and control panel (no visible text or symbols)CARACTERISTIQUES TECHNIQUES
Tension de service: 220-240V \~ 50-60Hz
Puissance: 800W
GARANTIE ET SERVICE APRÈS-VENTE

- MOTORSCHUTZFILTER REINIGEN
- HEPA-FILTER DES LUFTAUSLASSES REINIGEN.
- TECHNISCHE DATEN
- USE AND FUNCTION
- Assembling vacuum cleaner
- Note:
- BUTTON FUNCTION INTRODUCTION
- CLEAN THE DUST CUP
- CLEAN THE MOTOR PROTECTION FILTER
- CLEAN THE HEPA AIR OUTLET FILTER
- Please note:
- Important:
- Parking:
- TECHNICAL DATA
- GUARANTEE AND CUSTOMER SERVICE
- ENVIRONMENT FRIENDLY DISPOSAL
- ČIŠČENJE ZAŠČITNEGA FILTRA MOTORJA
- ČIŠČENJE HEPA FILTRA ODPRTINE ZA ODVOD ZRAKA
- TEHNIČNI PODATKI
- GARANCIJA IN SERVIS
- MÜSZAKI ADATOK
- ČISTENIE OCHRANNÉHO FILTRA MOTORA
- ČISTENIE HEPA FILTRA A VÝPUSTU VZDUCHU
- TECHNICKÉ ÚDAJE
- ČIŠTĚNÍ OCHRANNÉHO FILTRU MOTORU
- ČIŠTĚNÍ HEPA FILTRU VÝSTUPU VZDUCHU
- ČIŠĆENJE FILTERA ZAŠTITNOG MOTORA
- OČISTITE HEPA FILTER ZRAČNOG IZLAZA.
- TEHNIČKI PODACI
- JAMSTVO I SERVIS
- CURĂȚARE FILTRU HEPA PENTRU ORIFICIUL DE ELIBERARE A AERULUI.
- DATE TEHNICE
- GARANTIE ŞI SERVICIU CLIENTI
- CZYSZCZENIE FILTRA HEPA WYLOTU POWIETRZA
- DANE TECHNICZNE
- NETTOYAGE DU FILTRE DE PROTECTION DU MOTEUR
- NETTOYAGE DU FILTRE DE LA SORTIE D'AIR HEPA
- CARACTERISTIQUES TECHNIQUES
- GARANTIE ET SERVICE APRÈS-VENTE
Brand : Emerio
Model : VCE121218
Category : Vacuum Cleaner