
UVC-123263 - Vacuum Cleaner Emerio - Free user manual and instructions
Find the device manual for free UVC-123263 Emerio in PDF.


| Brand | Emerio |
| Model | UVC-123263 |
| Product Type | Handy / Stick Vacuum Cleaner |
| Battery Voltage | 25.9 V DC |
| Rated Power | 220 W |
| Adapter Input | 100-240 V~, 50/60 Hz |
| Adapter Output | 31 V DC, 0.5 A |
| Charging Time | Approx. 4.5 hours |
| Modes | Manual (ECO, MID, BOOST) and Auto |
| Indicators | Battery pilot light (4 levels), Auto mode light, Clog warning indicator |
| Dust Cup Capacity | Marked with MAX level; empty when full |
| Filtration System | HEPA filter, pre-filter, mesh filter |
| Filter Maintenance | Clean every 2 weeks (air dry only); replace HEPA if suction decreases |
| Attachments Included | Floor brush A (soft roller for hard floors), Floor brush B (hard roller for carpets), Crevice nozzle, Dusting brush, Extension tube |
| Floor Brush A | Soft brush rollers, ideal for sensitive hard floors |
| Floor Brush B | Hard brush roller, ideal for carpets |
| Wall-Mounting | Charging seat can be wall-mounted; recommended height 110 cm |
| Battery Type | Non-replaceable built-in battery pack |
| Warranty | 3 years |
| Color | Red and black |
| Safety Certifications | CE, WEEE compliant |
Frequently Asked Questions - UVC-123263 Emerio
User questions about UVC-123263 Emerio
0 question about this device. Answer the ones you know or ask your own.
Ask a new question about this device
Download the instructions for your Vacuum Cleaner in PDF format for free! Find your manual UVC-123263 - Emerio and take your electronic device back in hand. On this page are published all the documents necessary for the use of your device. UVC-123263 by Emerio.
USER MANUAL UVC-123263 Emerio
Handy vacuum cleaner (EN)
natural_image
Red and black vacuum cleaner with blue internal components, isolated on white background (no text or symbols visible)Content – Sisukord – Saturs – Turinys
Instruction manual – English.... - 2 -
Kasutusjuhend – Estonian ...... - 11 -
Instrukciju rokasgrāmata – Latvian.... - 21 -
Instrukciju vadovas – Lithuanian ...... - 31 -
SAFETY INSTRUCTIONS
Before use make sure to read all of the below instructions in order to avoid injury or damage, and to get the best results from the appliance. Make sure to keep this manual in a safe place. If you give or transfer this appliance to someone else make sure to also include this manual.
In case of damage caused by user failing to follow the instructions in this manual the warranty will be void. The manufacturer/importer accepts no liability for damages caused by failure to follow the manual, a negligent use or use not in accordance with the requirements of this manual.
- This appliance can be used by children aged from 8 years and above and persons with reduced physical, sensory or mental capabilities or lack of experience and knowledge if they have been given supervision or instruction concerning use of the appliance in a safe way and understand the hazards involved.
- Children shall not play with the appliance.
- Cleaning and user maintenance shall not be made by children without supervision.
- Detachable supply unit
WARNING: For the purposes of recharging the battery, only use the detachable supply unit provided with this appliance.
- This appliance contains batteries that are non-replaceable.
- Ensure that the mains cable is not hung over sharp edges and keep it away from hot objects and open flames.
- Do not immerse the appliance or the mains plug in water or other liquids. There is danger to life due to electric shock!
- To remove the plug from the plug socket, pull the plug. Do not pull the power cord.
- Never attempt to open the housing of the appliance, or to repair the appliance yourself. This could cause electric shock.
-
Never leave the appliance unattended during use.
-
This appliance is not designed for commercial use. For household use only.
- Do not use the appliance for other than intended use.
- Do not wind the cord around the charger and do not bend it.
- Close supervision is necessary for any appliance being used by or near children. Do not leave the system unattended while connected. Keep hair, loose clothing, fingers and all parts of body away from opening and moving parts.
- Do not use to pick up flammable or combustible liquids such as gasoline or use in areas where they may be present.
- Do not pick up anything that is burning or smoking such as cigarettes, matches or hot ashes.
- Use extra care when cleaning on stairs.
- Do not use the appliance without the dust cup and all filters in place.
- The use of accessory attachment not recommended by the appliance manufacturer may cause injuries.
- Do not put any objects into openings. Do not use with any opening blocked. Keep free of dust, lint, hair and anything else that may reduce air flow.
- Use only on dry surfaces.
- Important: If the suction opening in the unit is blocked, switch off the appliance and remove battery. Clear all obstructions before returning battery to vacuum and powering on again.
- Do not operate the appliance too close to heaters, radiators or cigarette butts.
- Before you start vacuuming, make sure to remove large or sharp objects that might damage the dust cup filter.
- The appliance is only to be used with the power supply unit provided with the appliance.
- The charger must be removed from the socket before removing the battery.
-
Use the included charger to charge the vacuum cleaner and do not use the charger for other purposes.
-
Do not vacuum up hard or sharp objects such as glass, nails, screws or coins that could damage the vacuum. Do not vacuum up drywall dust, fireplace ash, or embers. Do not use as an attachment to power tools for dust collection.
-
Do not vacuum up toxic solutions (e.g., chlorine bleach, ammonia, or drain cleaner).
-
Keep the vacuum moving over the carpet surface at all times to avoid damaging the carpet fibres.
-
Always turn off the appliance before connection or disconnecting attachments.
-
In an emergency situation contact professional help immediately.
-
Leaks from the battery cells can occur under extreme conditions. Do not touch any liquid that leaks from the battery. If the liquid that gets on skin wash immediately with soap and water. If the liquid gets into the eyes, flush them immediately with clean water for a minimum of 10 minutes and seek medical attention. Wear gloves to handle the battery and dispose of immediately in accordance with local regulations.
-
When the battery pack is not in use, keep it away from paper clips, coins, keys, nails, screws or other small metal objects that could make a connection from one terminal to another
-
DO NOT charge appliance while powered on.
-
If the appliance is to be stored unused for a long period, remove the battery pack.
-
Battery pack should not be exposed to or submerged in any water, salt water, or other liquids.
-
Keep battery pack away from heated surfaces.
-
DO NOT charge battery pack at temperatures below 32^ F ( 0^ C) or above 122^ F ( 50^ C)
-
DO NOT expose battery pack or appliance to fire or temperature above 266°F (130°C) as it may cause explosion.
-
Battery pack should not be stored at temperatures below - 4°F (-20°C) or above 113°F (45°C) to maintain long-term battery life
PARTS DESCRIPTION
- Battery pack
- Handle
- Power button
- Speed button
- Auto mode and speed indicators
- Battery pilot light
- Clog warning indicator
- Dust cup
- Dust cup release button
- Accessory release button
- Suction hole opening
- Extension tube
- Tube adjusting button
- Floor brush A
- Floor brush B
- Crevice nozzle
- Dusting brush
- Charging seat/ wall-mounted bracket
- Charging adapter

Floor brush A: with soft brush rollers, perfect for hard floors, especially sensitive wood floor. Pick up coarse and fine dirt at the same time.
Floor brush B: with hard brush roller, perfect for carpets. Pick up debris below the surface of your carpets.
Dusting brush: for removing fine dust and particles from curtains and other delicate surface.
Crevice nozzle: for corners, niches and other hard-to-reach places, such as car seat and mat, picture frame, etc.
HOW TO WALL-MOUNT CHARGING SEAT:
- Measure the distance between the holes situated at the back of the bracket and drill three holes in the wall with the same distance.
- Put the expansion bolts into the holes and then use the screws to fix the bracket onto the wall.
- Pay attention to the height of the bracket mounted. Recommended installation height is 110 cm.
Make sure there are no gas, water or electrical cables and wires behind the mounting area before drilling.

BATTERY CHARGING:
- First, install the battery pack. Push the battery pack into the slot on the back of the main unit until it clicks into place. (Fig. 1)
To remove the battery pack, pinch the release buttons on both sides of the battery pack and pull the battery pack out of the main unit.

natural_image
Exterior view of a modern vacuum cleaner with blue internal components and a close-up of its lid (no text or symbols visible)(Fig. 1)
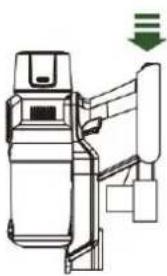
- Simply dock the appliance into the charging seat for re-charging (Fig.2). Plug the charging adapter into the power socket.
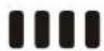
- While charging, the pilot light will blinking; when the charging is finished, the pilot light will stay lit.
- After charging, unplug first, then you can take out the appliance for cleaning or let it rest on charging seat.
Note:
- Do not let the appliance uncharged for a long time, because the inner accumulators may be damaged.
- It takes approx. 4.5 hours to fully charge.
- The connector of the charging adapter is integrated in the charging seat. To use the adapter separately, use a screwdriver to remove the screw and open the cover, then remove the connector from the charging seat.
(Fig. 3)

natural_image
Diagram of two identical mechanical device configurations with downward arrows indicating motion or force (no text or symbols)Fig. 2

Fig. 3
Battery pilot light:

100%
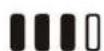
75%

50%

25%

0%
Recharge the appliance when the power level is lower than 25%.
OPERATION
- Assemble the battery pack into the main body.
- Insert the extension tube into the suction hole opening; make sure it fits firmly. Press the tube adjusting button to adjust the length of the tube to suit your cleaning requirements.
- Attach your desired attachment to the other side of the extension tube; make sure it fits firmly. (Fig. 4)

(Fig. 4)
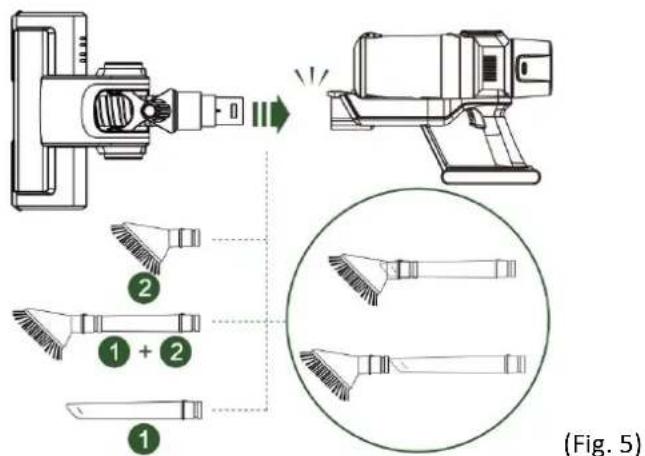
- For short-reach cleaning, you can attach your desired attachment directly to the suction hole opening. Once the click sound is heard, the nozzle is properly locked. (Fig. 5)
-
Press the power button to turn on the appliance. The appliance enters manual mode by default. The battery pilot light will illuminate. Press power button again to turn off the appliance.
-
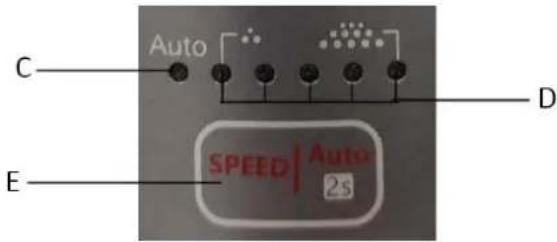
Mode selection: (Fig. 6)
1) Manual mode: in manual mode you can press speed button (E) to adjust the speed (ECO speed, MID speed or BOOST speed).
Lights D stand for speed:
1 of the lights D on: ECO speed; --- low power
3 of the lights D on: MID speed; --- mid power
All of the lights D on: BOOST speed. --- high power
2) Auto mode: the appliance automatically adjusts speed and power by sensing different floor types to maximize battery life. Auto mode light C will illuminate.
3) How to switch from manual mode to auto mode: long press the speed button (E) for 2 seconds; How to switch from auto mode to manual mode: short press the speed button (E) once.
(Fig. 6)
NOTE: During use, please pay attention to the dust capacity and do not exceed the "MAX" level indicated on the dust cup. This appliance is for dry suction only.
Caution: The suction hole opening must be open and free of any obstructions at all times. Otherwise, the motor will overheat and could become damaged.
CLEANING AND MAINTENANCE
- Before cleaning the product, turn off power and remove the battery pack.
- Do not immerse the main unit, battery pack, recharge seat, adapter and floor brushes in water or any other liquids.
- Use only a soft dry cloth to clean the appliance.
- Do not use aggressive chemicals or abrasives.
- Do not use the device if the filter is broken or worn out.
- The unit does not contain parts serviceable by you, do not disassemble it and do not try to repair it yourself.
- Store the appliance indoors. Ensure the appliance is at room temperature before operating.
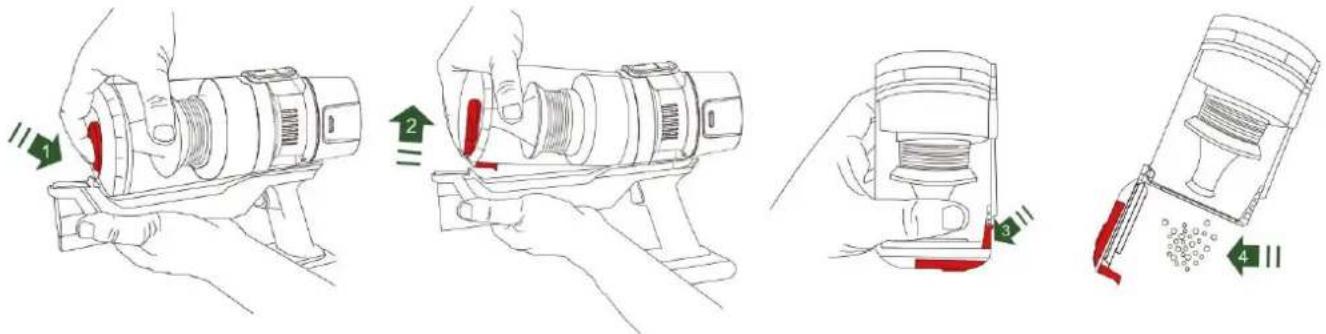
1. How to empty the dust cup:
1) To empty dust cup, first turn off power and disconnect all attachments.
2) Press the dust cup release button. Pull up the dust cup to remove it from the main unit.
3) Hold the dust cup over a bin.
4) Unlock the dust cup buckle to open the dust cup lid. If necessary, tap the dust cup on the side or top to remove excess dirt.
2. How to clean the dust cup filter:
1) First remove the dust cup from the main unit and empty it.
2) Remove HEPA filter, pre-filter and mesh filter in sequence, and wash them under running water. Then air dry completely before placing them back in the dust cup. AIR DRY ONLY.

Note:
(1) Clean the dust cup filter every two weeks or so (depending on usage).
(2) To ensure peak performance of the appliance, if the HEPA filter cannot be well cleaned or the suction of the appliance is decreasing, it is the time to replace the HEPA filter.
3. How to clean the brush rollers
1) First turn off power and disconnect the floor brush from the appliance.
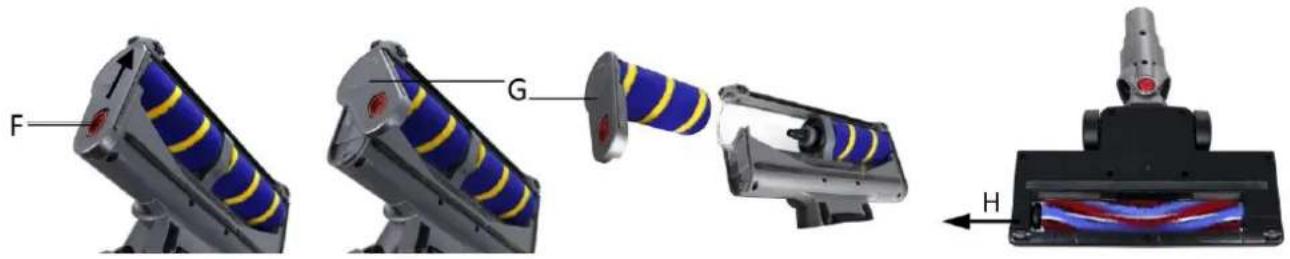
2) Floor brush A: push the release switch (F) and twist the roller handle (G) at the same time to take the brush roller out. Do the same for the brush roller in the other side. Clean off any dirt (hair and other fibers) tangled around the roller.
3) Floor brush B: push the lock (H) out to unlock the brush roller from the floor brush. Take it out and remove any dirt (hair and other fibers) tangled around the roller.
4) Wash the brush rollers as needed, using only water. Air-dry completely for at least 24 hours before reinstalling.
natural_image
Diagram of a mechanical device with labeled parts F, G, and H, showing exploded view and assembly (no text or symbols beyond labels)TROUBLESHOOTING
To reduce the risk of shock and unintended operation, turn off power and remove battery pack before servicing.
| Problem | Possible cause | Possible solution |
| Not pick up debris | Dust cup is full | Empty the dust cup |
| Filters clogged or dirty | Clean the filters | |
| Filters are out of service | Change the worn filters | |
| Brush roller not spin | Brush roller clogged by hair, fibers, etc. | Clean the brush roller |
| Poor suction | Filters clogged or dirty | Clean the filters |
| Dust cup not installed correctly | Reinstall the dust cup | |
| Low battery | Fully charge the battery | |
| Nozzle or dirt passage clogged | Disconnect nozzle to remove decreies | |
| Suddenly turns off on its own | Dust cup is full | Empty the dust cup |
| Filters clogged or dirty | Clean the filters | |
| Overheat | Let appliance cool down and retry | |
| Appliance won’t turn on or charge | Low battery | Fully charge the battery |
| Overheat | Let appliance cool down and retry | |
| Short running time | Low power | Fully charge the battery |
| Filters clogged or dirty | Clean the filters | |
| The appliance power is not stable | This is normal in the “auto-mode”. The suction power will be adjusted automatically during use |
TECHNICAL DATA
Voltage: 25.9 V DC
Power: 220W
Adaptor input: 100-240V\~ 50/60Hz
Adaptor Output: 31V DC, 0.5A
GUARANTEE AND CUSTOMER SERVICE
Before delivery our devices are subjected to rigorous quality control. If, despite all care, damage has occurred during production or transportation, please return the device to your dealer. In addition to statutory legal rights, the purchaser has an option to claim under the terms of the following guarantee:
For the purchased device we provide 3 years guarantee, commencing from the day of sale. If you have a defective product, you can directly go back to the point of purchase.
Defects which arise due to improper handling of the device and malfunctions due to interventions and repairs by third parties or the fitting of non-original parts are not covered by this guarantee. Always keep your receipt, without the receipt you can't claim any form of warranty. Damage caused by not following the instruction manual, will lead to a void of warranty, if this results in consequential damages then we will not be liable. Neither can we hold responsible for material damage or personal injury caused by improper use if the instruction manual is not
properly executed. Damage to accessories does not mean free replacement of the whole appliance. In such case please contact our service department. Broken glass or breakage of plastic parts is always subject to a charge. Defects to consumables or parts subjected to wearing, as well as cleaning, maintenance or the replacement of said parts are not covered by the warranty and are to be paid.
ENVIRONMENT FRIENDLY DISPOSAL

Recycling – European Directive 2012/19/EU
This marking indicates that this product should not be disposed with other household wastes. To prevent possible harm to the environment or human health from uncontrolled waste disposal, recycle it responsibly to promote the sustainable reuse of material resources. To return your used device, please use the return and collection systems or contact the retailer where the product was purchased.
They can take this product for environmental safe recycling.
Emerio Deutschland GmbH (no service address)
Lerchenweg 3
40789 Monheim am Rhein
Deutschland
Customer service:
T: +49 (0) 3222 1097 600
E: info.de@emerio.eu
OHUTUSJUHISED
natural_image
Close-up of a gray handheld vacuum cleaner with blue internal components and a red handle, shown in isometric view (no text or symbols visible)(joon. 1)
natural_image
Technical line drawing of two mechanical device assemblies with downward arrows indicating motion (no text or symbols)Joon. 2
natural_image
Technical line drawing of a mechanical device with no visible text or symbolsJoon. 3

Aku märgutuled:
100%

75%

50%

25%

0%
Laadige seadet, kui aku laetuse tase on alla 25%.
KASUTAMINE
(joon. 4)
(joon. 6)
Märkus!
natural_image
Diagram of a mechanical device with labeled parts F, G, and H, showing exploded view and assembly (no text or symbols beyond labels)Tõ RKEOTSING
natural_image
Exterior view of a modern vacuum cleaner with blue internal components and a red button (no text or symbols visible)(1. attēls)
natural_image
Technical line drawing of a mechanical device with no visible text or symbols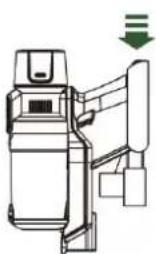
natural_image
Technical line drawing of a mechanical device with no visible text or symbols
- attēls
- attêls
Akumulatora kontrollampiņa:
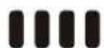
100%

75%
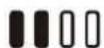
50%

25%

0%
(4. attēls)
(6. attēls)
2. Puteklu tvertnes filtra tirišana:
Piezime.
natural_image
3D mechanical assembly diagram showing progressive assembly from fan to base with labeled components (F, G, H), no text or symbols present.PROBLÉMU NOVĚRŠANA
natural_image
Close-up of a handheld vacuum cleaner with blue internal components and a red handle, labeled (1 pav.) (no text or symbols on the device itself)natural_image
Technical line drawing of a mechanical device with no visible text or symbols
natural_image
Technical line drawing of a mechanical device with no visible text or symbols2 pav.
3 pav.

4 pav.
6 pav.
Pastaba:
natural_image
3D mechanical assembly diagram showing progressive assembly from fan to base with labeled components (F, G, H), no text or symbols present.TRIKČIŲ ŠALINIMAS
(no service address)
Lerchenweg 3
40789 Monheim am Rhein
Deutschland
- Content – Sisukord – Saturs – Turinys
- SAFETY INSTRUCTIONS
- PARTS DESCRIPTION
- HOW TO WALL-MOUNT CHARGING SEAT:
- BATTERY CHARGING:
- Note:
- Battery pilot light:
- OPERATION
- CLEANING AND MAINTENANCE
- How to empty the dust cup:
- How to clean the dust cup filter:
- How to clean the brush rollers
- TROUBLESHOOTING
- TECHNICAL DATA
- GUARANTEE AND CUSTOMER SERVICE
- ENVIRONMENT FRIENDLY DISPOSAL
- Customer service:
- OHUTUSJUHISED
- Aku märgutuled:
- KASUTAMINE
- Märkus!
- Tõ RKEOTSING
- Akumulatora kontrollampiņa:
- Puteklu tvertnes filtra tirišana:
- Piezime.
- PROBLÉMU NOVĚRŠANA
- Pastaba:
- TRIKČIŲ ŠALINIMAS
Brand : Emerio
Model : UVC-123263
Category : Vacuum Cleaner