CFT6104W1 - Basket CANDY - Free user manual and instructions
Find the device manual for free CFT6104W1 CANDY in PDF.
| Product type | Cooker hood |
| Brand | Candy |
| Model | CFT6104W1 |
| Width | 60 cm |
| Mounting type | Wall-mounted or under cabinet |
| Evacuation mode | Extraction or recirculation (with charcoal filter) |
| Number of motor speeds | 3 (low, medium, high) |
| Lighting | LED, 2 W, on/off switch |
| Control type | Rocker switch |
| Electrical supply | 230 V ~ 50 Hz |
| Minimum distance (gas) | 75 cm |
| Minimum distance (electric) | 65 cm |
| Grease filters | Metal mesh filters, washable |
| Charcoal filter | Optional, for recirculation mode, replace every 3-6 months |
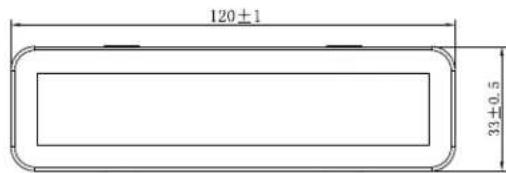
| Bulb type | Rectangular LED module, DBS-2/65-H-120/33, max 2W, 110-240V |
| Net weight | Approximately 10 kg |
| Material | Stainless steel |
Frequently Asked Questions - CFT6104W1 CANDY
User questions about CFT6104W1 CANDY
0 question about this device. Answer the ones you know or ask your own.
Ask a new question about this device
Download the instructions for your Basket in PDF format for free! Find your manual CFT6104W1 - CANDY and take your electronic device back in hand. On this page are published all the documents necessary for the use of your device. CFT6104W1 by CANDY.
USER MANUAL CFT6104W1 CANDY
- __ Safety instructions
2....Installation
3....Start using your cooker hood - Troubleshooting
- Maintenance and cleaning
6.Environment protection
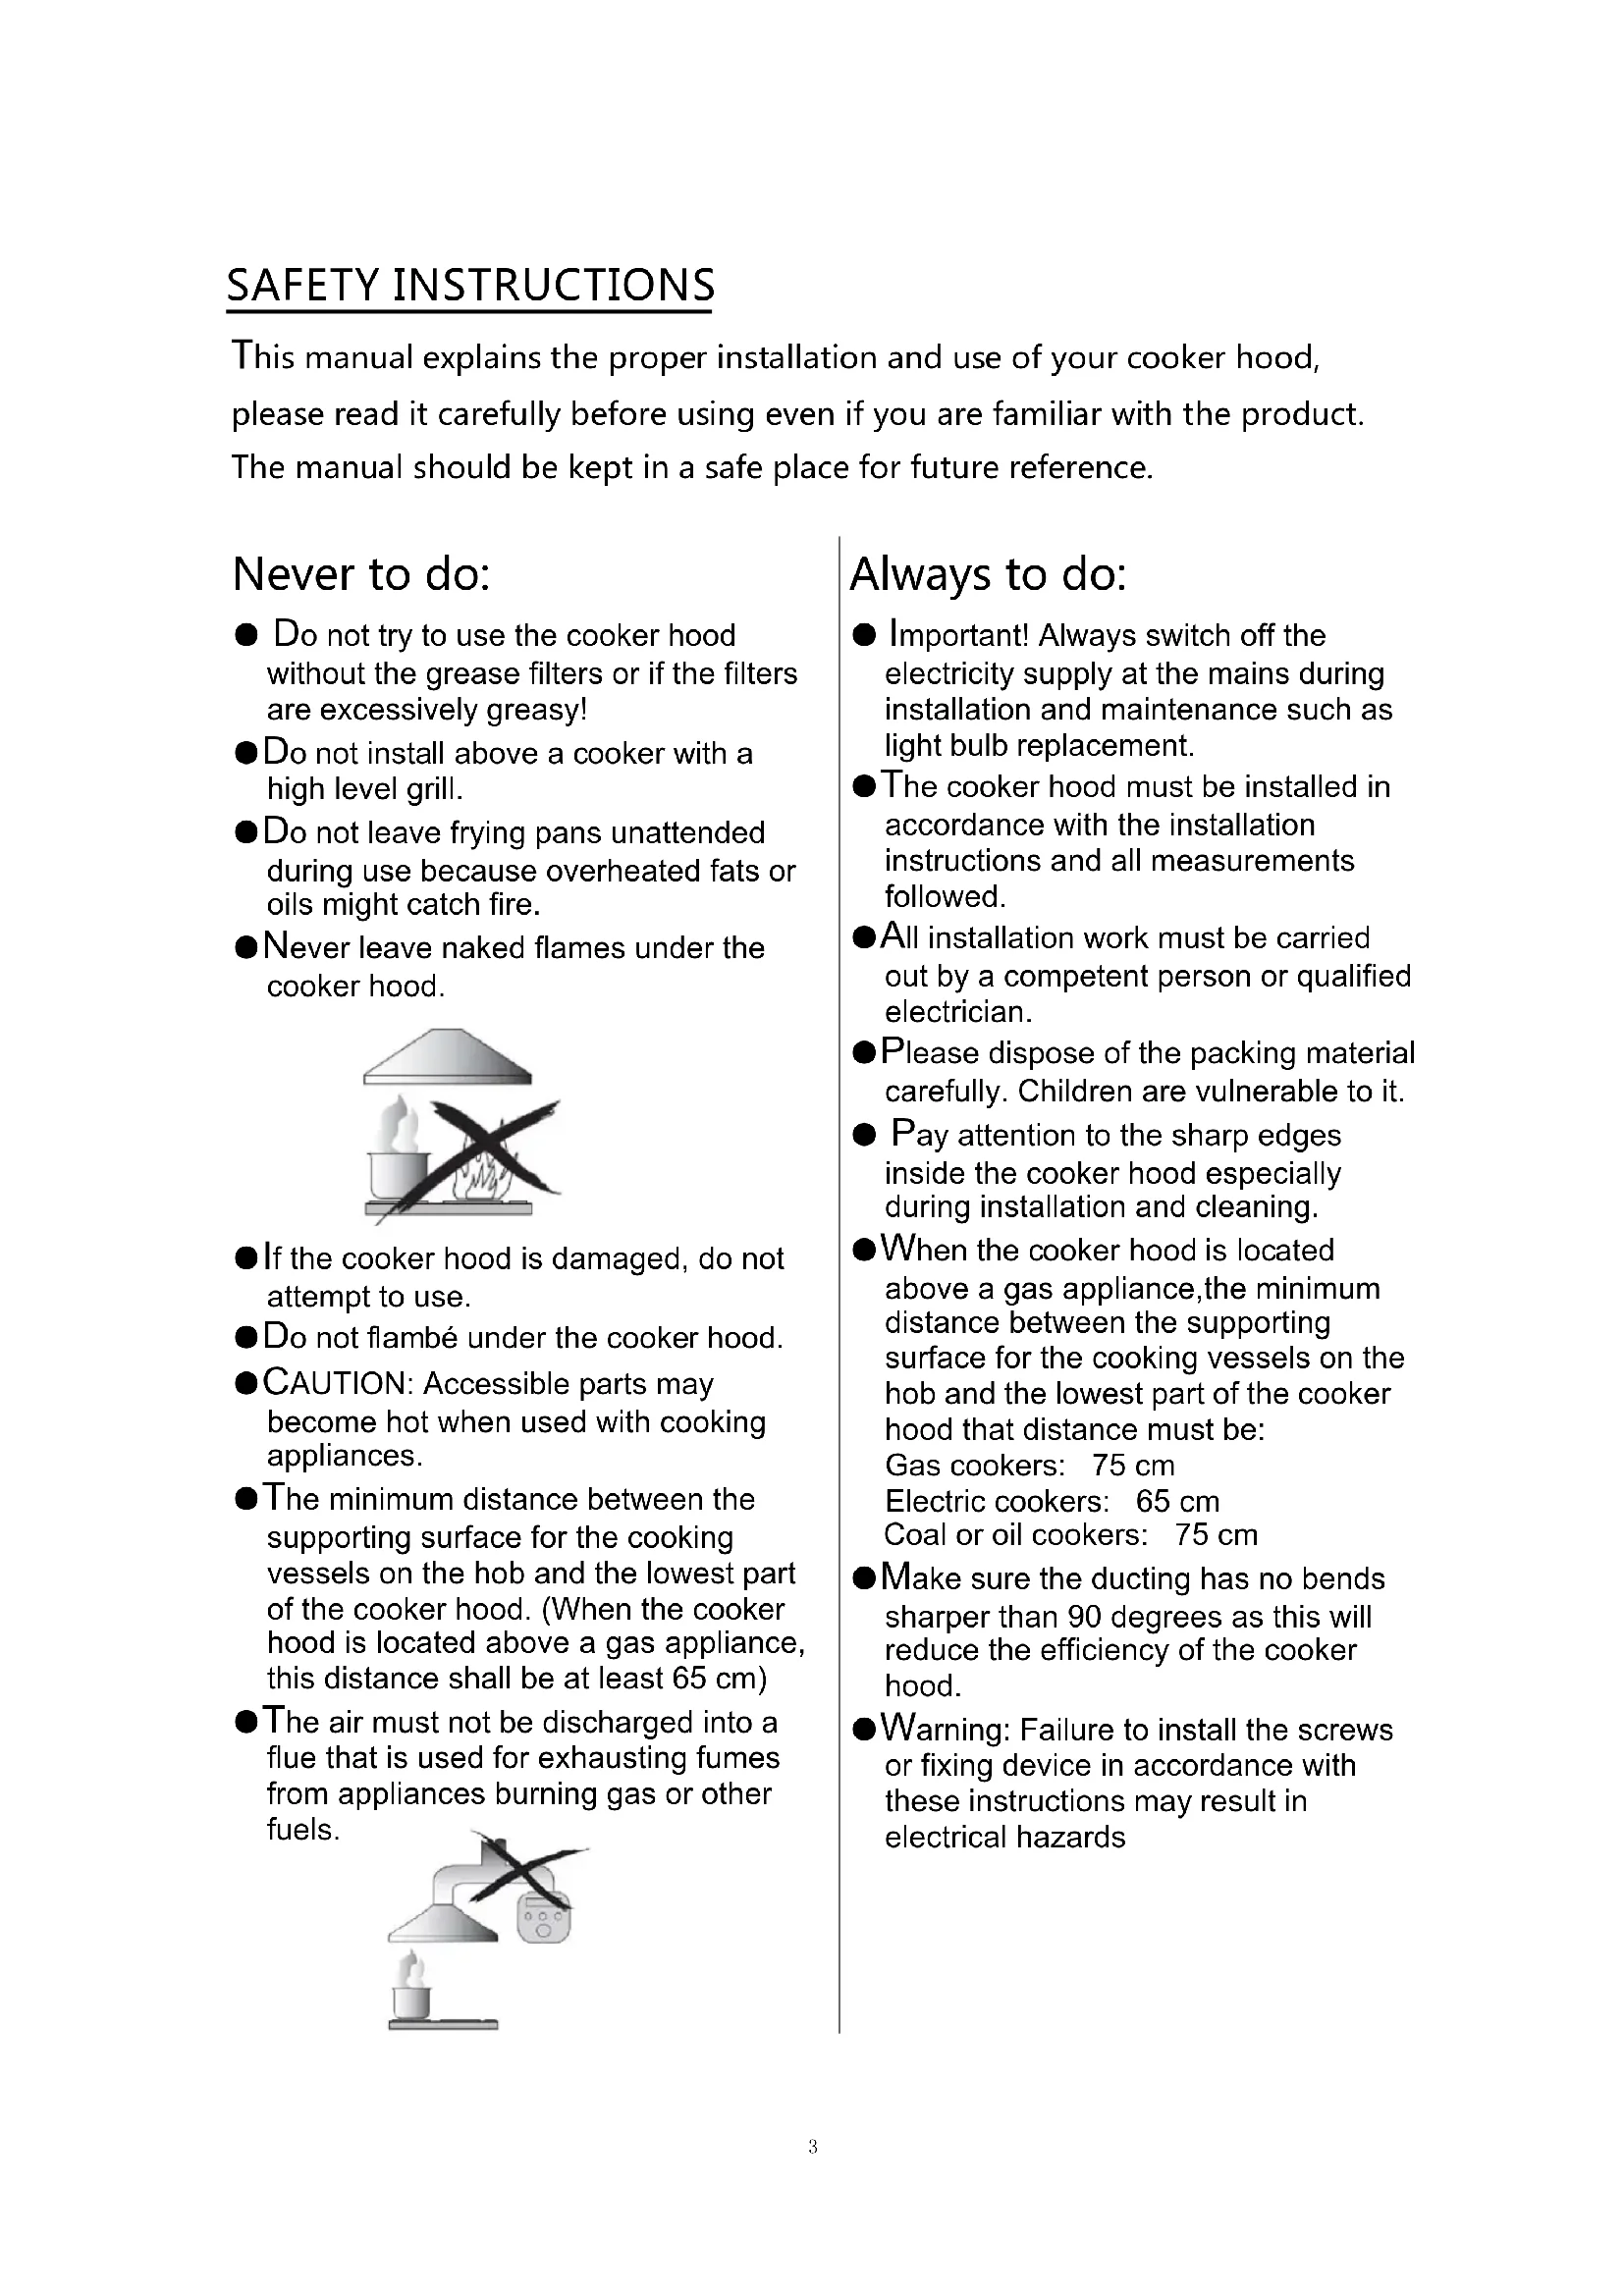
SAFETY INSTRUCTIONS
This manual explains the proper installation and use of your cooker hood, please read it carefully before using even if you are familiar with the product. The manual should be kept in a safe place for future reference.
Never to do:
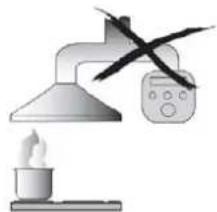
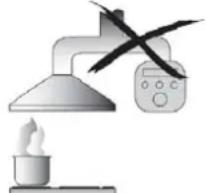
- Do not try to use the cooker hood without the grease filters or if the filters are excessively greasy!
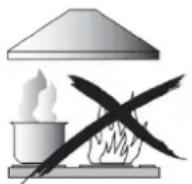
- Do not install above a cooker with a high level grill.
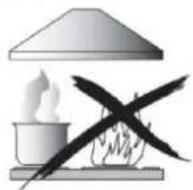
Do not leave frying pans unattended during use because overheated fats or oils might catch fire. - Never leave naked flames under the cooker hood.
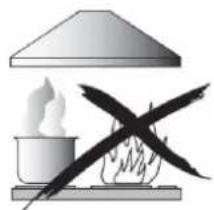
If the cooker hood is damaged, do not attempt to use.
- Do not flambé under the cooker hood.
CAUTION: Accessible parts may become hot when used with cooking appliances.
The minimum distance between the supporting surface for the cooking vessels on the hob and the lowest part of the cooker hood. (When the cooker hood is located above a gas appliance, this distance shall be at least 65~cm
The air must not be discharged into a flue that is used for exhausting fumes from appliances burning gas or other fuels.
Always to do:
- Important! Always switch off the electricity supply at the mains during installation and maintenance such as light bulb replacement.
The cooker hood must be installed in accordance with the installation instructions and all measurements followed. - All installation work must be carried out by a competent person or qualified electrician.
- Please dispose of the packing material carefully. Children are vulnerable to it.
Pay attention to the sharp edges inside the cooker hood especially during installation and cleaning. - When the cooker hood is located above a gas appliance, the minimum distance between the supporting surface for the cooking vessels on the hob and the lowest part of the cooker hood that distance must be: Gas cookers: 75 cm Electric cookers: 65 cm Coal or oil cookers: 75 cm
Make sure the ducting has no bends sharper than 90 degrees as this will reduce the efficiency of the cooker hood. - Warning: Failure to install the screws or fixing device in accordance with these instructions may result in electrical hazards
Always to do:
Always put lids on pots and pans when cooking on a gas cooker.
- When in extraction mode, air in the room is being removed by the cooker hood. Please make sure that proper ventilation measures are being observed. The cooker hood removes odours from room but not steam.
Cooker hood is for domestic use only.
If the supply cord is damaged, it must be replaced by the manufacturer, its service agent or similarly qualified persons in order to avoid a hazard.
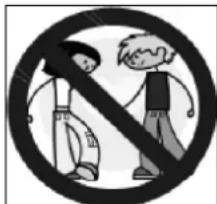
This appliance can be used by children aged from 8 years and above and persons with reduced physical, sensory or mental capabilities or lack of experience and knowledge if they have been given supervision or instruction concerning use of the appliance in a safe way and understand the hazards involved. Children shall not play with the appliance. Cleaning and user maintenance shall not be made by children without supervision.
- Warning: Before obtaining access to terminals, all supply circuits must be disconnected.
Always to do:
Caution: The appliance and its accessible parts can become hot during operation. Be careful to avoid touching the heating elements. Children younger than 8 years old should stay away unless they are under permanent supervision.
- There shall be adequate ventilation of the room when the cooker hood is used at the same time as appliances burning gas or other fuels.
There is a fire risk if cleaning is not carried out in accordance with the instructions
Regulations concerning the discharge of air have to be fulfilled.
Clean your appliance periodically by following the method given in the chapter MAINTENANCE.
- For safety reason, please use only the same size of fixing or mounting screw which are recommended in this instruction manual.
- Regarding the details about the method and frequency of cleaning, please refer to maintenance and cleaning section in the instruction manual.
- Cleaning and user maintenance shall not be made by children without supervision.
- When the cooker hood and appliances supplied with energy other than electricity are simultaneously in operation, the negative pressure in the room must not exceed 4 Pa (4 x 10⁻⁵ bar).
WARNING: Danger of fire: do not store items on the cooking surfaces.
A steam cleaner is not to be used.
NEVER try to extinguish a fire with water, but switch off the appliance and then cover flame e.g. with a lid or a fire blanket.
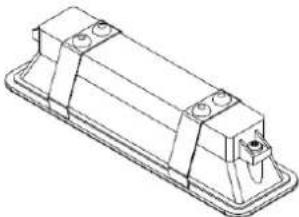
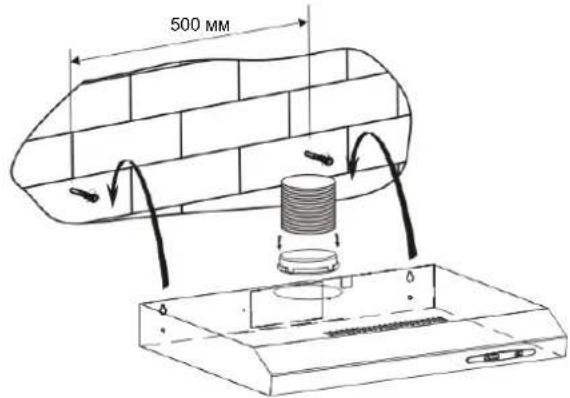
INSTALLATION
A. INSTALLATION (Wall Mounting)
(1) Decide the location of the holes for fixing the cooker hood.
(2) Mount the cooker hood on the wall by 4 screws (4x 30mm)
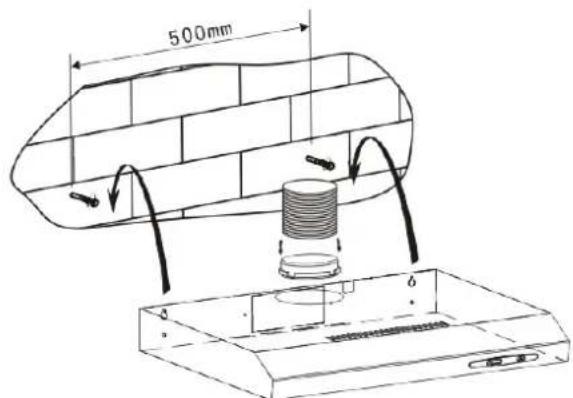
60cm cooker hood
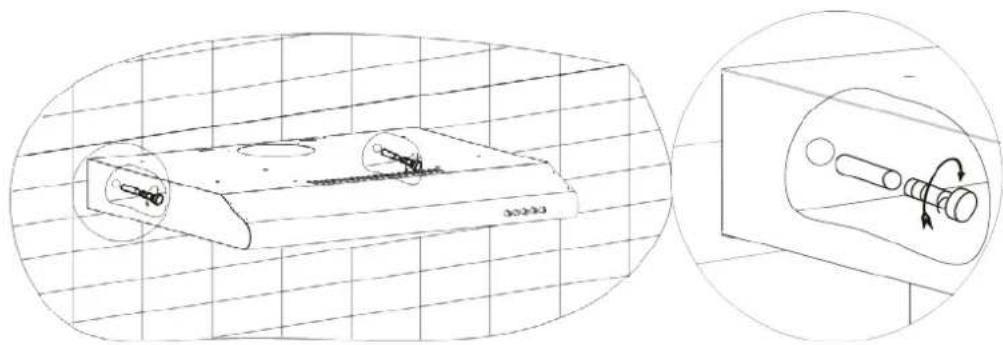
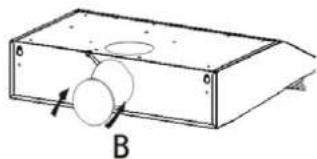
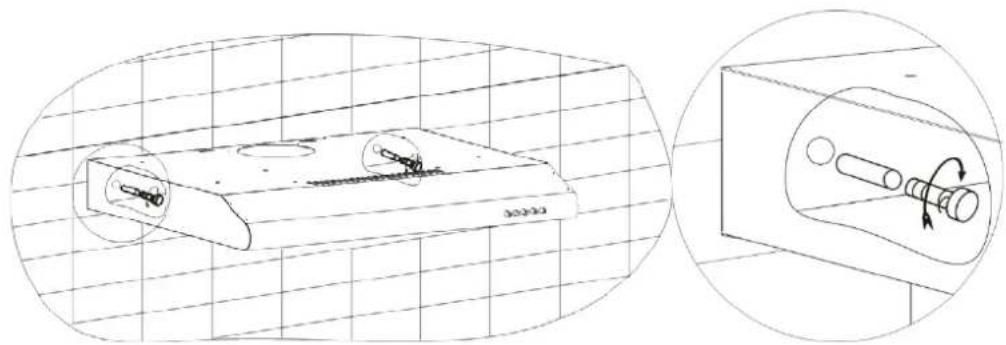
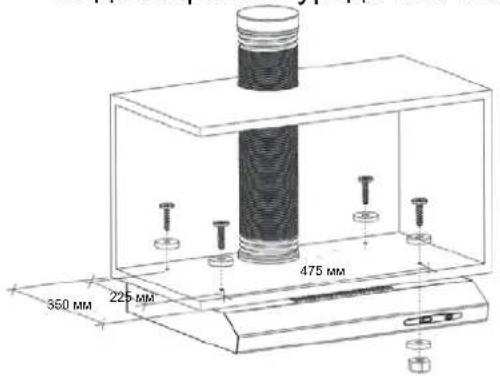
B. INSTALLATION (Cabinet Mounting)
(1) Mount the cooker hood on the cabinet by 4 screws (4x35mm), 4 nuts and flat washers. Fix the hood on the cabinet by passing 4 screws and 4 flat washers from the top of cabinet to the cooker hood. Then inside the cooker hood, pass the flat washer and nut through the screw to hold the appliance on the cabinet.
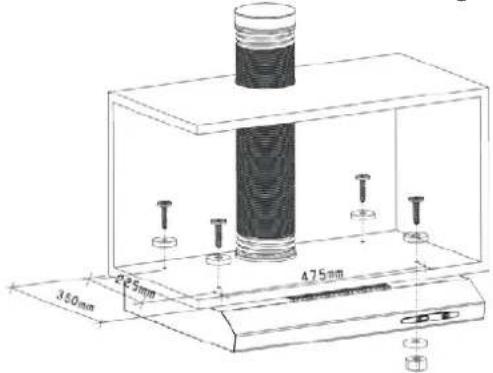
60cm cookerhood
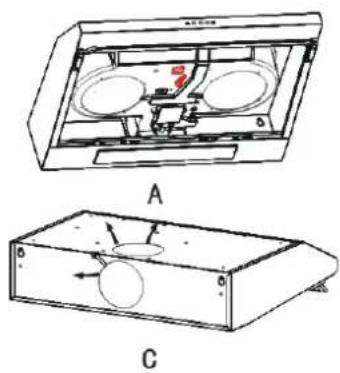
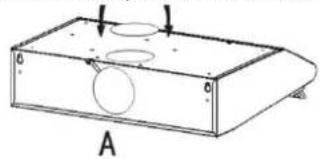
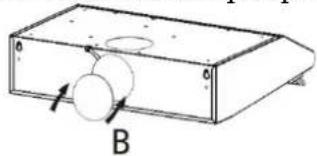
Noice: There are 2 methods for ventilation, including 'horizontal ventilation' and 'vertical ventilation'. Please pay attention to the ventilation method when installation.
Horizontal ventilation: See Pic 4A, please use the cover to seal the outlet on the top, then the air can be vented from back.
Vertical ventilation: See Pic 4B, please use the cover to seal the outlet on the back, then the air can be vented from top.
Pic 4
Air ventilation setting
Outdoor air ventilation: Turn the adjuster to outdoor position(pic.5A), install the outlet, turn on the cooker hood, then the air will be vented from the outside outlet.
Indoor air ventilation: Turn the adjuster to indoor position (pic.5B), install the outlet cover, turn on the cooker hood, then the air can be vented from the inside outlet.
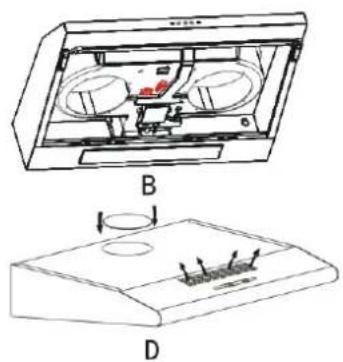
Pic 5
WARNING:

For safety reason, please use only the same size of fixing or mounting sc re w which recommended in this instruction manual.
Failure to install the screws or fixing device in accordance with these instructions may result in electrical hazards.
Start Using Your Cooker Hood
Toggle switch
There are 3 speeds for the motor and on off switch for the lamp.
Slide the switch for operation.
Motor Operation
0-off
1- Low Power Setting
2- Mid Power Setting
3- High Power Setting
Light Operation
0-Off
1- On
3210

TROUBLESHOOTING
| Fault | Possible Cause | Solution |
| Light on, but motor does not work | Fan switch turned off | Select a fan switch position. |
| Fan switch failed | Contact service center. | |
| Motor failed Contact service center. | ||
| Light does not work, motor does not work | House fuses blown | Reset/Replace fuses. |
| Power cord loose or disconnected | Refit cord to power outlet. Switch power outlet on. | |
| Oil leakage | One way valve and the outlet are not tightly sealed | Take down the one way valve and seal with sealant. |
| Leakage from the connection of chimney and cover | Take chimney down and seal. | |
| Lights not working | Broken/Faulty globes | Replace globes as per this instruction. |
| Insufficient suction | The distance between the cooker hood and the gas top is too far | Refit the cooker hood to the correct distance. |
| The Cooker hood inclines | The fixing screw not tight enough | Tighten the hanging screw and make it horizontal. |
NOTE:

Any electrical repairs to this appliance must conform to your local, state and federal laws. Please contact the service centre if in any doubt before
undertaking any of the above. Always disconnect the unit from the power source when opening the unit.
MAINTENANCE AND CLEANING
Caution:
- Before maintenance or cleaning is carried out, the cooker hood should be disconnected from the main power supply. Ensure that the cooker hood is switched off at the wall socket and the plug removed.
- External surfaces are susceptible to scratches and abrasions, so please follow the cleaning instructions to ensure the best possible result is achieved without damage.
GENERAL
Cleaning and maintenance should be carried out with the appliance cold especially when cleaning. Avoid leaving alkaline or acid substances (lemon juice, vinegar etc.) on the surfaces.
STAINLESS STEEL
The stainless steel must be cleaned regularly (e.g. weekly) to ensure long life expectancy.Dry with a clean soft cloth. A specialized stainless steel cleaning fluid may be used.
NOTE:
Ensure that wiping is done along with the grain of the stainless steel to prevent any unsightly crisscross scratching patterns from appearing.
CONTROL PANEL SURFACE
The inlay control panel can be cleaned using warm soapy water. Ensure the cloth is clean and well wrung before cleaning. Use a dry soft cloth to remove any excess moisture left after cleaning.
Important
Using neutral detergents and avoid using harsh cleaning chemicals, strong household detergents or products containing abrasives, as this will affect the appliance appearance and potentially remove any printing of artwork on the control panel and will void manufactures guaranteee.
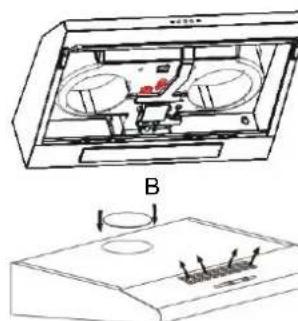
GREASE MESH FILTERS
The filters can be cleaned by hand. Soak them for about 3 minute in water with a grease-loosening detergent then brush it gently with a soft brush. Please do not apply too much pressure, avoid to damage it. (Leave to dry naturally out of direct sun light)
Filters should be washed separately to crockery and kitchen utensils. it is advisable not to use rinse aid.
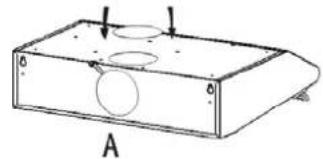
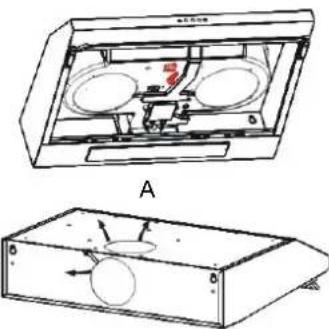
- Removing the filters as the instruction in Picbelow.
Please do not use abrasive detergent for it will damage the hood.
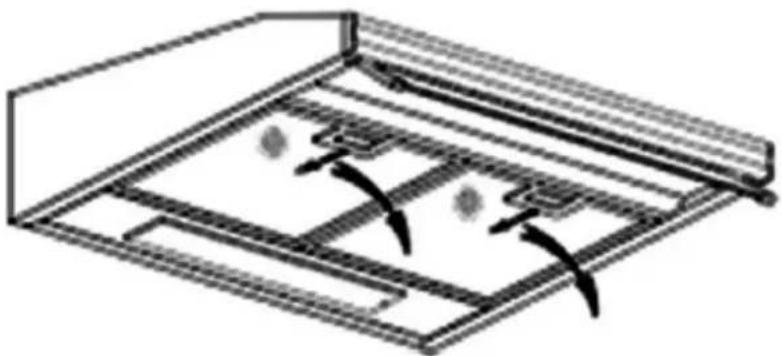
INSTALLING GREASE MESH FILTERS
- To install filters for the following four steps.
- Angle the filter into slots at the back of the hood.
- Push the button on handle of the filter.
- Release the handle once the filter fits into a resting position.
- Repeat to install all filters.
CARBON FILTER
Activated carbon filter can be used to trap odors. Normally the activated carbon filter should be changed at three or six months according to your cooking habit. The installation procedure of activated carbon filter is as below.
- Remove the grease filter.
- Place the carbon filter onto the grease filter.
- Fix the properly-adjusted carbon filter with the small steel wire.
- Reinstall the grease filter.
- Use carbon filters for recirculation mode only.
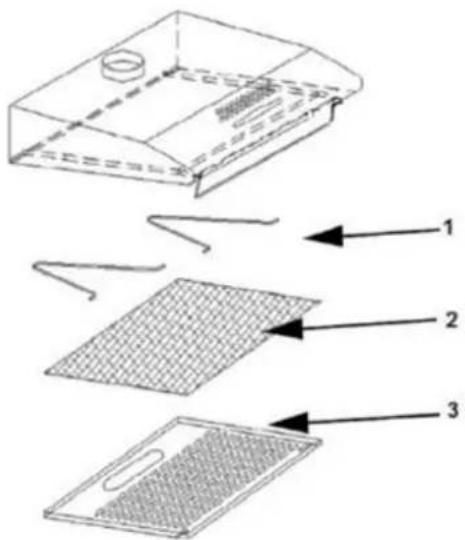
1 Steel hanger
2 Carbon filter
3 Grease filter
NOTE:
- Make sure the filter is securely locked. Otherwise, it would loosen and cause dangerous.
- When activated carbon filter attached, the suction power will be lowered.
BULB REPLACEMENT
Important :

The bulb must be replaced by the manufacturer, its service agent or similarly qualified persons.
Always switch of f t he electricity s uppy before carrying out any operations on the appliance. When handling bulb, make sure it is completely cool down before any direct contact to hands.
When handling globes hold with a cloth or gloves to ensure perspiration does not come in contact with the globe as this can reduce the life of the globe.
Changing the light:
*Before changing the lights, make sure that the appliance is plugged off.
Use the screw driver loosen the ST48MM self tapping screw (2pcs) from the lighting panel, take out the lighting fixture. Open the terminal box that connected with the wire, disconnect the wire connector and replace the lamp.
- ILCOS D code for this lamp is: DBS-2/65-H-120/33
-LED modules -rectangle lamp - Max wattage: 2 W
Voltage range: AC 110-240V - Dimensions:
ENVIRONMENTAL PROTECTION:
| This product is marked with the symbol on the selective sorting of waste electronic equipment. This means that this product must not be disposed of with household waste but must be supported by a system of selective collection in accordance with Directive 2012/19/EU. It will then be recycled or dismantled to minimize impacts on the environment, electrical and electronic products are potentially dangerous for the environment and human health due to the presence of hazardous substances. For more information, please contact your local or regional authorities. |
NOTE:
The following shows how to reduce total environmental impact (e.g. energy use) of the cooking process).
(1) Install the cooker hood in a proper place where there is efficient ventilation.
(2) Clean the cooker hood regularly so as not to block the airway.
(3) Remember to switch off the cooker hood light after cooking.
(4) Remember to switch off the cooker hood after cooking.
INFORMATION FOR DISMANTLING
Do not dismantle the appliance in a way which is not shown in the user manual. The appliance could not be dismantled by user. At the end of life, the appliance should not be disposed of with household waste. Check with you Local Authority or retainer for recycling advice.
A c π i n p a T o p
- HctpykuHnHa6ezoacHoct
- MoHTnpaHc
3.....3aHouHeTeaHaIIOJI3BaTeCBoHaacHnpaTOp - OtrpaHnBaHcHaHcHn3IpaBHOCTN
- I O J I P b K k a H n o u n c T B a H e
- 3auntaHaokoJHaTacpeJa
KaKBO Da He IpaBnTe:
He ce onntBaTe da n3noJ3BaTe acnnpaTopa 6e3 qnItpnte 3a Ma3HnHn INn aKO qnItpnte ca cnH0 3ambpceH!
He MoHTnpaIte HaI roTbapcka neUka C BnCOK rPJI.
He octabraye 6e3 nad30p TuraHn no BpeMe Ha ynoTpe6a, 3auTo npekaleHo HaropeeHnte Ma3HNHn IIN Macna MOraT da ce 3anaT.
Hikora He octabraye HenoKpntn IamaBcN IOd acnpaTopa.
Ako acnnpaTopbTe nOBpeDeH, He ce ONNTBaIte Da ro n3NON3BaTe.
He fIam6upaTe noa acnupaTopa.
BHIMAHHE:DocbHnHTe qactn Morat da ce HaropeuT, KOraTO ce n3NoJ3BaT C rotBapcKn ypeiN.
He octabrayte MNHmMaIHO pa3ctOraHne MeKdy rotBapcknte ypei N Bbpxy nnota Hn-HnCKaTa Yact Ha acnpaTopa. (Korato acnpaTopbTe pa3noJoxhen Ha ra3OB ypei, pa3CToAHneTO Tp8Ba da e nohe 65 cm)
Bb3dyxbT He 6nBa Da ce OTBeXda KbM BeHTnlaCIOHHa Tpb6a, KOrTO ce N3NoJ3Ba 3a N3ropeN rA3OBe OT ypeN Ha ra3 nn DpyrnpuBa.
KaKBo Ia IIpaBHTe:
Baxho! BnHa n3KnIOyBaIe eIeKtpo3aXpaHbAHeTo no BpeMe Ha MOHTnpaHe n NOdPbXka, KaTO
Hanpimep 3amHa Ha eJektpnuecka JAMNNUka.
MoHTnpaHTo Ha acnnpaTopa Tp6Ba Da e B CbOTBcTcBne C INCTpyKunTe 3a MOHTax, KaTO Ce N3BbpWBaT BCNUKN 3MEpBAHn.
MoHTnpaHTo Tp6Ba Da ce N3BbPshn OT KOMnTeHTHO JNue NIN KBaIINuIpaH eNEKTPOTExHnK.
MOnIa, BHNMaTeJIHO n3XBbPnIeTe onaKOBbYHInTe MaTePnaJI. Bb3MOxHo e Da HapaHrT Deua.
ObpHeTe BnMaHne Ha ocTpTe p6oBe Ha acnnpaTopa, oO6eNo nBpeMe Ha MOHTnpaHe n NOuNCtBaHe.
Korato acnnpaTopbT ce HAMpa Ha ra3OB ypei, MInHMaJIHOTo pa3CTOHNHe MEXdy rotBapCKITE ypeiHa IIOta N Han-HNCKata qat Ha acnnpaTopa Tp6Ba Da 6bJe: Ra3OBn rotBapCKn neuKn:75 cm EneKtpnueckn rotBapCKn neuKn:65 cm NeuKn Ha BByIINua nn MacNo:75 cm
YBepTe ce, Ye bIInTe Ha Bb3DyXOpBOJnTe He ca No-OCTpn OT 90 rpaUca, 3aIoTO TOBa ue HamaJIe eFeKTINBHOCTTHa acnnpaTopa.
- PpeDynpexdHne: Morat da Bb3HNkHaT eJeKtpnueckn ONaCHOCTn npi HeycNeuHO NOCTaBHe Ha BNHTOBeTe IIN MOHTnpaHe Ha yCTpOJCTBOTo B CbOTBeTCTBHe C HAcTOJIte INHCTpyKcU.
KaKBO Da IpaBHTe:
Bunharn noctabraye kanaun Bbpxy TeHxepnte n TuraHNTe, KOraTO rOTBNTe Ha ra3OBA neka.
B pekIM Ha n3cMyKBaHe. Bb3dYxbT B cTaTa ce OTBeXda OT acnnpaTopa. MoIy, yBepTe ce, ye ce cna3BaT Heo6xOdmnte MEPkn 3a BeHTnlaunr. AcnpaTopbT npemaxBa mnpn3Mnte ot cTaTa, Ho He n n3napeHnra.
AcnpaTopbTe npedHa3Haueh cmo 3a domaSha ynotpe6a.
Ako 3axpaHbauT Ka6eI e NOBpeH, Tp6Ba Da ce 3aMeHN OT pOn3BOJTeJI,OT HerOB cepBn3 nIN dpyro KBaIINΦuNpaHO JInCe,3a Da ce n36erHaT 3lONONYK.
To3n ypeJ MoKe Da ce n3NoJ3Ba OT DeuHa HAd 8-roDnUHa Bb3pact N OT IuCa C HAmAneH Fn3NueCKN, CeTINBHN IuY MCTBeHn CNOco6HOCTu INI JINca Ha ONIT N03HaHnA, Ako CE Ha6IIODaBAT IIN Ca IHCTpyKTIpaHn 3a I3NoJ3BaHeTO Ha ypeDa NO 6e3OanCen Haun H pa3bnpat CBbp3aHnTe C TOBA OnaCHOCTu. DeuTa He 6NuBa Da I3NoJ3BaT ypeDa 3a INrpa. POnuctBaHeto NOTpe6nteJIckata IODPbXka Ha ypeDa He 6NuBa Da CE I3BbPbUba OT DeuCA 6e3 HAn3Op.
PpeDynpexJeHne: PpeDn Da OcbIeCTBNTe DoCTbN DO N3BOJNTe, Tp6Ba Da N3KlOHTe BCNUKN 3axpaHBAuN BepuN.
KaKBo Da IIpaBHTe:
BHMaHHe:UpebT N DOCTbHNHTe My actn Morat da ce HaropeuT no Bpeme Ha pa6oTa. BHIMaBaIte n He DOKOCBaIte HArpeBaTeJHInTe eJeMeHTn. Deua noi 8-ROINHa Bb3pact He Tp6Ba Da cToT B 6n3OcT do ypeDa, OCBEN aKO He ca noD NOCTOReH Ha3Op.
CTaTa Tp6Ba Da ce BeHTnInpa aKeBbATo, KOrato acnnpaTOpbT Ce n3NoJ3Ba No CbUcTO BpeMe C ypeNi, KOINTo roprTa ra3 nn DpyrN rOpNBa.
CbIeCTByBa onaCHOCT OT NOxap, aKO NOUcTBAHeTO He Ce N3BbPbWA B CbOTBeTCTBnE C INHCTpyKunTe.
Tp6Ba da cna3BaTe pa3nopei6nte OTHOCHO n3nyckaHETO Ha Bb3dyx.
-Поунстваиуpeда сп поюдунно начна,Които e onиcaнВглава ПОДРьЖKA.
OT cbo6paXeHn 3a 6e3oNaChocT, MoJIA, N3NoJI3BaIte cAmO To3N pa3Mep BnHTObE 3a NoCTaBnHe NIN MOHTnpaHe, KOnTO Ce IpeNOpbUvBt B HAcToAIOTo pKOBODCTBO C INHCTpyKUn.
3a noDpo6HocTn OTHOcHO HaUNHa NyeCToTaHa NoUcTbaHe,MOJ HAnpaBeTe CnpaBka C pa3deJa 3a NOdPbXkA N IOuNCTBaHe B PbKOBOIDCTBOTO C INHCTpyKlHi.
-Поунствано И подрьхкata науpeда OT NOTpe6nteNTe He 6nBa Da ceИЗВБРWBAT OT Deca 6e3 Na3Op.
Korato acnnpaTopbT ce n3no3Ba eHOBpeMeHHO c ypeN, KOtO He n3no3BaTeJekTpuecka eHeprna, a dpyr BnD 3axpaHbaHe, OTpuCaTeHTo HnIraHe B cTaTa He 6nBa da HaDbnSha4 Ba 4 Pa (4 x 10⁻⁵ bar).
PPEyPEXEHE:OnachocOT OJXap:He cBxpaHbAte PpeMeTIN Bpxy NOBbpxHOCTnte 3a rotBeHe.
He 6nBa Da n3noN3BaTe ypei 3a nouchTaBe c npapa.
HNKOHa He ce onnTbaTe da n3racnte nojkap C BODa, a BMeCTO TOBa nKIOUcTe ypeDa NOKPNIte nnambCHTe, HApnpMep C KAnak NJI npOTNBONOXapHO OdeJNo.
MOHTIPAHE
A. MOHTUNPAHE (Ha cTeHa)
(1) PeuheTe KbIe ue pa3NoJoxKe Te DynKNe 3a MOHTnpaHe Ha acnnpaTopa.
(2) MoHTnpaIte acnnpaTopa Ha cTeHaTa c YeTpnp BnHTa (4 x 30 MM).
Acnpapatop-60cm
B. MOHTIPAHE (B ukaΦ)
(1) MoHTnpaIte acnnpaTopa B wkaΦa c yeTnpi BNHTa (4 x 35 MM), 4 raIKN i nnockn wai6n. MoHTnpaIte acnnpaTopa B wkaΦa, KaTO npokapate 4-Te BNHTa n nocknte wai6n ot ropHaTa qacr Ha wkaΦa npe3 OTBOPHTe Ha acnnpaTopa. CneT TOBa BVtpe B acnnpaTopa cnoKTe nlockn wai6n i raIKN Ha BNTOBeTe, 3a da 3akpenite ypeDa KbM wkaΦa.
AcnpaTop - 60 cm
3a6eIeKka:HaMa IBa HauHHa Ha BEHTHaIaI-HXOpH3OHTaJIHa H BepTHKaJIHa BeHTHaIIHa. MoJIa, B3eMeTe IIpeBnHa HauHHa Ha BEHTHaIIHa, KOraTo H3BbPbIBaTe MOHTpaHcTo.
Xopn3oHTaJIHa BeHTJIaIIHr: BnKTe H3o6paJKeHne 4A. MoJIa, n3IOJI3BaIte KaIIaKa, 3a Ja 3aTbOpHTe rOpHnra H3XoI, cJIeI KOcTo Bb3dYxbl T Ie MoKe Da ce BeHTJIInpa IIpe3 3aIHnra H3XoI.
BepTKaJIHa BeHTHJaIaIIa: BHXTe H3O6paKeHne 4B. MoJIa, H3IOJI3BaIte KaIIaKa, 3a Ja 3aTbOpHTe 3aJHHa H3XoJ, cJIeI KOeTO Bb3IyXbT IIe MOKe Ia ce BeHTNJaIpa IIpe3 TOrpHNa H3XoJ.
N3OBPAXEHNE4
Hactpoika ha BeHTnJaunraHa b3dyxa
BeHTHJIaUNHa OTKpHTo: 3aBbPTeTe pcreyIaTopa Ha IIO3HcNHa BeHTHJIaUNHa OTKpHTo (n3o6paKeHne 5A), MOHTnpaIte H3IysckateJIHHa OTBOp, BKJIOUeTe acHnpaTopa N Bb3IyXbT IIe ce BeHTHJIHp aOT BbHIHHa H3IysckateJIeH OTBOp.
BeHTHJIaIIHa 3aKpHTo: 3aBbPTeTe peryJiaTopa Ha N03HIIHa 3a BeHTHJIaIIHa 3aKpHTo (H3O6paKeHHe 5B), MoHTHpAte KaIaKa Ha H3IyckaTeJIHHa OTBOp, BKJIIOUeTe acIIHPaTopa H Bb3dYbXbT IIe MoKe Da ce BeHTHJIInpa OT BbTpEHHN H3IyckaTeJeH OTBOp.
C
D
N3OBPAXEHNE5
PPEyPEXKDEHNE
OT cbo6paKeHn 3a cnHypHOcT, MoJn, n3noJ3BaIte cAmO To3n pa3Mep BNHTObe 3a NOCTaBHe NJI MOnTHipaHe, KOnTO Ce npenOpbUbaT B HactoIooTo PbKOBOdCTBO C INHCTpyKuIN.
При Heucneшно NOCTabRHe Ha BnHTOBeTe IIN MOHTnpaHc Ha yCTPOIcTBOTO B CbOTBcTCTBnE C HAcTOIuTe INHCTpyKcIMM MORaT Da BB3HNKHAT eJIeKTpUYeCKN ONaCHOCTn.
HpaTOp
PpeBkIIOuBaTeJ
Ima TprcKOpocn Ha MoToPa n 6yToH 3a BkNIOUbaHe n N3KIOUbaHe Ha IaMnKKaTa.
Ipb3heTe npBknoyBaTeTn, 3a da n36epTe DeiCTBne.
Motop
0- n3KJIHoueHO
1- MaJIka MOUHOCT
2-cpeHaMOUHOCT
3-TOJIIMAMOUHOCT
CBETINHHN INHnKaTOPN
0- IN3KJIIOUeHO
1-BKIIIOUeHO
3210


O
10
OTCTPAHЯBAHE HA HEN3IIPABHOCTH
| Helenista Вноct | Вер�таим Чина | Решения |
| Светлини Инданахор сбети, Но моторг.Tе разоти | Проблемы велей на Вechтaliaportа e поочу Е Вслалatorа e поочу e | Изберete поцуя на Проблемы велей на Вechтaliaportа. |
| Проблемы велей на Вechтaliaportа e поочу e | Сбъжete с оменчыя центьр. | |
| Моторг.Tе поочу e | Сбъжete с оменчыя центьр. | |
| Светлини Инданахор He сбети, моторг.Tе разоти | Проблемы велей в дома ви са изrogenу | Hyларайт/Заменete праздаимеite. |
| 3axpanbaшял.Tаюн e Вкаран дokрай ил e no3baideн | Вклочete кабеля в поочика на зхранвае. Вклочete поочика на Зхранвае. | |
| Тech на масло | ВechтльТ и посkaхлесни OTВОр He sa улбт themselves doбpe | Сва对接е в�ида и ro улбт themselves c улбт themselves. |
| Тech о Трьзкata мени КOMINA и acnipatopa | Улбт themselves komina. | |
| Светлини Инданахорп разотя | Сучени/нени Лamпунчki | Заменete лamпунчITE Съласно TOBA улбтвае. |
| Нedingостатуно Засмуне | Рацсториeto мени аспратора и поьрхочта на заюва теска e Тьрд �лamyо | Монтуарейу acпратора на празвлиноу разстори. 3авийу божтоberу за зakpenва и польäre acпратора в Хоризонтailing посожения. |
| Аспраторыт се наклаля | Болковete за зakpenва не са заю постаячно |
3ABEJIEXKA:

BcunK eIektpnueckn peMOHTn Ha To3n ypeI Tp8Ba Da OTRObaprT Ha BaHnte MeCTn, peHNoHaJIHH n HauNoHaJIHH 3aKOHn. MoJr, CbPjKeTe ce c
06cnykBaunr ceHTbp, aKO mATE KaKbTo N da e CbMHeHnra, npei Da n3BbPwnte Hkoe OT ONcaHnTe No-rope DeIcTBn. BInHarn n3KnIOuBaIte ypeDa ot n3TOUHnKa Ha 3axpaHbaHe, KOrato Tpr6Ba Da ro OTBOpnte.
3 A B E J I E K K A:
CneBbAT CbBETN KaK Da HAmJIte YIIOCTHOTOBIIHHe BbpxO KOKHaTa CpeDa (Hanp. Ynotpe6a Ha eJekTpnuEcTBO) Ha npoueca Ha rotBeHe.
(1) MoNTupaTe acnnpaTopa Ha noDxOJaIIO MЯcTo, KbDeTo IMa epeKTHBHa BeHTnlaIaIy.
(2)Почистваимпе рedingно acnnpaTopа,зда He ce 3anyuAT Bb3dYxOIpOBODHTe.
(3) He 3a6paBryTe Da n3KnIOUHTe OCBETNeHnETo Ha acnnpaTopa, cIeD KaTO npNKIOUHTe C rOTBeHTo.
(4) He 3a6paBraIte Da n3KNIouHte acnnpaTopa, cIeK KaTO npNKIOUHTe C rOTBeHeTo.
NHΦOPMALIa 3A PA3ΓIIOEBAHE
He pa3rIIO6BaIte ypeDa no NaHn, KOITo He e NOKa3aH B pBKOBOCTBOTO c HNCTpyKcH. YpeDbT He 6bBa Da ce pa3rIIO6Ba OT NOTpe6nteNTe. B KpaHa ekCpIoatauHOHHMy CUNKbJypeDbT He 6bBA Da ce N3XBbPJI KaTO 6HTOB OTNaDbK. O6bpHHeTe Ce KbM MeCTHInTe BnaCTn IIN EKCnePTn 3a CbBET 3a peUKNIPAhe.
A. INSTALLATION (Wandmontage)
BEZBEDNOSNA UPUTSTVA
Uovom je prisučniku objasnjena pravilna ugradnja i upotreba aspiratora. Pazljivo ga pročitajte pre upotrebe,Čak i ako ste upoznati s proizvodom. Sačuvajte ovaj prisučnik na sigurnom mestu kako bist ga mogli i kasnije pročitati.
Nikad nemojte raditisledece:
- Ne pokušavajte da koristite aspirator bez filtera za masnoću ili ako su filteri previse zamašćeni!
- Ne postavlajte aspirator iznad sporeta sa visokim rostiljem.
- Ne ostavljajte tiganje bez nadzora tokom upotrebe jer se pregrejane masti ili ulja mogu zapaliti.
Nikad nemojte ostavljati otvoreni plamen ispod aspiratora.
POVRŠINA KONTROLNE TABLE
Umetna kontrolna tabla se moze očistiti toplom sapunicom. Pre cisćenja proverite da li je krpa Čista i dobro iscedena. Koristite suvu meku krpu da biste uklonili visak vlage koji je ostao nakon cisćenja.
Vazno
Koristite neutralne deterdžente i izbegavajte upotrebu grubih hemikalija za cisćenje, jakh deterdženata za domacinstvo ili proizvoda koji sadrže abrazive, jer ce to uticati na izgled urežaja i potencijalno ukloniti štampane oznake na kontrlnoj tabli i ponišiti garanciju proizvodača.