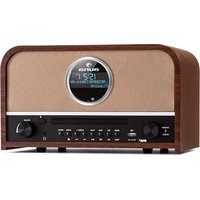
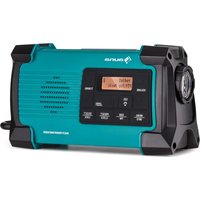
Roadie Smart - Radio Auna - Free user manual and instructions
Find the device manual for free Roadie Smart Auna in PDF.
User questions about Roadie Smart Auna
0 question about this device. Answer the ones you know or ask your own.
Ask a new question about this device
Download the instructions for your Radio in PDF format for free! Find your manual Roadie Smart - Auna and take your electronic device back in hand. On this page are published all the documents necessary for the use of your device. Roadie Smart by Auna.
USER MANUAL Roadie Smart Auna
Rnrrnnrnnnne rnrnnnne nnnnne nrnnnne
340
www.auna-multimedia.com

CLASS 1 LASER PRODUCT
CLASS 1 LASER PRODUCT APPAREIL A LASER DE CLASSE 1 PRODUCTO LASER DE CLASE 1
CAUTION INVISIBLE LASER RADIATION WHEN OPEN AND INTERLOCKS DEFEATED. AVOID EXPOSURE TO BEAM.

This product contains a low power laser device.
UPnP (Universal Plug and Play)
Member of Berlin Brands Group
Handwerkerstr. 11
15366 Dahlwitz-Hoppegarten
Deutschland
Congratulations on purchasing this device. Please read the following instructions carefully and follow them to prevent possible damages. We assume no liability for damage caused by disregard of the instructions and improper use. Scan the QR code to get access to the latest user manual and more product information.

CONTENTS
Specifications 32
Safety Instructions 33
Product overview 35
Before first Use 37
Overview of features and functions 39
Media Centre 42
DAB Radio (Digital Audio Broadcasting) 44
FM Radio 45
BT playback 46
Sleep Timer Setting 46
CD PLAYBACK 47
USB PLAYBACK 47
AUX IN playback 48
Alarm setting 48
LED Light 48
Configuration 49
Troubleshooting 54
Disposal Considerations 56
Declaration of Conformity 56
SPECIFICATIONS
Item number 10034031, 10034032
Power supply 230 V / 50 Hz
Power adaptor 12 V
Batteries 8× 1.5V = (LR14)
CD player
Supported audio format CD, CD-R / -RW, MP3 discs
FM radio
Tuning range 87.5 MHz - 108 MHz
DAB radio
Tuning range 174.9 MHz - 239.2 MHz (13F)
BT
Frequency 2402-2480MHz
WiFi 802.11 b/g/n
WiFi frequency 2.4G Band (2400-2483.5 MHz)
CLASS 1 LASER PRODUCT
CLASS 1 LASER PRODUCT APPAREIL A LASER DE CLASSE 1 PRODUCTO LASER DE CLASE 1
CAUTION INVISIBLE LASER RADIATION WHEN OPEN AND INTERLOCKS DEFEATED. AVOID EXPOSURE TO BEAM.

This product contains a low power laser device.
Follow the advice below for safe operation.
ON PROTECTION AGAINST LASER ENERGY EXPOSURE
- As the laser beam used in this compact disc player is harmful to the eyes, do not attempt to disassemble the casing.
- Stop operation immediately if any liquid or solid object should fall into the cabinet.
- Do not touch the lens or poke at it. If you do, you may damage the lens and the player may not operate properly.
- Do not put anything in the safety slot. If you do, the laser diode will be "ON" when the CD door is still open.
- If the unit is not to be used for a long period of time, make sure that the power source is disconnected from the unit. Unplug the AC cord from the wall outlet. Make it a practice to remove the AC cord by grasping the main body and not by pulling the cord.
- This unit employs a laser. The use of controls or adjustment or performance of procedures other than those specified here may result in exposure to hazardous radiation.
ON PLACEMENT
- Do not use the unit in places which are extremely hot, cold, dusty or humid.
- Place the unit on a flat and even surface.
- Do not restrict the air flow of the unit by placing it in a place with poor ventilation, by covering it with a cloth or by placing it on a carpet.
- Use only with the cart, stand, tripod, bracket, or table specified by the manufacturer, or sold with the apparatus. When a cart is used, use caution when moving the cart/apparatus combination to avoid injury from tipping over.
ON CONDENSATION
- When left in a heated room where it is warm and damp, water droplets or condensation may form inside the unit.
- When there is condensation inside the unit, the unit may not function
normally.
- Let it stand for 1 to 2 hours before turning the power on, or gradually heat the room up and dry the unit before use.
BATTERY NOTES AND CARE
- Danger of explosion if the battery is replaced incorrectly. Replace only with the same or equivalent type
- Do not mix old and new batteries.
- Do not mix alkaline, standard (carbon-zinc) or rechargeable (nickel-cadmium) batteries.
- If the unit is not to be used for an extended period of time, remove the batteries. Old or leaking batteries can cause damage to the unit and may void the warranty.
- Do not try to recharge batteries not intended to be recharged; they can overheat and rupture. (Follow battery manufacturer's directions).
- Do not dispose of batteries in fire, batteries may leak or explode.
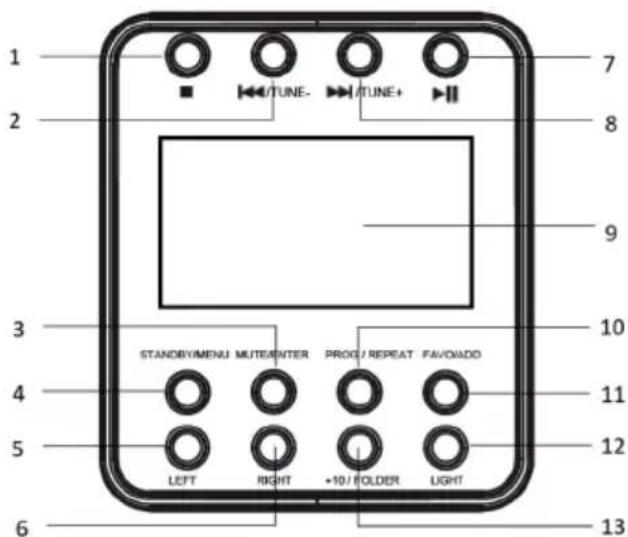
Control panel buttons
1 Stop button
2 Previous/tune- button
3 Mute/enter button
4 Standby/MENU button
5 Left button
6 Right button
7 Play/pair button
8 Next/tune+ button
9 LCD display
10 PROG/repeat button
11 FAVO/ADD button
12 Light button
13 Folder button
14 Volume button
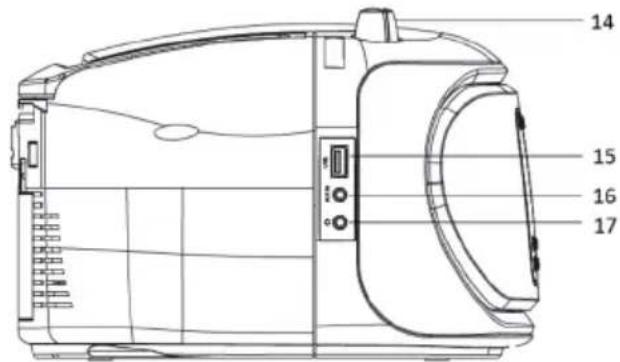
15 USB port
16 AUX IN
17 Earphone jack
18 Telescopic antenna
19 AC IN socket
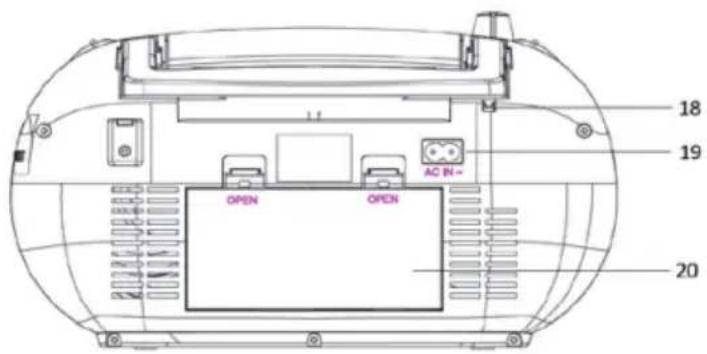
20 Battery compartment
BEFORE FIRST USE
Unpacking
- Remove all packaging
- Check the presence of all parts and for transportation damage, in case of damage or incomplete delivery, please contact your dealer.
- Please keep the packaging. The appliance can be stored if it is not used for a longer period of time.
- Place the appliance on a level, stable, clean and dry surface.
- Ensure that there is sufficient ventilation. Keep a minimum distance of 10cm between the product and other objects or walls.
Mains operation
- The appliance can either be powered through a wall outlet or by batteries.
- Insert the power cable into the AC IN~ inlet at the back of the appliance. Connect the power plug to a suitable wall outlet. Make sure that the power supply voltage is the same as needed for the appliance.
Battery operation
- Disconnect the power plug from the wall outlet before opening the battery compartment and inserting batteries.
- Open the battery compartment at the backside of the appliance.
- Insert 8 batteries (1.5 V, battery type LR14 / R14 / C) (not supplied) according to the polarity markings inside the battery compartment and on the batteries.
- Use batteries of high quality only, Batteries of low quality might leak and cause damage.
- Do not use new and old batteries together. Close the battery compartment lid after inserting the batteries.
Important:
- Do not use the appliance with a wall outlet and batteries at the same time. Remove batteries before connecting the appliance to mains power.
- If you will not use the appliance for a longer period of time, disconnect the power plug and remove all batteries.
Connecting to your Wireless Network
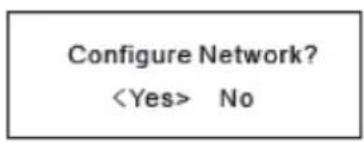
Press and hold the Standby button to turn on the boombox. It will display as below.
If this is the first use, the Configure Network wizard will be displayed. Choose yes to start configuring network. Press the left button to highlight Yes and press enter to confirm.
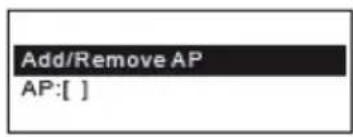
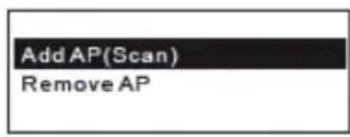
Select Add/Remove AP from list (AP is the access point), use the or button to scroll and press enter to confirm, and then choose Add AP (Scan):
It will start scanning the available Wi-Fi networks around. Scroll to your network and press enter to confirm. If your wifi network has a password protected, it will ask you to enter the passphrase / password. Here are the steps to enter the password.
Use the / button to scroll through the characters. When the correct one is highlighted, press the right button to input the next character. When it comes to the last character of the password and it is highlighted, press the enter button to confirm.
Note: The password is case sensitive. Please consult with the one who set up your network if you don't know the password.
When the Wi-Fi connection is successful, the Association Complete will be shown briefly. It will then display the main menu as follow:

OVERVIEW OF FEATURES AND FUNCTIONS
Press to enter the main menu. Scroll by / buttons and press the enter button to select:
| My Favourite | You can browse and stream music from your network via UPnP or DLNA-compatible devices.. |
| Internet Radio | Start exploring the worldwide radio stations and music here. |
| Media Centre | You can browse and stream music from your network via UPnP or DLNA Compatible devices. |
| DAB Radio | Pick up DAB+ and DAB radio signal if available in your local area (no internet connection required). |
| FM Radio | Receive ordinary FM radio stations in your local area (no internet connection required). |
| BT | BT playback, to play audio stream (receive) from another Bluetooth enabled device after pairing/connected each other. |
| CD Player | This appliance reads CD, CD-R / -RW, MP3 discs. |
| USB Player | This appliance features the ability to play music files in the MP3 format from a USB flash drive. |
| Sleep Timer | Enable the timer to turn the radio in standby after the selected time elapsed. |
| Alarm | Your radio includes dual alarms. |
| Mute | Press the mute button to make mute when unit is working. |
| Configuration | More options/settings available to personalize as desired. |
Notes:
- Always use the left button to exit to the previous menu.
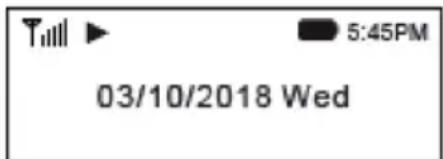
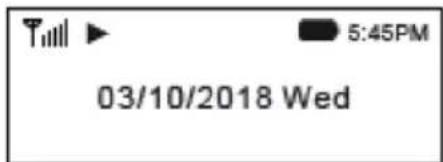
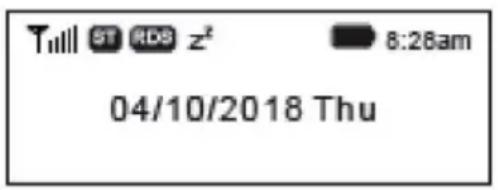
- The radio has a "Status menu" to show the time/date info. Under the playing screen of Internet radio, DAB and FM, press the right button and the "Status menu" will appear.
Internet Radio
On the main menu, choose Internet Radio and you will find the options below:
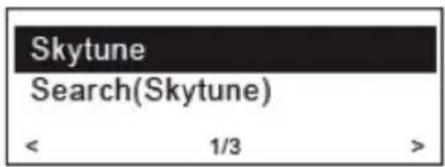
Skytune
Select Skytune to start enjoying tens of thousands of radio stations over the world.
You can filter your search by region, music genre and talks.
The Local Radio let you access quickly the stations available in your local area through internet connection.

Note - You can change the Local Radio area under Configuration>Local radio setup. Please refer to the section "Configuration" for details. Note - When you scroll along the list of Globe All and want to quickly reach to a certain point of the long list, press and hold the / buttons.
Search
Instead of browsing the radio station list, you can input a few characters of the desired station to filter out / short list the stations.
History
The radio memorises the stations you have listened up to 99 stations. If you have listened more than 99 stations, it will supersede the first station that you have listened.
Start playing internet radio
When it starts playing a radio station, various information will be displayed.
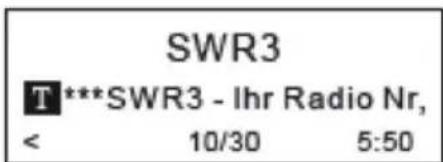
Under the playing screen, press the right button, it will display the date and time, as well as the battery level indicator.
Note: Whenever you want to return to the playing screen from other menu, press the MENU button or the left button repeatedly or wait for the time out.
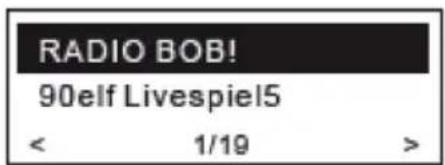
My Favourite
This is to show the list of your favourite stations which have been assigned to the presets.
Add to Favourite
When a radio station is playing, Press and hold the FAVO/ADD button on the unit, the station is added to the favourite list.

a notification will appear "----> FAV" meaning a station has been added to favourite
You can store up to 99 presets.
The newly added station will always appear in the last item on the Favourites list.
Recall a station
Press and release the FAVO/Add button to recall the favourite list or navigate to My Favourite on the main menu and select it to confirm. You can store up to 99 presets. The new added station will always appear in the last item on the Favourite list.
Recall a station
Press and release the FAVO/Add button to recall the favourite list or navigate to My Favourite on the main menu and select it to confirm.
Edit your Favourites list
On the Favourite list, choose the radio station you want to edit then press the right button. It will enter the Edit menu with the following options:
Move down - To move down the ranking of a station
Move up - To move up the ranking of a station
Delete - To delete a particular station
MEDIA CENTRE
UPnP (Universal Plug and Play)
You can stream music from the Networked device which supports UPnP function to the radio to play.
For instance, most of the latest computer laptop supports UPnP, and you can stream music from Windows Media Player application on the computer and listen on your radio.
Please make sure your computer laptop is on the same Wi-Fi network as the Radio before you start using this function.
The latest Windows Media Player may be downloaded from Microsoft's website and install by following the instructions detailed in its installation wizard. Once installed, Windows Media Player will create a library from all the media files available to it on your PC.
If you are using WMP 12, simply go to
Windows 7 or above requires the PC to be set as Home network and also with the Homegroup enabled to allow devices to access/ play the media files on your Windows Media Player. Please find the steps below:
-
Go to
, select -
Choose
- Set the network location
- Choose
- Create a homegroup, then choose the kind of media file to be accessed, such as music etc.
- Launch the Windows Media Player, select
and choose from the drop-down list. - You can now enjoy the music streaming from the windows media player.
Music streaming via UPnP
- Once the UPnP server is configured to share media files with your radio, you can start music streaming.
- On the main menu, select
and choose - It may take a few seconds for the radio to complete the scan for available UPnP servers, if no UPnP servers are found, it will show
. - After a successful scan is done, select your UPnP server.
- The radio will show the media categories available from the UPnP server, e.g. 'Music', 'Playlists' etc.
- Choose the media files that you wish to play.
You can set the mode of playback under.
My Playlist
You can make you own playlist for the UPnP music files. Choose the song you want to add to playlist, pressing and holding the dial until the sign appears. The song will be added to "My playlist". You can add up to 99 songs to "My Playlist".
The UPnP playlist will be erased when the radio is powered off.
Clear My Playlist
Remove all songs in "My Playlist" to allow a new playlist to be prepared.
DAB RADIO (DIGITAL AUDIO BROADCASTING)
If there is Digital Audio Broadcasting (DAB) in your area, the radio can pick up the DAB stations as well (no internet connection is required). The radio supports both DAB and DAB +
Place the radio close to the window and extend the antenna as far as it can go or move in different direction to get the best reception.
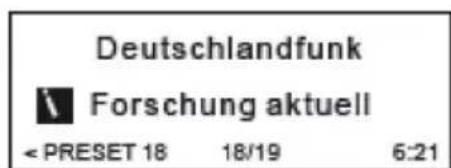
On the main menu, choose DAB Radio and press enter button to start. It will ask whether you want to Scan DAB Station. Press enter button to start scanning and it will show the progress on the number of channels received. When it is done, a preset list will be displayed for your action. You can select the channel and start listening to it. Whenever you want to add to My Favourite, press and hold the FAVO/ADD button on the unit and it will add to the favourites list. Press and release the button to recall the favourites list.
Always press the left button to return to the scanned preset list.
Note - It shows various information such as station name, radio frequency and rolling texts (if available) on the playing screen. Press the right button to view the date, time and battery level.
New digital radio stations should be picked up automatically by the radio if they are part of a multiplex you already receive. Otherwise you will need to do the preset scan again.
FM RADIO
To receive the ordinary FM stations (no internet connection is required), Place the radio close to the window and extend the antenna as far as it can go or move in different direction to get the best reception.
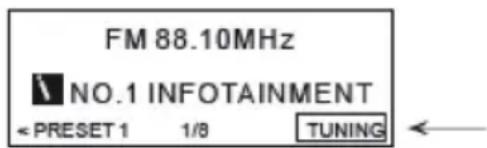
On the main menu, choose FM Radio and press enter button to start. It will ask whether you want to Scan FM Station. Press enter button to start scanning and it will show the progress on the number of channels are found. When it is done, it will automatically save the found channels on presets and display the list for your action.
You can select the channel and start listening to it. Whenever you want to add to My Favourite, press and hold the FAVO/Add button on the unit, and it will add to the favourites list. Press the FAVO/Add button to recall the favourites list.
Always press the left button to return to the scanned preset list.
Note - It shows various information such as station name, radio frequency and rolling texts (if available) on the playing screen. Press the right button to view the date, time and battery level indicator.
Manual Tune
To manual tune the frequency, press and hold the enter button, until you see the "Tuning" appeared on the display, at the bottom right corner. Use the tune+/tune- button to tune the frequency. When done, press and hold the enter button to exit manual tune.
BT PLAYBACK
- Press the MENU button to display the selection menu for the different operating modes.
- Use the / buttons to select the operating mode BT and press enter button to confirm.
- Switch on the BT device that you wish to connect the boombox to and activate the pairing mode here. The device will scan for BT devices in the reception range.
- When the boombox is found, your BT device shows its name "Roadie Smart".
- Select the boombox at your BT device.
- Start playback on your BT device.
- Playback now takes place using the radio.
Note: to disconnect the BT connection, please press and hold the pair button.
SLEEP TIMER SETTING
You can set the timer to make the radio switch to standby after the selected time in the range of 15 minutes to 180 minutes.
On the main menu, choose Sleep Timer and press enter button. Choose your desired time period and press the enter button to con rm. You will see the icon appeared on the top row under the status menu (press right button under the playing screen to view the status menu).
To see the time remaining for the sleep timer, choose Sleep Timer on the main menu and press the enter button. It will show the time left to go standby.
CD PLAYBACK
On the main MENU, choose the CD mode and press the enter button, then insert a CD. This appliance reads CD, CD-R / -RW,MP3 discs.
Press to play the music. Press to play the next song, press to return the last song. Press to stop the music.
Programmed play mode - In programmed play mode, you can programme the play order of the tracks on your CD. You can program up to 20 tracks in total.
Note: To set up programmed play mode, the CD must be stopped in the CD compartment and must not be paused or playing.
In CD mode, with the CD you wish to programme in the CD compartment and stopped.
- Press and release the PROG button to enter CD programmed play mode. 'Prog 1 Track1' will be displayed.
- Press the / button to go to the track number that you would like to programme to play first. Press and release the PROG button to confirm.
- 'PROG2 Track1' will now be displayed and you can select the second track that you would like to programmed. Continue to select each track as in Step 2 above, up to a total of 20 tracks. Press and release the PROG button again to confirm the last track in the programmed play mode list.
- Press and release the play button to play the programmed tracks.
- To exit programmed play mode, press and release the stop button twice.
Repeat- press and hold repeat button to choose repeat one, repeat all or random mode
USB PLAYBACK
On the main MENU, choose the USB mode and press the enter button, and then insert a
USB flash drive
Press the to play the music. Press to play the next song, press to return the last song. Press to stop the music.
AUX IN PLAYBACK
On the main MENU, choose the AUX IN mode and press the enter button.
Using a 3.5mm audio input connection cable (not included), AUX IN allows for a quick and easy connection to an external sound source.
- Connect one end of the 3.5mm audio connection cable to the headphone (or auxiliary out) socket of your secondary device, connect the other end to the Line in socket on the back of your boombox.
- Press the Play button on your external device to start playback through the boombox speakers.
- To gain optimal volume levels, adjust the output volume level on both the secondary device and on the Boom box.
ALARM SETTING
Your radio includes dual alarms. Set the alarm, making sure to set the time first.
- Press MENU button - Main menu - Alarms, and then press the enter button to confirm.
- Press the / buttons to select "Alarm 1" or "Alarm 2", then press the enter button to confirm.
- Press the / buttons to select Alarm on, then press the enter button to confirm.
- Set the alarm time, sound and repeat as in step 2 above.
- When the display shows "Alarm Saved", the alarm setting is successful or will show on the display.
- To temporarily switch off the alarm, press the enter button repeatedly to set the snooze time for 9 minutes in turn. The set snooze time will show on the display and unit will go to standby.
- To turn off the alarm, press and hold the enter button when the alarm sounds.
- To cancel off the alarm, refer to step 3 to switch the alarm "Off".
LED LIGHT
If the product is powered on, you can switch on the light by pressing the light button, and you can set 8 different light effects by pressing the light button.
CONFIGURATION
Here you will find the complete settings / options available to configure your own tuner. On the main menu, navigate to the configuration setting. Press enter button and you will see a list of available options.
Network
Wi-Fi Network
Add / Remove AP
Add AP - It will scan a list of wireless networks in the area.
Add AP (WPS button) - If WPS button is available on your router, you can choose this option to quickly connect to your Wi-Fi network without entering the password. Select this option on the boombox and press the enter button, it will show "Awaiting router info" on the display. In the meantime, press the WPS button on your router within one minute. It will time out if no action is taken. It is strongly recommended to place your radio within 2 metres to the router to setup.
Notes:
- In case the connection through WPS is not successful, repeat the steps above and try again.
- Remove AP - If you have already added a wireless network and want to remove it, choose this option.
- Always place the radio within 2 metres of the Wi-Fi router forest up.
AP: []
If you have added more than one wireless network on the radio and want to switch to another one, select this option to change.
Signal
This is to show the strength of the Wi-Fi signal of the Wi-Fi router as received by the radio. Usually signal levels lower than -70 dBm are at a weaker level. If it affects the reception of your radio, you may need to optimise the router location or check any problem of the router itself.
IP
The IP is set to Dynamic by default. Select to change Fixed IP according to your network condition.
DNS
The DNS is set to Dynamic by default. Select to change
Wi-Fi Channels
Not all of the Wi-Fi channels are available in every country. There may be variation between different countries. Therefore it is necessary to choose the Wi-Fi channels to ensure the Wi-Fi performs in a satisfactory way.
We have already set the channels according to the requirements in different countries. Choose the country you are staying from the list to get the correct channel
Date and time.
The radio will set your local time automatically after the internet connection is completed. If you want to set this manually, you change it with the following options:
Time zone
Auto-set time zone: This option is set by default.
Manual-set time zone: Choose this option if you want to set the time in another region.
Choose and highlight the region/city you prefer and press the enter button to confirm.
Coupled with NTP (use network time) and DST (daylight savings time) will be adjusted automatically if you choose to use network time (NTP).
Set Time Format: Choose either 12-hour or 24-hour notation you prefer.
Set date format
DST (daylight savings time) Enable on/off
NTP (use network time)
NTP is designed to synchronise a device's clock with a time server. Your boombox will synchronise the time server by default every time it powers up and connects to Internet. This ensures a very high degree of accuracy in the radio's clock. You can change to use another time server by inputting the URL address (see below NTP server). You can choose "Do not use network time" if you don't want it to.
If you choose not to use NTP for clock synchronisation, highlight the NTP (Network time protocol) and press OK to make the change. You will see the Set Date & Time appeared on the menu. Select it and adjust the date and time as you desire.
NTP Server: NTP is designed to synchronise a device's clock with a time server. Here it shows the server being used for the tuner.
Language
The default language is English; you can choose other languages as preferred. Scroll with the / buttons to the item with and press enter button. Scroll to highlight and press enter button to select your language of choice. English, French, Spanish, Italian, German, Dutch, Polish, Russian and Simplified Chinese are available.
Local Radio
The radio is set by default to detect the radio stations in your local area automatically through internet connection and these stations can be accessed by selecting Local Radio under Skytune> Local Radio. You can also set Local in another region if you want. Highlight the Local Radio and press the enter button. Choose Manual-set Local radio to change the region setting.
DAB set up
DAB FULL Scan
You can always carry out a new scan of DAB channels by selecting this option. All current presets and channels will be erased.
DAB Manual Tune
This can help you when adjusting your antenna or when adding stations that were missed.
DAB Station list
The scanned DAB stations will be listed here for management. You can move the position or even delete any station. Scroll to the station and press the enter button. A pop up window will be presented: Move up, Move down and Delete.
FM Setup
FM Area
Choose the Region according to your physical location to define the search range for the radio.
FM Full Scan
You can always carry out a new scanning of FM channels by selecting this option. All current presets and channels will be erased.
The radio at the lowest frequency of the scanned values will be highlighted.
The preset list will be saved unless a new preset scan is carried out.
FM Station List
You can adjust the preset ranking by Move down, Move up or Delete it. Highlight one of the presets, then press the right button, it will enter into the Edit menu. Always press the left button to return to the Preset list.
Playback Setup
This is to set the mode of playback under UPnP/DLNA-compatible streaming: Repeat All, Repeat Once or Shuffle.
Resume When Power On
This function is ON by default. The radio will resume to the last state of mode when the radio turns on next time, e.g. if it was playing radio station before power off, it will resume playing the last station listened to when it turns on next time.
Dimmer
You can set the backlight level for the display as you prefer. There are two settings: Mode and Level
Mode - Normal or Power Saving
Normal - the display will stay with the same level of brightness all the time without dim down. Dim - the display will dim down after 20 seconds if no operation is made on the radio.
- Level - Bright and Dim
Bright - This is to adjust the level of brightness in Normal mode. Dim - This is to adjust the level of brightness in Dim mode.
EQ(Equaliser)
Set the equaliser according to your listening preference.
Buffer Time
Sometimes you may experience uneven playback of the internet radio. This can happen if the internet connection is slow or network congestion occurs. To help improving the situation, you can choose longer buffer time to get a few seconds of radio stream before beginning to play. The default value is 2 seconds. You can choose 5 seconds if you prefer to have a longer a buffering time.
Information
View the Network and System Information of your radio.
When you use a PC to manage the My Favourite stations, you have to use the IP address and you can view this info from here. Then type in the IP address (Configuration>Info >Network>IP) to your PC's browser input
window.
Software Update
There may be a software release to upgrade features of the radio from time to time. Check the update regularly to keep your radio up to date with the latest software.
Reset to Default
You can do the reset to clear all the settings and return to default settings.
Please note that all the station presets, settings and configuration will be erased after you have performed the reset.
Add your favourite URL/ Manage favourite by PC
You can add your favourite radio station if you know the published audio stream URL of the radio.
We provide an embedded server for your radio and you can manage your favourite stations anytime to add or edit the list. Follow the steps below to access the embedded server:
- Connect your PC to the same Wi-Fi network as your radio.
- Locate the IP address as followed:
- On the main menu, go to Configuration > Information > Network Information > IP
- Open the web browser (we support Internet Explorer and Chrome) in your PC and type the IP address of the radio (e.g. 192.168.1.11). The screen will pop up as below:
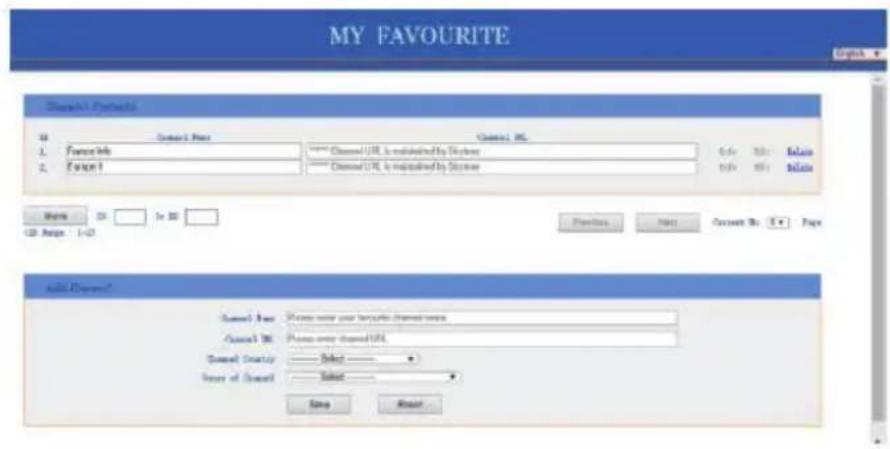
You can input the name and URL of a new radio station under the Add Channel section, then click Save. The new station will sync to the favourites list of your radio immediately. You can add up to 99 radio stations.
TROUBLESHOOTING
| Problem Cause Solutions | ||
| Cannot connect to Wi-Fi network | Network down | - Confirm that a Wi-Fi or Ethernet wired connected PC can access the internet (i.e. can browse the web) using the same network. - Check that a DHCP server is available, or that you have configured a static IP address on the radio. - Check that a firewall is not blocking any outgoing ports. At a minimum the radio needs access to UDP and DNS ports 80,443 and 8008, DNS part 53. |
| Router restricts access to listed MAC addresses | - Obtain the MAC address from Configuration> Information > Network > Wi-Fi MIAC and add to the allowed equipment list on your access point. - Note: The radio has separate MAC address for wireless networks. | |
| Insufficient Wi-Fi signal strength | - Check distance to the router; see if a computer can connect to the network in this location. - Optimise the distance of the router's location. - Always place the radio close to the muter within 2 metres. | |
| Unknown encryption method | - Change encryption method on router. - The radio supports WEP, WPA, WPA2 | |
| Firewall preventing access | - Windows Media Player: - various non-Microsoft firewalls may require configuration for UPnP. - Try other routers and see if the radio can connect, or if a hotspot is available on your mobile device, try to see if it can. | |
| If your radio can connect to the network successfully, but is unable to play particular stations. | - The station is not broadcasting at this time of the day (remember it may be located in a different time zone). - The station has too many people trying to attach to the radio station server and the server capacity is not large enough. - The station has reached the maximum allowed number of simultaneous listeners. - The link on the radio is out of date. - The streaming links will be updated regularly or, please contact our customer service. | |
| If it shows "Empty list when "Skytune" is selected. | Check if the history or favourites list can play. If there is no problem, please try again later after 30 minutes. If the stations under those lists cannot play, check the internet connection cable. | |
| If "Skytune is not ready" when Skytune is selected. | Try to play the list under history or favourites. If both cannot play, check your internet connection and see if other devices connected to the same network are working. If the favourites list and history can play, power the radio off and on and try again to see. If the problem persists, please contact us for further assistance. | |
| No DAB/FM radio reception - Please carry out "Factory Reset" on the radio under Configuration in the main menu and extend the antenna. Try different lengths and directions for the antenna. - Move the radio close to the window. | ||
| DAB/FM radio reception is poor. - Please adjust the length / direction of the antenna to reach a better reception. | ||
| No sound - Adjust the volume level. | - Check if the internet radio playback has stopped. Press the OK button to play. | |

If there is a legal regulation for the disposal of electrical and electronic devices in your country, this symbol on the product or on the packaging indicates that this product must not be disposed of with household waste. Instead, it must be taken to a collection point for the recycling of electrical and electronic equipment. By disposing of it in accordance with the rules, you are protecting the environment and the health of your fellow human beings from negative consequences. For information about the recycling and disposal of this product, please contact your local authority or your household waste disposal service.
This product contains batteries. If there is a legal regulation for the disposal of batteries in your country, the batteries must not be disposed of with household waste. Find out about local regulations for disposing of batteries. By disposing of them in accordance with the rules, you are protecting the environment and the health of your fellow human beings from negative consequences.
DECLARATION OF CONFORMITY
CE UK CA
Manufacturer:
Chal-Tec GmbH, Wallstrasse 16, 10179 Berlin, Germany.
Importer for Great Britain:
Berlin Brands Group UK Ltd PQ Box 1145
Oxford, OX1 9UW
United Kingdom
Hereby, Chal-Tec GmbH declares that the radio equipment type Roadie is in compliance with Directive 2014/53/EU. The full text of the EU declaration of conformity is available at the following internet address: use.berlin/10034031
For Great Britain: Hereby, Chal-Tec GmbH declares that the radio equipment type Roadie is in compliance with the relevant statutory requirements. The full text of the declaration of conformity is available at the following internet address: use.berlin/10034031
Chere cliente, cher client,
CLASS 1 LASER PRODUCT
CLASS 1 LASER PRODUCT APPAREIL A LASER DE CLASSE 1 PRODUCTO LASER DE CLASE 1
CAUTION INVISIBLE LASER RADIATION WHEN OPEN AND INTERLOCKS DEFEATED. AVOID EXPOSURE TO BEAM.

This product contains a low power laser device.
Add to Favourite (ajouter aux favors)
UPnP (Universal Plug and Play)
- List de stations DAB
Berlin Brands Group UK Ltd
PO Box 1145
Oxford, OX1 9UW
United Kingdom
CLASS 1 LASER PRODUCT
CLASS 1 LASER PRODUCT APPAREIL A LASER DE CLASSE 1 PRODUCTO LASER DE CLASE 1
CAUTION INVISIBLE LASER RADIATION WHEN OPEN AND INTERLOCKS DEFEATED. AVOID EXPOSURE TO BEAM.

This product contains a low power laser device.
PROTECCION CONTRA LA EXPOSICION AL LÁSER
Add to Favourite (ajouter aux favors)
REPRODUCTOR BLUETOOTH
Berlin Brands Group UK Ltd
PO Box 1145
Oxford, OX1 9UW
United Kingdom
CLASS 1 LASER PRODUCT
CLASS 1 LASER PRODUCT APPAREIL A LASER DE CLASSE 1 PRODUCTO LASER DE CLASE 1
CAUTION INVISIBLE LASER RADIATION WHEN OPEN AND INTERLOCKS DEFEATED. AVOID EXPOSURE TO BEAM.

This product contains a low power laser device.
UPnP (Universal Plug and Play)
Berlin Brands Group UK Ltd
PO Box 1145
Oxford, OX1 9UW
United Kingdom