SD9 - Keyboard KETRON - Free user manual and instructions
Find the device manual for free SD9 KETRON in PDF.
| Product Type | Multimedia Arranger Keyboard |
| Brand | Ketron |
| Model | SD9 |
| Power Supply | DC 9V 4A power adapter (included) |
| Display | Large color touch screen |
| Audio Connectivity | MAIN OUT outputs (L/R mono Jack), headphone output (Aux), MIC IN input (combo Jack/XLR), INPUT input (Jack), MIC OUT output |
| MIDI Connectivity | MIDI IN 1 (GM), MIDI IN 2 (Key), MIDI OUT, MIDI THRU |
| USB Connectivity | 3 USB Host ports (front) + 1 USB Device port (rear) |
| Video Connectivity | DVI output for external display |
| Pedals | SUSTAIN PEDAL jack (Jack), VOLUME PEDAL jack (stereo Jack), multi-pole FOOTSWITCH jack compatible with FS6/FS13 |
| Controls | GAIN MICRO potentiometer for microphone 1 |
| Main Functions | Multimedia player, sound reinforcement, automatic accompaniment, sequencer, effects |
| Cleaning | Soft dry cloth. Do not use solvents. |
| Safety | Do not expose to rain or humidity. Unplug if not used for a long time. Do not open. |
| Support Compatibility | Use exclusively the support recommended by the manufacturer |
| Power On | Up to 30 seconds to start, up to 10 seconds to shut down |
Frequently Asked Questions - SD9 KETRON
User questions about SD9 KETRON
0 question about this device. Answer the ones you know or ask your own.
Ask a new question about this device
Download the instructions for your Keyboard in PDF format for free! Find your manual SD9 - KETRON and take your electronic device back in hand. On this page are published all the documents necessary for the use of your device. SD9 by KETRON.
USER MANUAL SD9 KETRON
text_image
SD9 KETRONGUIDA PRATICA | QUICK GUIDE | KURZANLEITUNG GUIDE PRATIQUE | GUIA RAPIDA | GUIA RAPIDO
ITALIANO 3
ENGLISH 7
DEUTSCH 11
FRANÇAIS 15
ESPAÑOL 19
PORTUGUÊS 23
TECHNICAL TABLE 27
Benvenuti!
natural_image
Front view of a KETRON audio workstation keyboard with visible keys and control panel (no readable text or symbols)text_image
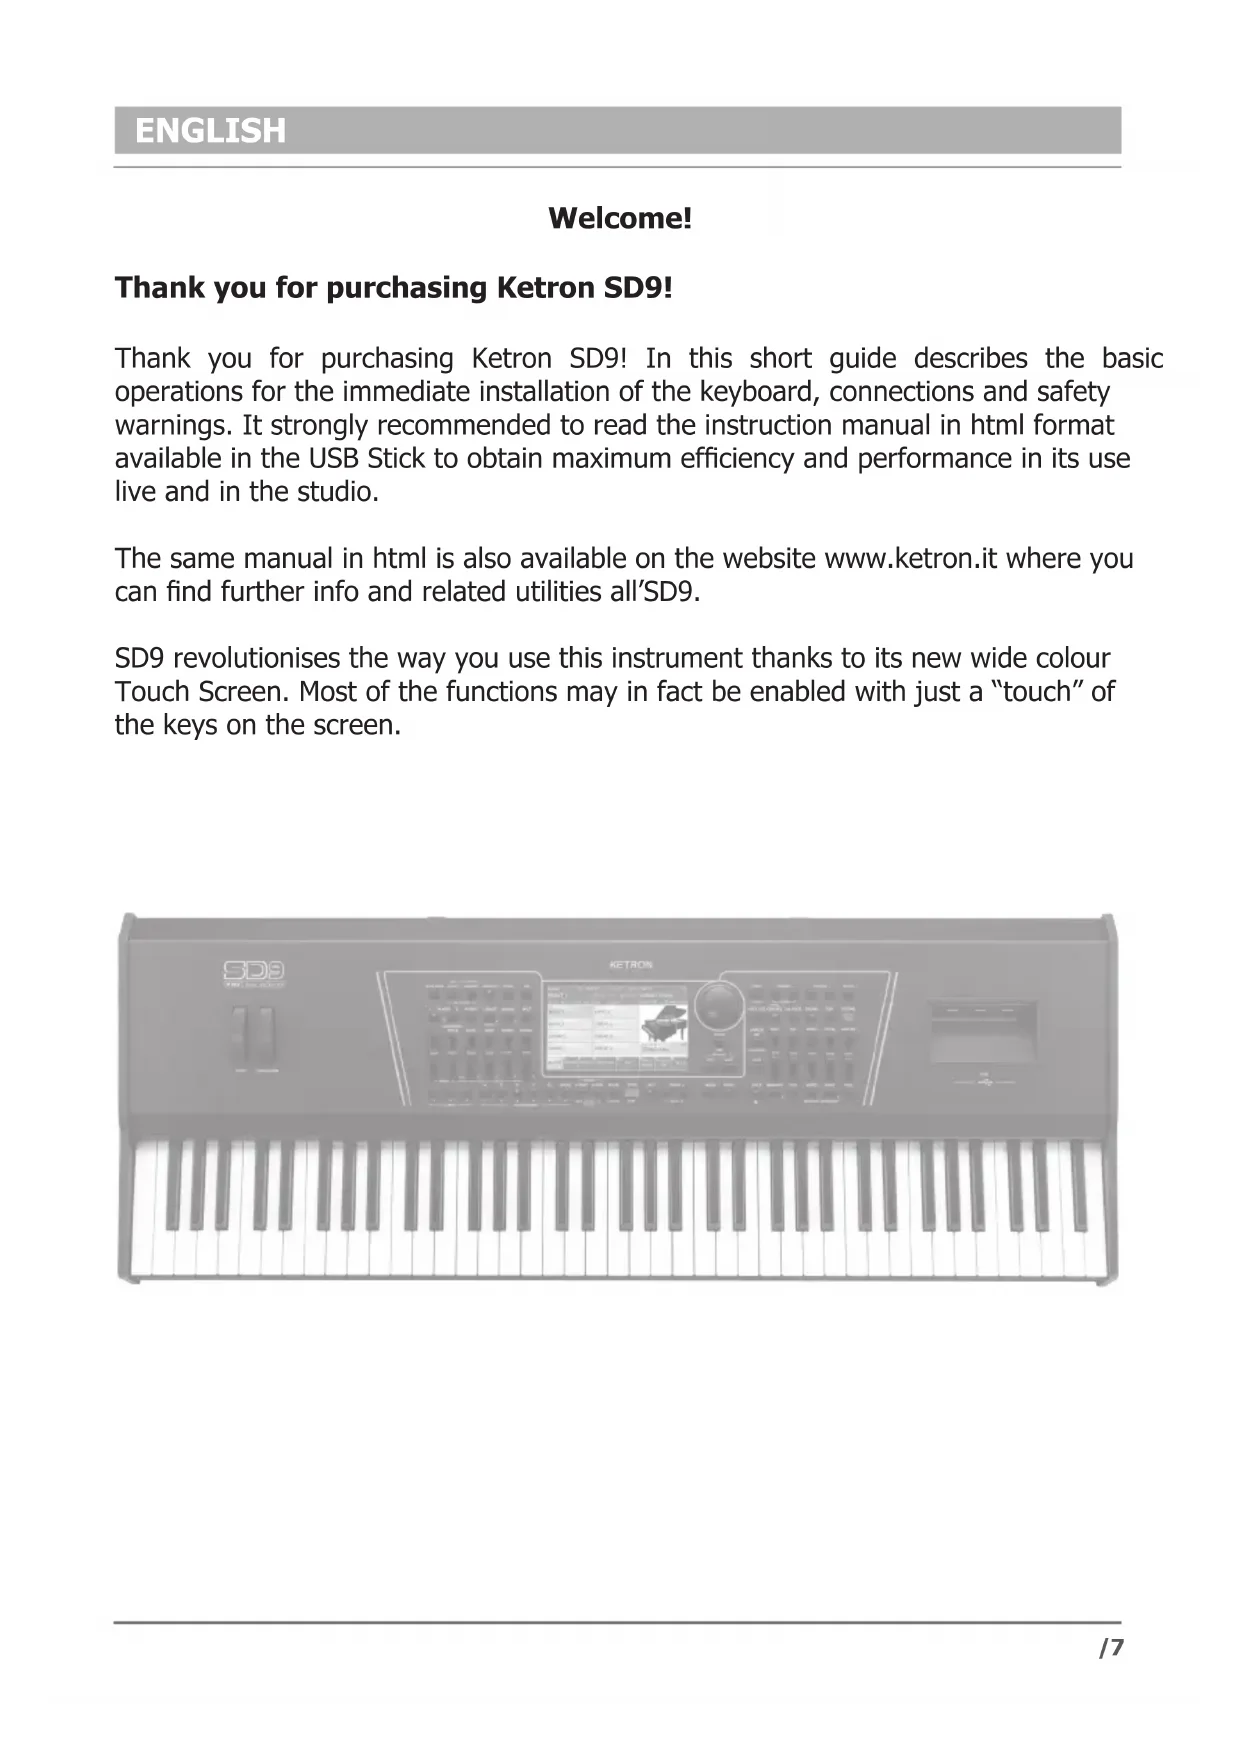
USB USB ON/OFF DCRF AS SUSTAIN VOLUME FOOT/SWITCH THIPS OUT INCH BANIN RIOLE OUT RIGHT LEFT HEADPHONE PUR OUT GABN INPUT MICROThank you for purchasing Ketron SD9!
Thank you for purchasing Ketron SD9! In this short guide describes the basic operations for the immediate installation of the keyboard, connections and safety warnings. It strongly recommended to read the instruction manual in html format available in the USB Stick to obtain maximum efficiency and performance in its use live and in the studio.
The same manual in html is also available on the website www.ketron.it where you can find further info and related utilities all'SD9.
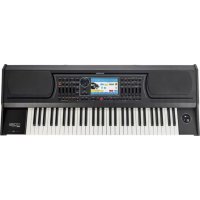
SD9 revolutionises the way you use this instrument thanks to its new wide colour Touch Screen. Most of the functions may in fact be enabled with just a “touch” of the keys on the screen.
natural_image
Front view of a KETRON audio workstation keyboard with visible keys and control panel (no readable text or symbols)RISK OF FIRE, ELECTRIC SHOCK OR INJURY TO PERSONS.
Caution: to reduce the risk of fire or electric shock, do not expose the instrument to rain or humidity.
IMPORTANT INSTRUCTIONS FOR SAFETY AND INSTALLATION
CAUTION – When using an electrical product it is important to take a number of precautions such as the following:
- Read the Instruction Manual before using the instrument.
- An adult should always supervise children when they play the instrument.
- Do not use the instrument in areas subject to seepage or water spray, such as next to a sink, a swimming pool, on a damp surfaces etc.; do not place containers with liquids on the instrument to prevent accidental seepage of liquid into the instrument.
- The instrument should be used only on a stand recommended by the manufacturer.
- Do not use the instrument at a very high volume for long periods of time: very high noise levels are dangerous to health.
- Position the instrument in such a way as to ensure appropriate ventilation.
- Keep the instrument away from heat sources such as central heating radiators, stoves etc.
- Connect the instrument to the mains only with the mains adapter. You will find the identification and power supply details under the instrument.
- Disconnect the power supply cable if the instrument is not to be used for a long period of time.
- If necessary, disconnect the instrument using the power supply switch on the back panel. When positioning the instrument, always ensure that this switch is easy to reach.
• Take the instrument to a service centre if:
a. the power supply cable or plug are damaged.
b. objects or liquid have fallen into the instrument.
c. the instrument has been exposed to rain.
d. the instrument is not functioning properly or performance is impaired.
e. the instrument has been dropped or the chassis is damaged. - Never attempt to repair the instrument on your own; all repairs should be carried out by a qualified technician.
KEEP THIS INSTRUCTION MANUAL IN A SAFE PLACE
PREVENTING RADIO/TV DISTURBANCE
This instrument operates on the radio frequency band. If it is not installed correctly and strictly in compliance with the instructions provided it may disturb the reception of radio-television appliances. Although the instrument you have purchased has been designed in compliance with applicable laws and in such a way as to provide reasonable protection against such disturbances, there is no guarantee that these will not occur. To check whether any disturbance you are experiencing is in fact produced by your instrument, turn it off to see if the disturbance disappears. Turn the instrument on again to see if the disturbance reappears. Once you are certain that your instrument is in fact causing the disturbance, take any of the following measures:
- Adjust the antenna of the radio or TV receiver.
- Place the instrument in a different position with respect to the radio or TV receiver.
- Place the instrument further away from the receiver.
- Connect the plug of the instrument to another socket so that the instrument and the receiver are connected to two different circuits.
- If necessary, call in a servicing technician.
POWER SUPPLY
- When you connect the instrument to other appliances (amplifier, mixer, Midi instruments etc.), ensure that all the units are off.
- Read the recommendations regarding Radio and TV disturbances.
INSTRUMENT CARE
- Clean the surfaces of the instrument with a soft dry cloth. Never use gasoline, diluting agents or solvents of any kind.
OTHER PRECAUTIONS
If you wish to use your instrument in a foreign country and have doubts about the power supply, consult a qualified technician before you leave. The instrument should never be subjected to strong shocks.
CURRENT ADAPTERS
When connecting this instrument to the mains socket, use only the KETRON current adapter supplied with the instrument. The use of different current adapters may damage the power supply circuits of the instrument. It is therefore of fundamental importance to use only an original adapter, requesting the correct model when ordering a new adapter.
"Implementation of Directive 2002/95/CE, 2002/96/CE and 2003/108/CE on reduced use of dangerous substances in electrical and electronic appliances and waste disposal".
The crossed bin symbol shown on the appliance means that at the end of its life the instrument must be disposed of separately from other waste. At the end of its life the user should therefore take the instrument to a separate waste centre for electronic and electrical products, or return the same to the dealer when purchasing a new and similar instrument, whichever is applicable. Disposing of the instrument correctly so that it may be consequently recycled and disposed of in an environmentally compatible manner helps to prevent possible negative effects to the environment and health and ensures that the components of the instrument are recycled. Unauthorised disposal of the product by the user entails the application of administrative penalties.

This symbol indicates that in EU countries, this product must be collected separately from household waste, as defined in each region. Products bearing this symbol must not be discarded together with household waste.
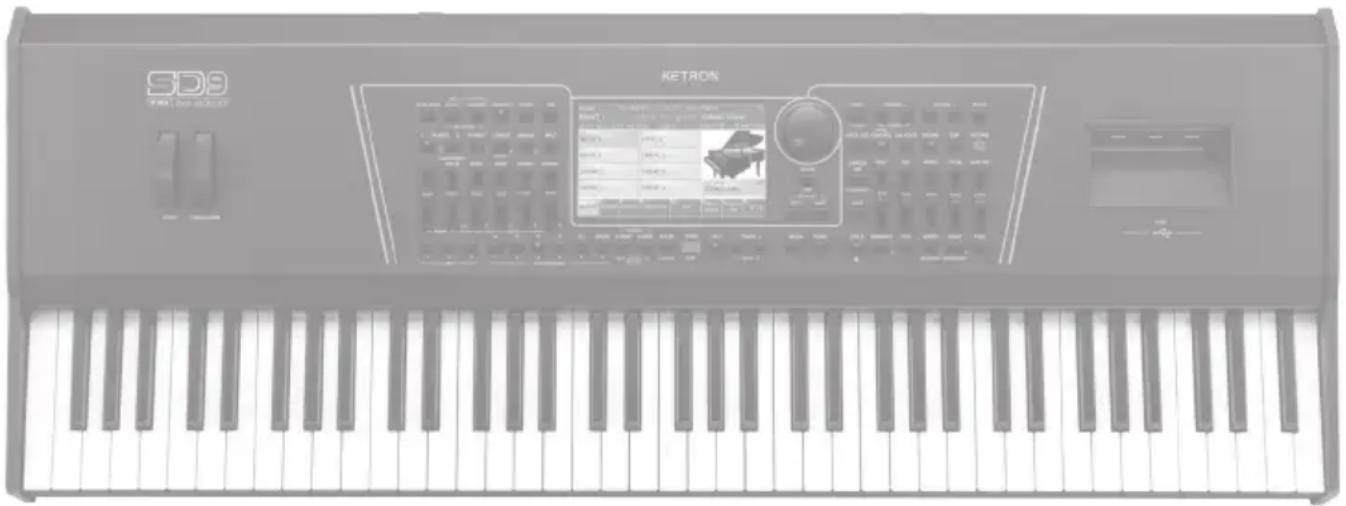
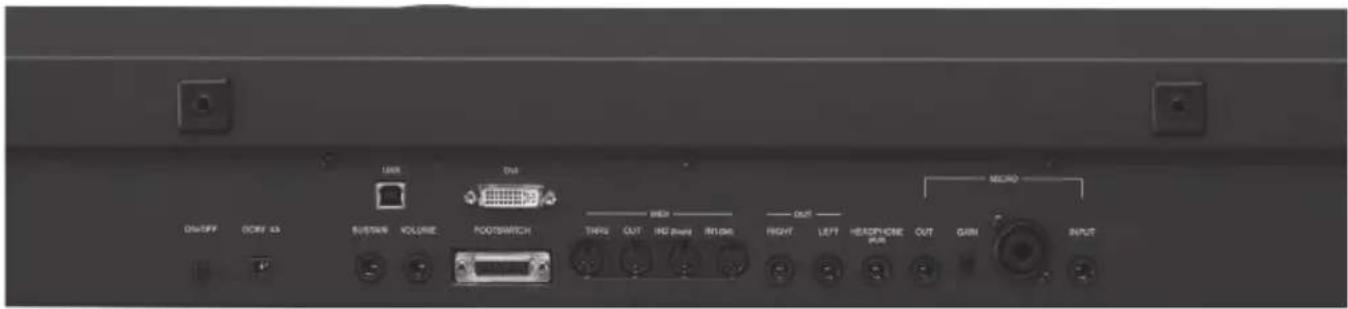
CONNECTIONS
text_image
USB USB ON/OFF DC/FA AS SUSTAIN VOLUME FOOT/SWITCH THIPS OUT INCH BANIN RIOLE OUT RIGHT LEFT HEADPHONE PUR OUT GABN INPUT MICRODC 9 V 4A Mains power supply socket Please use only the power supply supplied with the instrument. Output: 9 V, 4 A.
ON/OFF ON/OFF key. This instrument may take up to 30 seconds to start up. To turn off the instrument, press the ON/OFF key and wait for the instrument to turn off. This may take up to 10 seconds.
SUSTAIN PEDAL Standard jack to connect a Sustain pedal (optional).
VOLUME PEDAL Standard stereo jack to connect a Volume pedal (optional).
VIDEO DVI Digital video interface for connection to an external video monitor.
USB DEVICE This is used to connect a computer USB device or other devices to manage the SD9 as an external removable unit.
FOOTSWITCH Standard multi-pin plug for connection of an optional pedal to control a number of internal functions. Compatible with Ketron FS6/FS13.
MIDI Plugs for MIDI IN1 (GM), MIDI IN 2 (Key), MIDI OUT and MIDI THRU connection.
MAIN OUT Standard mono jack for the main output to connect to a PA STEREO system: left (Left Mono), right (Right Mono). We strongly recommend that you use the stereo connection for best performance of the instrument and relevant EFXs. A Mono connection (namely use of only the Left or Right output) will give poorer reproduction with respect to quality of the sounds and EFXs of the instrument.
HEADPHONE (Aux) Standard stereo jack for connection to a headphone. The volume of the headphone is controlled by the Master section.Aux separate Out Assign.
MICRO IN Standard mono combo plug (Jack/Xlr) for connection of a dynamic microphone.
GAIN MICRO Potentiometer for adjustment of the Micro 1 input signal gain.
MICRO OUT Standard mono jack dedicated exclusively to the Micro 1 output.
INPUT Standard mono jack for connection of auxiliary other instrument such Keyboard, Expander, Guitar or Dynamic Microphone.
text_image
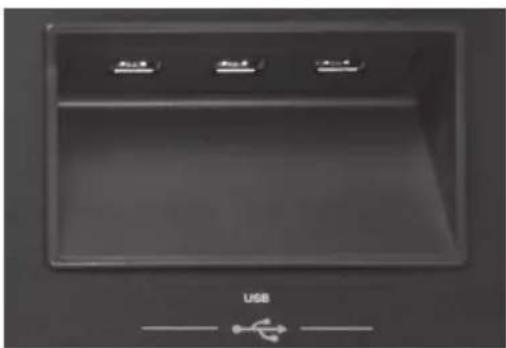
USBOn the right of the instrument you will find 3 USB Hosts for connection to external USB devices such as Pen drives, HD etc.
natural_image
Front view of a KETRON audio workstation keyboard with visible keys and control panel (no readable text or symbols)text_image
USB USB ON/OFF DCRF AS SUSTAIN VOLUME FOOT/SWITCH THIPS OUT INCH BANIN RIOLE OUT RIGHT LEFT HEADPHONE PUR OUT GABN INPUT MICRODC 9 V 4A
natural_image
Front view of a KETRON audio workstation keyboard with visible keys and control panel (no readable text or symbols)INSTRUCTIONS CONCERNANT LES RISQUES D'INCENDIE, LES DECHARGES ELECTRIQUES OU LES RISQUES D'ACCIDENTS PERSONNELS
text_image
USB USB ON/OFF DCRF AS SUSTAIN VOLUME FOOT/SWITCH THIPS OUT INCH BANIN RIOLE OUT RIGHT LEFT HEADPHONE PUR OUT GABN INPUT MICROnatural_image
Front view of a KETRON audio workstation keyboard with visible keys and control panel (no readable text or symbols)INSTRUCCIONES RELATIVAS AL RIESGO DE INCENDIOS, DESCARGAS ELÉCTRICAS O LESIONES PERSONALES.
text_image
USB USB ON/OFF DC/FA AS SUSTAIN VOLUME FOOT/SWITCH THIPS OUT INCH BANIN INCH OUT RIGHT LEFT HEADPHONE PUR OUT GABN INPUT MICROnatural_image
Interior view of a computer monitor with three labeled buttons and an 'USB' indicator below (no readable text or symbols on the screen)natural_image
Front view of a KETRON audio workstation keyboard with visible keys and control panel (no readable text or symbols)RISCO OU INCENDIO, CHOQUE ELÉCTRICO OU DANOS A PESSOAS.
text_image
USB USB ON/OFF DCRF AS SUSTAIN VOLUME FOOT/SWITCH THIPS OUT INCH BANIN RIOLE OUT RIGHT LEFT HEADPHONE PUR OUT GABN INPUT MICRO- Keyboard: 61 key light weighted. 3 Velocity Curves. Aftertouch. Portamento. Joystick: Pitch. Modulation. Transposer: +/- 24. Octave: +/- 2.
• Poliphony: 128 note. Multitimbral 48 parts. - Display: Lcd color Tft 7". Touch screen capacitive 800 x 480 dots. Brightness control.
- Sound & Voices: 672 GM Sounds. 5 Sound Banks. 61 Drum Sets. 368 Preset Voices. 1500 User Voices. 2nd Voice. V-Tone. Advanced Voice Editing. Voice List: 80 Voices programmable and Style assignable. Filter and Resonance live controls.
- Live Drum: Up to 100 Stereo Live Drums. Wav streaming with Time stretching and 3 Band stereo Equalizer. Full Arranger structure with ABCD, Fill, Break, Intro-End.
• Live Guitar: 150 audio Live Guitars (Folk Acoustic, Electric, Nylon). Stereo and Mix version.
• Grooves: 530 Grooves with Latin Percussions, Brazilian, individual and full Drums loops.
• Audio Drum (Grv): 159 sliced audio Drums loops. Full Arranger structure with ABCD, Fill, Break, Intro-End. - Arranger: 400 styles. 140 Live Styles with Live Drums, Live Guitars and Grooves. Compatibility with User Audio Drum @ from Audya series and SD Series (SD7, SD40, SD80). 4 Arranger ABCD. 4 Fill. 4 Break. 3 Intro. 3 Ending. Auto Fill. Fill to Arrange. To End. Reintro. Key Start. Key Stop. Restart. Pause. Count In. Midi Drum Mixer & Remap. Drum Boost. 4 Voice Variations. Voice to ABCD. Voice List assign to Style. 5 User Tabs. Pianist and Bassist mode. Manual Bass. Bass to Lowest. Bass to Root.
- Style Edit: Full Pattern creation and Editing. Functions: Record, Copy, Clear, Quantize, Velocity, Octave. User Style section (unlimited disk locations).
- Live Modeling: Style Live Modeling Library with Live Drums, Grv (Audio Drum Loops), Live Guitars, Grooves, Bass, Piano, Guitar, Orchestral and Synth templates.
- Launchpad: Up to 2048 Launchpad projects. 12 pads with 6 Scenes. 30 internal demos. 3 x Wav simultaneous with Time stretching and Midi synchronization. Functions: Record, Phase, Song, Single/Loop, Pad control, Harmonic/Melodic mode, Live Efx pad control. Drum kit Looper. Style Import. Full interaction with Style Live Modeling.
- Player: Double Player. Files recognized: Wav, Midi, Mp3, Mp4, Avi, Mov, Flv, Cdg, Jpg, Txt, Pdf. Functions: Marker. Sync/Next. Autoplay. Lead Mute. GM part. Lyric Off. Cross fade. File Search. Play List. My Folder. Transposer. Time stretching. Metronome Click. Midi Multimix. Song Drum Restyle. Audio and Midi synchronize.
- Audio Multitrack Player: 5+1 Audio tracks with separate slider control. Metronome click out.
• DJ: Double Audio and Midi player with Tempo & Pitch stretching, Pfl, Sync, Tap tempo, Cue, Fx Pad, Backspin, Brake.
• Juke Box: Play List, My Folders, SFX Special Effects. - Pic& Movie: Jpg & Mp4, Avi, Mov, Flv, Karaoke background, Movie/PDF To RGB, Pic List, Autoshow.
• Dvi: Video Monitor Out, Karaoke Lyric / Mirror. - Menu: Disk, Midi, Play Modes, Audio Edit, Language, Footswitch, Preferences, Controls, Video, Reg. Set up, Arabic Mode.
- Media: Internal Storage: SSD Card 16G. Usb: 3 Host + 1 device. External Storage: Removable HD_ SATA 2.3_2,5".
- Play Modes: Master keyboard. Accordion Style and Classic. Organ (with Pedalboard). Guitar mode with Efx (thru Input).
- Keyboard Control: Live Efx Chain editing. Aftertouch, Portamento, Double controls.
- Registrations: 4 Banks x 1024 Regs. Full Panel and function programming. 4 Playbox with 1024 files per folder (including Midifile, Mp3, Wav).
- Dsp: 2 x DSP with 2 separate Reverb units, Chorus, Reverb, Flanger, Phaser, Tremolo, Rotary, Autopan, Echo Delay, Tap Delay, Equalizer, Distorsion, Amp simulator, Compressor, Filter. 64 Insert EFX Chains (10 User programmable).
• Recording: HD Recording. 1 Stereo track. Loop. Audio Edit with Cut, Normalize. Midi Recording with Phrase and Song. - User Memory: up to 400 MB free User programmable.
- Micro: XLR Input. Gain control. Volume. Reverb. Micro On/Off Edit. Talk.
• Voicetron: 3 Voice Vocalizer. Manual, Unison, Midi Mode, Pitch Corrections, Autotune, Harmony Duet & Trio. 10 Voicetron User. - Instruction Manual: Html on board.
- Midi: In1 (Gm), In 2 (Keyb). Out. Thru. Midi Set up: Standard, Computer & Sequencer, Keyboard Right, Accordion, Player, Style.
- Out: Left/Right Stereo, Pedal Volume, Sustain Pedal, Micro Out.
- Input: Guitar (Instrument)/Micro2.
- Headphone: Stereo Headphone. Aux separate Out Assign (to Drums, Right, Bass, Click).
- Optional: Footswitch 6 or 13, Volume Pedal, Sustain pedal, Bag.
• Power Supply: External 9V-4A. - Dimensions: 108,5 × 14,5 × 40 cm. (42,5 x 5,7 x 15,7 inches).
• Weight: 16 Kg. (35 lbs.)

text_image
SD9PRO live station
KETRON s.r.l.
Via Giuseppe Taliercio n. 7
60131 Ancona (Italy)
Tel. +39 071 285771
Tel. +39 071 2857748
ketron@ketron.it
www.ketron.it