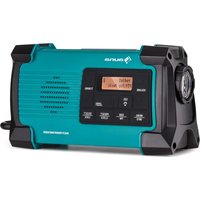
KCD20 - Radio Auna - Free user manual and instructions
Find the device manual for free KCD20 Auna in PDF.

User questions about KCD20 Auna
0 question about this device. Answer the ones you know or ask your own.
Ask a new question about this device
Download the instructions for your Radio in PDF format for free! Find your manual KCD20 - Auna and take your electronic device back in hand. On this page are published all the documents necessary for the use of your device. KCD20 by Auna.
USER MANUAL KCD20 Auna
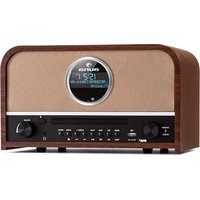
KCD-20 Kichenr radio
300
www.auna-multimedia.com
Member of Berlin Brands Group
Handwerkerstr. 11
15366 Dahlwitz-Hoppegarten
Deutschland
Berlin Brands Group UK Ltd
PO Box 1145
Oxford, OX1 9UW
United Kingdom
Congratulations on the purchase of your device. Please read the following instructions carefully and follow them to prevent potential damage. We accept no liability for damage caused by disregarding the instructions and improper use. Please scan the QR code to access the latest operating instructions and further information about the product.

CONTENTS
Safety Instructions 22
Device Overview 24
Remote control 27
Assembly 28
Getting Started 29
Set time 30
Radio Functions 30
CD Functions 32
USB Functions 32
System requirements for MP3 files 33
Tone control - EQ 33
AUX connection 33
Timer Functions 33
Disposal Considerations 34
Declaration of conformity 34
TECHNICAL DATA
| Article number 10029159 | |
| Power supply 100-240 V ~ 50/60 Hz | |
| Speaker Integrated | |
| Scope of delivery Device, mounting material, operating instructions | |
SAFETY INSTRUCTIONS
General instructions
- Lightning - If you do not use the device for a longer period of time or in the event of electrical storms, unplug the device from the power outlet or disconnect the device from the antenna connection. This prevents damage to the product due to lightning and overvoltage.
- Overloading - Do not overload electrical outlets, extension cords or integral sockets as this may result in a fire or electric shock.
- Foreign objects and liquid entry - Never push objects of any kind into the unit through openings as they may touch dangerous voltage points or short out parts that could cause a fire or electric shock. Never spill liquids of any kind on the unit.
- Repair and maintenance - Do not attempt to service this product yourself as opening or removing covers may expose you to dangerous voltages or other hazards. Leave all maintenance work to qualified service personnel.
- Damage requiring servicing - Unplug the appliance from the wall outlet and refer servicing to qualified service personnel when any of the following situations occur:
a) If the mains cable or plug is damaged.
b) If liquid has been spilled or objects have fallen onto the product.
c) If the product has been exposed to rain or water.
d) If the product has been dropped or damaged.
e) If the product has a significantly reduced performance.
- Spare parts - If spare parts are needed, make sure that the specialist company replacing the parts only uses spare parts that are approved by the manufacturer or have the same characteristics as the original part. Unauthorised substitutions may result in fire, electric shock or other hazards.
- Heat - Do not install near any heat sources such as radiators, heat registers, stoves, or other products (including amplifiers).
Special notes
Children over 8 years as well as mentally, sensory and physically impaired persons may only use the device if they have been informed in detail about the functions and safety precautions by a supervisor responsible for them beforehand and understand the associated risks.
- Children should be supervised to ensure that they do not play with the device. Make sure that children and babies do not play with plastic bags or other packaging materials.
- Make sure that the mains plug/mains adapter always remains easily accessible so that the unit can be quickly disconnected from the mains in an emergency.
- When you are no longer using the device, switch it off and pull the plug out of the socket.
DEVICE OVERVIEW
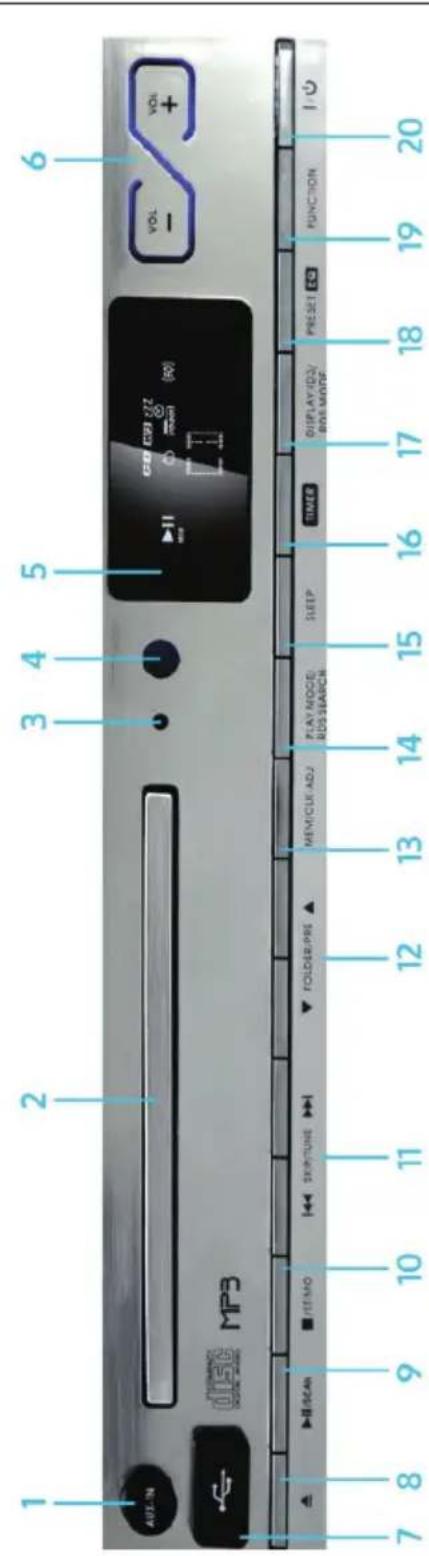
| 1 | AUX-In For connecting external devices via 3.5 mm audio cable | 11 | SKIP/TUNE Title back/forward. Press and hold for fast rewind or fast forward. In radio mode: Search for stations |
| 2 | CD tray | 12 | FOLDER/PRE In MP3 CD/USB mode: Select folder. In radio mode: Select preset |
| 3 | Standby LED | 13 | MEM / CLK-ADJ In radio mode: Go to preset mode / select preset. General: Set time |
| 4 | IR sensor for remote control | 14 | PLAY MODE / RDS-SEARCH CD/USB Select play mode. In radio mode: Scan for RDS criteria |
| 5 | Display | 15 | SLEEP Set the sleep timer |
| 6 | VOL+/- keys | 16 | TIMER Set alarm time / egg timer |
| 7 | USB connection | 17 | DISPLAY/ID3/RDS MODE CD/USB Change display Radio: Switch RDS reception on / off |
| 8 | Open/close CD tray | 18 | PRESET EQ Select equalizer preset |
| 9 | Play/Pause/SCAN | 19 | FUNCTION Function setting |
| 10 | Stop/ST/MO To pause CD/USB playback. In radio mode: choice between mono/stereo reception | 20 | On/Off switch |
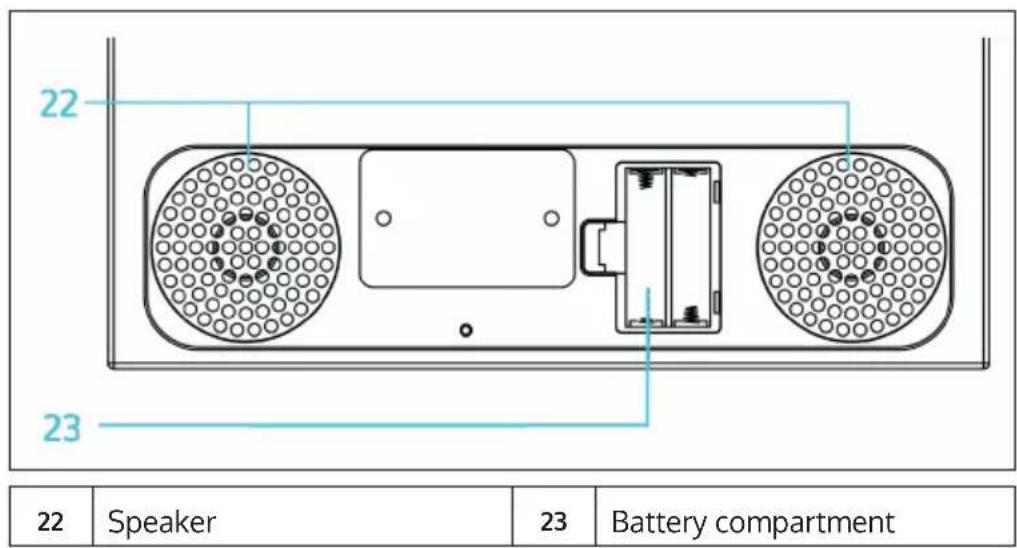
Bottom
Back side
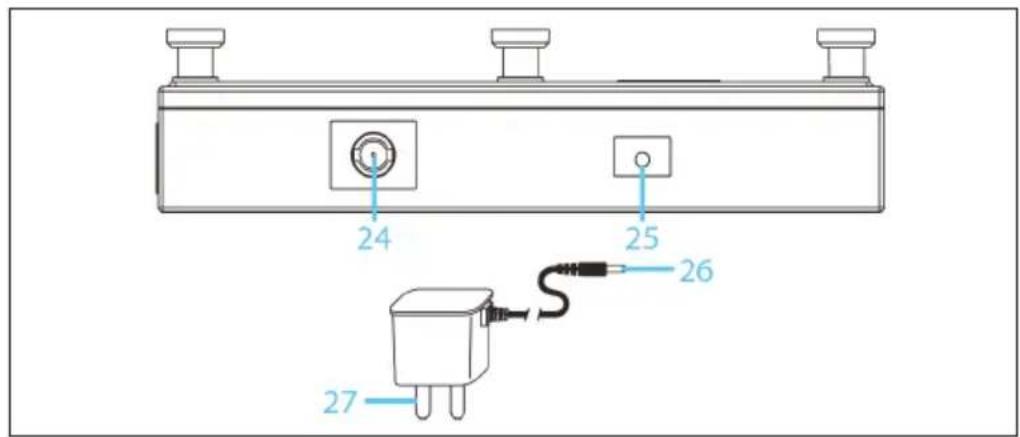
| 24 | Antenna | 26 | DC jack |
| 25 | DC plug | 27 | AC/DC adaptor |
| 7 1 2 3 4 5 6 | |||
| 1 On / Off | 8 | Sleep | |
| 2 | 9 | II/SCAN | |
| 3 | 10/+10 (10 titles back/ forward) | 10 | ■/ST/MO |
| 4 Folder/Pre Up-Down | 11 | MEM/CLK-ADJ | |
| 5 Display / ID3 / RDS Mode | 12 | Play Mode / RDS | |
| 6 VOL+/- | 13 | Timer | |
| 7 Function setting | 14 | EQ | |
ASSEMBLY
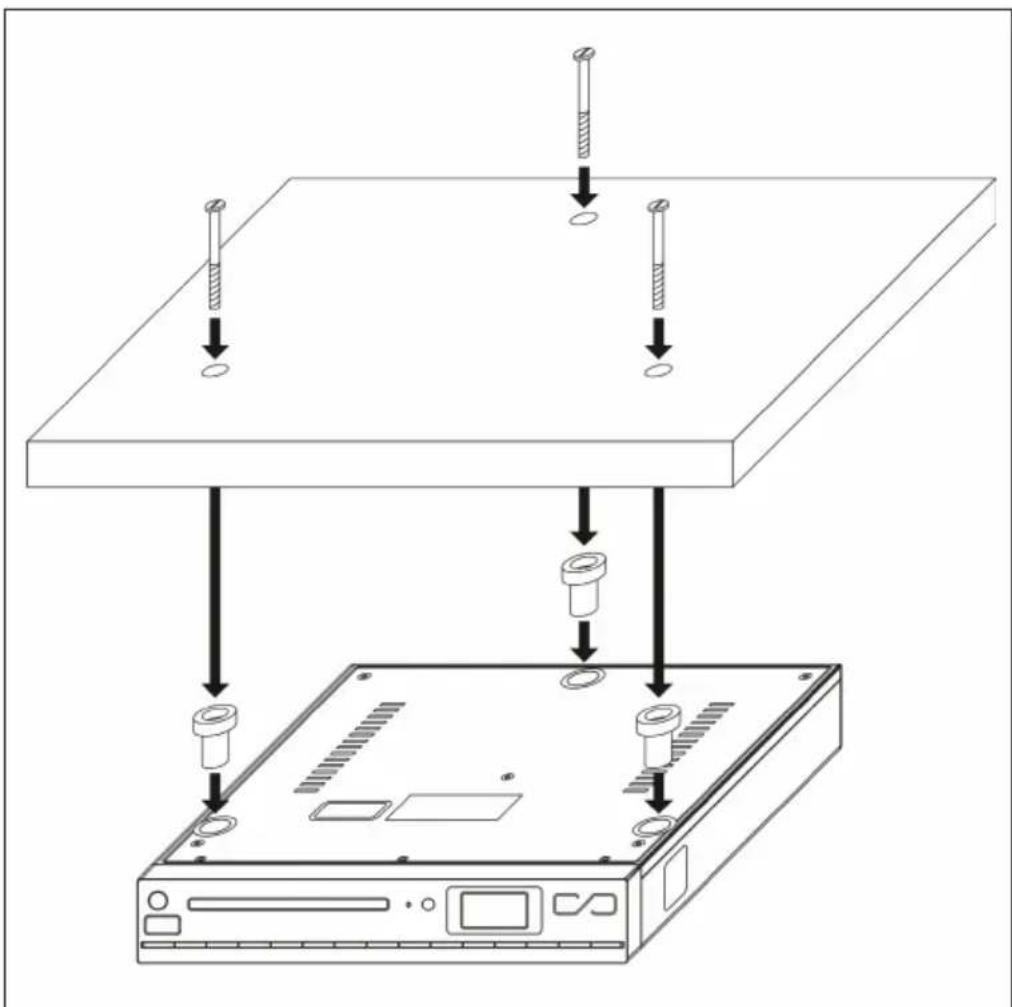
- Use the enclosed template to mark the drill holes on the underside of a suitable kitchen cabinet. The kitchen cupboard should be load-bearing and not located above the cooker or similar places that radiate heat.
- Drill 3 holes with a 6mm drill bit.
- Screw the spacers (enclosed) with the screws supplied, as shown in the sketch.
GETTING STARTED
EN
-
Insert two AA batteries into the battery compartment at the bottom of the unit. These are not absolutely necessary for operation, but they supply the memory chip (transmitter memory) and the clock with power whenever the unit is switched off.
-
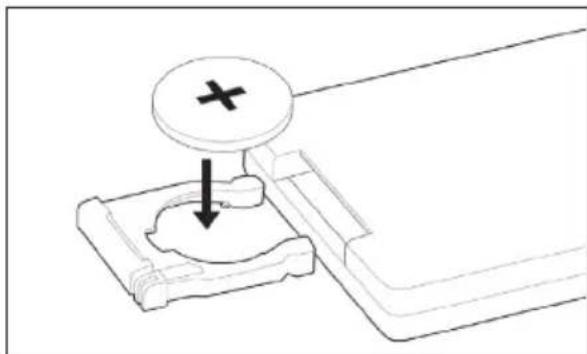
Insert the supplied button cell (battery type CR2025) into the remote control according to the following diagram:
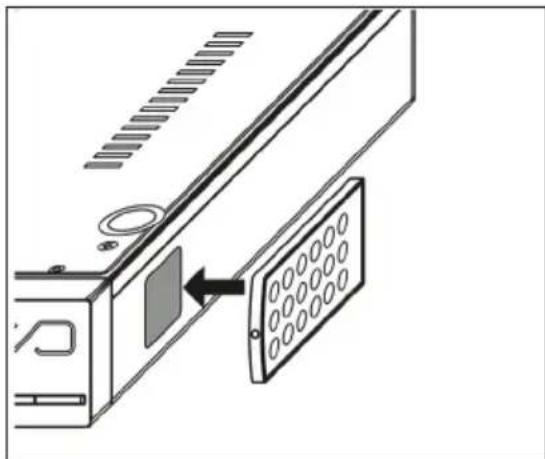
- There is a magnetic surface on the right-hand side of the radio housing to which you can attach the remote control if required:
- Connect the mains cable to an ordinary household socket and unroll the radio antenna for best possible reception.
- Switch the device on by pressing. (1)
SET TIME
- Switch the unit to standby mode with. (1)
- Press and hold MEM/CLK-ADJ until the display shows [24HR]. You can now use the arrow keys to choose between the time display in 12- or 24-hour format. Confirm your selection with MEM/CLK-ADJ.
Now set the hour with the arrow keys and confirm with MEM/CLK-ADJ. - Repeat the procedure for setting the minutes.
Note: The time setting is automatically cancelled if no entry is made for a period of approx. 5 seconds. The set time is deleted when the unit is disconnected from the power supply AND there are no batteries in the battery compartment or they are dead.
RADIO FUNCTIONS
- Switch on the unit and press FUNCTION several times to select the radio mode.
- Press and hold SCAN button, FM radio search starts and stores all received stations automatically.
- Press the / buttons for selecting desired stations (20 available).
Note: The memory setting is automatically cancelled if no entry is made for a period of approx. 5 seconds. The saved stations will be deleted when the unit is disconnected from the power supply AND there are no batteries in the battery compartment or they are dead. The memory locations are overwritten when they are reallocated without further enquiry.
- RDS: Press RDS to activate the RDS function and show RDS information on the display.
- RDS station search: Search specifically for programmes in a certain category. Press PLAY MODE/RDS SEARCH several times to select the desired category, then use the arrow keys to select from the matching stations. If no matching frequency is found, the display shows [NO MATCH] and the tuned station continues to play.
The categories are:
NEWS (News) - AFFAIRS (Current News) - INFO (Information Programmes) - SPORT - EDUCATE (Educational Programmes) - DRAMA (Radio Drama Programmes) - CULTURE (Culture Programmes) - SCIENCE (Science Programmes) - VARIED (Various) - POP M (Pop Music), ROCK M (Rock Music), EASY M (Easy Listening) LIGHT M (Light Classical Music) - CLASSICS (Classical "E" Music) - OTHER M (Other Music) - WEATHER (Weather Forecasts) - FINANCE (Financial Programmes) - CHILDREN (Programmes for Children) - SOCIAL - RELIGION - PHONE IN - TRAVEL - LEISURE - JAZZ - COUNTRY - NATION M - OLDIES - FOLK M - COUNTRY - NATION M - Folk Music) - DOCUMENT (Documentaries)
- Press Stop/ST/MO to switch between radio reception in mono or stereo.
CD FUNCTIONS
- Switch on the unit and press FUNCTION several times to select the CD mode. Insert a music or MP3 CD into the CD tray with the printed side facing up (to open/close the CD tray).
- The CD is automatically read in and the number of tracks contained is shown on the display.
- Use the buttons for play/pause and / for navigation. End playback with For MP3 discs, use the buttons to select between included folders.
- Press ID3 (for MP3 CDs) to show stored ID3 tags on the display.
- Play modes: Press PLAY MODE several times to switch between the play modes REPEAT 1 (current track is repeated) - REPEAT ALL (all contained tracks are repeated) - REPEAT FOLDER (current folder is repeated - only for MP3 CDs with folder structure) - RANDOM (random mode) - OFF (normal play mode).
To generate a playlist:
- End playback with.
- Press MEM and select the first track of the playlist with the arrow keys 14 / 25
- Press MEM again to confirm the selection.
- Repeat the process to add a maximum of 20 more titles.
Note: The programming mode is automatically terminated if no input is made for 10 seconds. Press, to play the playlist. Press to delete the playlist.
USB FUNCTIONS
Select any function mode (not USB) or switch the unit to standby mode before connecting a USB data carrier. Then switch to USB mode with FUNCTION. The unit automatically reads the storage medium and shows the number of folders and music files found on the display. Operation and functions are similar to the procedure explained in the CD FUNCTIONS section. However, only audio files in MP3 format are recognised and played back. Please select another function mode with the FUNCTION button or switch the unit to standby mode before removing the storage medium from the USB slot.
SYSTEM REQUIREMENTS FOR MP3 FILES
For playback of MP3 CDs as well as for USB sticks (and similar USB storage media), the following requirements apply to the file format: Bit rate: 32 kbps~320 kbps; Sampling rate: 32 kHz, 44.1 kHz or 48 kHz.
TONE CONTROL - EQ
Press EQ several times to select from the preset sound controls FLAT - CLASSIC - ROCK - POP - JAZZ.
AUX CONNECTION
Connect external devices (such as MP3 players, smartphones) to the AUX input via a 3.5 mm jack audio cable. Use them as usual. Switch to AUX mode with FUNCTION.
TIMER FUNCTIONS
Cooking clock
- Press and hold TIMER to enter the cooking clock setting. The first two digits of the display flash.
- Set the time (max. 120 minutes) with the VOL+/- buttons and confirm with TIMER.
- In the next step, set the volume of the alarm tone with VOL + / - and confirm again with TIMER.
Note: The time setting is automatically exited after no entry is made for 6 seconds. Stop the alarm tone or the timer function by pressing TIMER.
Sleep timer
Press SLEEP several times to activate the sleep mode and set the time (90 min > 80 min > ... > 10 min). After the set time has elapsed, the unit automatically switches to standby mode.

If there is a legal regulation for the disposal of electrical and electronic devices in your country, this symbol on the product or on the packaging indicates that this product must not be disposed of with household waste. Instead, it must be taken to a collection point for the recycling of electrical and electronic equipment. By disposing of it in accordance with the rules, you are protecting the environment and the health of your fellow human beings from negative consequences. For information about the recycling and disposal of this product, please contact your local authority or your household waste disposal service.
This product contains batteries. If there is a legal regulation for the disposal of batteries in your country, the batteries must not be disposed of with household waste. Find out about local regulations for disposing of batteries. By disposing of them in accordance with the rules, you are protecting the environment and the health of your fellow human beings from negative consequences.
DECLARATION OF CONFORMITY
CE UK CA
Manufacturer:
Chal-Tec GmbH, Wallstrasse 16, 10179 Berlin, Germany.
Importer for Great Britain:
Berlin Brands Group UK Ltd
PO Box 1145
Oxford, OX1 9UW
United Kingdom
Hereby, Chal-Tec GmbH declares that the radio equipment type KCD-20 is in compliance with Directive 2014/53/EU. The full text of the EU declaration of conformity is available at the following internet address: use.berlin/10029159
For Great Britain: Hereby, Chal-Tec GmbH declares that the radio equipment type KCD-20 is in compliance with the relevant statutory requirements. The full text of the declaration of conformity is available at the following internet address: use.berlin/10029159
Cher client, chere clientele,
Berlin Brands Group UK Ltd
PO Box 1145
Oxford, OX1 9UW
United Kingdom
Chal-Tec GmbH, Wallstraße 16, 10179 Berlin, Germany.
Berlin Brands Group UK Ltd
PO Box 1145
Oxford, OX1 9UW
United Kingdom