V13 - Hi-fi system OneConcept - Free user manual and instructions
Find the device manual for free V13 OneConcept in PDF.

User questions about V13 OneConcept
0 question about this device. Answer the ones you know or ask your own.
Ask a new question about this device
Download the instructions for your Hi-fi system in PDF format for free! Find your manual V13 - OneConcept and take your electronic device back in hand. On this page are published all the documents necessary for the use of your device. V13 by OneConcept.
USER MANUAL V13 OneConcept
text_image
QR code image containing encoded data, no visible human-readable textINHALTSVERZEICHNIS
text_image
3.2 mm (1/8") 5 mm (3/16") 9 mm (3/8") Min. 22 mm (7/8")text_image
Diagram showing a lock icon and warning symbol with an arrow pointing to a device interior, likely illustrating security or hazard.natural_image
Symbol of a trash bin crossed with a diagonal line, no text or numbers presentCongratulations on purchasing this device. Please read the following instructions carefully and follow them to prevent possible damages. We assume no liability for damage caused by disregard of the instructions and improper use. Scan the QR code to get access to the latest user manual and more product information.

text_image
QR code image containing encoded data, no visible human-readable textCONTENT
Safety Instructions 18
Controls 20
Global Functions 23
Radio 23
CD Player 24
USB 25
Audio IN 26
Setting the Clock (Remote Control only) 26
Timer Operation (Remote Control only) 27
Sleep Operation (Remote Control only) 27
BT (only 10027562 & 10027563) 28
Wall Mounting 29
Hints on Disposal 30
Declaration of Conformity 30
TECHNICAL DATA
| Item number | 10027560, 10027561, 10027562, 10027563 |
| Power supply | 220-240 V ~ 50 Hz |
SAFETY INSTRUCTIONS
General safety instructions

CAUTION
Risk of injury. Do not listen to music at excessive volume as this may result in a loss of hearing.
- This device may be only used by children 8 years old or older and persons with limited physical, sensory and mental capabilities and / or lack of experience and knowledge, provided that they have been instructed in use of the device by a responsible person who understands the associated risks.
- Only put CDs in the CD compartment.
- Never open the device cover. Do not attempt to repair the device by yourself.
- Consult qualified personnel for repairs. The device does not contain user-serviceable device components.
- Improper handling may damage the device and therefore void the warranty.
Power Connection
- Use only the supplied power adapter. Use of any other adapter will void the warranty and / or cause irreparable damage to the device.
- Unplug the device from the main power supply during thunderstorms.
- Be sure to turn off the power before unplugging the power cord.
- If you are using a multiple socket power strip or the plug as a splitting device, ensure that the plugs are always accessible and ready for use.
- Never throw batteries into an open fire and do not attempt to open their outer shells.
- Batteries are harmful if swallowed and should therefore be stored out of the reach of small children.
Ventilation
- Do not block or cover the ventilation holes, vents, or openings of the unit with anything, such as carpet, cloth, or similar, as otherwise the openings may not be able to ensure functionality and / or ventilation for safe use.
- The bottom of the unit may become warm if the unit is used for an extended period of time. This is normal.
Location
- Make sure the unit is standing on a flat and stable surface.
- Do not place the device more than 4.5 feet (1.4 meters) away from the nearest outlet. Make sure that the power cord and speaker cords do not create a tripping hazard.
- Place the device at least 3.25 feet (1 meter) away from other electrical devices in order to avoid noise interference.
- Place the device within the range of external BT devices (for example, iPod / iPhone / iPad / Android devices / computers, etc.). The range is (without obstacles) a maximum of 33 feet (10 meters).
- Make sure the device has enough room for the antenna to be properly aligned.
- Never place the unit directly on antique or polished surfaces.
Notes on the laser

CAUTION
Risk of injury. Never touch the optical lens in the CD compartment or look directly into it.
• This device is a Class 1 laser product
- The use of controls not listed in the operating instructions or unauthorized modification of the unit may result in the harmful release of laser radiation.
CONTROLS
text_image
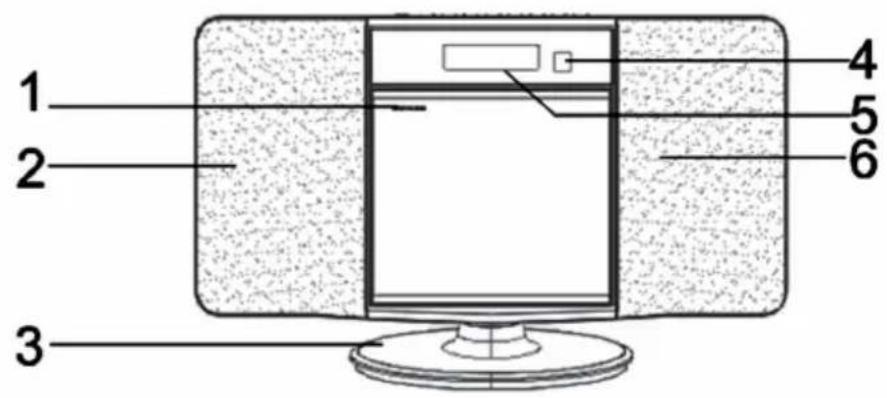
1 2 3 4 5 6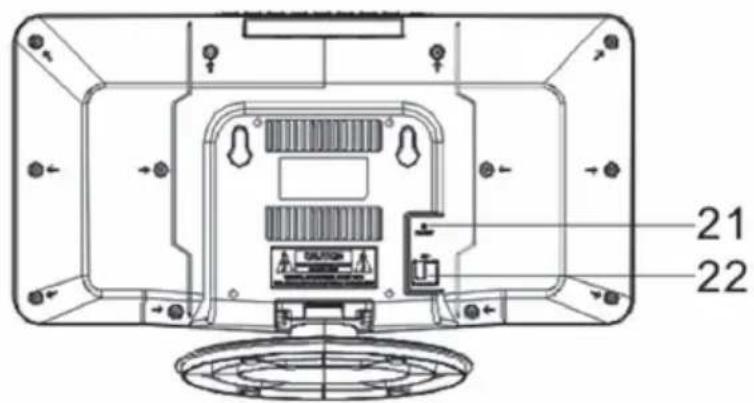
text_image
21 22| 1 | CD tray (open/close) | 5 | Display |
| 2 | Speaker | 6 | Speaker |
| 3 | Stand | 21 | Antenna |
| 4 | RC sensor | 22 | Mains cable |

text_image
7 8 9 10 11 12 13 14 15 16 17 20| 7 | USB socket | 13 | Headphones jack |
| 8 | AUX-IN jack | 14 | Memory |
| 9 | Standby | 15 | VOL+ |
| 10 | Source | 16 | VOL- |
| 11 | 17 | Stop | |
| 12 | 20 | Play / Pause / FM Scan |
text_image
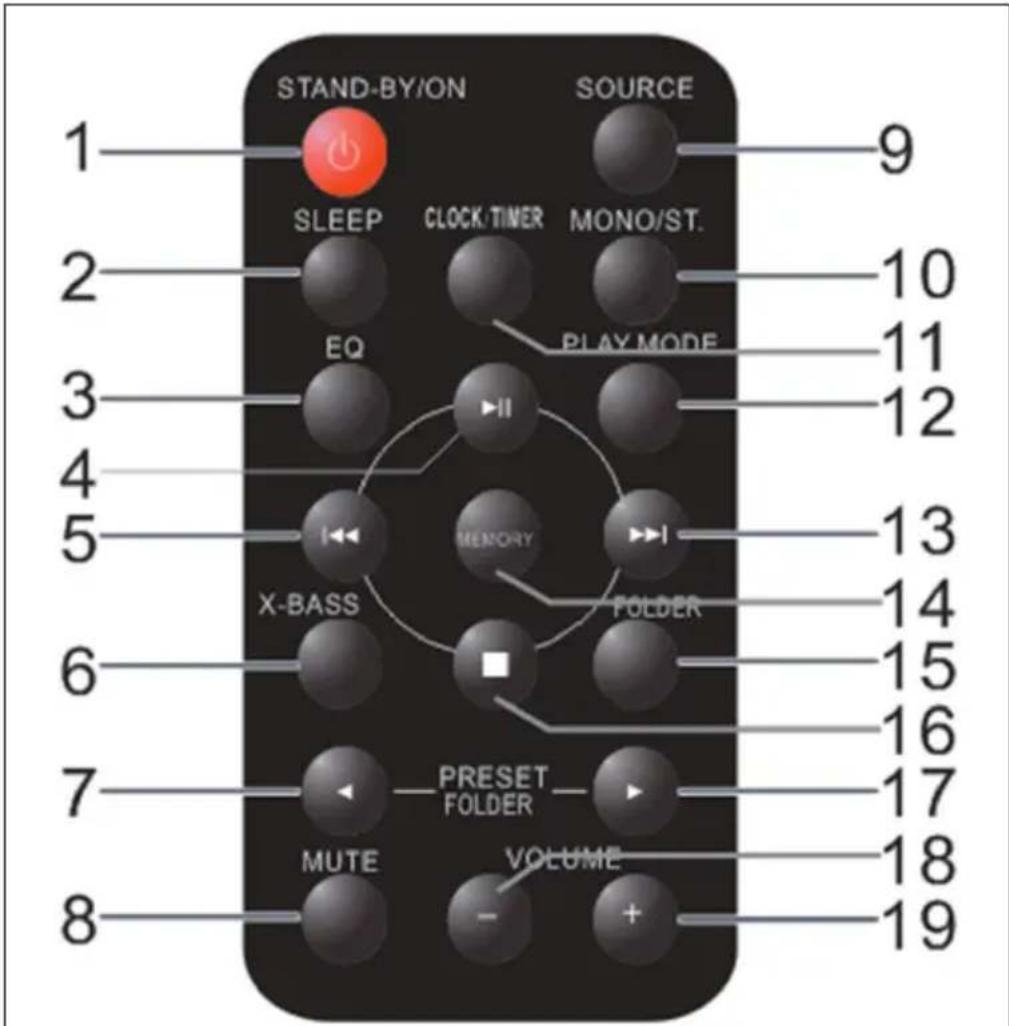
STAND-BY/ON SOURCE 1 SLEEP CLOCK/TIMER MONO/ST. EO PLAY MODE 2 10 11 3 12 4 13 5 MEMORY FOLDER X-BASS 6 14 15 7 16 17 8 PRESET FOLDER MUTE VOLUME - + 18 19| 1 | Power on /off | 11 | Clock / Time |
| 2 | Sleep (press repeatedly to adjust) | 12 | Play Mode (repeat & random modes) |
| 3 | EQ (press repeatedly for preset) | 13 | Next track / station |
| 4 | Play / Pause / FM Scan | 14 | Memory (station presets) |
| 5 | Previous track / station | 15 | Folder (toggle folder mode MP3) |
| 6 | X-Bass on/off | 16 | Stop |
| 7 | Back / up | 17 | Right / down |
| 8 | Mute (toggle mute on/off) | 18 | VOL- |
| 9 | Source (press repeatedly for selection) | 19 | VOL+ |
| 10 | Mono/St. (FM) |
GLOBAL FUNCTIONS
MUTE
The Volume is muted temporarily when pressing the MUTE button on the remote control. Press again to restore the volume.
X-BASS
When the power is first turned on, the unit will enter the extra bass mode which emphasizes the bass frequencies, and "X-BASS" indicator will appear. To cancel the extra bass mode, press the X-BASS button on the remote control.
EQ
When the EQ button on the remote control, the current mode setting will be displayed. To change to a different mode, press the EQ MODE button repeatedly until the desired sound mode appears ("CLASSIC, POPS, JAZZ, ROCK").
RADIO
Note: When searching for stations or listening to radio stations, no frequency is shown on the display.
Automatic station search (FM Scan)
You can use the FM Scan function to automatically scan for new digital radio stations and remove inactive stations.
Press and hold the PLAY / PAUSE / FM SCAN button on the stereo system or on the remote control for 2 seconds to select [Scan]. The number of stations found will be displayed during the automatic station scan. When the automatic station scan is finished, the last station listened to will be tuned in. If the last listened station is not available, the first station in the alphabetical list is tuned in.
To manually tune in a specific radio station, tap the ◀◀/▶button on the stereo or remote control repeatedly.
Calling up saved stations
If you are in radio mode, you can call up the stored radio stations by repeatedly pressing the PRESET key on the stereo system or on the remote control. When you access the preset stations for the first time, [P01] blinks on the display.
Note: The clock and the radio stations must be reset if there is a power interruption or power failure. When you turn on the radio again after a power failure, [12:00] blinks on the display to remind you that the clock must be reset. After you have reset the clock, start an automatic station search again.
CD PLAYER
- Switch the unit on and switch it to CD mode with SOURCE or FUNCTION.
- Open the CD tray by pressing the upper left corner („Open/Close“) and insert a CD with the top facing you.
- The CD will play as soon as the device has read the contents. This may take a few seconds.
- Navigate with //.
Repeat and random mode
- Press PLAY MODE on the remote control to select REPEAT1 (plays the current track in a loop), REPEAT ALL (plays the entire CD in a loop) or RANDOM (plays the tracks on the CD in random order). A logo is displayed in the top right corner of the display.
- Press PLAY MODE again to return to normal play mode.
Programmed play (Playlist)
You can choose up to 32 selections for playback in the order you like. NOTE: Program can only be set in STOP mode.
- While in stop mode, press MEMORY on the remote control to enter the programming mode.
- Press ◀◀◀ /▶ on the remote control to select the desired track.
- Press MEMORY to save the track number.
- Repeat for other tracks. Up to 32 tracks can be programmed. If you want to check the programmed tracks, press the MEMORY button repeatedly.
- Press the button to start playback.
USB
Note: This product is not compatible with MTP and AAC file systems from USB mass storage device or MP3 player.
Folder mode off
- Switch to USB mode and use the FOLDER button on the remote control to switch to FOLDER mode.
- Select USB mode using SOURCE on the unit or FUNCTION on the remote control.
- Connect a USB mass storage device (USB stick, MP3 player) that contains MP3 files.
- Navigate with //.
Folder mode on
- Switch to USB mode and use the FOLDER button on the remote control to switch to FOLDER mode.
- Select USB mode using SOURCE on the unit or FUNCTION on the remote control.
- Connect a USB mass storage device (USB stick, MP3 player) that contains MP3 files.
- Use the left/right arrow keys on the remote control to select the desired folder.
- Navigate with //.
AUDIO IN
- Use a connection lead to connect the portable audio player etc. to the AUDIO IN socket. When using video equipment, connect the audio output to this unit and the video output to a television.
- Press the ON/STAND-BY button to turn the power on.
- Press the SOURCE button on the remote control or SOURCE button repeatedly on main unit to select AUDIO IN function.
- Play the connected equipment. If volume level of the connected device is too high, sound distortion may occur. Should this happen, lower the volume of the connected device. If volume level is too low, increase the volume of the connected device.
Note: To prevent noise interference, place the unit away from the television.
SETTING THE CLOCK (REMOTE CONTROL ONLY)
- Press the ON/STAND-BY button to turn the power off.
- Press the CLOCK/TIMER button 2 seconds, to adjust the day.
- Press ◀◀ / to choose 12h / 24h display format and confirm with CLOCK/TIMER.
24-hour display: (0:00 - 23:59)
12-hour display (AM 00:00 - PM 11:59)
- To set the hour, use ◀◀/, then press CLOCK/TIMER.
- Repeat, to set the minutes.
In this example, the clock is set for the 24-hour (0:00) display.
- Press the CLOCK/TIMER Button once to turn the TIME function on. The TIME indicator will appear in the DISPLAY.
- Press the CLOCK/TIMER button 2 seconds, Operation again CLOCK/TIMER button until "ON" Appears.
- Press ◀◀ / to select Timer set and press the CLOCK/TIMER button.
- Press /to select "OFF", and press the CLOCK/TIMER button.
- Set the time to finish as in steps 3 and 4 above.
- To select the timer playback source (TU, CD, USB), press the or button. Press the CLOCK/TIMER button.
- Adjust the volume using the VOLUME (+ or -) on the main unit or VOL +/- on the remote control, and then press the CLOCK/TIMER button. Do not turn the volume up too high.
- The indicator lights up and the unit is ready for timer playback.
This function allows you to program the system to switch off itself after a set period of time. You can set your sleep time in power on mode:
- To activate the sleep function, press the SLEEP button on the remote, the display will show “Sleep Timer-OFF, 90, 80, 70, 60, 50, 40, 30, 20, 10” and flash.
- When the display shows your desired sleep time, release the button, the sleep timer is now activated. The display will show “SL10” is to indicate “10 minutes” sleep time and so on. When the sleep time counts to zero, the unit will go off.
- To cancel sleep, press the SLEEP button once again, the sleep function will turn off.
BT (ONLY 10027562 & 10027563)
BT wireless technology is a short-range radio technology that enables wireless communication between various types of digital devices, such as mobile phone or computer. It operates within a range of about 10 meters.
Pairing with BT devices:
- Press the ON/STAND-BY button to turn the power on.
- Press the SOURCE button (remote control) to select BT function. (PAIRING indicator flashes).
- Perform pairing procedure on the source device to detect this unit. "oneConcept-V13" will appear in the detected devices list (if available) in the source device. (Refer the source device operating manual for details).
Notes
- Place the devices to be paired within 1 meter (3 feet) of each other when pairing.
- Select "oneConcept-V13" from the source list. If Passcode* is required, enter "0000"."* Passcode may be called PIN Code, Passkey, PIN number or Password.
- Pairing indicator (blue) will stop blinking once the unit is successfully paired with the source device.(Pairing information is now memorized in the unit.) Some audio source de- vices may connect with the unit automatically after pairing is completed, otherwise follow the instructions in the source device operating manual to start connection
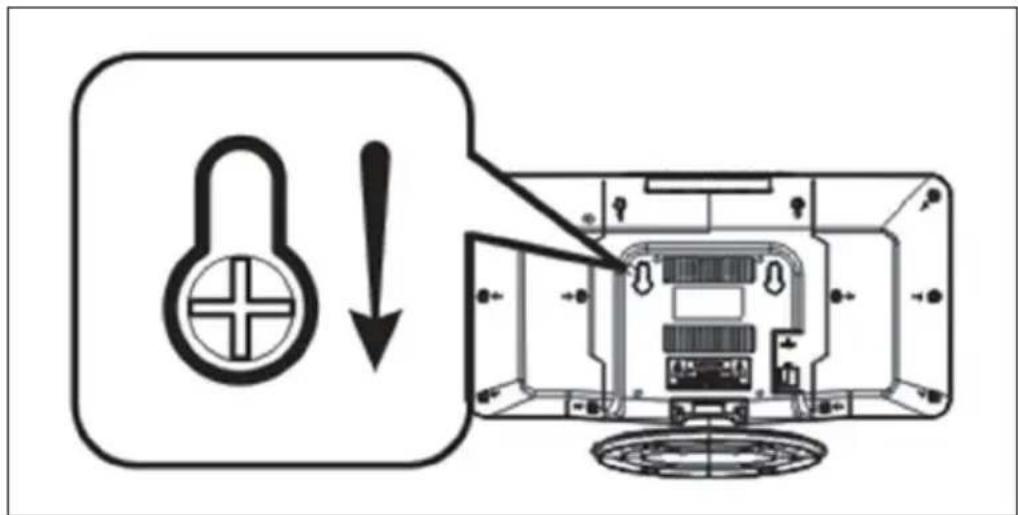
WALL MOUNTING
Use the supplied pattern, to mount the device to a wall. Please note, the device weights about 2.5 kgs. Make sure the wall is stable enough to hold the weigh. Ask a qualified person for aide, when in doubt.
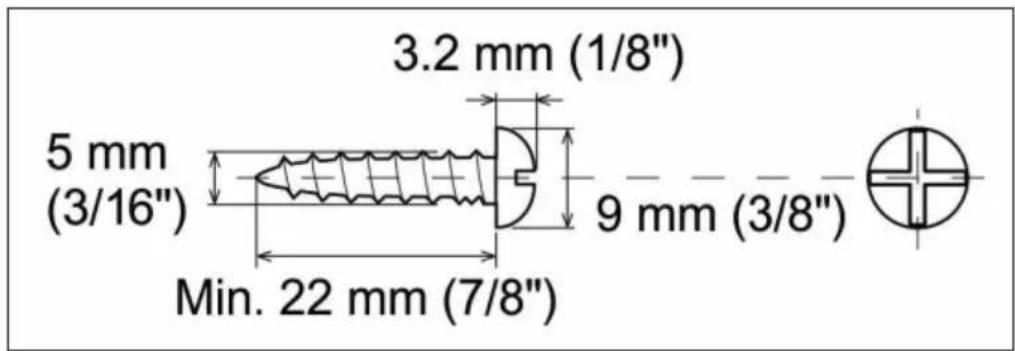
Screws are not supplied. Use screws that have about the depicted dimensions:
text_image
3.2 mm (1/8") 5 mm (3/16") 9 mm (3/8") Min. 22 mm (7/8")- Fix the pattern paper to the wall in horizontal position.
- Drill according to the screw point marks on the pattern paper.
- Fix a wall mount plug into the hole using a hammer, until it is flush with the wall surface
- Fasten the screws to the wall, so that there is a 4 mm gap between the screw heads and the wall surface.
- Hang the unit onto the screws:
text_image
Diagram showing a lock icon and warning symbol with an arrow pointing to a device interior, likely indicating lock status or hazard.HINTS ON DISPOSAL

natural_image
Symbol of a trash bin crossed with a diagonal line, no text or numbers presentAccording to the European waste regulation 2012/19/EU this symbol on the product or on its packaging indicates that this product may not be treated as household waste. Instead it should be taken to the appropriate collection point for the recycling of electrical and electronic equipment. By ensuring this product is disposed of correctly, you will help prevent potential negative consequences for the environment and human health, which could otherwise be caused by inappropriate waste handling of this product. For more detailed information about recycling of this product, please contact your local council or your household waste disposal service.
Your product contains batteries covered by the European Directive. 2006/66/EC, which cannot be disposed of with normal household waste. Please check local rules on separate collection of batteries. The correct disposal of batteries helps prevent potentially negative consequences on the environment and human health.
DECLARATION OF CONFORMITY

Producer:
Chal-Tec GmbH, Wallstraße 16, 10179 Berlin, Germany.
The complete declaration of conformity of the manufacturer can be found at the following link: https://use.berlin/10027560
Cher client,
text_image
QR code image containing encoded data, no visible human-readable textSOMMAIRE
text_image
3.2 mm (1/8") 5 mm (3/16") 9 mm (3/8") Min. 22 mm (7/8")text_image
Diagram showing a lock icon and warning symbol with an arrow pointing to a device interior, likely illustrating a security or security hazard.CONSEILS POUR LE RECYCLAGE

natural_image
Symbol of a trash bin crossed with a diagonal line, no text or numbers presentDÉCLARATION DE CONFORMITÉ
CE
Fabricant :
Chal-Tec GmbH, Wallstraße 16, 10179 Berlin, Allemagne.
text_image
QR code image containing encoded data, no visible human-readable textINDICE
text_image
3.2 mm (1/8") 5 mm (3/16") 9 mm (3/8") Min. 22 mm (7/8")text_image
Diagram showing a lock icon and warning symbol with an arrow pointing to a device interior, likely illustrating a security or security hazard.SMALTIMENTO

natural_image
Symbol of a trash bin crossed with a diagonal line, no text or numbers presenttext_image
QR code image containing encoded data, no visible human-readable textÍNDICE DE CONTENIDOS
text_image
3.2 mm (1/8") 5 mm (3/16") 9 mm (3/8") Min. 22 mm (7/8")text_image
Diagram showing a lock icon with an exclamation mark pointing to a device interior, indicating lock status or warning.RETIRADA DEL APARATO