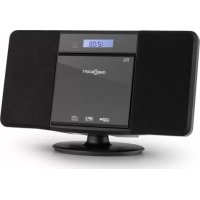
V 15BT 10029362 - Hi-fi system OneConcept - Free user manual and instructions
Find the device manual for free V 15BT 10029362 OneConcept in PDF.



User questions about V 15BT 10029362 OneConcept
0 question about this device. Answer the ones you know or ask your own.
Ask a new question about this device
Download the instructions for your Hi-fi system in PDF format for free! Find your manual V 15BT 10029362 - OneConcept and take your electronic device back in hand. On this page are published all the documents necessary for the use of your device. V 15BT 10029362 by OneConcept.
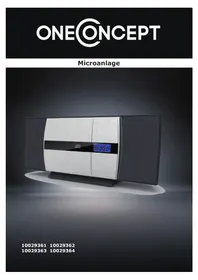
USER MANUAL V 15BT 10029362 OneConcept
natural_image
Exterior view of a black and white electronic device with a digital display showing time (no readable text or symbols beyond the clock)10029361
10029362
10029363
10029364
text_image
Diagram showing a hand holding a tool with labeled parts, including numbered annotations ① and ②.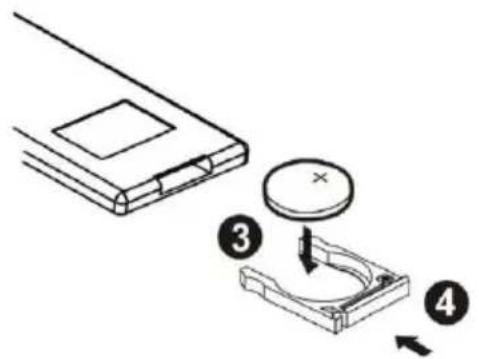
text_image
Diagram showing a device with a circular component and four labeled parts, likely illustrating a mechanical or electrical assembly.flowchart
graph LR
    A["Initial battery assembly"] --> B["Step 1: Insert battery"]
    B --> C["Step 2: Assembly with internal components"]
    C --> D["Step 3: Final packaging or assembly"]
B:
flowchart
graph LR
    A["Device 1"] --> B["Step 1"]
    B --> C["Step 2"]
    C --> D["Step 3"]
Wandmontage
natural_image
Symbol of a trash bin crossed with a diagonal line, no text or numbers presentCongratulations on purchasing this product. Please read and follow these instructions, in order to avoid damaging the item. We do not cover any damages that may arise from improper use of the item or the disregard of the safety instructions.
Important Safety Advice
- Read all instructions before using.
- To protect against a fire, electric shock or personal injury, do not immerse cord, electric plugs or device in water or other liquids.
- Do not expose the appliance to extreme temperatures. The appliance shall be used in moderate climates.
- The use of attachments that are not recommended by the appliance manufacturer may result in fire, electric shock or personal injury.
- Do not open the unit by removing any cover parts. Do not attempt to repair the unit. Any repairs or servicing should be done by qualified personell only.
- Only qualified persons may perform technical work on the product. The product may not be opened or changed. The components cannot be serviced by the user. The manufacturer is not responsible for any radio or TV interference caused by unauthorized modifications.
- The appliance is not a toy. Do not let children play with it. Never let children insert foreign objects into the appliance.
- Never clean the surface of the device with solvents, paint thinners, cleansers or other chemical products. Instead, use a soft, dry cloth or soft brush.
• We strongly suggest you power off projector when play it for 6 hours constantly one time. - To protect your eye, do not watch directly at the lens when projector working.
- Save these instructions.
Small objects
Keep small objects (i.e. screws, mounting material, memory cards etc.) and packaging out of the range of children. Do not let Children play with foil. Choking hazard!
Transporting the device
Please keep the original packaging. To gain sufficient protection of the device while shipment or transportation, make sure to put it back in its original packaging.
Cleaning the surface
Do not use any volatile liquids, detergents or the like. Use a clean dry cloth.
Technical Data
Art No. 10029361, 10029362, 10029363, 10029364
| Power supply | AC 230V ~ 50Hz |
| Power consumption | 27W max. |
| Speakers | 2x 3", 5W @ 4Ω (THD @ 1kHz: 10% max.) |
| FM Frequency | FM 88 - 108 MHz |
| USB | Compatible with USB 1.1 & USB 2.0File types: MP3 (32 ~ 320 kbps) |
| CD | D/A Converter: Multi bit D/A converterFrequency response: 20 - 20,000 Hz |
| Dimensions & Weight | |
| Scope of delivery | Device, RC, antenna, instruction manual |
Overview
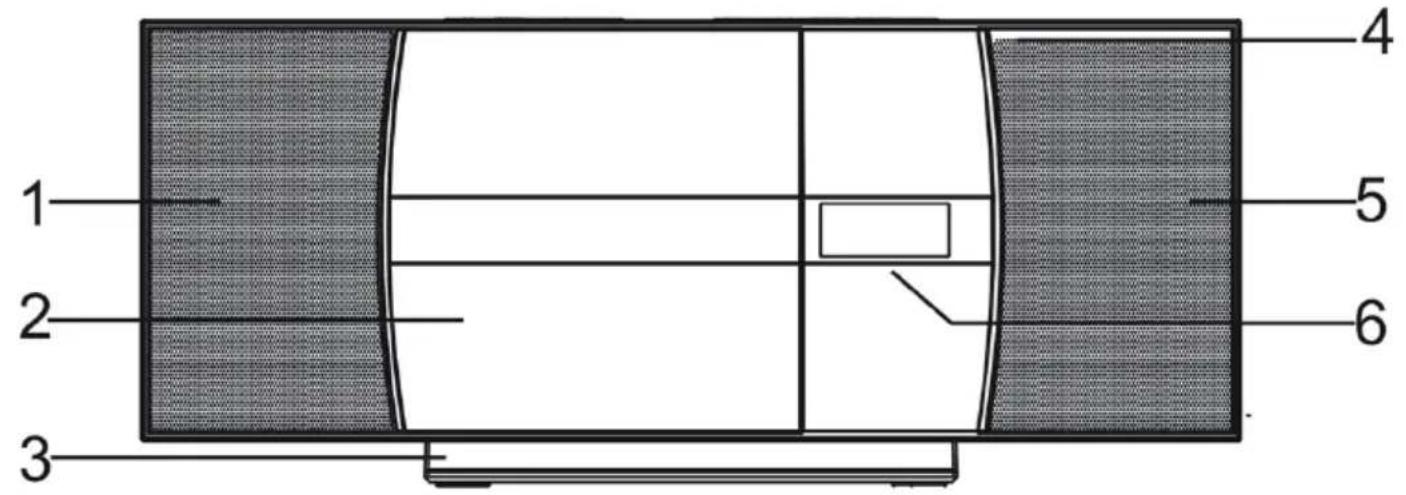
Front:
text_image
1 2 3 4 5 6| Left speaker | 1 | 4 | IR sensor | |
| CD tray | 2 | 5 | Right speaker | |
| Stand | 3 | 6 | Display |
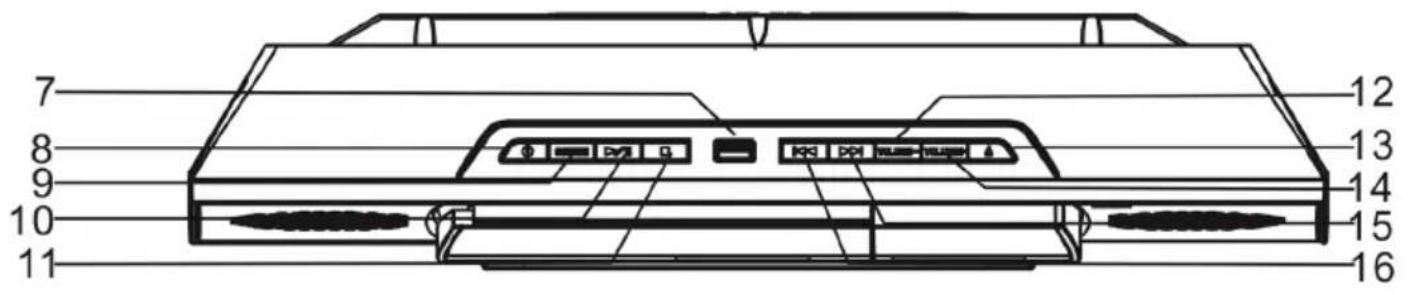
Top / Control Panel:
text_image
7 8 9 10 11 12 13 14 15 16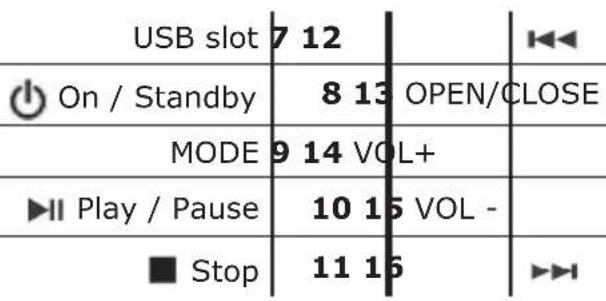
text_image
USB slot 7 12 On / Standby 8 13 OPEN/CLOSE MODE 9 14 VOL+ Play / Pause 10 15 VOL - Stop 11 16Rear:
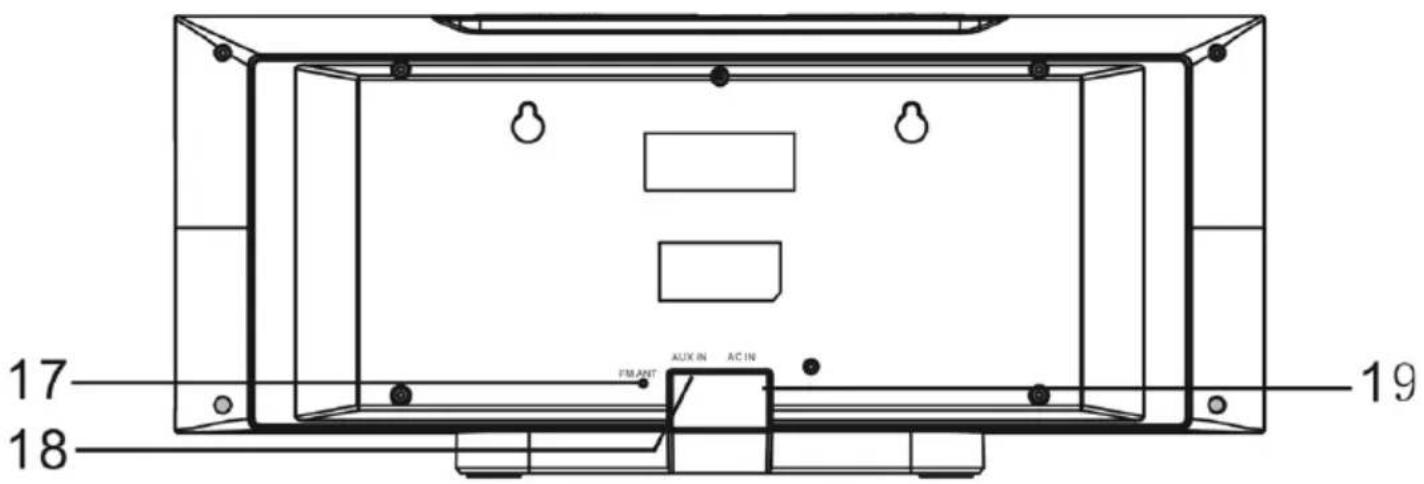
text_image
17 18 FILANT AUX IN AC IN 19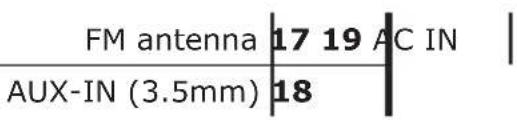
text_image
FM antenna | 17 19 AC IN | AUX-IN (3.5mm) | 18Remote Control:
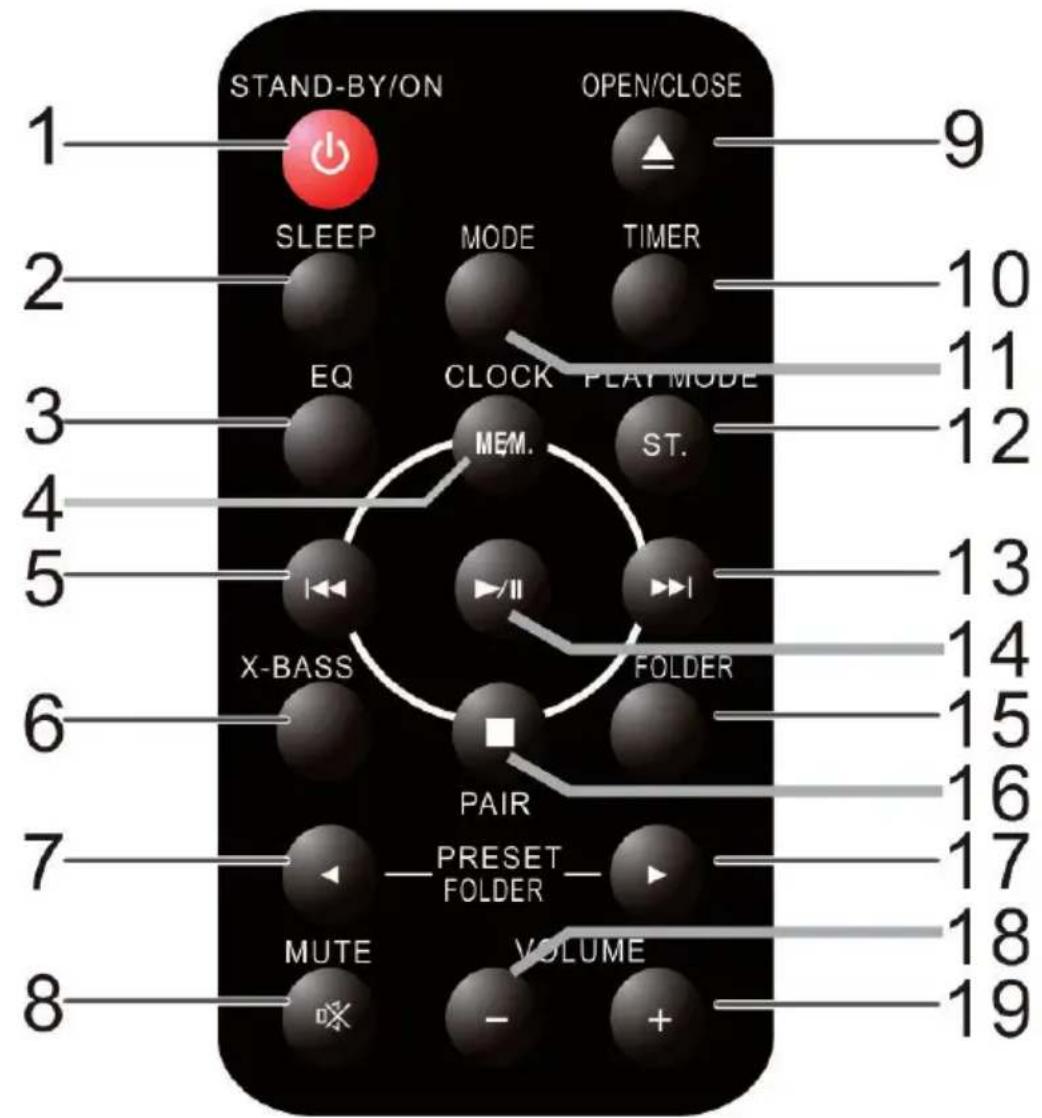
text_image
STAND-BY/ON OPEN/CLOSE 1 9 SLEEP MODE TIMER 2 EQ CLOCK PLAY MODE 3 MEM. ST. 4 5 X-BASS FOLDER 6 PAIR PRESET FOLDER 7 MUTE VOLUME 8 10 11 12 13 14 15 16 17 18 19
On / Standby
1 1
MODE
SLEEP
2 12 PL
AY MOD

EQ
3 13

Play / Pause

5 15
FOLDER

Stop / (Pair)

(Preset / Folder)
7
17

(Preset / Folder)
MUTE
8 18 vD
L -
OPEN/CLOSE
9 19 v
L +
TIME
10
Preparation and Wall Mounting
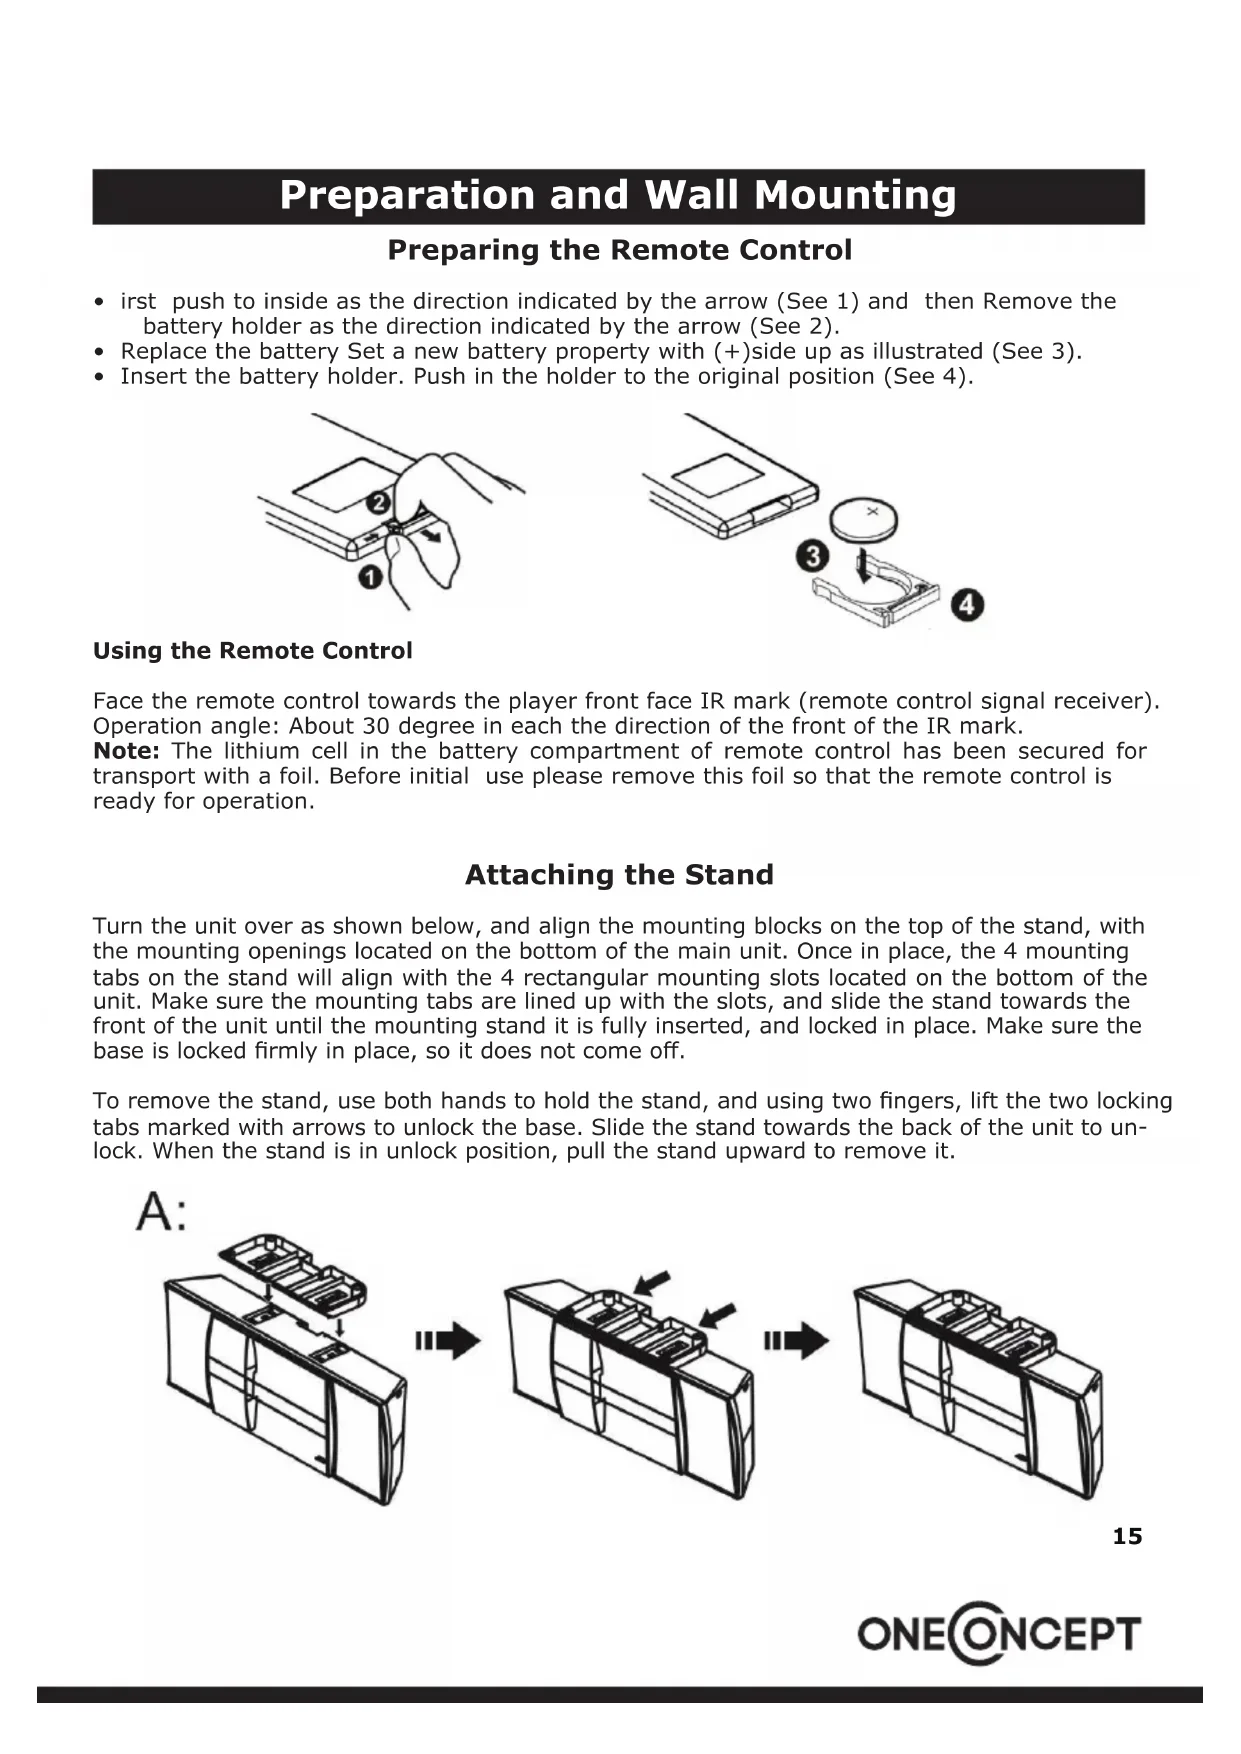
Preparing the Remote Control
- irst push to inside as the direction indicated by the arrow (See 1) and then Remove the battery holder as the direction indicated by the arrow (See 2).
- Replace the battery Set a new battery property with (+)side up as illustrated (See 3).
- Insert the battery holder. Push in the holder to the original position (See 4).

text_image
Diagram showing a hand holding a tool with labeled parts, including numbered annotations ① and ②.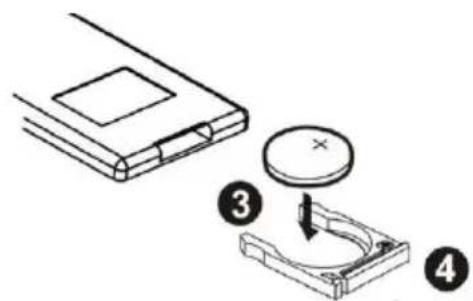
text_image
Diagram showing a device with a circular component and a mechanical component, labeled with numbers 3 and 4.Using the Remote Control
Face the remote control towards the player front face IR mark (remote control signal receiver). Operation angle: About 30 degree in each the direction of the front of the IR mark.
Note: The lithium cell in the battery compartment of remote control has been secured for transport with a foil. Before initial use please remove this foil so that the remote control is ready for operation.
Attaching the Stand
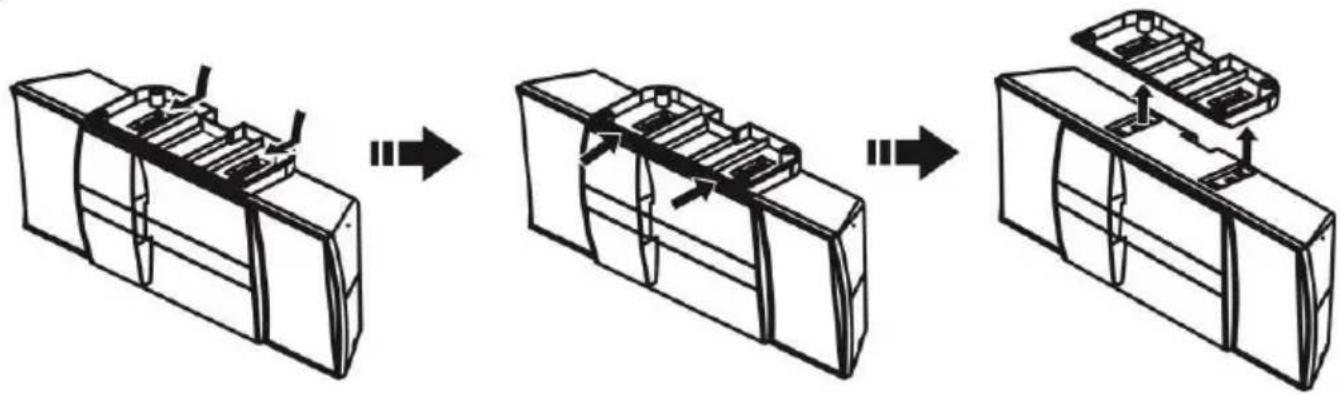
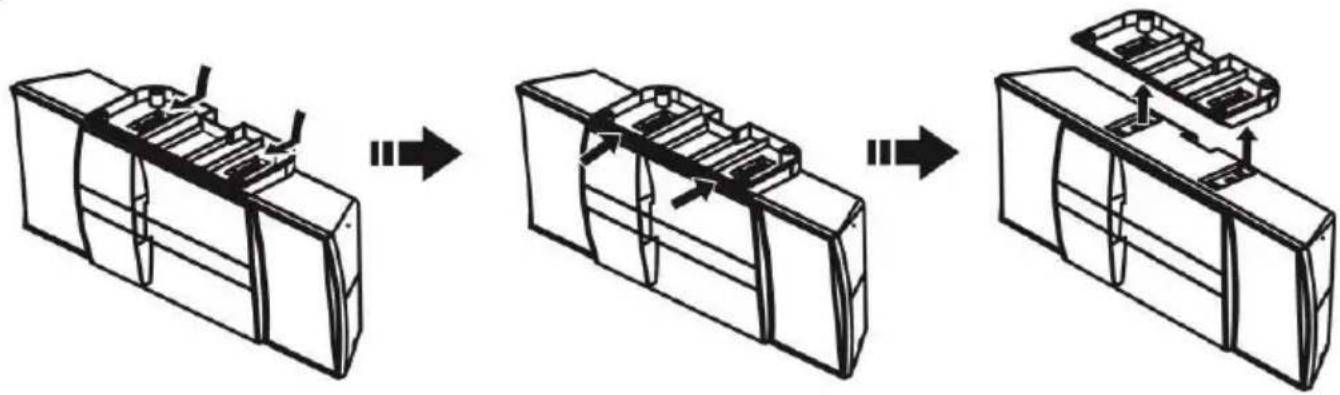
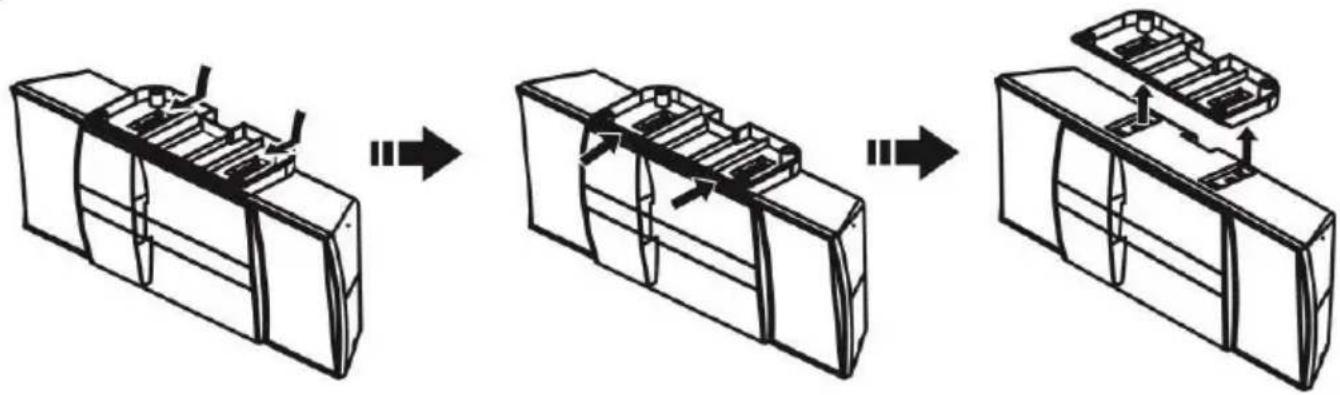
Turn the unit over as shown below, and align the mounting blocks on the top of the stand, with the mounting openings located on the bottom of the main unit. Once in place, the 4 mounting tabs on the stand will align with the 4 rectangular mounting slots located on the bottom of the unit. Make sure the mounting tabs are lined up with the slots, and slide the stand towards the front of the unit until the mounting stand it is fully inserted, and locked in place. Make sure the base is locked firmly in place, so it does not come off.
To remove the stand, use both hands to hold the stand, and using two fingers, lift the two locking tabs marked with arrows to unlock the base. Slide the stand towards the back of the unit to unlock. When the stand is in unlock position, pull the stand upward to remove it.
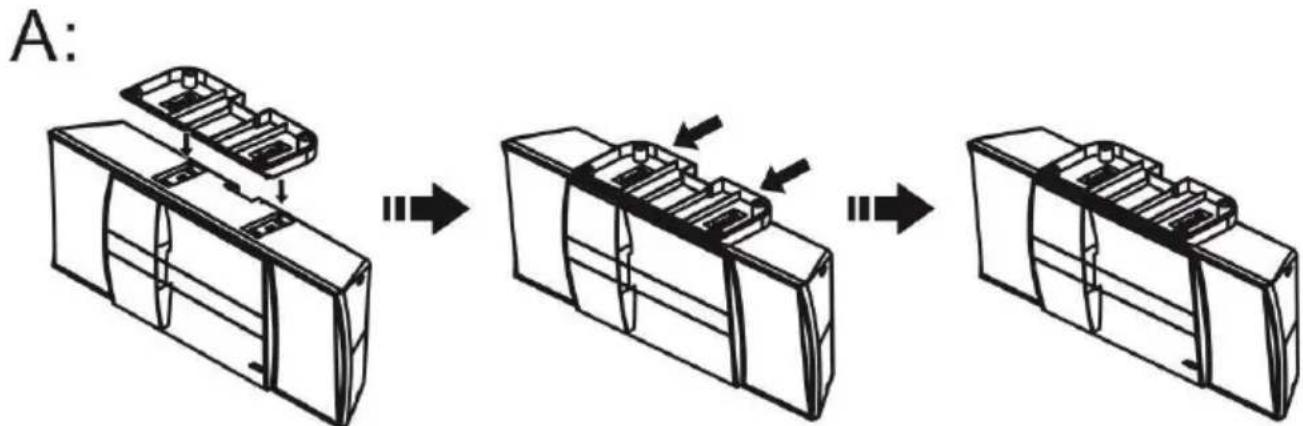
text_image
A:B:
flowchart
graph LR
    A["Raw Material"] --> B["Assembly Step 1"]
    B --> C["Assembly Step 2"]
    C --> D["Final Packaging"]
Wall Mounting
- The stand is detachable so the device can be mounted to an appropriate wall directly. Please ask someone for support, if you are not sure how to do this.
- Make a drill pattern or simply draw marks for the drilling holes onto your wall: the holes must be on a horizontal line, with a lead of 160mm. Be sure to use appropriate tools and dowels suitable for your wall material.
- Detach the stand and hang the device with the rear eyelets to the screwheads sticking out of the dowels
Operation
Global Functions / Basic Functions
MODE: Press MODE repeatedly for mode selection (Radio / CD / USB / AUX / BT).
VOL+/-: Press VOL+/- to adjust the output level.
MUTE: Press MUTE to mute the sound output. Press again to un-mute.
X-BASS: Press to toggle X-BASS on/off.
EQ: Press repeatedly to toggle pre-set equalizing (Classic - Pop - Jazz - Rock - EQ off).
Radio
- Press to switch on, then use MODE to select radio mode.
- Use ▶▶ and ◀◀ to search the frequency band for stations manually (press and hold for an automatic search in the respective direction).
- Save the current station to presets with MEM (hold for 2 seconds).
- Press MEM to go to presets. Select previously saved presets with the LEFT/RIGHT buttons on the RC (7 / 17).
CD / USB
- Press to switch the device on, then press MODE for the CD mode or USB mode.
- Press OPEN/CLOSE to open the CD tray and insert a CD with the printed side facing towards you. CDs will be read in automatically. Insert USB drives with music files into the USB slot on the top of the device.
- Control playback with , ▶ and ▶. ▶
- For MP3 CDs or USB drives with folders: use the RIGHT/LEFT buttons (7 / 17) to toggle folders.
- Repeat/Random: During playback, press PLAY MODE repeatedly for REPEAT 1 (current track on repeat) - REPEAT ALL (all contained tracks on repeat) - RANDOM (tracks will be played in random order).
- Program Mode: Program a playlist with up to 20 files: Stop playback with ■ and press-MEM. Use ▶▶ and ◀◀ to select the desired track and press MEM again. Repeat this procedure for up to 20 times and start playback with ▶ll
BT (10029363 & 10029364)
This device supports BT 2.1 + EDR with the A2DP profile. The BT function can be used to stream music from your smartphone / tablet / other BT device, but does not support hands free calling.
- Press to switch the device on and press MODE to select the BT mode.
- Activate BT on your smartphone/tablet/computer and pair with V-15.
- Use the buttons ▶▶, ◀◀, ▶II and ■ to navigate through your media library or use your external BT device.
- Enter „0000“, if prompted to enter a password.
The device will automatically pair to the previously connected BT device. To pair another device, press and hold PAIR for 3 seconds. The BT indicator flashes quickly: Device is in pairing mode.
AUX IN
- Press MODE repeatedly to select AUX mode.
- Connect the AUX wire from the out jack of your Personal Player such as portable MP3 player to the AUX input jack.
- Turn on your player to begin playing, adjust the volume to desire listening level.
- Adjust the volume by rotating the Vol +/- knob.
- Switch to standby ( ), then press and hold CLOCK for 2 seconds.
- Switch between the clock display in 12h or 24h mode, using the LEFT/RIGHT buttons and confirm pressing CLOCK.
- Use / to set the hour and press CLOCK to confirm. Repeat for setting the minutes.
Please note: The clock will be reset, when the device is disconnected from the AC outlet.
Set timer:
- Press TIMER to activate the timer function. The time indicator will appear on the display.
- Press and hold TIMER for two seconds, to set the timer. Set the hour with ▶▶/◀◀ and press TIMER to confirm. Repeat the procedure to set the minutes.
- Select the desired music source (Radio/CD/USB) with LEFT/RIGHT (7/17) and press TIMER to confirm.
- Set the desired volume with VOL+/- and press TIMER to confirm.
Sleep:
While the device is playing, press SLEEP repeatedly to switch on and set the sleep timer in steps of 10 minutes (90mins - 80mins - 70mins - ... - 10mins - off).
Hints on Disposal
natural_image
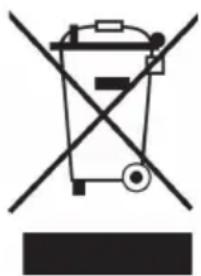
Symbol of a trash bin crossed with a diagonal line, no text or numbers presentAccording to the European waste regulation 2012/19/EU this symbol on the product or on its packaging indicates that this product may not be treated as household waste. Instead it should be taken to the appropriate collection point for the recycling of electrical and electronic equipment. By ensuring this product is disposed of correctly, you will help prevent potential negative consequences for the environment and human health, which could otherwise be caused by inappropriate waste handling of this product. For more detailed information about recycling of this product, please contact your local council or your household waste disposal service.
Your product contains batteries covered by the European Directive. 2006/66/EC, which cannot be disposed of with normal household waste. Please check local rules on separate collection of batteries. The correct disposal of batteries helps prevent potentially negative consequences on the environment and human health.
Declaration of Conformity
Producer: Chal-Tec GmbH, Wallstraße 16, 10179 Berlin, Germany.
This product is conform to the following European Directives:

2014/30/EU (EMC)
2014/35/EU (LVD)
2011/65/EU (RoHS)
1999/5/EC (R&TTE)
Chère cliente, cher client,
text_image
Diagram showing a hand holding a tool with labeled parts, including numbered annotations ① and ②.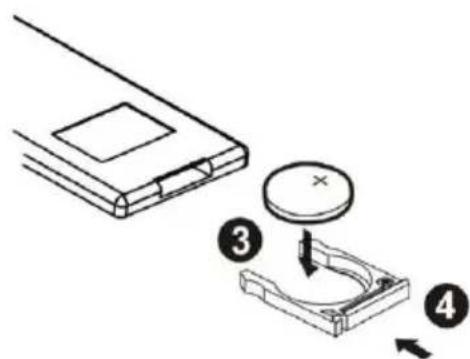
text_image
Diagram showing a device with a circular component and two labeled parts (③ and ④), illustrating a mechanical or electrical assembly.flowchart
graph LR
    A["Initial Component"] --> B["Assembly Step 1"]
    B --> C["Assembly Step 2"]
    C --> D["Final Assembly"]
B:
flowchart
graph LR
    A["Device 1"] --> B["Step 1"]
    B --> C["Step 2"]
    C --> D["Step 3"]