
Microstar Sing - Karaoke system Auna - Free user manual and instructions
Find the device manual for free Microstar Sing Auna in PDF.
| Product type | Karaoke system |
| Brand | Auna |
| Model | Microstar Sing |
| Reference | 10035303 |
| Power supply | AC/DC adapter (included): input 230-240 V ~ 50/60 Hz, output 5 V = 1.5 A |
| Standby power consumption | 0.4 W |
| RMS speaker | 2 W x 2 W |
| Supported disc types | CD, CD+G, CD-R, CD-RW, MP3, MP3+G |
| USB support | Up to 32 GB, FAT32 format, MP3 files |
| Microphone inputs | 2 x 6.35 mm mono (MIC1 and MIC2) |
| AUX input | 3.5 mm stereo jack |
| Audio/video outputs | RCA: audio (L/R) and composite video (PAL) |
| FM radio | Yes, with wire antenna |
| Bluetooth | Version 5.0, A2DP/AVRCP profile, range approx. 10 m |
| Karaoke functions | AVC (automatic voice control), Echo, Mic volume, Master volume |
| LED light show | Yes, can be turned on/off |
| Remote control | Yes, with CR2025 battery included |
| Maintenance and cleaning | Clean with a damp cloth, do not use solvents |
| Safety | Class 1 laser, do not open the casing, avoid exposure to water/humidity |
Frequently Asked Questions - Microstar Sing Auna
User questions about Microstar Sing Auna
0 question about this device. Answer the ones you know or ask your own.
Ask a new question about this device
Download the instructions for your Karaoke system in PDF format for free! Find your manual Microstar Sing - Auna and take your electronic device back in hand. On this page are published all the documents necessary for the use of your device. Microstar Sing by Auna.
USER MANUAL Microstar Sing Auna
www.auna.multimedia.com

Member of Berlin Brands Group
Handwerkerstr. 11
15366 Dahlwitz-Hoppegarten
Deutschland
Berlin Brands Group UK Ltd
PO Box 1145
Oxford, OX1 9UW
United Kingdom
Congratulations on purchasing this equipment. Please read this manual carefully and take care of the following hints to avoid damages. Any failure caused by ignoring the items and cautions mentioned in the instruction manual are not covered by our warranty and any liability. Scan the QR code to get access to the latest user manual and other information about the product.

CONTENTS
Specifications 34
Safety Instructions 36
Introduction 38
Product Description 40
Setting up for operation 44
Control Functions 47
How to sing with CD+G, USB OR AUX-IN Music Source 50
FM Radio Operation 53
BT Operation 54
Using the unit as a public address system 56
LED light show 56
Troubleshooting Guide 57
Care and Maintenance 59
Disposal Considerations 60
Declaration of Conformity 60
SPECIFICATIONS
| Item number 10035303 | |
| AC Operation AC/DC adapter (Included) | |
| Input AC 230 - 240 V ~ 50/60Hz | |
| Output DC 5 V | =1.5 A |
| Power stand-by 0.4 W | |
| Speaker Output 2 W x 2 W (rms) | |
| Video Output PAL composite (RCA) | |
| USB Flash Drive Support Max 32 GB (FAT32 formatted) | |
| Microphone Jacks (x2) Each 6.35 mm (mono) | |
| AUX IN Jack (x1): 3.5 mm (stereo) | |
| Compact Disc Support CD/CD+G/CD-R/CD-RW/MP3/MP3+G | |
| USB file types MP3 | |
| Frequency band 2.400GHz - 2.480GHz | |
| BT frequency 2402-2480 MHz | |
| BT radio-frequency power (max.) | 4 dBm |
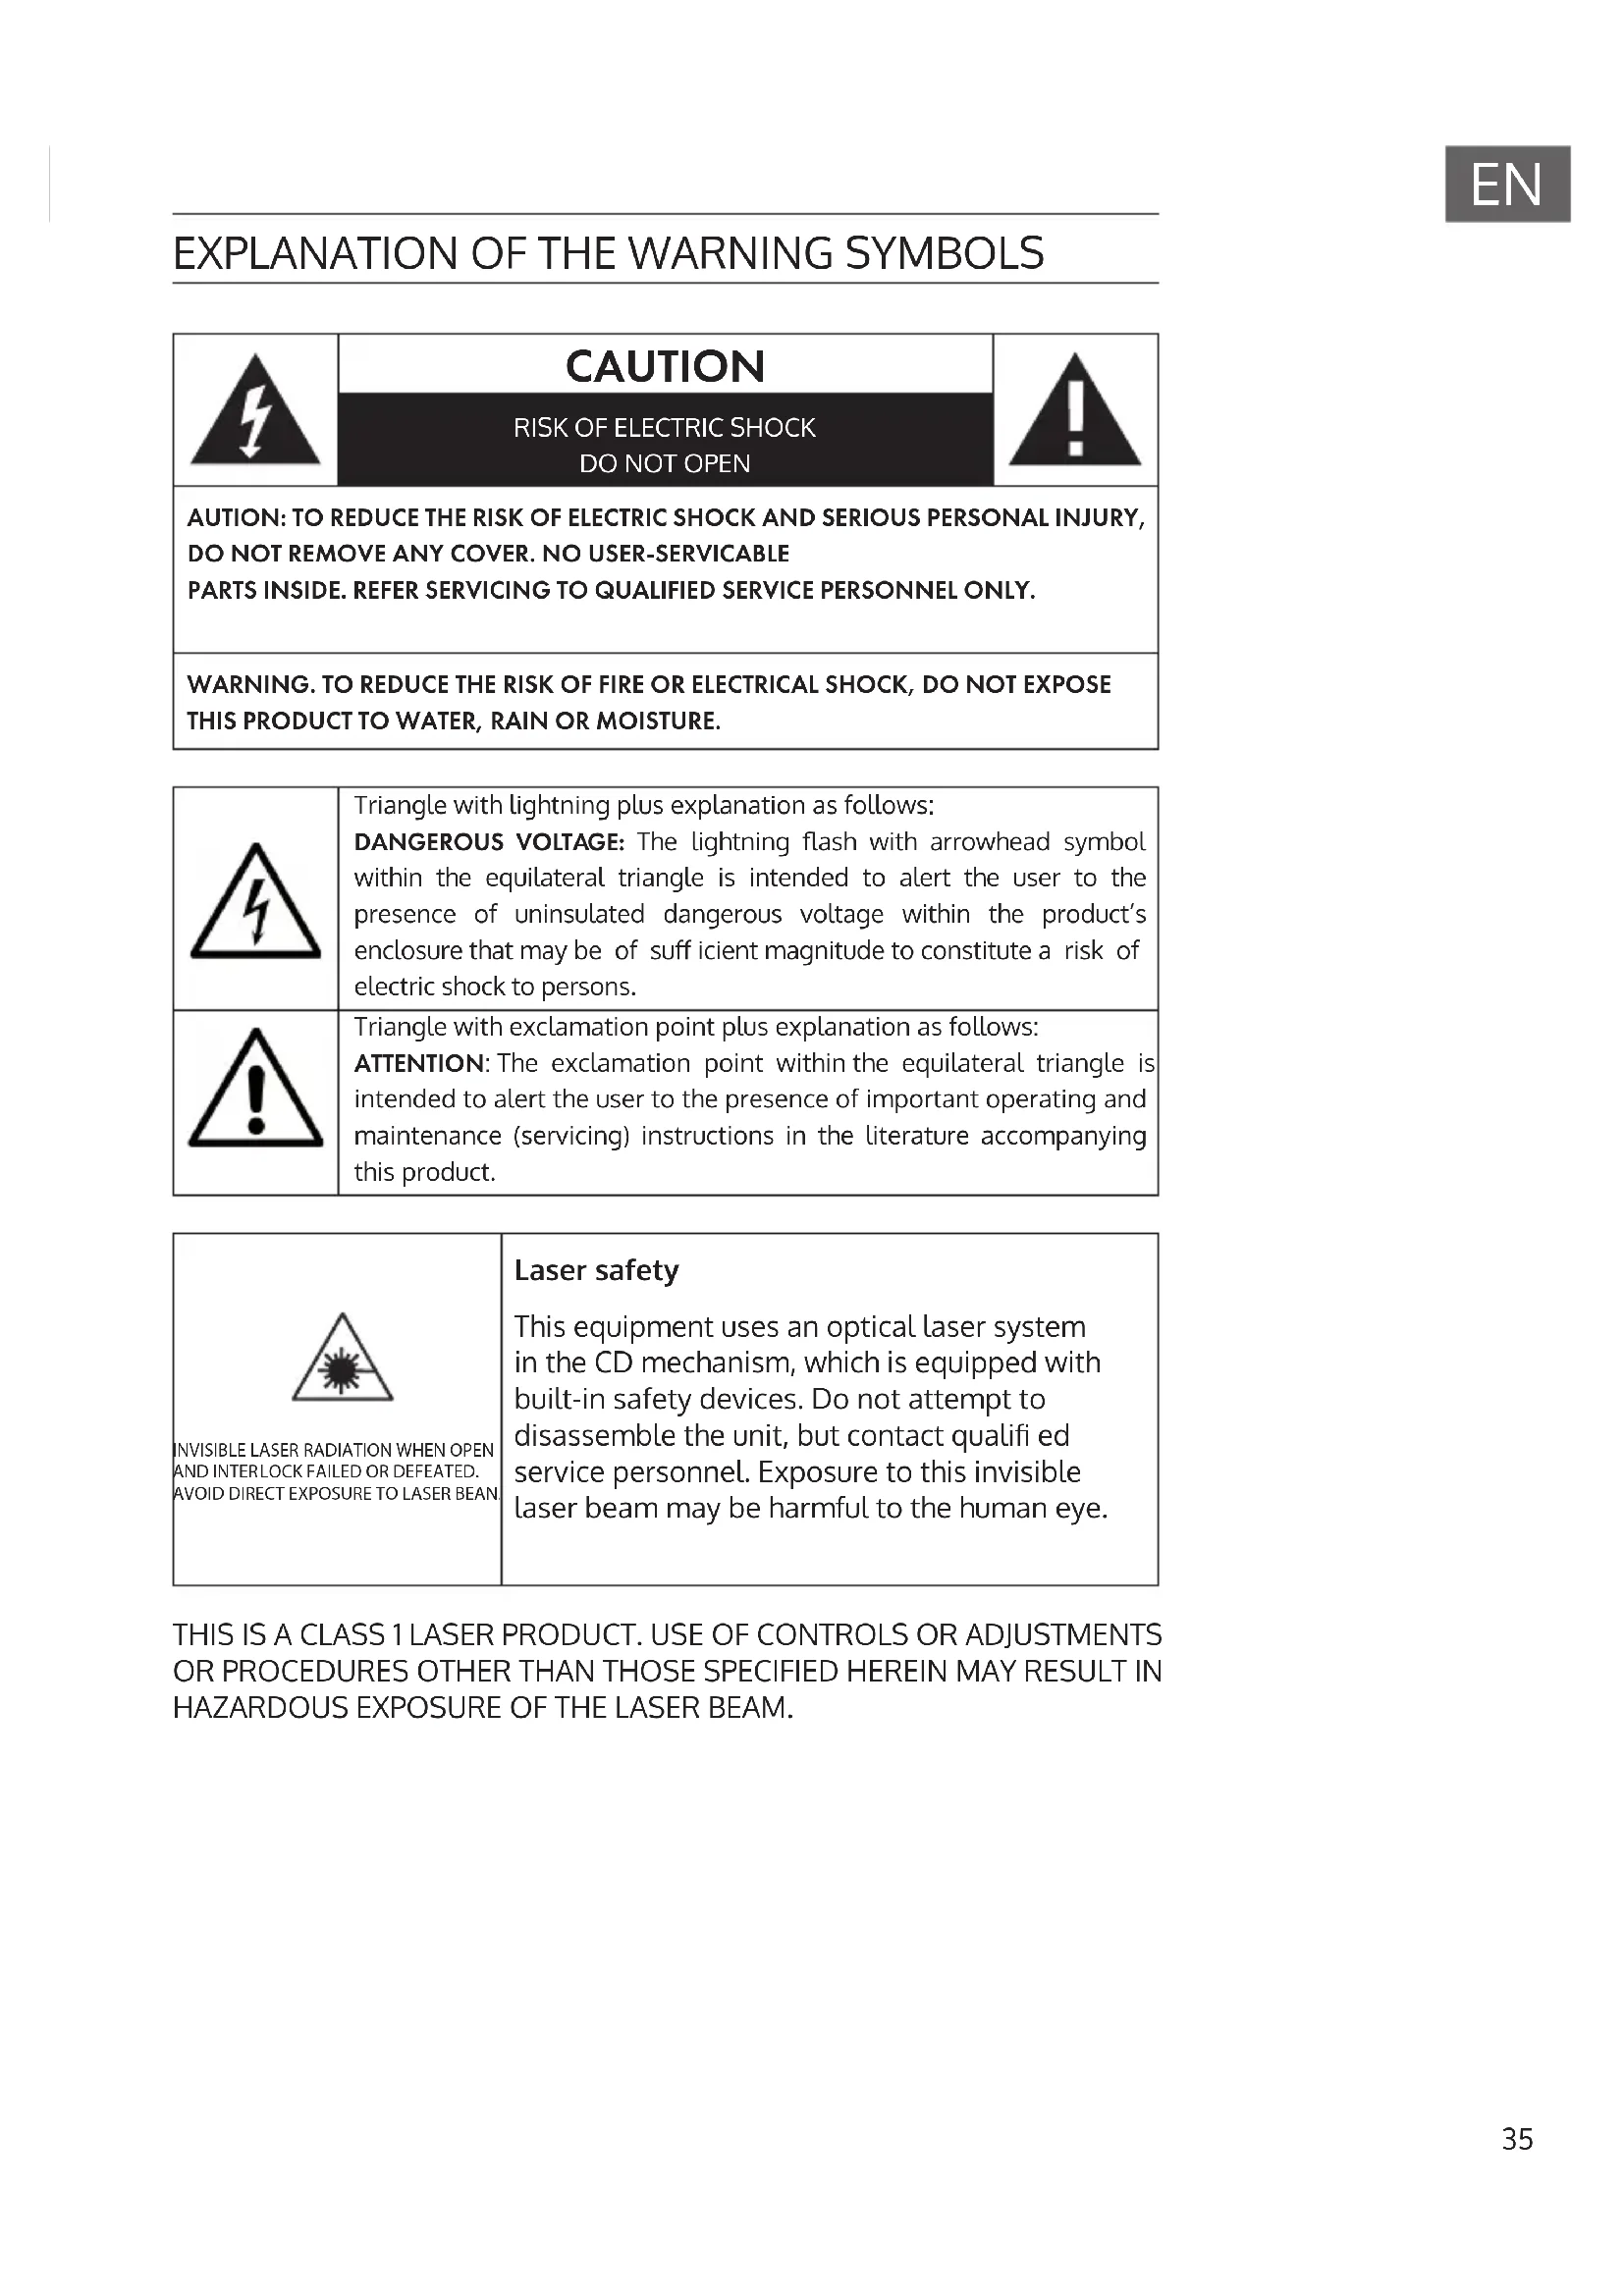
EXPLANATION OF THE WARNING SYMBOLS
| CAUTION RISK OF ELECTRIC SHOCK DO NOT OPEN | A |
| AUTION: TO REDUCE THE RISK OF ELECTRIC SHOCK AND SERIOUS PERSONAL INJURY, DO NOT REMOVE ANY COVER. NO USER-SERVICABLE PARTS INSIDE. REFER SERVICING TO QUALIFIED SERVICE PERSONNEL ONLY. | |
| WARNING. TO REDUCE THE RISK OF FIRE OR ELECTRICAL SHOCK, DO NOT EXPOSE THIS PRODUCT TO WATER, RAIN OR MOISTURE. | |
| 3 | Triangle with lightning plus explanation as follows: DANGEROUS VOLTAGE: The lightning flash with arrowhead symbol within the equilateral triangle is intended to alert the user to the presence of uninsulated dangerous voltage within the product's enclosure that may be of suff icient magnitude to constitute a risk of electric shock to persons. |
| 4 | Triangle with exclamation point plus explanation as follows: ATTENTION: The exclamation point within the equilateral triangle is intended to alert the user to the presence of important operating and maintenance (servicing) instructions in the literature accompanying this product. |
| INVISIBLE LASER RADIATION WHEN OPEN AND INTERLOCK FAILLED OR DEFECTED. AVOID DIRECT EXPOSURE TO LASER BEAN | Laser safety This equipment uses an optical laser system in the CD mechanism, which is equipped with built-in safety devices. Do not attempt to disassemble the unit, but contact qualified service personnel. Exposure to this invisible laser beam may be harmful to the human eye. |
THIS IS A CLASS 1 LASER PRODUCT. USE OF CONTROLS OR ADJUSTMENTS OR PROCEDURES OTHER THAN THOSE SPECIFIED HEREIN MAY RESULT IN HAZARDOUS EXPOSURE OF THE LASER BEAM.
SAFETY INSTRUCTIONS
Read these instructions. All uses guidelines must be read before using the device. Keep the instructions for future use.
- Children over the age of 8 and persons with reduced physical, sensory or mental capabilities or those with a lack of experience and knowledge may only use the device if they are instructed on how to do so by a person responsible for their safety, or if they are supervised and understand the hazards associated with the use of the device.
Protection against laser energy exposure
- As the laser beam used in this compact disc player is harmful to the eyes, do not attempt to disassemble the casing.
- Stop operation immediately if any liquid or solid object should fall into the cabinet.
- Do not touch the lens or poke at it. If you do, you may damage the lens and the player may not operate properly.
- Do not put anything in the safety slot. If you do, the laser diode will be "ON" when the CD door is still open.
- If the unit is not to be used for a long period of time, make sure that the power source is disconnected from the unit. Unplug the AC cord from the wall outlet. Make it a practice to remove the AC cord by grasping the main body and not by pulling the cord.
- This unit employs a laser. The use of controls or adjustment or performance of procedures other than those specified here may result in exposure to hazardous radiation.
Placement
- Do not use the unit in places which are extremely hot, cold, dusty or humid.
- Place the unit on a flat and even surface.
- Do not restrict the air flow of the unit by placing it in a place with poor ventilation, by covering it with a cloth or by placing it on a carpet.
Condensation
- When left in a heated room where it is warm and damp, water droplets or condensation may form inside the unit.
- When there is condensation inside the unit, the unit may not function normally.
- Let it stand for 1 to 2 hours before turning the power on, or gradually heat the room up and dry the unit before use.
Should any trouble occur, remove the power source and refer servicing to qualified personnel.
Protect your furniture
-
This system is equipped with non-skid rubber 'feet' to prevent the product from moving when you operate the controls. These 'feet' are made from non-migrating rubber material specially formulated to avoid leaving any marks or stains on your furniture. However certain types of oil based furniture polishes, wood preservatives, or cleaning sprays may cause the rubber 'feet' to soften, and leave marks or a rubber residue on the furniture.
-
To prevent any damage to your furniture we strongly recommend that you purchase small self-adhesive felt pads, available at hardware stores and home improvement centres everywhere, and apply these pads to the bottom of the rubber 'feet' before you place the product on fine wooden furniture.
INTRODUCTION
Introduction
Your CD+Graphics Karaoke System will provide you with many years of fun and entertainment. It makes you a "star" as you sing along with your favourite karaoke discs and hear your voice with the music through the system's speakers.
This Karaoke System has a compact design and is full of features yet it is easy to use. Just a few simple instructions and you will become an expert. Before using your unit, please read this manual to familiarize yourself with all the features available and the sections of the manual that describe their operations. Next go to the section for the specific operation you wish to perform.
Automatic Voice Control (AVC) - lets you replace the original singer's voice with your own voice when any pre-recorded multiplex karaoke disc is played. To activate, just adjust the Mic Volume and Auto Voice Control for the best balance between playback and microphone levels.
Echo Control - lets you add echo to enrich your voice for a concert hall effect.
Built-in Speakers - lets you share the music with your family and friends. Audio Out Jacks - lets you connect to another audio output component, such as an equalizer/booster or a PA system.
Video Out Jacks - lets you connect to your TV/monitor for displaying the lyrics from CD+G discs.
Glossary of Karaoke
In addition to all of the terminology associated with consumer electronics products, a few additional terms are used almost exclusively in karaoke. These terms are meant to familiarize you with the world of karaoke. Following are some brief explanations.
Echo
Echo adds depth and resonance to a singer's voice, without affecting the music. This echo is produced by creating minor controlled feedback in the singer's voice.
CDGM (Compact Disc Plus Graphics Multiplex)
They are CD's that contain songs that include the lead singer's voice, which can be removed with a karaoke system that has a balance or multiplex control. The idea is to sing along with the lead singer or replace the lead singer's voice with yours. Background vocals and backup singers are provided.
Automatic Voice Control (AVC):
When the AVC function is activated, the vocals on a multiplex recording are eliminated as soon as the singer begins singing into the microphone. When the singer stops singing, the vocals on the multiplex recording are automatically re-activated. This useful function is used primarily during practice sessions while a singer is learning a song. Please note that the AVC function only works with multiplex recordings and not with standard audio recordings.
CD+G
This is an acronym for Compact Disc plus Graphics. You will also see variations CD+G and CD+Graphics. This is a regular CD with information stored on a data track simultaneous to music. CD+G has video output for simple graphics (not full motion video). In the case of karaoke, the graphics function is used to store song lyrics and display the lyrics in sync with music. In most cases, CD+G software displayed lyrics change color as they are to be sung. A regular television with a video-in RCA jack is all that is required to display CD+G lyrics.
Features:
Lyrics on TV screen Displays lyrics in rhythm with the music when playing CD+G discs.
Automatic Voice Control (AVC)
Lets you replace the original singer's voice with your own voice when any pre-recorded multiplex karaoke disc is played. To activate, just adjust the Mic Volume and Auto Voice Control for the best balance between playback and microphone levels.
Echo Control Lets you add echo to enrich your voice for a concert hall effect.
Audio Out Jacks Lets you connect to another audio output component, such as an equalizer/booster or a PA system.
Video Out Jacks Lets you connect to your TV/monitor for displaying the lyrics from CD+G discs.
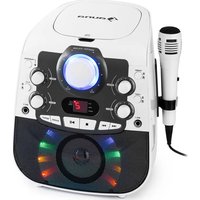
PRODUCT DESCRIPTION
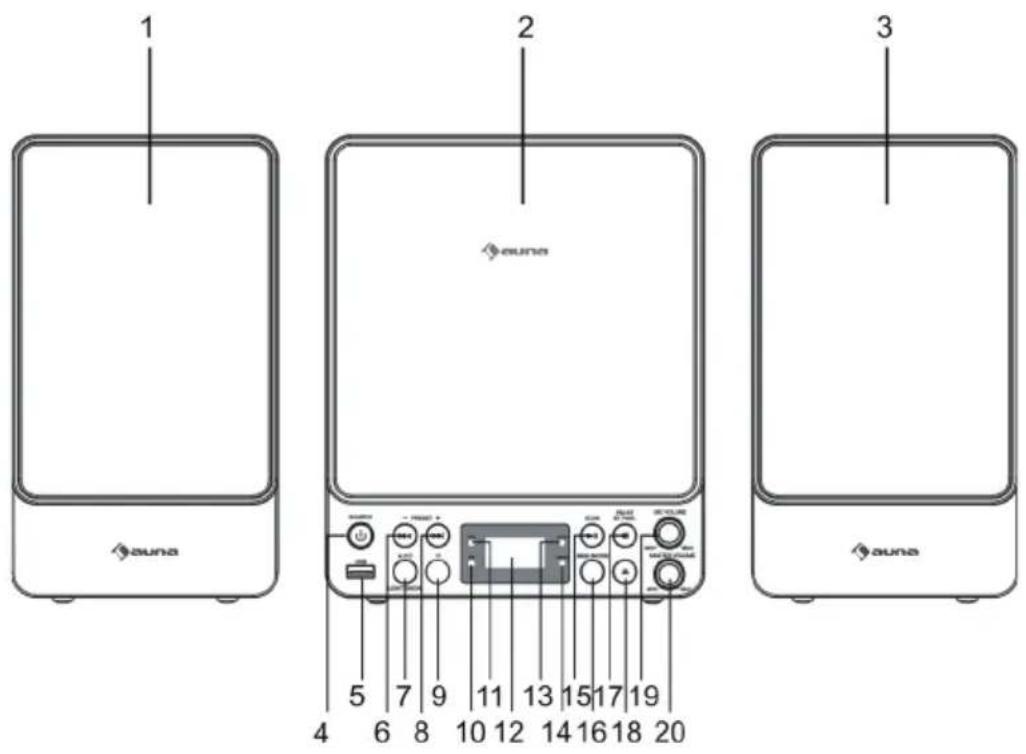
Front view
Top view
1 L-SPEAKER
2 CD DOOR
3 R-SPEAKER
4 STAND BY BUTTON / SOURCE BUTTON
5 USB JACK
6 SKIP/SEARCH BACKWARD, PRESET- BUTTON
7AVC BUTTON, LIGHT SHOW
8 SKIP/SEARCH FORWARD PRESET+ BUTTON
9 REMOTE SENSOR
10 FM INDICATOR
11 CDG INDICATOR
12 LED DISPLAY
13 PROGRAM INDICATOR
14 REPEAT INDICATOR
15 PLAY/PAUSE, FM SCAN BUTTON
16 MEMORY BUTTON, PLAY MODE BUTTON
17 BT PAIR BUTTON / FM ST BUTTON / STOP
18 CD OPEN/CLOSE BUTTON
19 MIC VOLUME
20 MASTER VOLUME
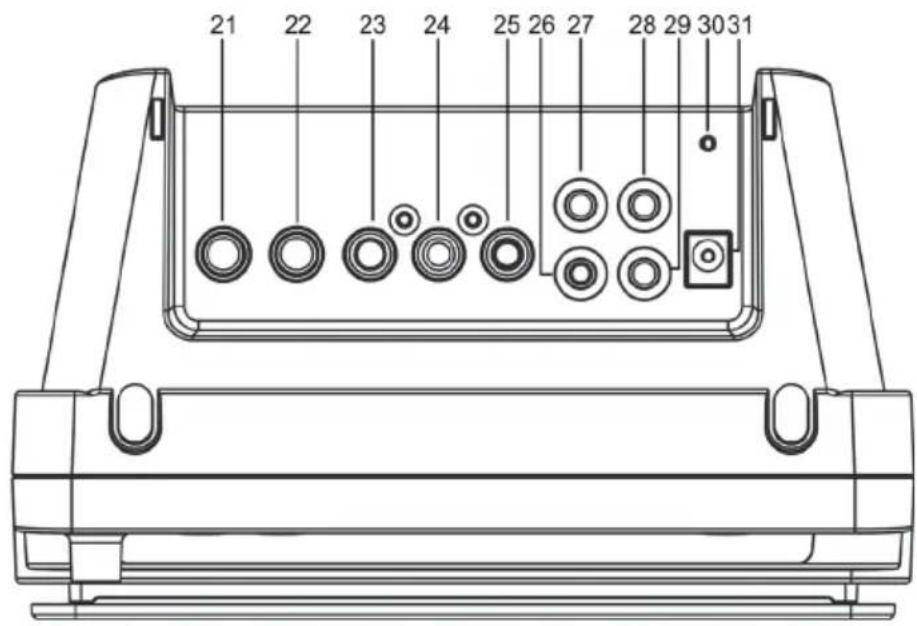
21 MIC2 INPUT JACK
22 MIC1 INPUT JACK
23 L-AUDIO OUT JACK
24 R-AUDIO OUT JACK
25VIDEO OUT JACK
26 L-SPEAKER OUT JACK
27 R-SPEAKER OUT JACK
28 AUDIO IN JACK
29 PHONE JACK
30 FM ANT
31 DC IN JACK
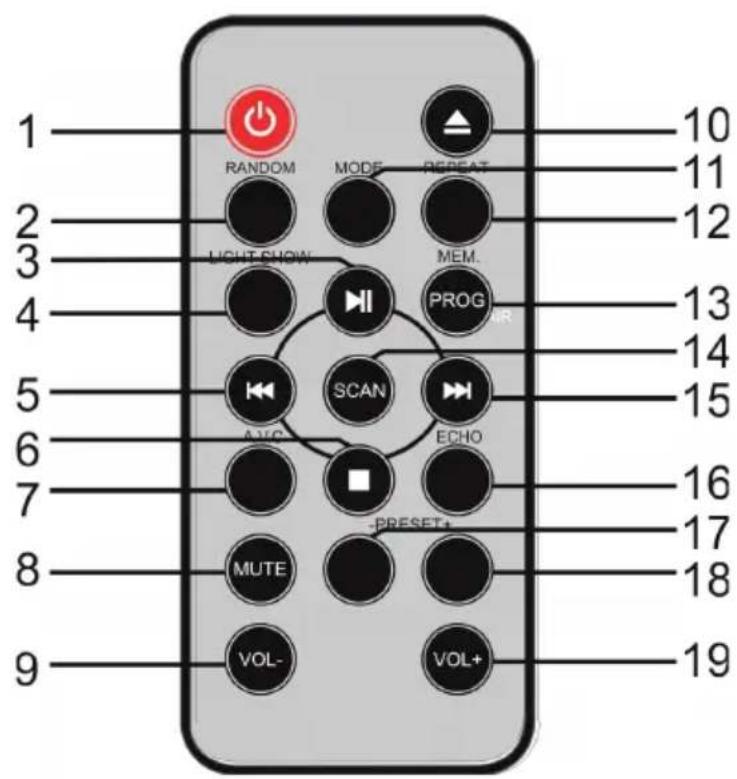
1 STANDBY BUTTON
2 RANDOM BUTTON
3 PLAY/PAUSE BUTTON
4 LIGHTSHOW BUTTON
5 SKIP/SEARCH BACKWARD BUTTON
6 STOP BUTTON
7AVC BUTTON
8 MUTE BUTTON
9 VOL-B BUTTON
10 OPEN/CLOSE BUTTON
11 MODE BUTTON
12 REPEAT/ BT PAIR BUTTON
13 MEMORY/PROG.BUTTIN
14 SCAN BUTTON
15 SKIP/SEARCH FORWARD BUTTON
16 ECHO BUTTON
17 PRESET-BUCTION
18 PRESET+ BUTTON
19 VOL + BUTTON
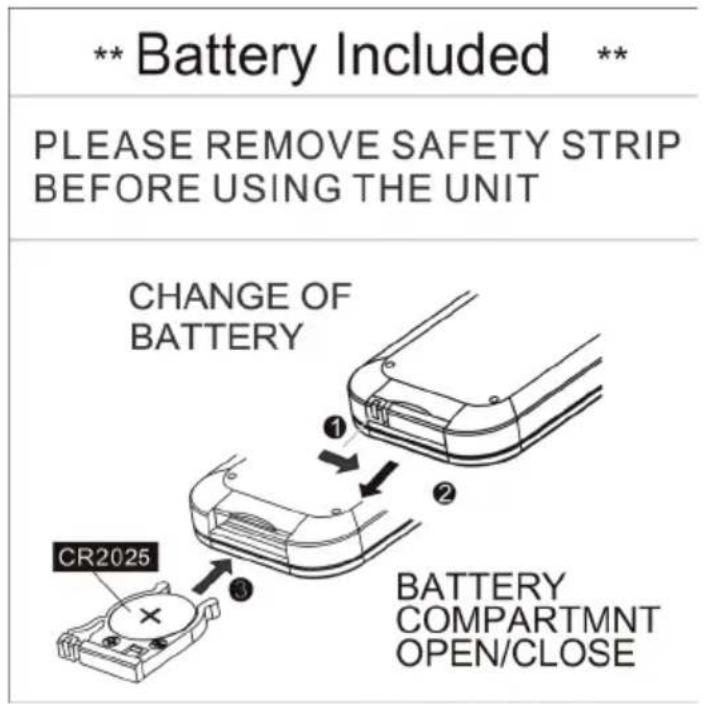
Installing batteries into the remote control
The remote control operates on one CR2025 battery (included). To activate the remote control, remove the insulation tab inserted in the battery compartment. When the operation of the remote control becomes intermittent or unsatisfactory, replace the original battery with a new CR2025 lithium battery.
- Slide out the battery holder from the remote control case.
- Replace the 3V CR2025 battery. Be sure the battery is installed correctly. The remote will not work if the battery is installed with the wrong polarity.
- Insert the battery holder back into the battery slot.
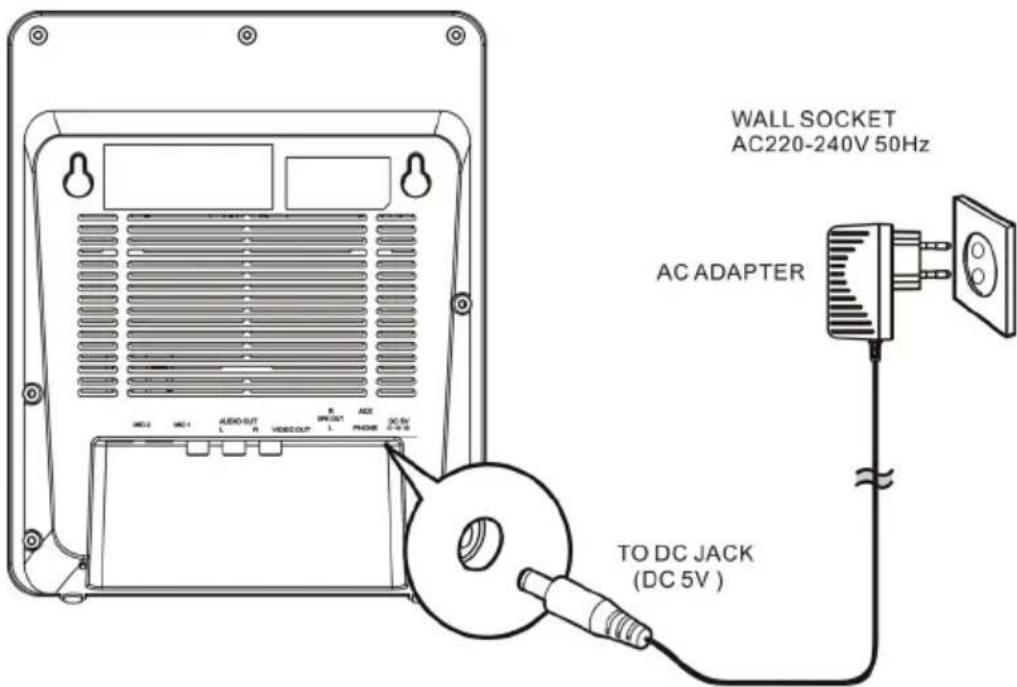
Plug the supplied AC adapter into the DC jack on the rear side of the unit and connect to a standard AC wall socket with 220-240V~50/60Hz continuous power supply.
Note: When the unit is not operated for long periods of time, unplug the AC adapter from the unit and wall outlet.
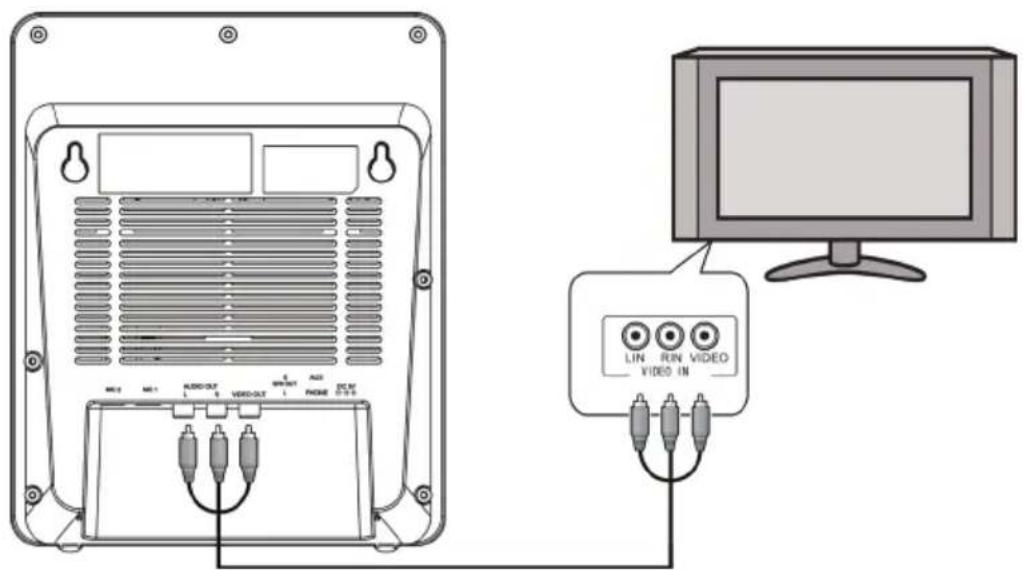
Connecting to the TV
The karaoke system provides a patch cord to give you the option of connecting your unit to an external audio/video device. The patch cord has three RCA jacks at each end. White and Red are for left and right audio connections and the Yellow is for video. Modern flat panel digital TV sets and home music systems are usually equipped with corresponding colour-coded RCA jacks to assist correct connections. Make sure that you have a CD+G disc in the karaoke system playing when you are making this connection. You will know you have the proper settings on your TV as soon as you see the lyrics on the screen.
Video connection
Please follow the steps below to display CD+G lyrics on the TV screen:
-
Locate the color-coded patch cords.
-
Connect video cable (Yellow) to the VIDEO OUT on the back of the karaoke system.
-
Connect the other end of the video cable (Yellow) to the VIDEO/AV INPUT on your TV.
If your television does not have the required Video Input, you will need a RF modulator (Radio Frequency Modulator), which connects through your TV Antenna or cable line and serves as your Video Input.
The RF Modulator can be purchased at almost any consumer electronics retailer. If you are connecting the video from the karaoke system to a television video input jack, you must specify the source the TV is to display. Your TV tuser guide can tell you how to display the video signal from the 'Video In' jack.
If you do not have the manual for your TV, we suggest calling the TV manufacturer's customer service department. Only the manufacturer will be able to tell you accurately how to configure your TV to display the video signal coming from the 'Video Input' jack.
Note: Some projection TV sets do not properly display the standard blue background used on most CD+G discs. If the background colour is inconsistent or flashing, please try connecting your karaoke system to a standard CRT/LCD television instead.
Common ways to configure your TV
- You karaoke system is designed to connect to your TV. The karaoke system is constantly sending the video and audio signals to the 'VIDEO OUT' and 'AUDIO OUT' jacks whenever you play a CD+G disc. So, load a CD+G into your karaoke system before you start making these connections. You will see lyrics on the TV screen as soon as you have completed the setup correctly.
- The setup of your TV is the most difficult part of making the connection for displaying your lyrics. In most homes, the TV has either cable connected or an antenna in use. Once you connect your karaoke system to the TV, you must 'tell' your TV to display the input from the karaoke system instead of the usual input from the cable or antenna.
-
Check your TV user manual for the easiest way to setup your particular entertainment system. If you do not have your manual, you can always call your TV manufacturer for that information or try their website for online assistance. We have listed below the most common ways of setting up a TV:
-
In the setup menu for configuring the TV there may be an 'Input Selection' option where you may choose between 'Cable/Ant.', 'Video 1', or 'Video 2' etc. as the input source.
- Try looking for a 'Video' channel between the highest channel and the lowest channel on your TV (i.e. between 2 and 99 may be 'VIDEO' or 'INPUT').
- Look for buttons on the remote control for the TV you are connecting to that say 'VIDEO', 'VIDEO 1', 'AUX', 'EXT', 'LINE 1'. The 'LINE-IN' button will display the Video input source.
Audio connection
Connect the unit to your TV or home stereo system using the White and Red connections on the supplied patch cord. Plug the white end of the patch cord into the white AUDIO OUT jack on the unit. Plug the red end of the patch cord into the red AUDIO OUT jack on unit. Now connect the other end of the cable's white (left channel) and red (right channel) plugs to your TV or home stereo system's 'AUDIO IN' or 'AUX IN' jacks.
Connecting a microphone
- Plug a microphone (one microphone is included) into the MIC 1 or MIC 2 JACK on the lower left side of your unit. The mic output will be mixed with an audio source from CD/CD+G/USB flash drive.
- Slide ON/OFF switch on microphone to "ON" before singing and always slide to "OFF" after use.
Caution: Tapping or dropping the microphone while it is on can cause permanent damage to it. Never grip and swing the microphone around by the connecting cord.
CONTROL FUNCTIONS
Power and playback functions
-
Functions selector
-
Press the SOURCE button on main unit or remote control the MODE button Select CD/USB
- Press the SOURCE Button to USB position to playback MP3 files on a USB flash drive.
-
Press the SOURCE button on the remote control or MODE button repeatedly on main unit to select AUX function. You can attach other music sources (iPod, MP3 or other digital audio players) through the AUX IN JACK to your external player's audio out jack or headphone jack.
-
Power ON/OFF button
Press this button to turn unit ON.
Press and hold this button to turn unit OFF.
Remote control operation: In Off (standby) mode, tap the POWER Button on remote control to turn the unit ON. The unit will turn ON.
- Press II
Press CD/USB PLAY/PAUSE BUTTON to start playing the CD/MP3. The play icon will light steadily.
- STOP
While a selected song is playing, tap this to stop
5.
Tap once to skip forward to the following song during playback or stop mode.
6.
Tap once to skip back to the start of the current song during playback or skip back to the previous song during stop mode.
- REPEAT/PROGRAM button
REPEAT function
During CD/CD+G/MP3 playback on CD/CD-R/CD-RW/USB Flash Drive
- tap once for Repeat 1 (REPEAT INDICATOR in LED DISPLAY will flash) to playback current song only;
- tap again for Repeat All (REPEAT INDICATOR will light steadily) to repeat all available tracks on the disc;
- tap again to cancel Repeat mode (REPEAT INDICATOR will be OFF)
PROGRAM function
This function allows music tracks to be played in a programmed sequence. Program function can only be set in STOP mode
- Press the PROGRAM button once. Program Number 01 will display and PROGRAM INDICATOR will flash.
- Press the SKIP FORWARD or SKIP BACKWARD button to select the track to be programmed.
- Press the PROGRAM button again to store the selection. The Program number, will advance to 02 to prompt for the next input.
- You may repeat steps #2 to #3 to program up to 20(CD)/99(MP3) tracks. As soon as you have entered the 20th track, the LED DISPLAY will show "FUL", indicating that program is full..
- Press the PLAY button to complete and start program play. Press STOP button to stop program play.
- You may use the REPEAT function to repeatedly play a certain track (Repeat 1) or all tracks (Repeat All) in the Program Play Mode.
- The CD player will stop when all the programmed tracks have been played through once. To repeat program play, press the PLAY/PAUSE button.
- To cancel program play, press the STOP button twice while program plays running or open the CD DOOR in stop mode.
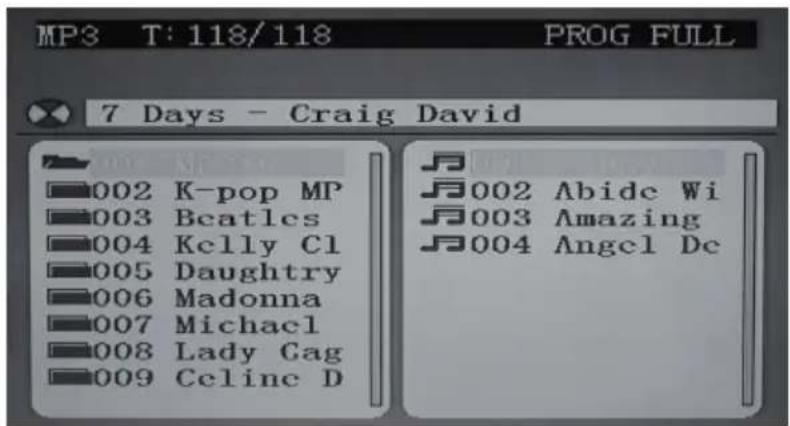
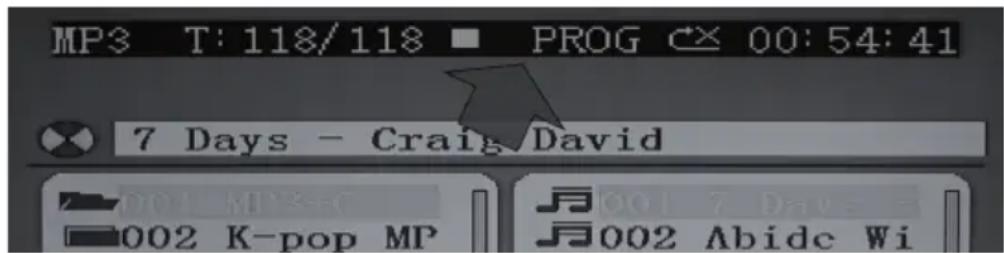
Up to 20 (CD)/99(MP3) tracks can be programmed. If you attempt to program more than 20(CD)/99(MP3) tracks, "FUL" will appear in the LED DISPLAY and "PROG FULL" will appear on the TV screen as shown below (if connected).
Program Play mode
When finished programming, tap PLAY BUTTON to confirm and start program play. The PROG INDICATOR in the LED DISPLAY will light. While playing, you may tap the NEXT or PREV BUTTON to skip to a desired song in the program list.
To stop program play temporarily, tap the STOP BUTTON once. The PROG INDICATOR in the LED DISPLAY and TV screen (as shown below) will remain ON.
Tap PLAY BUTTON to resume program play.
Note: if you tap the STOP BUTTON twice consecutively, you will cancel program play and erase the program list permanently. The PROG
INDICATOR in the LED DISPLAY and TV screen will go OFF.
Program review:
In stop mode, you can review the program list by pressing the NEXT or PREV BUTTON.
Input functions
- DC JACK: Connect the DC plug of the DC5V output AC Adapter (included) to this jack.
- USB JACK: Connect a USB flash drive (FAT32 formatted) up to 32GB (not included) to this jack for playback of MP3 files.
- AUX IN JACK: Connect the 3.5mm stereo plug of a stereo audio cable (not included) to this jack and the other end to an external audio player for playback.
- MIC 1 / MIC 2 JACKS: Connect the microphone (one included) to either one of the jacks to sing.
Output functions
VIDEO OUT JACK: Connect the yellow coded RCA plug of the A/V cable
(included) to this jack and the other end to the VIDEO/AV INPUT of your TV.
- AUDIO OUT JACKS (L/R): Connect the white coded RCA plug (L) and red coded plug (R) of the A/V cable (included) to these jacks and the other end to the audio inputs of your TV.
Karaoke control funktions
- MASTER VOLUME: Adjust this to obtain the desired volume level from the built-in speaker.
- AVC (AUTOMATIC VOICE CONTROL) BUTTON : When AVC is activated, the vocals on a multiplex recording are eliminated as soon as the singer begins singing into the microphone. When the singer stops singing, the vocals on the multiplex recording are automatically re-activated. This function is used primarily during practice sessions
- MIC VOLUME: Adjust this control to obtain the desired mic volume output during singing. Volume level of both Mic 1 and Mic 2 will be adjusted at the same time.
- ECHO CONTROL: Press the ECHO button on the remote control for a more significant echo effect to enrich your voice for a concert hall effect.
HOW TO SING WITH CD+G, USB OR AUX-IN MUSIC SOURCE
Getting prepared
- Connect your unit to a compatible TV using the included A/V cable.
- Plug in the included MICROPHONE into either the MIC 1 or MIC 2 JACK
Note: Always set the mic to OFF until you are ready to sing to avoid possible sharp feedback noises.
Singing along with CD+G, CD, CD-R/CD-RW or USB flash drive with MP3 files
- Set the SOURCE selector to "CD".
- Load a CD/CD+G disc as follows: Grip the top front edge on the CD DOOR where indicated and pull gently to open it. The LED DISPLAY will display "OP". Load a disc vertically into the compartment with the printed side facing you. Gently close the CD DOOR. The unit begins to read the disc. The LED DISPLAY will display the total number of tracks. (If no disc is loaded or the disc cannot be recognized, "No" will be displayed in the LED DISPLAY). When a CD+G disc is detected and being played, the CDG
INDICATOR in the LED DISPLAY will light.
- Press PLAY/PAUSE BUTTON to play the disc. If a CD+G track is being played, the following TV screen will appear.
If you try to play a self-compiled CD-R/RW disc or USB flash drive with MP3 songs (both are not included), you will see the following menu instead.
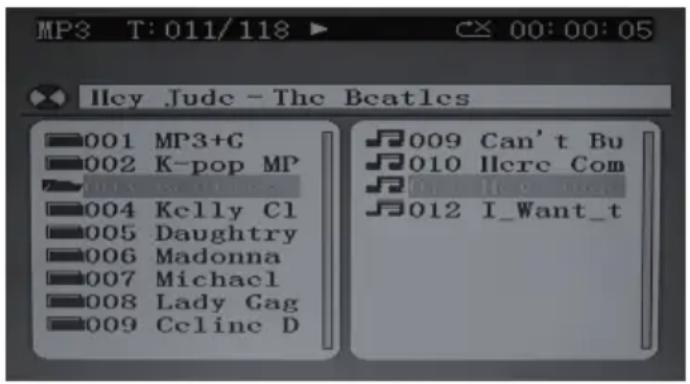
- On the top line of the menu, "T: 011/118 means track #11 out of total 118 tracks is now playing. The elapsed time of current track is shown on the right
- However, if you have connected to a TV, full disc content information will be shown as on page 11.
- All basic play/pause, stop and skip controls are identical to CD mode.
- Select your favorite song using the NEXT/ PREV BUTTON.
- Tap PLAY/PAUSE BUTTON to start playing.
- Turn ON your microphone and starting singing. Adjust the MASTER VOLUME, MIC VOLUME and TV VOLUME if necessary.
Notes on CDs
- CD mechanisms used in devices like this are designed to fully read all commercial CDs. They will also read self-compiled CD-R/CD-RW discs but it may take up to 10 seconds for playback to start. If playback does not start, it is likely due to the quality of the CD-R/CD-RW disc and/or the compatibility of the CD compilation software. Manufacturer is not responsible for the playback quality of CD-R/CD-RW discs.
- Do not attach a label or seal to either side of the CD-R/CD-RW disc. It may cause a malfunction
- Do not apply excessive force or press the CD DOOR while it is playing.
- Never place anything except a compact disc in the disc compartment. Foreign objects can damage the unit.
- Only load one disc into the disc compartment at a time.
Singing along from aux input sources
This karaoke unit features an AUX-IN jack for connecting your iPod, MP3 player or other digital music player.
- Connect the headphone jack of your external device to the AUX IN jack located on the lower side of this unit (The connection cable is not included).
- Turn on the unit player and it will enter the AUX function mode once an external device is plugged into the AUX IN jack.
- Connect the line out or headphone jack of your external audio device (e.g. a CD player, MP3 player, iPhone, iPod, etc...) to the unit with a suitable audio cable (not included).
- Select your favorite song on your external audio device to play. You may need to adjust the output volume of your external audio device if the headphone jack is used for making the connection.
- Turn on your microphone and start singing. Adjust the MASTER VOLUME and/or MIC VOLUME if necessary.
- Turn off both devices after use.
FM RADIO OPERATION
AUTO Scan (SCAN)
You can use the scan (auto tune) function to automatically scan for new digital radio stations and remove inactive ones.
- Press hold the PLAY/SCAN Button for 2 seconds the on main unit or remote control SCAN button to choose "P-xx". The number of stations found will be displayed during the auto tune. When the auto tune has finished, will tune to the last station that you were listening to. If the last station you were listening to is no longer available, will tune into the first station in the alphabetical list.
- To manually tune to a specific radio station, tap the or Button on either main unit or remote control repeatedly.
RECALLING PRESET MEMORY CHANNELS
In radio mode, recall the pre-set channels by pressing the PRESET+ or -Button on remote control repeatedly. (Note:"P01" will blink in the display if you are programming preset for first time)
Note
FM search and listening LED have no frequency display.
BT OPERATION
Bluetooth wireless technology is a short-range radio technology that enables wireless communication between various types of digital devices, such as mobile phone or computer. It operates within a range of about 10 meters (30 feet) without the hassle of having to use cables to connect these devices. Since the Bluetooth technology does not require line of sight between the communicating devices, it is not necessary to line up the transmitting device and the receiver, as in the case of infrared technology.
Communication System and Bluetooth Profile of this unit
There are many available Bluetooth Profiles describing the basic communication methods, specific functions and uses, to enable communication between devices.
This unit supports the following:
Communication System: Bluetooth Specification version 2.1 Bluetooth +Enhanced Data Rate (EDR) Profile : A2DP (Advanced Audio Distribution Profile) A2DP enables audio streaming from an A2DP equipped Bluetooth stereo audio source device (eg mobile phone) to this unit. By converting wireless stereo audio signal to analogue audio signal, you can enjoy listening to the sound through this speaker system. AVRCP (Audio/Video Remote Control Profile) is a technology that allows a single remote control to control all Bluetooth enabled Audio Video equipment to which a user has access.
Notes when using unit with a mobile phone:
- This unit cannot be used to talk over the telephone even when there is a Bluetooth connection made to a mobile phone.
- Please refer to the operating manual supplied with the mobile phone for details on operation of your mobile phone while transmitting the sound using a Bluetooth connection.
Pairing Bluetooth devices:
- Bluetooth devices need to be initially paired first before they can exchange data. Once paired, it is not necessary to pair them again unless:
- Pairing is made with more than 8 devices. Pairing can only be made one device at a time. This unit can be paired to a maximum of 8 devices. If subsequent device is paired, the oldest device paired, will be deleted and replaced with the new one.
- This unit is reset. All pairing information is deleted when unit is reset.
- Pairing information is deleted while re-pairing, etc.
Pairing with other Bluetooth source devices:
- Press the POWER button on main unit or remote control to turn the power on.
- Press the SOURCE button on main unit or remote control to select Bluetooth function. (LED DISPLAY BT blinks.)
- Press and hold the BT PAIR button on main unit or remote control for 3 seconds or more. LED DISPLAY BT PAIR indicator blinks quickly. The unit is now in pairing mode and is ready to be paired with other Bluetooth source devices.
- Perform pairing procedure on the source device to detect this unit. "MICROSTAR Sing" will appear in the detected devices list (if available) in the source device. (Refer the source device operating manual for details).
NOTE:
- Place the devices to be paired within 1 meter (3 feet) of each other when pairing.
- Some source devices are unable to display lists of detected devices. To pair this unit with the source device, refer to the source device operating manual for details.
- Select "MICROSTAR Sing" from the source list. If Pass code* is required, enter "0000". * Pass code may be called PIN Code, Passkey, PIN number or Password.
- Pairing indicator will stop blinking once the unit is successfully paired with the source device. (Pairing information is now memorized in the unit.) Some audio source devices may connect with the unit automatically after pairing is completed, otherwise follow the instructions in the source device operating manual to start connection.
- Press the PLAY button on main unit source device to start Bluetooth connection.
Listening to the sound
Check that:
- The mode device Bluetooth functionality is ON.
- Pairing of this unit and the source device is completed.
-
Unit is in connected mode (pairing indicator (BT) of LED)
-
Press the POWER button on main unit or remote control to turn the power on.
- Press the SOURCE button on main unit or remote control to select Bluetooth function.
-
Start the Bluetooth connection from the Bluetooth stereo audio source device.
-
Press PLAY/PAUSE button (on main unit, remote control or source device).
NOTE: If the source device has an extra bass function or equalizer function, set them to off. If these functions are on, sound may be distorted.
USING THE UNIT AS A PUBLIC ADDRESS SYSTEM
This unit can also be used as a PA (Public Address System).
Note: To prevent feedback or whistling from occurring, please be sure that the microphone is not held too close to unit's speaker.
- With unit stopped at CD or USB mode, unplug any 3.5mm audio cable (not included) connected to the AUX IN JACK previously.
- Turn on your MICROPHONE (one included) and start your performance. Adjust the MASTER VOLUME, MIC VOLUME and ECHO control if necessary.
LED LIGHT SHOW
The LED light shows inside the CD door and in the lower corners of the unit are created automatically based on the music source being played at the time. Press this LIGHT SHOW button to turn unit ON position.
Note: If the brightness is glaring, turn on room lights or turn off LED light show.
| Problem Possible Cause | Use Solution | |
| No power when POWER ON/OFF BUTTON is pressed | DC plug of the AC adapter is not plugged into the DC JACK properly. | Re-insert the DC plug of the AC adapter properly. |
| No power when plugged in | The AC outlet may not have power. | Check the outlet with a working lamp or other electrical appliance. |
| No sound MASTER VO LUME of this unit is set to minimum. | Turn up the MASTER VOLUME. | |
| Volume control on TV set/PA system is set to minimum. | Turn up the volume of the TV/PA system. | |
| TV set/PA system power is OFF. | Turn ON the power of TV/PA system. | |
| CD player of Karaoke System does not work normally or the "No" appears on the LED DISPLAY. | Disc is inserted upside down. Insert disc correctly. | |
| Disc is dirty. Wipe it clean with soft cloth. | ||
| Disc is scratched. Use a new disc. | ||
| Disc is warped. Use a new disc. | ||
| A non-standard disc is inserted. | Only use compatible discs mentioned in this manual. | |
| Lens is dirty. Clean the optical pickup with a CD lens cleaner. | ||
| Moisture has condensed inside the CD deck. | Wait about t20 to 30 minutes to let it dry out. | |
| Karaoke system needs to be reset. | Disconnect the machine from power source for 30 seconds. | |
| No sound - If audio is going through TV/ home stereo | Source Selection on your TV/home stereo is not set properly. | Select AV INPUT as the source for your TV/home stereo. |
| Improper connection to stereo system or PA. | Follow directions on 'Audio Connection' section for connecting to a home stereo system. | |
| Problem Possible Cause Solution | ||
| No song lyrics appear on the TV screen | Video cable is not connected properly to the TV. Connect the video cable to the VIDEO OUT of the unit and to the TV's Video In jack. | |
| Source selector on TV is not set to VIDEO or A/V IN. Use your TV Remote to select VIDEO or A/V input. | ||
| TV does not have video line input. Connect from VIDEO OUT of the unit to a RF modulator and then to the TV cable input. | ||
| No image on TV screen | TV input is not properly set. Set TV input to correct A/V input that is connected to the unit. | |
| Cannot sing through the mic | Improper mic volume setting. Adjust MIC and MASTER VOLUME CONTROLS to appropriate levels. | |
| Mic is off. Turn on mic with the ON/OFF switch located on the microphone. | ||
| Mic is not properly plugged in. Insert the mic plug fully into either MIC 1 or MIC 2 JACK of the unit properly. | ||
| Noise or sound distorted on FM broadcast | Station not tuned properly. FM wire antenna is not fully extended. Fine tune the FM broadcast station. Fully extend the FM wire antenna. | |
CARE AND MAINTENANCE
- Clean your unit with a damp (never wet) cloth. Solvent or detergent should never be used.
- Avoid leaving your unit in hot, humid or dusty places.
- Keep your unit away from heating appliances and sources of electrical noise such as fluorescent lamps or motors.
Handling cd discs
- If drop-outs or interruptions occur in the music during CD play, or if the CD fails to play at all, its bottom surface may require cleaning. Before playing, fingerprints and dust should be carefully wiped off with a soft cloth. Wipe in a straight motion from the center of the disc to the outside edge with a good soft cleaning cloth.
- Never use chemicals, such as record cleaning sprays, antistatic sprays or fluids, benzene or thinner to clean compact discs. These chemicals will permanently damage the plastic surface of the disc.
- Always install the compact disc securely on the disc clampers with the label side facing up. Compact discs can be played on only one side.
- To remove a disc from its storage case, press down on the center of the case and lift the disc out, holding it carefully by the edges.
- Discs should be returned to their cases after use to protect them from dust and scratches.
- To prevent warping the disc, do not expose it to direct sunlight, high humidity or high temperature for extended periods of time.
- Do not apply adhesive labels or write anything on either side of the disc. The inks used in some felt-tips pens may damage the surfaces of the disc.
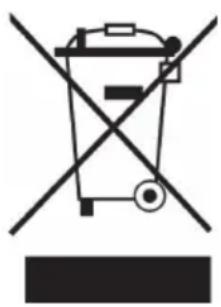
If there is a legal regulation for the disposal of electrical and electronic devices in your country, this symbol on the product or on the packaging indicates that this product must not be disposed of with household waste. Instead, it must be taken to a collection point for the recycling of electrical and electronic equipment. By disposing of it in accordance with the rules, you are protecting the environment and the health of your fellow human beings from negative consequences. For information about the recycling and disposal of this product, please contact your local authority or your household waste disposal service.
This product contains batteries. If there is a legal regulation for the disposal of batteries in your country, the batteries must not be disposed of with household waste. Find out about local regulations for disposing of batteries. By disposing of them in accordance with the rules, you are protecting the environment and the health of your fellow human beings from negative consequences.
DECLARATION OF CONFORMITY
CE UK CA
Manufacturer:
Chal-Tec GmbH, Wallstrasse 16, 10179 Berlin, Germany.
Importer for Great Britain:
Berlin Brands Group UK Ltd
PO Box 1145
Oxford, OX1 9UW
United Kingdom
Hereby, Chal-Tec GmbH declares that the radio equipment type Microstar Sing is in compliance with Directive 2014/53/EU. The full text of the EU declaration of conformity is available at the following internet address: use.berlin/10035303
For Great Britain: Hereby, Chal-Tec GmbH declares that the radio equipment type Microstar Sing is in compliance with the relevant statutory requirements. The full text of the declaration of conformity is available at the following internet address: use.berlin/10035303
Cher client,
Berlin Brands Group UK Ltd
PO Box 1145
Oxford, OX1 9UW
United Kingdom
- Member of Berlin Brands Group
- Dahlwitz-Hoppegarten
- CONTENTS
- EXPLANATION OF THE WARNING SYMBOLS
- SAFETY INSTRUCTIONS
- Protection against laser energy exposure
- Placement
- Condensation
- Protect your furniture
- INTRODUCTION
- Glossary of Karaoke
- Echo
- CDGM (Compact Disc Plus Graphics Multiplex)
- Automatic Voice Control (AVC):
- CD+G
- Features:
- PRODUCT DESCRIPTION
- Installing batteries into the remote control
- Connecting to the TV
- Video connection
- Common ways to configure your TV
- Audio connection
- Connecting a microphone
- CONTROL FUNCTIONS
- Power and playback functions
- PROGRAM function
- Program Play mode
- Program review:
- Input functions
- Output functions
- Karaoke control funktions
- HOW TO SING WITH CD+G, USB OR AUX-IN MUSIC SOURCE
- Getting prepared
- Singing along with CD+G, CD, CD-R/CD-RW or USB flash drive with MP3 files
- Notes on CDs
- Singing along from aux input sources
- FM RADIO OPERATION
- AUTO Scan (SCAN)
- RECALLING PRESET MEMORY CHANNELS
- BT OPERATION
- Communication System and Bluetooth Profile of this unit
- This unit supports the following:
- Notes when using unit with a mobile phone:
- Pairing Bluetooth devices:
- Pairing with other Bluetooth source devices:
- NOTE:
- Listening to the sound
- Check that:
- USING THE UNIT AS A PUBLIC ADDRESS SYSTEM
- LED LIGHT SHOW
- CARE AND MAINTENANCE
- Handling cd discs
- DECLARATION OF CONFORMITY
- CE UK CA
- Manufacturer:
- Importer for Great Britain:
Brand : Auna
Model : Microstar Sing
Category : Karaoke system