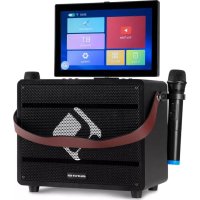
Rockstar LED - Karaoke system Auna - Free user manual and instructions
Find the device manual for free Rockstar LED Auna in PDF.
User questions about Rockstar LED Auna
0 question about this device. Answer the ones you know or ask your own.
Ask a new question about this device
Download the instructions for your Karaoke system in PDF format for free! Find your manual Rockstar LED - Auna and take your electronic device back in hand. On this page are published all the documents necessary for the use of your device. Rockstar LED by Auna.
USER MANUAL Rockstar LED Auna
Berlin Brands Group UK Ltd
PO Box 1145
Oxford, OX1 9UW
United Kingdom
Congratulations on purchasing this equipment. Please read this manual carefully and take care of the following hints on installation and use to avoid technical damages. Any failure caused by ignoring the mentioned items and cautions mentioned in the operation and installation instructions are not covered by our warranty and any liability. Scan the QR code to get access to the latest user manual and more product information.

CONTENTS
Technical Data 17
In the Box 18
Controls Overview 19
Display 20
Setup Power 21
Using BT 21
Using CD + G CDs 22
Connecting a Microphone 23
Using GUITAR IN and USB Port 24
Connecting to to a TV/DVD/Ext. Device 25
Disco Light 26
Power Management Function 26
Disposal Considerations 27
Declaration of Conformity 27
TECHNICAL DATA
| Item number 10032179 10032180 | |
| Power supply Input: 230 V~ 50 Hz | Output : 12 V |
| Playable Disks CD, CD+G, CD-R, CD-RW | |
| Connections Guitar , Aux, USB loading | jack 2 x 6.3mm microphone jack |
| BT specifications Frequency band Maximum radio-frequency power | 2402-2480 MHz 5 dBm |
- Read these instructions. Keep these instructions. Heed all warnings. Follow all instructions.
- Do not use this apparatus near water.
- Clean only with dry cloth.
- Do not block any ventilation openings. Install in accordance with the manufacturer's instructions.
- Do not install near any heat sources such as radiators, heat registers, stoves, or other apparatus (including amplifiers) that produce heat.
- Protect the power cord from being walked on or pinched, particularly at plugs, convenience receptacles, and the Point where they exit from the apparatus.
- Only use attachments/accessories specified by the manufacturer.
- Use only with the cart, stand, tripod, bracket, or table specified by the manufacturer or sold with the apparatus. When a cart is used, use caution when moving the cart/apparatus combination to avoid injury from tip-over.
- Unplug this apparatus during lightning storms or when unused for long periods of time.
- Refer all servicing to qualified service personnel. Servicing is required when the apparatus has been damaged in anyway, such as power-supply cord or plug is damaged, liquid has been spilled or objects have fallen into the apparatus, the apparatus has been exposed to rain or moisture, does not operate normally, or has been dropped.
- Apparatus shall not be exposed to dripping or splashing.
- Do not place any sources of danger on the apparatus (e.g. liquid filled objects, lighted candles).
- Where the MAINS plug or an appliance coupler is used as the disconnect device, the disconnect device shall remain readily operable.
- Make sure there is enough free space around the product for ventilation.
- Batteries (battery pack or batteries installed) shall not be exposed to excessive heat such as sunshine, fire or the like.
- Do not use this unit in wet or damp conditions.
- Always disconnect the unit from the mains power supply before cleaning. Clean the appliance with a soft, damp, lint free cloth. Do not use abrasives or harsh cleaners.
IN THE BOX
- Karaoke system
Power cord
1 Mikrophone
- Instruction manual
Power adapter
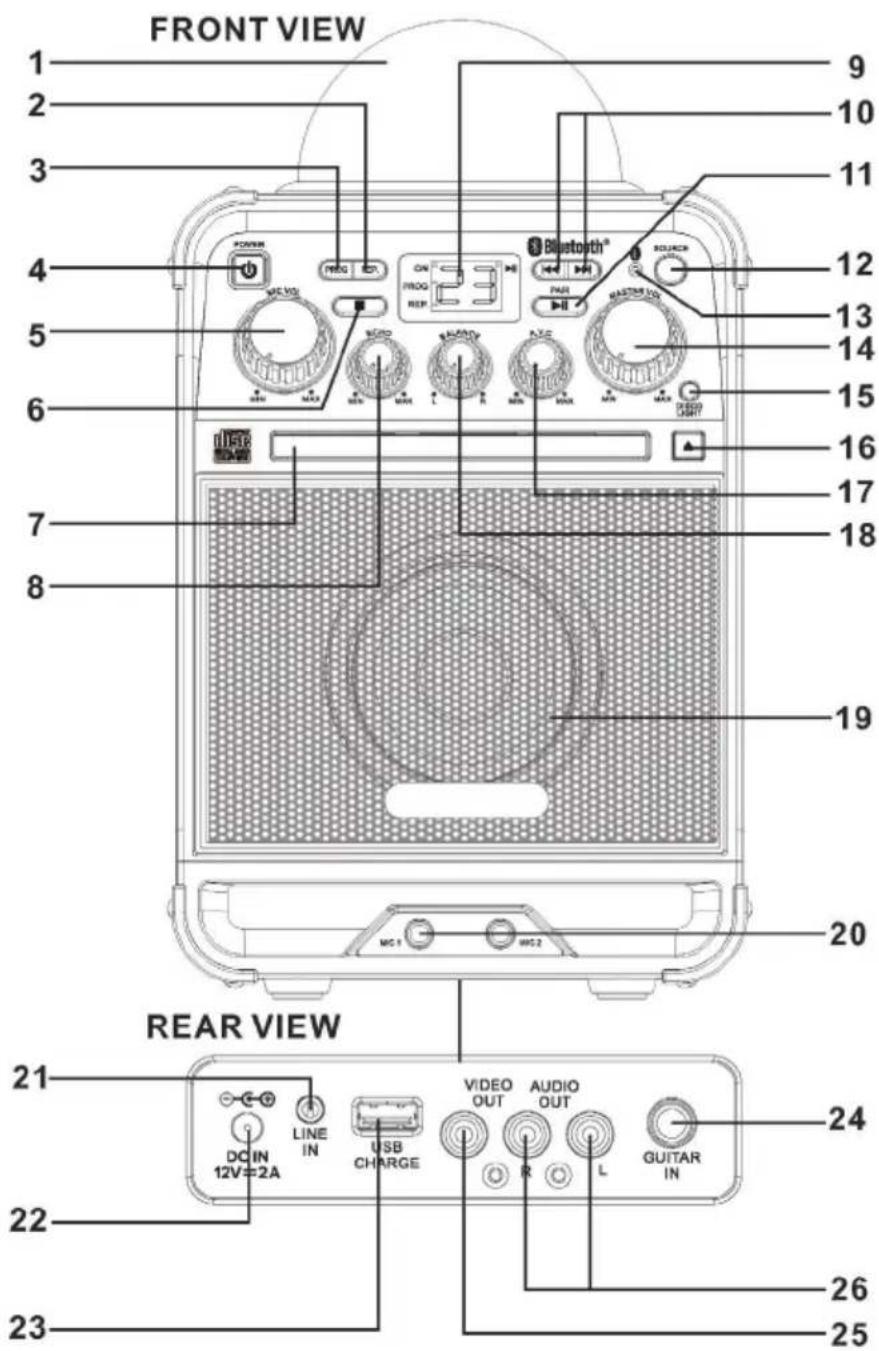
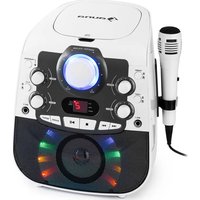
1 DISCO BALL 15 DISCO LIGHT ON/OFF Button
2 REPEATButton 16 DOOR OPEN / CLOSE Button
3 PROGRAM Button 17AVC Knob
4 POWER Button 18 BALANCE Knob
5 MIC VOLUME Knob 19 SPEAKER LIGHT SHOW
6 STOP Button 20 MIC JACK1/MIC JACK2
7 CD DOOR 21 LINE IN JACK
8 ECHO Button 22 DC INPUT JACK
9 DISPLAY and INDICATOR 23 USB CHARGING PORT
10SKIP and SEARCH Button 24 GUITAR IN JACK
Button 25VIDEOOUT
11 PLAY/PAUSE Button 26 AUDIOOUT
12 SOURCE Button
13 BT Indicator
14 MASTER VOLUME Knob
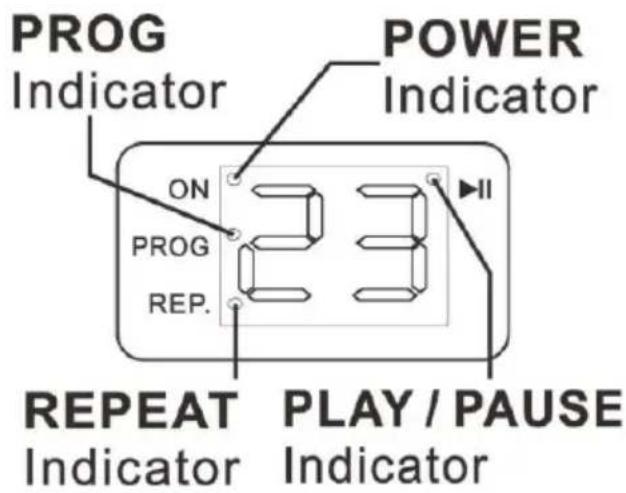
DISPLAY
- POWER Indicator: Will be light when unit turn on.
- REPEAT Indicator: Will be flash / light when REPEAT function turn on.
- PROG (Program) Indicator: will be light / flash when program mode turn on.
- PLAY / PAUSE Indicator: Will be light / flash when disc playing.
SETUP POWER
Plug the included AC adapter into the standard AC power outlet to power the Karaoke system. Connect small end to DC INPUT jack of your Karaoke system. After adapter connection, press the POWER button to turn on Karaoke system and the POWER indicator will be light. Press the SOURCE button of your Karaoke system to CD / BT/ LINE IN mode.
USING BT
- Press the POWER button to turn on the karoke system.
- On your smartphone / Tablet, turn on Bluetooth and enable device scanning.
- When "Rockstage LED" shows on the BT scan, select it to connect it to your device.
- When both devices are successfully connected, you are ready to play music wirelessly from your device
- Press the button of the Karaoke system or external Bluetooth device to start music playback.
- Press the of the Karaoke system or next / previous of external Bluetooth device to switch between music tracks.
Note:
- If problems arise, hold the button to reconnect again.
- If necessary to connect other devise, hold the button to reconnect.
- If mobile call coming, the music will stop play until the coming call end.
USING CD+G, CDS
Loading a Disc
- Press the POWER button to turn on Karaoke system
- Press the OPEN / CLOSE button to open CD DOOR.
- Place a CD+G or CD into the CD compartment.
- Press the OPEN / CLOSE button to close the CD DOOR.
- Press the SOURCE button to CD mode.
Playing a Disc
- After above setting, press the button to begin playing the loaded disc. The indicator will light on display.
- Rotate the MASTER VOL button to select the sound level.
- To temporarily stop playing, press the Taste einmal (Anzeige blinkt). Um die Wiedergabe fortzusetzen, drucken Sie erneut die button one more.
- Press buttons to skip between next or previous tracks.
- Hold the buttons to fast search through the track.
Note: The fast-forward / fast-rewind functions will not work for CDG discs.
- Connect the VIDEO OUT jack to TV, the lyrics text will show on TV.
Press the button to stop play.
Repeat Function
- Follow the instructions for Loading a Disc and Playing a Disc.
- When disc playback, press the REPEAT button once and the REPEAT indicator flash. The unit will play the current track repeatedly.
- When disc playback, press the REPEAT button twice and REPEAT indicator will be light up. The unit will play the entire disc repeatedly.
- To cancel the repeat function: press the REPEAT button repeatedly until the REPEAT indicator light off or press the button twice to stop.
Program Function
- When disc playing, press the button to stop mode.
- Press the PROG button and the PROG indicator will blink.
- Press the buttons to select the track from the loaded disc you wish to play first.
- Press the PROG button to confirm.
-
Repeat steps 3 and 4 to program up to 20 tracks.
-
Press the button to start the program playing, the Anzeige leuchtet auf.
- Drücken Sie die -Taste zweimal, um ein Programm zu Löschen.
CONNECTING A MICROPHONE
Require a microphone.
- Plug the microphone (see below figure) into the MIC 1 INPUT or MIC 2 INPUT.
- Slide the ON/OFF switch of MICROPHONE to on position.
- Press the POWER button to turn on Karaoke system
- Use the MASTER VOL / MIC VOL knob of Karaoke system to adjust the volume of audio sound from the microphone.
USING AVC / ECHO / BALANCE FUNCTION
AVC
Turn on Karaoke system and connect microphone. Adjust the AVC (Automatic Voice Control) knob of Karaoke system to adjust the volume of the unit to compensate for varying levels of volume from the connected microphone. Turn the dial to adjust the degree to which the Automatic Voice Control compensates for variations in volume.
Echo
Turn on Karaoke system and connect microphone. Adjust the ECHO knob of Karaoke system to enhance your voice for a concert hall effect.
Balance
Turn on Karaoke system, play with a CD+G format disc and rotate the BALANCE knob to select to hear only the music or vocals only.
USING GUITAR IN AND USB PORT
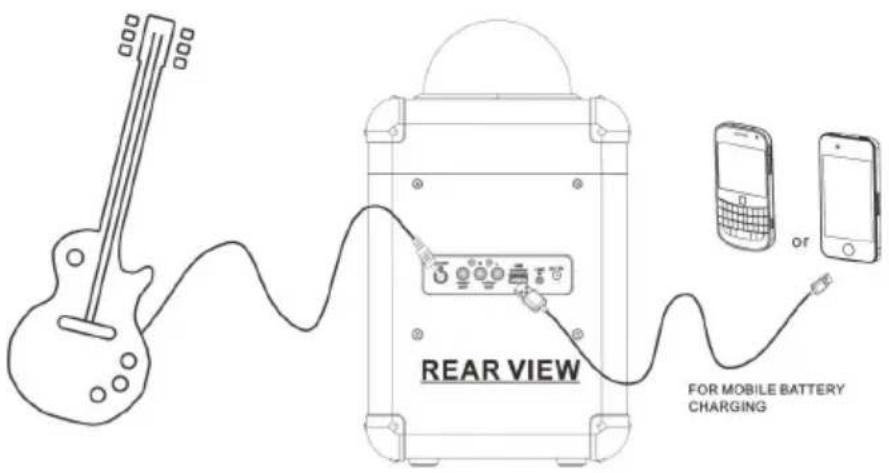
Require a cable with 6.3mm jack
- Plug the cable (see above figure) into the GUITAR INPUT of Karaoke system.
- The other end to connect the output of guitar or other Hi-Z instrument.
- Press the POWER button to turn on Karaoke system.
- Make sure the electric guitar power on.
- Use the MASTER VOL button of Karaoke system to adjust the volume of guitar sound from the guitar.
Connect USB Charging Port
- Plug the standard end of the USB cable into the USB port located on the rear of the unit. Plug the small end of the USB cable into the device you wish to charge.
- Observe the battery charge indicator on your device and the charging will start immediately.
- Remove the charging cable when charging complete.
Notes
- USB charging port supplies DC 5V output.
- USB charging port cannot support data transfer or connect to computer.
- Do not connect USB port of this unit to other external power charger USB ports or computer, it may damage both units and void the warranty
CONNECTING TO TO A TV/DVD/EXT. DEVICE
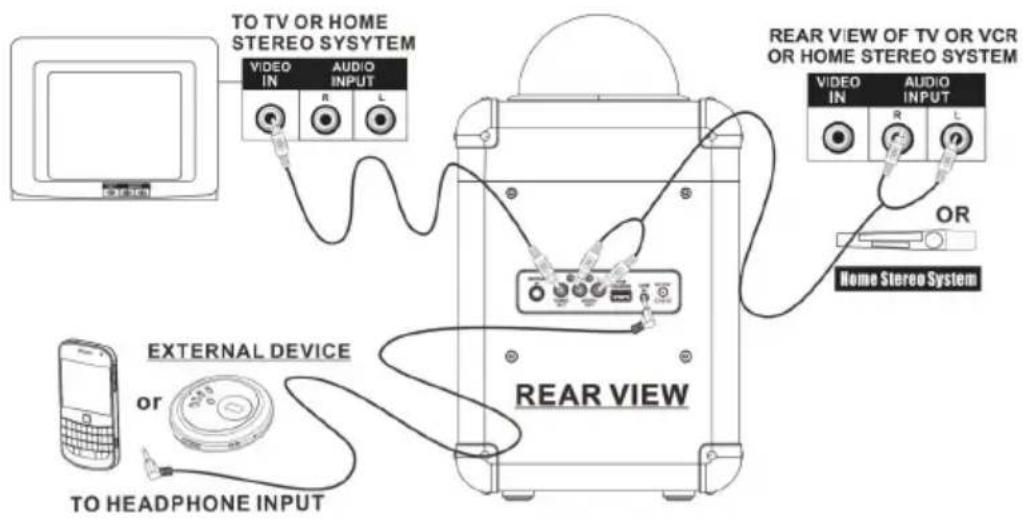
Composite Video output
- Plug the RCA audio/video cable into the VIDEO OUT and a composite video input on a television.
- Adjust the television to the correct input setting.
- When playing CDG discs, the Karaoke system will output written lyrics to the connected television.
Audio Output (RCA)
Require an RCA audio cable
- Plug the RCA audio/video cable into the AUDIO OUT and a RCA audio input on a television or stereo system.
- Adjust the television or stereo system to the correct input setting.
- When playing the disc, the Karaoke system will output audio to the connected television or stereo system. Use the external device to control the output sound level.
LINE IN (AUX In/AUDIO IN)
- Connect a 3.5 mm Auxiliary Cable to the LINE IN jack on front of unit and to the Audio Output or Phones on the audio device you wish to play.
- Press the SOURCE button of Karaoke system to LINE IN mode.
- Turn on both units.
- After connection, the external device will sound from your Karaoke system speaker.
DISCO LIGHT
Unit will automatically go to standby mode after 15 minutes without sound output or operation. To resume operation, simply press the button to turn on unit.
POWER MANAGEMENT FUNCTION
Unit will automatically go to standby mode after 15 minutes without sound output or operation. To resume operation, simply press the STANDBY button to turn on unit.
DISPOSAL CONSIDERATIONS
If there is a legal regulation for the disposal of electrical and electronic devices in your country, this symbol on the product or on the packaging indicates that this product must not be disposed of with household waste. Instead, it must be taken to a collection point for the recycling of electrical and electronic equipment. By disposing of it in accordance with the rules, you are protecting the environment and the health of your fellow human beings from negative consequences. For information about the recycling and disposal of this product, please contact your local authority or your household waste disposal service.
DECLARATION OF CONFORMITY
CE UK CA
Manufacturer:
Chal-Tec GmbH, Wallstrasse 16, 10179 Berlin, Germany.
Importer for Great Britain:
Berlin Brands Group UK Ltd PO Box 1145 Oxford, OX1 9UW United Kingdom
Hereby, Chal-Tec GmbH declares that the radio equipment type Rockstar LED is in compliance with Directive 2014/53/EU. The full text of the EU declaration of conformity is available at the following internet address: use.berlin/10032179
For Great Britain: Hereby, Chal-Tec GmbH declares that the radio equipment type Rockstar LED is in compliance with the relevant statutory requirements. The full text of the declaration of conformity is available at the following internet address: use.berlin/10032179
Cher client, chere clientele,
Berlin Brands Group UK Ltd
PO Box 1145
Oxford, OX1 9UW
United Kingdom
Berlin Brands Group UK Ltd
PO Box 1145
Oxford, OX1 9UW
United Kingdom
5.100% "TMT"Global.com
BICISWIFT-Code:HYVDEMM98