Arizona Sing - Karaoke system Auna - Free user manual and instructions
Find the device manual for free Arizona Sing Auna in PDF.

User questions about Arizona Sing Auna
0 question about this device. Answer the ones you know or ask your own.
Ask a new question about this device
Download the instructions for your Karaoke system in PDF format for free! Find your manual Arizona Sing - Auna and take your electronic device back in hand. On this page are published all the documents necessary for the use of your device. Arizona Sing by Auna.
USER MANUAL Arizona Sing Auna
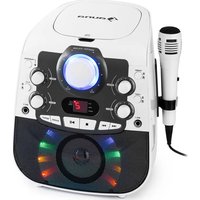
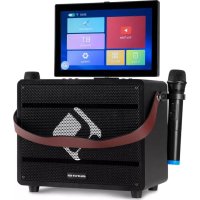
Arizona Sing Jukebox
10037817
a u
www.auna-multimedia.com

bar
| Category | Value | |---|---| | Category 1 | 100 | | Category 2 | 100 | | Category 3 | 100 | | Category 4 | 100 | | Category 5 | 100 | | Category 6 | 100 | | Category 7 | 100 | | Category 8 | 100 | | Category 9 | 100 | | Category 10 | 100 | | Category 11 | 100 | | Category 12 | 100 | | Category 13 | 100 | | Category 14 | 100 | | Category 15 | 100 | | Category 16 | 100 | | Category 17 | 100 | | Category 18 | 100 | | Category 19 | 100 | | Category 20 | 100 | | Category 21 | 100 | | Category 22 | 100 | | Category 23 | 100 | | Category 24 | 100 | | Category 25 | 100 | | Category 26 | 100 | | Category 27 | 100 | | Category 28 | 100 | | Category 29 | 100 | | Category 30 | 100 | | Category 31 | 100 | | Category 32 | 100 | | Category 33 | 100 | | Category 34 | 100 | | Category 35 | 100 | | Category 36 | 100 | | Category 37 | 100 | | Category 38 | 100 | | Category 39 | 100 | | Category 40 | 100 | | Category 41 | 100 | | Category 42 | 100 | | Category 43 | 100 | | Category 44 | 100 | | Category 45 | 100 | | Category 46 | 100 | | Category 47 | 100 | | Category 48 | 100 | | Category 49 | 100 | | Category 50 | 100 | | Category 51 | 100 | | Category 52 | 100 | | Category 53 | 100 | | Category 54 | 100 | | Category 55 | 100 | | Category 56 | 100 | | Category 57 | 100 | | Category 58 | 100 | | Category 59 | 100 | | Category 60 | 100 | | Category 61 | 100 | | Category 62 | 100 | | Category 63 | 100 | | Category 64 | 100 | | Category 65 | 100 | | Category 66 | 100 | | Category 67 | 100 | | Category 68 | 100 | | Category 69 | 100 | | Category 70 | 100 | | Category 71 | 100 | | Category 72 | 100 | | Category 73 | 100 | | Category 74 | 100 | | Category 75 | 100 | | Category 76 | 100 | | Category 77 | 100 | | Category 78 | 100 | | Category 79 | 100 | | Category 80 | 100 | | Category 81 | 100 | | Category 82 | 100 | | Category 83 | 100 | | Category 84 | 100 | | Category 85 | 100 | | Category 86 | 100 | | Category 87 | 100 | | Category 88 | 100 | | Category 89 | 100 | | Category 90 | 100 | | Category 91 | 100 | | Category 92 | 100 | | Category 93 | 100 | | Category 94 | 100 | | Category 95 | 100 | | Category 96 | 100 | | Category 97 | 100 | | Category 98 | 100 | | Category 99 | 100 | | Total (Total) |text_image
QR code image containing encoded data, no visible human-readable textINHALTSVERZEICHNIS
Technische Daten 4
natural_image
Symbol of a trash bin crossed with a diagonal line, no text or numbers presentUnit 6 Riverside Business Centre
Brighton Road
Shoreham-by-Sea
BN43 6RE
United Kingdom
Congratulations on purchasing this device. Please read the following instructions carefully and follow them to prevent possible damages. We assume no liability for damage caused by disregard of the instructions and improper use. Scan the QR code to get access to the latest user manual and more product information.
text_image
QR code image containing encoded data, no visible human-readable textCONTENTS
Technical Data 22
Safety Instructions 23
Device Overview 25
Control Panel 26
Connections 27
Operation 29
Cleaning and Maintenance 33
Troubleshooting 34
Disposal Considerations 36
Declaration of Conformity 36
TECHNICAL DATA
| Item number 10037817 | |
| Power supply DC input: 9V 1A | (AC adaptor supplied for AC 100-240 V ~ 50/60 Hz) |
| Operation temperature 0 °C bis +35 °C | |
| Speakers 1 x 4" | |
| Speaker output 1 x 8 W = 8 W RMS | |
| Microphone connections 2 x 6.3 mm | microphone jack |
| Line-In 3.5 mm AUX jack | |
| Compatible discs CD, CD+G, CD-R, CD-RW | |
| BT frequency 2402-2480 MHz | |
| BT transmission power ≤ -3.325 dBm | |
SCOPE OF DELIVERY
- Jukebox (1x)
- RCA cable (1x)
- Wired microphone (1x)
• Instruction manual (1x)
• AC Adapter (DC 9 V, 1 A) (1x)
SAFETY INSTRUCTIONS
General information
- Lightning - If you are not going to use the device for a long time or if there is a storm, disconnect the plug from the electrical outlet and disconnect the device from the antenna connector. This will avoid damage to the product that may be caused by lightning or overvoltage.
- Overload - Do not overload power outlets, extension cords, or built-in power outlets, as this may result in a fire or electric shock.
- Foreign objects and liquid - Never push objects of any kind through openings in the device as they may touch dangerous voltage points or short out parts, which could result in a fire or electric shock. Never spill liquids of any kind on the device.
- Repairs and maintenance - Do not attempt to service this product yourself, as opening or removing covers will expose you to dangerous voltages or other hazards. Leave all maintenance to qualified service personnel.
- Damage requiring service - Disconnect the power plug from the outlet and consult a qualified specialist if any of the following conditions occur:
a) If the power cord or plug is damaged.
b) If liquid has been spilled or objects have fallen onto the product.
c) If the product has been exposed to rain or water.
d) If the product has been dropped or damaged.
e) If the product has a markedly reduced performance.
- Replacement parts - When replacement parts are required, make sure that the service professional who replaces the parts only uses replacement parts that have been approved by the manufacturer or that have the same characteristics as the original part. Unauthorized replacement may result in fire, electric shock or other hazards.
- Heat - Do not place the unit near heat sources such as radiators, heaters, stoves or other products (including amplifiers).
Special Instructions
- This device may only be used by children from the age of 8 and up and by persons with reduced physical, sensory and mental capabilities or a lack of experience and / or knowledge if they are supervised or have been instructed in the safe use of the device and have understood the resulting dangers.
- Cleaning and user maintenance should not be done by children unless they are 8 years of age or older and are supervised.
• Children must not play with the device. - Ensure children and babies do not play with plastic bags or any packaging materials.
- Mains plug/power adaptor is used as disconnect device and it should remain readily operable during intended use.
- In order to disconnect the apparatus from the mains completely, the main plug/power adaptor should be disconnected from the mains socket outlet completely.
DEVICE OVERVIEW
| 1 LED decoration light 5 CD compartment | ||
| 2 Front panel 6 Microphone holder | ||
| 3 Speaker and speaker light 7 Carrying handle | ||
| 4 Slot for smartphone or tablet 8 Back panel |
CONTROL PANEL
text_image
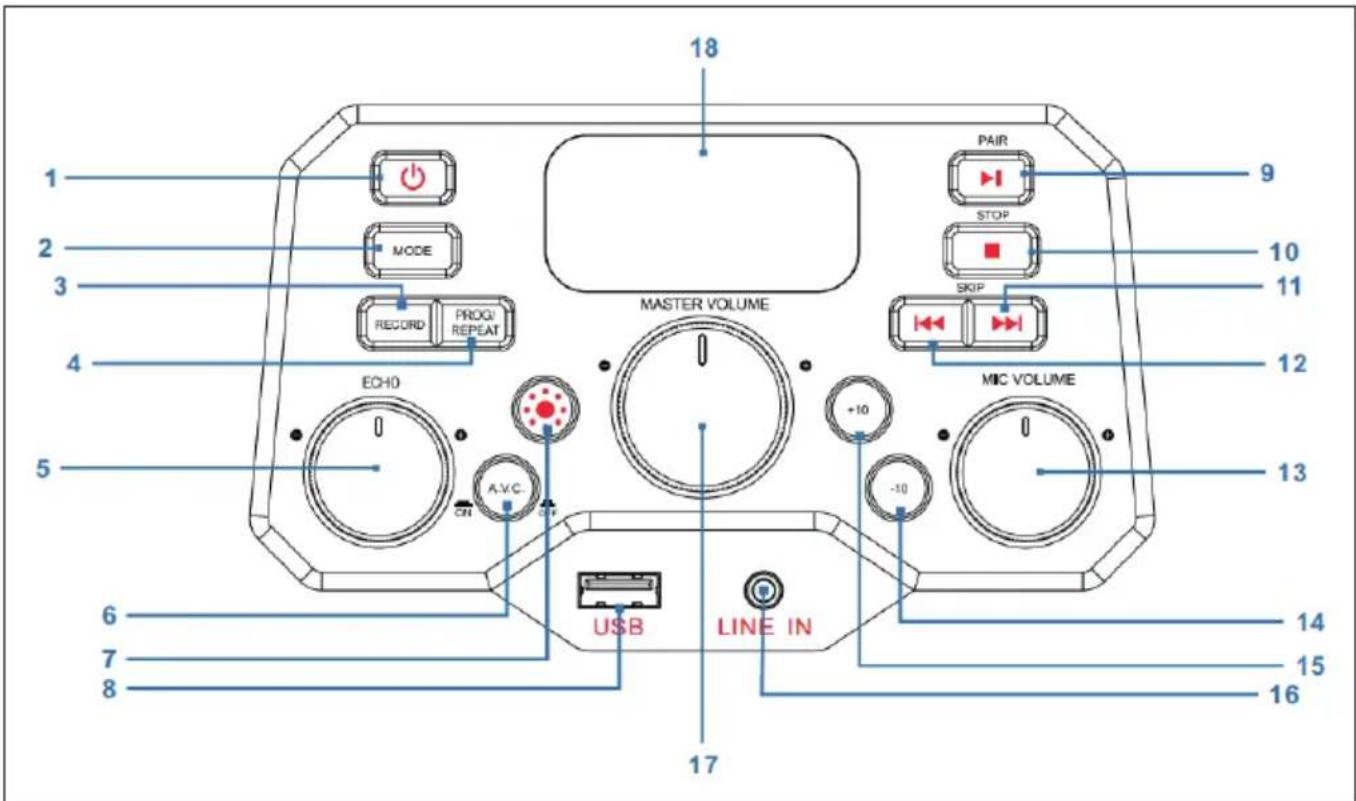
18 1 2 3 4 5 6 7 8 MODE RECORD PROG/ REPEAT ECHO A.V.C. ON MASTER VOLUME +10 -10 SHIP STOP PAIR MIC VOLUME LINE IN USB 17 9 10 11 12 13 14 15 16| 1 Power on/off button 10 | ■ STOP button | |
| 2 MODE button 11 | ▶▶ SKIP+ button:(next track) | |
| 3 RECORD button 12 | ◀◀ SKIP- button(previous track) | |
| 4 PROG/REPEAT button 13 | MIC VOLUME knob(microphone volume) | |
| 5 ECHO knob 14 | -10 button(skip previous 10 tracks) | |
| 6 A.V.C on/of button(Auto Voice Control) | 15 | +10 button(skip next 10 tracks) |
| 7 Light Mode button | 16 | LINE IN jack (3.5 mm ) |
| 8 USB port 17 MASTER VOLUME knob | ||
| 9 ▶I PAIR button(Play/Pause/Pairing) | 18 LED display | |
CONNECTIONS
| 1 DC in jack 5 Line out jack | ||
| 2 Audio out (L) jack 6 Microphone in jack 1 | ||
| 3 Audio out (R) jack 7 Microphone in jack 2 | ||
| 4 Video out jack |
Connecting Power Source
- Place the unit on a flat, stable surface.
- Connect AC adaptor (provided) into the DC IN jack (1) on the back panel of the unit and plug the other end to the mains outlet.
Connecting the Microphone
Connect the microphone into MIC 1 jack (6) on the back panel as well as MIC 2 jack (7) on the back panel (when desired).
Note: Do not drop or tap the Microphone as damage to the Microphone or speakers may occur. Do not twirl the microphone by cord as it will cause damage to the encased wiring.
Connecting the Unit to a TV
To output the video, lyrics and audio to your TV, perform the following steps:
- Connect the RCA video cable (Yellow) to the VIDEO OUT jack (4) and the audio cables (White and Red) to the AUDIO OUT jacks (2 & 3) located on the back of the jukebox.
- Connect the opposite end of the RCA video cable (Yellow) to the VIDEO IN jack and the audio cables (White and Red) to the AUDIO IN on your TV.
NOTES:
- This unit can be used with or without a TV, but it is highly recommended to use a TV in order to utilize all the features.
- Also refer to the TV's User Guide.
- To see the lyrics on the screen, you must use a CD+G disc or MP3+G files.
Connecting to Line In Jack
- Press the POWER button (1) on the front panel to turn the unit on.
- Insert the 3.5 mm audio cable (not included) into the LINE IN jack (16) on the front panel.
- Press the MODE button (2) on the front panel to switch to AUX mode.
- Use the controls on the connected device to begin playing audio routed through the unit.
Connecting to Line Out Jack
This unit can be connected to another audio system for greater audio output via 3.5 mm AUX cord (not included).
- Plug one end of AUX cord into the LINE OUT jack (5) located on the back panel.
- Plug the other end of the AUX cord into the Line In jack on your separate audio device. You may need to refer the instructions of your separate audio device for more details.
OPERATION
First Steps
- Read this instruction manual carefully.
- Remove the appliance from the box.
- Remove the packaging and save it for future use (for example when moving the unit).
Disco Lights
There are three light modes as follows:
- Light mode 1: The unit will synchronize to the music being played or with the sound when you speak or sing into the microphone.
- Light mode 2: The unit will light up with random colors and patterns.
• Light mode 3: The light effects will be turned off.
NOTE: When the unit is turned on, the Light mode 1 is automatically activated. Press LIGHT MODE button (7) on the front panel to switch to Light mode 2, and press again to turn off the light.
Playing a CD
- Press the POWER button (1) on the front panel to turn the unit on
- Lift open the CD door (on top of the wooden cabinet) and insert a CD (with standard or MP3+G files) or a CD+G by gently pressing it on the center spindle. Then close the CD door.
What is a CD+G?
A CD+G (CD+Graphics) is the standard format for most karaoke discs that will display the words on the screen.
What is an MP3+G
MP3+G is the newest format for karaoke music utilizing the MP3's small file size. It will display the words on the screen.
- Repeatedly press the MODE button (2) on the front panel to select the CDG/CD mode; “---” will blink on the LED display (18) when searching the disc and then the total number of tracks will appear.
- Press the PAIR button (9) on the front panel to start playback. If listening to a CD+G file, the image and lyrics will appear on the TV screen (if connected). When a CDG disc is inserted, the CDG indicator will light.
- If connected to a TV you will see the selected song and folders on the TV screen.
- Press the SKIP+ (11) or SKIP- button (12) on the front panel to choose the song that you want to play.
- Adjust the volume to a comfortable level using the MASTER VOLUME knob (17) on the front panel.
- Connect microphone(s), and slide the ON/OFF switch on the microphone to the ON position.
- Rotate the MIC VOLUME knob (13) on the front panel to increase or decrease the microphone volume as you desired, which will affect both microphones.
- Rotate the ECHO knob (5) on the front panel to adjust an echo effect (from level 00 to level 15) to your voice.
- Press A.V.C button (6) on the front panel, the lead vocal will be decreased and covered by your voice when you're singing a song with microphone. This function is only applicable to the songs recorded with separated vocals that is downloaded.
NOTES:
- Never place anything other than a CD in the compartment, as foreign objects can damage the unit.
- If no disc is inserted, "no" will appear on the display.
- If connected to a TV or other audio source, adjust the volume of the TV using its own volume control.
Playing Songs from the USB
- Press the POWER button (1) on the front panel to turn the unit on.
- Insert a USB flash drive into the USB slot (8) on the front panel of the unit.
- Repeatedly press the MODE button (2) on the front panel to select the USB mode. "USB" will be shown on the display and "USB" will blink when searching the drive and then the total number of tracks will appear.
NOTE: It is highly recommended to have it connected to a TV for USB playback.
- Press the PAIR button (9) on the front panel to start playback. If listening to an MP3+G file, the image and lyrics will appear on the TV screen (if connected).
NOTES:
- If connected to a TV you will see the selected song and folders on the TV screen.
-
Press the SKIP- (12) and SKIP+ (11) buttons on the front panel to choose the song that you want to play.
-
Adjust the volume to a comfortable level using the MASTER VOLUME knob (17) on the front panel.
NOTE: If connected to a TV or other audio source, adjust the volume of the TV using its own volume control.
- Connect microphone(s), and slide the ON/OFF switch on the microphone to the ON position.
- Rotate the MIC VOLUME knob (13) on the front panel to increase or decrease the microphone volume as you desired, which will affect both microphones.
- Rotate the ECHO knob (5) on the front panel to adjust an echo effect (from level 00 to level 15) to your voice.
- REPEAT:
- During playback, press the PROG/REPEAT button(3) on the front panel once to repeatedly play the selected song, the REPEAT indicator will blink rapidly.
- Press it again to repeatedly play the selected folder, the REPEAT indicator will blink slowly.
- Press it again to repeatedly play all the folders, the REPEAT indicator will turn solid red.
- Press it again to cancel the repeat function, the REPEAT indicator will turn off.
- PAUSE:
- Press the STOP button (10) on the front panel to stop playback.
- Press the POWER button(1) on the front panel to turn the unit off.
Using a BT Device
- Connect the unit as described previously. Press the POWER button (1) on the front panel to turn the unit on.
- Repeatedly press MODE button (2) on the front panel to select BT. "bt" will appear in the LED display and BT indicator on the front panel will flash blue. The unit automatically searches for and pairs a previously paired BT device (if previously paired). If no previously paired devices are present, connect as shown in the next step.
NOTE: You can also long press the PAIR button (9) on the front panel to disconnect any paired devices in order to pair another device.
- Turn on your device's BT option in settings to search for a discoverable device with a BT signal. Select "Arizona Sing" from the device results on the BT menu.
Note: Also refer to the user manual of your BT device for detailed instructions.
- The BT indicator will light solid blue and a chime will sound.
NOTES:
- If your BT prompts you for a pass code during the pairing process, please enter "0000" to connect.
- On some BT devices, once pairing is complete, select your BT device as "Use as Audio Device" or similar.
-
If connection is lost after successful pairing, check to make sure the distance between speaker and BT enabled device does not exceed 10 meters (30 feet).
-
Start playback of your BT device. Press the PAIR button (9) on the front panel during playback to pause the song.
-
Advance or go back one track by pressing the "SKIP- (12) and SKIP+ (11) buttons on the front panel.
Using recording function
- To record your singing as well as the music, press the RECORD button (3) on the front panel, the POWER indicator will flash green and then turn solid green, the recording will begin.
- When done recording, press the RECORD button (3) again, the POWER indicator will turn off.
-
The recorded audio file will be recorded onto the USB drive.
-
To listen to the recorded song, press the MODE button (2) on the front panel to switch to USB mode, you can find the recorded song in the REC file. Press th SKIP- (12) and SKIP+ (11) buttons to choose the song that you want to play.
- Press the PAIR button (9) to play the selected song.
NOTE: The recording function is available in BT, AUX, and CD mode. While in CD mode, it can only record the songs with CD, CD-R, CD-RW, and CD+G format, not available for MP3 format.
Using programming function
- When the unit is on, press STOP button (10) to enter into STOP mode, press the PROG/REPEAT button (4). The PROGRAM indicator will blink and "01" will appear on the display indicating the first program is ready to program.
- Select the first track by using the SKIP- (12) and SKIP+ (11) buttons.
- Press the PROG/REPEAT button (4) again to confirm the entry.
- Repeat to set up to 20 tracks into memory. When done, press the PAIR button (9) to start playback.
NOTES:
- Press the STOP button (10) TWICE to stop and clear the program.
- You can program up to 20 tracks for playback in any desired order. If more than 20 tracks are attempted to be programmed, "FUL" will appear in the display.
- The programming function is available in CD and USB mode.
CLEANING AND MAINTENANCE
- Disconnect the appliance from the power source when cleaning.
- If the unit becomes dusty, wipe it with a soft and dry duster.
- Use a soft cloth to clean this appliance. Do not use any wax, polish sprays, or abrasive cleaners on the unit.
Note: Never allow any water or other liquids to get inside the unit while cleaning.
TROUBLESHOOTING
Before taking the unit to be repaired, please check the following table when a problem occurs. Contact the manufacturer or the customer service if the problem cannot be solved with the following information.
| Problem Possible Cause/Solution | |
| No power Power is not on | ; press the POWER button (1) to turn power on. |
| Confirm the AC adapter is connected securely to the back of the unit. | |
| Connect the unit to a different outlet. | |
| If using batteries, replace with new ones. | |
| No sound (general) | MASTER VOLUME is set to minimum; raise volume. |
| Correct function was not selected; select using the MODE button (2). | |
| If using an external device, raise the volume. | |
| No sound (if connected to a TV) | Volume on the TV is muted or too low. Adjust the volume as desired. |
| Correct source (usually AV) was not selected on the TV's menu. | |
| Lyrics do not appear on the TV screen | If connected to a TV, Video plug is not connected properly, check carefully and connect it properly. |
| If connected to a TV, select the correct source on the TV (usually AV). | |
| The file/track being played is not a track recording with lyrics. These are the only files that allow you to view the lyrics on the TV screen. | |
| Nothing will appear on the TV screen when using LINE IN or BT. | |
| No sound from the microphone | Make sure the microphone is firmly connected to the MIC 1 or MIC 2 jack. |
| Make sure the Mic's ON/OFF switch on the Mic is set to the ON position | |
| Make sure the microphone's volume is not set too low. | |
| MASTER VOLUME is set to minimum; raise volume. | |
| File(s) on USB jack not playing | The file is corrupted; replace the file. |
| The file is not in a format this unit will play. | |
| The connected USB device is not supported by the jukebox. | |
| The BT device cannot be paired or connected with the unit. | You have not activated the BT function of your device; please refer to the BT device user's manual. |
| The system is not in pairing mode; press the PLAY/PAUSE button to restart pairing. | |
| The Music is not available on the unit after successfully connecting the BT. | Ensure your BT device can support the A2DP BT profile. |
| The volume on the external BT device is set to low or muted; raise as desired. | |
DISPOSAL CONSIDERATIONS

natural_image
Symbol of a trash bin crossed with a diagonal line, representing no waste or discharge (no text or labels)If there is a legal regulation for the disposal of electrical and electronic devices in your country, this symbol on the product or on the packaging indicates that this product must not be disposed of with household waste. Instead, it must be taken to a collection point for the recycling of electrical and electronic equipment. By disposing of it in accordance with the rules, you are protecting the environment and the health of your fellow human beings from negative consequences. For information about the recycling and disposal of this product, please contact your local authority or your household waste disposal service.
This product contains batteries. If there is a legal regulation for the disposal of batteries in your country, the batteries must not be disposed of with household waste. Find out about local regulations for disposing of batteries. By disposing of them in accordance with the rules, you are protecting the environment and the health of your fellow human beings from negative consequences.
DECLARATION OF CONFORMITY

text_image
CE UK CAManufacturer:
Chal-Tec GmbH, Wallstrasse 16, 10179 Berlin, Germany.
Importer for Great Britain:
Chal-Tec UK limited
Unit 6 Riverside Business Centre
Brighton Road
Shoreham-by-Sea
BN43 6RE
United Kingdom
The complete declaration of conformity of the manufacturer can be found at the following link: use.berlin/10037817
Cher client, chère cliente,
text_image
QR code image containing encoded data, no visible human-readable textSOMMAIRE
Fiche technique 38
natural_image
Symbol of a trash bin crossed with a diagonal line, representing no waste or discharge (no text or labels)DÉCLARATION DE CONFORMITÉ

text_image
CE UK CAFabricant :
Chal-Tec GmbH, Wallstraße 16, 10179 Berlin, Allemagne.
Unit 6 Riverside Business Centre
Brighton Road
Shoreham-by-Sea
BN43 6RE
Royaume Uni
text_image
QR code image containing encoded data, no visible human-readable textÍNDICE
Datos técnicos 54
natural_image
Symbol of a trash bin crossed with a diagonal line, no text or labels presentUnit 6 Riverside Business Centre
Brighton Road
Shoreham-by-Sea
BN43 6RE
United Kingdom
text_image
QR code image containing encoded data, no visible human-readable textINDICE
Dati tecnici 70
natural_image
Symbol of a trash bin crossed with a diagonal line, representing no waste or discharge (no text or labels)Unit 6 Riverside Business Centre
Brighton Road
Shoreham-by-Sea
BN43 6RE
Regno Unito