
Fruit Tornado - Juicer Klarstein - Free user manual and instructions
Find the device manual for free Fruit Tornado Klarstein in PDF.

| Product Type | Juice Extractor |
| Brand | Klarstein |
| Model | Fruit Tornado |
| Supply Voltage | AC 220 V ~ 50 Hz |
| Number of Speeds | 2 (slow for soft fruits, fast for hard fruits) + pulse function |
| Maximum Continuous Running Time | 1 minute |
| Recommended Pause Time | 2 minutes between uses, 15-20 minutes after 5 cycles |
| Overheat Protection | Automatic shutdown; unplug and let cool for 15-20 minutes |
| Safety System | Double safety: the appliance only turns on if all parts are correctly assembled |
| Filter Material | Stainless Steel |
| Housing Material | ABS Plastic |
| Included Accessories | Pusher, top lid, extraction filter, center ring, pulp container, control window |
| Cleaning | Do not immerse the appliance; clean removable parts with water < 80 °C; use a soft cloth; avoid abrasive detergents |
| Recommended Fruits | Pineapple, beetroot, celery, apple, cucumber, carrot, spinach, melon, tomato, tangerine, grape, etc. |
| Non-Recommended Fruits | Banana, papaya, avocado, fig, mango (contain starch) |
| Fruit Preparation | Remove hard seeds, thick peels (citrus, pineapple, beetroot); cut into suitable pieces |
| Warranty | 2 years |
| Manufacturer | Chal-Tec GmbH, Wallstraße 16, 10179 Berlin, Germany |
| Certifications | CE (compliance with directives 2014/30/EU, 2014/35/EU, 2011/65/EU) |
| Net Weight (approx.) | 2.5 kg |
| Dimensions (approx.) | 250 x 200 x 350 mm |
Frequently Asked Questions - Fruit Tornado Klarstein
User questions about Fruit Tornado Klarstein
0 question about this device. Answer the ones you know or ask your own.
Ask a new question about this device
Download the instructions for your Juicer in PDF format for free! Find your manual Fruit Tornado - Klarstein and take your electronic device back in hand. On this page are published all the documents necessary for the use of your device. Fruit Tornado by Klarstein.
USER MANUAL Fruit Tornado Klarstein
natural_image
Red and black juicer appliance with a glass lid, no visible text or symbols on the device bodynatural_image
Line drawing of a juice maker with a side view showing internal components and a schematic symbol (no text or labels)Gänge:
natural_image
Symbol of a trash bin crossed with a diagonal line, no text or numbers presentThank you for using our juicer.
For correct use and maintenance of the product, we have specially compiled this User's Manual. Please read it carefully before using the product and properly keep it for future reference.
Precautions for safe use
- Make sure the product has an input voltage of AC220V\~50Hz before use.
- Disconnect the power supply before dismantling, assembling or adjusting any part.
- The product has Y type connection. If the power cable is damaged, contact our customer service department or have it replaced by a designated service center of us directly. It is dangerous to dismantle and repair the product by yourself.
- If the juice strainer is damaged, do not use the product.
- Before use, check whether any parts such as the power cable or the plug is damaged and, if it is, stop using the product and contact our customer service department promptly. It is dangerous to dismantle and repair the product by yourself.
- If product maintenance is necessary in use, contact our customer service department or have the maintenance done by a designated service center of us directly. It is dangerous to dismantle the product by yourself.
- Before connecting the power supply, make sure detachable parts such as the juice strainer and the top cover are all properly installed.
- When the product is running, never put hands or sharp articles into its feed opening, or replace the pushing rod with any object, or have eyes close to the feed opening or else accidents may happen.
- Keep the juice strainer or motor wheels from the operator's body and other hard foreign matters when the product is running to avoid personal injuries and product damage.
- After juicing, do not dismantle the detachable parts of the product until the motor and the juice strainer have both stopped and the power supply has been disconnected.
- Operate with the rated operating time strictly: Juice continually for 1 minute at most each time. After end of any function above, stop for 2 minutes to end a cycle. Stop for 15 to 20 minutes after 5 successive cycles and start again after the motor has cooled down. This practice can prolong life of the product.
- If the product stops running in use, it is possibly caused by temperature protection of the motor. Disconnect the power supply for cooling and use the product 15 to 20 minutes later.
- To avoid heat caused deformation and damage; do not disinfect any accessories in hot water above 80°C or microwave ovens. Materials of the parts in contact with food materials should be cleaning, hygienic, reliable and in compliance with relevant food hygiene certification.
- Do not place main unit of the product into water or other liquids, or flush it with water or other liquids (it can be wiped by soft cloth).
- Do not clean the product with steel wool, abrasive cleansers or corrosive liquids (such as gasoline or acetone).
- Put the product in a place out of reach of children. Use or play of the product by persons with disabled limbs or sensory or mental disorders or by persons without relevant experience or knowledge (including children) is forbidden.
- Do not process any fruits or vegetables with cores, hard seeds or shells or thick skins until their cores, hard seeds or shells or thick skins have been removed.
- The product is suitable for individuals or families only.
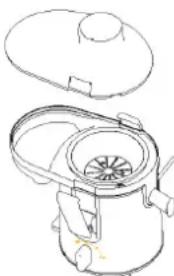
Parts and their functions
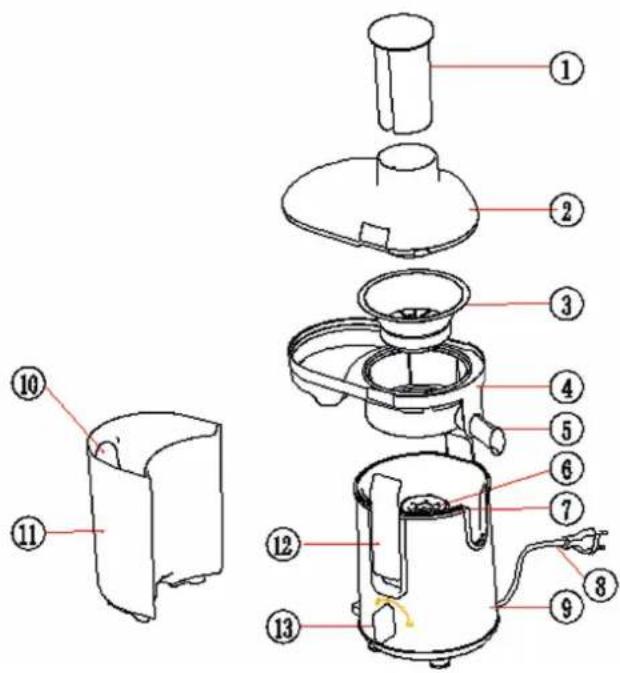
Note: The product pictures are for reference only. Please take the real object packed as standard
| No. | Part Function | |
| 1 | Pushing rod | For gently pushing the food materials in food material feeding to ensure full contact between the food materials and the juice strainer and prove the juicing effi ciency |
| 2 | Top cover | For connecting with the main unit. As a key part for juicing, it realizes safety protection. |
| 3 | Juice strainer | For cutting food materials by the cutter holder at its bottom and fi ltering juice and separating fruit residues by the lateral strainer |
| 4 | Middle ring For discharging the juice separated by the juice strainer by means of pressing | |
| 5 | Juice nozzle For discharging juice via the middle ring | |
| 6 | Motor wheel | For connecting the juice strainer and making the juice strainer align automatically for convenient handling |
| 7 | Safety switch (micro switch) | For connecting the product with the power supply, making use of the product safer |
| 8 | Power cable | For connecting the power supply (220V~/50Hz) |
| 9 | Main unit | As a main part of the product, it contains parts such as motor and serves as the power source of the product. |
| 10 | Sight glass | It is a transparent part for checking whether the fruit residue cup is fully fliled with fruit residues. |
| 11 | Fruit reside cup | For collecting the fruit residues separated by the juice strainer by means of pressing |
| 12 | Plate fastener | For opening the top cover and connecting the middle ring and the main unit |
| 13 | Power switch | For controlling the operating status (including inching, homing (stop), low speed, and high speed) of the product |
Directions for use
Clean its parts in contact with food materials thoroughly before using the product for the first time (see the content of "Maintenance").
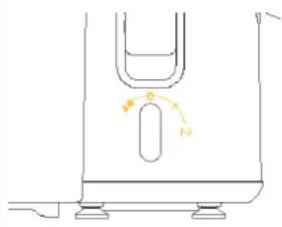
Gears:
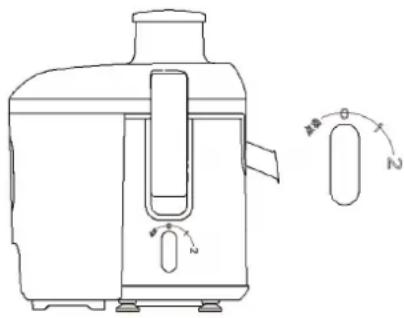
natural_image
Line drawing of a juice maker with a side view showing internal components and a schematic symbol (no text or labels)Inching: For instant and quick turning
0: For closing and stopping
1: A low-speed gear for processing soft fruits and vegetables such as watermelon, tomato, cucumber and strawberry
2: A high-speed gear for processing all fruits and vegetables (see "II. Tips for fruit selection" under "Directions for use" for the selection of fruits, vegetables and gears)
I. Use of product (see "Parts and their functions" for names of the following parts)
The product is designed with a dual-action safety system and can run after all parts are correctly installed. Install and use the product following the steps below
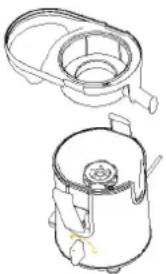 ↓ ↓ | 1 Put the middle ring on the main unit. | |
↓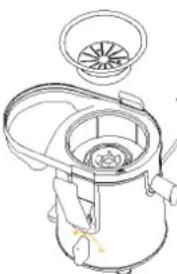 | 2 | Put the juice strainer into the middle ring and properly install it on the motor wheel(before use, check whether the juice strainer is damaged and, if it is, do not use the product but contact a near service center at once). |
↓ 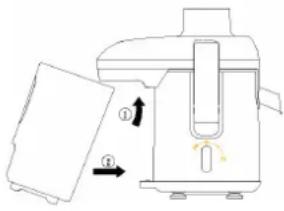 | 34 | Fit the top cover over the middle ring and press it for fi xing.Raise the plate fasteners on two sides, have them align with the fasteningpositions of the top cover and gently press until the plates are fi rmly locked, otherwise the product will not run.Put the fruit residue cup below the fruit residue outlet of the middle ring in an inclined way. Snap bottom of the fruit residue cup into the corresponding position of the main unit. |
 | 5 | Connect the power supply and prepare for run. Make the operating time equal to or smaller than 1 minute (make sure the switch is off before connecting the power supply). |
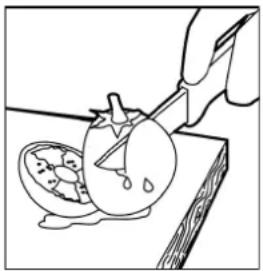 | 6 | Clean fruits and vegetables and cut them into blocks suitable for the food material inlet (remove hard seeds or shells or thick skins of the fruits and vegetables, if any, first). |
 | 7 | Take a juice cup and place it below the juice outlet (the product is not provided with a juice cup. You can choose one by yourself. It is suggested to choose one with a height similar to that of the juice nozzle of the product to avoid juice splashing). Start the switch and select a gear according to type of the fruit processed (see "Tips for fruit selection"). It is suggested to make the continual operating time not longer than 1 minute for a longer life of the product. |
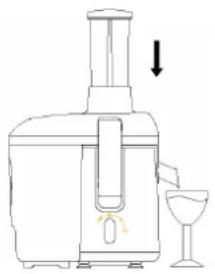 | 8 | Put the cut fruit blocks into the feed opening of the top cover and push them gently with the pushing rod. For a good juicing effect, do not push violently. If the fruit residue outlet is blocked or the fruit residue cup or the juice cup is full after the product has run for some time, disconnect the power supply and clear up the fruit residue outlet before starting the product again. Never put fingers or other articles into the feed opening. |
 | 9 | When there is no longer juice flowing via the juice outlet after good material processing, make the switch off, disconnect the power supply and take the juice cup from the juice nozzle after the motor and the juice strainer have both stopped running (drink the juice at one, otherwise its taste and nutrition will be both influenced after some time of exposure in air). |
II. Tips for fruit selection
- Select fresh fruits and vegetables because they have more juice. The fruits particularly suitable for the product include pineapple, beetroot, celery stick, apple, cucumber, carrot, spinach, the melons, tomato, mandarin orange, grape, etc.
- It is not necessary to remove thin fruit and vegetable skins but the thick skins of fruits and vegetables such as mandarin orange, pineapple and raw beetroot. Remove the seeds of citrus fruits because they will make juice bitter.
- Concentration of the extracted apple juice depends on type of the apple processed. The more juice the processed apple has, the clearer the juice will be. Thus, select the apple type in line with the juice concentration expected.
- Newly extracted apple juice will become brown very soon. This process can be slowed down by a few drops of lemon juice.
- Leaves and leaf stalks (such as that of lettuce) may be put into the product for juicing.
- Starchy fruits such as banana, papaya, avocado, fig and mango are not suitable for juicing in the product.
- Nutrients and gear selection of common fruits and vegetables are introduced in the table below.
| Fruit/vegetable Vitamin/mineral | kj/cal | Gear | ||
| Apple | Vitamin C | 200 g =150 kj (72 cal) | 2 | |
| Apricot | Abundant dietary fiber and K | 30 g =85 kj (20 cal) | 1 | |
| Beet | Folic acid, dietary fiber, Vitamin C and K | 160 g =190 kj (45 cal) | 1 | |
| Blueberry | Vitamin C | 125 g =295 kj (70 cal) | 1 | |
| Brussels sprout | Vitamin C, B, B6, E, folic acid and dietary fiber | 100 g =110 kj (26 cal) | 1 | |
| Cabbage | Vitamin C, folic acid, B6 and dietary fiber | 100 g =110 kj (26 cal) | 1 | |
| Carrot | Vitamin A, C and B6 and dietary fiber | 120 g =125 kj (30 cal) | 2 | |
| Celery | Vitamin C and K | 80 g =55 kj (7 cal) | 1 | |
| Cucumber | Vitamin C | 280 g =120 kj (29 cal) | 1 | |
| Fennel | Vitamin C and dietary fiber | 300 g =145 kj (35 cal) | 1 | |
| Grape | Vitamin C and B6 and K 125 g | =355 kj (85 cal) | 1 | |
| Kiwi | Vitamin C and K | 100 g =100 kj (40 cal) | 1 | |
| Sweet melon | Vitamin A and C, folic acid and dietary fiber | 200 g =210 kj (50 cal) | 1 | |
| Nectarine | Vitamin C and B3, K and dietary fiber | 180 g =355 kj (85 cal) | 2 | |
| Peach | Vitamin C and B3, K and dietary fiber | 150 g =205 kj (49 cal) | 1 | |
| Pear | Dietary fiber | 150 g =250 kj (60 cal) | 1 | |
| Pineapple | Vitamin C | 150 g =245 kj (59 cal) | 1 | |
| Raspberry | Vitamin C, Fe, K and Mg | 125 g =130 kj (31 cal) | 1 | |
Safety indexes
| Rated voltage | 220V~ |
| Rated frequency 50Hz | |
| Continual juicing time ≤1 min. | |
| Time interval ≥2 min. |
As an electric appliance of class II, the product needs no grounding device.
Standards
National standards: GB4706.1-2005 GB4706.30-2008
Fault analysis and elimination
| Fault Possible cause | Elimination | |
| After the power supply is connected and the switch is made on, the product does not run. | The middle ring is not correctly installed; The top cover is not correctly installed; or The top cover contact has fractured. | Install the middle ring correctly; Install the top cover correctly; or Replace the top cover. |
| There is a bad smell from the motor in the first few times of use of the product. | It is normal. | If the bad smell still exists after the product has been used for several times, have the product tested by a near service center of us. |
| The product stops automatically in use. | The voltage is too low; There are many food materials in the product; The pushing rod is pushed violently; or The motor is under temperature protection. | Check whether the voltage is too low; Disconnect the power supply and remove the surplus food materials; Gently push the pushing rod; or Stop the product and start it again 20 to 30 minutes later. |
| There are many residues in juice. | The juice strainer is damaged; or There are many residues in the middle ring. | Replace the juice strainer; or Clean the middle ring. |
| The product has abnormal vibration or big noise. | The juice strainer is not correctly installed, resulting in poor running balance; The product is not steadily placed or the foot pad has fallen off; The voltage is too high; or There are many food materials in the product; | Install the juice strainer correctly; Place the product steadily or install the foot pad correctly; Check whether the voltage is too high; or Disconnect the power supply and remove the surplus food materials; |
| There is a little juice. | There are too many residues in the middle ring; or The pushing rod is pushed violently. | Clean the middle ring; or Gently push the pushing rod. |
| The cutter holder is seized. | The cutter holder is wound or seized by food materials. | Disconnect the power supply, take out the food materials and cut them into smaller blocks. |
Notes: The table above introduces the common faults and their cause analysis and elimination methods. For other faults, contact our customer service department or have the product repaired by a designated service center of us directly. Do not dismantle or repair the product by yourself.
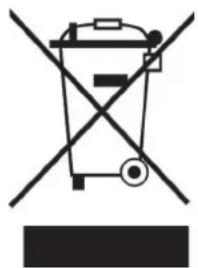
Hints on Disposal
natural_image
Symbol of a trash bin crossed with a diagonal line, no text or numbers presentAccording to the European waste regulation 2002/96/EG this symbol on the product or on its packaging indicates that this product may not be treated as household waste. Instead it should be taken to the appropriate collection point for the recycling of electrical and electronic equipment. By ensuring this product is disposed of correctly, you will help prevent potential negative consequences for the environment and human health, which could otherwise be caused by inappropriate waste handling of this product. For more detailed information about recycling of this product, please contact your local council or your household waste disposal service.
Declaration of Conformity
Producer: Chal-Tec GmbH, Wallstraße 16, 10179 Berlin, Germany.

This product is conform to the following European Directives:
2014/30/EU (EMC)
2014/35/EU (LVD)
2011/65/EU (RoHS)
Gentile cliente,
natural_image
Line drawing of a juice maker with a side view showing internal components and a schematic symbol (no text or labels)natural_image
Symbol of a trash bin crossed with a diagonal line, no text or numbers presentnatural_image
Line drawing of a juice maker with a side-view schematic showing internal components and rotation indicators (no text or labels)Vitesses :
natural_image
Symbol of a trash bin crossed with a diagonal line, no text or numbers present


- Gänge:
- Thank you for using our juicer.
- Precautions for safe use
- Parts and their functions
- Directions for use
- Gears:
- Use of product (see "Parts and their functions" for names of the following parts)
- Tips for fruit selection
- Standards
- Hints on Disposal
- Declaration of Conformity
- Gentile cliente,
- Vitesses :
Brand : Klarstein
Model : Fruit Tornado
Category : Juicer