
Applebee - Juicer Klarstein - Free user manual and instructions
Find the device manual for free Applebee Klarstein in PDF.

| Product type | Steam juice extractor |
| Brand | Klarstein |
| Model | Applebee |
| Item number | 10031478 |
| Power supply | 220-240 V ~ 50 Hz |
| Power | 1500 W |
| Water tank capacity | 3 litres (fill to 3/4) |
| Lid material | Glass |
| Included accessories | Strainer, juice container, silicone hose, elastic clamp |
| Main function | Steam juice extraction |
| Recommended extraction time | Approximately 40 minutes |
| Extraction method | Steaming fruits in the strainer |
| Recommended use | Fresh and ripe fruits and vegetables, cut into small pieces |
| Cleaning the water tank | By hand with a soft cloth, do not put in dishwasher |
| Cleaning other parts | Dishwasher safe |
| Descaling | Soak in vinegar solution (100 ml vinegar per 1 L of water) |
| Safety | Do not immerse the appliance, do not touch moving parts |
| Recycling | Do not dispose with household waste, take to WEEE collection point |
Frequently Asked Questions - Applebee Klarstein
User questions about Applebee Klarstein
0 question about this device. Answer the ones you know or ask your own.
Ask a new question about this device
Download the instructions for your Juicer in PDF format for free! Find your manual Applebee - Klarstein and take your electronic device back in hand. On this page are published all the documents necessary for the use of your device. Applebee by Klarstein.
USER MANUAL Applebee Klarstein
INHALTSVERZEICHNIS
Member of Berlin Brands Group
Handwerkerstr. 11
15366 Dahlwitz-Hoppegarten
Deutschland
natural_image
Symbol of a trash bin crossed with a diagonal line, no text or numbers presentBerlin Brands Group UK Ltd
PO Box 1145
Oxford, OX1 9UW
United Kingdom
Dear Customer,
Congratulations on purchasing this device. Please read the following instructions carefully and follow them to prevent possible damages. We assume no liability for damage caused by disregard of the instructions and improper use. Scan the QR code to get access to the latest user manual and more product information.

CONTENT
Safety Instructions 12
Product Description 13
Operation 14
Tips and hints for juicing 15
Cleaning and Maintenance 15
Disposal Considerations 16
Manufacturer & Importer (UK) 16
TECHNICAL DATA
| Item number 10031478 | |
| Power supply 220-240 V ~ 50 Hz | |
| Power consumption 1500 W |
SAFETY INSTRUCTIONS
- Always check that the power supply corresponds to the voltage on the rating plate.
- Always unplug from mains supply when not in use. Do not abuse or damage the power cord. If the supply cord is damaged, it must be replaced by the manufacturer or its service agent or a similarly qualified person in order to avoid a hazard.
- This appliance is not intended for use by persons (including children) with reduced physical, sensory or mental capabilities, or lack of experience and knowledge, unless they have been given supervision or instruction concerning use of the appliance by a person responsible for their safety. Children should be supervised to ensure that they do not play with the appliance.
- Do not immerse appliance in water or supply cord in water. Do not use with wet hands or use in damp situations.
- Do not use outdoors. Do not use directly below a socket outlet. This appliance is not intended to be operated by means of an external timer or separate remote-control system. This appliance is designed exclusively for private, domestic use and is not suitable for commercial or industrial use. Do not use this appliance for anything other than its intended use. Only use the appliance on a stable, level, heat-resistant surface.

CAUTION
Risk of injury! Avoid contact with all moving parts. Switch off the appliance and disconnect from supply before changing accessories or approaching parts that move in use.
- Always inspect your appliance before use. Check parts are correctly attached. Do not use this appliance if it has been damaged, dropped, left outdoors or dropped in water. Return it to an authorised service dealer for examination and repair.
- This device may be only used by children 8 years old or older and persons with limited physical, sensory and mental capabilities and / or lack of experience and knowledge, provided that they have been instructed in use of the device by a responsible person who understands the associated risks.
PRODUCT DESCRIPTION
1 Glass lid
2 Fruit strainer
3 Juice container
4 Silicone tube
5 Spring clamp
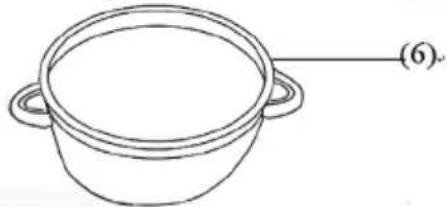
6 Water container

natural_image
Simple line drawing of a circular object with a small central component and an arrow pointing to it, labeled (1) at the end (no text or symbols on the object itself)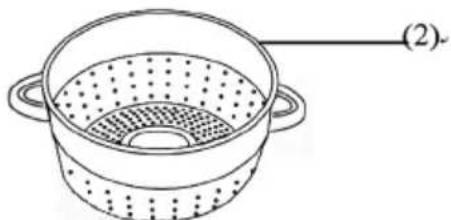
natural_image
Line drawing of a cooking pot with two handles and a perforated interior (no text or symbols)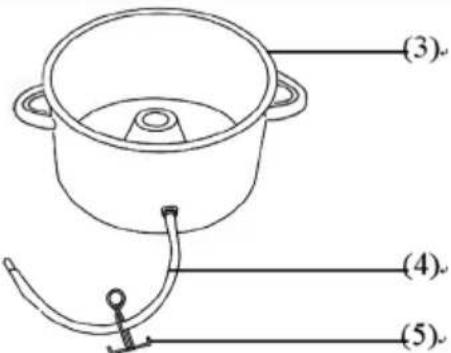
natural_image
Simple line drawing of a cooking pot with two handles and a label (6) pointing to it (no text or symbols on the pot itself)OPERATION
- Fill the water tank with 3 liters of water so that it is about 3/4 full. Then insert the power plug into the unit and the plug into the outlet.
- Make sure the drain hose is as low as possible in the outlet and attach the spring clip about halfway down the hose. Place the juice container on top of the water container.
- Place the fruit strainer filled with fruit on the juice container and put the lid on.
- Once steam starts to flow out of the top of the juicer, watch the time or set a timer for 40 minutes. Make sure steam is continuously produced and check the water level regularly. Make sure the unit does not run dry.
- Wash and sterilize all preserving jars in the oven at 100 °C for 15 minutes. Sterilize the caps and lids as well.
- Before you pour the juice into the jars. Place the jars in a baking or casserole dish that will catch any dripping juice.
- To get the clearest juice possible, do not touch the fruit in the fruit strainer while juicing, if you like pulp in the juice, pass the fruit through the strainer after it has softened and become mushy.
- Fill the jars 40 minutes after you have looked at the clock. To do this, place the end of the tube in the jar and press the clamp to fill the juice.

CAUTION
Risk of burns! Fill the jars very carefully as the juice is boiling hot. Keep children and pets away during fi lling and wear oven gloves.
- Fill the jars with juice until there is about 0.5 cm of space left at the top, so that there is as little air as possible in the jar. Immediately close the jars.
- Place the filled jars in a 90 °C water bath for 15 minutes. Use oven gloves when removing the jars afterwards.
- Afterwards, place the jars on a towel and let them cool down. After 24 hours, check if all jars are really tight and then store them in a cool, dry and dark place.
TIPS AND HINTS FOR JUICING
- To get the most juice out of fruits and vegetables, cut them into small pieces. Do not put ice or frozen fruit in the juicer.
- If pieces get stuck in the feed chute, use the pusher. Gradually add the pieces to the feed chute. Do not push them in too quickly.
- When juicing leafy greens or wheatgrass, mix them with fruits or hard vegetables for best results. Juice nuts only with other foods, such as soaked soybeans or liquids.
- Use only fresh and ripe fruits and vegetables for juicing. Fresh and ripe ingredients are more flavorful and contain more juice than unripe ones. If possible, consume the juice immediately after juicing, as it contains the most vitamins and minerals at this time.
CLEANING AND MAINTENANCE
Before first use
Before using the unit for the first time, clean it with a little soapy water and a soft cloth. This will remove any particles or residue caused by the production process.
After use
- Clean the unit parts with a soft cloth to avoid scratching the surface.
- Do not clean the water tank in the dishwasher as it contains electronics. All other parts can be cleaned in the dishwasher.
- If lime residues form on the device parts, remove them by soaking the corresponding part in a vinegar solution. To do this, add about 100 ml of vinegar to 1 liter of water and soak the corresponding parts for 30-60 minutes. Then wash the part with a cloth and clean water and dry it. Parts may need to soak a little longer.
- Once all parts are cleaned, dry them carefully to prevent water spots from forming.
DISPOSAL CONSIDERATIONS

natural_image
Symbol of a trash bin crossed with a diagonal line, no text or numbers presentIf there is a legal regulation for the disposal of electrical and electronic devices in your country, this symbol on the product or on the packaging indicates that this product must not be disposed of with household waste. Instead, it must be taken to a collection point for the recycling of electrical and electronic equipment. By disposing of it in accordance with the rules, you are protecting the environment and the health of your fellow human beings from negative consequences. For information about the recycling and disposal of this product, please contact your local authority or your household waste disposal service.
MANUFACTURER & IMPORTER (UK)
Manufacturer:
Chal-Tec GmbH, Wallstrasse 16, 10179 Berlin, Germany.
Importer for Great Britain:
Berlin Brands Group UK Ltd
PO Box 1145
Oxford, OX1 9UW
United Kingdom
Estimado cliente:
ÍNDICE
natural_image
Symbol of a trash bin crossed with a diagonal line, no text or numbers presentBerlin Brands Group UK Ltd
PO Box 1145
Oxford, OX1 9UW
United Kingdom
Cher client,
SOMMAIRE
natural_image
Symbol of a trash bin crossed with a diagonal line, no text or numbers presentBerlin Brands Group UK Ltd
PO Box 1145
Oxford, OX1 9UW
United Kingdom
Gentile cliente,
INDICE
natural_image
Symbol of a trash bin crossed with a diagonal line, no text or numbers presentPRODUTTORE E IMPORTATORE (UK)
Produttore:
Chal-Tec GmbH, Wallstraße 16, 10179 Berlino, Germania.
Berlin Brands Group UK Ltd
PO Box 1145
Oxford, OX1 9UW
United Kingdom

area
| Category | Value | |---|---| | 1 | 100 | | 2 | 100 | | 3 | 100 | | 4 | 100 | | 5 | 100 | | 6 | 100 | | 7 | 100 | | 8 | 100 | | 9 | 100 | | 10 | 100 | | 11 | 100 | | 12 | 100 | | 13 | 100 | | 14 | 100 | | 15 | 100 | | 16 | 100 | | 17 | 100 | | 18 | 100 | | 19 | 100 | | 20 | 100 | | 21 | 100 | | 22 | 100 | | 23 | 100 | | 24 | 100 | | 25 | 100 | | 26 | 100 | | 27 | 100 | | 28 | 100 | | 29 | 100 | | 30 | 100 | | 31 | 100 | | 32 | 100 | | 33 | 100 | | 34 | 100 | | 35 | 100 | | 36 | 100 | | 37 | 100 | | 38 | 100 | | 39 | 100 | | 40 | 100 | | 41 | 100 | | 42 | 100 | | 43 | 100 | | 44 | 100 | | 45 | 100 | | 46 | 100 | | 47 | 100 | | 48 | 100 | | 49 | 100 | | 50 | 100 | | 51 | 100 | | 52 | 100 | | 53 | 100 | | 54 | 100 | | 55 | 100 | | 56 | 100 | | 57 | 100 | | 58 | 100 | | 59 | 100 | | 60 | 100 | | 61 | 100 | | 62 | 100 | | 63 | 100 | | 64 | 100 | | 65 | 100 | | 66 | 100 | | 67 | 100 | | 68 | 100 | | 69 | 100 | | 70 | 100 | | 71 | 100 | | 72 | 100 | | 73 | 100 | | 74 | 100 | | 75 | 100 | | 76 | 100 | | 77 | 100 | | 78 | 100 | | 79 | 100 | | 80 | 100 | | 81 | 100 | | 82 | 100 | | 83 | 100 | | 84 | 100 | | 85 | 100 | | 86 | 100 | | 87 | 100 | | 88 | 100 | | 89 | 100 | | 90 | 100 | | 91 | 100 | | 92 | 100 | | 93 | 100 | | 94 | 100 | | 95 | 100 | | 96 | 100 | | 97 | 100 | | 98 | 100 | | 99 | 100 | | Note: The actual values in the 'Value' column are not provided in the code. I have used the label 'The Region' to represent the 'Region'. The values are estimated based on the provided code.
KLARSTEIN


- INHALTSVERZEICHNIS
- Member of Berlin Brands Group
- Handwerkerstr. 11
- Dahlwitz-Hoppegarten
- Deutschland
- Dear Customer,
- CONTENT
- SAFETY INSTRUCTIONS
- CAUTION
- PRODUCT DESCRIPTION
- OPERATION
- TIPS AND HINTS FOR JUICING
- CLEANING AND MAINTENANCE
- Before first use
- After use
- DISPOSAL CONSIDERATIONS
- MANUFACTURER & IMPORTER (UK)
- Manufacturer:
- Importer for Great Britain:
- Estimado cliente:
- ÍNDICE
- Cher client,
- SOMMAIRE
- Gentile cliente,
- INDICE
- PRODUTTORE E IMPORTATORE (UK)
- Produttore:
- KLARSTEIN
Brand : Klarstein
Model : Applebee
Category : Juicer