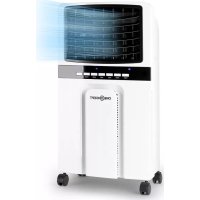
MCH2 V2 - Air Conditioning OneConcept - Free user manual and instructions
Find the device manual for free MCH2 V2 OneConcept in PDF.

User questions about MCH2 V2 OneConcept
0 question about this device. Answer the ones you know or ask your own.
Ask a new question about this device
Download the instructions for your Air Conditioning in PDF format for free! Find your manual MCH2 V2 - OneConcept and take your electronic device back in hand. On this page are published all the documents necessary for the use of your device. MCH2 V2 by OneConcept.
USER MANUAL MCH2 V2 OneConcept
text_image
QR code image containing encoded data, no visible human-readable textINHALTSVERZEICHNIS
text_image
A B C D E F G H I J KMember of Berlin Brands Group
Handwerkerstr. 11
15366 Dahlwitz-Hoppegarten
Deutschland
natural_image
Symbol of a trash bin crossed with a diagonal line, no text or numbers presentBerlin Brands Group UK Ltd
PO Box 1145
Oxford, OX1 9UW
United Kingdom
Dear customer,
Congratulations on the purchase of your unit. Please read the following instructions carefully and follow them to prevent potential damage. We accept no liability for damage caused by disregarding the instructions and improper use. Please scan the QR code to access the latest operating instructions and further information about the product.

text_image
QR code image containing encoded data, no visible human-readable textCONTENTS
Safety Instructions 16
Overview and remote control 18
Control panel 19
Filling 20
Operation 20
Cleaning and care 22
Troubleshooting 23
Disposal considerations 24
Manufacturer & Importer (UK) 24
TECHNICAL INFORMATION
| Article number 10029741 | |
| Mains voltage and frequency 220-240 | V ~ 50/60 Hz |
| Nominal power 65 W | |
| Water tank capacity 8.0 L | |
| Water consumption 1 L/h |
SAFETY INSTRUCTIONS
- Check the voltage specification on the type plate before use. Ensure that you only connect the appliance to sockets with the appropriate voltage.
- Keep the cable away from hot surfaces and sharp objects.
- Do not lay the cable under a carpet or cover it with other objects or fabrics. Lay the cable so that no one falls over it or gets caught on it.
- Do not use the device if the plug or the power cord is damaged.
- If the power cord is damaged, it must be replaced by the manufacturer, an authorised specialist company or a similarly qualified person.
- Use the unit indoors only.
- Do not cover the device.
- Place the appliance on a level, stable surface. Make sure that the device is upright.
- Make sure that the unit is switched off before inserting the plug into the socket.
- Do not operate the appliance with wet hands and do not handle the plug and the cable with wet hands.
- Do not leave the device unattended during operation. Switch the device off and unplug it when you are not using it.
- Unplug the plug from the socket before cleaning the device.
- Do not pull the plug out of the socket by the cable. Instead, hold it securely with your hand while unplugging it.
- Children over 8 years as well as mentally, sensory and physically impaired persons may only use the device if they have been informed in detail about the functions and safety precautions by a supervisor responsible for them beforehand and understand the associated risks.
- Use the device only as described in these operating instructions.
- Do not put your fingers or objects into the ventilation openings.
- Do not place the appliance near curtains, drapes, tablecloths or similar textiles. These could be drawn into the fan and could damage it.
- Do not use the unit in damp rooms such as bathrooms.
- Do not use the unit before the wheels are mounted or when it is lying on its side.
- Unwind the cable completely before use.
- During operation, the unit humidifi es the ambient air. However, avoid too high humidity. We recommend a humidity of between 40-50%. Excessive humidity can lead to mould or health problems.
- Only place the unit on surfaces that are insensitive to moisture and high humidity. It can always happen that a few drops fall out when installing or removing the water tank. If this is the case, wipe away the water drops immediately.
- Change the water in the tank after 3 days at the latest.
Special notes
- This appliance can be used by children aged from 8 years and above and persons with reduced physical, sensory or mental capabilities or lack of experience and knowledge only if they have been given supervision or instruction concerning use of the appliance in a safe way and understand the hazards involved. Children must not play with the device. Cleaning and maintenance of the air cooler must not be carried out by children without supervision.
- Be aware that high humidity can promote the growth of biological organisms such as mould.
- Make sure that the area around the air cooler does not get damp or wet. If moisture occurs, turn down the power or stop the humidifi cation function. Make sure that absorbent materials such as carpets, curtains, drapes or tablecloths do not get damp.
- Never leave water in the tank when the appliance is not in use.
- Empty and clean the air cooler before storage. Clean the storage area before the next use.
- Keep new and used batteries away from children.
- If the battery compartment cannot be closed securely, stop using the product.
- The batteries contain environmentally hazardous substances. They must be removed from the unit before it is scrapped and must be disposed of safely.
WARNING
Danger of injury! Make sure that children do not swallow the battery. If the button cell battery is swallowed, it can cause severe internal burns and death in as little as 2 hours. If you think batteries may have been swallowed, seek medical attention immediately.
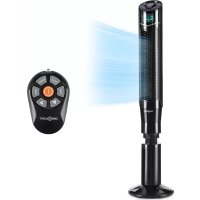
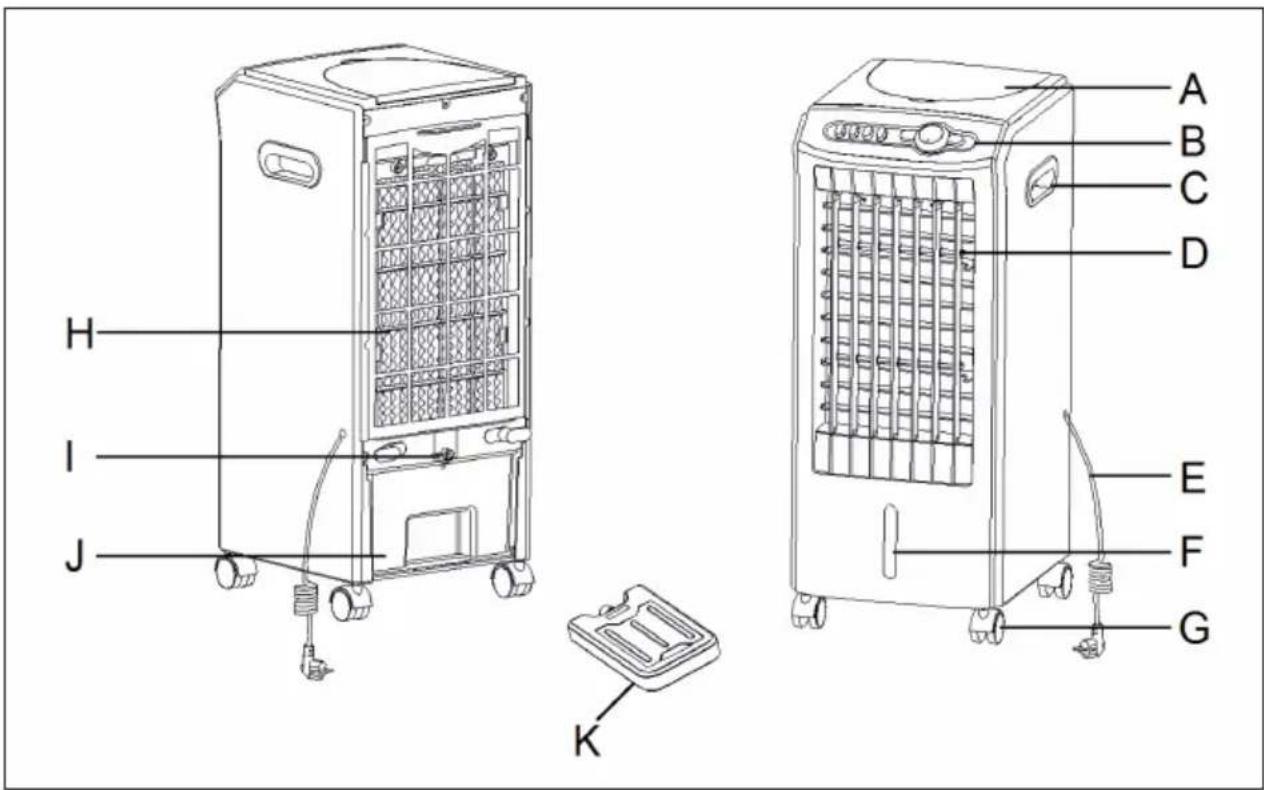
OVERVIEW AND REMOTE CONTROL
text_image
A B C D E F G H I J K| A Top cover G Rear panel | ||
| B Control panel H Air filter | ||
| C Handle I Locking lever | ||
| D Louvres / air outlet J Water tank | ||
| E Power cable and plug K Cooling pack | ||
| F Window for water level |
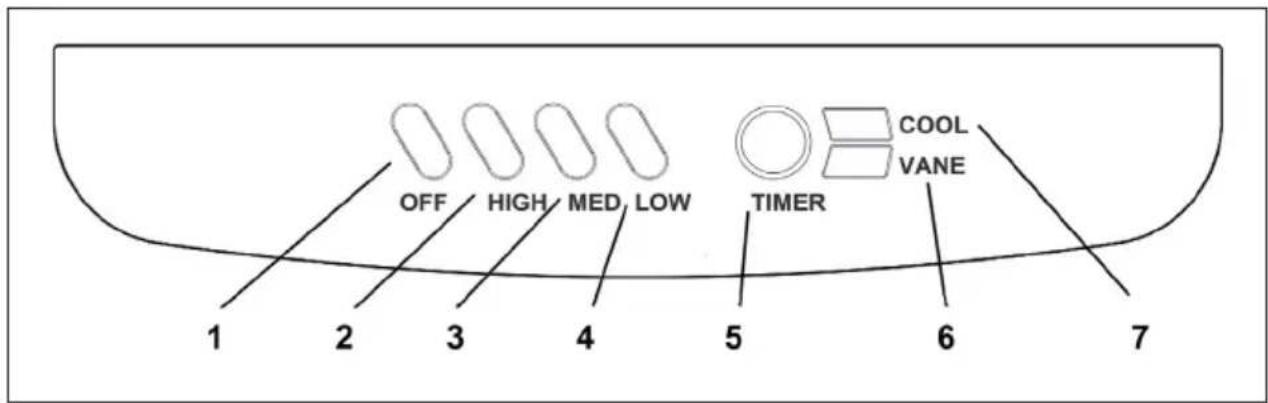
CONTROL PANEL
text_image
OFF HIGH MED LOW TIMER COOL VANE 1 2 3 4 5 6 7| 1 Switch off 5 Timer | ||
| 2 High 6 Swivel operation | ||
| 3 Medium 7 Cooling | ||
| 4 Low |
FILLING
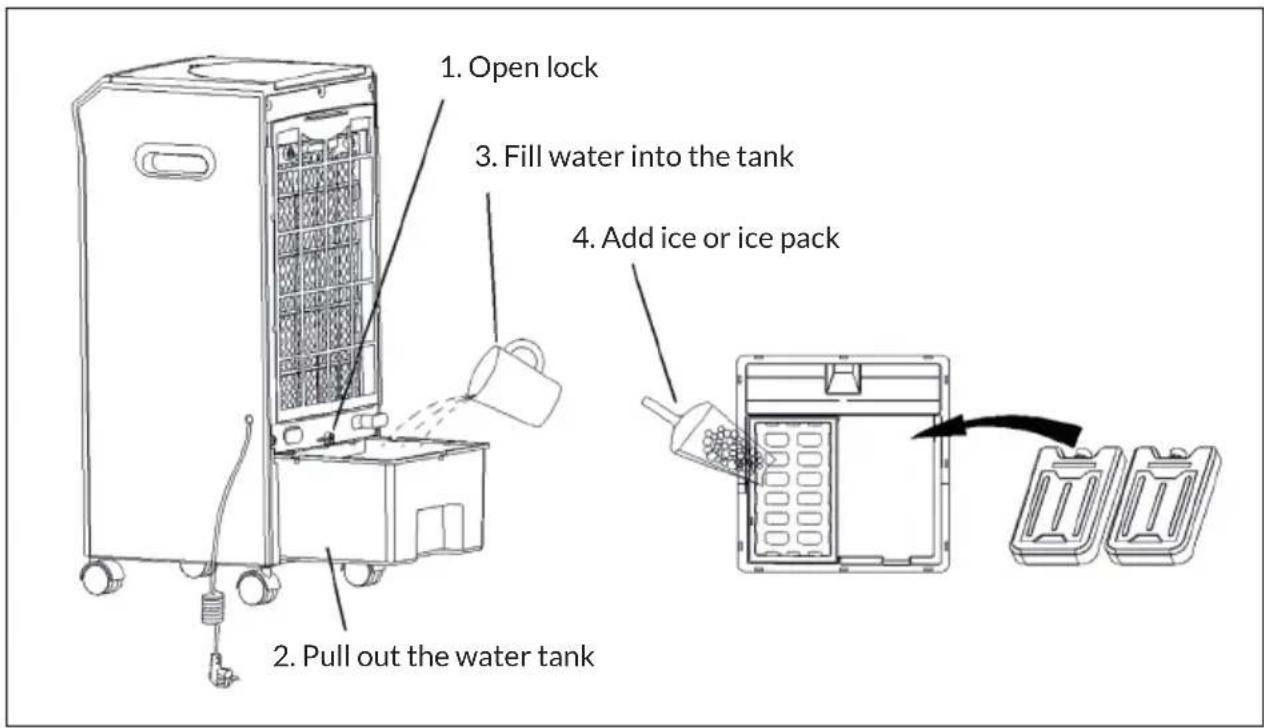
text_image
1. Open lock 3. Fill water into the tank 4. Add ice or ice pack 2. Pull out the water tankOPERATION
- When using the appliance, make sure that it is on a flat and hard surface. If it is placed on a slope or incline, it may be damaged.
- Plug the power plug into the mains socket. Make sure that the mains plug is firmly inserted into the socket.
- Turn the TIMER KNOB to the ON position.
- Press the LOW, MEDIUM or HIGH button to set the desired fan power.
- If you want to increase the area that the fan reaches, press the VANE button. The corresponding indicator lamp lights up and the swivel blades slowly move back and forth. If you want to stop the swivel operation, press the VANE button again, The control lamp goes out. If you slide the horizontal slats up or down, you can change the wind direction manually.
- With the TIMER BUTTON you can set a maximum operating time of up to 120 minutes, after which the appliance switches off automatically.
- Press the OFF button to switch off the device. For safety, disconnect the power plug from the mains.
Cooling function
Note: The cooling function can only be switched on when the fan is in operation.
Before operating the unit in cooling mode, check the proper position of the water tank. Then, fill with clean, cold water. Observe the water level indicator to avoid overfilling. Press the Cool button after filling the water and the appliance starts blowing cooler air. To increase the cooling effect, you can additionally place the cold pack in the water tank.
Notes: Before using the cold pack, you must remove the lid and pour in clean, cold water until the maximum water level is reached. Overfilling can cause the pack to burst. Put the lid back on and place the cold pack in the freezer compartment of your refrigerator or in a freezer for 1 to 2 hours until the water is completely frozen.
Always pull out the water tank for cleaning. Be careful not to break off the intake manifold.
Removing the honeycomb evaporator for cleaning purposes
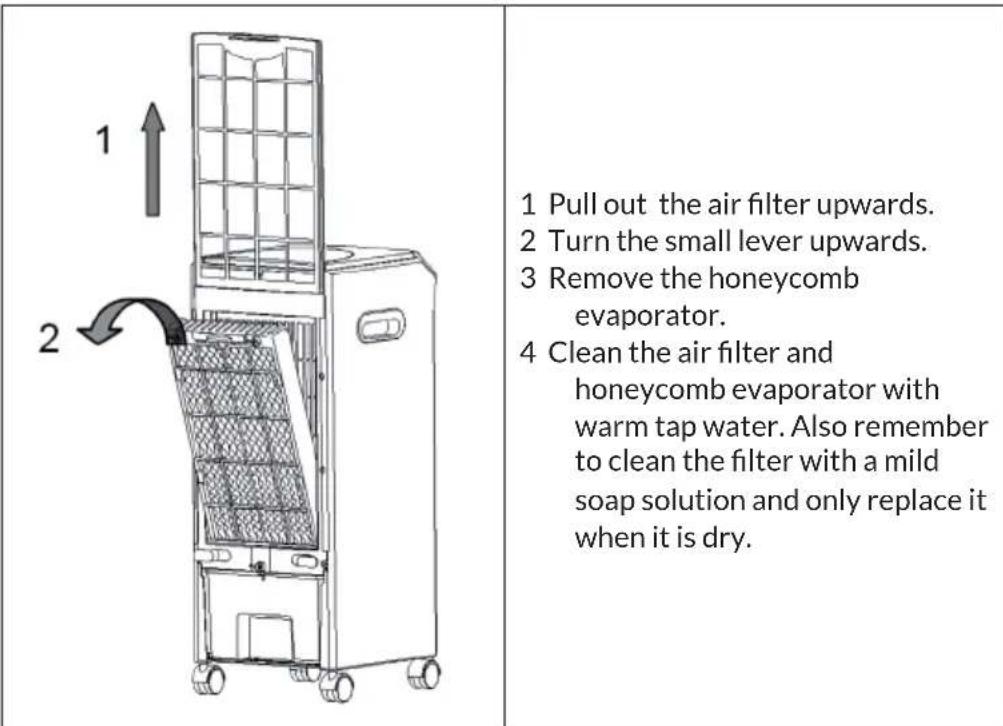
text_image
1 Pull out the air filter upwards. 2 Turn the small lever upwards. 3 Remove the honeycomb evaporator. 4 Clean the air filter and honeycomb evaporator with warm tap water. Also remember to clean the filter with a mild soap solution and only replace it when it is dry.CLEANING AND CARE
Before cleaning
- Switch off the device and unplug the power cord. Always disconnect the mains plug before cleaning to avoid electric shocks or mechanical damage.
- Use a commercially available cleaning agent and a soft brush for cleaning. Do not use chemical cleaners for cleaning.
Cleaning the outer surface
- Wipe the surface with a damp cloth. Do not use water, as it could enter the unit and damage the electronics.
- Do not use corrosive cleaning agents or solvents.
Storage
- If the product will not be used for a long time, unplug it from the mains and pack it away to prevent dust from getting into the housing.
• After packing, store it in a dry, ventilated place.
TROUBLESHOOTING
| Problem Possible cause | Solution approach | |
| The appliance does not work. | The plug has not been inserted correctly. | Plug the power plug securely into the wall socket. |
| The nebuliser unit has not been installed correctly. | Install the nebuliser unit correctly. | |
| The unit is switched off. | Switch the device on. | |
| The wiring in the unit has come loose. | Contact a specialist company for repairs. | |
| The humidifier does not work / The pump makes strange noises. | No water in the water tank or the water level is below the MIN mark. | Switch off the machine and fill water into the water tank. |
| The filter screen of the submersible pump is clogged. | Clean the filter screen. | |
| The water outlet hole of the nebuliser unit is blocked. | Clean the nebuliser unit. | |
| The pump or the wiring in the unit has come loose. | Contact a specialist company for repairs. | |
| Abnormal noises. Deposits | in the nebuliser unit. | Remove the nebuliser unit and clean the components. |
| Loose fan blades or engine damage. | Contact a specialist company for repairs. |
DISPOSAL CONSIDERATIONS
natural_image
Symbol of a trash bin crossed with a diagonal line, no text or numbers presentIf there is a legal regulation in your country regarding the disposal of electrical and electronic equipment, this symbol on the product or on the packaging indicates that this product must not be disposed of with household waste. Instead, it must be taken to a collection point for the recycling of electrical and electronic equipment. By disposing of this product in accordance with the regulations, you protect the environment and the health of those around you from negative consequences. For information on recycling and disposal of this product, contact your local government or household waste disposal service.
This product contains batteries. If there is a legal regulation in your country regarding the disposal of batteries, the batteries must not be disposed of in household waste. Consult your local regulations for the disposal of batteries. By disposing of this product in accordance with the regulations, you protect the environment and the health of those around you from negative consequences.
MANUFACTURER & IMPORTER (UK)
Manufacturer:
Chal-Tec GmbH, Wallstraße 16, 10179 Berlin, Germany.
Importer for Great Britain:
Berlin Brands Group UK Ltd
PO Box 1145
Oxford, OX1 9UW
United Kingdom
Estimado cliente:
text_image
QR code image containing encoded data, no visible human-readable textÍNDICE
text_image
A B C D E F G H I J Knatural_image
Symbol of a trash bin crossed with a diagonal line, no text or numbers presentBerlin Brands Group UK Ltd
PO Box 1145
Oxford, OX1 9UW
United Kingdom
Cher client, chère cliente,
text_image
QR code image containing encoded data, no visible human-readable textSOMMAIRE
text_image
A B C D E F G H I J Knatural_image
Symbol of a trash bin crossed with a diagonal line, no text or numbers presentBerlin Brands Group UK Ltd
PO Box 1145
Oxford, OX1 9UW
United Kingdom
Gentile cliente,
text_image
QR code image containing encoded data, no visible human-readable textINDICE
text_image
A B C D E F G H I J Knatural_image
Symbol of a trash bin crossed with a diagonal line, no text or numbers presentPRODUTTORE E IMPORTATORE (UK)
Produttore:
Chal-Tec GmbH, Wallstraße 16, 10179 Berlino, Germania.
Berlin Brands Group UK Ltd
PO Box 1145
Oxford, OX1 9UW
United Kingdom