DR160 BT - Radio Auna - Free user manual and instructions
Find the device manual for free DR160 BT Auna in PDF.
User questions about DR160 BT Auna
0 question about this device. Answer the ones you know or ask your own.
Ask a new question about this device
Download the instructions for your Radio in PDF format for free! Find your manual DR160 BT - Auna and take your electronic device back in hand. On this page are published all the documents necessary for the use of your device. DR160 BT by Auna.
USER MANUAL DR160 BT Auna
text_image
QR code image containing encoded data, no visible human-readable textINHALTSVERZEICHNIS
text_image
1 auna Mode Scan Info/Menu Sleep 3 4 5 2 = Volume + OK Alarm Present Prev Next 7 8 9 6Member of Berlin Brands Group
Handwerkerstr. 11
15366 Dahlwitz-Hoppegarten
Deutschland
natural_image
Symbol of a trash bin crossed with a diagonal line, representing no waste or discharge (no text or labels)Berlin Brands Group UK Ltd
PO Box 1145
Oxford, OX1 9UW
United Kingdom
Congratulations on purchasing this equipment. Please read this manual carefully and take care of the following hints to avoid damages. Any failure caused by ignoring the items and cautions mentioned in the instruction manual is not covered by our warranty and any liability. Scan the QR code to get access to the latest user manual and other information about the product:
text_image
QR code image containing encoded data, no visible human-readable textCONTENTS
Safety Instructions 16
Product Overview 17
Getting Started 18
DAB Mode 18
FM Mode 19
AUX-IN Mode 20
BT Mode 20
USB Mode 21
System Settings 21
Disposal Considerations 23
Declaration of Conformity 23
TECHNICAL DATA
| Item number 10033110, 10033111 | |
| Power supply 100-240 V ~ 50/60 Hz | |
| DAB 174-240 MHz | |
| FM 87.5 MHz - 108 MHz | |
| BT frequency 2402-2480 MHz | |
| BT radio-frequency power (max.) 17 dBm |
SAFETYINSTRUCTIONS
- Observe all notes listed in the operating instructions.
- Do not use the unit near water or in a humid environment.
- Make sure that no liquid is spilled over the unit and the unit openings.
- Move the unit carefully to avoid damaging it.
- Do not block the device outputs.
- Do not place the unit near heat sources (e.g. heating). Do not expose the device to direct sunlight.
- Plug the power plug of the unit into the power outlet in the manner intended.
- The device is equipped with overload protection. Should this need to be replaced, contact customer service or a similarly qualified person.
- Unplug the unit from the wall outlet if it will not be used for a long period of time.
- Do not attempt to service or repair the unit yourself. In this case, the warranty expires.
- The mains plug is used to disconnect the device from the mains after it has been switched off. Make sure that the mains plug is always freely accessible.
- Do not expose the device to splash water or place objects filled with liquid, such as vases, on the device.
- Do not expose the batteries to extreme heat such as sunlight or fire.
- Do not obstruct the ventilation of the unit by blocking the ventilation openings with objects such as newspapers, tablecloths, curtains, etc..
- Ensure that a minimum distance of 5 mm to all sides of the unit is maintained.
- Do not place sources of open flame ignition, such as lit candles, on the unit.
- Dispose of used batteries in an environmentally friendly manner.
- Use the device only in temperate climate, not in tropical climate.
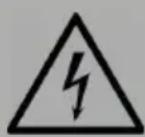
WARNING
Risk of injury! To reduce the risk of electric shock, do not open either the cover or the back of the unit. The device does not contain any parts that could be serviced by the customer. Please contact customer service or similarly qualified personnel for maintenance and repair.
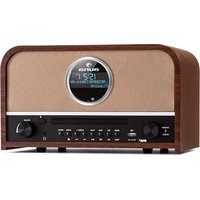
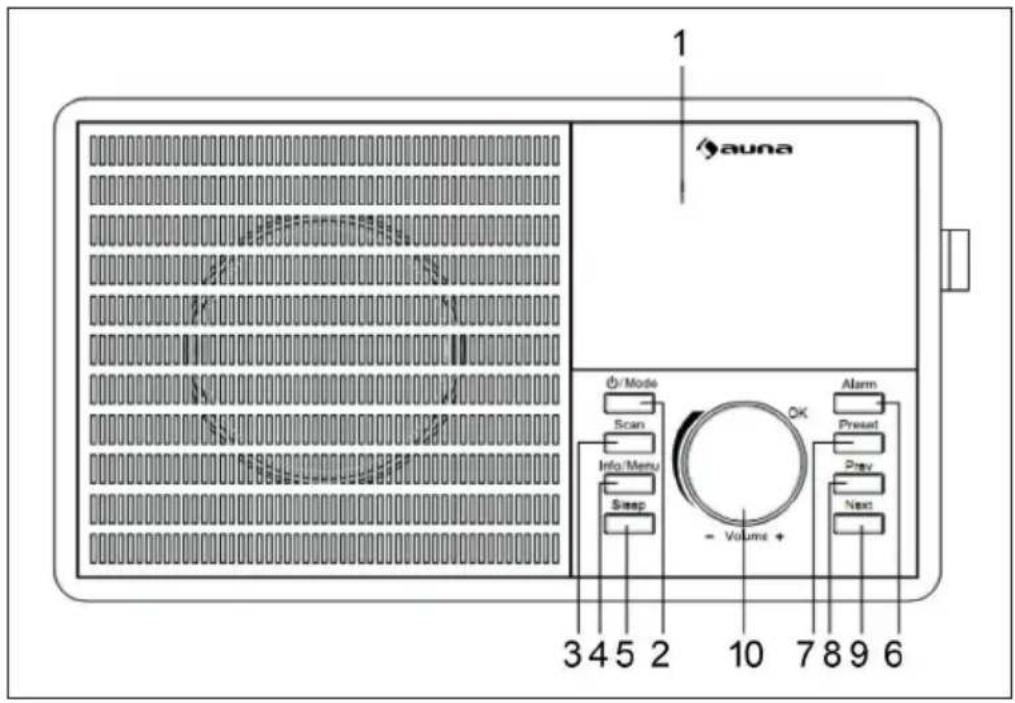
PRODUCT OVERVIEW
text_image
1 auna Mode Scan Info/Menu Sleep 3 4 5 2 = Volume + OK Alarm Present Prev Next 7 8 9 6- Display
- Standby/Mode button
- Scan button
- Info/Menu button
- Sleep button
- Alarm button
- Preset button
- Previous button
- Next button
- Volume/ ok button

text_image
11 OR ON DOWN UNOUT DOWN +Q 12 13 14 15 16- Aerial
- On/Off
- DC IN
- Line out
- Aux in
- Big USB
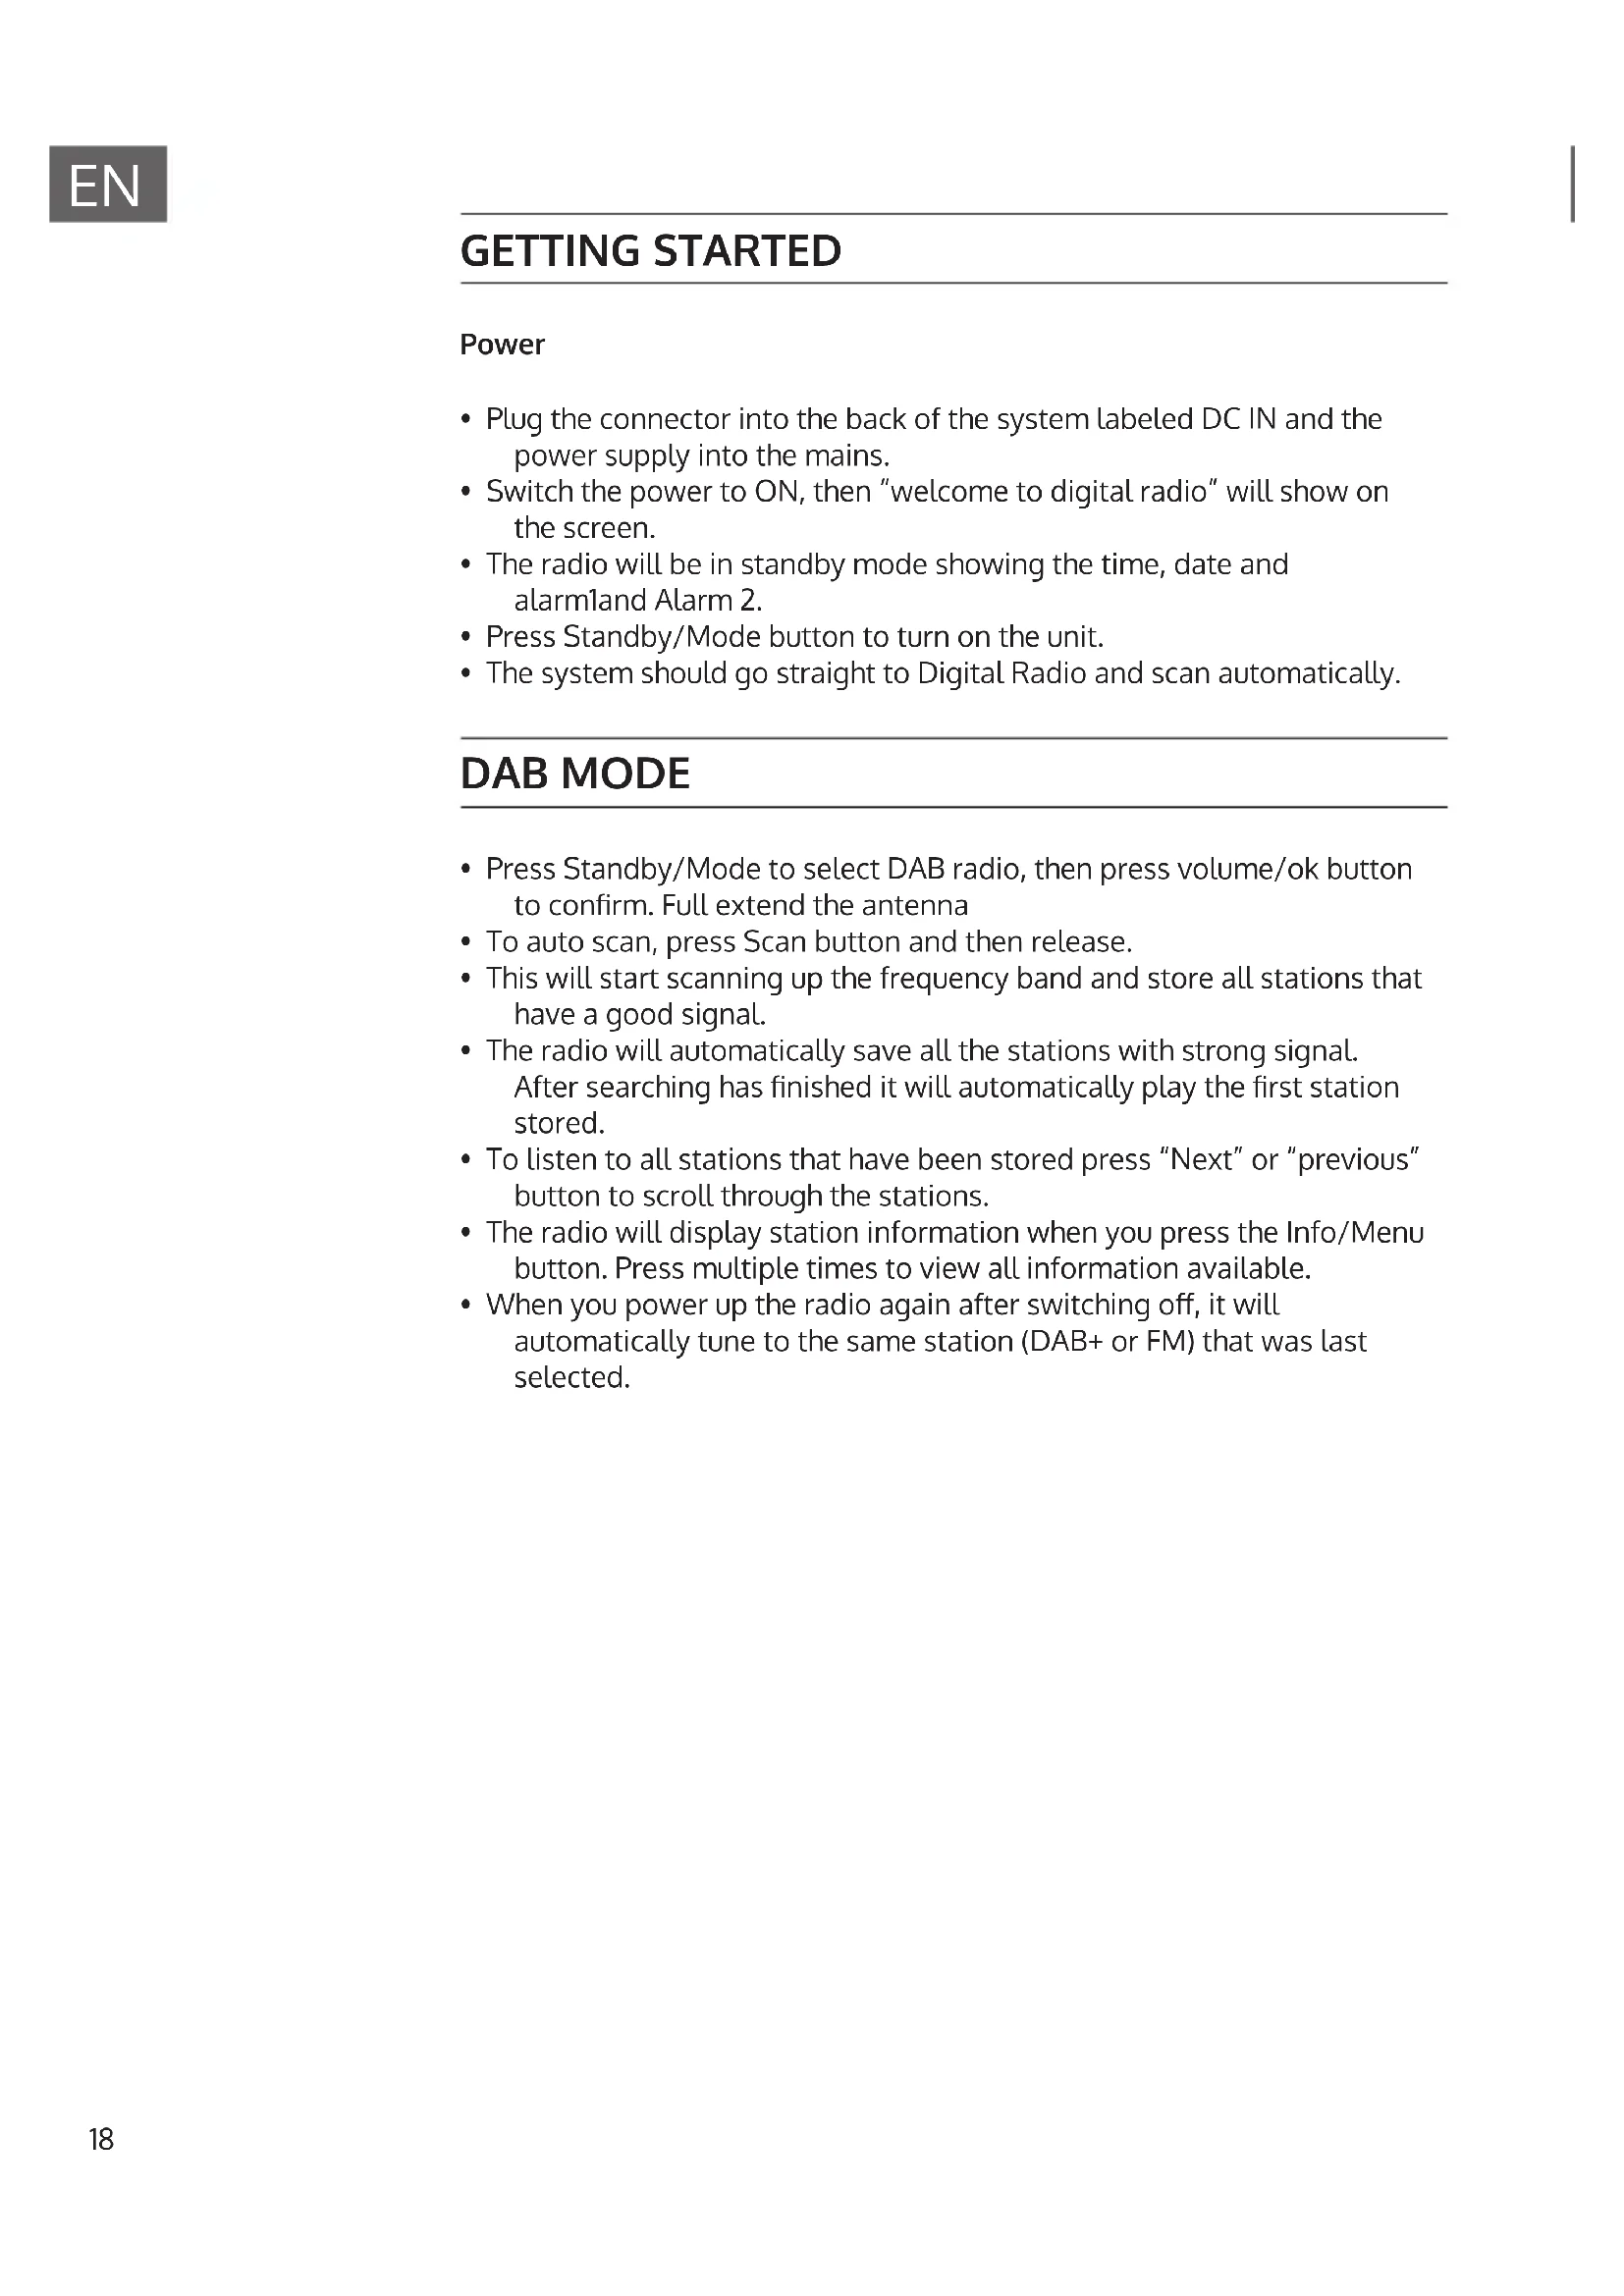
GETTING STARTED
Power
- Plug the connector into the back of the system labeled DC IN and the power supply into the mains.
- Switch the power to ON, then "welcome to digital radio" will show on the screen.
- The radio will be in standby mode showing the time, date and alarm1and Alarm 2.
- Press Standby/Mode button to turn on the unit.
- The system should go straight to Digital Radio and scan automatically.
DAB MODE
- Press Standby/Mode to select DAB radio, then press volume/ok button to confirm. Full extend the antenna
- To auto scan, press Scan button and then release.
- This will start scanning up the frequency band and store all stations that have a good signal.
- The radio will automatically save all the stations with strong signal. After searching has finished it will automatically play the first station stored.
- To listen to all stations that have been stored press "Next" or "previous" button to scroll through the stations.
- The radio will display station information when you press the Info/Menu button. Press multiple times to view all information available.
- When you power up the radio again after switching off, it will automatically tune to the same station (DAB+ or FM) that was last selected.
DAB Information
- Bit rate: shows the date rate at which the signal is being transmitted.
- Bit Error Rate (BER): provides details of the signal error rate.
- Channel and Frequency: Displays the station's transmission channel number and frequency.
- PTY (Program Type): shows the type and description of the program provided by the DAB station.
- Time and Date: Displays the time and date information provided by the broadcaster.
• DAB Indication: Indicates DAB mode. - Dynamic Label Segment (DLS): Displays scrolling text information supplied by the broadcaster.
How to store a preset station
Up to 10 preset stations can be set. To store a station that you are currently playing:
- Press and hold "preset" button, 01.[EMPTY] will show on screen.
- Press "prev" or "next" button to change the "1" to the number you want to store the station as. Then press "volume/ok" button to save.
How to recall a preset station
Press the "preset" button, then press "prev" or "next" buttons to scroll through your preset stations. Press "enter" button to select your choice.
FM MODE
- Press the "Standby/Mode" button to select FM radio. Then press volume/ok button to confirm.
- The first time you do this FM frequency "87.5MHZ" will be displayed on the screen.
• Fully extended the antenna - To auto scan, press "scan" button. This will start scanning up the frequency band and play the first station it find with good signal.
- To scan down the frequency band press and hold "scan" button for a few seconds.
FM Information
- Program Type: Displays a description of the type of program provided by the broadcaster.
- Date: Displays the time and the date.
- Frequency: Displays the station's transmission frequency.
- Radio Text: Displays scrolling test information supplied by the broadcaster.
How to store a preset station
Up to 10 preset stations can be set. To store a station that you are currently playing:
- Press and hold "preset" button, 01.[EMPTY] will show on screen.
- Press "prev" or "next" button to change the "1" to the number you want to store the station as. Then press "volume/ok" button to save.
How to recall a preset station
Press the "preset" button, then press "prev" or "next" buttons to scroll through your preset stations. Press "enter" button to select your choice.
AUX-IN MODE
- You can connect your phone or tablet with an AUX 3.5 mm cable that connect to Aux-in jack, then press "standby/mode" button to switch to "AUX".
- Press multiple times to switch from "DAB/FM/AUX/Bluetooth/USB" it will clearly show on the display screen). Insert the audio cable. You will then be able to play your music via your phone or tablet.
BT MODE
- Press the Standby/Mode button to select BT.
- Then press volume/ok button to confirm.
- Search the pairing name 'DR-160' in your phone and click it to pair.
- It will have reminding sound after paired successfully.
- You now can play music via BT; you can adjust volume from the radio or your phone.
USB MODE
- Press the Standby/Mode button to select USB, then press volume/ok button to confirm.
- Plug the USB sticks into USB port and it will play first track automatically.
- Use Previous or Next button to switch to next track.
- The display shows file name.
Note: The USB port does not support charging or data transfer with computer
SYSTEM SETTINGS
Hold and press "info/Menu" button to step into, then press "prev/next" button to select your desired Sub-option between
1. Audio
Equalizer: You can press prev/next to select the equalizer which you want.
2. Backlight
- Timeout: Press next button to select on/10 sec/20 sec/30 sec/45 sec/60 sec/90 sec/120 sec/180 sec, then press 'Enter' button to confirm.
- Level: Press next button to select High/Medium/Low, then press 'Enter' to confirm.
3. Clock
- Set Time/Date: Press next button to select date/month/year/month/min and hour, then press 'Enter' button to confirm.
- Set Format: Press next button to select 12 or 24, then press volume/ok button to confirm.
- Auto Update: Press next button to select 'No update' or 'Update from Any' or 'Update from DAB', or 'Update from FM', then press 'Enter' button to confirm.
4. System Settings
- Language: Press Next button to select English/Nederlands/Français/Deutsch/Italiano/Norweigian. Then press volume/ok button to confirm.
- Factory Reset: Press next button to select NO/YES and then press volume/ok button to confirm.
• Information: Press 'Enter' button to check the SW version of unit.
5. Sleep
You can press sleep button repeatedly to select off-15 minutes-30 minutes-45 minutes-60 minutes-90 minutes, then press 'Enter' button to confirm.
6. Alarm
- On the standby mode, Press alarm button to set alarm, then press next button to select Alarm 1/Alarm 2/Timer, then press volume/ok button to confirm.
- Alarm 1: Press volume/ok button to step into alarm 1, then press next button to select Alarm Mode/Alarm Time/Alarm Sound/Alarm Volum and press volume/ok button to confirm.
- Alarm Mode: Press Next button to select Off/Daily/Once/Weekend/Weekday, then press volume/ok button to confirm
- Alarm Time: Press next button to select min/hour, then press volume/ok button to confirm.
- Alarm Sound: Press Next button to select Buzzer/DAB/FM, then press volume/ok button to confirm.
- Alarm Volume: Press Next button to select the volume which you want, then press volume/ok button to confirm.
Note : When the alarm is ringing you can press standby/mode button to turn it off.
• Alarm 2: Follow the step of Alarm 1
- Timer: Press Next button to select the hour which you want and then press volume/ok button to confirm.
DISPOSAL CONSIDERATIONS

natural_image
Symbol of a trash bin crossed with a diagonal line, representing no waste or discharge (no text or labels)If there is a legal regulation for the disposal of electrical and electronic devices in your country, this symbol on the product or on the packaging indicates that this product must not be disposed of with household waste. Instead, it must be taken to a collection point for the recycling of electrical and electronic equipment. By disposing of it in accordance with the rules, you are protecting the environment and the health of your fellow human beings from negative consequences. For information about the recycling and disposal of this product, please contact your local authority or your household waste disposal service.
DECLARATION OF CONFORMITY
CE UK CA
Manufacturer:
Chal-Tec GmbH, Wallstrasse 16, 10179 Berlin, Germany.
Importer for Great Britain:
Berlin Brands Group UK Ltd PO Box 1145 Oxford, OX1 9UW United Kingdom
Hereby, Chal-Tec GmbH declares that the radio equipment type DR-160 is in compliance with Directive 2014/53/EU. The full text of the EU declaration of conformity is available at the following internet address: use.berlin/10033111
For Great Britain: Hereby, Chal-Tec GmbH declares that the radio equipment type DR-160 is in compliance with the relevant statutory requirements. The full text of the declaration of conformity is available at the following internet address: use.berlin/10033111
Estimado cliente:
text_image
QR code image containing encoded data, no visible human-readable textÍNDICE DE CONTENIDOS
text_image
1 auna Mode Scan Info/Menu Sleep 3 4 5 2 = Volume + OK Alarm Present Prev Next 7 8 9 6natural_image
Symbol of a trash bin crossed with a diagonal line, no text or numbers presentBerlin Brands Group UK Ltd
PO Box 1145
Oxford, OX1 9UW
United Kingdom
text_image
QR code image containing encoded data, no visible human-readable textSOMMAIRE
text_image
1 auna Mode Scan Info/Menu Sleep 3 4 5 2 = Volume + OK Alarm Present Prev Next 7 8 9 6natural_image
Symbol of a trash bin crossed with a diagonal line, no text or numbers presentDÉCLARATION DE CONFORMITÉ

text_image
CE UK CAFabricant :
Chal-Tec GmbH, Wallstraße 16, 10179 Berlin, Allemagne.
Berlin Brands Group UK Ltd
PO Box 1145
Oxford, OX1 9UW
United Kingdom
text_image
QR code image containing encoded data, no visible human-readable textINDICE
text_image
1 auna Mode Scan Info/Menu Sleep 3 4 5 2 = Volume + OK Alarm Present Prev Next 7 8 9 6natural_image
Symbol of a trash bin crossed with a diagonal line, no text or numbers presentBerlin Brands Group UK Ltd
PO Box 1145
Oxford, OX1 9UW
United Kingdom
text_image
QR code image containing encoded data, no visible human-readable textINHOUDSOPGAVE
text_image
1 auna Mode Scan Info/Menu Sleep 3 4 5 2 = Volume + OK Alarm Present Prev Next 7 8 9 6INSTRUCTIES VOOR AFVOER

natural_image
Symbol of a trash bin crossed with a diagonal line, no text or numbers presentBerlin Brands Group UK Ltd
PO Box 1145
Oxford, OX1 9UW
United Kingdom