Connect 120 - Radio Auna - Free user manual and instructions
Find the device manual for free Connect 120 Auna in PDF.

User questions about Connect 120 Auna
0 question about this device. Answer the ones you know or ask your own.
Ask a new question about this device
Download the instructions for your Radio in PDF format for free! Find your manual Connect 120 - Auna and take your electronic device back in hand. On this page are published all the documents necessary for the use of your device. Connect 120 by Auna.
USER MANUAL Connect 120 Auna
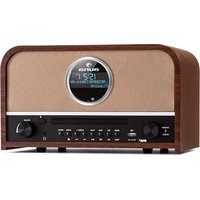
connect 120
Internet Radio
Radio de Internet
Radio Internet
1002986
300
www.auna-multimedia.com

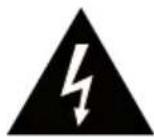
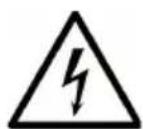
The lighting flash and arrow head within the triangle is warning sign alerting you of dangerous voltage inside the product
CAUTION
RISK OF ELECTRIC SHOCK DO NOT OPEN
CAUTION:TO REDUCE THE RISK OF ELECTRIC SHOCK DO NOT REMOVE COVER (OR BACK).NO USER SERVICIABLE PARTS INSIDE.REFER SERVICING TO QUALIFIED SERVICE PERSONNEL.

The exclamation point within the triangle is a warning sign alerting you of important instructions accompanying the product
Internetradio, Podcasts

For Android system (Google Play)
For Apple iOS (App Store)
Unit 6 Riverside Business Centre
Brighton Road
Shoreham-by-Sea
BN436RE
United Kingdom
Congratulations on purchasing this equipment. Please read this manual carefully and take care of the following hints to avoid damages. Any failure caused by ignoring the items and cautions mentioned in the instruction manual are not covered by our warranty and any liability. Scan the QR code to get access to the latest user manual and other information about the product.

CONTENTS
Technical Data 26
Safety Instruction 29
Device Overview 31
Remote Control 32
Getting Started 33
Operation 34
DAB+ Radio 37
FM Radio 37
BT 38
AUX IN 38
USB 38
Automatic Switch-Off 39
Alarm 39
UNDOK 39
System Settings 40
Cleaning and Care 42
Troubleshooting 42
Disposal Considerations 44
Declaration of Conformity 44
| Item number 10029866, 10029867 | |
| Power input (power adapter) 100 - 2 | 40V AC, 50/60 Hz, 1.5A |
| Display 2.8", 320 x 240, TFT colour d | splay |
| Network supported WiFi IEEE 802.11b | /g/n wireless; BT (BT 4.2, Supports A2DP, AVRCP profiles) |
| Frequency band WiFi : 2.400 - 2.4835 | GHz; BT: 2.4 - 2.48 GHz |
| Max. radio frequency power transmitted | WiFi: <20 dBm; BT: <4 dBm |
| Encrypted key WEP, WPA, WPA2 (PSK), WPS | |
| DAB / DAB+ Band III (174.928 - 239.200 MHz) | |
| FM 87.5 - 108.0 MHz, support RDS | |
| Remote Control Power Supply 2 x 1.5 | V AAA battery |
| Standby mode power consumption | <1.0 W |
| Networked standby mode power consumption | <2.0 W |
| Operating temperature 0 °C - 35 °C | |
| Total power consumption 18 W | |
| Connections 3.5mm headphone socket | 3.5mm line out socket, stereo 3.5mm aux in socket, stereo USB port DC IN power supply socket (5.5mm) |
| Dimensions (LxHxD) 302 mm x 122 mm | mm x 140 mm |
| Weight | 1.8 kg |
Specifications subject to change without notice.
| Power Adaptor | |
| Producer Chal-Tec GmbH | |
| Address Wallstr. 16 10179 Berlin, Germany | |
| Model number A241-1201500E | |
| Input voltage 100-240 V~ | |
| Input AC frequency 50/60 Hz | |
| Output voltage DC 12.0 V | |
| Output current 1.5 A | |
| Output power 18.0 W | |
| Average active efficiency | 86.70% @ 115 VAC/60 Hz 85.92% @ 230 VAC/50 Hz |
| Efficiency at low load (10%) | 83.03% @115 VAC/60Hz 80.09% @230 V/50 Hz |
| No-load power consumption | 0.045 W @115 VAC/60 Hz 0.070 W @ 230 VAC/50 Hz |
Use only original AC adaptor.
Use only the power supply listed in the user instructions.
WARNING
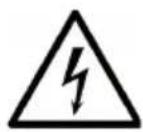
The lighting flash and arrow head within the triangle is warning sign alerting you of dangerous voltage inside the product
CAUTION
RISK OF ELECTRIC SHOCK DO NOT OPEN
CAUTION:TO REDUCE THE RISK OF ELECTRIC SHOCK DO NOT REMOVE COVER (OR BACK).NO USER SERVICIABLE PARTS INSIDE.REFER SERVICING TO QUALIFIED SERVICE PERSONNEL.

The excclamation point within the triangle is a warning sign alerting you of important instructions accompanying the product
CAUTION: TO REDUCE THE RISK OF ELECTRIC SHOCK AND SERIOUS PERSONAL INJURY,DO NOT REMOVE ANY COVER.NO USER-SERVICABLE
PARTS INSIDE. REFER SERVICING TO QUALIFIED SERVICE PERSONNEL ONLY.
WARNING. TO REDUCE THE RISK OF FIRE OR ELECTRICAL SHOCK, DO NOT EXPOSE THIS PRODUCT TO WATER, RAIN OR MOISTURE.
Triangle with lightning plus explanation as follows:
DANGEROUS VOLTAGE: The lightning flash with arrowhead symbol within the equilateral triangle is intended to alert the user to the presence of uninsulated dangerous voltage within the product's enclosure that may be of sufficient magnitude to constitute a risk of electric shock to persons.

Triangle with exclamation point plus explanation as follows:
ATTENTION: The exclamation point within the equilateral triangle is intended to alert the user to the presence of important operating and maintenance (servicing) instructions in the literature accompanying this product.

CAUTION: Danger of hearing damage
To avoid possible hearing damage, do not listen to this Retro turntable at high volume levels for long periods of time. Always keep the volume within reasonable limits.
SAFETY INSTRUCTION
Please read these instructions fully before installing or operating.
General safety information
- Keep the product and all its parts out of reach of small children.
- This product is not intended for use by persons (including children) with reduced physical, sensory or mental capabilities, or lack of experience and knowledge, unless they have been given supervision or instruction concerning the use of the appliance by a person responsible for their safety.
- Do NOT place foreign objects into the CD compartment. Use of controls or adjustments other than those specified herein, may result in hazardous laser light beam exposure. Do NOT open the cover and do NOT attempt to repair it yourself. Refer servicing to qualified personnel. This product does not contain any user serviceable parts. Unauthorized handling of the device may damage it and will void your warranty.
Power source
- Only use the power supply that came with the product. Using an unauthorised power supply will invalidate your guarantee and may irrecoverably damage the product.
- Disconnect your Retro Turntable from the mains power supply during thunderstorms.
- Always check that you have completely switched off your Retro Turntable, before you change or disconnect the power supply.
- Where the mains power plug or an appliance coupler is used as the disconnect device, the disconnect device shall remain readily operable.
- The power socket must be within easy reach
- In order to avoid electric shock, do not bend, stretch or pull the power supply cable.
- Switch the Retro Turntable off at the mains power socket and unplug it if you are leaving it unattended for a long period of time (holidays etc).
- Do not attempt to open the product. This product does not contain any user serviceable parts.
- Unauthorised handling of the product may damage it and will void your warranty.
Moisture and water: To reduce the risk of fire or electric shock:
- Do not use this product near water or moisture.
-
Do not use this product near a bath or sink, near a swimming pool or anywhere else that water or moisture is present.
-
Do not place objects filled with water, such as a vase, on or near the product.
- Keep it dry. Avoid exposure to precipitation, humidity and liquids which could all affect the product circuitry.
Heat sources and flames
- Do not leave this product in high temperatures as electronic devices and plastic parts may warp in heat.
- Keep it away from bright sunlight or heat sources, such as a radiator.
- Never place any type of candle or naked flame on top of, or near the product.
Ventilation
- Do not install this product in a confined space.
- Allow adequate ventilation to prevent heat build-up.
- Do not block or cover slots, holes or openings on the product by placing on soft furnishings such as carpets, rugs or beds as these are provided for functionality and/or ventilation to ensure safe operation of the product.
- For indoor use only.
Care and cleaning
- All care and cleaning operations should be carried out with the Retro Turntable unplugged from the mains power.
- Occasionally wipe the cabinet with a lint free cloth.
- Never clean the unit with liquids or solvents.
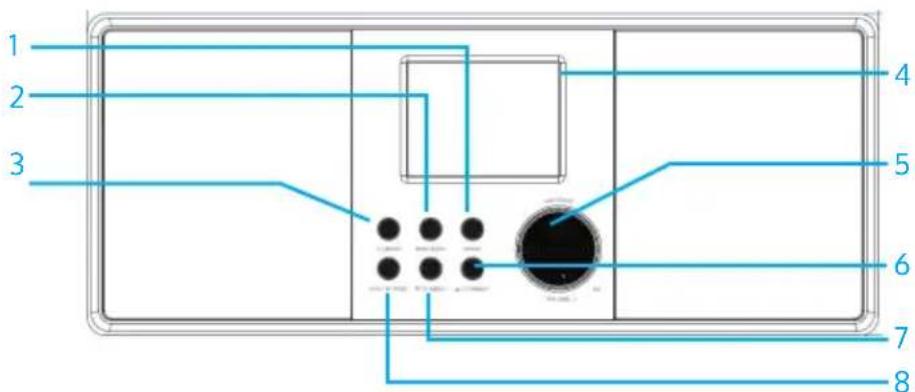
1 Button: Back
2.2 Button: MENU/INFO
3 Button: Standby/MODE
4 2.8" TFT color display
5 NAVIGATE/VOLUME (+/-) (Navigation knob/Volume control)
6 Button: / TUNING+
7 Button: TUNING
8 Button: FAV/BT PAIR
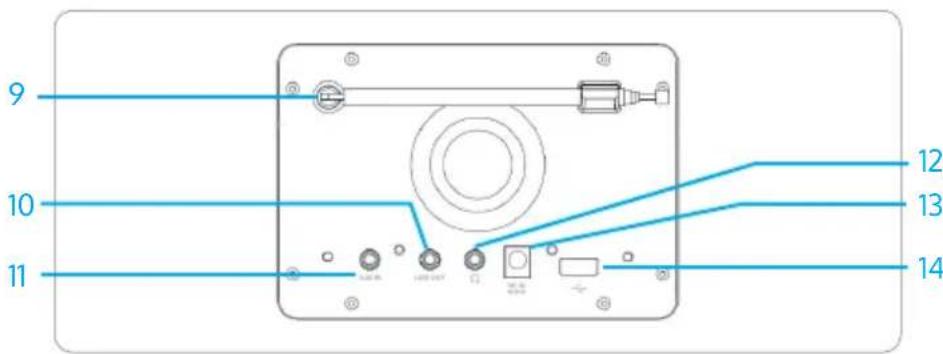
9 FM/DAB+ antenna
10 Line Out socket
11 AUX IN socket
12 Earphone out socket
13 DC IN socket
14 USB port
REMOTECONTROL

1 Device power on/off; alarm off
2 Open, close mode selection
3 Press to open, close menu
4 Select track, hold down to seek
5 Start playback, pause
6 Select equalizer preset
7 Move up; FM: Set frequency
8 Move left, step back
9 Confirm entry; FM: Scan; Playing: album in full screen
10 Move right, step next
11 Move down; FM: Set frequency
12 Sleep setting
13 Music: random and repeat selection
14 Alarm setting
15 Press and hold to BT discoverable under BT mode
16 Select track
17 Increase volume
18 Decrease volume
19 Mute, unmute
20 Number buttons: retrieve saved favorite station, hold down to save station
21 Display FM mode info (Name, PTY, RT, frequency) Display DAB mode info (Station, track, artist etc.)
22 Select favorite stations
GETTING STARTED
Connection and Preparation
Connect the power adaptor to the back of device and plug it into power socket. Switch on the device, it starts up.
Pull out the rod DAB/FM antenna for DAB and FM reception.
Connecting to the network
- A broadband connection in combination with a wireless access point, router or similar network device.
- The network device needs to support WiFi (802.11 b/g/n) wireless connection.
Make sure you have setup the wireless network and you have the WEP, WPA or WPA2 security password to activate the connection. You may also use the WPS (WiFi Protected Setup) function for easy pairing between the network device and CMS 5000 BT DAB+ WEB. Check if the light indicators on the network device are in appropriate status.
Connecting an audio source via AUX in
Use a standard RCA audio cable to connect the audio output from the external device to the audio input sockets on the back of the device.
Connecting the headphones
Turn the volume down before using the headphones.
Inset the headphone plug (standard 3.5mm ) into the headphone socket at the front of the device.
OPERATION
On the playing screen, rotate the volume knob or press on the remote control to adjust the volume. Switch off the sound by pressing on the remote control.
- Press MODE on the device/remote control to select modes.
- Press MENU to open the menu. Press again to close the menu and return to playing screen.
- On the menu, rotate the knob or press / on the remote control to move along the entries.
- Press OK/SCAN to confirm. Press on the device or on the remote control to step back.
- Press the volume knob on the device or press ① on the remote control to switch to standby mode. The time, date and any active alarm times display on the screen. Switch on with the same button.
- When album cover is displayed on the playing screen, press OK (SCAN) to view the full screen size of the picture. (This feature may need software update, contact us if required.)
Presets
- Presets are stored in the radio and cannot be accessed from other radios.
- To store an Internet radio preset, press and hold FAV until the display shows the Save preset screen. Select one of the 10 presets to save the currently playing station.
- Shortcut to preset store 1-10 favourite stations by directly pressing and hold numbers directly on the remote control.
- To select a preset, press FAV, then select one of the listed preset stations. When a preset station is playing, it shows n ( 1, *2 etc) at the bottom of the screen. Shortcut to preset recall 1-10 favourite stations by directly pressing numbers "1-10/0" directly on the remote control.
Now playing information
- While stream/DAB/FM is playing, the screen shows some information about the station, press INFO to view.
- The device may process large amounts of data after a period of operation, no matter in which mode, it will cause the system freeze or malfunction.
- Reboot the device if necessary.
First-time setup
- When powering the device on for the first time, it displays information of privacy policy. Press OK (SCAN) to continue.
- Then a setup wizard appears for helping you setup the main use of the device. Select "YES" and confirm your selection and launch the setup wizard.
- If you select "NO", the next window will ask you choose if you want to start the setup wizard again next time you power the device on.
Setup wizard helps you setup the main use of the device:
Selecting the menu language
Rotate the knob to select the menu language you want from the list and press OK (SCAN) to confirm.
Setting date and time
Select "12" for 12-hour display format or "24" for 24-hour display format. If you select the 12-hour format, the display shows "AM" in the morning or "PM" in the afternoon after the time.
After this, the following options are available, to define if the time to be synchronized from radios: "Update from DAB", "Update from FM", "Update from Network" or "No update".
- If you choose "Update from Network" you must indicate your time zone in the next window.
- Next choose "ON" for summer time, otherwise select "OFF".
- If you choose "No update", you will have to enter the date and time manually.
- "AM" / "PM" displays only if you have chosen the 12-hour time format. Select "AM" for the morning hours or "PM" for the afternoon hours.
Setting network
Firstly the device asks if keep network connected. If you want to control the device in all operating modes via the app, select "YES". If choosing "NO", it is not possible to control the device from the app in the (Standby, AUX IN, FM, DAB) operating modes. Note that the power consumption in standby mode will be higher when the network connection is kept up.
- Any WLAN networks found are listed on the display, along with their names.
-
After selecting the network, you will be asked for input a standard encryption.
-
To enter the network's key, use the reel or direction keys on the remote control to move the cursor through the characters and press "OK/SCAN" to confirm.
- As each character is selected, the key is built up near the top of the display.
- There are three options accessible by tuning the navigate reel back before the first characters - Backspace, OK and Cancel.
WPS
There will be hints for the type of network - if your network device supports WPS function.
Use one of the following methods of connection:
- Push button: The device prompts you to press the connect button on the router. It then scans for a ready Push Button Connect network and connects.
- Pin: The device generates an 8-digit code number which you enter into the wireless router, access point, or an external registrar.
- Skip WPS: Enter key as for a standard encrypted network.
- For more information on setting up a WPS encrypted network, see your WPS router's instructions.
Device attempts to connect to the selected network. - It will show "connected" if the setup is successful.
- If connecting fails, it returns to a previous screen to try again. Once completed, press OK/SCAN to quit the setup wizard.
Internet Radio, Podcasts
Device can play thousands of radio stations and podcasts from around the world though a broadband Internet connection. When you select Internet radio or Podcasts mode, the device directly contacts the Frontier Smart Technologies portal to get a list of stations or podcasts. The list menu is provided from the portal, so it is only accessible when the device is connected to the Internet. The contents and submenus may change from time to time. Choose required category and search the station or podcast to listen.
DAB+ RADIO
DAB mode receives DAB/DAB+ digital radio and displays information about the station, stream and track playing.
Scanning for stations
The first time you select DAB radio mode, or if the station list is empty, the radio automatically performs a full scan to see what stations are available. You may also need to start a scan manually to update the list of stations.
- To start a scan manually, choose Full scan.
- To scan only stations with good signal strength, select Local scan. Once the scan is complete, the radio shows a list of available stations.
- To remove stations that are listed but not unavailable, choose Prune invalid.
- Turn the navigate reel to view a list of stations and press to select. Once selected, the station plays and the screen show information about station, track or show as broadcast.
Settings
- Dynamic range compression (DRC): If you are listening to music with a high dynamic range in a noisy environment, you may wish to compress the audio dynamic range. This makes quiet sounds louder, and loud sounds quieter. You can change DRC as off, low or high.
- Station order: You can choose the order of the DAB station list to be either Alphanumeric, Ensemble or Valid. Ensemble lists groups of stations that are broadcast together on the same ensemble. Valid lists valid stations first, alphabetically, then off-air stations.
FM RADIO
FM radio mode receives analogue radio from the FM band and displays RDS (Radio Data System) information about the station and where broadcast. To find a station, press OK (SCAN). The frequency display starts to run up as the device scans the FM band. Alternatively, you can scan up or down by pressing and holding the buttons / or tune manually with quick presses, or by turning the reel.
Settings
-
Scan settings: By default, FM scans stop at any available station. This may result in a poor signal-to-noise ratio (hiss) from weak stations. To change the scan settings to stop only at stations with good signal strength, select "Yes" after choosing "Strong station only?".
-
Audio settings: All stereo stations are reproduced in stereo. For weak stations, this may result in a poor signal-to-noise ratio (hiss). To play weak stations in mono, select FM weak reception: Listen in mono only and then YES.
BT
In BT mode, you can turn on the BT of your BT device. Go to the menu and turn BT discoverable. From your BT device, search the radio "CONNECT 120" to pairing. When it is waiting for pairing, there is a blinking BT icon at the bottom. If the pairing is successful, the BT icon becomes steady.
Control the music playback from your BT device. Press / on the remote control to go back to forward track or go to next track. Press to play or pause the track.
To disconnect from the radio, press and hold BT PAIR on the remote control.
AUX IN
AUX in mode plays audio from an external source.
Turn the volume low on both the radio and, if adjustable, the audio source device.
Enter AUX mode, then adjust the volume as required.
USB
USB mode plays audio from the USB stick/device after plugging into the USB port.
- Menu are generated from the folders on the USB stick/device. Browse folders with the navigate reel, back button, shuffle/repeat or direction keys on the remote control. The display shows folder and file names (not necessarily track names).
Once you have found a track you want to play, press OK to play. It can be added to "My playlist, press and hold OK when the track is playing.
Note:
USB port does not support charging.
Only MP3 audio format supported.
AUTOMATIC SWITCH-OFF
To set the sleep timer, select "Sleep" under Main menu. Or press zon the remote control to set. Choose from Sleep OFF, 15, 30, 45 or 60 minutes and confirm. Once you select a sleep period, the system returns to the now playing screen.
ALARM
- There are two versatile wake-up alarms with snooze facility. Each alarm can be set to start in a particular mode.
- Select Alarms under Main menu to set or change an alarm. Alternately, press ALARM on the remote control to configure.
- After setup all the parameters, select Save to activate. The screen shows active alarms with an icon at the bottom left.
- At the set time, the alarm will sound. To temporarily silence, press any key excepted pressing the VOLUME knob or pressing or ALARM on the remote control. You can change the snooze period. The radio returns to standby for the set period, with the silenced alarm icon flashing.
- Press the VOLUME knob OR press or ALARM on the remote control to turn off the alarm.
UNDOK
The device gives a feature of network remote by smartphone or tablet in iOS or Android system. By downloading the assigned app named UNDOK, you can view all the modes the device. Search UNDOK from Google Play or Apple Store, and install it to your smartphone or tablet.

For Android system (Google Play)

For iOS (App Store)
Before using the UNDOK app, make sure the device and the smartphone / tablet are in the same WiFi network.
Launch the app. The app initializes and scans for Internet Radio in the network. Tap the device to make the connection. When prompted, enter the current PIN code. The default PIN is "1234". You can view and edit the current PIN on the Internet Radio in the menu Select your desired mode in the main page. You may then control the selected mode on your smartphone / tablet and on the display of the device simultaneously.
NOTE: Be aware that if another smartphone / tablet with the app in the same network have access with the device, the original connection will be cut off.
SYSTEM SETTINGS
Equaliser
Several preset EQ modes are available: Normal, Flat, Jazz, Rock, Movie, Classic, Pop, News and My EQ. Press EQ to select. A user-defined setting is available; create your own EQ with custom bass, treble settings.
Network
Network wizard: Enter to search AP SSID, then input the WEP / WPA key or choose Push Button/Pin/Skip WPS to connect to the wireless network.
PBC Wlan setup: Push Button Configuration, it is to connect the AP that supports WPS (Wi-Fi Protected Setup).
View settings: View the information of current connected network: Active connection, MAC address, Wlan region, DHCP, SSID, IP address, Subnet mask, Gateway address, Primary DNS and Secondary DNS.
Manual settings: Enable or disable DHCP (Dynamic Host Configuration Protocol). Input the SSID, WEP / WPA key and/or other configuration.
NetRemote PIN Setup: Here you can view and edit the NetRemote PIN. The default NetRemote PIN is: 1234. The NetRemote PIN is required when you want to connect a smartphone or Tablet PC to your radio.
Network profile: The device remembers the last four wireless networks it has connected to, and automatically tries to connect to whichever one of them it can find. From here you can see the list of registered networks. You can delete unwanted networks.
Clear network settings: Select "YES" to clear all the current network settings. Select "NO" to cancel.
Keep network connected: If you choose to keep network connected, the WiFi will not disconnect even you are in standby mode or non-network mode. This option allows the device to be ready for UNDOK and Spotify Connect connection in any modes.
Time/Date
Set the time manually or auto update, time format, time zone and daylight. For details, see the section "Setting date and time" (in the chapter "Operation").
Inactive Standby
You can inactivate the radio for a set period of time and switch to standby mode. You can set the duration of inactivity Off or 2/4/6 hours.
Language
The default language is English. Change it as your preference. Available languages: English, Danish, Dutch, Finnish, French, German, Italian, Norwegian, Polish, Portuguese, Spanish, Swedish, Turkish.
Factory Reset
Resetting all user settings to default values, so that time and date, network configuration and presets are lost. However, current software version of the radio is maintained
Software Update
- Auto-check setting: This option automatically checks for new updates from time to time. Automatic updating is enabled by default.
- Check now: Search for available updates immediately. You will be asked if you want to go ahead with download and installation of an update. After a software upgrade, all user settings are maintained.
NOTE: Before starting a software upgrade, ensure that the radio is plugged into a stable main power connection. Disconnecting power during an upgrade may permanently damage the unit.
Setup Wizard
With this function, you can start the setup wizard at any time. Any parameters or stations entered already are not deleted. For more information, please read the section "First-time setup" (in the chapter "Operation").
Info
View the firmware version and the radio ID.
Privacy policy
View the information of Privacy Policy.
Backlight
You may change the backlight of each environment (power on level or standby) to High, Medium, Low or Auto. And adjust the timeout duration which the radio turns to standby backlight level when it has not been controlled.
CLEANING AND CARE
- Always unplug the device from the mains before cleaning it.
- Never use aggressive cleaning agents or scouring pads for cleaning, as this could damage the surface of the device.
- Wipe the device with a soft and dry cloth. If the device is very dirty, the dirt can be removed with a slightly damp cloth. After cleaning, make sure to dry the device with a damp cloth before using it again.
- Keep the packaging of the device in order to store it if necessary.
TROUBLESHOOTING
| Error Remedy | |
| The device does not switch on. | Check it the power adaptor is connected properly. |
| No sound.1. Turn on the sound | as it may be muted 2. Increase the volume. 3. Pull any connected headphone or speaker from the connector jack. |
| No network connection can be established. | 1. Check the WLAN function. 2. Try to set an IP address at the device. 3. Activate the DHCP function on the router and make the connection again at the device. 4. A firewall is activated on the network – set the respective program in such a way that access is possible. 5. Reboot the router. |
| WiFi connection cannot be established. | 1. Check the availability of WLAN network on the router. 2. Place the device closer to the router. 3. Make sure the password is correct. |
| No station is found. 1. Check the network as well as the access point and firewall. 2. The station may not be available currently, try again later. 3. The link of the station is changed or the station no longer transmits – ask the provider for information. 4. The link of manual added station may not be correct, check and change it. | |
| Hiss in FM mode 1. Check/move the FM antenna. 2. Move the radio. | |
| No stations available / burbling / intermittent in DAB mode | 1. Move the radio. 2. Rescan local stations only (high-strength). 3. Check the local DAB coverage. |
| Alarm does not work. 1. Switch on the alarm. 2. Due to the volume setting, refer to the solutions of “No sound”. 3. The source of alarm was set to be station but there is no network connection. Change the source of alarm or reconfigure the connection. | |
| All other undetermined cases. | The smart radio may process large amount of data after a period of operation, no matter in which mode, it will cause the system freeze or malfunction. Reboot the device if necessary. The normal function of the product may be disturbed by strong Electro-Magnetic Interference. If so, simply reset the product to resume normal operation by following the instruction manual. In case the function could not resume, please use the product in other location. The device may malfunction when used in areas with strong radio interference. The device will work properly again once there is no more interference. |

If there is a legal regulation for the disposal of electrical and electronic devices in your country, this symbol on the product or on the packaging indicates that this product must not be disposed of with household waste. Instead, it must be taken to a collection point for the recycling of electrical and electronic equipment. By disposing of it in accordance with the rules, you are protecting the environment and the health of your fellow human beings from negative consequences. For information about the recycling and disposal of this product, please contact your local authority or your household waste disposal service.
This product contains batteries. If there is a legal regulation for the disposal of batteries in your country, the batteries must not be disposed of with household waste. Find out about local regulations for disposing of batteries. By disposing of them in accordance with the rules, you are protecting the environment and the health of your fellow human beings from negative consequences.
DECLARATION OF CONFORMITY

Manufacturer:
Chal-Tec GmbH, Wallstrasse 16, 10179 Berlin, Germany.
Importer for Great Britain:
Chal-Tec UK limited
Unit 6 Riverside Business Centre
Brighton Road
Shoreham-by-Sea
BN436RE
United Kingdom
The complete declaration of conformity of the manufacturer can be found at the following link: https://use.berlin/10029866
Chere cliente, cher client,
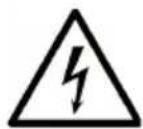
The lighting flash and arrow head within the triangle is warning sign alerting you of dangerous voltage inside the product
CAUTION
RISK OF ELECTRIC SHOCK DO NOT OPEN
CAUTION:TO REDUCE THE RISK OF ELECTRIC SHOCK DO NOT REMOVE COVER (OR BACK).NO USER SERVICIABLE PARTS INSIDE.REFER SERVICING TO QUALIFIED SERVICE PERSONNEL.

The excclamation point within the triangle is a warning sign alerting you of important instructions accompanying the product
ATTENTION : POUR RÉDUIRE LES RISQUES DE CHOCS ÉLECTRIQUES, NE DEMIONTEZ AUCUN Cache. L'APPAREIL NE CONTIEN AUCUNE PIECE À ENTRETENIR. ADRESSEVOUS UNIQUÉMENT À DES PERSONNELS QUALIFIÉS POUR LA MAINTENANCE. MISE EN GARDE / POUR RÉDUIRE LE RISQUE D'INCENDIE ET DE CHOC ÉLECTRIQUE, NE PLONGEZ PAS L'APPAREIL DANS L'EAU ET NE L'EXPOSEZ PAS À LA PLUIE OU À L'HUMIDITÉ.
Radio Internet, Podcasts
Unit 6 Riverside Business Centre
Brighton Road
Shoreham-by-Sea
BN43 6RE
United Kingdom
The lighting flash and arrow head within the triangle is warning sign alerting you of dangerous voltage inside the product
CAUTION
RISK OF ELECTRIC SHOCK DO NOT OPEN
CAUTION:TO REDUCE THE RISK OF ELECTRIC SHOCK DO NOT REMOVE COVER (OR BACK).NO USER SERVICIABLE PARTS INSIDE.REFER SERVICING TO QUALIFIED SERVICE PERSONNEL.

The exclamation point within the triangle is a warning sign alerting you of important instructions accompanying the product
ATTENZIONE: NON APRIRE L'ALLOGGIAMENTO PER EVITARE SCOSSE ELETTRICHE E LESIONI GRAVI. LE COMPONENTI INTERNE NON NECESITANO DI MANUTENZIONE DA PARTE DEL CLIENTE. RIVOLGERSI ESCLUSIVAMENTE A TECHNICI QUALIFICATI. AVVISO. PER DIMINUIRE IL RISCHIO DI INCENDIO O SCOSSE ELETTRICHE, NON ESPORRE IL DISPOSITIVO ALL'ACQUA, PIOGGIA O UMIDITA'.

Unit 6 Riverside Business Centre
Brighton Road
Shoreham-by-Sea
BN43 6RE
United Kingdom
The lighting flash and arrow head within the triangle is warning sign alerting you of dangerous voltage inside the product
CAUTION
RISK OF ELECTRIC SHOCK DO NOT OPEN
CAUTION:TO REDUCE THE RISK OF ELECTRIC SHOCK DO NOT REMOVE COVER (OR BACK).NO USER SERVICIABLE PARTS INSIDE.REFER SERVICING TO QUALIFIED SERVICE PERSONNEL.

The exclamation point within the triangle is a warning sign alerting you of important instructions accompanying the product
PRECAUCION: NO ABRA LA CARCASA PARA EVITAR DESCARGAS ELECTRICAS Y LESIONES GRAVES. EN EL INTERIOR NO HAY COMPONENTES A MANTENER POR EL CLIENTE. PONGASE EN CONTACTO UNICAMENTE CON ESPECIALISTAS CUALIFICADOS. ADVERTENCIA. PARA REDUCIR EL RIESGO DE INCENDIO O DESCARGA ELECTRICA, NO EXPONGA EL APARATO AL AGUA, LA LLUVIA O LA HUMEDAD.
Unit 6 Riverside Business Centre
Brighton Road
Shoreham-by-Sea
BN436RE
United Kingdom
The lighting flash and arrow head within the triangle is warning sign alerting you of dangerous voltage inside the product
CAUTION
RISK OF ELECTRIC SHOCK DO NOT OPEN
CAUTION:TO REDUCE THE RISK OF ELECTRIC SHOCK DO NOT REMOVE COVER (OR BACK).NO USER SERVICIABLE PARTS INSIDE.REFER SERVICING TO QUALIFIED SERVICE PERSONNEL.

The excclamation point within the triangle is a warning sign alerting you of important instructions accompanying the product
LET OP! OPEN DE BEHUIZING NIET OM EEN ELEKTRISCHE SCHOK EN ERNSTIG LETSEL VOORKOMEN ER BEVINDEN ZICH BINNENIN GEEN COMPONENTEN DIE DOOR DE KLANT MOETEN WORDEN ONDERHOUDEN. WENDT U ZICH HIERVoor UItsLUITEND TOT GEKWALIFICEERDE PERSONEN.
WAARSCHUWING. OM HET RISICO OP BRAND OF EEN ELEKTRISCHE SCHOK TE VERMINDEREN, HET APPARAAT NIET AAN WATER, REGEN OF ANDERE VORMEN VAN VOCHT BLOOTSTellen.
Unit 6 Riverside Business Centre
Brighton Road
Shoreham-by-Sea
BN43 6RE
Verenigd Koninkrijk