34953 - Smoke detector CHACON - Free user manual and instructions
Find the device manual for free 34953 CHACON in PDF.
| Product Type | Photoelectric Smoke Detector |
| Brand | Chacon |
| Model | 34953 |
| Power Supply | 1 9V DC 6F22 battery |
| Dimensions (L x W x H) | 102 x 102 x 31 mm |
| Weight | Approximately 150 g (with battery) |
| Communication Range | Up to 80 m without obstacles (with wireless module) |
| Alarm Sound Level | 85 dB at 3 m |
| Indicator Light | Red LED flashes normally every 32 s, in alarm every 0.67 s |
| Operating Temperature | -10 °C to +55 °C |
| Operating Humidity | 95% RH (non-condensing) |
| Recommended Coverage Area | Up to 20 m² per detector |
| Radio Frequencies | 315 MHz, 433.92 MHz or 868 MHz |
| Housing Material | ABS Plastic |
| Standards | EN 14604, EN 60950, EN 300220, EN 301489 |
| Warranty | 2 years against manufacturing defects |
| Maintenance | Weekly test, annual cleaning of detection chamber |
| Special Function | Can be connected to an alarm control panel (wireless module required) |
| Recommended Battery Type | Gold Peak 1604P, Eveready 522, Duracell MN1604, etc. |
| Battery Life | Approximately 1 year (depending on usage) |
Frequently Asked Questions - 34953 CHACON
User questions about 34953 CHACON
0 question about this device. Answer the ones you know or ask your own.
Ask a new question about this device
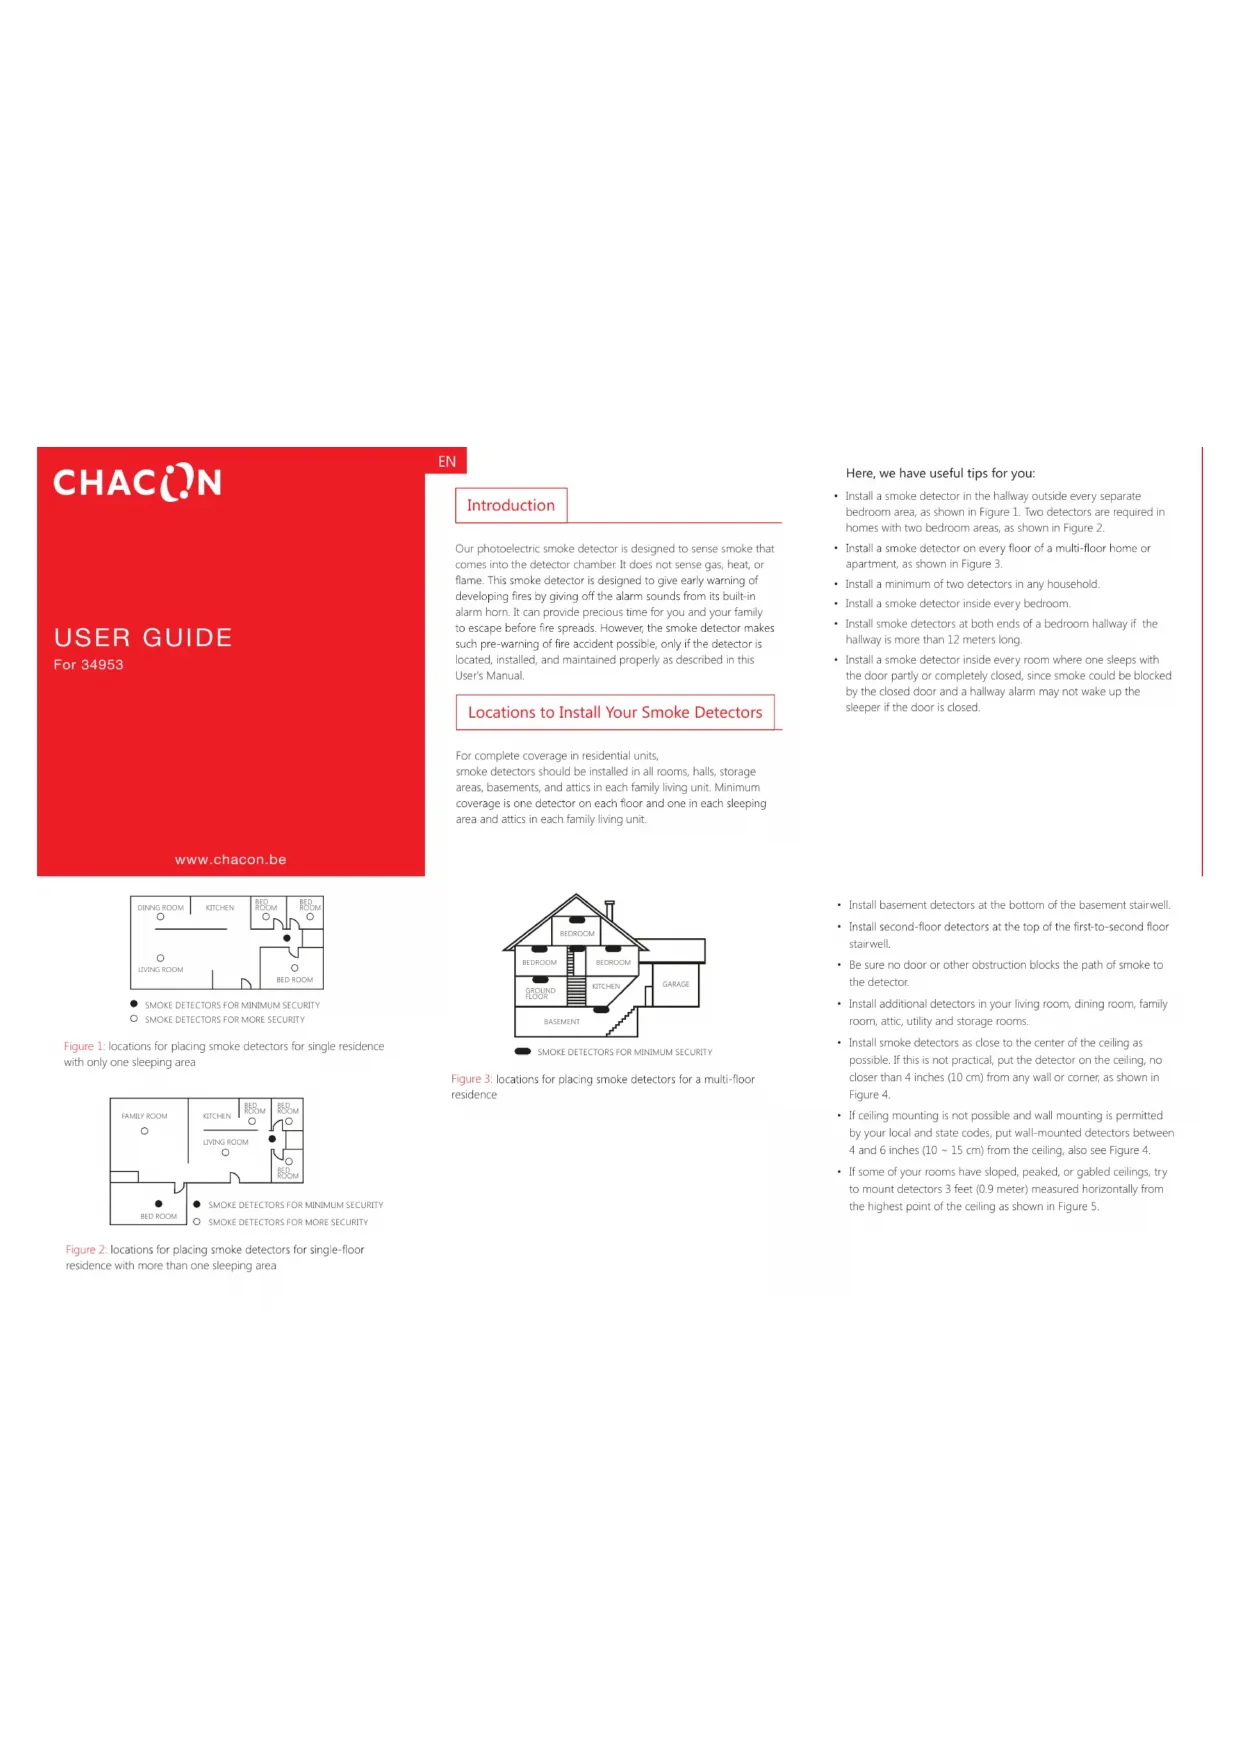
Download the instructions for your Smoke detector in PDF format for free! Find your manual 34953 - CHACON and take your electronic device back in hand. On this page are published all the documents necessary for the use of your device. 34953 by CHACON.
USER MANUAL 34953 CHACON
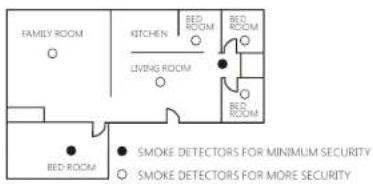
Figure 1: locations for placing smoke detectors for single residence with only one sleeping area
Figure 2: locations for placing smoke detectors for single-floor residence with more than one sleeping area
EN
Introduction
Our photoelectric smoke detector is designed to sense smoke that comes into the detector chamber. It does not sense gas, heat, or flame. This smoke detector is designed to give early warning of developing fires by giving off the alarm sounds from its built-in alarm horn. It can provide precious time for you and your family to escape before fire spreads. However, the smoke detector makes such pre-warning of fire accident possible, only if the detector is located, installed, and maintained properly as described in this User's Manual.
Locations to Install Your Smoke Detectors
For complete coverage in residential units, smoke detectors should be installed in all rooms, halls, storage areas, basements, and attics in each family living unit. Minimum coverage is one detector on each floor and one in each sleeping area and attics in each family living unit.
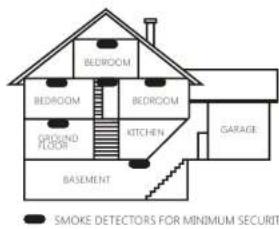
Figure 3: locations for placing smoke detectors for a multi-floor residence
Here, we have useful tips for you:
- Install a smoke detector in the hallway outside every separate bedroom area, as shown in Figure 1. Two detectors are required in homes with two bedroom areas, as shown in Figure 2.
- Install a smoke detector on every floor of a multi-floor home or apartment, as shown in Figure 3.
- Install a minimum of two detectors in any household.
- Install a smoke detector inside every bedroom
Install smoke detectors at both ends of a bedroom hallway if the hallway is more than 12 meters long. - Install a smoke detector inside every room where one sleeps with the door partly or completely closed, since smoke could be blocked by the closed door and a hallway alarm may not wake up the sleeper if the door is closed.
Install basement detectors at the bottom of the basement stairwell.
Install second-floor detectors at the top of the first-to-second floor stairwell.
- Be sure no door or other obstruction blocks the path of smoke to the detector.
Install additional detectors in your living room, dining room, family room, attic, utility and storage rooms.
- Install smoke detectors as close to the center of the ceiling as possible. If this is not practical, put the detector on the ceiling, no closer than 4 inches (10 cm) from any wall or corner, as shown in Figure 4.
- If ceiling mounting is not possible and wall mounting is permitted by your local and state codes, put wall-mounted detectors between 4 and 6 inches (1.0 - 15 cm) from the ceiling, also see Figure 4.
- If some of your rooms have sloped, peaked, or gabled ceilings, try to mount detectors 3 feet (0.9 meter) measured horizontally from the highest point of the ceiling as shown in Figure 5.
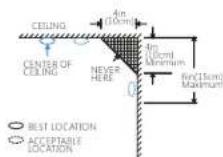
Figure 4: Recommended best and acceptable locations to mount smoke detectors
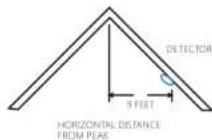
Figure 5: recommended locations to mount smoke detectors in rooms with sloped, gabled, or peaked ceiling
Do not install smoke detectors less than 20 feet (6 meters) away from places where combustion particles are normally present, like kitchens. If a 20-foot distance is not possible, e.g. in a mobile home, try to install the detector as far away from the combustion particles as possible, preferably on the wall. To prevent nuisance alarms, provide good ventilation in such places.
IMPORTANT: For any reason, do not disable the detector to avoid nuisance alarms.
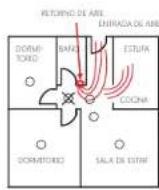
When air streams passing by kitchens, the way how a detector can sense combustion particles in normal air-flow paths is graphically shown in Figure 6, which indicates the correct and incorrect smoke detector locations concerning this problem.
CAUTION (As required by the California State Fire Marshall)
*Early warning fire detection is best achieved by the installation of fire detection equipment in all rooms and areas of the household as follows: (1) A smoke detector installed in each separate sleeping area (in the vicinity, but outside of the bedrooms), and (2) Heat or smoke detectors in the living rooms, dining rooms, bedrooms, kitchens, hallways, attics, furnace rooms, closets, utility and storage rooms, basements and attached garages.
For your information, NFPA Standard 74, Section 2-4 reads as follows:
*2-4.1.1 Smoke detectors shall be installed outside of each separate sleeping area in the immediate vicinity of the bedrooms and on each additional story of the family living unit including basements and excluding crawl spaces and unfinished attics.
The provisions of 2-4.1.1 represent the minimum number of detectors required by this standard. It is recommended that the householder considers the use of additional smoke detectors for increased protection for those areas separated by a door from the
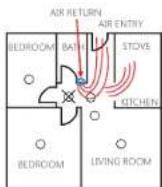
CORRECT LOCATION
INCORRECTLOCATION
Figure 6: recommended smoke detector locations to avoid air streams with combustion particles
In damp or very humid areas, or near bathrooms with showers. Moisture in humid air can enter the sensing chamber, then turns into droplets upon cooling, which can cause nuisance alarms. Install smoke detectors at least 3 meters away from bathrooms.
In very cold or very hot areas, including unheated buildings or outdoor rooms. If the temperature goes above or below the operating range of smoke detector, it will not work properly. The operating temperature range for your smoke detector is 4 C to 38 C.
areas protected by the required smoke detectors under 2-4.1.1 above. The recommended additional areas are living room, dining room, bedroom(s), kitchen, attic (finished or unfinished), furnace rooms, utility room, basement, integral or attached garage, and hallways not included in 2-4.1.1 above. However, the use of additional detectors remains the option of the householder. We recommend complete coverage and use of additional smoke detectors.
Locations not to Install Your Smoke Detectors
Nuisance alarms take place when smoke detectors are installed where they will not work properly. To avoid nuisance alarms, do not install smoke detectors in the following situations:
Combustion particles are the by-products of something that is burning. Thus, in or near areas where combustion particles are present you do not install the smoke detectors to avoid nuisance alarms, such as kitchens with few windows or poor ventilation; garages where there may be vehicle exhaust, near furnaces, hot water heaters, and space heaters.
In very dusty or dirty areas, dirt and dust can build up on the detector's sensing chamber, to make it over sensitive. Additionally, dust or dirt can block openings to the sensing chamber and keep the detector near fresh air vents or very drafty areas like air conditioners, heaters or fans, fresh air vents and drafts can drive smoke away from smoke detectors.
Dead air spaces are often at the top of a peaked roof, or in the corners between ceilings and walls. Dead air may prevent smoke from reaching a detector. See Figures 4 and 5 for recommended mounting locations.
In insect-infested areas. If insects enter a detector's sensing chamber, they may cause a nuisance alarm. Where bugs are a problem, get rid of them before putting up a detector:
Near fluorescent lights, electrical "noise" from fluorescent lights may cause nuisance alarms Install smoke detectors at least 1.5 meters from such lights.
WARNING: Never remove batteries to stop a nuisance alarm. Open a window or fan the air around the detector to get rid of the smoke. The alarm will turn itself off when the smoke is gone. If nuisance alarms persist, attempt to clean the detector as described in this User's Manual.
WARNING: Do not stand close to the detector when the alarm is sounding. The alarm is loud in order to wake you in an emergency. Too much exposure to the horn at close range may be harmful to your hearing.
Installing Your Smoke Detectors
Read"Locations to Install Your Smoke Detectors" and "Locations not to Install Your Smoke Detectors" section in the manual first, and then decide where to install the detector.
Please follow these steps to install your smoke detector:
- At the place where you are going to install the detector, draw a horizontal line 15 cm long.
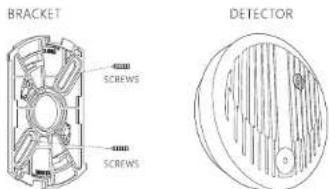
- Remove the mounting bracket from your unit by rotating it counterclockwise.
- Place the bracket so that the two longest hole slots are aligned on the line. In each of keyhole slots, draw a mark to locate a mounting plug and screw.
- Remove the bracket.
- Using a 5mm drill bit, drills two holes at the marks and insert plastic wall plugs. Put the detector away from getting plaster dust on it when you drill holes for mounting.
- Using the two screws and plastic wall plugs (all supplied), attach the bracket to the wall.
- Line up the slot of the bracket and the detector. Push the clockwise to fix it into place. Pull outward on the detector to make sure it is securely attached to the mounting bracket.
Connect with Alarm Control Panel
34953 can not only work as a single station, but also can work with alarm control panel to form an alarm system when wireless module is added to the smoke detector.
1) Make sure the control panel is in learning state.
2) Press the testing button on the smoke detector for 3 seconds, two beeps are heard. Simultaneously, one beep is heard from the control panel. The detector has been connected successfully with the control panel.
Testing:
Press the testing button on the smoke detector for 3 seconds, the control panel will alarm immediately.
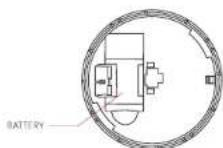
- The steps to open the battery cover and to install the battery are listed as follows:
(1) To power smoke detector requires a battery.
(2) Match terminals on the end(s) of the battery with opposite terminal connections on the detector. Be sure to insert the zinc-manganese dry battery in the position shown on the detector.
(3) When terminals are properly matched, push battery firmly in until it snaps and cannot be shaken loose.
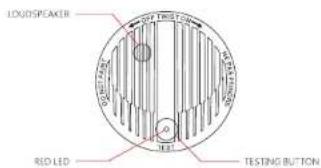
Red LED Indicator
The red LED, as the ALARM indicator, is featured with the detector. It can be seen through the test button on the cover of the detector. When red LED flashes once 32 seconds, it indicates the detector under normality. When smoke detector senses smoke and simultaneously sounds an audible alarm, the red LED will flash very frequently, once 0.67 seconds.
Testing Your Smoke Detector
Test the detector weekly by pushing firmly on the test button with your finger until the horn sounds. Testing method may take up to 5 seconds to sound the alarm horn. These are only ways to be sure that detector is working correctly. If the detector fails to test properly, have it repaired or replaced immediately.
WARNING: Never use an open flame to test your detector. You may set fire to damage the detector, as well as your home. The built-in test switch accurately tests all detector functions, as required by Underwriters' Laboratories. They are the only correct ways to test the unit.
CAUTION: This smoke detector comes with cover latches that will prevent the smoke detector cover from closing if battery is not installed. This tells you that the smoke detector will not work until a new battery is properly installed. The battery is purposely positioned WRONGLY in the factory to keep it fresh until installation. It must be re-positioned correctly to provide DC power.
NOTE When the detective battery first makes contact with the detector, the alarm horn may sound for one second. This is normal and indicates that the battery is positioned properly. Close cover, then press the test button, holding it down for about 5 seconds until the horn sounds. The horn should sound a loud, pulsating alarm. This means the unit is working properly.
WARNING: When you are not testing the unit and the alarm horn sounds a loud continuous sound, this means the detector has sensed smoke or combustion particles in the air. Be sure that the alarm horn is a warning of a possible serious situation, which requires your immediate attention.
The alarm could be caused by a nuisance situation. Cooking smoke or a dusty furnace, sometimes called "friendly fires" can cause the alarm to sound. If this happens, open a window or fan the air to remove the smoke or dust. The alarm will turn off as soon as the air is completely clear.
NOTE: Do not disconnect the battery from the detector. This will remove your protection from fires.
If a beep or chirp virtually simultaneously with an LED flash once a minute, this means the detector's battery is weak. Replace new battery immediately.
If a beep or chirp occurring halfway an LED flash once a minute, this signal means that the detector is faulting, it is must repaired or replaced immediately.
Taking Care of Your Smoke Detector
To keep your detector in good working condition, you must test the detector weekly, as referring to section "TESTING YOUR SMOKE DETECTOR".
Replace the detector battery when the low battery "beep" signal sounds once a minute. The low battery "beep" should last at least 30 days.
NOTE: For replacement battery, use Gold Peak 1604P, 1504S, 1504G, 1604A; Eveready522, 216; Duracel Mn1604; PremisateG6F22; UltralifeU9VL-J; EVE CRV.
WARNING: Do not use any other kind of battery. This detector may not operate properly with other kind of battery.
Open the cover and vacuum the dust off the detector's sensing chamber at least once a year. This can be done when you open the detector to change the battery. Remove battery before cleaning. To clean detector, use soft brush attachment to your vacuum. Carefully remove any dust on detector components, especially on the openings of the sensing chamber. Replace battery after cleaning. Test detector to make sure battery works correctly.
Check to make sure there is no obstruction inside the test button. If there is any dust in the test button, insert a toothpick from the back to the front.
NOTE: If nuisance alarms keep coming from the detector, you should check whether the detector's location is adequate. Refer to section WHERE TO INSTALL SMOKE DETECTORS* Move your detector if it is not located properly. Clean detector as described above.
Clean detector cover when it gets dirty. First open the cover and remove battery. Hand-wash cover with cloth dampened with clean water. Dry it with lint-free cloth. Do not get any water on the detector components. Replace the battery, and close cover. Test detector to make sure that battery works correctly.
Technical Specifications
| Power Supply | DC 9 V 6F 22 battery x 1 |
| Standby Current | 5 uA |
| Alarm Current | ≤15 mA |
| LED Frequency in Working State | Once every 32 sec. |
| LED Frequency in Alarming State | Once every 0.62 sec. |
| Low Battery State | Beep once with a LED flash per 60s (last for 30 days) |
| Operation Condition | Temperature: -10°C ~ +55°C Relative humidity: ≤95%(no condensing) |
| Monitoring Area | 20 m² |
| Alarm Decibel | 85dB/3 m |
| Radio Frequency | 315 MHz, 433.92 MHz or 868 MHz |
| Transmitting Distance | 80m in open area |
| Housing Material | ABS plastic |
| Dimensions(L x W x H) | 102 x 102 x 31 mm |
Introduction
433,92 MHz of 868 MHz
<80 m in open veld
ABS-kunststoff
102× 102× 31mm
Raadgevingen
B. Wees attend on te reageren!
LUGAR CORRECTED
X LUGAR INCORRECTED
Figure 6: Lugares recommendados quando registrar o detector de humano para evacitar as corrientes de aire com particulas de combustion.
R&TTE Declaration of Conformity
FCC Compliance Statement: This device complies with Part 15 of the FCC rules. Operation is subjected to the following two conditions: (1) this device may not cause harmful interference, and (2) this device must accept any interference/overceived, including interference that may cause undesired operation.

CNACON defectors that Mr. 34945, 34946, 34947, 34952, 34953, 34956, 34957, 34958, 34960 are compliant with the essential requirements and other relevant provisions of Directive 1998/EC.
EN301489-1V1.9.2.201
EN62479.2010
EN303220-1V2.4.1.2012EN198320-1V2.4.1.2011
EN609501-2006+A11:2009+A12:2010+A12:2011+A2:2013
EN60950-1:2006+Am11:2009+Am12:2010+Am12:2011+Am2:2013

If the alarm system no longer functions or can no longer be repaired, it must be disposed of according to the valid statutory regulations. Disposal of spent batteries/accumulators: These users are required to carry (Water) Orientation and Maintenance (WOM) training and maintenance instructions with them. Disposal of damaged batteries/accumulators with a common household estate is prohibited. Batteries/accumulators that contain hazardous substances are marked with the symbols on the side. These symbols indicate that if it is prohibited to dispose of these batteries/accumulators in the future, they will be replaced by new ones. The disposal of batteries/accumulators in the form of liquid Hg-mycer, Pb-lead. You can return spent batteries and accumulators that can no longer be charged to the designated collection points in your community, outlets or wherever batteries or accumulators are sold. Following these instructions we allow you to fulfil the legal requirements for the disposal of such batteries/accumulators.