
TTM1 - DJ Equipment TASCAM - Free user manual and instructions
Find the device manual for free TTM1 TASCAM in PDF.
| Product type | DJ controller for Tascam CD-X CD players |
| Turntable compatibility | Technics SL-1200MK2/MK3, Numark TTX1, Vestax PDX-2000 (with included adapters) |
| Power supply | Via the CD-X unit (connection cable included) |
| Operating modes | Turntable mode and scratch mode (switch via SCRATCH button on CD-X remote) |
| Main features | Turntable rotation direction and speed detection, CD scratch, transport controls, track search, CUE points, instant start |
| Calibration | Required after installation, stored in the CD-X, repeat if reinstalling or changing player |
| Connection | ACCESSORY jack on the back of the CD-X, connector oriented with arrow pointing up |
| Installation | Mount on turntable with adapters (T2, V, N) or double-sided tape if not compatible; vertical and horizontal adjustment possible |
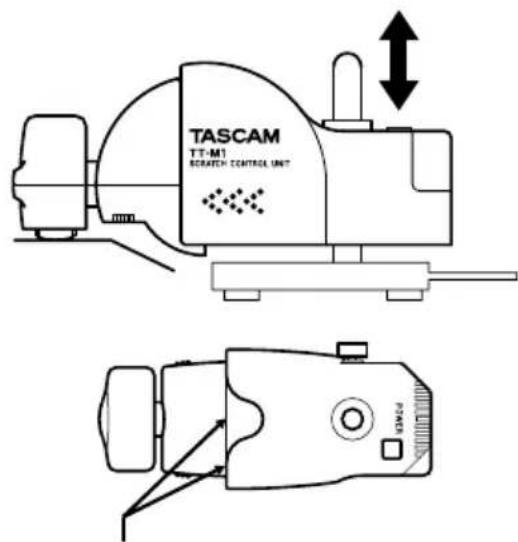
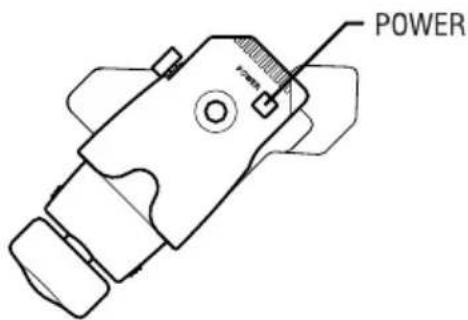
| LED indicator | Lights up when power is turned on (POWER switch) |
| Safety | Only connect to a CD-X; turn off power before connecting; raise the roller to the up position when not in use |
| Maintenance | Clean with a dry cloth; avoid humidity and extreme temperatures |
| Spare parts and repairability | Mounting adapters included; repair by qualified technician; no specific spare parts listed |
Frequently Asked Questions - TTM1 TASCAM
User questions about TTM1 TASCAM
0 question about this device. Answer the ones you know or ask your own.
Ask a new question about this device
Download the instructions for your DJ Equipment in PDF format for free! Find your manual TTM1 - TASCAM and take your electronic device back in hand. On this page are published all the documents necessary for the use of your device. TTM1 by TASCAM.
USER MANUAL TTM1 TASCAM
TEAC Professional Division
D00811500A
TT-M1
Scratch Control Unit
OWNER'S MANUAL / MODE D'EMPLOI / BEDIENUNGSANLEITUNG / MANUALE D'ISTRUZIONI / MANUAL DEL USUARIO / 取扱説明書
English 2
Français 6
Deutsch 10
Italiano 14
Español 18
日本語 22
Introduction
Read this manual thoroughly before using the product, and keep it handy for future reference.
The TT-M1 is a special controller for the TAS-CAM CD-X series of CD players (hereafter referred to as CD-X). When a record player equipped with the TT-M1 is being used to conduct scratching, the controller detects the turntable's rotating direction and speed and transfers them to the CD-X. The CD-X then plays back the scratching on a CD with great accuracy.
- The names of the companies and products that appear in this document are the trademarks or registered trademarks of their respective holders.
- Do not connect the product to any equipment other than the CD-X.
- This product is powered by the CD-X unit. When the product is not in use, always turn off the POWER switch and raise the roller to an upright position.
Installation
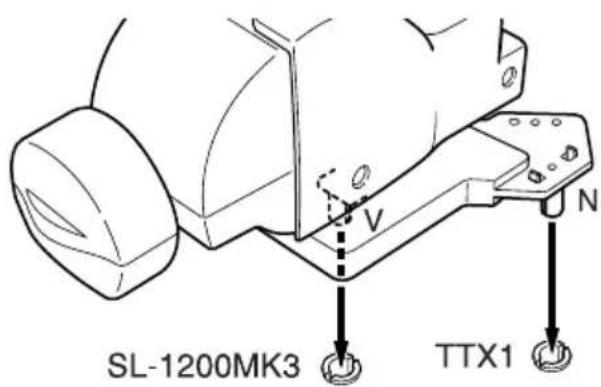
The TT-M1 can be attached to the following record players using accessory adapters. Install the adapter in the specified position on the base unit and then affix the product to the record player.
Mounting
Model hole Adapter
Technics SL-1200MK2 T2 T2
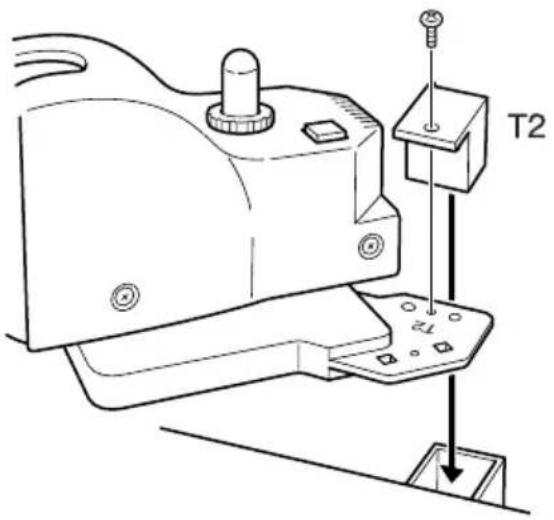
Technics SL-1200MK3 T3 V
Numark TTX1 N N
Vestax PDX-2000 V, T2 V, T2
If you want to install the TT-M1 on models other than these, fix it in place with double-sided tape or by other means.
2 English
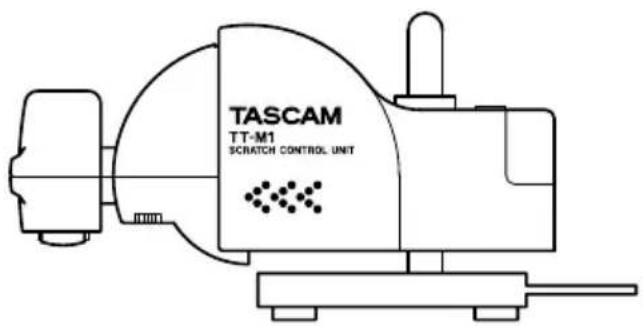
Technics SL-1200MK2
Attach adapter T2 to mounting hole T2 and insert the TT-M1 into the dust cover holder.
natural_image
Technical line drawing of a mechanical device with labeled components (T2), showing assembly steps without any readable text or symbols.Technics SL-1200MK3
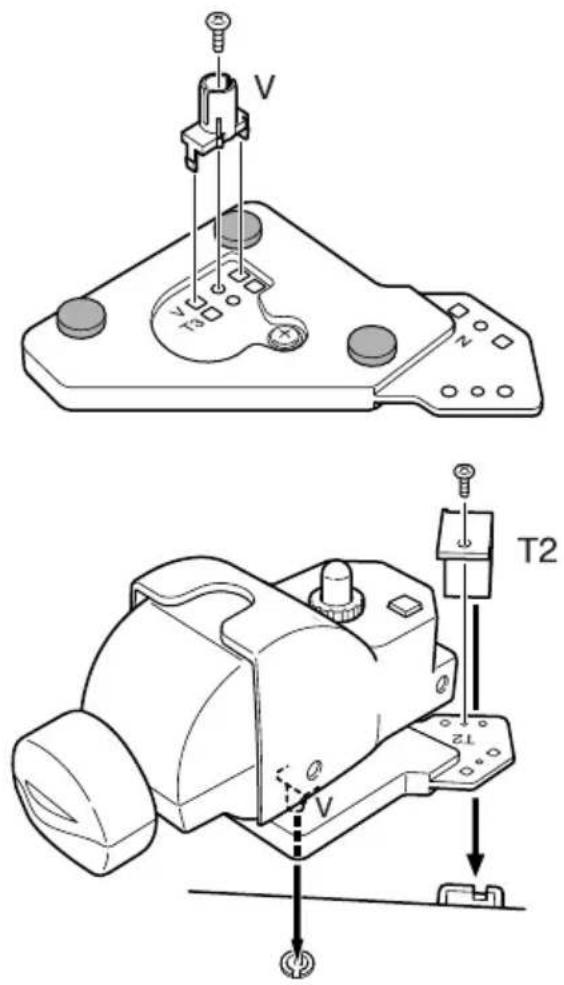
Attach adapter V to mounting hole T3 on the back of the base unit, and insert the TT-M1 into the headshell stand.
Numark TTX1
Attach adapter N to mounting hole N on the back of the base unit, and insert the TT-M1 into the headshell stand.
Vestax PDX-2000
Attach adapter V to mounting hole V on the back of the base unit, and adapter T2 to mounting hole T2 on the top surface. Install the TT-M1 by inserting adapter V into the headshell stand and placing adapter T2 on the dust cover holder.
Adjustment
Adjust the vertical and horizontal positions of the TT-M1 as follows. Note that a record does not have to be placed on the turntable.
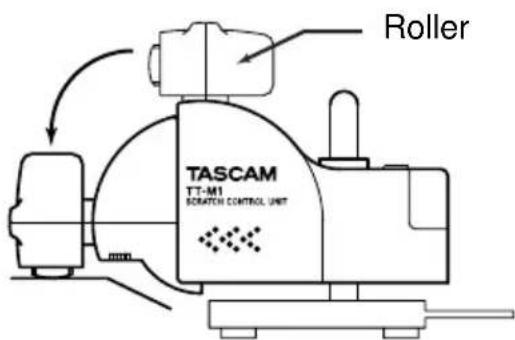
1 Lower the roller onto the turntable.
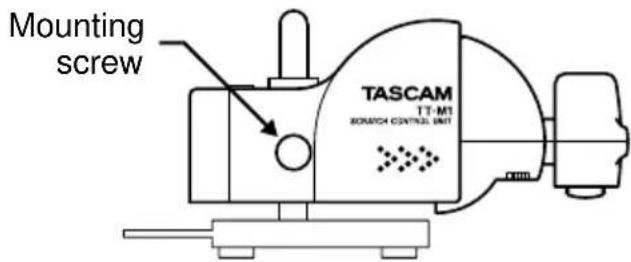
2 Loosen the mounting screw.
3 Adjust the height so that the roller is positioned horizontally on the turntable.
Align these lines with each other.
4 Move the product to the left and right in order to align the axis of the roller with the center of the turntable. Use the guides at the base of the roller.
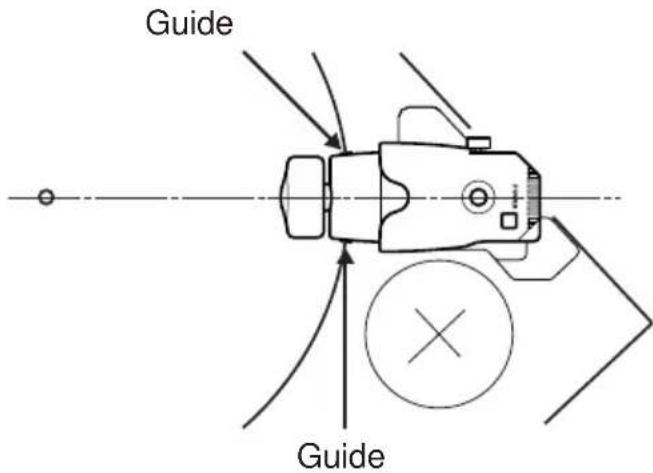
5 When the product is properly adjusted, tighten the mounting screw securely.
Connection
- Be sure to turn off the CD-X unit before connecting the TT-M1 to the CD-X.
On the rear panel of the CD-X, an ACCESSORY terminal is provided for each of the two CD drives. Connect the TT-M1 cable to the desired terminal. Orient the cable connector so that the arrow is located on the upper side of the connector.

Calibration
The TT-M1 must be calibrated to accurately detect the turntable's rotating speed.
- As the calibration results are saved to the CD-X unit, the product is only required to be calibrated once after it is installed to the player. However, when the product is re-installed, it must be calibrated again.
- T he calibration results are saved for each CD drive. When two TT-M1 units are connected to the CD-X, perform calibration on a drive basis. Calibration is also required when a TT-M1 that was connected to one drive is re-connected to another drive.
1 Turn on the CD-X.
2 L ower the TT-M1 roller onto the turntable and press the POWER switch.
- A record does not have to be placed on the turntable.
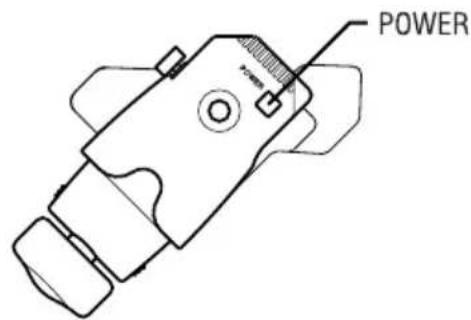
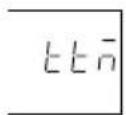
The LED comes on and the following is displayed on the CD-X's remote controller:
3 Turn the turntable on to rotate at 33 rpm.
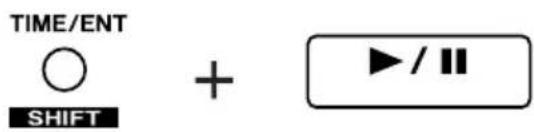
4 Press the ▶/■ key on the CD-X's remote controller while pressing and holding down the SHIFT key.
Calibration begins and the following is displayed on the remote controller:

5 Calibration is completed in five seconds and the following is displayed on the CD-X's remote controller. The normal display is then resumed momentarily:

Scratch PlaybackOperation Mc
The TT-M1 has two operation modes: the turntable mode and the scratch mode.
To switch these operation modes, press the SCRATCH key on the CD-X's remote controller.
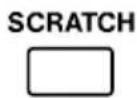
The TT-M1 is in the turntable mode when the SCRATCH key is turned off, and it is in the scratch mode when the key is lit up.
Turntable mode (SCRATCH key: off)
All the transport control of the CD-X is performed on the TT-M1 (turntable). Track searching, locating to the CUE and CUE 1-3 points, and the flash start function can also be operated from the CD-X's remote controller.
Scratch mode (SCRATCH key: on)
In addition to the operations in the turntable mode, the transport control of the CD-X can be performed with the CD-X's remote controller when the turntable is stopped.
1 Turn on the CD-X and load a CD.
2 L lower the TT-M1 roller onto the turntable and press the POWER switch.
- A record does not have to be placed on the turntable.
The LED comes on and the following is displayed on the CD-X's remote controller:

3 Turn the turntable on to rotate at 33 rpm.
4 Switch the operation modes by pressing the SCRATCH key on the CD-X's remote controller.
5 Play the desired tune on the CD-X and conduct scratching on the record player.
6 To stop scratch playback, stop playing the CD and rotating the turntable.
If CDs are played too slowly or too quickly
- Is the pitch control of the record player set to the normal position?
- Has the TT-M1 been calibrated?
Introduction
natural_image
Technical line drawing of a mechanical device with a T2 component and mounting base (no text or symbols)Technics SL-1200MK3
Réglage
Position justieren
natural_image
Technical line drawing of a mechanical device with labeled component T2 (no text or symbols beyond label)Technics SL-1200MK3
Regolazione
natural_image
Technical line drawing of a mechanical device with a T2 component and mounting bracket (no text or symbols)Technics SL-1200MK3
Ajuste
Technics SL-1200MK2 T2 T2
Technics SL-1200MK3 T3 V
Numark TTX1 N N
Vestax PDX-2000 V, T2 V, T2
調整
TEAC Professional Division
TT-M1
TEAC CORPORATION
Phone: +81-422-52-5082 www.tascam.com
3-7-3, Nakacho, Musashino-shi, Tokyo 180-8550, Japan
TEAC AMERICA, INC.
Phone: +1-323-726-0303 www.tascam.com
7733 Telegraph Road, Montebello, California 90640
TEAC CANADA LTD.
Phone: +1905-890-8008 Facsimile: +1905-890-9888 www.tascam.com
5939 Wallace Street, Mississauga, Ontario L4Z 1Z8, Canada
TEAC MEXICO, S.A. De C.V
Phone: +52-555-581-5500 www.tascam.com
Campesinos No. 184, Colonia Granjes Esmeralda, Delegaacion Iztapalapa CP 09810, Mexico DF
TEAC UK LIMITED
Phone: +44-1923-438880 www.tascam.co.uk
5 Marlin House, Croxley Business Park, Watford, Hertfordshire. WD1 8TE, U.K.
280 William Street, Port Melbourne, Victoria 3000, Australia
Phone: +39-02-66010500 www.teac.it
Via C. Cantù 11, 20092 Cinisello Balsamo, Milano, Italy

- TEAC Professional Division
- TT-M1
- Scratch Control Unit
- Introduction
- Installation
- English
- Technics SL-1200MK2
- Technics SL-1200MK3
- Numark TTX1
- Vestax PDX-2000
- Adjustment
- Connection
- Calibration
- Scratch PlaybackOperation Mc
- Turntable mode (SCRATCH key: off)
- Scratch mode (SCRATCH key: on)
- If CDs are played too slowly or too quickly
- Réglage
- Position justieren
- Regolazione
- Ajuste
- 調整
- TEAC CORPORATION
Brand : TASCAM
Model : TTM1
Category : DJ Equipment