
XS4 - DJ Equipment TASCAM - Free user manual and instructions
Find the device manual for free XS4 TASCAM in PDF.
| Product type | 2-channel DJ console |
| Brand / Model | Tascam XS4 |
| Dimensions (W x H x D) | 265 x 80 x 325 mm |
| Weight | 3.6 kg |
| Power supply | 100-240 V AC, 50/60 Hz, 22 VA |
| Microphone inputs | 2 x XLR/TRS balanced, level -50 to -30 dBV, impedance 1.5 kΩ |
| Phono inputs | 2 x RCA unbalanced, level -45 dBV, impedance 50 kΩ |
| Line inputs | 2 x RCA unbalanced, level -10 dBV, impedance 50 kΩ |
| External input | 1 x RCA unbalanced, level 0 dBV, impedance 20 kΩ |
| Master outputs | 1 x XLR balanced (M1), 1 x RCA unbalanced (M2), level 0 dBV |
| Recording output | 1 x RCA unbalanced, level 0 dBV, impedance 10 kΩ |
| Headphone output | 6.35 mm jack, 230 mW into 400 Ω |
| Equalizer | 2 bands per channel (High: 6.5 kHz ±10 dB, Low: 200 Hz ±10 dB) |
| PGM faders | Removable and replaceable |
| Crossfader | Removable, selectable curve, reversible direction |
| Headphone monitoring | Master/Cue selection, CUE PGM1/PGM2 balance |
| Frequency response (line) | 10 Hz - 30 kHz, -1 dB |
| Signal-to-noise ratio (line) | 95 dB (A-weighted) |
| Total harmonic distortion (line) | < 0.08% |
| Number of manual pages | 36 pages (FR) |
| Maintenance | Disconnect before cleaning, use a soft slightly damp cloth |
| Spare parts | Use only manufacturer-approved parts |
| Repairability | Service by qualified technician only |
| Protection rating | Do not expose to water or moisture |
Frequently Asked Questions - XS4 TASCAM
User questions about XS4 TASCAM
0 question about this device. Answer the ones you know or ask your own.
Ask a new question about this device
Download the instructions for your DJ Equipment in PDF format for free! Find your manual XS4 - TASCAM and take your electronic device back in hand. On this page are published all the documents necessary for the use of your device. XS4 by TASCAM.
USER MANUAL XS4 TASCAM
TEAC Professional Division
XS-4
Professional DJ Mixer
D00685900A
OWNER'S MANUAL/ MODE D'EMPLOI / BEDIENUNGSANLEITUNG / MANUALE D'ISTRUZIONI / Mezclador de DJ profesional

CAUTION
RISK OF ELECTRIC SHOCK
DO NOT OPEN

CAUTION: TO REDUCE THE RISK OF ELECTRIC SHOCK, DO NOT REMOVE COVER (OR BACK). NO USER-SERVICEABLE PARTS INSIDE. REFER SERVICING TO QUALIFIED SERVICE PERSONNEL.

The lightning flash with arrowhead symbol, within an equilateral triangle, is intended to alert the user to the presence of uninsulated “dangerous voltage” within the product’s enclosure that may be of sufficient magnitude to constitute a risk of electric shock to persons.

The exclamation point within an equilateral triangle is intended to alert the user to the presence of important operating and maintenance (servicing) instructions in the literature accompanying the appliance.
This appliance has a serial number located on the bottom. Please record the model number and serial number and retain them for your records.
Model number ____ Serial number ____
WARNING: TO PREVENT FIRE OR SHOCK HAZARD, DO NOT EXPOSE THIS APPLIANCE TO RAIN OR MOISTURE.
IMPORTANT (for U.K. Customers)
DO NOT cut off the mains plug from this equipment.
If the plug fitted is not suitable for the power points in your home or the cable is too short to reach a power point, then obtain an appropriate safety approved extension lead or consult your dealer.
If nonetheless the mains plug is cut off, remove the fuse and dispose of the plug immediately, to avoid a possible shock hazard by inadvertent connection to the mains supply.
If this product is not provided with a mains plug, or one has to be fitted, then follow the instructions given below:
IMPORTANT: DO NOT make any connection to the larger terminal which is marked by the letter E or by the safety earth symbol ± or coloured GREEN or GREEN-and-YELLOW.
The wires in this mains lead are coloured in accordance with the following code:
BLUE
: NEUTRAL
BROWN
: LIVE
As the colours of the wires in the mains lead of this apparatus may not correspond with the coloured markings identifying the terminals in your plug proceed as follows:
The wire which is coloured BLUE must be connected to the terminal which is marked with the letter N or coloured BLACK.
The wire which is coloured BROWN must be connected to the terminal which is marked with the letter L or coloured RED.
When replacing the fuse only a correctly rated approved type should be used and be sure to re-fit the fuse cover.
IF IN DOUBT — CONSULT A COMPETENT ELECTRICIAN.
For U.S.A
TO THE USER
This equipment has been tested and found to comply with the limits for a Class A digital device, pursuant to Part 15 of the FCC Rules. These limits are designed to provide reasonable protection against harmful interference when the equipment is operated in a commercial environment. This equipment generates, uses, and can radiate radio frequency energy and, if not installed and used in accordance with the instruction manual, may cause harmful interference to radio communications.
Operation of this equipment in a residential area is likely to cause harmful interference in which case the user will be required to correct the interference at his own expense.
CAUTION
Changes or modifications to this equipment not expressly approved by TEAC CORPORATION for compliance could void the user's authority to operate this equipment.
For the consumers in Europe
WARNING
This is a Class A product. In a domestic environment, this product may cause radio interference in which case the user may be required to take adequate measures.
The equipment draws nominal non-operating power from the AC outlet with its POWER switch in the off position.
CAUTION:
- Read all of these Instructions.
- Save these Instructions for later use.
- Follow all Warnings and Instructions marked on the audio equipment.
1) Read Instructions — All the safety and operating instructions should be read before the product is operated.
2) Retain Instructions — The safety and operating instructions should be retained for future reference.
3) Heed Warnings — All warnings on the product and in the operating instructions should be adhered to.
4) Follow Instructions — All operating and use instructions should be followed.
5) Cleaning — Unplug this product from the wall outlet before cleaning. Do not use liquid cleaners or aerosol cleaners. Use a damp cloth for cleaning.
6) Attachments — Do not use attachments not recommended by the product manufacturer as they may cause hazards.
7) Water and Moisture — Do not use this product near water — for example, near a bath tub, wash bowl, kitchen sink, or laundry tub; in a wet basement; or near a swimming pool; and the like.
8) Accessories — Do not place this product on an unstable cart, stand, tripod, bracket, or table. The product may fall, causing serious injury to a child or adult, and serious damage to the product. Use only with a cart, stand, tripod, bracket, or table recommended by the manufacturer, or sold with the product. Any mounting of the product should follow the manufacturer's instructions, and should use a mounting accessory recommended by the manufacturer.
9) A product and cart combination should be moved with care. Quick stops, excessive force, and uneven surfaces may cause the product and cart combination to overturn.
natural_image
Symbolic icon of a person lifting a large object inside a circle (no text or symbols)10) Ventilation — Slots and openings in the cabinet are provided for ventilation and to ensure reliable operation of the product and to protect it from overheating, and these openings must not be blocked or covered. The openings should never be blocked by placing the product on a bed, sofa, rug, or other similar surface. This product should not be placed in a built-in installation such as a bookcase or rack unless proper ventilation is provided or the manufacturer's instructions have been adhered to.
11) Power Sources — This product should be operated only from the type of power source indicated on the marking label. If you are not sure of the type of power supply to your home, consult your product dealer or local power company. For products intended to operate from battery power, or other sources, refer to the operating instructions.
12) Grounding or Polarization — This product may be equipped with a polarized alternating-current line plug (a plug having one blade wider than the other). This plug will fit into the power outlet only one way. This is a safety feature. If you are unable to insert the plug fully into the outlet, try reversing the plug. If the plug should still fail to fit, contact your electrician to replace your obsolete outlet. Do not defeat the safety purpose of the polarized plug.
13) Power-Cord Protection — Power-supply cords should be routed so that they are not likely to be walked on or pinched by items placed upon or against them, paying particular attention to cords at plugs, convenience receptacles, and the point where they exit from the product.
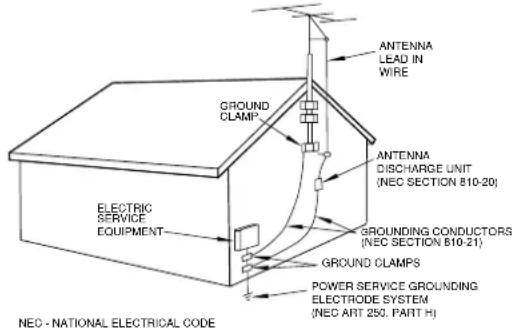
14) Outdoor Antenna Grounding — If an outside antenna or cable system is connected to the product, be sure the antenna or cable system is grounded so as to provide some protection against voltage surges and built-up static charges. Article 810 of the National Electrical Code, ANSI/NFPA 70, provides information with regard to proper grounding of the mast and supporting structure, grounding of the lead-in wire to an antenna discharge unit, size of grounding conductors, location of antenna-discharge unit, connection to grounding electrodes, and requirements for the grounding electrode.
"Note to CATV system installer:
This reminder is provided to call the CATV system installer's attention to Section 820-40 of the NEC which provides guidelines for proper grounding and, in particular, specifies that the cable ground shall be connected to the grounding system of the building, as close to the point of cable entry as practical.
Example of Antenna Grounding as per National Electrical Code, ANSI/NFPA 70
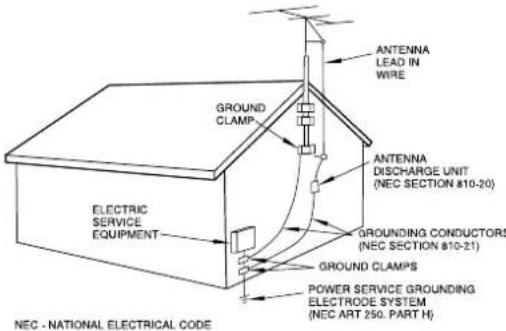
15) Lightning — For added protection for this product during a lightning storm, or when it is left unattended and unused for long periods of time, unplug it from the wall outlet and disconnect the antenna or cable system. This will prevent damage to the product due to lightning and power-line surges.
16) Power Lines — An outside antenna system should not be located in the vicinity of overhead power lines or other electric light or power circuits, or where it can fall into such power lines or circuits. When installing an outside antenna system, extreme care should be taken to keep from touching such power lines or circuits as contact with them might be fatal.
17) Overloading — Do not overload wall outlets, extension cords, or integral convenience receptacles as this can result in risk of fire or electric shock.
18) Object and Liquid Entry — Never push objects of any kind into this product through openings as they may touch dangerous voltage points or short-out parts that could result in a fire or electric shock. Never spill liquid of any kind on the product.
19) Servicing — Do not attempt to service this product yourself as opening or removing covers may expose you to dangerous voltage or other hazards. Refer all servicing to qualified service personnel.
20) Damage Requiring Service — Unplug this product from the wall outlet and refer servicing to qualified service personnel under the following conditions:
a) when the power-supply cord or plug is damaged.
b) if liquid has been spilled, or objects have fallen into the product.
c) if the product has been exposed to rain or water.
d) if the product does not operate normally by following the operating instructions. Adjust only those controls that are covered by the operating instructions as an improper adjustment of other controls may result in damage and will often require extensive work by a qualified technician to restore the product to its normal operation.
e) if the product has been dropped or damaged in any way.
f) when the product exhibits a distinct change in performance – this indicates a need for service.
21) Replacement Parts — When replacement parts are required, be sure the service technician has used replacement parts specified by the manufacturer or have the same characteristics as the original part.
Unauthorized substitutions may result in fire, electric shock, or other hazards.
22) Safety Check — Upon completion of any service or repairs to this product, ask the service technician to perform safety checks to determine that the product is in proper operating condition.
23) Wall or Ceiling Mounting — The product should be mounted to a wall or ceiling only as recommended by the manufacturer.
24) Heat — The product should be situated away from heat sources such as radiators, heat registers, stoves, or other products (including amplifiers) that produce heat.
Table of contents
- Introduction......4
1.1. Some notes and precautions .... 4
1.2. Serial number, etc.... 4
- Features and controls .... 5
2.1.Top panel 6
2.2. How to replace the fader.... 6
2.3. Rear panel....7
2.4. Front panel....7
- Modification....8
3.1. Output level 8
- Specifications....8
- Block diagram ...... Back page
1. Introduction
The XS-4 is a sophisticated 2 channel DJ mixer which allows the connection of many devices, and allows you to mix in a creative way. Following the sophisticated layout design, the XS-4 combines easy operation with a wide range of functions.
It is VERY IMPORTANT that you read this manual before connecting the mixer in order to obtain its maximum performance.
We recommend our authorised Technical Services whenever any maintenance task should be needed so that optimum operation shall be achieved.
1.1. Some notes and precautions
Treat the XS-4 as you would any other piece of precision equipment.
Avoid exposing it to extremes of temperature and humidity and avoid mechanical shocks and vibration.
Keep the unit away from strong magnetic fields (TV sets, computer monitors, large electric motors, etc.).
Environmental considerations
The XS-4 may be used in most areas, but to maintain top performance, and prolong operating life, observe the following environmental conditions:
The nominal temperature should be between 5^ C and 35^ C ( 41^ F and 95^ F).
Relative humidity should be 30 to 90 degrees non-condensing.
As the unit may become hot during operation, always leave sufficient space above and around the unit for ventilation.
Do not install this equipment in a confined space such as a bookcase or similar unit.
You should not place the unit on a piece of equipment generating heat, e.g. an amplifier, to avoid possible problems with overheating.
XS-4 operates under 100 to 240V, 50-60Hz. Make sure that the power cable is far away from the signal cables in order to avoid any possible audio hum.
NOTE
When transporting the unit, always use the original packing materials or a properly-designed equipment case. For this reason, we strongly recommend that you save all the packing materials that came with the XS-4, in case you need to transport it in the future.
In order to protect the unit from an eventual electrical overload it carries a 250mA fuse. Should it ever blow up, unplug the unit from mains and replace it with an identical one. If the new fuse blows again, contact immediately with our authorized technical service.
WARNING
NEVER SHORT-CIRCUIT THE SECURITY PATH NOR USE A HIGHER VALUE FUSE.
Fuse substitutions have to be performed by a qualified technician.
Connections to other equipment
It is extremely important that the power is turned off on all units when making or breaking connections to or from the XS-4.
When turning power on, it is usually a good idea to start with the source (turntables, CD players, etc.), then the XS-4 and finish with the amplifier system.
Turning power off should be done in the other direction (amplifiers first, then other equipment).
1.2. Serial number, etc.
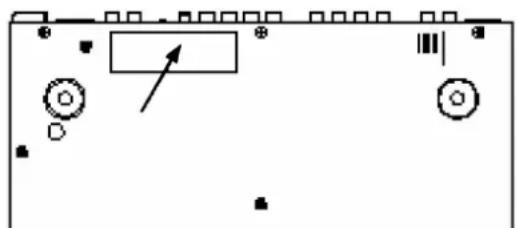
The serial number of the XS-4 is located on a sticker at the front of the unit on the bottom panel. Make a note of this for future reference (warranty, etc.).
natural_image
Pure electrical circuit lines without any symbols2. Features and controls
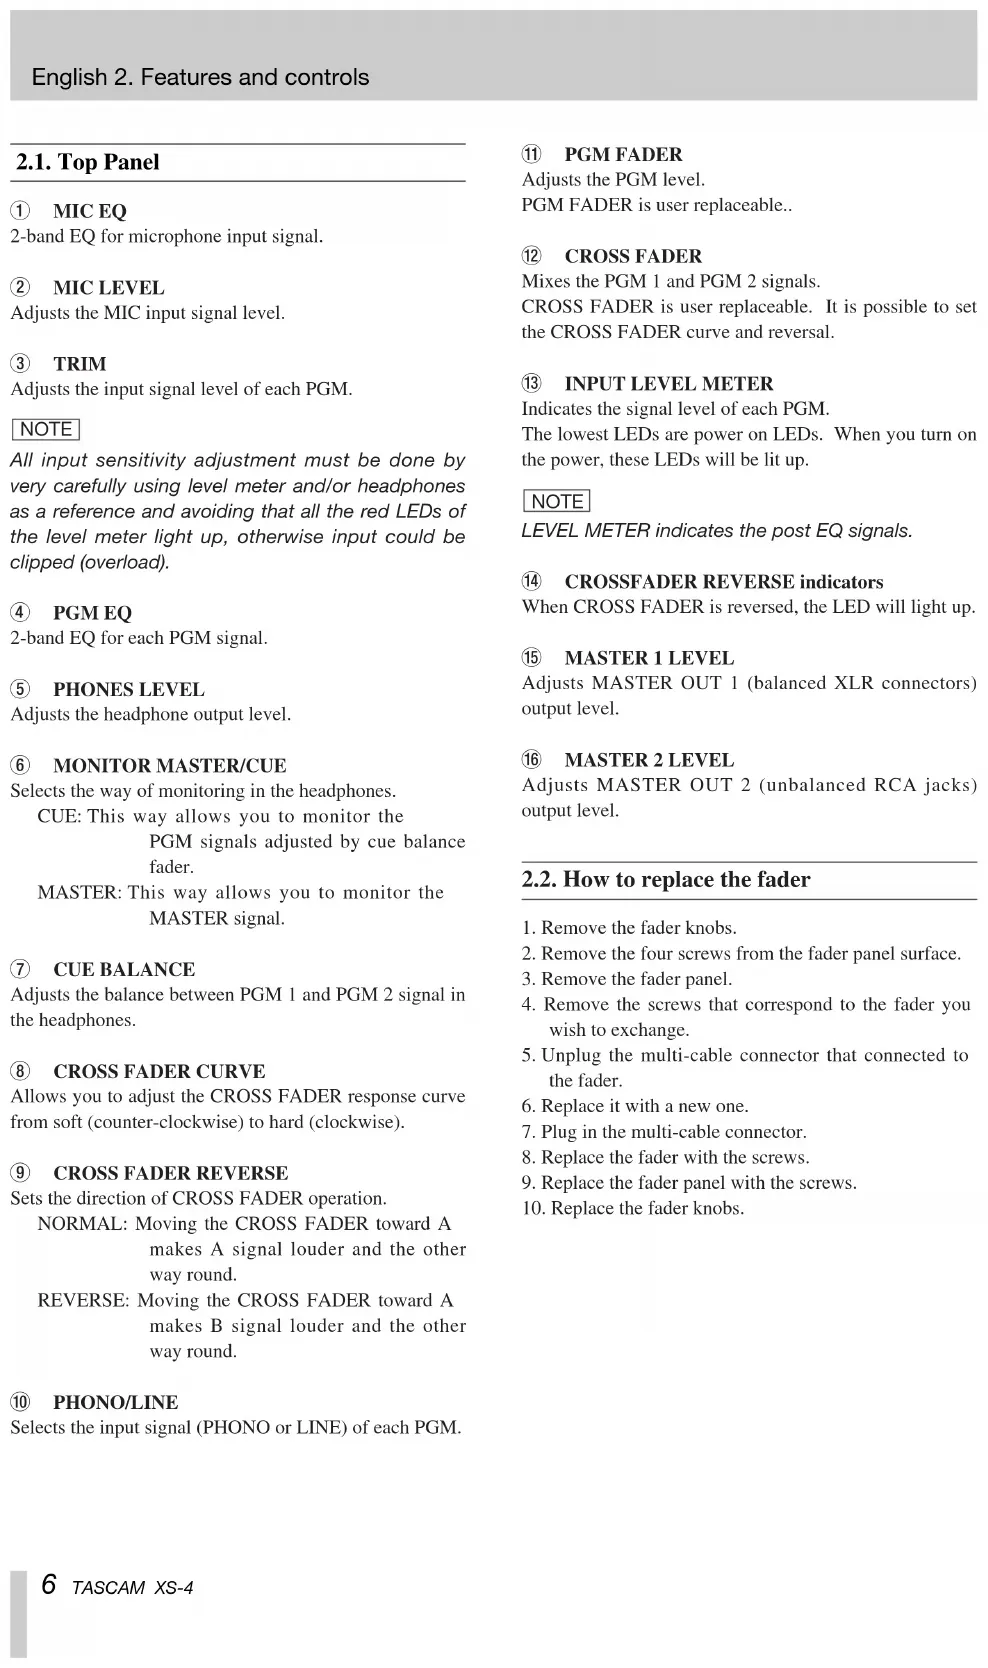
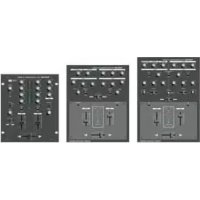
2.1. Top Panel
① MIC EQ
2-band EQ for microphone input signal.
② MIC LEVEL
Adjusts the MIC input signal level.
③ TRIM
Adjusts the input signal level of each PGM.
NOTE
All input sensitivity adjustment must be done by very carefully using level meter and/or headphones as a reference and avoiding that all the red LEDs of the level meter light up, otherwise input could be clipped (overload).
④ PGM EQ
2-band EQ for each PGM signal.
⑤ PHONES LEVEL
Adjusts the headphone output level.
⑥ MONITOR MASTER/CUE
Selects the way of monitoring in the headphones.
CUE: This way allows you to monitor the PGM signals adjusted by cue balance fader.
MASTER: This way allows you to monitor the MASTER signal.
⑦ CUE BALANCE
Adjusts the balance between PGM 1 and PGM 2 signal in the headphones.
⑧ CROSS FADER CURVE
Allows you to adjust the CROSS FADER response curve from soft (counter-clockwise) to hard (clockwise).
Sets the direction of CROSS FADER operation.
NORMAL: Moving the CROSS FADER toward A makes A signal louder and the other way round.
REVERSE: Moving the CROSS FADER toward A makes B signal louder and the other way round.
⑩ PHONO/LINE
Selects the input signal (PHONO or LINE) of each PGM.
⑪ PGM FADER
Adjusts the PGM level.
PGM FADER is user replaceable..
⑫ CROSS FADER
Mixes the PGM 1 and PGM 2 signals.
CROSS FADER is user replaceable. It is possible to set the CROSS FADER curve and reversal.
⑬ INPUT LEVEL METER
Indicates the signal level of each PGM.
The lowest LEDs are power on LEDs. When you turn on the power, these LEDs will be lit up.
NOTE
LEVEL METER indicates the post EQ signals.
⑭ CROSSFADER REVERSE indicators
When CROSS FADER is reversed, the LED will light up.
⑮ MASTER 1 LEVEL
Adjusts MASTER OUT 1 (balanced XLR connectors) output level.
⑯ MASTER 2 LEVEL
Adjusts MASTER OUT 2 (unbalanced RCA jacks) output level.
2.2. How to replace the fader
- Remove the fader knobs.
- Remove the four screws from the fader panel surface.
- Remove the fader panel.
- Remove the screws that correspond to the fader you wish to exchange.
- Unplug the multi-cable connector that connected to the fader.
- Replace it with a new one.
- Plug in the multi-cable connector.
- Replace the fader with the screws.
- Replace the fader panel with the screws.
- Replace the fader knobs.
2.3. Rear Panel
⑰ MIC INPUT (balanced TRS connector)
Connect the microphone to this connector.
Connections are as follows:
TRS
HOT: Tip
COLD: Ring
GND: Sleeve
NOTE
If you connect the unbalanced microphone to this connector, we recommend that cold (Pin 3 or Ring) short-circuited to GND (Pin 1 or Sleeve).
⑱ ADJ
Adjusts the microphone input signal gain.
NOTE
MIC input sensitivity adjustment must be done by very carefully using the headphones as a reference and avoiding that input could be clipped (overload).
⑲ PHONO INPUTS (unbalanced RCA jacks)
Connect the turntables equipped with the MM cartridge.
⑳ GND terminal
If the turntables are fitted with grounding wires, connect these to this GND terminal to reduce noise and hum.
②1 LINE INPUTS (unbalanced RCA jacks)
Connect the line level equipment, such as CD players, cassette decks, DAT, MD, etc.
②2 EXT INPUT (unbalanced RCA jacks)
Connect external line level equipment.
The input signals from these jacks are mixed to master bus (pre MASTER 1/2 control).
②3 REC OUTPUT (unbalanced RCA jacks)
Outputs the pre MASTER 1/2 signal.
For example, to connect the recorder to these jacks, you can record your live performance before MASTER LEVEL control.
⑳ MASTER OUTPUT 1 (balanced XLR connector)
Outputs the master output signal adjusted by MASTER 1 control.
Connections are as follows:
HOT: Pin 2
COLD: Pin 3
GND: Pin 1
⑲ MASTER OUTPUT 2 (unbalanced RCA jacks)
Outputs the master output signal adjusted by MASTER 2 control.
②6 POWER switch
⑳ AC POWER jack
2.4. Front Panel
⑳ PHONES
Connect your headphone to this jack.
3. Modification
3.1. Output level
XS-4 has two MASTER outputs.
MASTER OUTPUT 1 (27): Balanced XLR connectors
MASTER OUTPUT 2 (28): Unbalanced RCA jacks
These output level is set to 0 dBV. These output levels can be changed to +6dBV with jumpers. (See diagram below.)
WARNING
Changes on the Output Level have to be performed by a qualified technician.
NOTE
You must be careful when setting up the nominal output level of the mixer. The "clip" display of the connected power amplifiers must never remain permanently lightened up, but do it occasionally by following the rhythm of the bass signals that are being played.
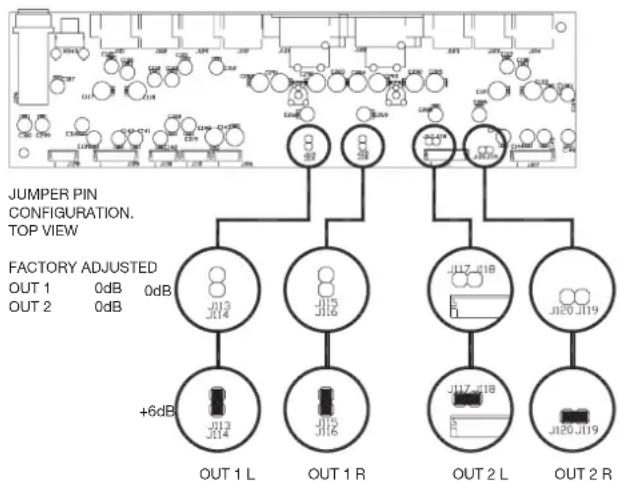
flowchart
graph TD
    A["JUMPER PIN"] --> B["OUT 1"]
    A --> C["OUT 2"]
    D["CONFIGURATION. TOP VIEW"] --> E["FACTORY ADJUSTED"]
    E --> F["OUT 1 L"]
    E --> G["OUT 1 R"]
    E --> H["OUT 2 L"]
    E --> I["OUT 2 R"]
    F --> J["J113 J114"]
    G --> K["J115 J116"]
    H --> L["J117 J118"]
    I --> M["J120 J119"]
    J --> N["+6dB"]
    K --> O["+6dB"]
    L --> P["+6dB"]
4. Specifications
LINE IN (PGM1-4): RCA, unbalanced
Input Level: -10dBV
Input impedance: 50kohm
PHONO IN (PGM1-4) RCA, unbalanced
Input Level: -45dBV
Input impedance: 50kohm
MIC INPUT TRS, balanced
Input Level: -50dBV \~ -30dBV
Input impedance: 1.5kohm
EXT INPUT: RCA, unbalanced
Input Level: 0dBV
Input impedance: 20kohm
MASTER OUT 1: XLR, balanced
Nominal Output Level: 0dBV
Output impedance: 600ohm
MASTER OUT 2: RCA, unbalanced
Nominal Output Level: 0dBV
Output Impedance: 1kohm
REC OUT: RCA, unbalanced
Nominal Output Level: 0dBV
Output Impedance: 10kohm
PHONES: 230mW, (at 400ohm)
Frequency Response:
LINE IN: 10Hz to 30KHz, -1.0dB
PHONO IN: RIAA, +/-0.5dB
MIC IN: 10Hz to 30KHz, -1.0dB
Signal to Noise Ratio:
LINE IN: 95dB (IHF A WTD)
PHONO IN: 90dB (IHF A WTD)
MIC IN: 75dB (IHF A WTD)
Total Harmonic Distortion:
LINE IN: <0.08%
PHONO IN: <0.09%
MIC IN: <0.15%
EQ
HIGH: 6.5kHz, +10dB \~ -30dB
LOW: 200Hz, +10dB \~ -30dB
Power Requirement: 100V-240V(50Hz-60Hz)
Power Consumption: 22VA
Dimension (mm): 265(W) x 80(H) x 325(D)
Weight: 3.6kg
All specifications subject to change without notice.
For the consumers in Europe
WARNING
This is a Class A product. In a domestic environment, this product may cause radio interference in which case the user may be required to take adequate measures.
natural_image
Symbolic icon of a person pushing a large object under a circular background (no text or symbols)natural_image
Pure electrical circuit lines without any symbolsnatural_image
Pure electrical circuit lines without any symbolsOUT 1 L OUT 1 R
OUT 2 ROUT 2 L
4. Technische Daten
LINE IN (PGM 1 + 2) Cinch, unsymmetrisch
natural_image
Pure electrical circuit lines without any symbolsLINE IN 10 Hz æ 30 kHz, -1,0 dB
PHONO IN RIAA, ± 0,5 dB
MIC IN 10 Hz æ 30 kHz, -1,0 dB
LINE IN 95 dB (IHF A WTD)
PHONO IN 90 dB (IHF A WTD)
MIC IN 75 dB (IHF A WTD)
natural_image
Symbolic icon of a person lifting a large object, enclosed in a circle with no text or symbolsExample of Antenna Grounding as per National Electrical Code, ANSI/NFPA 70
natural_image
Pure electrical circuit lines without any symbolsMASTER OUT 1: XLR, balanceado
Nivel salida nominal: 0 dBV
REC OUT: RCA, no balanceado
Nivel salida nominal: 0 dBV
PHONO IN: 90 dB (IHF MEDICION A)
MIC IN: 75 dB (IHF MEDICION A)
Phone: (323) 726-0303 7733 Telegraph Road, Montebello, CA 90640
TEAC CANADA LTD.
Phone: 905-890-8008 Facsimile: 905-890-9888 5939 Wallace Street, Mississauga, Ontario L4Z 1Z8, Canada
TEAC MEXICO, S.A. De C.V
Phone: 5-581-5500 Campesinos No.184, Colonia Granjes Esmeralda, Delegaacion Iztapalapa CP 09810, Mexico DF
TEAC UK LIMITED
Phone: 01923-819699 5 Marlin House, Croxley Business Park, Watford, Hertfordshire, WD1 8TE, U.K.
Phone: (03) 9672-2400 Facsimile: (03)9672-2249 280 William Street, Port Melbourne, Victoria 3000, Australia

- TEAC Professional Division
- XS-4
- Professional DJ Mixer
- IMPORTANT (for U.K. Customers)
- DO NOT cut off the mains plug from this equipment.
- For U.S.A
- TO THE USER
- CAUTION
- For the consumers in Europe
- WARNING
- CAUTION:
- "Note to CATV system installer:
- Table of contents
- Introduction
- Some notes and precautions
- Environmental considerations
- NOTE
- Connections to other equipment
- Serial number, etc.
- Features and controls
- Top Panel
- ① MIC EQ
- ② MIC LEVEL
- ③ TRIM
- ④ PGM EQ
- ⑤ PHONES LEVEL
- ⑥ MONITOR MASTER/CUE
- ⑦ CUE BALANCE
- ⑧ CROSS FADER CURVE
- ⑩ PHONO/LINE
- ⑪ PGM FADER
- ⑫ CROSS FADER
- ⑬ INPUT LEVEL METER
- ⑭ CROSSFADER REVERSE indicators
- ⑮ MASTER 1 LEVEL
- ⑯ MASTER 2 LEVEL
- How to replace the fader
- Rear Panel
- Front Panel
- Modification
- Output level
- Specifications
- Technische Daten
Brand : TASCAM
Model : XS4
Category : DJ Equipment