
Carbide Clear 600C - Desktop Computer CORSAIR - Free user manual and instructions
Find the device manual for free Carbide Clear 600C CORSAIR in PDF.
| Product type | Central unit case (tower) |
| Brand | Corsair |
| Model | Carbide Clear 600C |
| Dimensions (W x D x H) | 454 x 260 x 535 mm |
| Weight | 9.85 kg |
| Power supply | Not included, supports PSU up to 210 mm long |
| Material | Steel, clear acrylic side panel |
| Motherboard form factor | ATX (inverted layout) |
| Drive bays | 2 x 5.25", 2 x 3.5", 3 x 2.5" |
| Expansion slots | 8 |
| Front connectors | 2 x USB 3.0, 2 x USB 2.0, headphone/microphone jack, 3-speed fan controller, power/reset button |
| Included fans | 3 x AF140L (140 mm) |
| Front radiator support | 240/280 mm (2x120 or 2x140) |
| Rear radiator support | 120/140 mm (1x) |
| Top fan support | Not specified (slots available) |
| Bottom fan support | 3x120 mm or 2x140 mm |
| Dust filters | Front and bottom, removable |
| Max GPU length | 368 mm |
| Max CPU cooler height | 200 mm |
| Warranty | 2 years (estimated) |
Frequently Asked Questions - Carbide Clear 600C CORSAIR
User questions about Carbide Clear 600C CORSAIR
0 question about this device. Answer the ones you know or ask your own.
Ask a new question about this device
Download the instructions for your Desktop Computer in PDF format for free! Find your manual Carbide Clear 600C - CORSAIR and take your electronic device back in hand. On this page are published all the documents necessary for the use of your device. Carbide Clear 600C by CORSAIR.
USER MANUAL Carbide Clear 600C CORSAIR
© 2015 Corsair Components, Inc.
All rights reserved. Corsair, the sails logo, and Carbide Series are registered trademarks of Corsair in the United States and/or other countries. All other trademarks are the property of their respective owners. Product may vary slightly from those pictured.
PN:49-001387 rev AA


CORSAIR
CARBIDE
SERIES
600
INSTALLATION GUIDEGUIDED INSTALLATION
Table of Contents Case Specifications
Congratulations: 5
Case specifications: 6
Accessory kit contents:
Case features: 8
Removing the side panels: 9
Instaing the motherboard: 10
Installing a 5.25" drive: 10
Installing HDDs: 11
Installing SSDs: 11
Installing the PSU: 12
Installing PCI-E/PCI Card(s): 12
Removing the Front and Top Fascia: 13
Cleaning the Dust Filters: 13
Connecting the Fan Controller.. 14
Installing the Front I/O Connectors: 14
Frequently Asked Questions: 15-16
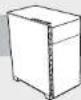
Congratulations!
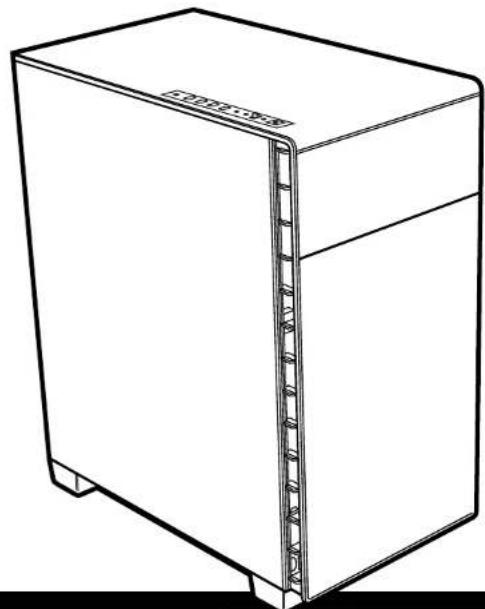
Thank you for purchasing the Carbide Series 600
Inverse-ATX Full-Tower PC Case.
Carbide Series Qulet 600Q
The 600Q's minimalistic curved exterior houses an inverse ATX layout designed to maximize airflow and minimize noise. A door hides a pair of 5.25'' drive bays, while a three-speed fan controller lets you pick just the right airflow and performance profile for your comfort. By flipping the ATX standard, we've been able to close off the top of the 600Q while leaving the bottom open, improving cooling performance and muffling sound. You shouldn't have to compromise between noise and performance when it comes to your build, and the 600Q proves it.
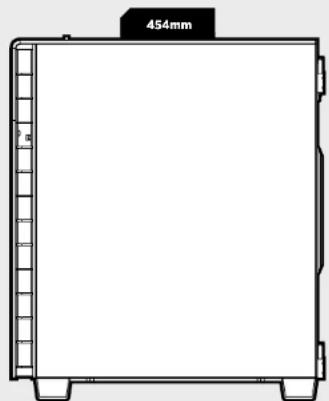
Carbide Series Clear 600C
The 600C's minimalistic curved exterior houses an inverse ATX layout designed to maximize airflow and minimize noise. A door hides a pair of 5.25^ drive bays, while a three-speed fan controller lets you pick just the right airflow and performance profile for your comfort. By flipping the ATX standard, you can show off the most interesting part of your graphics card - the cooler - instead of looking at a boring PCB. When it comes to your build, the 600C gives you great looks and great performance.
Length: 454mm
Width: 260mm
Height: 535mm
Weight: 9.85kg
Maximum GPU length: 368mm
Maximum CPU cooler height: 200mm
Maximum PSU length: 210mm
Radiator compatibility:
Front: 2x120mm or 2x140mm
Bae 1x176mm or 1x148mm


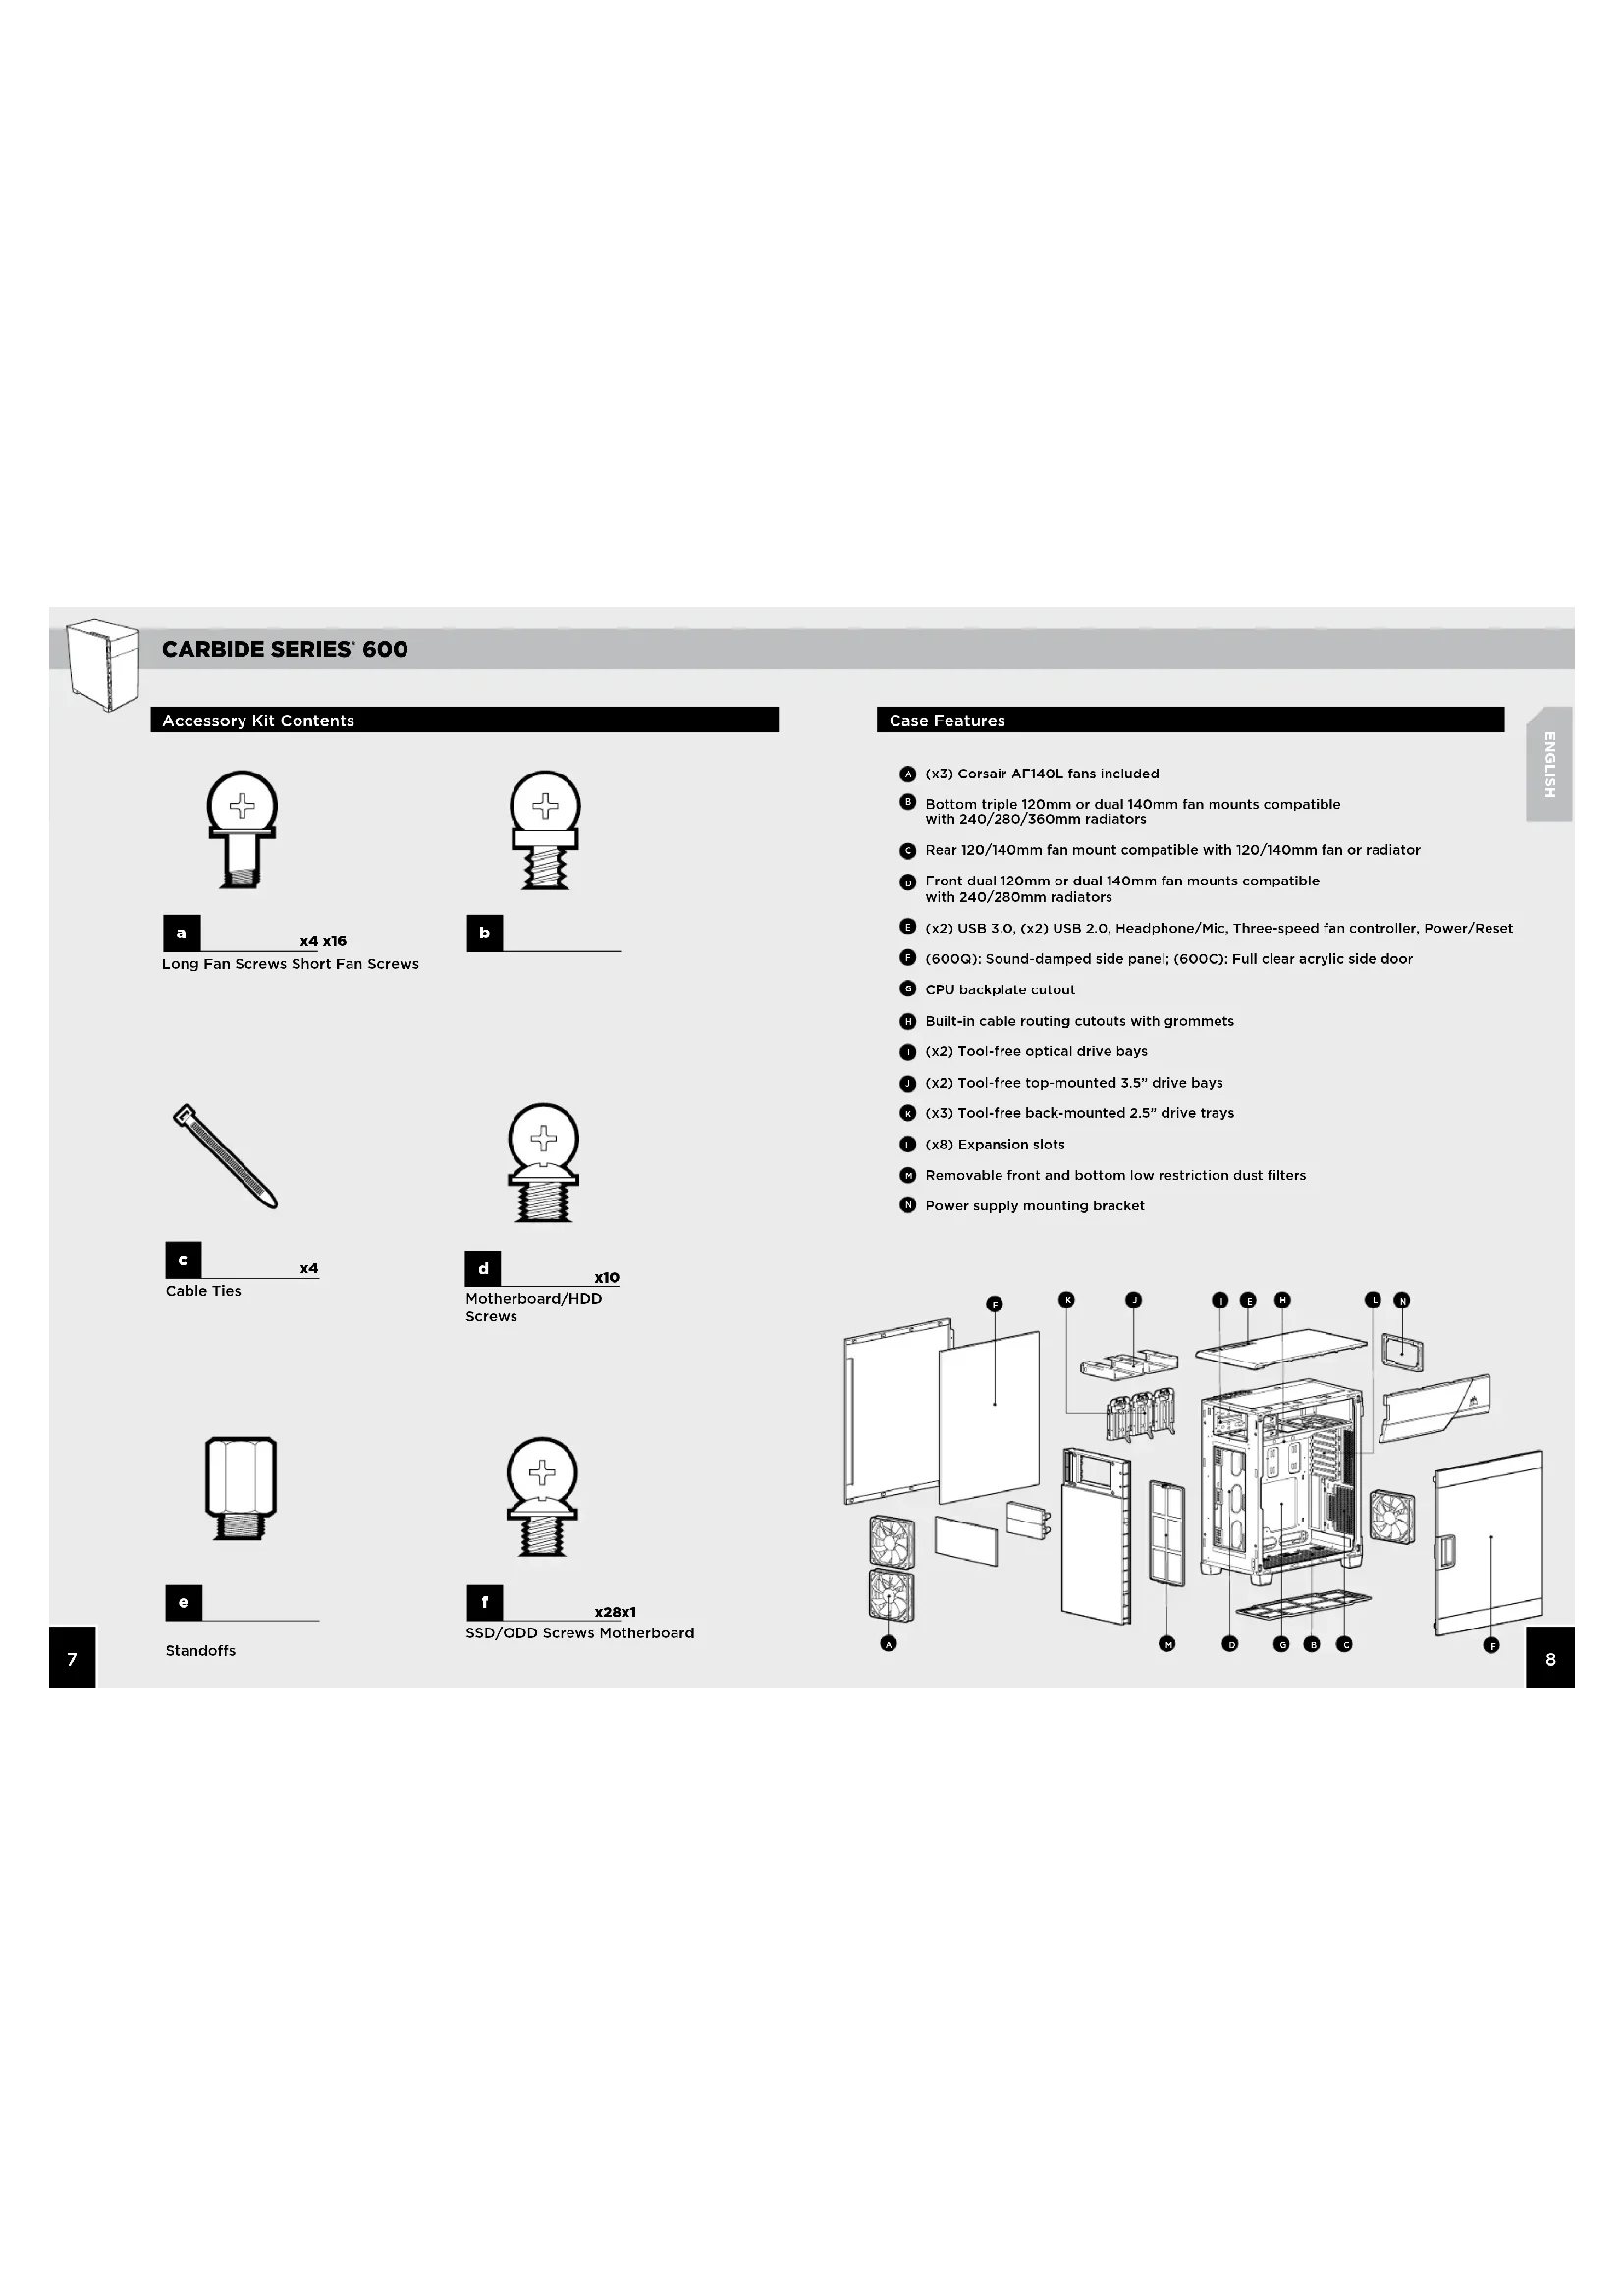
CARBIDE SERIES 600
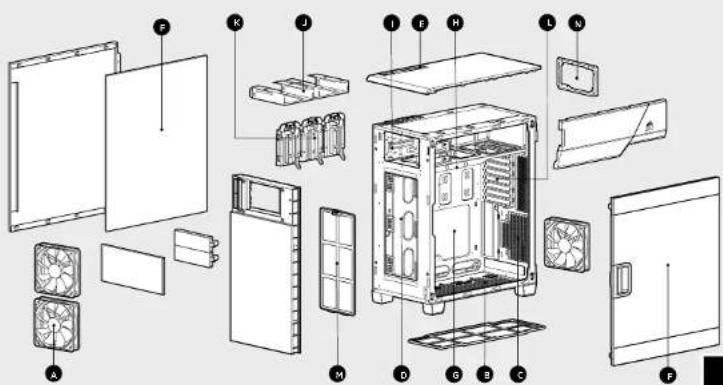
Accessory Kit Contents


x4 x16
Long Fan Screws Short Fan Screws


X4
Cable Ties


X10
Motherboard/HDD Screws


Standoffs

x28x1
SSD/ODDScrews Motherboard
Case Features
(x3) Corsair AF140L fans included
Bottom triple 120mm or dual 140mm fan mounts compatible with 240/280/360mm radiators
Rear 120/140mm fan mount compatible with 120/140mm fan or radiator
Front dual 120mm or dual 140mm fan mounts compatible with 240/280mm radiators
(x2) USB 3.0, (x2) USB 2.0, Headphone/Mic, Three-speed fan controller, Power/Reset
(600Q):Sound-damped side panel; (60OC):Full clear acrylic side door
CPU backplate cutout
Built-in cable routing cutouts with grommets
1 (x2) Tool-free optical drive bays
(x2) Tool-free top-mounted 3.5" drive bays
(x3) Tool-free back-mounted 2.5" drive trays
1 (x8) Expansion slots
Removable front and bottom low restriction dust filters
Power supply mounting bracket
CARBIDE SERIES 600
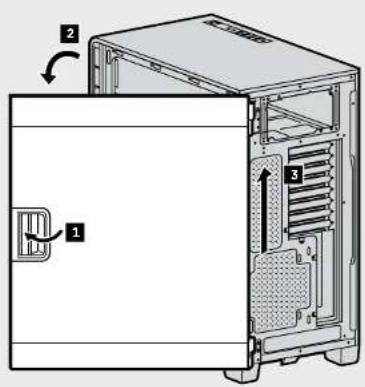
1. Removing the Side Panels (600C)
Pull the latch to release the acrylic side panel, then lift the panel off of the hinge.
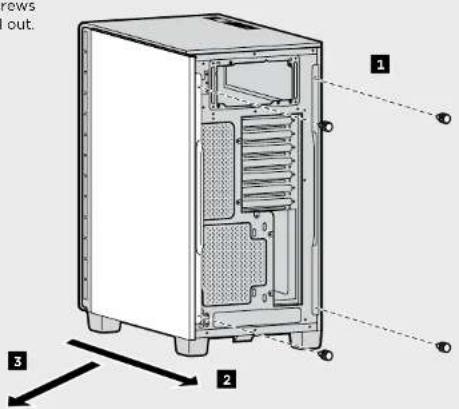
1. Removing the Side Panels (600Q)
Remove the thumbscrews and tilt the side panel out.
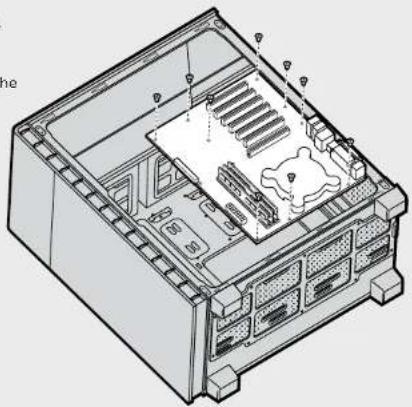
2. Installing the Motherboard
Snap your motherboard's I/O shield into the cutout.
Align the motherboard with the standoffs in the case.
Secure with the included screws
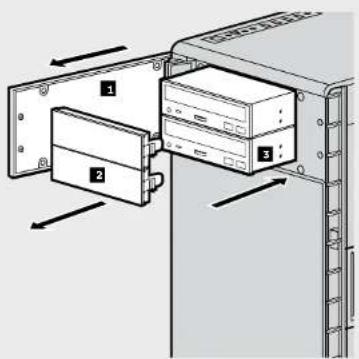
3. Installing a 5.25" drive
- Open the front door.
- Remove the 5.25" bay shield.
- Insert the 5.25^ drive into the drive bay from the front until the tool-free latch clicks, securing the drive.
Note: To remove your drive, push the tool-free tab to release the drive and slide it out of the front.
CARBIDE SERIES 600
4. Installing HDDs
Step 1- Place the drive into the 3.5^ drive tray.
Step 2 - Slide the drive and rail assembly into the HDD cage from behind the motherboard as shown.
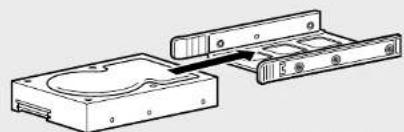
Step1
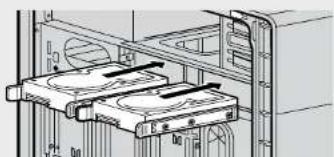
Step 2
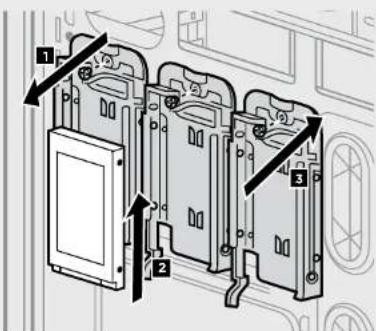
5. Installing SSDs
- Remove the screws to release the drive tray from the back of the motherboard tray.
- Slide the 2.5" drive into the tray until it snaps into place.
- Reattach the drive tray to the back of the motherboard tray.
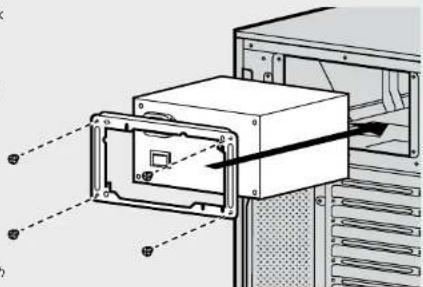
6. Installing the Power Supply
Remove the thumbscrews securing the power supply mounting bracket to the back of the case.
Attach bracket to the power supply with screws (included with the power supply).
Slide power supply into the back of the case.
Replace thumbscrews, securing the bracket to the case.
Note: PSU should be installed with the fan facing down to ensure proper airflow.
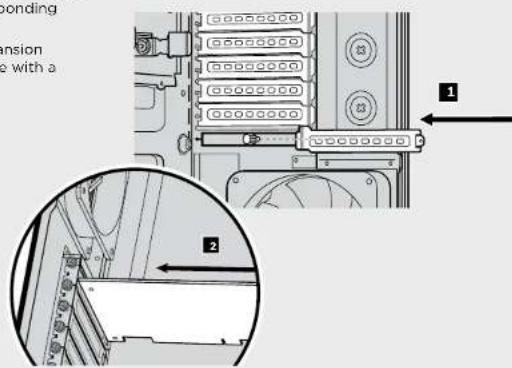
7. Installing PCI-E/PCI Card(s)
- Remove the thumbed screws and the corresponding slot covers.
- Install the expansion card and secure with a thumbscrew.
CARBIDE SERIES 600
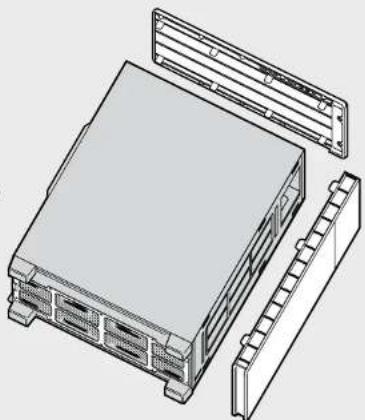
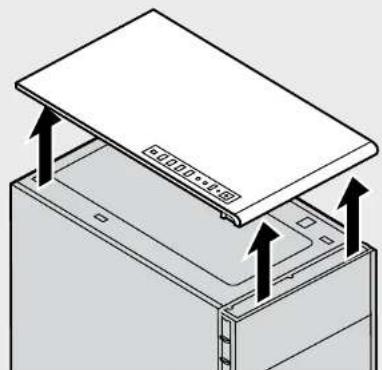
8. Removing the Front and Top Fascia
From inside the case, carefully push the tabs securing the front or top to the case, and pull gently outwards.
Repeat for all six (6) tabs for the front panel or eight (8) tabs for the top panel.
To replace panels, simply press them back into place slowly.
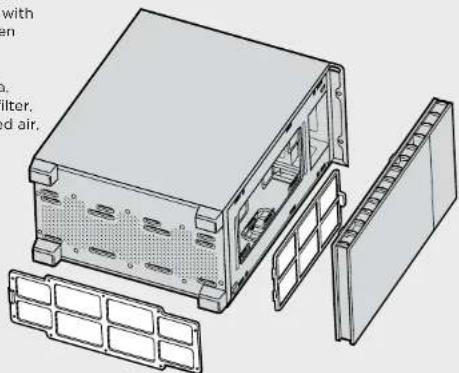
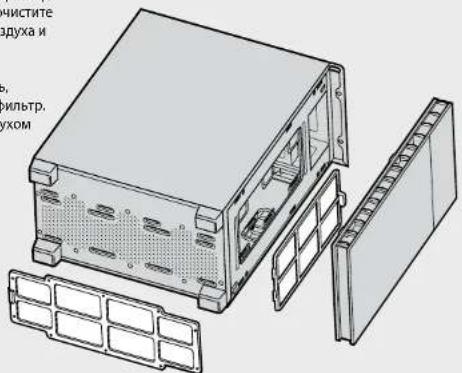
9. Cleaning the Dust Filters
Remove the bottom dust filter as shown, clean it with compressed air, and then replace.
Remove the front fascia. remove the front dust filter, clean it with compressed air, and then replace.
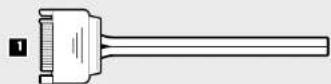
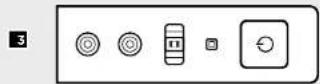
10. Connecting the Fan Controller
- Connect the SATA power connector to the PSU SATA power cable.
- Connect the 3 or 4-Pin fan connector to the case fan header.
- Push the fan speed selector button on your case to toggle fan speed.


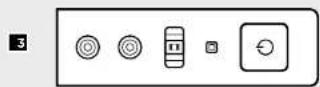
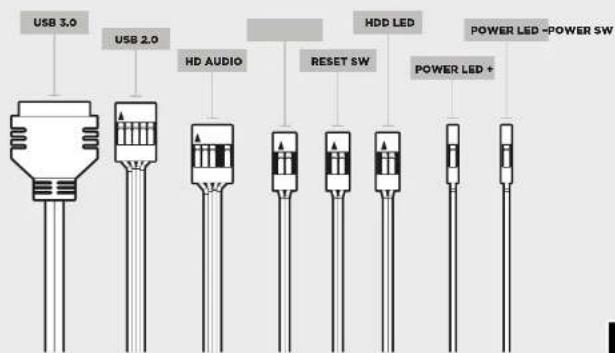
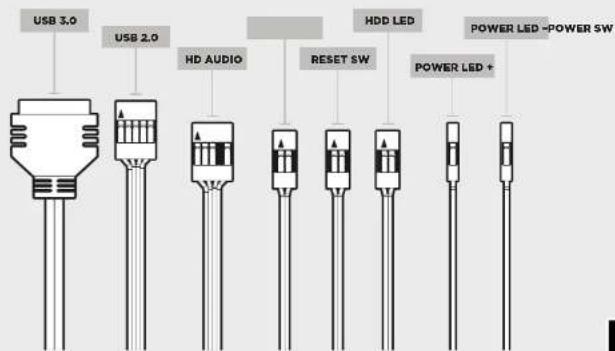
11. Installing the Front I/O Connectors
See your motherboard's manual for front panel header locations and pin-outs.

CARBIDE SERIES 600
Frequently Asked Questions
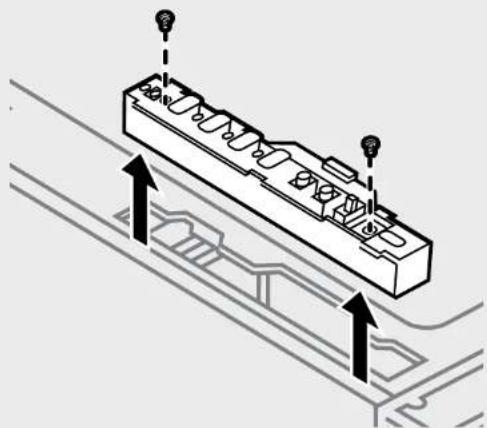
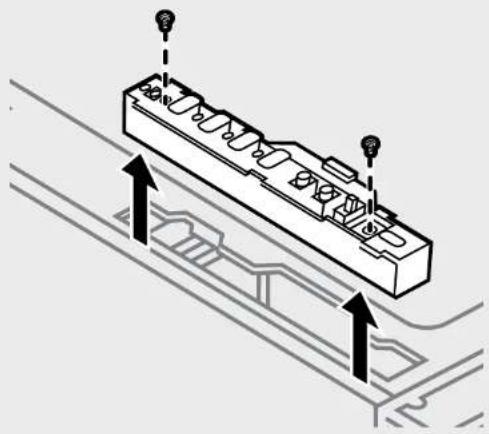
- How do I remove the I/O Panel?
Remove the top panel as mentioned in Step 8;
then remove the screws and gently pull the I/O panel upwards:
- Does the polarity matter with the I/O panel's power and reset header?
No, only the LED headers.
- Who should I contact if I received my case damaged or one of the fans is no longer working?
Please go to corsair.force.com and request an RMA so that we can replace the damaged part(s).
- Where can I mount a fan?
| Fan Mount Locations | |
| Front x2 120mm/140mm | |
| Top x | |
| Roar x1 120mm/140mm | |
| Bottom x5 120mm, x2 140mm | |
| Side x | |
| Mid x | |
To learn more about this case visit the product page at corsair.com
CARBIDE SERIES 600
Motherboards in die dafur
CoBMeCTMMoCTbpaMaTOpOB:
CnepeM 2x120mmnnn2x140mm
C

CARBIDE SERIES 600
CopexHMOe KOMPnEeKTA akceccyapOB
C BHTYHHeI CTOpOHN KOPNYCA OCTOPKOHN HAJIIMTE Ha3NHKIN, KOPTOPAM KpeiHTbCR NepeJHIN HREXHHNAH K KopPYCY, N OCTOPOON BuaBNIHbTe HAPKY.
NoTOpTe 3To DeCTBne DnBcEx
MeCTe (6) AaMbKOB nepeHnE
NaHEnnn BocMm (8) AaMbKOB
BepXHeN NaHEm.
TcHIOYUyCTAHOBRTI PAHEHNA MECTO, pnoCToMeDnEHHo HAKKMATe HAXHX.

9. OuNTKa nbIneBbIX φnIbTpOB
CHKMMTEHKKHMnblneBOHΦMHbTp, KAKNOK3AHO HA PNCYHKe, OHMNCTHe EOR C NOMIOBIO CHMTOBOO BDOyHa HycTahOBTE HA MeTO.
CHMNTe nepeDHOIO naHb, 3aTeN peHnI bIbeBOn FOhBtP. OcHNTte erO CKATm BO3yXOM UCTHOBTte ME CHTo.
10. NoidknoueHne KOHTpOJIePa BENTnIaTopa
- NpoknHHTe pa3bEM NTAHMNA SATA K Ka6BIO NTAHNAMA SATA H6NOKE NTAHNAM.
- IopKnKmTRE 3-NNI 4-KoTakThNb paZbEm BEHTHITOPa Kpa3bemy BEHTHITOPa Kopnyca.
3.ДиьвоборсКСССТНВЕПИТОРАХКМЛТЕпКИЧАТьБВБОРСССТН

11.YctahOBka nepeDnX pa3beMOB BBOda/BBBOda
PacnoonokHepepaBemOB KOKrAeKoB DnpepeHne naHenn Cm. BpykoOaCTBe no MaTePHNKoN nntae.
CARBIDE SERIES 600
Tacto3aabaembleBonpocbi
- KaK CHaTb NaHEnb BBoDa-BBbODa?
CHINMTBEpxHIO naHbB COOTBETCTBN C HHTpyKUNAMN B DeiCTBnB S

3aTeM OTBepHNTe BNHTbI NOCTOPOXHO NOTRAHHTe naHenb BBoDa-BbBODa BBepx:
2.М.imгл.THaHuHEnNtOHaJIPOHCTbPnI HcNtlo3OBAHmP aBa bEma NtIHAnr h c60paHa Na HauHEn BBOda-bBaBoDa?
HeT, OHa BaXHa ToIbKO DnA CBTeOIOIDHbIX pa3beMOB.
- K Komy clyedey obtpatbIbCS, eCN Kopny NOLnyeH NOBpeKeHNbHM HAM OHN h BENTHNIITOPoB 60nJIe He pAObaTeJ.
Ipejynhe na hain corsair force.com an apocriste paapeuwehna HOB3paa matepaon (RMA), urobo Mbl CMNITMAMHHTNIIOBPEXENHEHNEA CHNT.
4.Дe moKHO yCTaHObMb BeHTnIaTOp?
| Расноюжени мост Дд моHTахь BENTMЛТОПОВ | |
| пс\'д\'\'\'\'\'\'\'\'\'\'\'\'\'\'\'\'\'\'\'\'\'\'\'\'\'\'\'\'\'\'\'\'\'\'\'\'\'\'\'\'\'\'\'\'\'\'\'\'\'\'\'\'\'\'\'\'\'\'\'\'\'\'\'\'\'\'\'\'\'\'\'\'\'\'\'\'\'\'\'\'\'\'\'\'\'\'\'\'\'\'\'\'\'\'\'\'\'\'\'\''x2120mm/140mm | x2120mm/140mm |
| Б\'\'\'\'\'\'\'\'\'\'\'\'\'\'\'\'\'\'\'\'\'\'\'\'\'\'\'\'\'\'\'\'\'\'\'\'\'\'\'\'\'\'\'\'\'\'\'\'\'\'\'\'\'\'\'\'\'\'\'\'\'\'\'\'\'\'\'\'\'\'\'\'\'\'\'\'\'\'\'\'\'\'\'\'\'\'\'\'\'\'\'\'\'\'\'\'\'\'\'' 3a\`d\`b\`c\`e\`f\`g\`h\`i\`j\`k\`l\`m\`o\`p\`q\`r\`s\`t\`u\`v\`w\`x\`y\`z\`a\`b\`c\`d\`e\`f\`g\`h\`i\`j\`k\`l\`m\`o\`v\`g\`h\`i\`j\`k\`l\`m\`o\`v\`g\`h\`i\`j\`k\`l\`m\`o\`v\`g\`h\`i\`j\`k\`l\`m\`o\`v\`g\`h\`i\`j\`k\`l \`m\`o\`v\`g\`h\`i\`j\`k\`l\`m\`o\`v\`g\`h\`i\`j\`k\`l\`m\`o\`v\`g\`h\`i\`j\`k\`l\`m\`o\`v\`g\`h\`i\*x | x |
| H\'\'\'\'\'\'\'\'\'\'\'\'\'\'\'\'\'\'\'\'\'\'\'\'\'\'\'\'\'\'\'\'\'\'\'\'\'\'\'\'\'\'\'\'\'\'\'\'\'\'\'\'\'\'\'\'\'\'\'\'\'\'\'\'\'\'\'\'\'\'\'\'\'\'\'\'\'\'\'\'\'\'\'\'\'\'\'\'\'\'\'\'\'\'\'\'\'\'\'{\x3 120mm, x2140mm} | |
| Б\'\'\'\'\'\'\'\'\'\'\'\'\'\'\'\'\'\'\'\'\'\'\'\'\'\'\'\'\'\'\'\'\'\'\'\'\'\'\'\'\'\'\'\'\'\'\'\'\'\'\'\'\'\'\'\'\'\'\'\'\'\'\'\'\'\'\'\'\'\'\'\'\'\'\'\'\'\'\'\'\'\'\'\'\'\'\'\'\'\'\'\'\'\'\''x | x |
| С\'\'\'\'\'\'\'\'\'\'\'\'\'\'\'\'\'\'\'\'\'\'\'\'\'\'\'\'\'\'\'\'\'\'\'\'\'\'\'\'\'\'\'\'\'\'\'\'\'\'\'\'\'\'\'\'\'\'\'\'\'\'\'\''x | x |
IOnoHInHentbHy HnHopMaJIO bO 3ToM KOpNcE CM. Na cTpaHnCe npOdyKa TcaTa Corsaln

CARBIDE SERIES 600

- Table of Contents Case Specifications
- Congratulations!
- Thank you for purchasing the Carbide Series 600
- Inverse-ATX Full-Tower PC Case.
- Carbide Series Qulet 600Q
- Carbide Series Clear 600C
- CARBIDE SERIES 600
- Accessory Kit Contents
- Case Features
- Removing the Side Panels (600C)
- Removing the Side Panels (600Q)
- Installing the Motherboard
- Installing a 5.25" drive
- Installing HDDs
- Installing SSDs
- Installing the Power Supply
- Installing PCI-E/PCI Card(s)
- Removing the Front and Top Fascia
- Cleaning the Dust Filters
- Connecting the Fan Controller
- Installing the Front I/O Connectors
- Frequently Asked Questions
- CopexHMOe KOMPnEeKTA akceccyapOB
- OuNTKa nbIneBbIX φnIbTpOB
- NoidknoueHne KOHTpOJIePa BENTnIaTopa
- 11.YctahOBka nepeDnX pa3beMOB BBOda/BBBOda
- Tacto3aabaembleBonpocbi
Brand : CORSAIR
Model : Carbide Clear 600C
Category : Desktop Computer