
TechniMax SR1 - Vacuum Cleaner TECHNISAT - Free user manual and instructions
Find the device manual for free TechniMax SR1 TECHNISAT in PDF.
| Product type | Intelligent robot vacuum with laser navigation |
| Brand | TechniSat |
| Model | TechniMax SR1 |
| Dimensions (diameter × height) | 34.6 cm × 9 cm |
| Weight | 3.5 kg |
| Battery | Lithium-ion 14.6 V, 2,600 mAh |
| Maximum runtime | 120 minutes (at lowest level) |
| Maximum area per charge | 200 m² |
| Power supply | 100-240 V AC, 50/60 Hz, 18 V DC, 1 A |
| Power consumption (standby) | < 2 W (on docking station) |
| Power consumption (typical operation) | ~36 W |
| Cleaning system | 1 main brush + 2 side brushes |
| Dustbin | 0.6 liter |
| Filter | HEPA 13, filtration efficiency up to 99.95% |
| Navigation | Laser (Class 1), drop sensors, full bumper |
| Connectivity | Wi-Fi and Bluetooth (2.4 GHz) |
| Control app | TECHNIMAX (iOS and Android) |
| Operating temperature | +10 °C to +40 °C |
| Warranty | 24 months (legal warranty) |
| Repairability | Telephone technical support (Mon-Fri 8am-6pm) and online repair |
| Package contents | Robot, docking station, power supply, main brush, 2 side brushes, dustbin, HEPA 13 filter, cleaning tool, quick start guide |
Frequently Asked Questions - TechniMax SR1 TECHNISAT
User questions about TechniMax SR1 TECHNISAT
0 question about this device. Answer the ones you know or ask your own.
Ask a new question about this device
Download the instructions for your Vacuum Cleaner in PDF format for free! Find your manual TechniMax SR1 - TECHNISAT and take your electronic device back in hand. On this page are published all the documents necessary for the use of your device. TechniMax SR1 by TECHNISAT.
USER MANUAL TechniMax SR1 TECHNISAT
natural_image
Black TechniSat robotic vacuum cleaner with control panel and tassels (no visible text or symbols on device body)TECHNIMAX SR1
Smart robot vacuum cleaner with laser navigation
CONTENTS
ENGLISH....3-36
FRANÇAIS 37-70
ITALIANO....71-104
NEDERLANDS....105-138
POLSKE 139-172
Quick start guide
TECHNIMAX SR1
Smart robot vacuum cleaner with laser navigation

natural_image
Black TechniSat robotic vacuum cleaner with control buttons and tassels (no visible text or symbols on body)TechniSat
1 Contents
1 Contents....4
2 Preface....5
2.1 Target group for this instruction manual....5
2.1.1 Intended use 5
2.2 Scope of delivery....6
2.3 Accessories....6
2.4 Information regarding this quick start guide....6
3 Safety instructions....7
3.1 Regulations....12
3.2 Service instructions 14
3.3 Disposal instructions....15
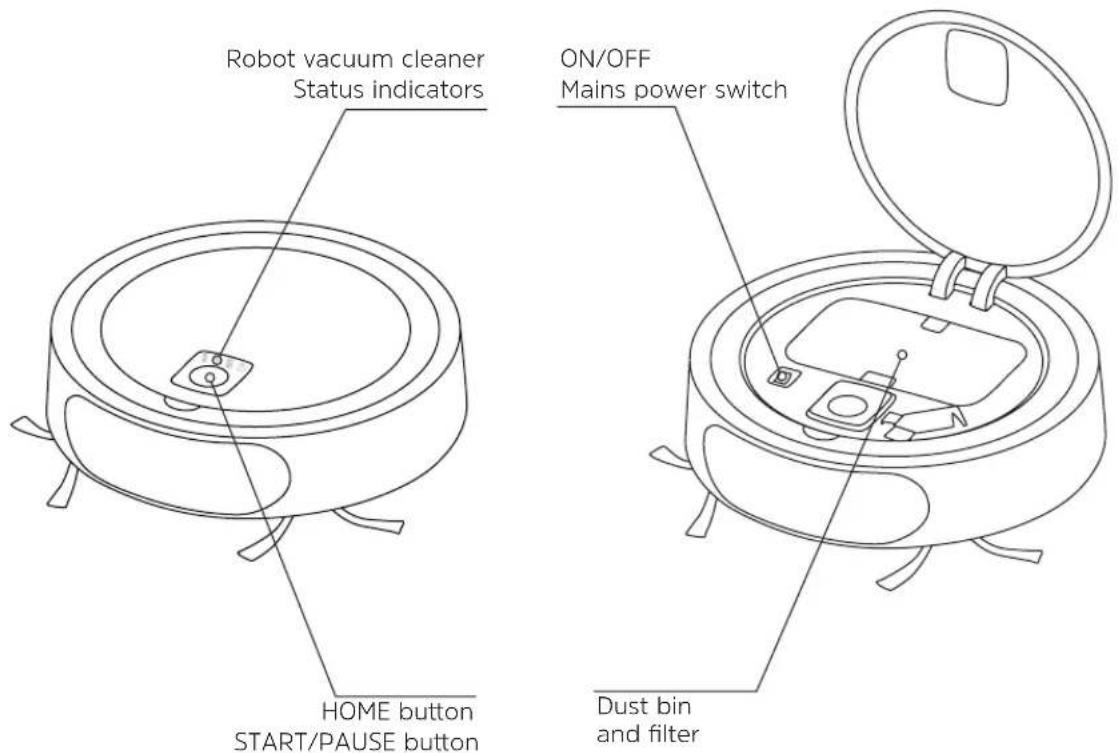
4 Device description....17
4.1 Robot vacuum cleaner status indicator....18
5 Operation....19
5.1 Preparing for first-time use....19
5.2 Operating the robot vacuum cleaner....22
5.3 After the cleaning process....23
5.4 Thoroughly cleaning the robot vacuum cleaner 25
6 Control using the TECHNIMAX app 29
6.1 Creating a TECHNIMAX user account 30
6.2 Registering the TECHNIMAX SR1 31
7 Troubleshooting 33
7.1 Factory settings....34
8 Technical data....34
9 Notes....36
2 Preface
Dear Customer,
Congratulations on your decision to purchase the TECHNIMAX SR1 robot vacuum cleaner.
This quick start guide is designed to help you to familiarise yourself with the extensive functions of your new robot vacuum cleaner and make best use of it.
Please read this quick start guide carefully before using the product for the first time and keep it for future reference. An up-to-date version of the quick start guide can be found in the TECHNIMAX SR1 download area on the TechniSat homepage at www.technisat.de.
We have kept the operating instructions as brief as possible and have used terminology that everybody can understand.
The range of functions on your device can constantly be expanded by means of software updates. This means that additional operating steps may be added that are not covered in this quick start guide, or the operation of existing functions may change. For this reason you should occasionally visit the TechniSat homepage, to download the latest version of the quick start guide.
We hope you enjoy using your TechniSat TECHNIMAX SR1!
The
TechniSat Team
2.1 Target group for this instruction manual
The instruction manual is intended for anyone who is installing, operating, cleaning or disposing of the device.
2.1.1 Intended use
This device is intended for private use at home only and is not designed for commercial use. Use the device exclusively for cleaning floor coverings (hard floors and low-pile carpets) in your home. The device is intended for use in normal, dry ambient conditions of +10 to +40 degrees Celsius. Operation in damp rooms or outside the house is expressly prohibited. Please use the device only as described in this quick start guide. No liability is assumed for damage caused by improper use.
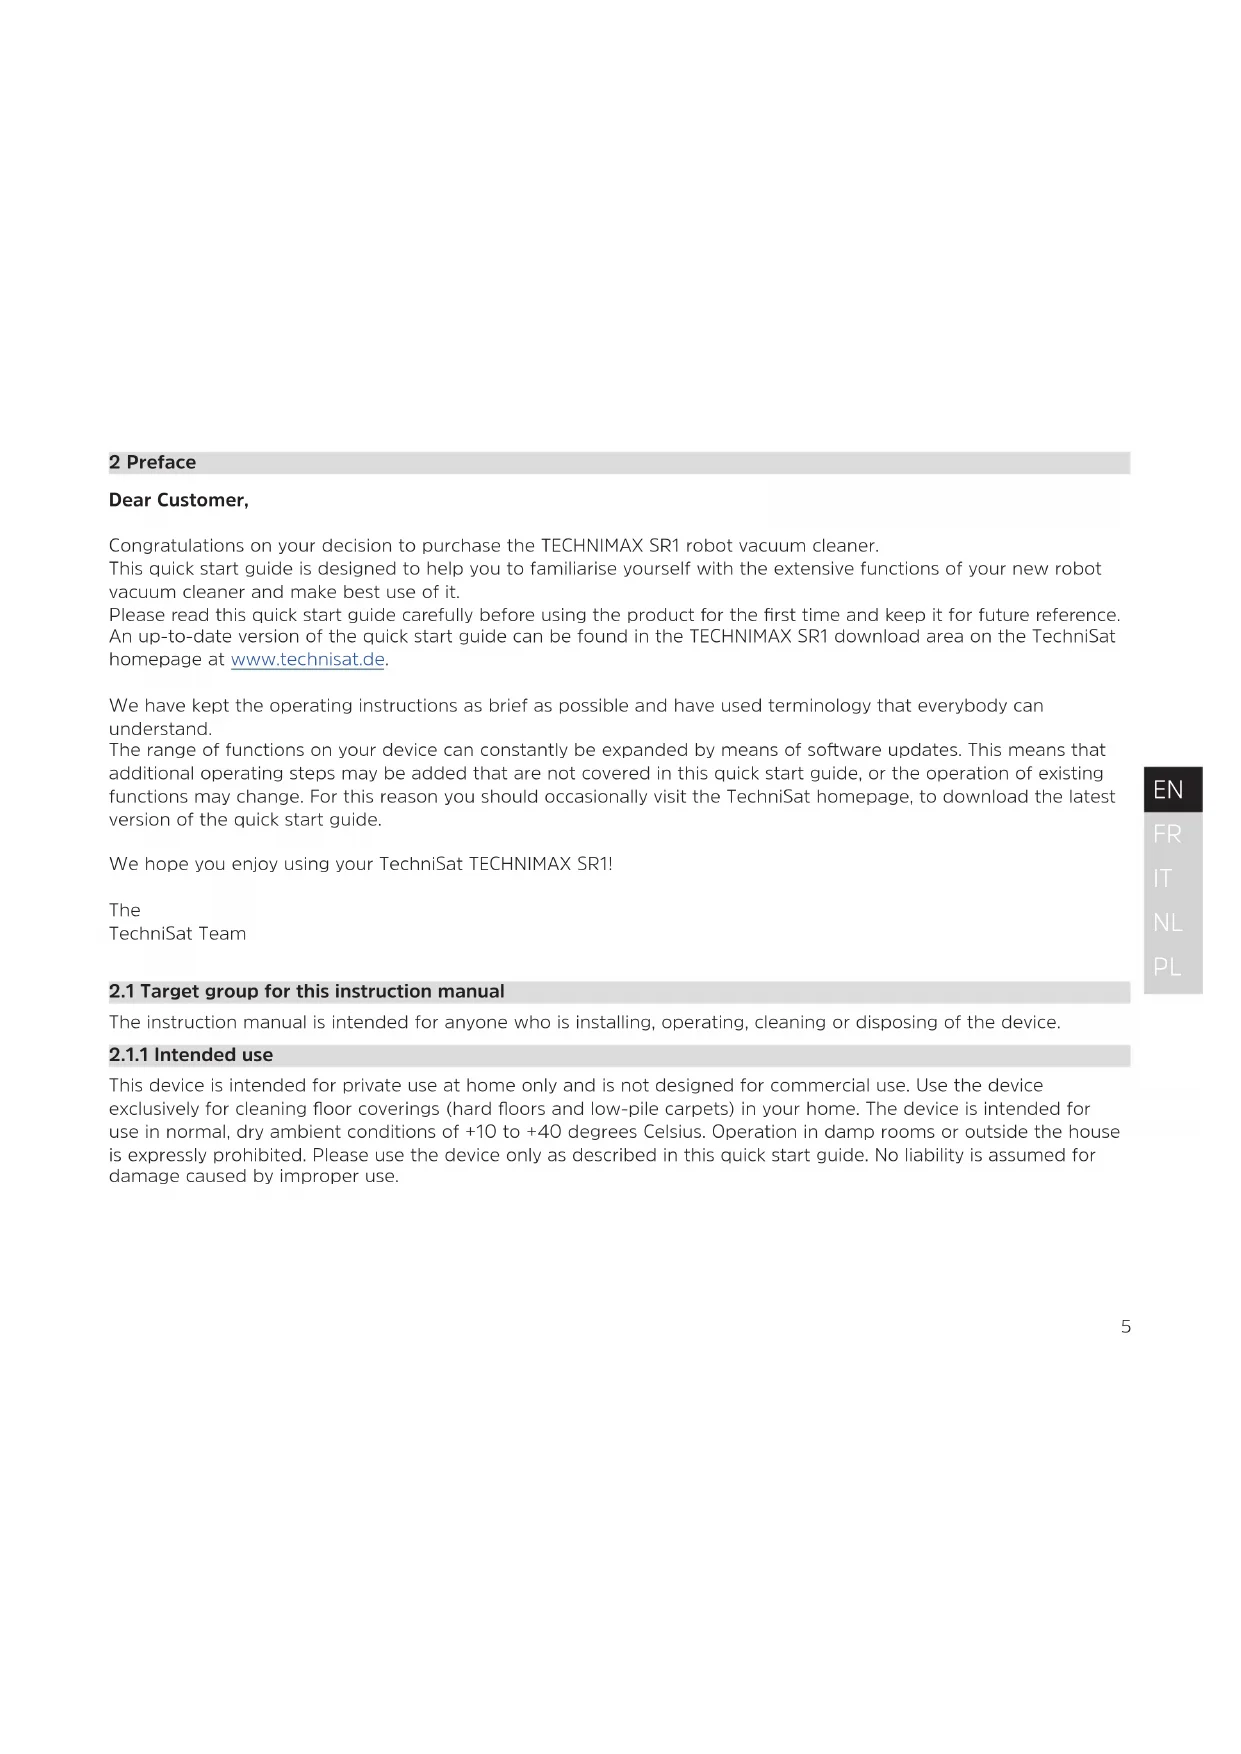
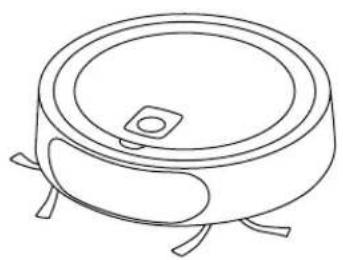
2.2 Scope of delivery
1 x TECHNIMAX SR1 1 x main brush
1 x power supply unit 2 x side brushes
1 x base station 1 x dust bin
1 x cleaning tool 1 x HEPA 13 filter
1 x quick start guide
natural_image
Line drawing of a cylindrical electronic component with four legs and a central square hole (no text or symbols)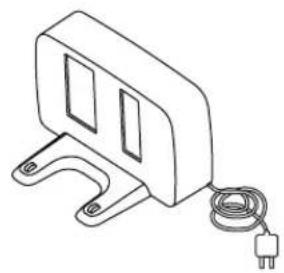
natural_image
Line drawing of a mechanical device with a coiled cable and power plug (no text or symbols)
natural_image
Line drawing of a laboratory pipette with multiple tubes (no text or labels)TECHNIMAX SR1 Base station Cleaning tool
2.3 Accessories
Please only use the original accessories, which are designed for this device, with this robot vacuum cleaner. This ensures the permanently high quality of your robot vacuum cleaner and ensures a long service life for the device. Suitable accessories for your robot vacuum cleaner can be found on our homepage at www.technisat.de.
2.4 Information regarding this quick start guide
Please take note of the following information to minimise safety risks, to prevent damage to the device and to make a contribution to environmental protection. Please read all the safety information carefully and keep it for future reference. Always observe all warnings and information in this quick start guide and on the rear of the device.

Caution - This identifies important information that must be observed to prevent device defects, data loss/ misuse or undesired operation.

Tip - This identifies information relating to the described function, as well as to other related functions that may have to be taken into account, with reference to the corresponding section in the manual.
Indicates a work step.
3 Safety instructions


Please fully charge the robot vacuum cleaner's battery before using it for the first time. Use only the supplied base station and the supplied AC adapter for charging. Using other components to charge the robot vacuum cleaner may damage the device and will void the warranty. To maintain the capacity of the rechargeable battery for as long as possible, the device should only be stored and operated at room temperature. At least once a year, the battery must be fully charged in order to avoid a deep discharge.

The operating temperature of the robot vacuum cleaner is between 10^ C and 40^ C. Operation and storage should never take place outside this temperature range, otherwise the service life can be reduced.

If the power adapter, power cord or base station is damaged, stop using these parts and contact your dealer to replace the defective parts.

Before cleaning, the floor must be cleared of objects that the robot could suck in or damage. Cables may be damaged by the rotating brush, and fine textiles may wrap around the rotating brush causing significant damage. Before each use, please ensure that the robot vacuum cleaner can move around freely.

The robot vacuum cleaner has crash sensors that prevent the device from falling from a height. Please make sure that these sensors, which are located at the bottom of the robot, are cleaned at regular intervals. Moreover, ensure that these crash sensors are in no way covered up. We recommend cleaning after every use.

The robot vacuum cleaner cannot be used for cleaning stairs, tables and shelves. The robot is unable to drive over and clean deep-pile carpets.

The robot vacuum cleaner has rotating parts which must never be touched during operation due to the risk of injury!
⚠️ Please never operate the robot vacuum cleaner close to the body as hair and clothing could be sucked in causing injury!
The base station has a special pattern that allows the robot to recognize it as such. Please make sure that the base station can be seen in full by the robot vacuum cleaner. For optimal visibility of the base station by the robot vacuum cleaner, no other objects may be present within a radius of one meter around the base station.
An internal safety mechanism protects the robot vacuum cleaner from overheating. Should the device or the battery become too hot, the device switches off automatically. Please allow the device to cool for 30 minutes before putting it back into operation.
⚠️ Repairs to the robot vacuum cleaner or the base station may only be carried out by authorized specialists.
⚠️ Use the device only with the intended, specially designed batteries. Using other batteries may result in injury and fire.
When the battery is not in use, keep it away from other metal objects such as paper clips, coins, keys, nails, screws, or other small metal objects that can create a connection between the battery contacts. A battery contact short circuit can lead to burns or fires.
⚠️ Never expose the battery or device to fire or high temperatures. Fire or temperatures over 130^ C can cause an explosion.
⚠️ Follow all charging instructions and do not charge the battery or device outside the temperature range specified in the instructions.
⚠️ Incorrect charging or charging at temperatures outside the specified range may damage the battery and increase the risk of fire.
Only have repairs carried out by qualified personnel using identical spare parts. This ensures that the safety of the product is maintained.
Do not attempt to modify or repair the device or the battery. The warranty is void in the event of unauthorized intervention by third parties.
The power adapter and base station may only be used in dry, enclosed indoor areas.
The device must not be used as a toy. Not suitable for children under 12 years of age. When used near children, close supervision is required. To prevent injury or damage, keep children away from the product and make sure that children do not put fingers or other objects inside the openings of the device.
⚠️ Use the device only as described in this quick start guide.
Do not use the power adapter if it has a damaged cable or plug. If the robot vacuum cleaner or power adapter is not working properly, is dropped, damaged, left outdoors or dropped into water, it must be inspected and repaired by a specialist before further use.
Do not pull or carry the power adapter by the cable, do not use the cable as a handle, do not trap the cable in door frames, and do not pull the cable across sharp edges or around corners. Do not place the product on the cable. Do not drive the device over the cable. Keep the cable away from hot surfaces.
⚠️ Plug the power adapter into an easily accessible power outlet.
⚠️ Never carry the power adapter by the cable or pull it out of the socket using the cable.
⚠️ Ventilation ducts must not be covered.
⚠️ Keep hair, loose clothing, fingers and all body parts away from openings and moving parts.
Do not place the robot on stairs or furniture, as this may result in injury or damage.
Never vacuum up flammable liquids such as gasoline or fine wood chips or use the device in areas where they may be present -> there is a danger of explosion!
Do not vacuum up burning or smoking objects such as cigarettes, matches or hot ashes.
Do not use the device without the dust bin and filter.
⚠️ Turn off the main power switch before cleaning the brush roller.
Under extreme conditions, battery cell leaks can occur. If leaked liquid gets on the skin, wash the affected areas quickly with soap and water. If leaked liquid gets into your eyes, do not rub the eyes. Rinse them immediately with clean water. Seek assistance from a doctor immediately.
⚠️ Only use the supplied base station and power adapter for charging.
⚠️ Move cables from other devices outside the area to be cleaned.
Do not use the robot vacuum cleaner in a room where an infant or child is sleeping.
Do not use the robot vacuum cleaner in an area where burning candles or fragile objects are on the floor to be cleaned.
Do not use the robot vacuum cleaner in a room where burning candles are placed on furniture that the robot vacuum cleaner might accidentally bump into.
Do not use the robot vacuum cleaner in rooms or buildings with motion detectors or alarm monitoring.
Do not allow children or animals to sit on the robot vacuum cleaner.
⚠️ Do not use the robot to transport objects.
WARNING!
The power adapter is designed for operation at 230 V / 50 Hz AC voltage. Only plug the power adapter into an undamaged and easily accessible socket.
Do not vacuum up hard, sharp objects with this product, as they may cause damage.
⚠️ Make sure that there are no children or pets in the room or that they do not have access to the room that is being cleaned to avoid the risk of injury.
⚠️ To avoid injury and / or damage to the device, do not vacuum up hot, poisonous or sharp objects or liquids.
CAUTION
To avoid damage, remove fragile objects, loose cables, and small objects that could fall over.
Laser and laser classification
The robot vacuum cleaner is equipped with a laser-controlled navigation unit. The iR laser is classified as a Laser Class 1 product according to DIN EN 60825-1: 2015-07:
The following safety instructions must be observed with regard to the laser beam:
Do not aim the laser beam at people or animals.
Do not look at the direct or reflected laser beam.
⚠️ Any form of manipulation of the laser unit is strictly prohibited.
The camera on the laser unit is used exclusively for the evaluation of the reflected laser signals for map generation and does not detect any images in the conventional sense.
3.1 Regulations
WEEE Directive
Directive 2012/19/EU on Waste Electrical and Electronic Equipment RoHS.
Directive 2011/65 / EU of the European Parliament and of the Council of 8 June 2011 on the restriction of the use of certain hazardous substances in electrical and electronic equipment (OJ L 174, 1 July, 2011).
ErP Directive on ecodesign for energy-related products:
The Ecodesign Directive 2009/125/EC is a European Directive which sets out the requirements for the environmentally sound design of "energy-related products" (ErP) in the common internal market of the European Union. When it came into force, it replaced Directive 2005/32/EC of 6 July 2005, also known as the Energy Using Products (EuP) Directive. For the TECHNIMAX SR1: ENER 7 Chargers and Power Supplies Regulation (EC) 278/2009.
Declaration of Conformity
TechniSat hereby declares that the TECHNIMAX SR1 radio equipment type complies with Directive 2014/53/EU. The complete text of the EU Declaration of Conformity is available at the following web address:
TechniSat accepts no liability for product damage as a result of external influences, wear or improper handling, unauthorised repairs, modifications or accidents.
Changes and printing errors reserved. Version 09/19.
Duplication and reproduction only with the publisher's approval. The current version of the manual is available in PDF format in the download area of the TechniSat homepage at www.technisat.de. TECHNIMAX SR1 and TechniSat are registered trademarks of
D-54550 Daun/Eifel, Germany
www.technisat.de

The names of the companies, institutions or makes referred to are trademarks or registered trademarks of the respective owners.
3.2 Service instructions

This product is quality-tested and provided with the legal warranty period of 24 months as from the date of purchase. Natural wear, i.e. any impairment of the robot vacuum cleaner due to wear, which is not caused by defects in the materials, is excluded from the warranty. The warranty is only valid if the product is used as intended. Please keep your receipt as proof of purchase. In the event of warranty claims please contact the product dealer.

Should you experience a problem with this device, or for queries and information, our Technical Hotline is available:
Mon. - Fri. 8:00 am - 6:00 pm on:
+49 (0) 3925 9220 1800.

Repairs can also be ordered directly online at www.technisat.de/reparatur.

If the device needs to be returned, please only use the following address:
39418 Stassfurt, Germany
3.3 Disposal instructions
The device packaging consists exclusively of recyclable materials. Please sort the components appropriately, and dispose of them in line with your local waste disposal regulations. At the end of its service life, this device must not be disposed of with your regular household waste. It must be taken to a recycling collection point for electrical and electronic equipment.
This is indicated by the ☒ symbol on the product, the instruction manual or the packaging.
The materials are recyclable according to their labelling.
An important contribution is made to our environment by recycling, recovery of materials or other kinds of recycling for old devices.
Please ask local authorities for the location of the relevant disposal point. Please ensure that electronic waste is not disposed of in your regular household refuse, but is correctly disposed of either in special bins for problem waste, or at collection points in the retail trade.
Batteries/rechargeable batteries may contain poisonous substances which cause harm to health and the environment. Batteries/rechargeable batteries are subject to European Directive 2006/66/EC. They must not be disposed of with normal household waste.
Disposal of packaging:

Your new device was protected by packaging on its way to you. All materials used are environmentally friendly and recyclable. Please collaborate and dispose of the packaging in an environmentally-friendly way. Ask for information from your dealer regarding current disposal means or your local disposal facility.
Risk of suffocation! Keep packaging and parts thereof away from children. Risk of suffocation by films and other packaging materials.
Device disposal:
Old devices constitute valuable waste. Valuable raw materials can be recovered through environmentally-friendly disposal. Consult your town or local authority as to the possibilities for environmentally-friendly and proper disposal of the device. Prior to disposal of the device, remove the batteries/rechargeable batteries contained therein.
This device is identified in accordance with the Waste Electrical and Electronic Equipment (WEEE) Directive 2012/19/EU.
At the end of its service life, this device must not be disposed of with your regular household waste. It must be taken to a recycling collection point for electrical and electronic equipment. The symbol on the product, the operating manual or the packaging indicates this. The materials are recyclable according to their labelling. An important contribution is made to our environment by recycling, recovery of materials or other kinds of recycling for old devices.
⚠️ Important information for the disposal of batteries/rechargeable batteries: batteries/rechargeable batteries may contain poisonous substances that harm the environment. Therefore you must always comply with applicable statutory provisions when you dispose of batteries/rechargeable batteries. Never dispose of batteries in normal household waste. Used batteries/rechargeable batteries can be disposed of at your specialist retailer or at special disposal sites free of charge.
4 Device description
4.1 Robot vacuum cleaner status indicator

Battery
The battery icon informs you of the battery status. If it lights up, it means that the battery level is sufficient. When it starts to flash, the robot vacuum cleaner needs to be charged via the base station. When the battery runs low during cleaning, the robot vacuum cleaner automatically moves to the base station and continues cleaning once the battery is fully charged.

WiFi connection
The blue WiFi symbol lights up when the robot vacuum cleaner has connected to the WiFi via the TECHNIMAX app and the robot vacuum cleaner can be found on the WiFi network. If the symbol is not lit, the robot vacuum cleaner is not connected to the WiFi.

Dust bin full
The dust bin icon lights up permanently when the dust bin needs to be emptied. The robot vacuum cleaner will continue cleaning even when the dust bin is full.

Error
If this symbol flashes, there is a problem and the robot vacuum cleaner cannot start cleaning. Possible reasons are a missing dust bin, or a brush getting stuck. Please refer to the information in Section 7 "Troubleshooting", on page 33.
5 Operation
5.1 Preparing for first-time use
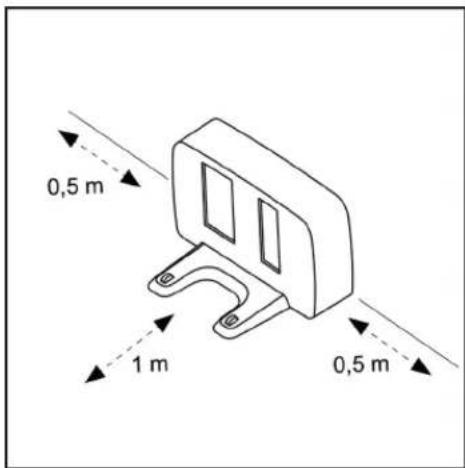
- Place the base station against a wall such that there are no obstacles within 50 cm of the base station. Connect the base station to the power adapter, then connect the power adapter to the power supply.
i Make sure that the metal contacts (charging contacts) on the base station are free of dirt and dust. Otherwise, the charging process can end prematurely. If necessary, clean them with a dry, lint-free cloth.
- Open the top cover and switch on the robot vacuum cleaner using the power switch.
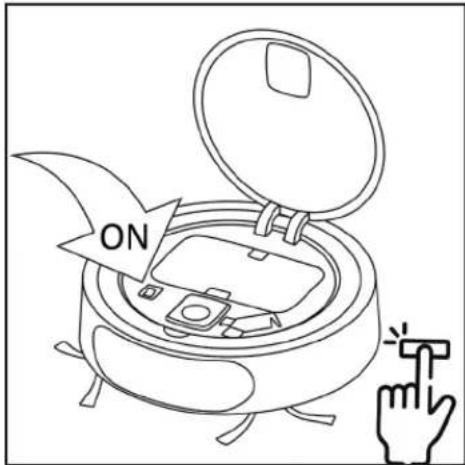
i The robot takes about 20 seconds to be ready for use.
- Place the robot vacuum cleaner at a distance of 30 - 50 cm with the sensor unit facing the base station. Press HOME on the top of the robot vacuum cleaner.
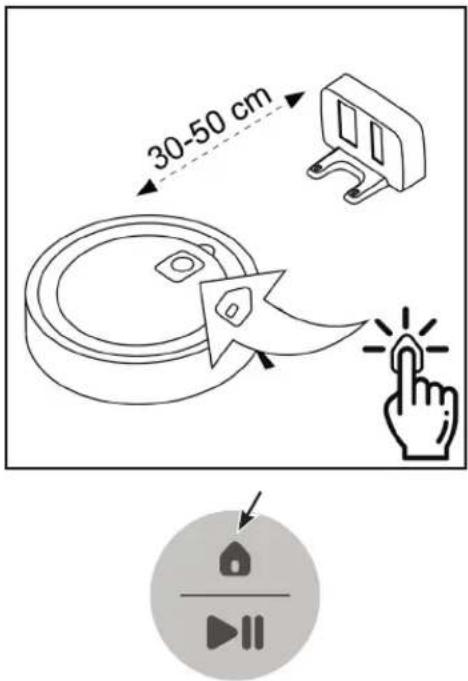

The robot vacuum cleaner will now turn on and "look for" the base station. Then it will drive to the base station to charge the battery (the battery icon flashes). Before using the device for the first time, wait until the battery is fully charged (the battery icon lights up permanently).

Like any lithium-ion battery, the TECHNIMAX SR1's battery is subject to natural wear. Over time, the battery performance, and thus the running time, decreases steadily. This is a natural aging process on the part of the battery and not a consequence of a material or manufacturing error or material defect!
5.2 Operating the robot vacuum cleaner
Safety instructions before vacuuming.

To avoid damaging the floor, remove pointed or sharp objects that could get under the robot and scratch the floor surface.

The robot vacuum cleaner is designed to pick up small amounts of dust and does not replace a hand-held vacuum cleaner.

The robot vacuum cleaner is designed to clean hard floors and low-pile carpets. It is not recommended for deep pile carpets.

Dark carpets or objects can trigger the robotic sensors, preventing the robot from moving on or around them.

Note that, due to the design, the robot detects obstacles by laser starting from a height of about 8 cm. Obstacles below this height are detected by the bumper. For small and light objects, we recommend drawing a no-go area in the app.

Mirrors, glass panes and high-gloss surfaces affect the robot's sensors in such a way that they might not be recognized as obstacles. Again, we recommend designating a no-go area.
To start the cleaning process, tap the START/PAUSE button on the top.
START/PAUSE button
Cleaning started If pressed again, the current cleaning is paused and can be resumed by pressing the button again.
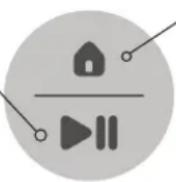
HOME button
Send the robot back to the charging station. The current job is cancelled.
The robot vacuum cleaner now powers up and starts the cleaning process.
When the cleaning process is completed, or if the battery falls below a certain level of charge, the robot vacuum cleaner automatically moves to the base station to recharge the battery.
If you want to pause the cleaning process, press the Start/Pause button. Press the button again to resume cleaning.
Press the HOME button to stop the cleaning process. The robot vacuum cleaner automatically returns to the base station to charge the battery.
i Observe the safety instructions in this quick start guide for each cleaning procedure.
5.3 After the cleaning process
i After each cleaning, the dust bin must be emptied and cleaned, as a lot of dirt and dust can accumulate.
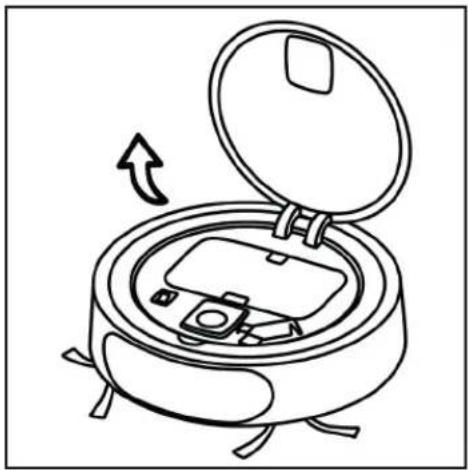
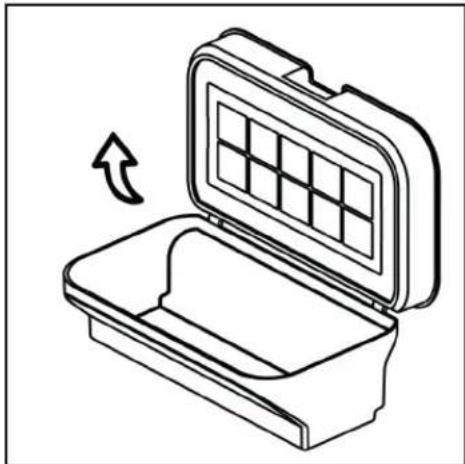
- Open the top cover of the robot vacuum cleaner.
natural_image
Line drawing of a device with an open lid and internal components, showing a rotation arrow (no text or symbols)- Press the catch on the top of the dust bin to unlock it. Remove the dust bin.

natural_image
Line drawing of a portable stove with open lid and internal compartments, no text or symbols present- Open the top cover of the dust bin and remove the dirt and dust from the dust bin.
natural_image
Line drawing of an open toolbox with a grid pattern on the lid, showing a curved arrow indicating rotation (no text or symbols)- Carefully clean the filters and the dust bin under running water. Allow all parts to dry completely before reassembling them in reverse order and placing them in the robot vacuum cleaner.
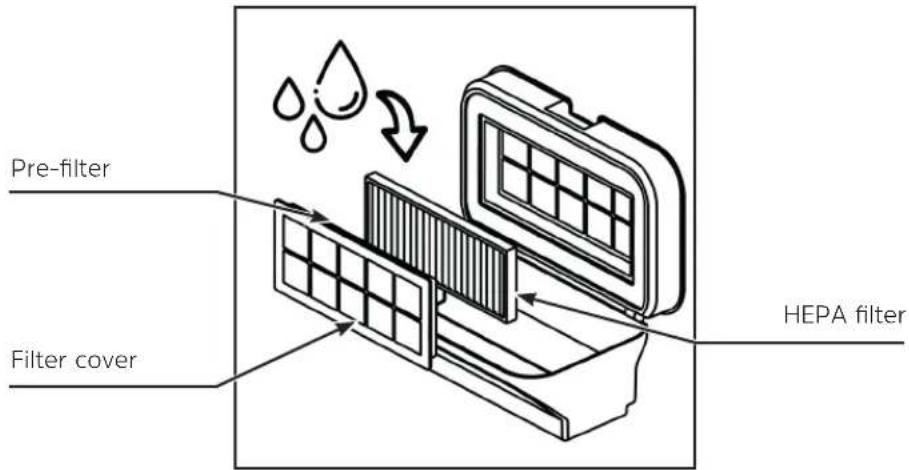
The filter unit consists of the filter cover, the pre-filter (foam) and the HEPA filter (paper).
When assembling the filter system, first insert the pre-filter into the filter cover and then the HEPA filter. Then put the filter cover with the pre-filter and HEPA filter back into the lid of the dust bin.
When inserting the dust bin into the robot vacuum cleaner, press lightly on the dust bin until it clicks into place.
5.4 Thoroughly cleaning the robot vacuum cleaner
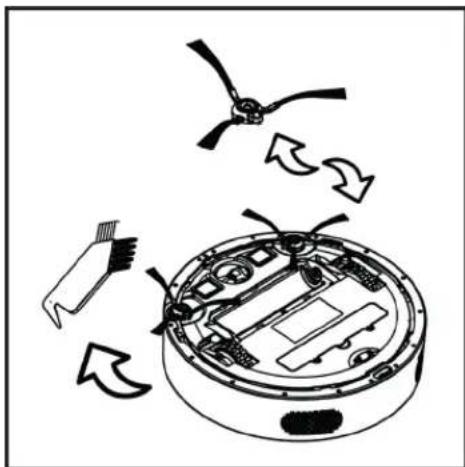
We recommend thoroughly cleaning the robot vacuum cleaner after each use. This includes the brushes on the bottom, the crash sensors on the bottom and the sensor panel on the front.
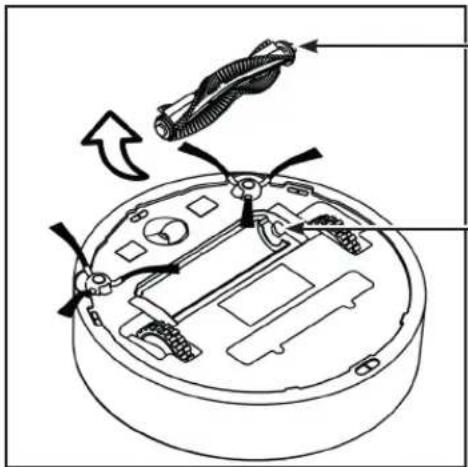
- Remove the protective cover of the main brush by squeezing the two tabs together.

Squeeze the tabs together
- Remove the main brush. Note that the motor mount for the main brush is on the right side.
Guide for Motor mount
Motor mount
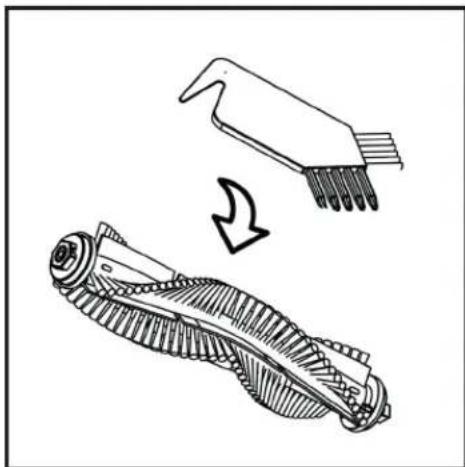
- Clean the main brush with the supplied cleaning brush / cleaning tool. If necessary, remove any hair that has wrapped around the brush.
natural_image
Technical line drawing of a mechanical component with a tool and gear assembly (no text or symbols)- If necessary, replace the side brushes. These are attached with a Phillips head screw. Free the wheels from dirt and dust.
natural_image
Diagram of a robotic vacuum cleaner with internal components and directional arrows indicating motion (no text or symbols)- Clean the crash sensors on the bottom with a soft, lint-free microfiber cloth.

- Clean the sensor panel on the front with a soft, lint-free microfiber cloth.

natural_image
Line drawing of a robotic vacuum cleaner with motion arrows and a hand cleaning the surface (no text or symbols)6 Control using the TECHNIMAX app
With the TECHNIMAX app, it is possible to control the robot vacuum cleaner using a smartphone. You can also use the app to set no-go areas that the robot vacuum cleaner should not clean/drive on.
To control the TECHNIMAX SR1 please activate both the WiFi and Bluetooth connection on your smartphone. Take note of the instructions in the app. Further information on using the TECHNIMAX app can be found on the TechniSat homepage at www.technisat.de.

TECHNIMAX APP


6.1 Creating a TECHNIMAX user account
After downloading and installing the TECHNIMAX app on your smartphone, open it. You first need to create a user account.

If you do not have a user account yet, tap Register.
Enter your e-mail address and password in the following screen.
When you have completed all required fields, tap Register. You will now receive an e-mail with a registration link. Tap this link to complete the registration. Then return to the TECHNIMAX app and enter your registration data. Then tap Sign in.
6.2 Registering the TECHNIMAX SR1
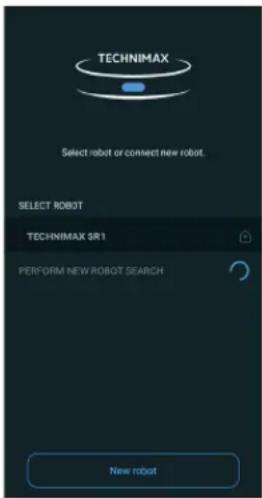
After you have logged in with your TECHNIMAX user account, an overview appears showing your registered devices.
To register a new TECHNIMAX SR1, tap the New Robot button.
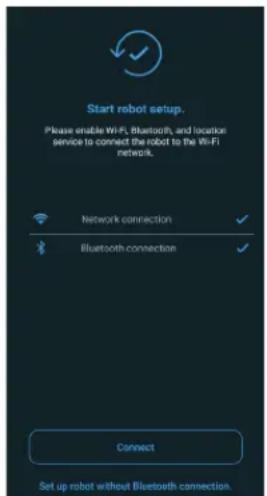
To start setting up your new robot, enable both the WiFi and Bluetooth connection on your smartphone. In addition, the phone's location must be turned on.

Follow the instructions in the smartphone manufacturer's operating instructions.
Then tap the Connect button.

If not already done, switch the TECHNIMAX SR1 on with the mains switch and wait until it is completely ready for operation.
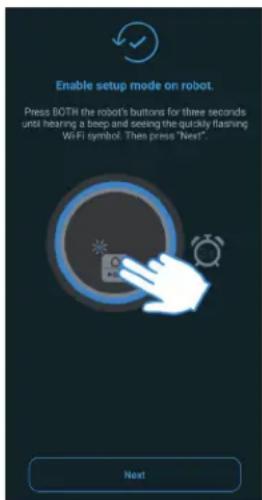
Press and hold the HOME and START/STOP buttons on the top for at least 3 seconds until a beep sounds and the WiFi icon flashes.
Then tap the Next button.
If the connection fails, please pay attention to the following points:
- Turn the robot off and on again.
- Wait until the red symbol lights on the robot turn off.
- Press the two buttons on the robot again for 3 seconds.
- Make sure the robot is no more than 2 meters away.
If the connection still does not work, you will be asked to configure the connection via WiFi.
After the connection has failed 3 times, you can connect via WiFi. Tap Start when prompted.
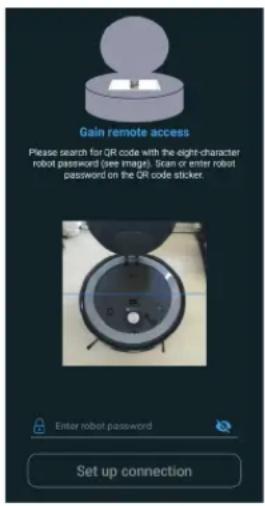
A window will appear with the name of the WiFi access point for your TECHNIMAX SR1.
Tap the name.
Then you need to scan the QR code, which is located on the bottom underneath the dust bin.
Subsequently, a list is shown of the WiFi networks within reach. Select your WiFi network and enter the password for your WiFi network. The TECHNIMAX SR1 now connects to your WiFi network and the WiFi icon lights up permanently.
7 Troubleshooting
Here are the most common problems and how to fix them. In the event of a error, a red LED in the shape of a triangle with an exclamation mark lights up on the robot vacuum cleaner.
| Error Possible cause Fix | ||
| Main brush The main | brush is stuck or does not rotate properly. | Clean the main brush of dirt, lint, or hair. |
| Vacuum motor Som | ething is blocking the vacuum path. | Remove the main brush and dust bin and any obstacles. |
| Battery critically low | The battery is too low and the robot cannot return to the base station for charging. | Manually place the robot on the base station to charge it. |
| Battery is not charging (no visual indication) | Charging contacts on the robot vacuum cleaner and the base station are dirty. | Clean the charging contacts on the robot vacuum cleaner and the base station. |
| Wheel is stuck Wheel | is stuck or does not turn properly. | Clean the wheels of possible dirt, lint or hair. |
| No dust bin The dust | bin is missing or inserted incorrectly. | Insert the dust bin. |
| The device is not on the floor. | Robot has been raised. Place the robot | properly on the floor. |
| Side brush stuck Side | brush is jammed or does not rotate properly. | Clean the side brush of dirt, lint, or hair. |
| Electrical problem Internal software error. Reset to the factory settings (press Play/Pause button for 10 sec.). | ||
| Firmware update failed | Connection lost. Ensure there is a stable WiFi connection and download the firmware from the TECHNIMAX app. | |
| Robot stuck Robot is | stuck. Free the robot so that it | can move freely again. |
| Shock absorber Som | ething is blocking the shock absorber. | Check to see if something is jamming the shock absorber and make sure it can move. |
7.1 Factory settings
If the TECHNIMAX SR1 does not function as intended or if another error occurs, it can be reset to the factory settings.

CAUTION: Resetting to factory settings clears all stored data.
Press and hold the START/PAUSE button for at least 10 seconds.

All indicator lights go out for 1-2 seconds.
The TECHNIMAX SR1 is restarted and all the indicator lights come on again. Then switch the TECHNIMAX SR1 off and then back on again using the power switch.
8 Technical data
| Room size and cleaning time up to 200 m^2 (running time up to 120 minutes at the lowest level) | |
| Room coverage (standard test room according to IEC 60312-3 version 2010) | >95% |
| Cleaning system 1 main brush, 2 side brushes | |
| Dust bin 0.6 litres | |
| Filter system Hepa filter for allergy class 13 with up to 99.95% filter performance | |
| Navigation Laser navigation for map formation | and avoiding obstacles,Wrap-around bumper and crash sensors |
| Indicators LED status indicator | |
| Communication WiFi and Bluetooth | |
| WiFi/Bluetooth frequencies 2.400 ~ 2.4835 GHz | |
| WiFi transmission power 17dBm@11b | 14dBm@11g13dBm@11n |
| Bluetooth transmission power max. +10 dBm | |
| Battery Lithium ion battery 14.6 V, 2,600 mAh | |
| Charge cycles >500 | |
| Power adapter AC 100 - 240 V, 50/60 Hz | DC 18 V, 1 AProtection class IP20 |
| Power consumption In standby on the charging station: < 2 WIn standby on battery: 1.5 WIn operation, max. (short-term, max. 3 sec.): ~ 192 WIn operation, typical: ~ 36 W | |
| Dimensions ∅ 34.6 cm, height 9 cm | |
| Weight 3,5 kg | |
| Ambient conditionsOperating temperature | +10°C to +40°C |
| Ambient conditionsStorage temperature | +5°C to +50°C |
| Humidity during operation 40% - 60% relative humidity | |
| Humidity for storage 20% - 75% relative humidity | |
| Item number for TECHNIMAX SR1 0000/7030 | EAN: 4019588070301 |
Technical data of the delivered power adapter
| Manufacturer TechniSat Digital GmbH, TechniPark, D-5455 | 0 Daun/Eifel |
| Model identifier CZH024180100EUWH | |
| Input voltage AC 100 - 240 V | |
| Input AC frequency 50/60 Hz | |
| Output voltage DC 18,0 V | |
| Output current 1,0 A | |
| Output power 18,0 W | |
| Average active efficiency 87,4 % | |
| Efficiency at low load (10%) 82,9 % | |
| No-load power consumption 0,04 W |
9 Notes
natural_image
Black TechniSat 501 robotic vacuum cleaner with control buttons and antenna (no visible text or symbols beyond branding)TechniSat
1 Sommaire
1 Sommaire 38
2 Avant-propos....39
natural_image
Line drawing of a cylindrical electronic component with four legs and a square top (no text or symbols)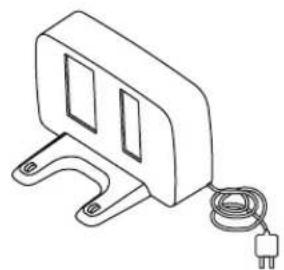
natural_image
Line drawing of a mechanical clamp or bracket with a coiled cable and terminal block (no text or symbols)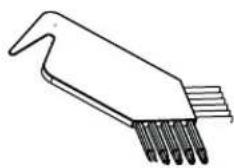
natural_image
Line drawing of a laboratory pipette with multiple tubes (no text or labels)natural_image
Line drawing of a portable alarm device with open lid and internal components, no text or symbols presentnatural_image
Line drawing of a device inside a cylindrical container with an open lid and internal compartments, showing a rotation arrow (no text or symbols)natural_image
Line drawing of an open toolbox with a grid pattern on the lid, showing a curved arrow indicating rotation (no text or symbols)natural_image
Technical line drawing of a mechanical component with a tool and gear assembly (no text or symbols)natural_image
Diagram of a robotic vacuum cleaner with internal components and directional arrows indicating motion (no text or symbols)natural_image
Line drawing of a robotic vacuum cleaner with motion arrows and a hand cleaning the surface (no text or symbols)
7 Dépannage
Technical data of the delivered power adapter
| Manufacturer TechniSat Digital GmbH, TechniPark, D-54550 Daun/Eifel | |
| Model identifier CZH024180100EUWH | |
| Input voltage AC 100 - 240 V | |
| Input AC frequency 50/60 Hz | |
| Output voltage DC 18,0 V | |
| Output current 1,0 A | |
| Output power 18,0 W | |
| Average active efficiency 87,4 % | |
| Efficiency at low load (10%) 82,9 % | |
| No-load power consumption 0,04 W | |
9 Notes
Istruzioni brevi
TECHNIMAX SR1
natural_image
Black TechniSat 501 robotic vacuum cleaner with control buttons and antenna (no visible text or symbols beyond branding)TechniSat
1 Indice
1 Indice 72
2 Premessa....73
natural_image
Line drawing of a cylindrical electronic component with four legs (no text or symbols)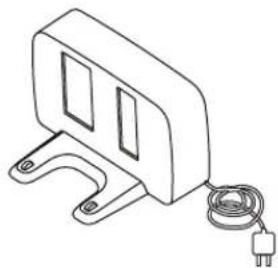
natural_image
Line drawing of a mechanical component with a coiled cable and power plug (no text or symbols)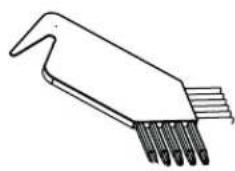
natural_image
Line drawing of a mechanical tool with multiple pins inserted (no text or symbols)Direliva ErP design eco di energy-related products:
natural_image
Line drawing of a portable stove with open lid and internal compartments, showing a rotation arrow (no text or symbols)natural_image
Line drawing of a device inside a cylindrical container with an open lid and internal compartments, showing a rotation arrow (no text or symbols)natural_image
Line drawing of an open toolbox with a grid pattern on the lid, showing a curved arrow indicating rotation (no text or symbols)natural_image
Technical line drawing of a mechanical component with a tool and gear assembly (no text or symbols)natural_image
Diagram of a robotic vacuum cleaner with internal components and directional arrows indicating motion (no text or symbols)natural_image
Line drawing of a robotic vacuum cleaner with motion arrows and a hand cleaning the surface (no text or symbols)6 Controllo con l'app TECHNIMAX
Technical data of the delivered power adapter
| Manufacturer TechniSat Digital GmbH, TechniPark, D-54550 Daun/Eifel | |
| Model identifier CZH024180100EUWH | |
| Input voltage AC 100 - 240 V | |
| Input AC frequency 50/60 Hz | |
| Output voltage DC 18,0 V | |
| Output current 1,0 A | |
| Output power 18,0 W | |
| Average active efficiency 87,4 % | |
| Efficiency at low load (10%) 82,9 % | |
| No-load power consumption 0,04 W | |
9 Appunti
Snelstartgids
TECHNIMAX SR1
natural_image
Black TechniSat 501 robotic vacuum cleaner with control buttons and antenna (no visible text or symbols beyond branding)TechniSat
1 Inhoudsopgave
natural_image
Line drawing of a cylindrical electronic component with four legs and a central square hole (no text or symbols)
natural_image
Line drawing of a mechanical clamp or bracket with a coiled cable and terminal block (no text or symbols)
natural_image
Line drawing of a laboratory pipette with multiple tubes (no text or labels)TECHNIMAX SR1 Basislaadstation Reinigingshulpmiddel
2.3 Accessoires
ErP-richtlijn ecodesign energy-related products:
natural_image
Line drawing of a portable stove with open lid and internal compartments, showing a rotation arrow (no text or symbols)natural_image
Line drawing of a device inside a cylindrical container with an open lid and internal compartments, showing a rotation arrow (no text or symbols)natural_image
Line drawing of an open toolbox with a grid pattern on the lid, showing a curved arrow indicating rotation (no text or symbols)natural_image
Technical line drawing of a mechanical component with a tool and gear assembly (no text or symbols)natural_image
Diagram of a robotic vacuum cleaner with internal components and directional arrows indicating motion (no text or symbols)natural_image
Line drawing of a robotic vacuum cleaner with motion arrows and a hand cleaning the surface (no text or symbols)
7 Storingshulp
Technical data of the delivered power adapter
| Manufacturer TechniSat Digital GmbH, TechniPark, D-54550 Daun/Eifel | |
| Model identifier CZH024180100EUWH | |
| Input voltage AC 100 - 240 V | |
| Input AC frequency 50/60 Hz | |
| Output voltage DC 18,0 V | |
| Output current 1,0 A | |
| Output power 18,0 W | |
| Average active efficiency 87,4 % | |
| Efficiency at low load (10%) 82,9 % | |
| No-load power consumption 0,04 W | |
9 Opmerkingen
natural_image
Black TechniSat 501 robotic vacuum cleaner with control buttons and tassels (no visible text or symbols on device body)TechniSat
1 Spis treści
natural_image
Line drawing of a portable stove with open lid and internal compartments, no text or symbols presentnatural_image
Line drawing of a portable stove with open lid and internal compartments, no text or symbols presentnatural_image
Line drawing of an open toolbox with a grid pattern on the lid, showing a curved arrow indicating rotation (no text or symbols)natural_image
Technical line drawing of a mechanical component with a tool and gear assembly (no text or symbols)natural_image
Diagram of a robotic vacuum cleaner with internal components and directional arrows indicating motion (no text or symbols)natural_image
Line drawing of a robotic vacuum cleaner with motion arrows and a hand cleaning the surface (no text or symbols)
7 Usuwanie usterek
Technical data of the delivered power adapter
| Manufacturer TechniSat Digital GmbH, TechniPark, D-54550 Daun/Eifel | |
| Model identifier CZH024180100EUWH | |
| Input voltage AC 100 - 240 V | |
| Input AC frequency 50/60 Hz | |
| Output voltage DC 18,0 V | |
| Output current 1,0 A | |
| Output power 18,0 W | |
| Average active efficiency 87,4 % | |
| Efficiency at low load (10%) 82,9 % | |
| No-load power consumption 0,04 W | |
9 Notatki
- TECHNIMAX SR1
- CONTENTS
- Quick start guide
- Contents
- Preface
- Dear Customer,
- Target group for this instruction manual
- Intended use
- Scope of delivery
- Accessories
- Information regarding this quick start guide
- Safety instructions
- WARNING!
- CAUTION
- Laser and laser classification
- Regulations
- WEEE Directive
- ErP Directive on ecodesign for energy-related products:
- Declaration of Conformity
- Service instructions
- Disposal instructions
- Disposal of packaging:
- Device disposal:
- Device description
- Robot vacuum cleaner status indicator
- Battery
- WiFi connection
- Dust bin full
- Error
- Operation
- Preparing for first-time use
- Operating the robot vacuum cleaner
- Safety instructions before vacuuming.
- START/PAUSE button
- HOME button
- After the cleaning process
- Thoroughly cleaning the robot vacuum cleaner
- Control using the TECHNIMAX app
- Creating a TECHNIMAX user account
- Registering the TECHNIMAX SR1
- Troubleshooting
- Factory settings
- Notes
- Sommaire
- Dépannage
- Istruzioni brevi
- Indice
- Controllo con l'app TECHNIMAX
- Appunti
- Snelstartgids
- Inhoudsopgave
- Accessoires
- ErP-richtlijn ecodesign energy-related products:
- Storingshulp
- Opmerkingen
- Spis treści
- Usuwanie usterek
- Notatki
Brand : TECHNISAT
Model : TechniMax SR1
Category : Vacuum Cleaner