
TechniMax AS1 - Vacuum Cleaner TECHNISAT - Free user manual and instructions
Find the device manual for free TechniMax AS1 TECHNISAT in PDF.
| Product Type | Cordless Vacuum Cleaner |
| Brand | TechniSat |
| Model | TechniMax AS1 |
| Power Supply | 28.8 V DC, lithium-ion battery 2500 mAh |
| Power | 300 W |
| Battery Type | Rechargeable lithium-ion, removable |
| Charging Time | Up to 360 minutes (6 hours) |
| Runtime | Up to 60 minutes (depending on power and accessories) |
| Filtration System | HEPA H13 filter, metal pre-filter |
| Delivery Contents | 1 motor unit, 1 aluminum tube, 1 LED motor brush, 1 2-in-1 nozzle, 1 crevice tool, 1 flexible hose, 1 battery, 1 power supply, 1 wall mount, 4 HEPA 13 filters, 1 cleaning tool |
| Functions | Adjustable suction power (eco, high, AUTO), touch screen, blockage detection, LED brush |
| Included Accessories | LED motor brush for floors and carpets, 2-in-1 nozzle (brush + crevice), crevice tool long, aluminum tube |
| Display Type | Touch screen with battery charge indicator, alerts (brush blocked, suction blocked) |
| Dust Capacity | Not specified (MAX mark to be observed) |
| Dust Container Cleaning | Quick emptying via button, cleaning of HEPA filter and pre-filter |
| Brush Maintenance | Removable roller for easy cleaning |
| Storage | Wall mount provided, accessories attach on the side |
| Safety | Battery overheat protection, automatic stop in case of blockage, indoor use only |
| Warranty | Legal warranty of 24 months |
Frequently Asked Questions - TechniMax AS1 TECHNISAT
User questions about TechniMax AS1 TECHNISAT
0 question about this device. Answer the ones you know or ask your own.
Ask a new question about this device
Download the instructions for your Vacuum Cleaner in PDF format for free! Find your manual TechniMax AS1 - TECHNISAT and take your electronic device back in hand. On this page are published all the documents necessary for the use of your device. TechniMax AS1 by TECHNISAT.
USER MANUAL TechniMax AS1 TECHNISAT
natural_image
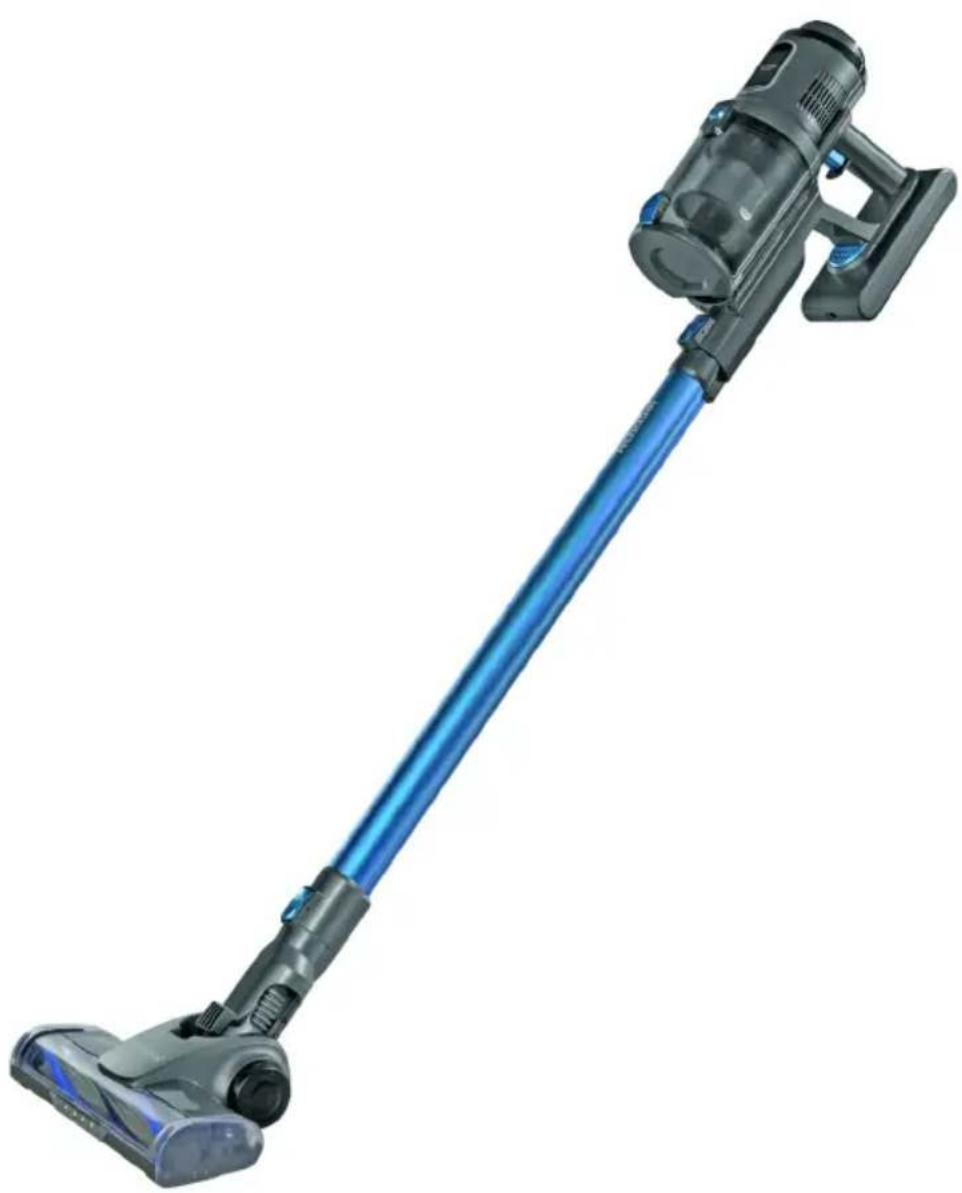
Blue and black vacuum cleaner with handle extended, no visible text or symbolsTechniSat
CONTENTS
DEUTSCH 3-21
ENGLISH....23-41
FRANÇAIS 43-61
ITALIANO 63-81
NEDERLANDS.... 83-101
POLSKIE 103-121
flowchart
graph TD
    A["Initial Component"] --> B["Assembly Step 1"]
    B --> C["Assembly Step 2"]
    C --> D["Final Assembly Part"]

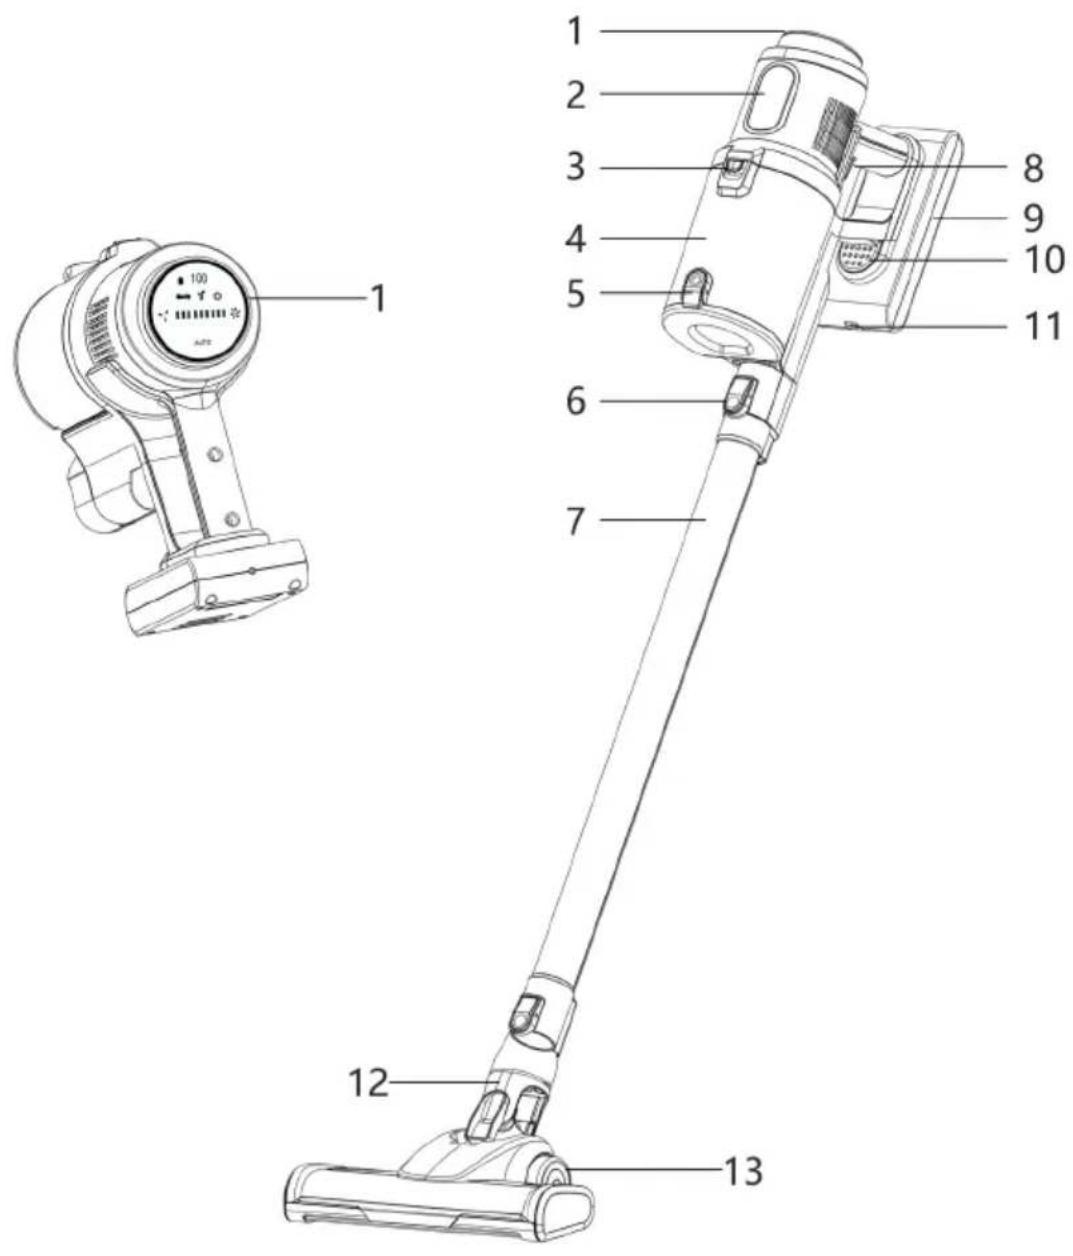
1 Touch-Display
2 Typbezeichnung
natural_image
Line drawing of a handheld electric shock absorber with digital display and control buttons (no text or symbols)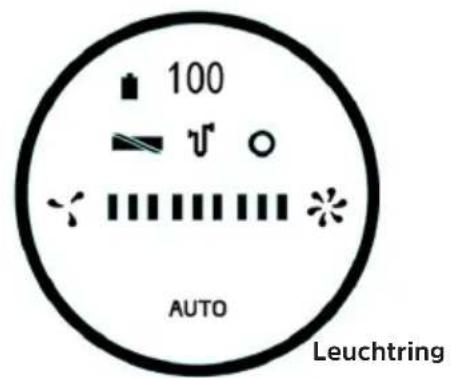

Akku-Ladezustand

Bürste blockiert

Saugblockade

natural_image
Technical line drawing of a mechanical device with an arrow indicating assembly or transformation (no text or symbols present)natural_image
Line drawing of a mechanical device emitting particles from a pile of geometric shapes (no text or symbols)Rechargeable vacuum cleaner
natural_image
Blue and black compact vacuum cleaner with extended handle (no visible text or symbols)TechniSat
flowchart
graph TD
    A["Top Component"] --> B["Bottom Component"]
    B --> C["Left Side Component"]
    C --> D["Right Side Component"]
    D --> E["Bottom Box"]

1 Touch Display
2 Model Name
3 Dust Holder Release
4 Dust Holder
5 Dust Holder Quick Emptying
6 Motor Unit Release Button
7 Aluminium Suction Tube
8 Operating Switch (Vacuum On/Off)
9 Rechargeable Battery
10 Rechargeable Battery Release
11 Rechargeable Battery Charging Connector
12 LED Motorised Brush
13
Wheels
2 Index
1 Illustrations....24
2 Index....25
3 Preface....26
4 Safety instructions....26
4.1 Signs and symbols used....26
4.2 Intended use....27
4.3 Using the product safely 28
4.4 Legal notices....31
4.5 Service information....31
5 Description of the TECHNIMAX AS1....32
5.1 Scope of supply 32
5.2 Operating element....33
5.2.1 Description....33
6 Assembling the TECHNIMAX AS1....34
6.1 Attaching / detaching the LED motorised brush and aluminium suction tube .....34
6.2 Attaching / detaching the 2-in-1 combination nozzle and crevice tool......34
6.3 Detaching /attaching the dust holder....34
7 First use....35
7.1 Charging the battery....35
8 Usage....36
8.1 Emptying the dust holder 37
9 Cleaning and storing....38
9.1 Cleaning the dust holder, HEPA filter and dust filter 38
9.1.1 Assembly....39
9.2 Cleaning the motor unit, aluminium suction tube and nozzles....39
9.3 Cleaning the LED motorised brush....39
9.4 Storage....39
10 Troubleshooting ....39
11 Technical data....41
©
©
©

WARNING
Fire hazard from rechargeable batteries!
- The battery must not be dismantled, thrown onto a fire, exposed to high temperatures above 40^ C, immersed in liquids or short-circuited. The battery could ignite or explode.
- Ensure that the motor unit and the rechargeable battery do not get wet.
- Do not use the device if liquid has penetrated it. The battery could ignite or explode.
- Do not cover the device or the power supply unit during charging to prevent it from catching fire. Do not insert anything into the ventilation openings of the device and make sure that they are not blocked.
- If the battery leaks, remove it from the device immediately. Clean the contacts before inserting a new battery.
- Check the battery regularly for damage or deformation. A damaged/deformed battery must not be used.

Observe all of the following instructions on the intended use of the device and to prevent device defects and personal injury.
- This device can be used by children aged 8 years and above and persons with reduced physical, sensory or mental capabilities or a lack of experience and/or knowledge if they have been given supervision or instruction concerning use of the device in a safe way and they understand the risks involved.
- Children must not play with the device.
- Cleaning and user maintenance must not be carried out by children unless they are more than 8 years old and are supervised.
- Children younger than 8 and animals must be kept away from the device and the connecting cable.
- The device must always be disconnected from the mains before assembly, disassembly or cleaning.
- Never immerse the device or the connecting cable in water or other liquids and ensure that they cannot fall into water or get wet.
- Charge the battery using the supplied mains adapter only.
- Do not use the supplied mains adapter to charge other devices.
- In the interest of your own safety, check the device for damage before each use. Use the device only if it is undamaged! If the device or the connecting cable are damaged, they must be replaced by the manufacturer, customer service or a similarly qualified person (e.g. a specialist workshop) in order to avoid hazards.
Risk of material damage
- Ensure that the mains cable is not crushed, bent or laid over sharp edges and does not come into contact with hot surfaces.
- Do not wind the mains cable around the device or the mains adapter.
- Use the device if it has been fully and correctly assembled. The dust holder and the filters must be inserted and be undamaged! Damage to the motor could occur if dirt were to get inside the motor unit.
- Unplug the mains adapter if a fault occurs during charging or before a thunderstorm.
- The device must be switched off when the mains adapter is unplugged from, or plugged into, a socket. Always pull on the mains adapter and never on the mains cable to disconnect the device from the mains!
- Do not use the device if it is still connected to the mains adapter.
- Never pull or carry the device by the mains cable.
- Keep the device away from heat, naked flames, extreme temperatures, prolonged humidity, moisture and knocks.
- Use original accessories only so as not to impair operation of the device and to prevent potential damage. The LEDs are not replaceable.
4.4 Legal notices

TechniSat is not liable for damage caused by external influences, wear and tear or improper use, unauthorised repairs, modifications or accidents.

Subject to change for amendments and printing errors. Version 04/21 Duplication and reproduction only with the publisher's approval. You can find the current version of the manual in PDF format in the download area of the TechniSat homepage at www.technisat.com.

TECHNIMAX AS1 and TechniSat are registered trademarks of
This product is quality-tested and comes with the statutory warranty period of 24 months from the date of purchase. Please keep your receipt as proof of purchase. In the event of warranty claims, please contact the product dealer.

For questions and information, or if there is a problem with this device, please contact our technical hotline:
Mon. - Fri. 8:00 am - 6:00 pm at tel.:
+49 (0) 3925 9220 1800.

Repair orders can also be placed directly online at
www.technisat.de/reparatur.

The illustrations used in this instruction manual may differ from the actual device. If you have any questions about the device or spare parts/accessories, please contact customer service.
If the device needs to be sent to us for any reason, please use only the following address:
39418 Stassfurt, Germany
Names of the companies, institutions or brands mentioned are trademarks or registered trademarks of their respective owners.
5 Description of the TECHNIMAX AS1
5.1 Scope of supply
Before starting up, please check that everything has been delivered:
1 x TECHNIMAX AS1 motor unit
1 x Aluminium suction tube
1 x Motorised brush LED
1 x Crevice tool
1 x Flexible suction hose
1 x 2-in-1 combination nozzle
1 x Rechargeable battery
1 x Mains adapter
1 x Wall bracket / stand
4 x HEPA 13 filters
1 x Cleaning tool
Description of accessories:
The LED motorised brush is suitable for both carpets and hard floors. It has a rotating microfibre roller and is therefore particularly suitable for delicate surfaces. The LEDs illuminate dark areas for even more thorough cleaning.
The 2-in-1 combination nozzle (optional with the flexible suction hose) combines a small crevice tool and brush nozzle. Press the release button on the brush attachment and push it up at the same time to turn the crevice nozzle into a brush nozzle. The brush attachment must engage audibly:
- The crevice tool is suitable for upholstery, cleaning car interiors and all nooks and crannies.
- The brush nozzle is used for vacuuming upholstery and textiles and for removing dust from delicate objects such as picture frames, lampshades, keyboards, books, etc.
The long crevice tool is suitable for hard-to-reach places such as corners, grooves or niches.
The aluminium suction tube ensures better accessibility to ceilings, corners, cupboard surfaces and, in combination with the LED motorised brush, for floor cleaning.
5.2 Operating elements
natural_image
Line drawing of a handheld electric shock absorber with digital display and control buttons (no text or symbols)
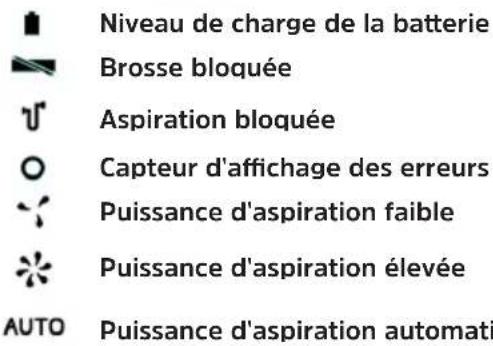
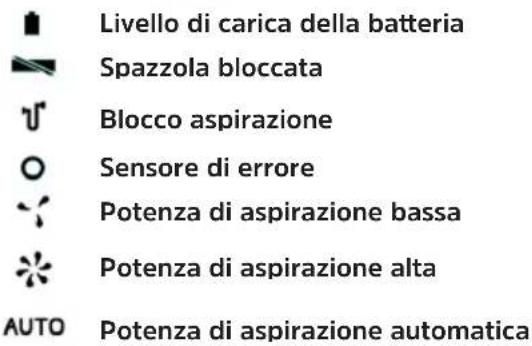
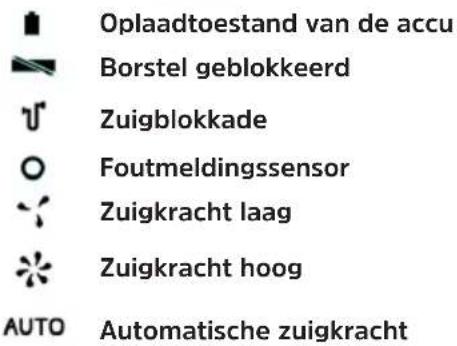
Battery charge status
Brush blocked
Suction blockage
- Sensor error display
Suction strength low
Suction strength high
AUTO Automatic suction strength
5.2.1 Description
Battery charge status - Symbol flashes when charge status is less than 10 %.
Brush blocked - Flashes red when the brush is blocked.
Suction blockage - Flashes red when the suction tube is blocked.
- Sensor error display - Suction strength control (Auto) is not functioning.
Suction strength low - Low suction strength (Eco), low motor noise
Suction strength high - High suction strength, loud motor noise
AUTO Auto suction strength control - The suction strength is controlled automatically (depending on contamination). The light ring indicates the strength level: Green = low, to red = high.
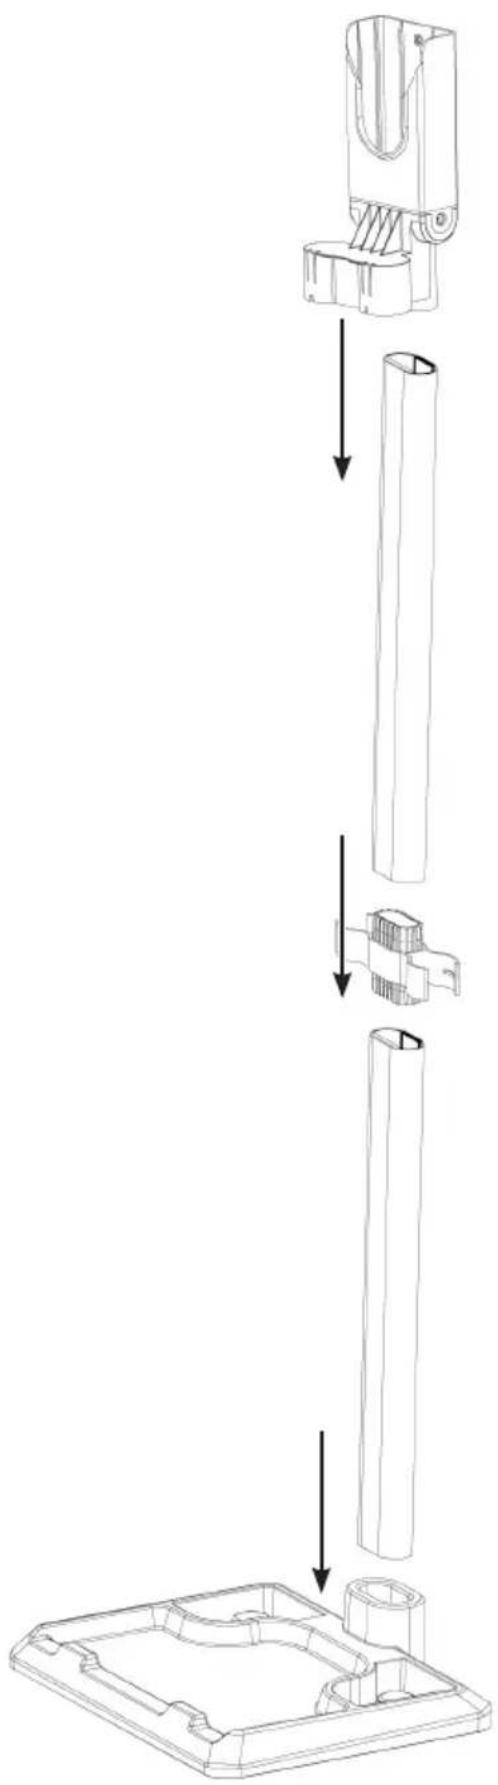
6 Assembling the TECHNIMAX AS1
6.1 Attaching / detaching the LED motorised brush and aluminium suction tube
Attaching:
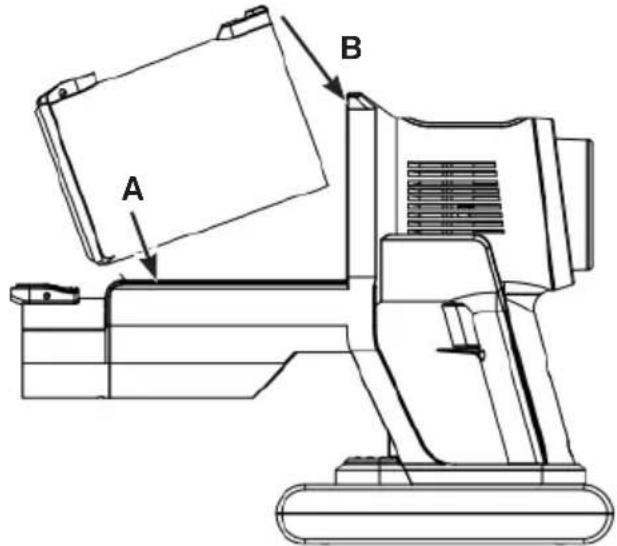
The aluminium suction tube (7) is plugged directly into the suction opening in the motor unit. It must engage audibly. Attach the LED motorised brush (12) to the aluminium suction tube in the same way.
Detaching:
Press the release button (A) on the motor unit or on the aluminium suction tube (B) and pull the LED motorised brush or the aluminium suction tube out at the same time.
Motor unitAluminium suction tubel
6.2 Attaching/detaching the 2-in-1 combination nozzle and crevice tool
Attaching:
Insert the desired nozzle into the suction opening in the motor unit or the aluminium suction tube (7). Make sure that the catch on the nozzle is pointing towards the respective release button. The nozzle must engage audibly.
Detaching:
Press the release button (A) above the suction opening or on the aluminium suction tube (B) and pull the nozzle out at the same time.
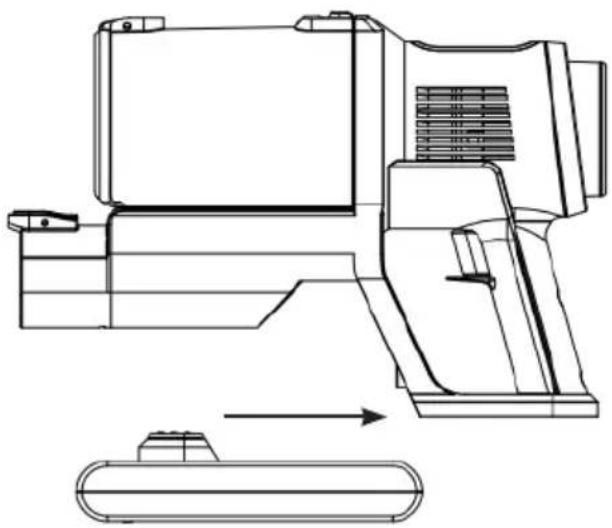
6.3 Detaching / attaching the dust holder
Detaching:
Push the release button (3) on the dust holder (4) and remove it upwards.
Attaching:
Insert the dust holder into the motor unit from above. Make sure that the catch on the dust holder fits into the corresponding recess in the motor unit (A). The dust container must engage audibly (B).
7 First use
Please note the following points before using the device for the first time:
Remove any films, stickers or transport protection from the device. Never remove the type plate or any warning labels!
Charge the battery.
Set up the storage holder.
7.1 Charging the battery

Before using for the first time, fully charge the battery to reach the maximum charge capacity. If the battery is discharged during use, it should be fully recharged before next use.

Connect the power supply only to a properly installed socket that complies with the technical specifications of the device. The socket must also be easily accessible after connection so that the mains connection can be disconnected quickly.

Before inserting the battery, check that the contacts are clean, and clean them if necessary.

The battery can be charged separately, when connected to the motor unit or when in the storage holder. The storage holder has a slot for the mains adapter DC connector.
Connect the battery (9) to the motor unit by pushing the battery onto the motor unit until it engages audibly.
natural_image
Technical line drawing of a mechanical device with an arrow indicating assembly or transformation (no text or symbols present)Insert the mains adapter plug (DC connection) into the connection socket (11) on the battery and then plug the mains adapter into the socket. The charging indicator light on the battery flashes red and the battery status display on the touch display shows the charging status in %. The battery is charging.
If the charging indicator lights green or if the battery status indicator is at 100, the battery is fully charged.
First disconnect the mains adapter from the mains, then disconnect the DC connector from the battery.

The charging electronics in the battery have overheating protection that protects the battery from defects. If you try to charge the battery after a long period of continuous use (battery power is at 0 - 10 %), the charging process may start only after a delay.
To remove the battery from the motor unit, first press the release button (10) on the battery and simultaneously pull the battery forwards off the motor unit.
8 Usage

Make sure that there are no large, sharp objects on the surface to be cleaned.

Take note of the MAX mark on the dust holder. If the mark is reached during use, empty the dust holder. Empty and clean the dust holder after each use. The filters must also be cleaned regularly to avoid overloading the motor.

Switch the device off after each area has been cleaned. This will significantly increase the operating time per battery charge. Recharge the battery after use.
Select the accessories as required and attach them to the device.
Switch the device on by pressing the operating switch (8) once. The device immediately starts the suction process. The touch display (1) lights up.
If necessary, the suction strength can be changed manually via the touch display by touching the "Suction strength" field. The intelligent suction control can also be set by touching the AUTO symbol.Move the device over the area to be cleaned.
If you want to switch the device off again, press the control switch once more.
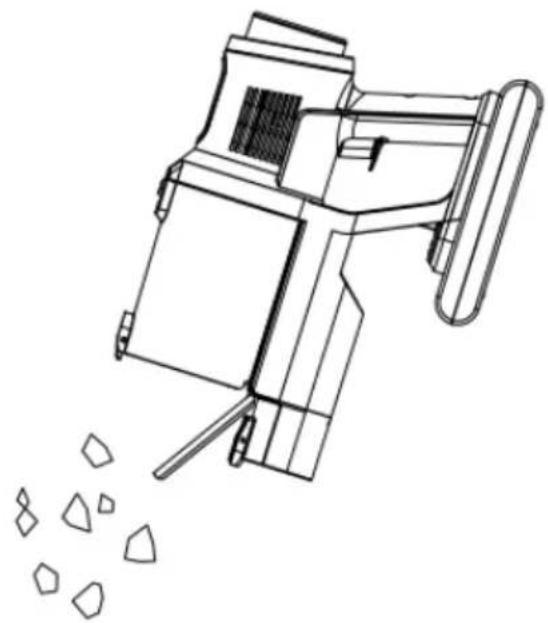
8.1 Emptying the dust holder

Remove the dust holder from the motor unit to facilitate emptying.
Hold the dust holder over an open bin. The distance to the bin should be as small as possible so that the dust is not dispersed into the surroundings.
Press the emptying button (5) on the dust holder. The lid of the dust holder opens and the dirt falls out.
Press the lid onto the dust holder to close it. The tab must engage audibly.
natural_image
Line drawing of a mechanical device emitting particles from a pile of geometric shapes (no text or symbols)9 Cleaning and storing

Do not immerse the HEPA filter in water or rinse it under running water, to avoid damage. It is not suitable for cleaning in a washing machine, dishwasher or tumble dryer.

The dust filter is not suitable for cleaning in a washing machine, dishwasher or tumble dryer! Air dry only, never use a hair dryer.

Do not use any aggressive or abrasive cleaning agents to clean the housing. They can damage the surfaces.
9.1 Cleaning the dust holder, HEPA filter and dust filter
Remove the dust holder from the motor unit.
Pull the filter unit out of the dust holder by the handle.
The pre-filter (metal filter) and the HEPA filter it inside are connected with a bayonet lock. Turn the HEPA filter anticlockwise to separate it from the prefilter and pull it out.

Knock out all parts and clean with a soft brush as necessary.
The pre-filter can also be rinsed in clean water.

Do not clean the HEPA filter in water!
Wipe the dust holder out with a damp cloth if necessary.

Allow all parts to air dry completely before reassembly. Never assemble wet or damp components or attach them to the motor unit!
9.1.1 Assembly
Place the pre-filter on the HEPA filter so that the catch is in the recess provided. Turn the dust filter clockwise until it is firmly seated.
Insert the pre-filter and HEPA filter into the dust holder. The dust filter must be seated correctly in the dust holder; it must not protrude from the top.
Reinsert the dust holder in the motor unit.
9.2 Cleaning the motor unit, aluminium suction tube and nozzles
Wipe the motor unit, the aluminium suction pipe and the nozzles with a damp, soft cloth as necessary. Dry with a soft cloth.
Regularly remove hair and lint from the nozzles and brushes.
9.3 Cleaning the LED motorised brush
For easier cleaning, the roller can be removed from the LED motorised brush:
On the right side of the LED motorised brush, slide the lock (lock symbols) to the open lock position and remove the retaining bracket.
Pull out the roller and remove contaminants.
Insert the roller in the reverse order, insert the retaining bracket and press down until it engages audibly.
9.4 Storage
Store the device in a cool, dry place away from direct sunlight and out of reach of children and animals.
For storage, hang the device in the wall bracket/stand with the suction opening pointing downwards.
The 2-in-1 combination nozzle and crevice tool can be attached to the side of the wall bracket/stand for easy and space-saving storage.

If the device is not to be used for an extended period of time, remove the battery from the motor unit and charge the battery before next use.
10 Troubleshooting
If the device does not work properly, check if you can solve the problem yourself. If the steps below do not solve the problem, contact customer service (“4.5 Service information” on page 31).
Risk of injury!
Do not attempt to repair an electrical device yourself.
In the event of defects, always contact the service department (“4.5 Service information” on page 31).
| Problem Possible cause Solution | ||
| The device only operates slowly or does not start. | The battery is flat. Charge the battery. | |
| The battery is not charging. | Lower voltage at 0-10 % and 90-100 % to protect the battery. | Battery protective circuit. |
| The suction power is too weak. | The battery is too weak. | Charge the battery. |
| The dust holder is overfilled. | Empty the dust holder. | |
| The filters are contaminated. | Clean the filters. | |
| The suction opening is blocked. | Switch off the device and remove the blockage. | |
| Particles that are too large or heavy can stick to the carpet. | Remove these foreign bodies by hand. | |
| Dust is escaping from the device during vacuuming. | The dust holder or filter are not seated correctly. | Correct the position of the dust holder and filter.Ensure that the dust holder is closed. |
| The filters are contaminated. | Clean the filters. | |
| The filters are worn out or damaged. | Replace the filters. | |
| The charging light does not come on when the device is connected to the mains. | The mains adapter (A) is not inserted correctly into the socket or the DC connector is not inserted correctly into the battery connection socket (F). | Correct the positioning. |
| The socket is defective. | Try using a different socket. | |
| Strange smell The device | is being used for the first time. | An unusual smell is normal the first time the device is used. It will disappear over time. |
11 Technical data
Device
| Model TECHNIMAX AS1 | |
| Voltage supply 28.8 V, 2,500 mAh | |
| Power rating 300 W | |
| Battery charging time Up to 360 minutes | |
| Operating time Up to 60 mins (when power levels and accessories are used) | |
| HEPA filter H13 |
Technical data for supplied power cable
| Manufacturer TechniSat Digital GmbH, Julius-Saxler-Strasse 3, D-54550 Daun, Germany | |
| Model number TYGSDC3600500 | |
| Input voltage AC 100 - 240 V | |
| Input AC frequency 50/60 Hz | |
| Output voltage DC 36.0 V | |
| Output current | 0.5 A |
| Output power rating | 18.0 W |
| Average efficiency during operation | 85 % |
| Efficiency under low load (10 %) | 73.5 % |
| Power consumption under zero load | 0.06 W |
natural_image
Blue and black compact vacuum cleaner with extended handle (no text or symbols visible)TechniSat

flowchart
graph TD
    A["Component"] --> B["Assembly Step"]
    B --> C["Final Part"]
    style A fill:#f9f,stroke:#333
    style B fill:#ccf,stroke:#333
    style C fill:#cfc,stroke:#333
1 Illustrations

natural_image
Line drawing of a handheld electric shock absorber with digital display and control buttons (no text or symbols)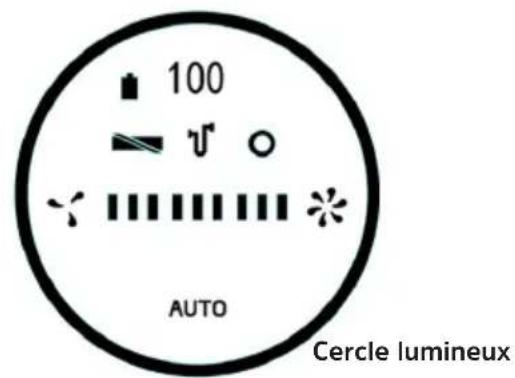
natural_image
Line drawing of a mechanical device emitting particles from a pile of geometric shapes (no text or symbols)natural_image
Blue and black compact vacuum cleaner with extended handle (no text or symbols visible)TechniSat

flowchart
graph TD
    A["Start"] --> B["Assembly Step 1"]
    B --> C["Assembly Step 2"]
    C --> D["Final Assembly Case"]
    D --> E["End"]

natural_image
Line drawing of a handheld electric shock absorber with digital display and control buttons (no text or symbols)
natural_image
Technical line drawing of a mechanical device with an arrow indicating assembly or transformation (no text or symbols present)natural_image
Line drawing of a mechanical device emitting particles from a pile of plastic fragments (no text or symbols)natural_image
Blue and black vacuum cleaner with handle extended, no visible text or symbolsTechniSat

flowchart
graph TD
    A["Component"] --> B["Assembly Step"]
    B --> C["Final Part"]
    style A fill:#f9f,stroke:#333
    style B fill:#ccf,stroke:#333
    style C fill:#cfc,stroke:#333

1 Aanraakscherm
2 Typeaanduiding
3 Ontgrendeling stofbak
4 Stofbak
5 Snelleegsystem stofbak
6 Ontgrendelknop van de motor-unit
natural_image
Line drawing of a handheld electric shock absorber with digital display and control buttons (no text or symbols)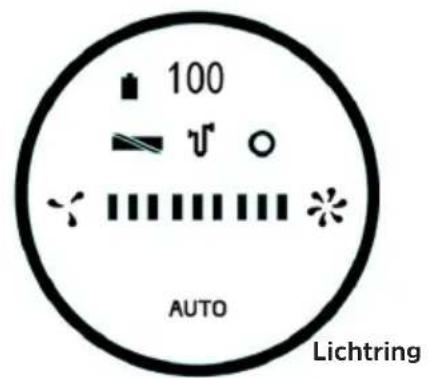
natural_image
Technical line drawing of a mechanical device with an arrow indicating assembly or transformation (no text or symbols present)natural_image
Line drawing of a mechanical device emitting particles from a pile of plastic fragments (no text or symbols)Straße 3, D-54550 Daun
Modelaanduiding TYGSDC3600500
Ingangsspanning AC 100 - 240 V
Wisselstroom-ingangsfrequentie 50/60 Hz
Uitgangsspanning DC 36,0 V
natural_image
Blue and black compact vacuum cleaner with clear glass handle (no text or symbols visible)TechniSat

flowchart
graph TD
    A["Top Component"] --> B["Bottom Component"]
    B --> C["Left Side Component"]
    C --> D["Right Side Component"]
    D --> E["Bottom Cover Part"]
natural_image
Line drawing of a handheld electric shock absorber with digital display and control buttons (no text or symbols)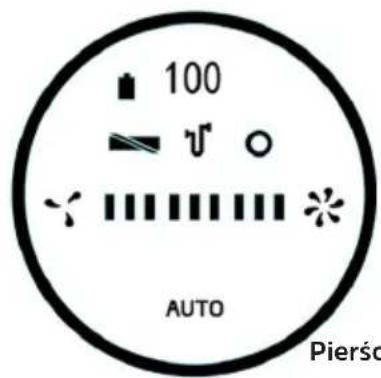
Pierścień świetlny

natural_image
Technical line drawing of a mechanical device with an arrow indicating assembly or transformation (no text or symbols present)natural_image
Line drawing of a mechanical device emitting particles from a pile of geometric shapes (no text or symbols)
- CONTENTS
- Index
- WARNING
- Fire hazard from rechargeable batteries!
- Observe all of the following instructions on the intended use of the device and to prevent device defects and personal injury.
- Risk of material damage
- Legal notices
- Description of the TECHNIMAX AS1
- Scope of supply
- Operating elements
- Description
- Assembling the TECHNIMAX AS1
- Attaching / detaching the LED motorised brush and aluminium suction tube
- Attaching/detaching the 2-in-1 combination nozzle and crevice tool
- Detaching / attaching the dust holder
- Attaching:
- First use
- Charging the battery
- Usage
- Emptying the dust holder
- Cleaning and storing
- Cleaning the dust holder, HEPA filter and dust filter
- Assembly
- Cleaning the motor unit, aluminium suction tube and nozzles
- Cleaning the LED motorised brush
- Storage
- Troubleshooting
- Risk of injury!
- Technical data
- Illustrations
Brand : TECHNISAT
Model : TechniMax AS1
Category : Vacuum Cleaner