
TR200A - Data Logger Amprobe - Free user manual and instructions
Find the device manual for free TR200A Amprobe in PDF.
| Product Type | Temperature and Humidity Data Logger |
| Brand | Amprobe |
| Model | TR200-A |
| Temperature Range | -40 to 85 °C (-40 to 185 °F) |
| Humidity Range | 0 to 100 % RH |
| Temperature Accuracy | ±0.6 °C (from -20 to 50 °C), ±1.2 °C elsewhere |
| Humidity Accuracy | ±3 % (25°C, 10-90 % RH), ±5 % elsewhere |
| Temperature Resolution | 0.1 °C / 0.1 °F |
| Humidity Resolution | 0.1 % |
| Sampling Points | 1,000 / 2,000 / 4,000 / 8,000 / 12,000 / 16,000 |
| Sampling Interval | 1 s to 12 h programmable |
| Memory | Up to 16,000 measurements |
| Display | LCD 13 x 13 mm |
| LED Indicators | Red (high/low alarm), Yellow (recording) |
| Power Supply | Lithium CR2 battery 3.0 V |
| Protection Rating | IP54 |
| Dimensions | 75 x 55 x 23 mm |
| Communication | USB port, Download Suite software |
| Main Functions | Temperature and humidity measurement, high/low threshold alarm, 3 start modes (immediate, programmed, magnetic), automatic stop, data retention without battery |
| Mounting | Integrated wall hook |
| Maintenance | Clean with a dry cloth, do not use solvents |
| Warranty | 1 year |
| Supplied Accessories | CR2 battery, USB cable, software CD, user manual |
| Repairability | User replaceable battery; repair by approved center |
Frequently Asked Questions - TR200A Amprobe
User questions about TR200A Amprobe
0 question about this device. Answer the ones you know or ask your own.
Ask a new question about this device
Download the instructions for your Data Logger in PDF format for free! Find your manual TR200A - Amprobe and take your electronic device back in hand. On this page are published all the documents necessary for the use of your device. TR200A by Amprobe.
USER MANUAL TR200A Amprobe
natural_image
Abstract geometric logo composed of white triangles on black background (no text or symbols)AMPROBE®
TR100-A / TR200-A
Temperature /
Humidity Data
Loggers
Users Manual
© 2009 Amprobe Test Tools.
All rights reserved.
Limited Warranty and Limitation of Liability
Your Amprobe product will be free from defects in material and workmanship for 1 year from the date of purchase. This warranty does not cover fuses, disposable batteries or damage from accident, neglect, misuse, alteration, contamination, or abnormal conditions of operation or handling. Resellers are not authorized to extend any other warranty on Amprobe's behalf. To obtain service during the warranty period, return the product with proof of purchase to an authorized Amprobe Test Tools Service Center or to an Amprobe dealer or distributor. See Repair Section for details. THIS WARRANTY IS YOUR ONLY REMEDY. ALL OTHER WARRANTIES - WHETHER EXPRESS, IMPLIED OR STAUTORY - INCLUDING IMPLIED WARRANTIES OF FITNESS FOR A PARTICULAR PURPOSE OR MERCHANTABILITY, ARE HEREBY DISCLAIMED. MANUFACTURER SHALL NOT BE LIABLE FOR ANY SPECIAL, INDIRECT, INCIDENTAL OR CONSEQUENTIAL DAMAGES OR LOSSES, ARISING FROM ANY CAUSE OR THEORY. Since some states or countries do not allow the exclusion or limitation of an implied warranty or of incidental or consequential damages, this limitation of liability may not apply to you.
Repair
All test tools returned for warranty or non-warranty repair or for calibration should be accompanied by the following: your name, company's name, address, telephone number, and proof of purchase. Additionally, please include a brief description of the problem or the service requested and include the test leads with the meter. Non-warranty repair or replacement charges should be remitted in the form of a check, a money order, credit card with expiration date, or a purchase order made payable to Amprobe® Test Tools.
In-Warranty Repairs and Replacement – All Countries
Please read the warranty statement and check your battery before requesting repair. During the warranty period any defective test tool can be returned to your Amprobe® Test Tools distributor for an exchange for the same or like product. Please check the "Where to Buy" section on www.amprobe.com for a list of distributors near you. Additionally, in the United States and Canada In-Warranty repair and replacement units can also be sent to a Amprobe® Test Tools Service Center (see address below).
Non-Warranty Repairs and Replacement – US and Canada
Non-warranty repairs in the United States and Canada should be sent to a Amprobe® Test Tools Service Center. Call Amprobe® Test Tools or inquire at your point of purchase for current repair and replacement rates.
In USA In Canada
Amprobe Test Tools Amprobe Test Tools
Everett, WA 98203 Mississauga, ON L4Z 1X9
Tel: 877-AMPROBE (267-7623) Tel: 905-890-7600
Non-Warranty Repairs and Replacement – Europe
European non-warranty units can be replaced by your Amprobe® Test Tools distributor for a nominal charge. Please check the "Where to Buy" section on www.amprobe.com for a list of distributors near you.
European Correspondence Address\*
Amprobe® Test Tools Europe
Beha-Amprobe GmbH
In den Engematten 14
79286 Glottertal, Germany
Tel.: +49 (0) 7684 8009 - 0
*(Correspondence only – no repair or replacement available from this address. European customers please contact your distributor.)
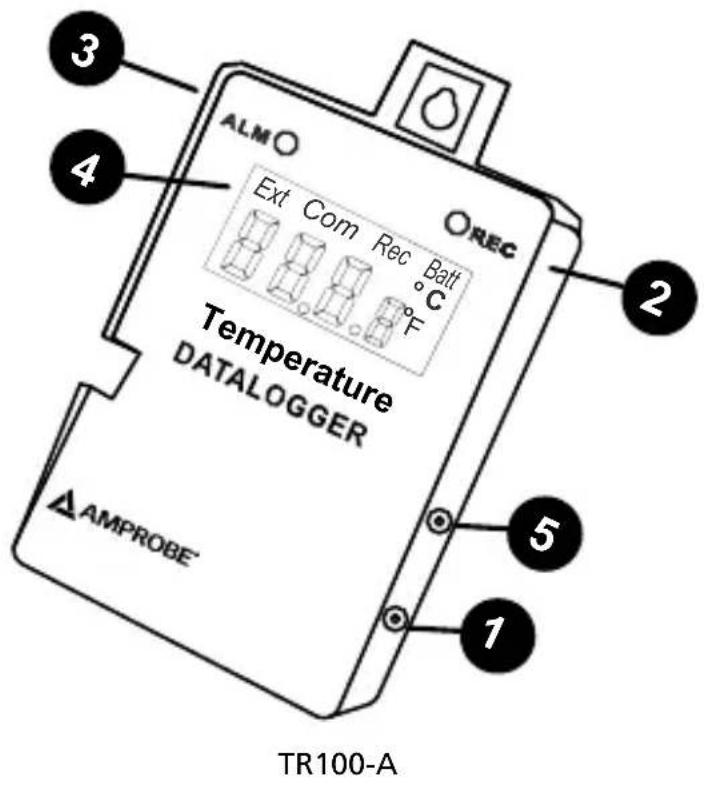
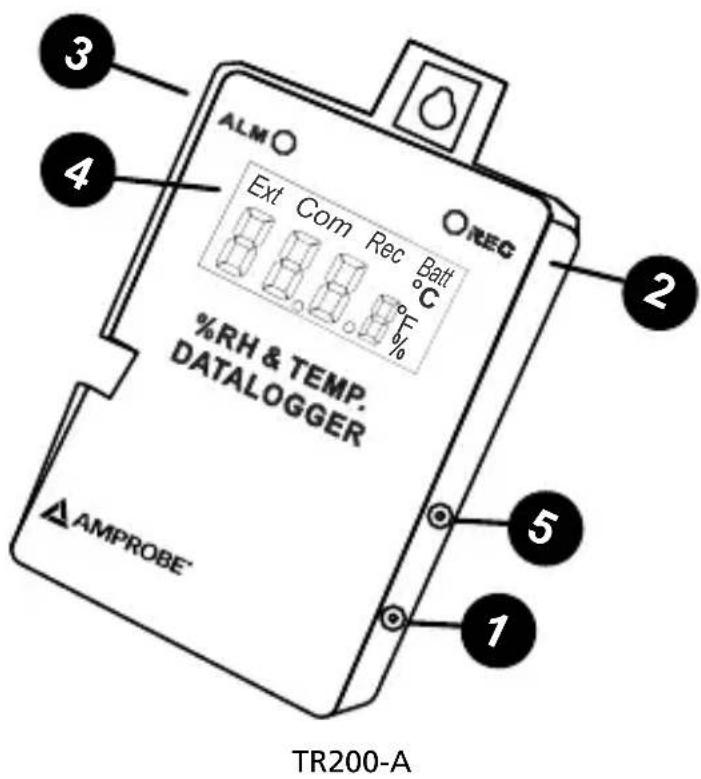
① USB Port
② Recording indicator LED
③ Alarm Indicator LED
④ LCD display
⑤ External temperature probe jack
CONTENTS
Introduction....5
Unpacking and Inspection....5
Features 5
LED Indicators....5
ALM 5
REC....6
LCD Display....6
Battery Replacement....6
Software Operation 8
Specifications....9
Troubleshooting....9
Error Codes....10
INTRoDUCTIoN
Congratulations on your purchase of this temperature or temperature/relative humidity data logger. Please, read the manual completely before using the meter.
Use the unique Amprobe Download Suite software to setup the meter to record, download the recorded data, and analyze the data.
This meter is a valuable tool to monitor ambient condition in greenhouses, warehouses, food transport, aircraft cabins, refrigeration truck, containers, railway, art galleries and museums, incubation process, hatcheries, HVAC field (Heat, Ventilation, Air Conditioning), collecting data for QC.....etc.
UNpACkINg AND INSpectIoN
Your shipping carton should include:
1 x TR100-A/TR200-A temperature or temperature/humidity data logger
1 x Manual
1 x Battery: CR2 (3.0V lithium)
1 x USB cable
1 x CD Download Suite
If any of the items are damaged or missing, return the complete package to the place of purchase for an exchange.
FEATURES
Up to 16K sample reading in real-time•
Digital display •
Programmable sample interval from 1 sec to 12 hours•
• Temperature unit: °C/°F Selectable
User-defined High / Low limit alarm•
Up to 3 different start modes•
Data retained when battery is low or has been removed
IP64/IP54 housing design•
Embedded mounting hook for easy hanging on the wall•
Auto power off function•
LED INDICAToRS
ALM
The “ALM” led will flash when the measured value is higher than HI limit or less than LO limit that has been set. The logger alarm is not designed to be audible. The LED alarm is to warn users that the measurement is over the limit. The ALM LED flashes to warn about exceeding threshold limits when in Monitoring mode and not in Record mode.
REC
When in Record mode, both LEDs will flash to indicate being in record mode. The ALM LED will flash but does not indicate if you are over or under the limits. Analyzing the recorded data will indicate if the HI or LOW thresholds were crossed.
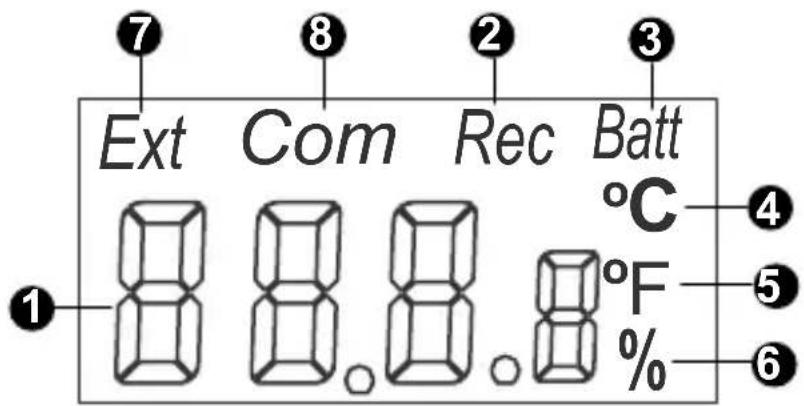
LCD DISpLAy
① Display Temperature reading (TR100-A) or Temperature and Humidity (TR200-A)
② Rec - "Rec" is displayed during the logging process. When logger stops logging and in monitoring mode, "REC" will not appear on LCD.
③ Batt - Batt appears when the battery power is too low for operation.
④ °C - Temperature displays reading in Celsius
⑤ °F - Temperature displays reading in Fahrenheit
⑥ % - Relative Humidity %. (TR200-A ONLY)
⑦ Ext - External probe temperature. When an external probe is plugged in, the air temp./external probe temperature and RH% (TR200-A ONLY) will appear in turn. (Not supplied with instrument)
8 Com - When the logger is communicating with computer, "COM" is shown on the top of the LCD.
BATTERy REpLACEMENT
The data logger is designed with a waterproof housing and O-rings but allows the user to replace the battery when necessary.
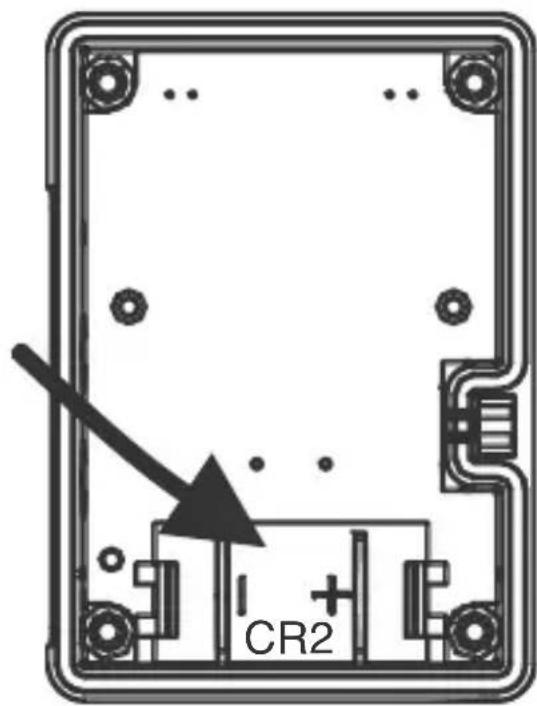
Follow these steps to remove and replace battery:
Unscrew the rear cover of data logger.1.
Do not remove o-ring and make sure the o-ring is in its place (groove).2.
Remove the expired battery.3.
Insert a new battery Cr2 battery with correct polarity.4.
Re-screw the rear cover .5.
SoFTWARE opERATIoN
-Insert the software CD into CD-ROM driver
-Install the USB driver first
-Install the software follow the on-screen instructions
-Open the program
-Click the "Comm.Set" from main screen and input the right comm. port.
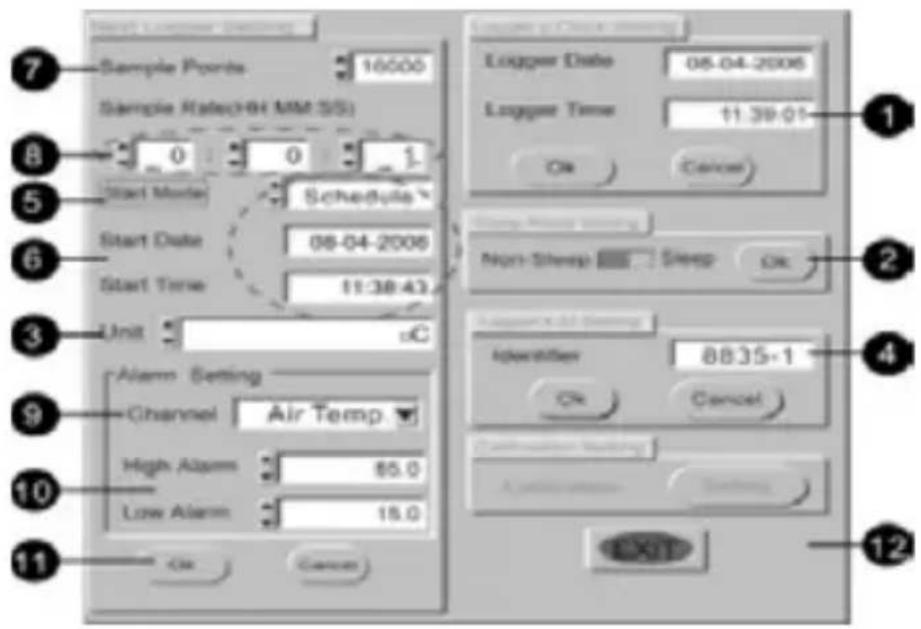
-Click the "Logger Set" from main screen to program the logger
Set date and time: Click OK to use the PC date and time1.
Non-Sleep, Sleep: Click OK to turn sleep mode on and off2.
Unit: Click up and down arrows to select °F, °C, or %3.
Identifier: Logger ID set4.
Click to select the starting mode5.
*Schedule: Recording will start at the setting date & time
*Magnetic: Recording will start by using a magnet on the rear of the instrument for more than 2 seconds
*Immediate: Recoding will start immediately
-
Set Scheduled start date & time
-
Click to select the sample point
-
Click to select the sample rate
-
Click the down arrow to select the channel for the alarm (Temperature or Humidity)
-
Click up and down arrows to set low and high limits for the alarm
-
Click OK to start the recording
12. Click to exit the program
- Click the "START" from main screen to download the memory from logger
SPECIFICATIONS
| Description TR100-A TR200-A | ||
| Temperature range -40 to 85°C(-40 to 185°F) | ||
| Humidity range N/A 0 to 100 %RH | ||
| Accuracy: | ||
| Temperature | ±0.6°C / 1°F (-20 to 50°C / -4 to 122°F), ±1.2°C / 1.2°F all others | |
| Relative Humidity N/A | ±3% (25°C, 10-90%), ±5% all others | |
| Sample points 1K / 2K / 4K / 8K / 12k / 16K | ||
| Resolution: | ||
| Temperature 0.1°C / 0.1°F | ||
| Relative Humidity N/A 0.1% | ||
| LED response Red: Hi, LO Alarm; Yellow: Record | ||
| LCD Display 13 x 13 mm | ||
| Dimension 75 x 55 x 23 mm (2 | 95 x 2.16 x 0.9 in) | |
| Housing IP65 IP54 | ||
TROUBLESHOOTING
Cannot connect and the display won't turn on
Ans: Make sure you have selected the correct baud rate. Select 9600 baud rate for all models.
Meter is programmed as Magnetic but could not start
Ans: Set up Magnet start in the Download Suite software. Use a magnet on the rear side of the meter for more than 2 seconds, the logger should be activated and the REC flashes. If not, change a new and stronger magnet and try it again.
Cannot stop the downloading before completing all sample points
Ans: Make sure the sample rate is greater than 1-sec
ERROR CODES
| Error Code Description | |
| E01 Probe is | disconnected |
| E02 Value under the lower limit | |
| E03 Value over the upper limit | |
| E04 Value falls because of the relative original data error. | |
| E11 RH Calibration ErrorThe humidity sensor accuracy cannot be calibrated by the end user due to special equipment requirements. Please contact a qualified calibration lab for calibration. | |
| E32 Read/Write EEPROM Error | |
| E33 Hardware Error | |

AMPROBE®
TR100-A / TR200-A
© 2009 Amprobe Test Tools.
Amprobe Test Tools Amprobe Test Tools
Everett, WA 98203 Mississauga, Ontario L4Z 1X9 Canada
Tél. : 877-993-5853 Tél. : 905-890-7600
Fax:425-446-6390 Fax:905-890-6866
© 2009 Amprobe Test Tools.
Amprobe Test Tools Amprobe Test Tools
Everett, WA 98203 Mississauga, ON L4Z 1X9
Tel.: 877-993-5853 Tel.: 905-890-7600
Fax: 425-446-6390 Fax: 905-890-6866
© 2009 Amprobe Test Tools.
Amprobe Test Tools Amprobe Test Tools
Everett, WA 98203, U.S.A. Mississauga, ON L4Z 1X9 Canada
Tel.: 877-993-5853 Tel.: 905-890-7600
Fax: 425-446-6390 Fax: 905-890-6866
© 2009 Amprobe Test Tools.
Amprobe Test Tools Amprobe Test Tools
Everett, WA 98203 Mississauga, Ontario L4Z 1X9
Tel.: 877-993-5853 Tel.: 905-890-7600
Fax: 425-446-6390 Fax: 905-890-6866
© 2009 Amprobe Test Tools.
Med ensamrätt.
Amprobe Test Tools Amprobe Test Tools
Everett, WA 98203 Mississauga, ON L4Z 1X9
Tel: 877-AMPROBE (267-7623) Tel: 905-890-7600
Fax: 425-446-6390 Fax: 905-890-6866
Visit www.Amprobe.com for
Catalog•
Application notes•
Product specifications•
User manuals•
- AMPROBE®
- TR100-A / TR200-A
- Temperature /
- Humidity Data
- Loggers
- Users Manual
- Limited Warranty and Limitation of Liability
- Repair
- In-Warranty Repairs and Replacement – All Countries
- Non-Warranty Repairs and Replacement – US and Canada
- In USA In Canada
- Non-Warranty Repairs and Replacement – Europe
- European Correspondence Address\*
- CONTENTS
- INTRoDUCTIoN
- UNpACkINg AND INSpectIoN
- FEATURES
- LED INDICAToRS
- ALM
- REC
- LCD DISpLAy
- BATTERy REpLACEMENT
- SoFTWARE opERATIoN
- Click to exit the program
- TROUBLESHOOTING
- Cannot connect and the display won't turn on
- Meter is programmed as Magnetic but could not start
- Cannot stop the downloading before completing all sample points
Brand : Amprobe
Model : TR200A
Category : Data Logger