PDMD301BT - DJ Equipment Power Dynamics - Free user manual and instructions
Find the device manual for free PDMD301BT Power Dynamics in PDF.
User questions about PDMD301BT Power Dynamics
0 question about this device. Answer the ones you know or ask your own.
Ask a new question about this device
Download the instructions for your DJ Equipment in PDF format for free! Find your manual PDMD301BT - Power Dynamics and take your electronic device back in hand. On this page are published all the documents necessary for the use of your device. PDMD301BT by Power Dynamics.
USER MANUAL PDMD301BT Power Dynamics
Power Dynamics Professional Audio
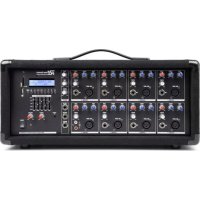
PDM-D301 (BT) 3-Channel USB Mixer
Ref. nr.: 172.600 / 172.603


INSTRUCTION MANUAL
GEBRUKSAANWIJZING
BEDIENUNGSANLEITUNG
MANUAL DE INSTRUCTIONS
MANUEL D'INSTRUCTIONS
INSTRUKCJA OBSLUGI
Congratulations to the purchase of this Power Dynamics product. Please read this manual thoroughly prior to using the unit in order to benefit fully from all features.
Read the manual prior to using the unit. Follow the instructions in order not to invalidate the warranty. Take all precautions to avoid fire and/or electrical shock. Repairs must only be carried out by a qualified technician in order to avoid electrical shock. Keep the manual for future reference.
- Prior to using the unit, please ask advice from a specialist. When the unit is switched on for the first time, some smell may occur. This is normal and will disappear after a while.
- The unit contains voltage carrying parts. Therefore, do NOT open the housing.
- Do not place metal objects or pour liquids into the unit. This may cause electrical shock and malfunction.
- Do not place the unit near heat sources such as radiators, etc. Do not place the unit on a vibrating surface. Do not cover the ventilation holes.
- The unit is not suitable for continuous use.
- Be careful with the mains lead and do not damage it. A faulty or damaged mains lead can cause electrical shock and malfunction.
- When unplugging the unit from a mains outlet, always pull the plug, never the lead.
- Do not plug or unplug the unit with wet hands.
- If the plug and/or the mains lead are damaged, they need to be replaced by a qualified technician.
- If the unit is damaged to such an extent that internal parts are visible, do NOT plug the unit into a mains outlet and DO NOT switch the unit on. Contact your dealer. Do NOT connect the unit to a rheostat or dimmer.
- To avoid fire and shock hazard, do not expose the unit to rain and moisture.
- All repairs should be carried out by a qualified technician only.
- Connect the unit to an earthed mains outlet (220-240Vac/50Hz) protected by a 10-16A fuse.
- During a thunderstorm or if the unit will not be used for a longer period of time, unplug it from the mains. The rule is: Unplug it from the mains when not in use.
- If the unit has not been used for a longer period of time, condensation may occur. Let the unit reach room temperature before you switch it on. Never use the unit in humid rooms or outdoors.
-
To prevent accidents in companies, you must follow the applicable guide lines and follow the instructions.
-
Do not repeatedly switch the fixture on and off. This shortens the life time.
- Keep the unit out of the reach of children. Do not leave the unit unattended.
- Do not use cleaning sprays to clean switches. The residues of these sprays cause deposits of dust and grease. In case of malfunction, always seek advice from a specialist.
- Do not force the controls.
- This unit is with speaker inside which can cause magnetic field. Keep this unit at least 60cm away from computer or TV.
- This unit is with built-in lead-acid rechargeable battery. Please recharge the battery every 3 months if you are not going to use the unit for a long period of time. Or the battery may be damaged.
- If the battery is damaged please replace with same specifications battery. And dispose the damaged battery environment friendly.
- If the unit has fallen, always have it checked by a qualified technician before you switch the unit on again.
- Do not use chemicals to clean the unit. They damage the varnish. Only clean the unit with a dry cloth.
- Keep away from electronic equipment that may cause interference.
- Only use original spares for repairs, otherwise serious damage and/or dangerous radiation may occur.
- Switch the unit off prior to unplugging it from the mains and/or other equipment. Unplug all leads and cables prior to moving the unit.
- Make sure that the mains lead cannot be damaged when people walk on it. Check the mains lead before every use for damages and faults!
- The mains voltage is 220-240Vac/50Hz. Check if power outlet match. If you travel, make sure that the mains voltage of the country is suitable for this unit.
- Keep the original packing material so that you can transport the unit in safe conditions.

This mark attracts the attention of the user to high voltages that are present inside the housing and that are of sufficient magnitude to cause a shock hazard.

This mark attracts the attention of the user to important instructions that are contained in the manual and that he should read and adhere to.
The unit has been certified CE. It is prohibited to make any changes to the unit. They would invalidate the CE certificate and their guarantee!
NOTE: To make sure that the unit will function normally, it must be used in rooms with a temperature between 5^ / 41^ and 35^ / 95^ .

Electric products must not be put into household waste. Please bring them to a recycling centre. Ask your local authorities or your dealer about the way to proceed. The specifications are typical. The actual values can slightly change from one unit to the other. Specifications can be changed without prior notice.
Do not attempt to make any repairs yourself. This would invalid your warranty. Do not make any changes to the unit. This would also invalid your warranty. The warranty is not applicable in case of accidents or damages caused by inappropriate use or disrespect of the warnings contained in this manual. Power Dynamics cannot be held responsible for personal injuries caused by a disrespect of the safety recommendations and warnings. This is also applicable to all damages in whatever form.
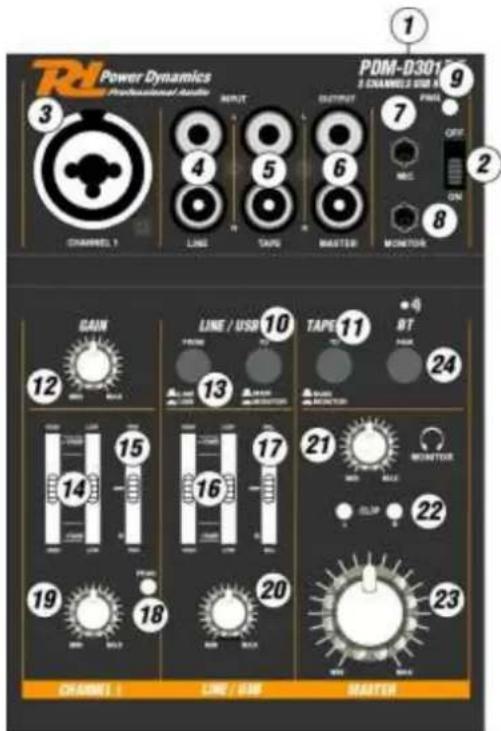
OVERVIEW
- USB Port type B (5Volt/500mA)
- Power ON/OFF
-
Combo connector
-
XLR with +18V Phantom power for microphone
-
Jack 6.3mm (1/4") for line input
-
Line input RCA jacks
-
Tape input RCA jacks
-
Master output
-
Microphone input Jack 3.5mm
-
Monitor output Jack 3.5mm
-
Power LED indicator
-
Switch send LINE/USB signal to Main (up) or Monitor (down)
- Tape switch to Main/Monitor output
- Gain control for channel 1
- Switch input signal from Line (up) or USB (down)
- 2-Way equalizer for channel 1
- Panorama control
- 2-Way equalizer for channel LINE/USB
- Balance control
- Peak LED indicator
- Level control channel 1
- Level control channel LINE/USB
- Level control monitor / headphone
- Clip LED indicator L/R
- Master volume
- Pair BT for audio streaming with led indicator (172.603 only)
MIXER OPERATION
Prior to connecting / disconnecting and prior to switching on, always turn back the output controls (21, 23) to the minimum.
-
Connect a microphone or a mono audio source with line signal level to the combined jack MIC / LINE (3) of the mono channel:
-
Connect a microphone via a balanced XLR plug. A +18V phantom power is available at the XLR jack (for operating a condenser microphone using this phantom power).
- Connect a unit with line level (e.g. receiver of a wireless microphone system) via a 6.3mm plug. The 6.3mm jacks balanced. To connect units with unbalanced output, use 2-pole 6.3mm plugs.

WARNING: Please choose balanced cable and MIC to connect. Do not use the unbalanced cables! When the unit is powered on, remember not to connect the high level signal to XLR MIC In, which may damage the unit. Via XLR connector is am phantom power of +18V always present!
- Connect a stereo audio source with line signal level (e.g. CD player) to the RCA jacks (4/5) of the stereo channel.
- Connect RCA jacks to MASTER (6) mix for amplifier or a recorder.
- For monitoring purposes, connect stereo headphones (impedance ≥ 8 ) or amplifier of a small monitor system to the 3.5mm stereo jack MONITOR (8).
- To switch on, slide the button PWR (2); the power LED ON (9) lights up. To switch off, disengage the button.
OPERATION WITH A COMPUTER
When operating the mixer with a computer, install audio software for your operating system. Various programs for audio reproduction/recording are available on the internet free of charge.
- Start the computer. Connect the USB port (1) to a USB port on the computer. The computer will recognize the switched-on mixer as a USB audio device for audio input and audio output.
- Call up the replay/recording software and make the settings required for audio reproduction via the mixer or audio recording from the mixer.
If no audio recording or audio reproduction is possible, check the system settings of the computer to find out if the USB interface has been selected for audio input or audio output.
OPERATION

WARNING: Never adjust the audio system and the headphones to a very high volume. Permanent high volumes may damage your hearing! Your ear will get accustomed to high volumes which do not seem to be that high any more after some time. Therefore, do not further increase a high volume after getting used to it.

- Use the button LINE / USB (13) to select the input signal assigned to channel LINE/USB.
Note: For recordings via the USB port, please take into account that there is a risk of feedback if the recording signal of the computer is assigned to channel LINE/USB as an input signal.
-
For the basic setting, first set the controls :
-
LEVEL (19, 20) to the minimum
- HIGH, LOW (14, 16), PAN (15) and BAL (17) to mid-position
- GAIN (12) and MASTER (23) to mid-position
Feed an audio signal to channel 1. Turn up the control LEVEL (19) until the audio signal can be heard well and it is possible to adjust its sound with the controls HIGH and LOW (14). If you have to turn up the control LEVEL very far, turn up the control GAIN (12) to increase the input gain. However, if the LED PEAK (18) lights up for a longer period of time, turn back the control GAIN accordingly. The LED PEAK should briefly flash for signal peaks only.
Turn back the control LEVEL of channel 1. Feed an audio signal to channel LINE/USB and turn up its control LEVEL (20) until it is possible to adjust the sound with the controls HIGH and LOW(16).
- After the basic setting, use the controls LEVEL to mix the signals of channels 1 and LINE/USB in the volume ratio desired or to fade them in or out individually. When a channel is not used, always turn back its control LEVEL to the minimum.
- For channel 1, use the control PAN (15) to place the mono signal in the stereo sound. For channel LINE/USB, use the control BAL (17) to adjust the balance of the stereo signal.
- To add the signal of the input TAPE IN (5) to the audio mix, press the button TAPE TO MAIN (11).
Note: When a recording is made via the output MASTER (6) and at the same time reproduced via the input TAPE IN, make sure that the button TAPE TO MAIN is disengaged. Otherwise, there will be feedback.
- Use the control MASTER (23) to adjust the level of the output signal sent to the jacks MASTER (6) and the USB port (1). If one of the overload LEDs CLIP (22) lights up, turn back the control LEVEL or any channel control (19, 20) turned up too far. Make sure that the button TAPE TO MAIN/MONITOR (11) is disengaged so that the LEDs CLIP will be able to respond to the output signal.
- Use the button TAPE TO MAIN/MONITOR (11) to select the signal assigned to the monitor output MONITOR (8). The overload LEDs CLIP (22) respond to the signal selected for the monitor function. Use the control MONITOR (21) to adjust the monitoring volume.
Manufacturer: TRONIOS BV
Trade Name: POWER DYNAMICS
Regulatory Requirement: EN 55013:2013
EN 55020: 2007
EN 60065:2014
I hereby declare that the product meets the requirements stated in Directives 2014/35/EU and 2014/30/EU and conforms to the above mentioned Declarations.
Almelo,
01-01-2016
Name : M. Velders
Signature :

Specifications and design are subject to change without prior notice..
www.tronios.com
Copyright © 2016 by TRONIOS the Netherlands