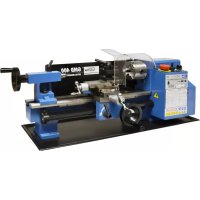
GBF 550 - Milling machine Güde - Free user manual and instructions
Find the device manual for free GBF 550 Güde in PDF.
| Product type | Precision milling machine |
| Brand | Güde |
| Model | GBF 550 |
| Dimensions (L x W x H) | 520 x 510 x 760 mm |
| Weight | 49.2 kg |
| Power supply | 230 V ~ 50 Hz, 350 W (P1 S3 50%) |
| Protection class | I (IP20 motor) |
| Max drilling diameter | 13 mm |
| Max straight milling | 30 mm |
| Max face milling | 16 mm |
| Morse taper in spindle | MK 3 |
| Head tilt | -45° to +45° |
| Max spindle-table distance | 220 mm |
| Overhang | 167 mm |
| Rotation speeds | 0-1100 rpm and 0-2500 rpm |
| Table size | 390 x 92 mm |
| Noise level | L WA 82 dB |
| Main functions | Drilling, face milling, deep milling, chamfering |
| Included equipment | Chuck with toothed ring, keys, drawbar, cover, oil, etc. |
| Maintenance and cleaning | Clean after use, grease metal parts regularly |
| Safety | Use with RCD safety switch, wear PPE |
| Warranty | 12 months industrial use, 24 months end consumer |
| Spare parts and repairability | Available via after-sales service, entrust repairs to a professional |
| General information | CE compliant, EAN 4015671481405, Order no. 48140 |
Frequently Asked Questions - GBF 550 Güde
User questions about GBF 550 Güde
0 question about this device. Answer the ones you know or ask your own.
Ask a new question about this device
Download the instructions for your Milling machine in PDF format for free! Find your manual GBF 550 - Güde and take your electronic device back in hand. On this page are published all the documents necessary for the use of your device. GBF 550 by Güde.
USER MANUAL GBF 550 Güde
Originalbetriebsanleitung MINI BOHR- & FRASMASCINE
Translation of the original instructions 12 MINI DRILLING AND MILLING MACHINE
Traduction du mode d'emploi d'origine 19 MINI APPAREIL DE MOUTURE ET DE PERCAGE
Traduzione del Manuale d'Uso originale 26 MINI FRESA CON PARALLELO
NLTervaling van de originele gebruiksaanwijzing 33 MINI BOOR-FREES MACHINE
Cz Preklad originiho navodu k provozu 40 STOLNI FREZKA
SK Preklad originalneho nadvodu na prevadzku 47 MINI VRTACKA FREZOVACKA
H Azeredeti hasznalati utasitas forditasa MINI FURO-ES MAROGEP
MaBLe x BxH (in mm): 520x510x760
EAN:4015671481405
Articlel-Nr.:48140
Handhabung des Bohrflutters
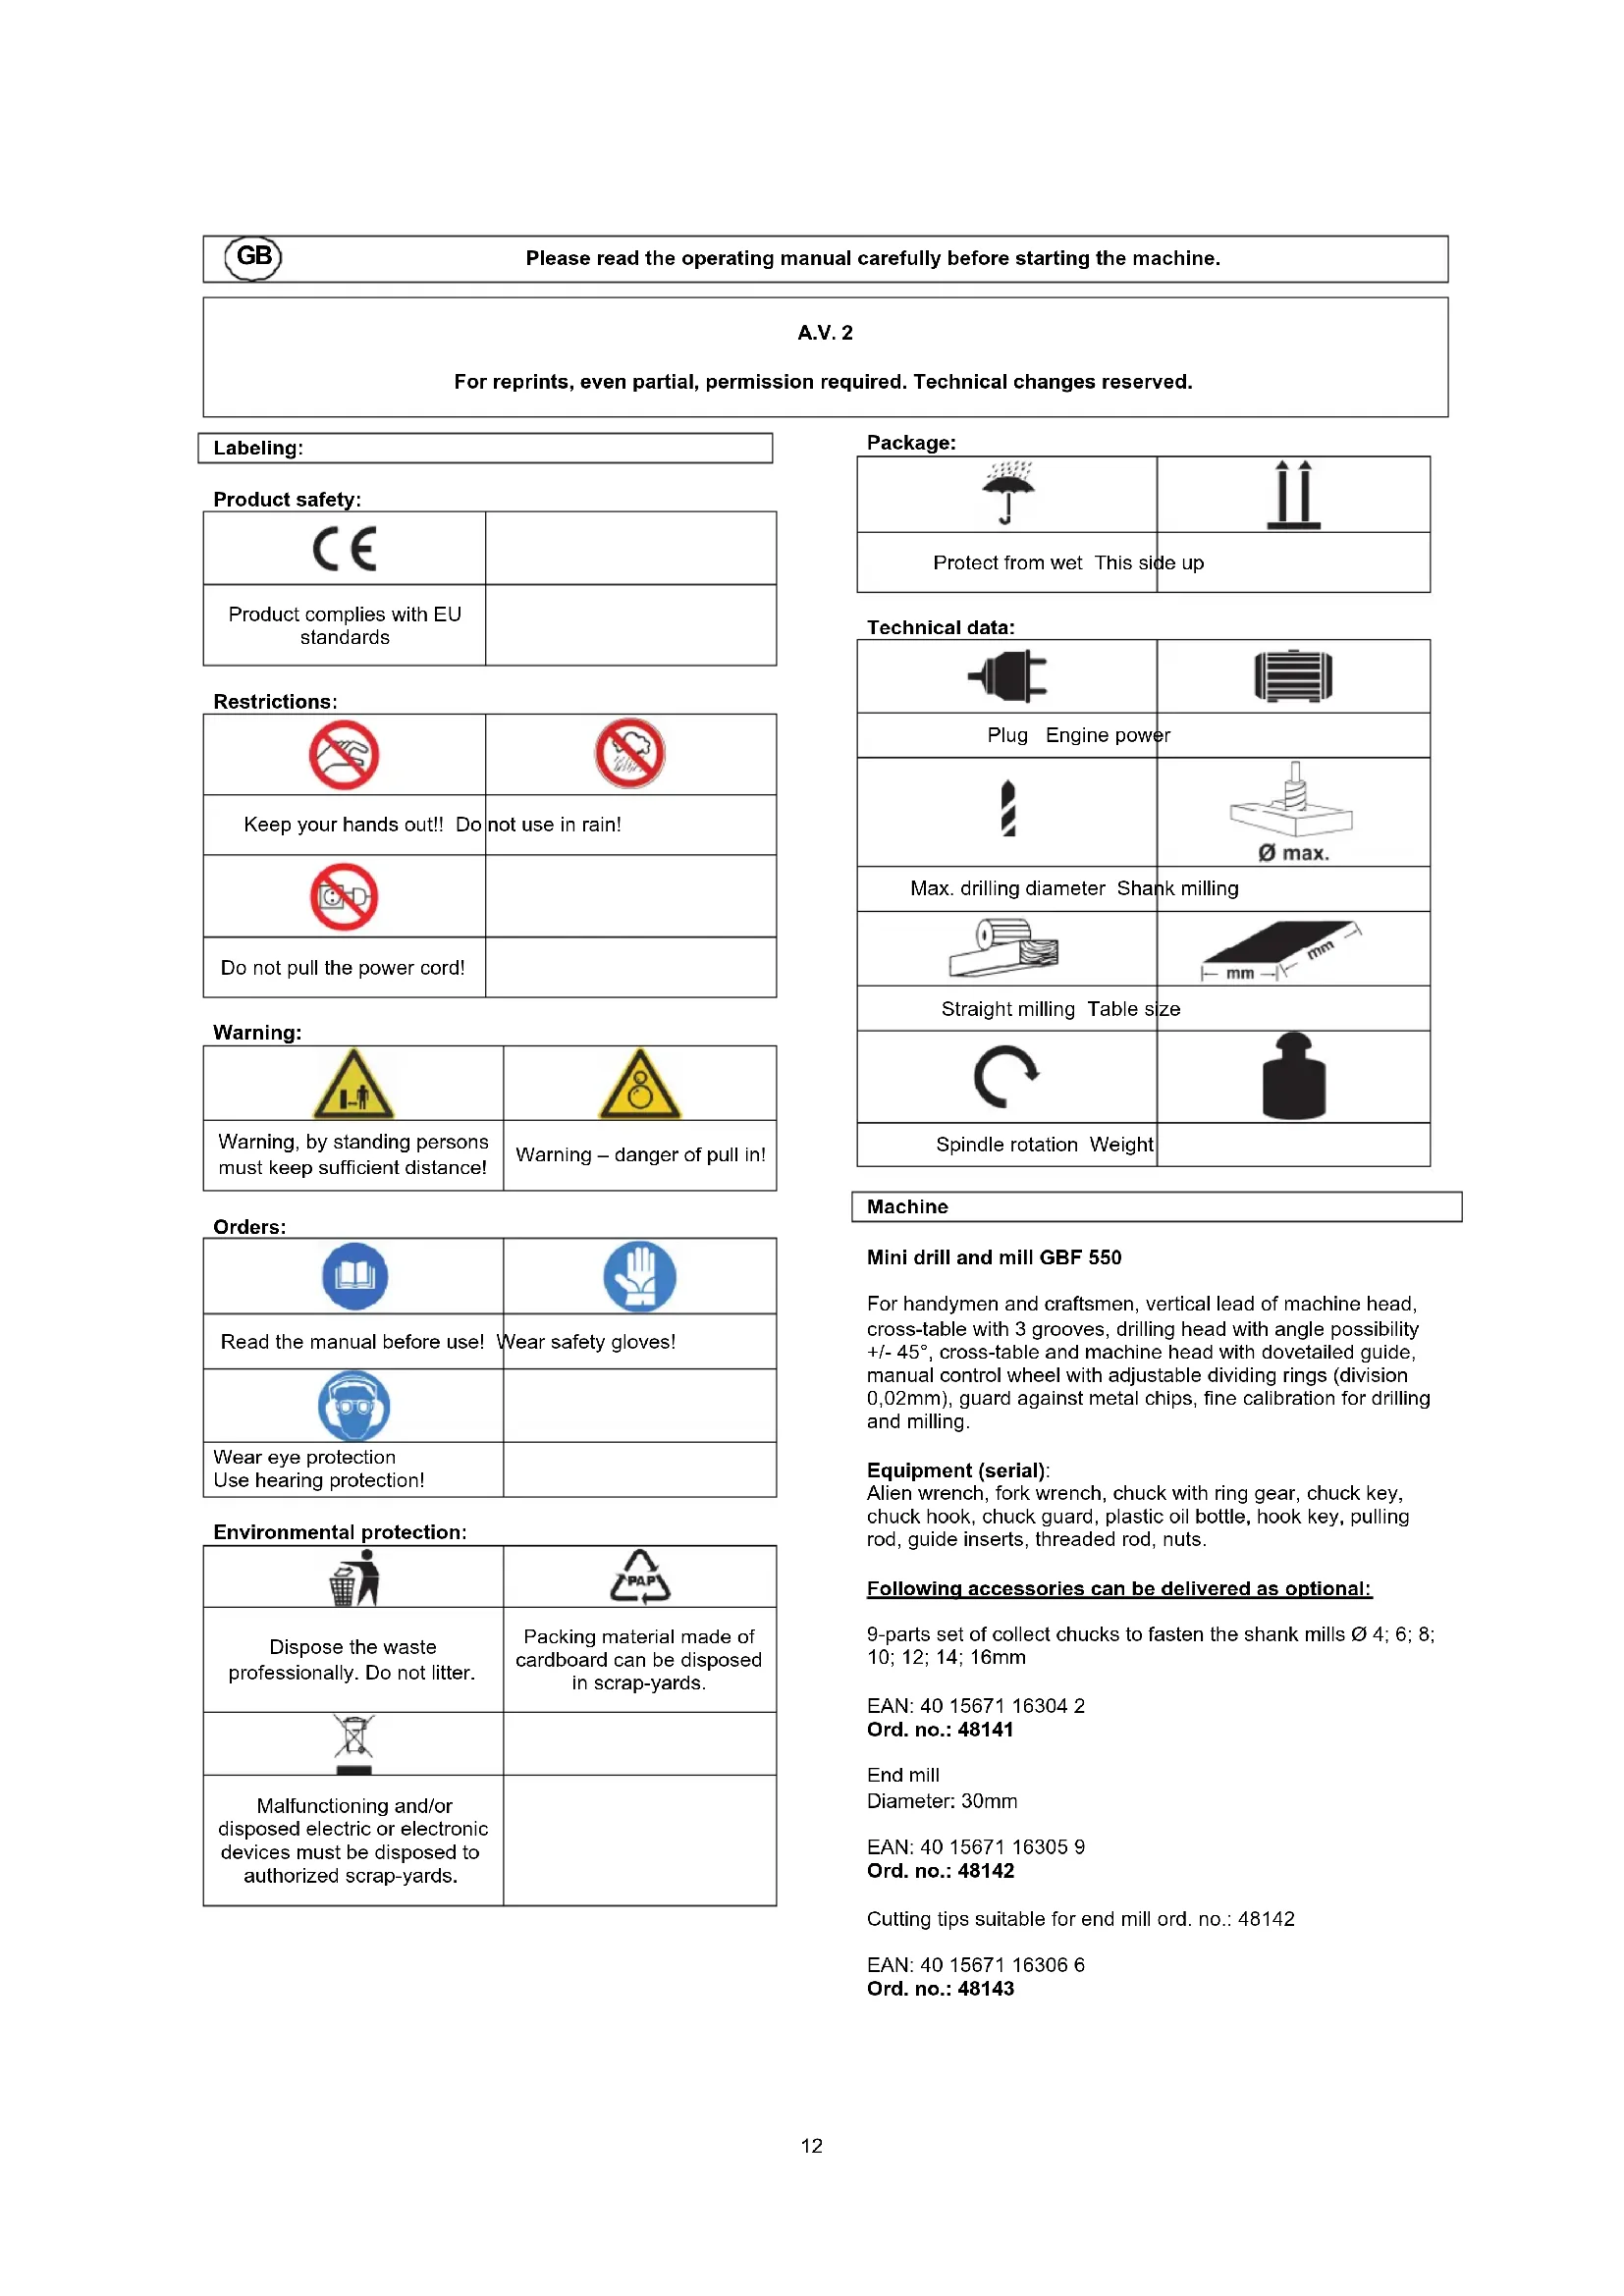
Please read the operating manual carefully before starting the machine.
A.V.2
For reprints, even partial, permission required. Technical changes reserved.
Labeling:
Product safety:
| CE | |
| Product complies with EU standards |
Restrictions:
| Keep your hands out!! Do | not use in rain! |
| Do not pull the power cord! |
Warning:
| Warning,by standing persons must keep sufficient distance! | Warning-danger of pull in! |
Orders:
| Read the manual before use! | Wear safety gloves! |
| Wear eye protection Use hearing protection! |
Environmental protection:
| PAP | |
| Dispose the waste professionally. Do not litter. | Packing material made of cardboard can be disposed in scrap-yards. |
| Malfunctioning and/or disposed electric or electronic devices must be disposed to authorized scrap-yards. |
Package:
| J | IH |
| Protect from wet This side up | |
Technical data:
| Plug Engine power | |
| 1 | Ø max. |
| Max. drilling diameter Shank milling | |
| 0 | - mm - - mm - - |
| Straight milling Table size | |
| C | |
| Spindle rotation Weight | |
Machine
Mini drill and mill GBF 550
For handymen and craftsmen, vertical lead of machine head, cross-table with 3 grooves, drilling head with angle possibility +/-45^ , cross-table and machine head with dovetailed guide, manual control wheel with adjustable dividing rings (division 0.02mm), guard against metal chips, fine calibration for drilling and milling.
Equipment (serial):
Alien wrench, fork wrench, chuck with ring gear, chuck key, chuck hook, chuck guard, plastic oil bottle, hook key, pulling rod, guide inserts, threaded rod, nuts.
Following accessories can be delivered as optional:
9-parts set of collect chucks to fasten the shank mills 4; 6; 8; 10; 12; 14; 16mm
EAN:4015671163042
Ord.no.:48141
End mill
Diameter: 30mm
EAN:4015671163059
Ord.no.:48142
Cutting tips suitable for end mill ord. no.: 48142
EAN:4015671163066
Ord.no.:48143
Machine description (pict. 1-4)
- milling head
- cross-table
- machine post
- working spindle
- shift bar
- revolution selection switch
- control wheel for fine feed
- Emergency
- chuck with ring gear
- manual handle for cross slide
- manual handle for front carriage
- depth stop
- fastening nut for angle adjusting
- turning cross
- spindle guard
- guard against chips
switch
Delivery range
- Mini drill and mill GBF 550
- chuck key
- hook key
- fastening pin
- tool box
- operating manual
Warranty
A warranty period of 12 months applies to commercial use and 24 months apply to private use and commences on the day of purchase of the device.
Warranty applies exclusively to failures due to defective material or workmanship. An original sale slip with indication of date of sale must be presented in case of claiming for the warranty rights.
Warranty does not cover unprofessional use such as device overload, violent use, damage caused by third party or foreign materials, failure to comply with operations and assembly manual, and normal wear and tear.
Technical data
Voltage/oscillation: 230 V~50 Hz
Coverage type (Motor): IP 20
Protection grade: I
max.output: 350W(P1S350%)*
max. drilling diameter: 13 mm
straight milling: 30 mm
shank milling: 16 mm
morse taper in the spindle MK 3
folding machine head: -45°/+45°
max. spindle-table distance: 220 mm
overlapping: 167 mm
spindle revolution - grade1/grade2: 0-1100 min ^-1 /0-2500 min ^-1
table size: 390 mm x 92 mm
noise level: L WA 82 dB
weight: 49,2 kg
dimensions L x W x H (in mm): 520 x 510 x 760
EAN:4015671481405
Ord.no.:48140
*Operating schedule S3 (periodic duty)
Machine can be put to work with stated output for certain period of time (relative switch period in % of working cycle).
Then it has to be on hold (break) to avoid overheating.
Working cycle consists of loading period and break period. During the on hold position between the working cycles, the machine will not cool down to surrounding temperature. The working cycle is set to 10 min., if not stated otherwise.

General safety instructions
Read the manual carefully before first use. If any doubts about installation or operation occur, please contact the manufacturer (Service department).
PLEASE OBSERVE FOLLOWING SAFETY INSTRUCTIONS TO ENSURE HIGH LEVEL OF SAFETY:

A. Warning: Operate with RCD only (residual current)
device)!
WARNING!
- Keep your workplace clean and tidy.
Messy workplace or table increases the risk of accident and injury.
Pay attention to your working environment. Electric devices and milling tools shall not be used in damp or humid environment. Secure proper lightning. Do not expose the electric devices to rain or humid air. Do not turn on the electric devices in environment with flammable fluids and gases. - Do not let unauthorized persons to come close to the machine. Keep observers and visitors, especially children and older people, away from your workplace.
- Store your tools safely.
Tools you are not using must be stored on dry, if possible, elevated place or lock them up to restrict the access to other persons.
- Use always job specific tools. Never use e.g. small tools or accessories for job which requires big tools. Use only tool designed for specific job. Do not overload the machine.
- Watch out for power cord. Do not pull the cord. When disconnecting the cord pull the plug. Keep the cord away from heat, oil and sharp edges.
- Avoid accidental start up. Always ensure that the starting switch is in off position before plugging the cord in the socket.
Use special extension cables while working outdoors. While working outdoors you will need special extension cables bearing corresponding marking. - Keep your attention. Always pay attention to what you are doing. Use common sense. Do not use electric devices when tired.
- Watch out for damaged parts. Check the machine before use. Are there any parts damaged? In case of minor damage consider if the tool will work fine and safely.
- Avoid electric shocks.
Avoid any body contact with earthed objects, such as water piping, heaters, cookers and refrigerators.
Use approved parts only. Use only identical spare parts for maintenance and repairs. Contact the authorized service department.
- Warning! Using the accessories and attachments not recommended in this operating manual can be dangerous to people and objects.
- Do not lean out of your working place.
Avoid abnormal body positions. Keep your stability and balance.
- Remove all tool wrenches etc. Before turning on make sure that all wrenches and other adjusting tools are removed.

Machine specific safety instructions
Always wear personal protective equipment when operating the machine.
- To avoid eye injury always wear eye protection.
- If long-haired, wear hair net or suitable working hat.
- Wear skin tight working clothes. Rotating parts could catch the sleeves etc.
- Never take the metal chips out by bare hands.
- If the machine is turned off, remove the chips by a brush.
- Before starting the work check the function of safety devices.
- Do not overload the machine. It works better within the stated output power range.
- Use the right machine and make sure that the tools (turning tool, driller, etc.) are not blunted or damaged otherwise.
Always place cables behind the machine. Protect them from heat, oil and sharp edges. - Before repair and maintenance and when not in use unplug the cord.
- Works on electric devices can be done by professional only. Only original spare parts can be used.
- Tidy work place makes work easier.
- Be careful what you are doing. Use common sense.
- Ensure that the machine base can carry its weight and is stable enough. Vibrations must be avoided while in operation.
- All parts were greased as an anticorrosive protection in the workshop. Clean the machine before use with ecological cleaning detergent.

Close the safety guard of jaw chuck, gently before start up of the machine.
- Do not process hazardous or dusty materials like wood, Teflon, etc.
- Do not use the machine close to the flammable fluids or gases.
- Use the machine in suitable areas and do not expose it to wet or humidity.
- Ensure proper lighting when working
- Do not pull the power cord to unplug.
- Make sure that the workpiece is always fastened properly when processing. Fix it in vice or by using clamping clips.
Always use clean and sharp tools. - When in dangerous situation, turn the machine off and unplug it.
- When damaged, the machine cannot be operated and must be unplugged.

You can use inserting tools and
accessories approved by manufacturer only. Using of unapproved parts bears great risk of injury.
- Keep your workplace clean and tidy. Messy workplace can cause accidents.
Always wear safety goggles when operating the machine. If the work generates dust, dust mask is recommended. - Chuck keys and other tools must be removed before start up of the machine.

Use the shift bar to adjust revolutions only. The machine is on hold!
Emergency Action
Apply the first aid adequate to the injury and get qualified medical assistance as quickly as possible. Protect the injured person from more accidents and calm him/her down.
For the sake of eventual accident, in accordance with DIN 13164, a workplace has to be fitted with a first-aid kit. It is essential to replace any used material in the first-aid kit immediately after it has been used. If you seek help, state the following pieces of information:
- Accident site
- Accident type
- Number of injured persons
- Injury type(s)
Using the machine for intended use only
This machine is designed for drilling, deep and end milling of small workpieces (max. dimensions: 300mm× 200mm× 200 mm) made of metal, plastic and similar materials. Serial chuck with ring gear can be used only with drills and mills with cylindrical shank of max. 16mm when working metal (ST37), the tool diameter cannot exceed 13mm . It is also possible to fix tools with conical shank directly into working spindle (MK3).
This drill and mill is designed for domestic use only and cannot be used industrially. Machine can be used for intended use only. Any other use of the machine contradicts its design.
Residual risk and safety measures
Direct electric contact
Defected power cord or plug can cause electric shock.
Defected cords and plugs must be replaced by qualified person.
Use the machine only with residual current device (RCD)
connected.
Indirect electric contact
Injuries caused by conductive machine parts when the machine is opened or in case of design errors.
Always plug the cord out when maintaining.
Use the machine only with residual current device (RCD)
connected
Insufficient local lighting
Insufficient lighting means great safety risk.
Always arrange proper lighting when working with the machine.
Disposal
Disposal instructions are made clear in pictograms on machine label resp. package. You can find pictograms description in chapter "Labeling".
Disposal of transport package
Package protects machine against damage during the transport. All packing materials are chosen to comply with strict environmental waste disposal standards and can be therefore recycled.
Recycling saves resources and minimizes waste existence.
Parts of the packing material can be dangerous to children (e.g. plastic wrap, styropor). Risk of suffocation!!!
Package parts keep away from children and dispose it as soon as possible.
Operation requirements
Operating personnel must read the manual carefully before use
Qualification
There is no need for any special qualification except for detailed training by qualified person.
Minimum age
Operate the machine can only people 18+ years old familiar with manipulation and all functions of the machine. Youth between 16 and 18 years can operate the machine only under the supervision of an adult.
Exception is made when using by youths during the occupational training to achieve exact skills under the supervision of a trainer.
Training
There is a corresponding course needed only to operate this machine. No special training is necessary.
Transport and storage
- You should clean the machine properly when storing for long period of time. Store the machine in clean and dry place with restricted access of unauthorized persons.
Fix the machine properly before every transport so it will not turn over.
Installation/First start up

Pull the plug out of the socket before every
installation and adjustment. To avoid damage during the transport, transport the machine in vertical position, in original package if possible. Keep in mind the weight of the machine and use corresponding transport vehicle with sufficient loading capacity. If you do not have a vehicle to your disposal, handle the machine carefully so you don't cause harm to people neither to machine. Protect the machine from wet, humidity and rain. It is allowed to install the machine in dry and ventilated rooms only. A working temperature range for the machine is the best between +15^ to +40^ . Are the chuck tools and mill fixed properly? Check for loose machine parts. Is the revolution range set properly? Are the machine and the fastening device clean and chips free? Check if the fixing screws of the 3-jaw chuck are fastened and if you are able to turn the spindle with your hand easily. Before the commissioning make sure that all guards and safety devices are in place. The jaw chuck must rotate. Before you press the start button check again if everything is installed correctly and movable parts are moving. Check if the type label figures match with power supply figures before installation. Install the lever handles which are part of the delivery.
Installation
Position the machine on flat basement (working bench, etc.)

The machine must be fixed tightly to a base by four holes. Use four fixing holes drilled into the machine base. Make sure there is enough room for cross-table movement and there is angle adjustment available. Make sure the base for the machine is stabile enough and is not bear its weight. All parts have been greased in the shop against the corrosion. Clean the machine with ambient ecological detergent before commissioning. Do not detergents that could damage the paint and ensure air ventilation during the cleaning. Lubricate the base again after the cleaning with light lubrication acid.

Oil, grease and cleaning detergents can cause harmful environment so must be disposed ecologically. Do not use it into the domestic waste.
Connecting to power supply/swi
Machine can be used only with monophase current 230V 50Hz . Electric circuit must have maximum protection of 16A in domestic use.
Turning on (pict. 3)
Before turning the machine on there must be a folding guard against the metal chips down (16).
If the green light is on (a) you can start the machine by revolution selection switch (6) and set the desirable revolutions.
If the orange light is also on (b) the revolution selection switch must be put to "zero" position first. Then you can set the revolutions on the machine and it will start.
Turning off
You can turn off the machine by pressing the red button "0" or by pressing the emergency switch (c). Then the machine must be disconnected from the power supply.
Operation and setting

Adjust the machine with the cord plugged out only. f injury.
Revolutions setting (pict. 3, 4)
You can choose between two revolution ranges by using the shift bar (5).
Front position (1) for revolution range between 0 - 1100 min ^-1 .
Rear position (2) for revolution range between 0 - 2500 min

Never shift the revolution ranges 1 and 2 during the ion time. Within the revolution ranges 1 or 2 you can be smooth fine adjustment by using the revolution on switch (6).
Right revolutions/cutting speed
Setting the proper cutting speed can influence the machine lifetime and working result significantly. It must be set according to material you are working on. Right cutting speed will be obtained by setting right revolutions.
Drilling
There is an empiric rule to be followed: the smaller holes there are and softer the material is, higher are the revolutions. Following table will help you with selection of right revolutions for different materials. These revolutions data are only for your orientation.
(data in rev./min)
| Ø drill | Cast iron | Steel | Iron | Alu | minu m | Bronze |
| 3 | 2550 | 1600 | 2230 | 950 | 0 | 8000 |
| 4 | 1900 | 1200 | 1680 | 720 | 0 | 6000 |
| 5 | 1530 | 955 | 1340 | 5700 | 0 | 4800 |
| 6 | 1270 | 800 | 1100 | 4800 | 0 | 4000 |
| 7 | 1090 | 680 | 960 | 4100 | 0 | 3400 |
| 8 | 960 | 600 | 840 | 3600 | 0 | 3000 |
| 9 | 850 | 530 | 740 | 3200 | 0 | 2650 |
| 10 | 765 | 480 | 670 | 2860 | 0 | 2400 |
| 11 | 700 | 435 | 610 | 2600 | 0 | 2170 |
| 12 | 640 | 400 | 560 | 2400 | 0 | 2000 |
| 13 | 590 | 370 | 515 | 2200 | 0 | 1840 |
| 14 | 545 | 340 | 480 | 2000 | 0 | 1700 |
| 16 | 480 | 300 | 420 | 1800 | 0 | 1500 |
| 18 | 425 | 265 | 370 | 1600 | 0 | 1300 |
| 20 | 380 | 240 | 335 | 1400 | 0 | 1200 |
| 22 | 350 | 220 | 305 | 1300 | 0 | 1100 |
| 25 | 305 | 190 | 270 | 1150 | 0 | 950 |
Milling
You can calculate the revolutions as follows:
n=vl(mxd)
n= revolutions in min-1
v=cutting speed in v m/min
d = tool diameter in m
= 3,14
You will find the data for cutting speed and depth in the list or tables below.
| Hot-work steel Hard metal | ||||
| Material | Tena city | Cutting depth (mm) | Cutting speed in (m/min) | Cutting depth (mm) |
| General structural steel, tool steel, carburizing and heat treated steel, cast steel | 500-700 | 0,5 | 70-50 | 1 |
| 3 | 50-30 | 6 | ||
| 10 | 30-20 | 10 | ||
| 700-900 | 0,5 | 45-30 | 1 | |
| 3 | 30-20 | 6 | ||
| 10 | 18-12 | 10 | ||
| 900-1100 | 0,5 | 30-20 | 1 | |
| 3 | 20-15 | 6 | ||
| 10 | 18-10 | 10 | ||
| 1100-1400 | - | - | 1 | |
| - | - | 3 | ||
| - | - | 6 | ||
| Automatou s steel | 700 | 0,5 | 90-40 | 1 |
| 3 | 75-30 | 3 | ||
| Cast iron with laminated graphite | 200 | 0,5 | 45-35 | 1 |
| 3 | 35-25 | 3 | ||
| 10 | 20-15 | 10 | ||
| 200-400 | 0,5 | 40-30 | 1 | |
| 3 | 30-20 | 3 | ||
| Black malleable cast iron | 350 | 0,5 | 70-45 | 1 |
| 3 | 60-40 | 3 | ||
| 6 | 40-20 | 6 | ||
| White malleable cast iron | 350-400 | 0,5 | 60-40 | 1 |
| 3 | 50-35 | 3 | ||
| 6 | 35-20 | 6 | ||
| Aluminum alloy | 60-320 | 0,5 | 180-160 | 0,5 |
| 3 | 160-140 | 3 | ||
| 6 | 140-120 | 6 | ||
| 320-440 | 1 | 140-100 | 1 | |
| 6 | 120-80 | 6 | ||
| 440+ | - | - | 1 | |
| - | - | 6 | ||
| Copper alloy | 200-400 | 3 | 150-100 | 3 |
| 6 | 120-70 | 6 | ||
| 400-800 | 3 | 100-55 | 3 | |
| 6 | 55-35 | 6 | ||
Tools chucking (pict. 3, 4, 6-8)
Because of joint shape there can be used only tools, chucking devices and tool brackets with Morse taper MK3 and inner thread M12 inside the spindle. Reducers cannot be used.
Tools chucking in the spindle and its removing
Chucking:
Turn off the machine and plug the power cord out! Remove the spindle guard (15). Clean up the conical shank (18) and spindle (4) and remove grease. To avoid accidents use a piece of cloth to hold the mill. To fix the spindle, insert a fastening pin (17) into the spindle bush sideway. Tighten up the pulling rod (19) with a flat wrench (SW10). The pulling
rod must be screwed in about 8 threads (clockwise) into the taper stud. Important: secure the tool and chuck always with the pulling rod to avoid self releasing of the tool. Remove the fastening pin (17) again and put the spindle guard (15) back again.
Removing:
Turn off the machine and plug the power cord out! Remove the spindle guard (15).
To fix the spindle, insert a fastening pin (17) into the spindle bush sidewall. Loose the pulling rod anticlockwise using a flat wrench (SW10). Loose the conical shank (18) by tapping the pulling rod (19) carefully with a rubber hammer and take it out from a spindle bush. To avoid accidents use a cloth to hold the mill. Put the spindle guard (15) back again.
Chuck manipulation
You can fasten into the chuck (9) cylindrical tools only with maximum shank diameter as stated. Use only perfect and sharp tool. Do not use tools with damaged shank or otherwise deformed. Use only accessories and attachments approved by manufacturer. Insert the tool shank into the chuck (9) whole the way in and tighten it up with a wrench, which is part of the delivery. Remove the chuck wrench again. Make sure the chucked tools are tightened properly.

Do not leave the chuck wrench in. There is great risk of injury by flying wrench.
Workpieces clamping

A Tools must be always chucked in properly. This is all for operational safety and working results. If a piece is not clamped properly, it can be pulled out by the used force of the mill and fling away.
This can be achieved by using machine vice (not part of the delivery). Thanks to fastening screws and adapters, the machine vice can be aligned precisely parallel to a slide lead.
To clamp a workpiece to the machine table, suitable clamping clips can be also used (not part of the delivery). To achieve firm holding of a workpiece, the clamping clips must be of right size.
Feed (pict. 7, 8)
All feeding movements must be carried out manually.
Normal and fine feed of the milling head (pict. 1/2/9)
Normal feed of the milling head
Pull the feed turning cross (14) out of the machine. Tool can be now brought to a workpiece by the turning cross quickly. Normal feed is used for drilled holes. Thanks to a depth stop (12) the drilling resp. milling depth can be regulated in z direction. To do so, loose up the arresting handle (20) on a depth stop (12). Put a depth stop into the position required and tighten up the adjusting handle (20) again. You can read out the feed position on a scale (21).
Fine feed of the milling head
Move the turning cross (14) towards the milling head (1) so the teeth of the tooth clutch (27) interlock. You can place the mill accurately now by using the control wheel for fine feed (7). One division on the scale corresponds with 0,02mm on the table track. If the desirable milling depth is set, the milling head (1) must be fixed firmly by clutching lever (28).
Cross-table feed (pict. 8)
Cross-table (2) can be moved manually in two perpendicular axes (X,Y) . The milling feed is executed by pressing the
handles (10,11). A zero position of the slide track is set by using a dimension on the handles scale. One division on the scale corresponds with 0,02mm on the table track. If the axes of the slide track (X,Y) are not in use, it is recommended to clip them with clutching lever (22).
Turning the milling head (pict. 1, 2, 11-13)
To mill beveled edges or V-grooves, the milling head can be turned to the left or right about 45^ . Warning: before you start adjusting, make sure that the machine is fixed to the table properly!
Turn the machine off. Hold the milling head (1) by hand to prevent it from tilting. Loose the fastening nut (13) with flat wrench (SW36). Unblock the neutral fixing device (23) by pulling it out. Set the desirable angle on the angle scale (24). Tighten up the fastening nut (13) again.
Lead calibration for litre cuts (pict. 14)
Distance between slide surfaces of cross and longitudinal slides and milling head can change when using extensively. To ensure perfect function and movement, the lead for litre cuts should be calibrated circa once a year. Loose up a jam-nuts (25). Adjust the calibration bolts (26) so there is an even pressure made on the lead for litre cuts on each calibration bolt. Hold the calibration bolt (26) with alien wrench (3mm) in position and tighten up the jam-nut back again. Tip: Tighten up the calibration bolts evenly, start always from outside on both sides, to achieve unified adjustment.
Processing
Drilling and deep milling
Insert a chuck and a tool as described and secure it with a pulling rod. Tighten up the chuck with chuck key. Set right revolutions (see paragraph "Revolutions setting"). Fix a workpiece firmly using machine vice or by using clamping clips. Move the cross-table (2) into desirable position (direction X a Y). Adjust a depth stop (see "Normal feed of the milling head") and make sure that a workpiece will not come into contact with a tool. Remove objects you are not using away from a work place. Turn the machine on and set right spindle revolutions by revolution selection switch (6). Drill or mill now. Warning: when drilling large holes, drill ahead with small drill first. Take the drill out of a workpiece regularly to get the chips out of the hole. You will get a drilling or milling depth by adjusting a depth stop (12). After you are done with your work put the milling head back to the upper position and turn the machine off. Clean up the machine and the chucking device and grease them up possibly.
Counter boring and centralizing drilling
Please take into account that counter boring is done with low cutting speed and small feed, while centralizing drilling with high cutting speed and small feed.
Face milling
Fix a chuck and a tool and secure it by pulling rod (19). Tighten up a chuck with a chuck key. Set the right revolution range. Warning: Do not change the revolution ranges (1 and 2) while the spindle is spinning! Fix a workpiece firmly using machine vice or by using clamping clips. Move the cross-table (2) into desirable position (direction X and Y). Adjust a depth stop (see "Normal feed of the milling head") and make sure that a workpiece will not come into contact with a tool. Remove objects you are not using away from a work place. Turn the machine on and set right spindle revolutions by revolution selection switch (6). Mill now. Adjust the cross-table by using manual handles in
a direction X and Y. After you are done with your work put the milling head back to the upper position and turn the machine off. Clean up the machine and the chucking device and grease them up possibly.
After using the machine, working table must be cleaned and greased again.
Checking, maintenance and keeping
Plug the power cord out of the socket prior to maintaining! Carry out the machine maintenance regularly (depending on how often you use it). Document all maintenance jobs.
Keep a taper shank and the mill clean. If not in use store it in a box. Check the whole function of electric circuit (switches, sockets, contacts, etc.). To prevent major damage and injuries, please contact our customer service when dealing with malfunctions that don't belong to regular maintenance. You will find the customer service address in the warranty card. Check the mobility of the milling head and make sure it will not get loose. Check the overshoots at the spindle. Check if all bolt connections are tightened up.
Lubrication
To get good working results and to protect the machine against rust, it must be lubricated regularly. Spread out the lubricant evenly by brush or non-felted cloth.
Places to be lubricated and lubricants:
All metal machine parts: lubricating oil
Toothed rod on a post: lubricating oil
Machine table: lubricating oil
Fine feed mechanism: lubricating oil
Sliding spindle of the longitudinal slides: lubricating oil
Sliding spindle of the cross slides: lubricating oil
Prismatic lead of the milling head: lubricating grease
Turning bearing of the milling head: lubricating grease
Prismatic lead of the cross slides: lubricating grease
Prismatic lead of the longitudinal slides: lubricating grease
Replacement of a power cord
In case of damage power cord, it must be replaced by manufacturer or by customer service or other qualified person, to prevent danger.
Cleaning
Pull the power cord out of the socket before every cleaning
Keep the safety devices, ventilation holes and motor guard dust and dirt free if possible. Wipe the machine with a clean piece of cloth or blow it with low pressure pressurized air. We recommend cleaning the machine after every use immediately. Clean the machine regularly with dump cloth and soap water. Do not use chemical detergents and dis solvent that could damage plastic parts of the machine. Keep the machine out of the water.
Maintenance
There are no other parts inside the machine that require maintenance.
Service
Any technical questions? Complaint? Do you need spare parts or operation manual?
Go to our website www.guide.com and the section Service will help you quickly and without bureaucracy. Please, help us to help you. In order to identify your device in case of complaint, please indicate serial number, order number and year of manufacture. All information is available on the product label. To have all information always at hand, put them down.
Serial number:
Order number:
Year of manufacture:
Phone: +49 (0) 79 04 / 700-360
Fax: +49 (0) 79 04 / 700-51999
E-Mail: support@ts.guede.com
Important information for the customer
Please be sure to know that returning the product in or after the warranty period must be made in the original packaging.
Mini boor-en freesmachine GBF 550
$$ n = v / (\pi x d) $$
$$ \begin{array}{l} n = o t a c k y v m i n ^ {- 1} \ v = \text {r e z n a r y c h l o s t} v m / \min \ d = p r i e m e r n a s t r o j a v m m \ \pi = 3, 1 4 \ \end{array} $$
$$ n = v / (\pi x d) $$
Translation of the EC-Declaration of Conformity
We, hereby declare the conception and construction of the below mentioned appliances correspond - at the type of construction being launched - to appropriate basic safety and hygienic requirements of EC Directives.
In case of any change to the appliance not discussed with us the Declaration expires.