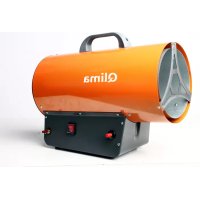
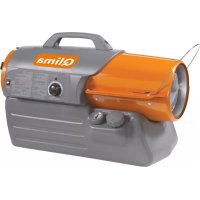
DFA4100 Premium - Heat gun QLIMA - Free user manual and instructions
Find the device manual for free DFA4100 Premium QLIMA in PDF.
| Product type | Forced air heater |
| Brand | Qlima |
| Model | DFA4100 Premium |
| Fuel | Kerosene (paraffin class C1) or diesel |
| Supply voltage | 220-240 V / 50 Hz / single-phase |
| Electrical power (ignition) | 145 W |
| Pump pressure | 5 psi (0.34 bar) |
| Temperature display | Digital (range 5-45°C) |
| Adjustable thermostat | Yes (5-45°C) |
| Ignition | Electronic (spark plug) |
| Flame detection | Photocell |
| Safety | Fuse 5A 250V, overheat protection, automatic shutdown in case of fault |
| Use | Outdoor only, well-ventilated area (25% open surface) |
| Wheels | Yes (supplied as assembly kit) |
| Handle | Yes (front and back) |
| Cord winder | Yes |
| Maintenance | Clean air and fuel filters, drain tank, replace fuse |
| Spare parts | Air filter, fuel filter, spark plug, photocell, fuse |
| Warranty | 24 months (parts and labor) |
Frequently Asked Questions - DFA4100 Premium QLIMA
User questions about DFA4100 Premium QLIMA
0 question about this device. Answer the ones you know or ask your own.
Ask a new question about this device
Download the instructions for your Heat gun in PDF format for free! Find your manual DFA4100 Premium - QLIMA and take your electronic device back in hand. On this page are published all the documents necessary for the use of your device. DFA4100 Premium by QLIMA.
USER MANUAL DFA4100 Premium QLIMA
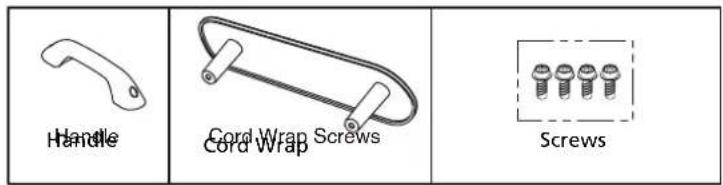
Assembling the heater
Installation
Replacing the lamp
Storage instructions
Guarantee conditions
Environmental protection
INDICE
Normal operation 125 W
(BS2869 part2) or 1-K kerosene or No.1. fuel oil
Pout 16.500 W
IP class IPx4
Serial number
PVG Holding BV, Kanaalstraat 12 C, 5347 KM
Oss, the Netherlands | P.O. Box 96,
5340 AB Oss, the Netherlands
Qlima.com
Made in Korea


SPECIFICATIONS DUAL FUEL FORCED AIR HEATER

Model DFA 2900 premium
P_in 220-230V / 50hz / 1Ph
Ignition 210 W
Normal operation 190 W
(BS2869 part2) or 1-K kerosene or No.1. fuel oil
P_out 29,000 W
IP class IPx4
PVG Holding BV, Kanaalstraat 12 C, 5347 KM
Oss, the Netherlands | P.O. Box 96,
5340 AB Oss, the Netherlands
Qlima.com
Made in Korea


SPECIFICATIONS DUAL FUEL FORCED AIR HEATER

Model DFA 4100 premium
P_in 220-230V / 50hz / 1Ph
Ignition 220 W
Normal operation 200 W
(BS2869 part2) or 1-K kerosene or No.1. fuel oil
P_out 41,000 W
IP class IPx4
PVG Holding BV, Kanaalstraat 12 C, 5347 KM
Oss, the Netherlands | P.O. Box 96,
5340 AB Oss, the Netherlands
Qlima.com
Made in Korea


DFA 1650 Premium

DFA 2900 Premium DFA 4100 Premium


Normal operation 125 W
(BS2869 part2) or 1-K kerosene or No.1. fuel oil
Pout 16.500 W
IP class IPx4
Serial number
PVG Holding BV, Kanaalstraat 12 C, 5347 KM
Oss, the Netherlands | P.O. Box 96,
5340 AB Oss, the Netherlands
Qlima.com
Made in Korea


SPECIFICATIONS DUAL FUEL FORCED AIR HEATER
Qlima
Model DFA 2900 premium
P_in 220-230V / 50hz / 1Ph
Ignition 210 W
Normal operation 190 W
(BS2869 part2) or 1-K kerosene or No.1. fuel oil
P_out 29,000 W
IP class IPx4
PVG Holding BV, Kanaalstraat 12 C, 5347 KM
Oss, the Netherlands | P.O. Box 96,
5340 AB Oss, the Netherlands
Qlima.com
Made in Korea


SPECIFICATIONS DUAL FUEL FORCED AIR HEATER
Qlima
Model DFA 4100 premium
P_in 220-230V / 50hz / 1Ph
Ignition 220 W
Normal operation 200 W
(BS2869 part2) or 1-K kerosene or No.1. fuel oil
P_out 41,000 W
IP class IPx4
PVG Holding BV, Kanaalstraat 12 C, 5347 KM
Oss, the Netherlands | P.O. Box 96,
5340 AB Oss, the Netherlands
Qlima.com
Made in Korea


Qlima
- Use away from combustible materials. - NOT TO BE USED FOR THE HEATING OF HABITABLE AREAS OF DOMESTIC PREMISES; FOR USE IN PUBLIC BUILDINGS REFER TO NATIONAL REGULATIONS. - Check the heater for possible shipping damage. - Connect power cord to well grounded 220V-, 50Hz source of power.
- The appliance must be installed in accordance with the instructions and local regulations. - For use outdoors and in well ventilated areas: - A well ventilated area must have a minimum of 25% - of the surface area open. - The surface area is sum of the walls surface. - Air delivery temperature classification: space heating
FOR OUTDOOR USE ONLY - The use of this appliance in enclosed areas can be dangerous and is PROHIBITED. - Read the instructions before using this appliance
DFA 1650 Premium

DFA 2900 Premium DFA 4100 Premium
1 LISEZ PRÉALABLEMENT LE MANUEL D'UTILISATION.
2 EN CAS DE DOUTE, CONTACTEZ VOTRE REVENDEUR.
PRINCIPAUX COMPOSANTS
CONDITIONS DE GARANTIE
Normal operation 125 W
(BS2869 part2) or 1-K kerosene or No.1. fuel oil
Pout 16.500 W
IP class IPx4
Serial number
PVG Holding BV, Kanaalstraat 12 C, 5347 KM
Oss, the Netherlands | P.O. Box 96,
5340 AB Oss, the Netherlands
Qlima.com
Made in Korea


SPECIFICATIONS DUAL FUEL FORCED AIR HEATER

Model DFA 2900 premium
Pin 220-230V / 50hz / 1Ph
Ignition 210 W
Normal operation 190 W
(BS2869 part2) or 1-K kerosene or No.1. fuel oil
P_out 29,000 W
IP class IPx4
PVG Holding BV, Kanaalstraat 12 C, 5347 KM
Oss, the Netherlands | P.O. Box 96,
5340 AB Oss, the Netherlands
Qlima.com
Made in Korea


SPECIFICATIONS DUAL FUEL FORCED AIR HEATER

Model DFA 4100 premium
P_in 220-230V / 50hz / 1Ph
Ignition 220 W
Normal operation 200 W
(BS2869 part2) or 1-K kerosene or No.1. fuel oil
P_out 41,000 W
IP class IPx4
PVG Holding BV, Kanaalstraat 12 C, 5347 KM
Oss, the Netherlands | P.O. Box 96,
5340 AB Oss, the Netherlands
Qlima.com
Made in Korea


DFA 1650 Premium

DFA 2900 Premium DFA 4100 Premium
1 PLEASE READ THE USER'S MANUAL FIRST.
2 IF YOU HAVE ANY DOUBTS, CONSULT YOUR DEALER.
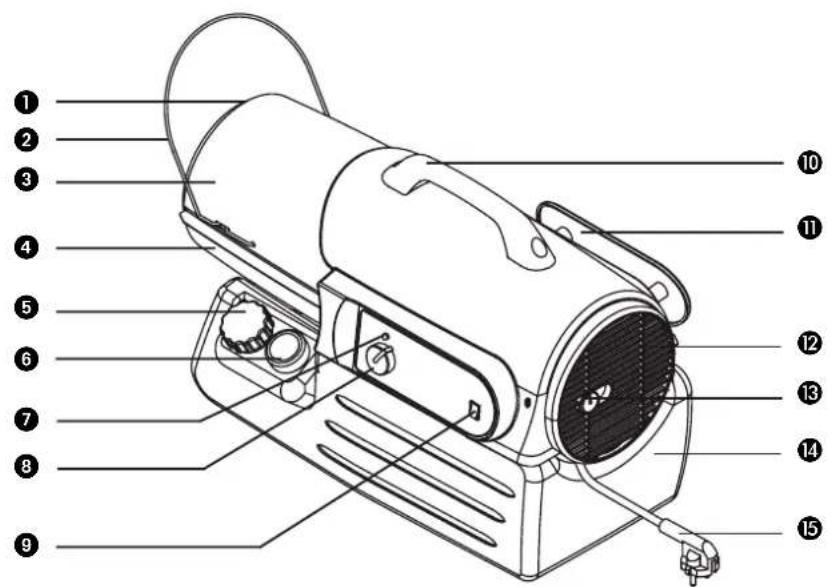
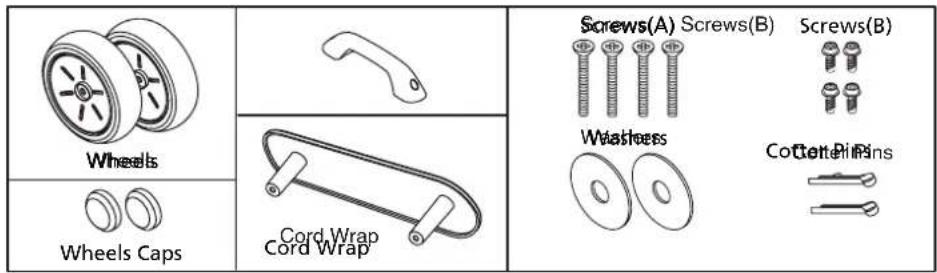
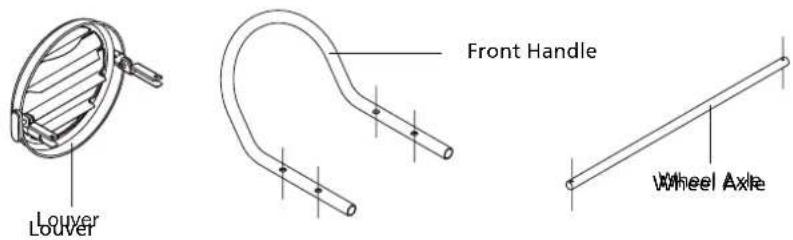
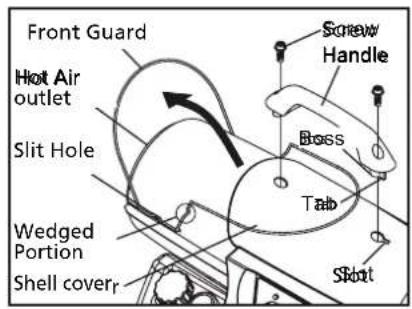
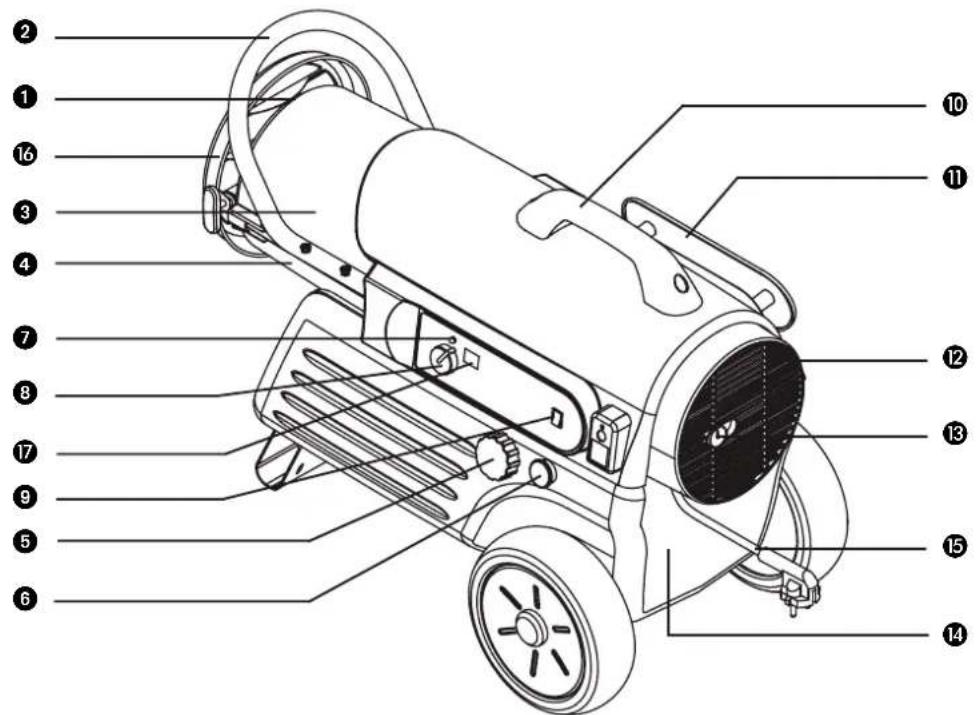
MAIN COMPONENTS
① Hot air outlet
② Front guard
③ Upper shell
4 Lower shell
⑤ Fuel cap
6 Fuel gauge
⑦ Indicator lamp
⑧ Thermostat knob
⑨ LED power / reset switch
10 Handle
⑪ Cord wrap
⑫ Fan guard
13 Pressure gauge
14 Fuel tank
15 Power cord
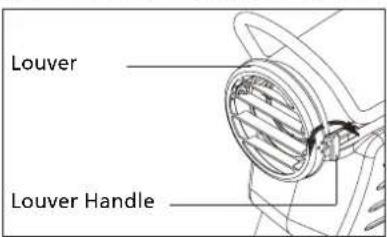
16 Louver
⑰ Temperature display
DIRECTIONS FOR USE (GB)

- Read this user manual carefully before using the appliance and keep it for future reference. Install this device only when it complies with local/national legislation, ordinances and standards.
- The heater is designed for outdoor use only. This product is intended to be used as a heater in non-residential conditions only
- After unpacking, check the appliance for any damages. When in doubt, do not use the appliance, but contact customer service at your local dealer. Keep the packaging materials (plastic bags, etc.) away from children, as they may cause hazardous situations to children.
- No modifications to the safety system are allowed.
- This heater is constructed in conformity with relevant texts in the LVD/EMC standard

WARNINGS
- Read the Directions for Use before using the Heater. The safety of this heater is guaranteed only by its correct usage in accordance with these instructions, therefore it is recommended that they are retained for future reference.
- Only use the device for its intended purpose. Other usage may lead to short circuits, burns, electroshocks, lamp explosion, crash, etc.
• Install the heater only if it complies with local regulations, laws and standards; - Make sure that the available voltage does not exceed the voltage stated in the specifications of this manual.
- Check if the voltage indicated on the type plate corresponds to the local mains voltage before you connect the appliance.
- The appliance is suitable for mains voltages ranging from \~230 V.
- Always make sure that you actually see the appliance when you want to switch it on. Never use things like a timer, programmer or any other device (including Internet apps) that switches on the appliance automatically as this may cause fire!
- Use the heater according to the instructions as described in the installation section of the directions for use;
- This heater is manufactured according to CE safety standards. Nevertheless, as with any other heating device, care must be taken;
- RISK OF FIRE Never use the heater in places where inflammable and/or harmful Gases, products or fumes may be present (e.g. exhaust Gases, paint fumes, curtains, paper, clothes);
- If the heater is positioned too close to inflammable materials you may risk fire;
- Do not use any extension cords or multi-socket adapters.
- For safety reasons take care when children or animals are in the proximity of the heater, as with any other heating device, and make sure that children are always aware of the presence of a hot heater;
- This appliance is not intended for use by persons (including children) with reduced physical, sensory or mental capabilities, or lack of experience and knowledge, unless they have been given supervision or instruction concerning use of the appliance by a person responsible for their safety.
- If the supply cord is damaged, it shall be replaced by the manufacturer, its service agent or similarly qualified persons in order to avoid a hazard.
• Children should be supervised to ensure that
they do not play with the appliance.
- In order to avoid overheating, do not cover the device.
- The device must not be located immediately below a socket outlet.
- Do not use this heater in the immediate surroundings of a bath, a shower or a swimming pool.
• Make sure that the power cable can never touch the heater.
- The guard of this heater is intended to prevent direct access to warm parts and must be in place when the heater is in use..
- Do not insert objects into the openings of the device.
- The guard does not give full protection for young children and infirm persons.
- This appliance can be used by children aged from 8 years and above and persons with reduced physical, sensory or mental capabilities or lack of experience and knowledge if they have been given supervision or instruction concerning use of the appliance in a safe way and understand the hazards involved.
- Cleaning and user maintenance shall not be made by children without supervision.
- Children of less than 3 years should be kept away from the heater.
- Children aged from 3 years and less than 8 years shall only switch on/off the appliance provided that it has been placed or installed in its intended normal operating position and they have been given supervision or instruction concerning use of the appliance in a safe way and understand the hazards involved.
- Children aged from 3 years and less than 8 years shall not plug in, regulate and clean the appliance or perform user maintenance.
- CAUTION - some parts of this product can become very hot and cause burns. Particular
attention has to be given where children and vulnerable people are present.
- WARNING - Do not use this heater in small rooms when they are occupied by persons not capable of leaving the room on their own, unless constant supervision is provided.
- During operation and just after operation the appliance will be extremely hot. NEVER touch it during operation or just after operation. NEVER move the appliance during this time.
- Switch off the appliance when it is unattended.
- Do not cover or obstruct the heater when in use.
- Disconnect the mains during installation, cleaning, maintenance and / or transportation. Ensure it is cooled down completely before moving, cleaning or performing maintenance.
Improper use of this heater can result in serious injury or death from burns, fire, explosion, electrical shock and/or carbon monoxide poisoning.
- Improper use of this heater can result in serious injury or death from burns, fire, explosion, electrical shock and/or carbon monoxide poisoning.
- Use this heater only in well ventilated areas.
- Use good quality fuel like Qlima Premium Quality fuels or similar in order to ensure that your heater can be used without problems.
- Never use other fuels than kerosene or diesel.
- Never use this heater with liquids like gasoline, benzene, paint thinners, alcohol based liquids or other oil compounds.
- Never use this heater where flammable vapours may be present.
- Never refill the heater, unless it has cooled
down completely.
- Use kerosene OR diesel as a fuel only, not mixed. When you want to switch from kerosene to diesel or vice versa, first empty the fuel tank completely.
-
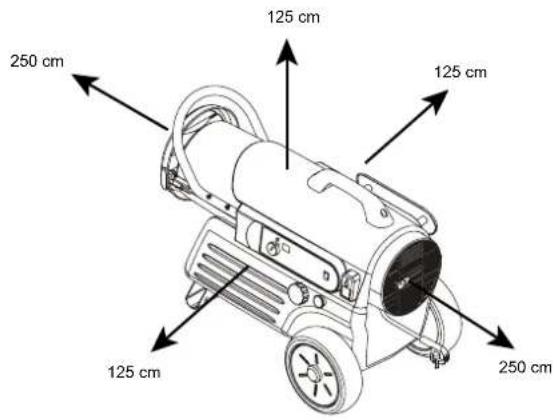
Always respect the minimum clearance distances when using the heater:
Air inlet and air outlet: 250cm. Sides and top 125cm. -
Never use ducts or other objects to guide the air flow on air inlet or air outlet side.
- Never transport the heater with fuel in the tank. Make sure it is empty before moving it.
• Always ensure that the heater is standing and keeps standing on a level and firm surface. - Make sure the surface on which the heater is standing is stable, without vibrations and not moving.
• Make sure that (potentially) dangerous situations cannot occur. - Combustible objects should be stored safely according to local regulations, but never in such a way that the heater can heat or ignite them or (potentially) dangerous vapours can be generated.
• Make sure the heater is standing on a surface which cannot be harmed by using the unit. - For optimal performance of this heater, please use Qlima Premium Quality Fuels or other kerosene. Diesel may be used, but the performance of the heater will be influenced. Emissions might be higher and burning process will be a little more volatile (small flame tips might be visible at the exhaust of the heater.
If you fail to consult and/or follow up the rules, instructions and explanation, the warranty will no longer be valid, and the manufacturer will no longer deal with any damage to the appliance and/or your environment under the warranty.
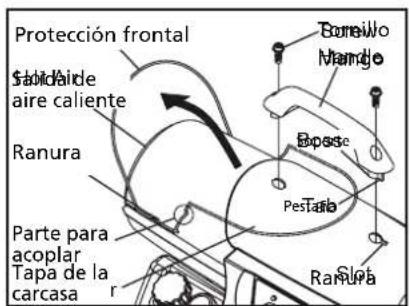
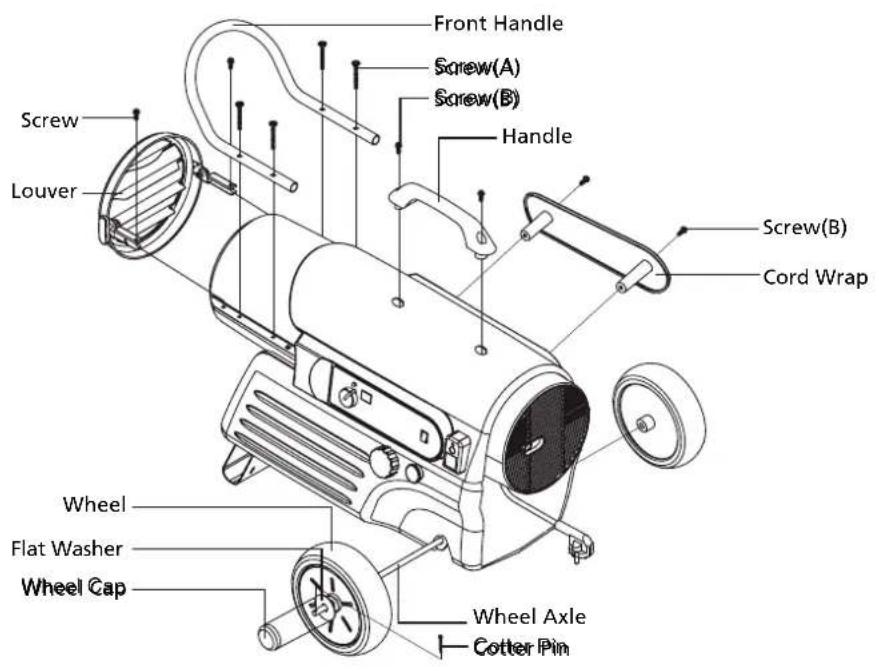
ASSEMBLING THE HEATER
The manufacturer is not responsible for any harm or damage if attention is not paid to the points described above.
The use of this product and the elements required for that purpose is entirely at the end user's own risk.
| DFA 1650 premium | DFA 2900 premium | DFA 4100 premium | |
| Wheel | No Yes | Yes | |
| Wheel Axle | No | Yes | Yes |
| Wheel Cap | No | Yes | Yes |
| Front Handle | No | Yes | Yes |
| Handle Yes Yes | Yes | ||
| Cord Wrap | Yes Yes Yes | ||
| Louver | No Yes Yes | ||
| Hardware Kit | Yes Yes Yes |
INSTALLATION
Make sure to use the appliance only on a firm and sturdy underground. In case of doubt have underground checked by an expert.
WARNING - this appliance must be connected to an earthed power socket.
The heater is fitted with a supply cable and molded plug, therefore the terminals should not be interfered with. The following points should be considered when positioning the heater
- Your heater has been designed for use with high-quality, water-free pure paraffin oil such as Qlima Premium Quality Fuels or high quality, water-free
pure diesel oil (not home-oil). We recommend you to use paraffin. Only fuels of this kind will ensure clean and proper burning.
Lower quality fuel may result in:
- Increased possibility of malfunctioning
• Incomplete combustion - Reduced heater lifetime
- Smoke and/or fumes
- Deposits on the grid, mantle or other objects
- Increased repair costs
Using the right fuel is therefore essential for safe, efficient and comfortable use of your heater.
Damage and/or malfunctioning of the heater due to the use of other than high-quality water-free pure paraffin oil or high quality, water-free pure diesel oil (not home-oil) is not covered by the warranty.
Always refer to your local dealer for the right fuel for your heater.
FILLING FUEL
Fill the fuel tank in a suitable, well ventilated area. Please avoid spillage of fuel and respect following precautions:
• Make sure the heater is standing on a level surface
• Make sure the heater is switched off and cooled down completely
- Remove the fuel tank cap
- Ensure that the same fuel is added to the remaining fuel in the tank, unless the tank is empty.
- Fill the tank just below the maximum level in order to avoid spillage; the gauge indicates the fuel level
- Replace the fuel tank cap
IGNITING AND OPERATING THE HEATER
STARTING THE HEATER
After refilling the fuel, put the plug into an earthed socket. Turn the thermostat control knob to the desired setting (5 - 45 °C.) and put the power switch in the 'ON' position. The power indicator lamp will light up and the heater will start.
The temperature display (DFA 2900 Premium and DFA 4100 Premium only) will indicate:
- 'Lo' when the detected temperature is below 5 °C
• The actual temperature when it is between 5 and 45 °C
• 'Hi' when the detected temperature is above 45 °C
When the heater doesn't start, the set temperature may be lower than the detected temperature.
STOPPING THE HEATER
Put the power switch in 'OFF' position.
RESTART THE HEATER
Wait for minimum 20 seconds after stopping the heater in order to avoid damage to the heater.
ADJUSTMENT OF AIR FLOW DIRECTION WITH THE LOUVER
The only way to adjust the air flow direction is by using the louver. Approximately 28 degrees upward and 20 degrees downward.
TROUBLE SHOOTING
| TROUBLE | POSSIBLE CAUSE | CORRECTIVE ACTION |
| Heater ignites but main PCB assembly shuts heater off after a short period of time (Indicator Lamp is flickering and temperature display indicates "E1")." | Wrong pump pressure | See pump pressure adjustment |
| Dirty air output, air intake of lint filter. | See air output, air intake and lint filters | |
| Dirty fuel filter See fuel filter | ||
| Dirt in nozzle See nozzle | ||
| Dirty photocell lens Clean photocell lens | ||
| Photocell assembly not properly installed (not seeing the flame) | Make sure photocell boot is properly seated in bracket | |
| Bad electrical connection between photocell and main PCB assembly | Check electrical components. See wiring diagram | |
| Defective photocell Replace photocell. | ||
| Heater will not ignite but motor runs for a short period of time (Indicator lamp is flickering and temperature display indicates "E1" | No fuel in tank Fill tank with kerosone | |
| Wrong pump pressure | See pump pressure adjustment | |
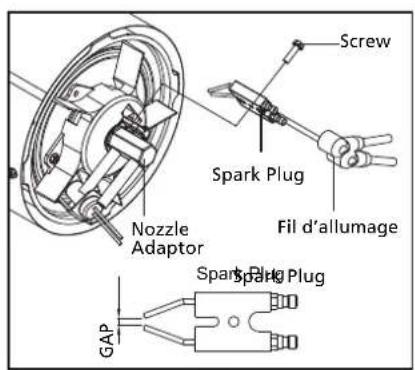
| Carbon deposits on spark plug and/or improper gap | See spark plug | |
| Dirty fuel filter See fuel filter | ||
| Dirt in nozzle See nozzle | ||
| Water in fuel tank | Flush fuel tank with clean kerosone | |
| Bad electrical connection between ignitor and main PCB assembly | Check electrical components. See wiring diagram | |
| Ignitor wire is not attached to spark plug | Attach ignitor to spark plug | |
| Fan does not turn when heater is plugged in and power switch was in the "On" position. (Indicator lamp is on or flickering) | Thermostat setting is too low | Turn thermostat control knob to a higher setting |
| Bad electrical connection between motor and main PCB assembly | Check electrical connections. See wiring diagram | |
| Indicator lamp is flickering and temperature display indicates "E2" | Temperature sensor disconnected | Reconnect sensor. See wiring diagram |
| Sensor failure | Replace sensor. See wiring diagram. | |
| Indicator lamp is flickering and temperature display indicates "E3" | Thermostat switch failure | Replace switch. See wiring diagram |
| Heater will not turn on (Indicator lamp is off) | Temperature limit safety device is overheated | Turn power switch to "Off" and allow to cool (about 10 minutes) |
| No electrical power | Check to insure heater cord and extension cord are plugged in. Check power supply | |
| Blown fuse | Replace safety fuse in PCB board | |
| Bad electrical connection between temperature limit safety device and PCB board | Check electrical connections. See wiring diagram |
MAINTENANCE (TO BE EXECUTED BY AUTHORIZED PERSONS ONLY)
WARNING!! : NEVER SERVICE HEATER WHILE IT IS PLUGGED IN OR WHILE HOT!
USE ORIGINAL EQUIPMENT REPLACEMENT PARTS ONLY. Use of third party or other alternate components will void warranty and may cause unsafe operating conditions.
FUEL TANK
- Flush every 200 hours of operation or as needed.
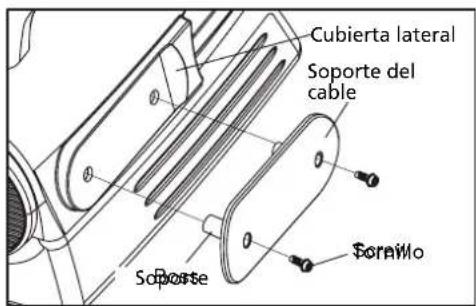
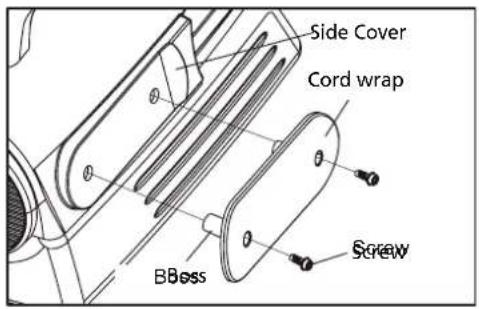
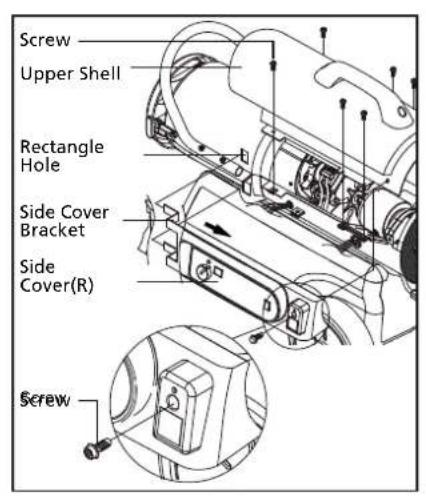
UPPER SHELL REMOVAL
- Remove Screw that secure the side.
- Push out for arrow direction and extract side cover's bracket from rectanlar hole and separate side cover (R).
- Side cover (L) in opposite of side cover (R). Separates by same method. (DFA 2900 premium and DFA 4100 premium)
- Remove 4 screws along each side of heater using medium phillips screwdriver. These screws attach upper rear and lower shells together. (DFA 1650 premium).
- Remove screws along each side of heater using medium phillips screwdriver. These screws attach the upper and lower shells together.
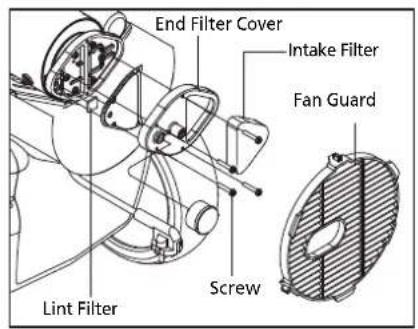
AIR OUTPUT, AIR INTAKE AND LINT FILTERS
Wash and dry with soap and water or replace every 500 hours of operation or once a year.
- Remove the upper shell.
- Remove the fan guard.
- Remove the end filter cover screws using medium phillips screwdriver.
- Remove the end filter cover.
- Replace the air output and lint filters.
- Wash or replace the air intake filter.
• Reinstall the fan guard and the upper shell.
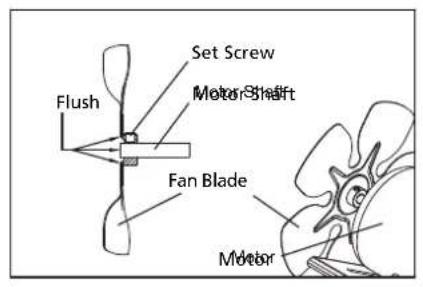
FAN BLADES
Clean every season or as needed.
- Remove the upper shell.
- Use 1/8" allen wrench to loosen the set screw which holds the fan blade to motor shaft.
-
Slip fan blade off motor shaft.
-
Clean fan blade using a soft cloth moistened with kerosene or solvent.
• Dry fan blade thoroughly. - Reinstall the fan blade on the motor shaft. Place the fan blade hub flush with the end of motor shaft.
- Place the set screw on flat of the shaft. Tighten the set screw firmly(40\~50 inch-pounds/4.5\~5.6 N-m).
FUELFILTER
Clean or replace twice a heating season or as needed.
- Remove the upper shell.
- Remove the fan blade.
• Pull the fuel line off from the fuel filter neck. - Remove the fuel filter.
- Wash the fuel filter with clean kerosene and replace in the tank.
- Attach the fuel line to the fuel filter neck.
- Replace the fan Blade and the upper shell.
PUMP PRESSURE ADJUSTMENT
- Start the heater and allow the motor to reach full speed.
- Adjust the pump pressure. (Using a flat blade screwdriver)
- Turn the relief valve clockwise to increase pressure.
- Turn the relief valve counter-clockwise to decrease pressure.
- Set the pump pressure according to the chart below.
- Stop the heater
NOTE: Use only original equipment replacement parts. Use of alternative or third party components will void any warranty and may cause unsafe operating conditions.
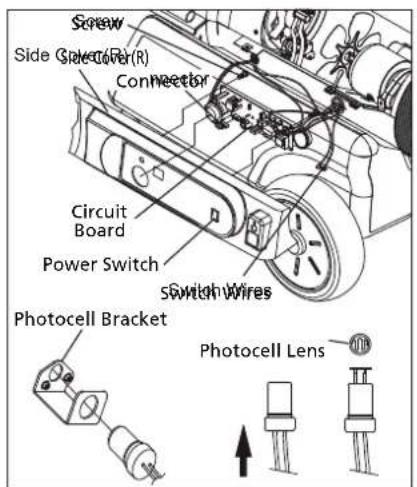
REPLACING THE FUSE
NOTICE: This heater is fuse protected.
If your heater fails to ignite, do not return your heater to the store.
Please follow the simple instruction below to inspect and change the fuse first.
To prevent personal injury, unplug the power cord before replacing fuse.
- Unplug heater
- Remove the screw that secures the side cover
- Push out for arrow direction and extract the side cover's bracket from the rectanlar hole and separate the side cover.
- Disconnect the switch wires from the power switch.
- Remove the two screws using a medium phillips screwdriver. These screws attach the circuit board to the side cover.
- Remove the fuse from the fuse holder and replace the fuse 250V, 5A.
To avoid fire, do not substitute with a higher or lower current rating. - Replace the switch wires to the power switch.
- Replace the circuit board and the side cover.


| MODEL PUMP PRESSURE | |
| DFA 1650 Premium 3 psi | |
| DFA 2900 Premium 4 psi | |
| DFA 4100 Premium 5 psi |
STORAGE INSTRUCTIONS
Store the heater in a dry place above 10^ C in the original packaging. Remove all fuel from the tank before storing.
GUARANTEE CONDITIONS
The appliance is supplied with a 24-month guarantee, commencing on the date of purchase. All material and manufacturing defects will be repaired or replaced free of charge within this period. The following rules apply:
- We expressly refuse all further damage claims, including claims for collateral and/or consequential damage.
- Repairs to or replacement of components within the guarantee period will not result in an extension of the guarantee.
- The guarantee is invalidated if any modifications have been made, non-genuine parts are fitted or repairs are carried out by third parties.
- Components subject to normal wear, such as filters, batteries, lamps and heating elements are not covered by the guarantee.
- The guarantee is valid only when you present the original, dated purchase invoice and if no modifications have been made to it.
- The guarantee is invalid for damage caused by neglect and/or by actions that deviate from those in this instruction booklet.
- Transportation costs and the risks involved during the transportation of the appliance or components of the appliance shall always be for the account of the purchaser
- Damage caused by not using suitable spare parts is not covered by the guarantee.
To prevent unnecessary expense, we recommend that you always first carefully consult the instructions for use. Take the appliance to your dealer for repairs if these instructions do not provide a solution.
www.qlima.com
ENVIRONMENTAL PROTECTION
Do not dispose of electrical appliances as unsorted municipal waste, use separate collection facilities.
Contact your local government for information regarding the collection systems available.
If electrical appliances are disposed of in landfills or dumps, hazardous substances can leak into the groundwater and get into the food chain, damaging your health and well-being. When replacing old appliances with new ones, the retailer is legally obligated to take back your old appliance for disposal at least for free of charge.
SPECIFICATIONS DUAL FUEL FORCED AIR HEATER

Model DFA 1650 Premium
P_in 220-230V / 50hz / 1Ph
Ignition 145 W
Normal operation 125 W
(BS2869 part2) or 1-K kerosene or No.1. fuel oil
Pout 16.500 W
IP class IPx4
Serial number
PVG Holding BV, Kanaalstraat 12 C, 5347 KM
Oss, the Netherlands | P.O. Box 96,
5340 AB Oss, the Netherlands
Qlima.com
Made in Korea


SPECIFICATIONS DUAL FUEL FORCED AIR HEATER

Model DFA 2900 premium
Pin 220-230V / 50hz / 1Ph
Ignition 210 W
Normal operation 190 W
(BS2869 part2) or 1-K kerosene or No.1. fuel oil
P_out 29,000 W
IP class IPx4
PVG Holding BV, Kanaalstraat 12 C, 5347 KM
Oss, the Netherlands | P.O. Box 96,
5340 AB Oss, the Netherlands
Qlima.com
Made in Korea


SPECIFICATIONS DUAL FUEL FORCED AIR HEATER

Model DFA 4100 premium
P_in 220-230V / 50hz / 1Ph
Ignition 220 W
Normal operation 200 W
(BS2869 part2) or 1-K kerosene or No.1. fuel oil
P_out 41,000 W
IP class IPx4
PVG Holding BV, Kanaalstraat 12 C, 5347 KM
Oss, the Netherlands | P.O. Box 96,
5340 AB Oss, the Netherlands
Qlima.com
Made in Korea


DFA 1650 Premium

DFA 2900 Premium DFA 4100 Premium
1 LEGGERE DAPPRIMA LE ISTRUZIONI D'USO.
2 IN CASO DI DUBBIO, RIVOLGERSI AL RIVENDITORE.
COMPONENTI PRINCIPALI
Normal operation 125 W
(BS2869 part2) or 1-K kerosene or No.1. fuel oil
Pout 16.500 W
IP class IPx4
Serial number
PVG Holding BV, Kanaalstraat 12 C, 5347 KM
Oss, the Netherlands | P.O. Box 96,
5340 AB Oss, the Netherlands
Qlima.com
Made in Korea


SPECIFICATIONS DUAL FUEL FORCED AIR HEATER

Model DFA 2900 premium
Pin 220-230V / 50hz / 1Ph
Ignition 210 W
Normal operation 190 W
(BS2869 part2) or 1-K kerosene or No.1. fuel oil
P_out 29,000 W
IP class IPx4
PVG Holding BV, Kanaalstraat 12 C, 5347 KM
Oss, the Netherlands | P.O. Box 96,
5340 AB Oss, the Netherlands
Qlima.com
Made in Korea


SPECIFICATIONS DUAL FUEL FORCED AIR HEATER

Model DFA 4100 premium
P_in 220-230V / 50hz / 1Ph
Ignition 220 W
Normal operation 200 W
(BS2869 part2) or 1-K kerosene or No.1. fuel oil
P_out 41,000 W
IP class IPx4
PVG Holding BV, Kanaalstraat 12 C, 5347 KM
Oss, the Netherlands | P.O. Box 96,
5340 AB Oss, the Netherlands
Qlima.com
Made in Korea


DFA 1650 Premium
DFA 2900 Premium DFA 4100 Premium
Screwesh(A) Screwesh(B)(B)
Wheels
SWaringea
SpättemRiens
WielddppGaps
SloerhWakop
Vorste Handlgreep
Wiel Axle
Luobtuetlaatklep
Afscherming vooraan
Schroeven
Handgreep
Uitlaat
hete lucht
Opening
Boss
Tap
Vastgeklemd
gedeelte
Afdekking
koker
SijpanGelver
Snoerhaakje
Schneuf
Foont-Handlereep
Schweer(AA)
Schrew(B)
Sbreef
Handkeep
Luchtoultvaetklep
Scheer(B)
Soreth Aberg
Wheel
Plakwalyheng
WeldepCap
Wielas
SplitItemPin
INSTALLATIE
Normal operation 125 W
(BS2869 part2) or 1-K kerosene or No.1. fuel oil
P_out 16.500 W
IP class IPx4
Serial number
PVG Holding BV, Kanaalstraat 12 C, 5347 KM
Oss, the Netherlands | P.O. Box 96,
5340 AB Oss, the Netherlands
Qlima.com
Made in Korea


SPECIFICATIONS DUAL FUEL FORCED AIR HEATER

Model DFA 2900 premium
Pin 220-230V / 50hz / 1Ph
Ignition 210 W
Normal operation 190 W
(BS2869 part2) or 1-K kerosene or No.1. fuel oil
P_out 29,000 W
IP class IPx4
PVG Holding BV, Kanaalstraat 12 C, 5347 KM
Oss, the Netherlands | P.O. Box 96,
5340 AB Oss, the Netherlands
Qlima.com
Made in Korea


SPECIFICATIONS DUAL FUEL FORCED AIR HEATER

Model DFA 4100 premium
P_in 220-230V / 50hz / 1Ph
Ignition 220 W
Normal operation 200 W
(BS2869 part2) or 1-K kerosene or No.1. fuel oil
P_out 41,000 W
IP class IPx4
PVG Holding BV, Kanaalstraat 12 C, 5347 KM
Oss, the Netherlands | P.O. Box 96,
5340 AB Oss, the Netherlands
Qlima.com
Made in Korea


DFA 1650 Premium

DFA 2900 Premium DFA 4100 Premium
1 LEIA O MANUAL DO UTILIZADOR PRIMEIRO.
2 EM CASO DE DÚVIDAS, CONSULTE O SEU REVENDEDOR.
COMPONENTES PRINCIPAIS
Normal operation 125 W
(BS2869 part2) or 1-K kerosene or No.1. fuel oil
Pout 16.500 W
IP class IPx4
Serial number
PVG Holding BV, Kanaalstraat 12 C, 5347 KM
Oss, the Netherlands | P.O. Box 96,
5340 AB Oss, the Netherlands
Qlima.com
Made in Korea


SPECIFICATIONS DUAL FUEL FORCED AIR HEATER

Model DFA 2900 premium
Pin 220-230V / 50hz / 1Ph
Ignition 210 W
Normal operation 190 W
(BS2869 part2) or 1-K kerosene or No.1. fuel oil
P_out 29,000 W
IP class IPx4
PVG Holding BV, Kanaalstraat 12 C, 5347 KM
Oss, the Netherlands | P.O. Box 96,
5340 AB Oss, the Netherlands
Qlima.com
Made in Korea


SPECIFICATIONS DUAL FUEL FORCED AIR HEATER

Model DFA 4100 premium
P_in 220-230V / 50hz / 1Ph
Ignition 220 W
Normal operation 200 W
(BS2869 part2) or 1-K kerosene or No.1. fuel oil
P_out 41,000 W
IP class IPx4
PVG Holding BV, Kanaalstraat 12 C, 5347 KM
Oss, the Netherlands | P.O. Box 96,
5340 AB Oss, the Netherlands
Qlima.com
Made in Korea


DFA 1650 Premium

DFA 2900 Premium DFA 4100 Premium
1 NAJPREJ PREBERITE PRIROČNIK ZA UPORABNIKE.
2 ČE IMATE KAKRŠNE KOLI DVOME, SE POSVETUJTE S SVOJIM TRGOVCEM.
GLAVNI SESTAVNI DELI
(DFA 2900 premium in DFA 4100 premium)
Distributed in Europe by PVG Holding B.V.
Benötigen Sie weitere Informationen oder treten Probleme auf, besuchen Sie bitte unsere Website www.qlima.com, oder setzen Sie sich mit unserem Kundendienst in Verbindung (Telefonnummer auf www.qlima.com).
For alle yderligere oplysninger eller ved eventuelle problemer med apparatet hervises til www.qlima.com eller det lokale Kundecenter (telefonnumre findes i www.qlima.com).
ES Si necesita información o si tiene algún problema, visite nuestra página Web www.qlima.com, o póngase en contacto con el servicio cliente (hallará el número de teléfono en www.qlima.com).
F Si vous souhaitez obtenir des informations supplémentaires ou si vous rencontrez un problème, rendez-vous sur notre site Web (www.qlima.com) ou contactez notre service client (vous trouverez l'adresse et numéro de téléphone sur www.qlima.com).
FHN Jos haluat huoltoapua, lisätietoja tai laitteen kanssa tulee ongelmia, tutustu verkkosivustoon osoitteessa www.qlima.com tai kysy neuvoa PVG kuluttajapalvelukeskuksesta (www.qlima.com).
(6) If you need information or if you have a problem, please visit the our website (www.qlima.com) or contact our sales support (you find its phone number on www.qlima.com)
① Per informazioni e in caso di problemi, visitate il sito Web www.qlima.com oppure contattate il Centro Assistenza Clienti (per conoscere il numero di telefono, consultate www.qlima.com).
Hvis du trenger informasjon, eller hvis du har et problem med produktet, kan du gå til nettsidene www.qlima.com. Alternativt kan du kontakte med PVG' forbrukertjeneste (telefonnummeret i www.qlima.com).
Als u informatie nodig hebt of als u een probleem hebt, bezoek dan de onze website (www.qlima.com) of neem contact op met de afdeling sales support (adres en telefoon op www.qlima.com).
Se necessitar de informações ou se tiver problemas, visite o Web site www.qlima.com ou contacte o Centro de Assistência (número de telefone o www.qlima.com)
FL W przypadku problemów i w celu uzyskania szczegółowych informacji odwiedź stronę internetową Qlima dostępną pod adresem www.qlima.com lub skontaktuj się z Centrum kontaktów Qlima (www.qlima.com)
Om du behöver service eller information eller har problem med apparaten kan du besöka www.qlima.com eller kontakta Qlima kundtjänst (du hittar telefonnumret på www.qlima.com).
Slo Če želite dodatne informacije, obiščite spletno mesto podjetja na naslovu www.qlima.com ali pokličite na telefonsko (www.qlima.com).
TR Daha fazla bilgiye ihtiyaç duyarsanız veya bir sorunla karşılaşırsanız, www.qlima.com adresindeki Qlima Internet sitesini ziyaret edin veya ülkenizde bulunan Qlima müşteri merkeziyle iletişim kurun (telefon numarasını: www.qlima.com).