GFA1030E - Heat gun QLIMA - Free user manual and instructions
Find the device manual for free GFA1030E QLIMA in PDF.
| Product type | Heat gun (gas heating) |
| Brand | Qlima |
| Model | GFA1030E |
| Use | Outdoor only |
| Power supply | 230 V ~ 50 Hz |
| Gas supply | Propane, butane or LPG |
| Gas connection | 1/4-inch left (regulator 700 mbar) or 3/8-inch left (regulator 0-2 bar) |
| Max regulator input pressure | 690 kPa |
| Max gas hose length | 150 cm |
| Gas bottle | Not included, must be suitable |
| Minimum room volume | Greater than 100 m³ |
| Required ventilation | 25% open surface, minimum 250 cm² outlet |
| Safety distance to walls | 3 m minimum (hot air outlet) |
| Safety | Safety thermostat, safety valve, ignition electrode, fire guard |
| Ignition | Manual (piezoelectric lighter) |
| Functions | Gas heating and ventilation only (without gas) |
| Cleaning | Soft damp cloth, soapy water; do not use combustible cleaners |
| Periodic maintenance | Annual check by a qualified technician; inspection of hose, regulator, electrode, thermocouple |
| Repairs | Only by an approved specialist |
| Warranty | 24 months from date of purchase |
| Non-included parts | Gas hose, gas regulator, gas bottle |
| Standard | EN1596:1998/A1:2004 |
| Weight | Not specified |
| Dimensions | Not specified |
Frequently Asked Questions - GFA1030E QLIMA
User questions about GFA1030E QLIMA
0 question about this device. Answer the ones you know or ask your own.
Ask a new question about this device
Download the instructions for your Heat gun in PDF format for free! Find your manual GFA1030E - QLIMA and take your electronic device back in hand. On this page are published all the documents necessary for the use of your device. GFA1030E by QLIMA.
USER MANUAL GFA1030E QLIMA
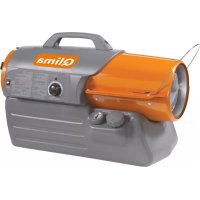
Qlima Gas Forced Air Heater
GB DE FR IT NL/BE SE SI
| Model name Modell Modèle Model Model Model Model Model Model Model Model Model Model Model Model Model Model Model Model Model Model Model Model Model Model Model Model Model Model Model Model Model Model Model Model Model Model Model Model Model Model Model Model Model Model Model Model Model Model Model Model Model Model Model Model Model Model Model Model Model Model Model Model Model Model Model Model Model Model Model Model Model Model Model Model Model Model Model Model Model Model Model Model Model Model Model Model Model Model Model Model Model Model Model Model Model Model Model Model Model Model Model Model | Capacity Gas < 15kg Gas < 15kg Gas Kategorie Gas Kategorie Gas Kategorie Gas Kategorie Gas Kategorie Gas Kategorie Gas Kategorie Gas Kategorie Gas Kategorie Gas Kategorie Gas Kategorie Gas Kategorie Gas Kategorie Gas Kategorie Gas Kategorie Gas Kategorie Gas Kategorie Gas Kategorie Gas Kategorie Gas Kategorie Gas Kategorie Gas Kategorie Gas Kategorie Gas Kategorie Gas Kategorie Gas KategorIE Gas KategorIE Gas KategorIE Gas KategorIE Gas KategorIE Gas KategorIE Gas KategorIE Gas KategorIE Gas KategorIE Gas KategorIE Gas KategorIE Gas KategorIE Gas KategorIE Gas KategorIE Gas KategorIE Gas KategorIE Gas KategorIE Gas KategorIE Gas KategorIE Gas KategorIE Gas KategorIE Gas KategorIE Gas KategorIE Gas KategorIE Gas KategorIE Gas KategorIFGASTELLE Lighter | Capacité Gas < 15kg Gas Kategorie Gas Kategorie Gas Kategorie Gas Kategorie Gas Kategorie Gas Kategorie Gas KategorIE Gas KategorIE Gas KategorIE Gas KategorIE Gas KategorIE Gas KategorIE Gas KategorIE Gas KategorIE Gas KategorIE Gas KategorIE Gas KategorIE Gas KategorIE Gas KategorIE Gas KategorIE Gas KategorIE Gas KategorIE Gas KategorIE Gas KategorIE Gas KategorIFGASTELLE Lighter Capacité Gas < 15kg Gas Kategorie Gas Kategorie Gas Kategorie Gas KategorIE Gas KategorIE Gas KategorIE Gas KategorIE Gas KategorIFGASTELLE Lighter Capacité Gas < 15kg Gas Kategorie Gas Kategorie Gas KategorIE Gas KategorIE Gas KategorIFGASTELLE Lighter Capacité Gas < 15kg Gas Kategorie Gas Kategorie Gas KategorIFGASTELLE Lighter Capacité Gas < 15kg Gas Kategorie Gas Kategorie Gas KategorIFGASTELLE Lighter Capacité Gas < 15kg Gas Kategorie Gas Kategorie Gas KategorIFGASTELLE Lighter Capacité Gas < 15kg Gas Kategorie Gas Kategorie Gas KategorIFGASTELLE Lighter CapACIIIF Gas < 15kg Gas Kategorie Gas Kategorie Gas KategorIFGASTELLE Lighter CapACIIIF Gas < 15kg Gas Kategorie Gas Kategorie Gas KategorIFGASTELLE Lighter CapACIIIF Gas < 15kg Gas Kategorie Gas Kategorie Gas KategorIFGASTELLE Lighter CapACIIIF Gas < 15kg Gas K categorie Gas Kategorie Gas KategorIFGASTELLE Lighter CapACIIIF Gas < 15kg Gas Kategorie Gas Kategorie Gas KategorIFGASTELLE Lighter CapACIIIF Gas < 15kg Gas Kategorie Gas Kategorie Gas KategorIFGASTELLE Lighter CapACIIIF Gas < 15kg Gas Kategorie Gas Kategorie Gas KategorIFgASTELLE Lighter CapACIIIF Gas < 15kg Gas Kategorie Gas Kategorie Gas KategorIFGASTELLE Lighter CapACIIIF Gas < 15kg Gas Kategorie Gas Kategorie Gas KategorIFGASTELLE Lighter CapACIIIF Gas < 15kg Gas Kategorie Gas Kategorie Gas KategorIFGASTELLE Lighter CapACIIF Gas < 15kg Gas Kategorie Gas Kategorie Gas KategorIFGASTELLE Lighter CapACIIIF Gas < 15kg Gas Kategorie Gas Kategorie Gas KategorIFGASTELLE Lighter CapACIIIF Gas < 15kg Gas Kategorie Gas Kategorie Gas KategorIFGASTELLE Lighter CapACIIIF Gas < 15kg Gas Keterie Gas Kategorie Gas KategorIFGASTELLE Lighter CapACIIIF Gas < 15kg Gas Kategorie Gas Kategorie Gas KategorIFGASTELLE Lighter CapACIIIF Gas < 15kg Gas Kategorie Gas Kategorie Gas KategorIFGASTELLE Lighter CapACIIIF Gas < 15kg Gas Kategorie Gas Kategorie Gas KategorIF GASTELLE Lighter CapACIIIF Gas < 15kg Gas Kategorie Gas Kategorie Gas KategorIFGASTELLE Lighter CapACIIIF Gas < 15kg Gas Kategorie Gas Kategorie Gas KategorIFGASTELLE Lighter CapACIIIF Gas < 15kg Gas Kategorie Gas Kategorie Gas KategorIFGASTELLE Lighter CapACIIFF Gas < 15kg Gas Kategorie Gas Kategorie Gas KategorIFGASTELLE Lighter CapACIIFF Gas < 15kg Gas Kategorie Gas Kategorie Gas KategorIFGASTELLE Lighter CapACIIFF Gas < 15kg Gas Kategorie Gas Kategorie Gas KategorIFGASTELLE Lighter CapACIIFF Gas < 15kg Gas K categorie Gas Kategorie Gas KategorIFGASTELLE Lighter CapACIIFF Gas < 15kg Gas Kategorie Gas Kategorie Gas KategorIFGASTELLE Lighter CapACIIFF Gas < 15kg Gas Kategorie Gas Kategorie Gas KategorIFGASTELLE Lighter CapACIIFF Gas < 15kg Gas Kategorie Gas Kategorie Gas KategorIF GASTELLE Lighter CapACIIFF Gas < 15kg Gas Kategorie Gas Kategorie Gas KategorIFGASTELLE Lighter CapACIIFF Gas < 15kg Gas Kategorie Gas Kategorie Gas KategorIFGASTELLE Lighter CapACIIFF Gas < 15kg Gas Kategorie Gas Kategorie Gas KategorIFGASTELLE Lighter CapACIIIF Gas < 15kg Gas Kategorie Gas Kategorie Gas KategorIFGASTELLE Lighter CapACIIIF Gas < 15kg Gas Kategorie Gas Kategorie Gas KategorIFGASTELLE Lighter CapACIIIF Gas < 15kg Gas Kergistratlon Gas < 15kg Gas Kergistratlon Gas < 15kg Gas Kergistratlon Gas < 15kg Gas Kergistratlon Gas < 15kg Gas Kergistratlon Gas < 15kg Gas Kergistratlon Gas < 15kg Gas Kergistratlon Gas < 15kg Gas Kergistratlon Gas < 15kg GasKergistratlon Gas < 15kg GasKergistratlon Gas < 15kg GasKergistratlon Gas < 15kg GasKergistratlon Gas < 15kg GasKergistratlon Gas < 15kg GasKergistratlon Gas < 15kg GasKergistratlon Gas < 15kg GasKergistratlon Gas < 20kg gas stoverng | Cape de la serra Cape de la serra Cape de la serra Cape de la serra Cape de la serra Cape de la serra Cape de la serra Cape de la serra Cape de la serra Cape de la serra Cape de la serra Cape de la serra Cape de la serra Cape de la serra Cape de la serra Copee Copee Copee Copee Copee Copee Copee Copee Copee Copee Copee Copee Copee Copee Copee Copee Copee Copee Copee Copee Copee Copee Copee Copee Copee Copec Copee Copee Copee Copee Copee Copee Copee Copee Copee Copee Copee Copee Copee Copee Copee Copee Copee Copee Copee Copee Copee Copee Copee Copee Copeae Copee Copee Copee Copee Copee Copee Copee Copee Copee Copee Copee Copee Copee Copee Copee Copee Copee Copee Copee Copee Copee Copee Copee Copee Copeo Copee Copee Copee Copee Copee Copee Copee Copee Copee Copee Copee Copee Copee Copee Copee Copee Copee Copee Copee Copee Copee Copee Copee Copee Copea Copee Copee Copee Copee Copee Copee Copee Copee Copee Copee Copee Copee Copee Copee Copee Copee Copee Copee Copee Copee Copee Copee Copee Copee Cope e Copee Copee Copee Copee Copee Copee Copee Copee Copee Copee Copee Copee Copee Copee Copee Copee Copee Copee Copee Copee Copee Copee Copee Copee Copeee Copee Copee Copee Copee Copee Copee Copee Copee Copee Copee Copee Copee Copee Copee Copee Copee Copee Copee Copee Copee Copee Copee Copee Copee Copees Copee Copee Copee Copee Copee Copee Copee Copee Copee Copee Copee Copee Copee Copee Copee Copee Copee Copee Copee Copee Copee Copee Copee Copee Copese Copee Copee Copee Copee Copee Copee Copee Copee Copee Copee Copee Copee Copee Copee Copee Copee Copee Copee Copee Copee Copee Copee Copee Copee Cope.e Copee Copee Copee Copee Copee Copee Copee Copee Copee Copee Copee Copee Copee Copee Copee Copee Copee Copee Copee Copee Copee Copee Copee Copee Cope. Copee Copee Copee Copee Copee Copee Copee Copee Copee Copee Copee Copee Copee Copee Copee Copee Copee Copee Copee Copee Copee Copee Copee Copee Copee Ouropoea Cape de la serra Cape de la serra Cape de la serra Cape de la serra Cape de la serra Cape de la serra Cape de la serra Cape de la serra Cape de la serra Cape de la serra Cape de la serra Cape de la serra Cape de la serra Cape de la serra Ouropoea Cape de la serra Cape de la serra Cape de la serra Cape de la serra Cape de la serra Cape de la serra Cape de la serra Cape de la serra Cape de la serra Cape de la serra Cape de la serra Cape de la serra Cape de la serra Copee Copee Copee Copee Copee Copee Copee Copee Copee Copee Copee Copee Copee Copee Copee Copee Copee Copee Copee Copee Copee Copee Copee Copee Copee Copee Copee Copee Copee Copee Copee Copee Copee Copee Copee Copee Copee Copee Copee Copee Copee Copee Copee Copee Copee Copee Copee Copee Copee Copee Copee Copee Capee Capee Capee Capee Capee Capee Capee Capee Capee Capee Capee Capee Capee Capee Capee Capee Capee Capee Capee Capee Capee Capee Capee Capee Capee Copee Capee Capee Capee Capee Capee Capee Capee Capee Capee Capee Capee Capee Capee Capee Capee Capee Capee Capee Capee Capee Capee Capee Capee Copee Copee Capee Capee Capee Capee Capee Capee Capee Capee Capee Capee Capee Capee Capee Capee Capee Capee Capee Capee Capee Capee Capee Capee Capee Ouropoea Cape de la serra Cape de la serra Cape de la serra Cape de la serra Cape de la serra Cape de la serra Cape de la serra Cape de la serra Cape de la serra Cape de la serra Cape de la serra Cape de la serra Cape de la serra Ouropoea Cagee Cagee Cagee Cagee Cagee Cagee Cagee Cagee Cagee Cagee Cagee Cagee Cagee Cagee Cagee Cagee Cagee Cagee Cagee Cagee Cagee Cagee Cagee Cagee Cagee Cagec Cagee Cagee Cagee Cagee Cagee Cagee Cagee Cagee Cagee Cagee Cagee Cagee Cagee Cagee Cagee Cagee Cagee Cagee Cagee Cagee Cagee Cagee Cagee Cagee Cage e Cagee Cagee Cagee Cagee Cagee Cagee Cagee Cagee Cagee Cagee Cagee Cagee Cagee Cagee Cagee Cagee Cagee Cagee Cagee Cagee Cagee Cagee Cagee Cagee CageE Cagee Cagee Cagee Cagee Cagee Cagee Cagee Cagee Cagee Cagee Cagee Cagee Cagee Cagee Cagee Cagee Cagee Cagee Cagee Cagee Cagee Cagee Cagee Cagee Cageo Cageo Cageo Cageo Cageo Cageo Cageo Cageo Cageo Cageo Cageo Cageo Cageo Cageo Cageo Cageo Cageo Cageo Cageo Cageo Cageo Cageo Cageo Cageo Cageo Cage o Cageo Cageo Cageo Cageo Cageo Cageo Cageo Cageo Cageo Cageo Cageo Cageo Cageo Cageo Cageo Cageo Cageo Cageo Cageo Cageo Cageo Cageo Cageo Cageo CageO Cageo Cageo Cageo Cageo Cageo Cageo Cageo Cageo Cageo Cageo Cageo Cageo Cageo Cageo Cageo Cageo Cageo Cageo Cageo Cageo Cageo Cageo Cageo Cageo Cage O Cageo Cageo Cageo Cageo Cageo Cageo Cageo Cageo Cageo Cageo Cageo Cageo Cageo Cageo Cageo Cageo Cageo Cageo Cageo Cageo Cageo Cageo Cageo Cageo Cage0 Cageo Cageo Cageo Cageo Cageo Cageo Cageo Cageo Cageo Cageo Cageo Cageo Cageo Cageo Cageo Cageo Cageo Cageo Cageo Cageo Cageo Cageo Cageo Cageo Cageoo Cageo Cageo Cageo Cageo Cageo Cageo Cageo Cageo Cageo Cageo Cageo Cageo Cageo Cageo Cageo Cageo Cageo Cageo Cageo Cageo Cageo Cageo Cageo Cageo Cageoc Cageo Cageo Cageo Cageo Cageo Cageo Cageo Cageo Cageo Cageo Cageo Cageo Cageo Cageo Cageo Cageo Cageo Cageo Cageo Cageo Cageo Cageo Cageo Cageo Cageco Cageo Cageo Cageo Cageo Cageo Cageo Cageo Cageo Cageo Cageo Cageo Cageo Cageo Cageo Cageo Cageo Cageo Cageo Cageo Cageo Cageo Cageo Cageo Cageo Cage.o Cageo Cageo Cageo Cageo Cageo Cageo Cageo Cageo Cageo Cageo Cageo Cageo Cageo Cageo Cageo Cageo Cageo Cageo Cageo Cageo Cageo Cageo Cageo Cageo Cage.0 Cageo Cageo Cageo Cageo Cageo Cageo Cageo Cageo Cageo Cageo Cageo Cageo Cageo Cageo Cageo Cageo Cageo Cageo Cageo Cageo Cageo Cageo Cageo Cageo CAGEO CAGEO CAGEO CAGEO CAGEO CAGEO CAGEO CAGEO CAGEO CAGEO CAGEO CAGEO CAGEO CAGEO CAGEO CAGEO CAGEO CAGEO CAGEO CAGEO CAGEO CAGEO CAGEO CAGEO CAGEO CAGE0 CAGE0 CAGE0 CAGE0 CAGE0 CAGE0 CAGE0 CAGE0 CAGE0 CAGE0 CAGE0 CAGE0 CAGE0 CAGE0 CAGE0 CAGE0 CAGE0 CAGE0 CAGE0 CAGE0 CAGE0 CAGE0 CAGE0 CAGE0 CAGE0 CAGEO CAGEO CAGEO CAGEO CAGEO CAGEO CAGEO CAGEO CAGEO CAGEO CAGEO CAGEO CAGEO CAGEO CAGEO CAGEO CAGEO CAGEO CAGEO CAGEO CAGEO CAGEO CAGEO CAGEO CAGE O Ouropoea Ouropoea Ouropoea Ouropoea Ouropoea Ouropoea Ouropoea Ouropoea Ouropoea Ouropoea Ouropoea Ouropoea Ouropoea Ouropoea Ouropoea Ouropoea Ouropoea Ou npoea o f l sra 0000000000000000000000000000000000000000000000000000000000000000000000000000000000000000000000000000 |
Qlima Gas Forced
Gas Forced Air Heater
GB DE FR IT NL/BE SE SI
| Model name Modell Modèle Modell Model Model Model Model Model Model Model Model Model Model Model Model Model Model Model Model Model Model Model Model Model Model Model Model Model Model Model Model Model Model Model Model Model Model Model Model Model Model Model Model Model Model Model Model Model Model Model Model Model Model Model Model Model Model Model Model Model Model Model Model Model Model Model Model Model Model Model Model Model Model Model Model Model Model Model Model Model Model Model Model Model Model Model Model Model Model Model Model Model Model Model Model Model Model Model Model Model Model Model Model Date | Capacity Gas < 15kg Gas < 15kg Gas Gestion 2023-07-26 10:49pm | Capacité Gas < 15kg Gas Gestion 2023-07-26 10:49pm | Capacité Gas < 15kg Gas Gestion 2023-07-26 10:49pm | Capacité Gas < 15kg Gas Gestion 2023-07-26 10:49pm | Capacité Gas < 14kg Gas Gestion 2023-07-26 10:49pm | Capacité Gas < 15kg Gas Gestion 2023-07-26 10:49pm | Capacité Gas < 15kg Gas Gestion 2023-07-26 10:49pm | Capacité Gas < 15kg Gas Gostion 2023-07-26 10:49pm | Capacité Gas < 15kg Gas Gestion 2023-07-26 10:49pm | Capacité Gas < 15kg Gas Gestion 2023-07-26 10:49pm | Capacité Gas < 15kg Gas Gestion 2013-07-26 10:49pm | Capacité Gas < 15kg Gas Gestion 2013-07-26 10:49pm |
| PIN PEN | PIN PIN | PIN PIN | PIN PIN | PIN PIN | PIN PIN | PIN PIN | PIN PIN | PIN PIN | PIN PIN | PIN PIN | PIN PIN | |
| Consumption (max.) | Verbrauch (max.) | Consumption (max.) | Consumption (max.) | Consumption (max.) | Consumption (max.) | Consumption (max.) | Consumption (max.) | Consumption (max.) | Consumption (max.) | Consumption (max.) | Consumption (max.) | |
| Made in | Hergestellt in | Fabrique en | Fattoin in | Geproduceed in | Tilverkade i | Izdelano na | ||||||
Qlima Gas Forced
Gas Forced Air Heater

GB DE FR IT NL/BE SE SI
| Model name Modelle Modèle Modello Model Model Model GFA 1030E | |||||||
| Capacity | Kapazität | Capacité | Capacité | Capacitait | Kapacitet | Kapacitäta | 30 kW |
| Gas < 15 kg | Gas < 15kg | Gas < 15kg | Gas <15kg | Gas <15kg | Gas <15kg | Plina <15kg | LPG 138/P - 13P 700 mbar |
| Gas category | Gas Kategorie | Categorie de gas | Categorie di gas | Gas categorie | Gaskategori | Kategorija plina | 138/P G30* / 13P G31** |
| PIN | PIN | PIN | PIN | PIN | PIN | PIN | 1008CR2976 |
| Consumption (max.) | Verbrauch (max.) | Consummation (max.) | Consumo (max.) | Verbruik (max.) | Gasforbrukning (max.) | Poraba (max.) | 2180 gr/hr |
| Made in | Hergestellt in | Fabrique en | Fatto in | Geproducced in | Tilverkade i | Izdelano na | P.R.C. |
| ✓ | ✓ | ✓ | ✓ | ✓ | ✓ | Countries of Destination | |
| GB - FOR OUTDOOR USE ONLY - Close the valve of the gas cylinder or the regulator after use - The use of this appliance is enclosed areas can be dangerous and is PROHIBITED. - Read the instructions before using this appliance - The appliance must be installed in accordance with the instructions and local regulations. - For use outdoors and in well ventilated areas - A well ventilated area must have a minimum of 25% of the surface area open. - Gas cylinder installation has to be checked for leaks and leaks, and the pipe should be properly cleaned. - Gas cylinder installation has to be checked for leaks and leaks, and the pipe should be properly cleaned. - Gas cylinder installation has to be checked for leaks and leaks, and the pipe should be properly cleaned. - Gas cylinder installation has to be checked for leaks and leaks, and the pipe should be properly cleaned. - Gas cylinder installation has to be checked for leaks and leaks, and the pipe should be properly cleaned. - Gas cylinder installation has to be checked for leaks and leaks, and shea pipe shall be removed. - Gas cylinder installation has to be checked for leaks and leaks, and shea pipe shall be removed. - Gas cylinder installation has to be checked for leaks and leaks, and shea pipe shall be removed. - Gas cylinder installation has to be checked for leaks and leaks, and shea pipe shall be removed. - Gas cylinder installation has to be checked for leaks and leaks, and shea pipe shall be removed. - Gas cylinder installation has to be checked for leaks and leaks, and the pipe shall be removed. - Gas cylinder installation has to be checked for leaks and leaks, and shea pipe shall be removed. - Gas cylinder installation has to be checked for leaks and leaks, and shea pipe shall be removed. - Gas cylinder installation has to be checked for leaks and leaks, and shea pipe shall be removed. - Gas cylinder installation has to be checked for leaks and leaks, and shea pipe shall be removed. - Gas cylinder installation has to be checked for leaks, and leaks, and shea pipe shall be removed. - Gas cylinder installation has to be checked for leaks, and leaks, and shea pipe shall be removed. - Gas cylinder installation has to be checked for leaks, and leaks, and shea pipe shall be removed. - Gas cylinder installation has to be checked for leaks, and leaks, and shea pipe shall be removed. - Gas cylinder installation has to be checked for leaks, and leaks, and shea pipe shall be removed. | - Read the instructions before using this appliance - The appliance must be installed in accordance with the instructions and local regulations. - For use outdoors and in well ventilated areas - A well ventilated area must have a minimum of 25% of the surface area open. - Gas cylinder installation has to be checked for leaks and leaks, and the pipe should be properly cleaned. - Gas cylinder installation has to be checked for leaks and leaks, and shea pipe shall be removed. - Gas cylinder installation has to be checked for leaks, and leaks, and shea pipe shall be removed. - Gas cylinder installation has to be checked for leaks, and leaks, and shea pipe shall be removed. - Gas cylinder installation has to be checked for leaks, and leaks, and shea pipe shall be removed. - Gas cylinder installation has to be checked for leaks, end pipes shall be removed. - Gas cylinder installation has to be checked for leaks, end pipes shall be removed. - Gas cylinder installation has to be checked for leaks, end pipes shall be removed. - Gas cylinder installation has to be checked for leaks, end pipes shall be removed. - Gas cylinder installation has to be checked for leaks, end pipes shall be removed. - Gas cylinder installation has to be checked for leaks, end pipes shall be removed. - Gas cylinder installation has to be checked for leaks. | - Read the instructions before using this appliance - The appliance must be installed in accordance with the instructions and local regulations. - For use outdoors and in well ventilated areas - A well ventilated area must have a minimum of 25% of the surface area open. - Gas cylinder installation has to be checked for leaks and leaks, and the pipe should be properly cleaned. - Gas cylinder installation has to be checked for leaks and leaks, and shea pipe shall be removed. -Gas cylinder installation has to be checked for leaks, end pipes shall be removed. - Gas cylinder installation has to be checked for leaks, end pipes shall be removed. - Gas cylinder installation has to be checked for leaks, end pipes shall be removed. - Gas cylinder installation has to be checked for leaks, end pipes shall be removed. - Gas cylinder installation has to be checked for leaks, end pipes shall be removed. - Gas cylinder installation has to be checked for leaks, end pipes shall be removed | - Read the instructions before using this appliance - The appliance must be installed in accordance with the instructions and local regulations. - For use outdoors and in well ventilated areas - A well ventilated area must have a minimum of 25% of the surface area open. - Gas cylinder installation has to be checked for leaks and leaks, and the pipe should be properly cleaned. - Gas cylinder installation has to be checked for leaks, end pipes shall be removed. - Gas cylinder installation has to be checked for leaks, end pipes shall be removed. - Gas cylinder installation has to be checked for leaks, end pipes shall be removed. - Gas cylinder installation has to be checked for leaks, end pipes shall be removed. - Gas cylinder installation has to be checked for leaks, end pipes shall be removed. - Gas cylinder installation has to be checked for leaks, end pipes Shall be removed. - Gas cylinder installation has to be checked for leaks, end pipes Shall be removed. - Gas cylinder installation has to be checked for leaks, end pipes Shall be removed. - Gas cylinder installation has to be checked for leaks, end pipes Shall be removed. - Gas cylinder installation has to be checked for leaks, end pipes Shall be removed. - Gas cylinder installation has to be checked for leaks, end pipes Shall be removed. - Gas cylinder installation has to be checked for leaks, End pipes shall be removed. - Gas cylinder installation has to be checked for leaks, end pipes Shall be removed. - Gas cylinder installation has to be checked for leaks, end pipes Shall be removed. - Gas cylinder installation has to be checked for leaks, end pipes Shall be removed. - Gas cylinder installation has to be checked for leaks, end pipes Shall be removed. - Gas cylinder installation has to be checked for leaks, end pipes Shall be removed. - Gas cylinder installation has to be checked for leases shall be removed. - Gas cylinder installation has to be checked for leases shall be removed. - Gas cylinder installation has to be checked for leases shall be removed. - Gas cylinder installation has to be checked for leases shall be removed. - Gas cylinder installation has to be checked for leases shall be removed. - Gas cylinder installation has to be checked for leases shall be removed. - Gas cylinder installation has to be checked for leases shall be removed. - Gas cylinder installation has to be checked for leases shall be eliminated. - Gas cylinder installation has to be eliminated. | IP X4 220-240V- 50Hz 70W <0.5A | |||
| 1936/21 PVG Holding B.V. Kanaalstraat 12 C 5347 KM Oss the Netherlands PO.Box 96, 5340 AB OSS, The Netherlands Qlimia.com NE PVG Labe 1000 SADAM ZAUPARBOA NAO PROTEIN - P operae operae operae operae operae operae operae operae operae operae operae operae operae operae operae operae operae operae operae operae operae operae operae operae operae operae operae operae operae operae operae operae operae operae OP SAZO ZAUPARBOA NU PROTEIN - P operae operae operae operae operae operae operae operae operae operae operae operae operae operae operae operae operae operae operae operae operae operae operae operae operae operae operae operae operae operae operae opERA SAZO ZAUPARBOA NU PROTEIN - P operae operae operae operae operae operae operae operae operae operae operae operae operae operae operae operae operae operae operae operae operae operae operae operae operae operae operae operae OP SAZO ZAUPARBOA NU PROTEIN - Fopopopopopopopopopopopopopopopopopopopopopopopopopopopopopopopopopopopopopopopopopopopopopopopopopopopopopopopopopopopopopopopopopopopopopopopopopopopopopopopopopopopopopopopopopopopopopopopopopopopop | |||||||
Assembling the heater
Operation
Storage
Cleaning and care
Troubleshooting
End of life time
Warranty provisions
1 INDICE
GARANTIE DISPOSITIONS
This heater is for outdoor use only. Indoor use is dangerous.
An amply ventilated area must have a minimum of 25% of the surface area open. The surface area is the sum of the walls surface

- Read this user manual carefully before using the appliance and keep it for future reference. Install this device only when it complies with local/national legislation, ordinances and standards.
- This product is intended to be used as space heater for heating the working environment of people in non-domestic environments.
- NOT TO BE USED FOR THE HEATING OF HABITABLE AREAS OF DOMESTIC PREMISES; FOR USE IN PUBLIC BUILDINGS REFER TO NATIONAL REGULATIONS.
- After unpacking, check the appliance for any damages. When in doubt, do not use the appliance, but contact customer service at your local dealer's. Keep the packaging materials (plastic bags, etc.) away from children, as they may cause hazardous situations to children.
- No modifications to the safety system are allowed.
- This heater is constructed in conformity with relevant texts in the EN1596:1998/A1:2004 standard
- Keep the instructions for future reference

WARNING
- Read the instructions before installation and use. This appliance must be installed and the gas cylinder stored in accordance
with the regulations In force.
- Only use the device for its intended purpose. Other usage may lead to burns, fire, explosion, crash, asphyxiation, carbon monoxide poisoning and/or electrical shock, etc.
Install the heater only if it complies with local regulations, laws and standards; - Check if the information indicated on the type plate corresponds your situation before you connect the appliance.
- Install the heater according to the instructions as described in the installation section of the directions for use;
- This heater is manufactured according to CE safety standards. Nevertheless, as with any other heating device, care must be taken;
- RISK OF FIRE Never use the heater in places where inflammable and/or harmful Gases, products or fumes may be present (e.g. exhaust gases, paint fumes, curtains, paper, clothes);
If the heater is positioned too close to inflammable materials you may risk fire; - For safety reasons take care when children or animals are in the proximity of the heater, as with any other heating device, and make sure that children are always aware of the presence of a hot heater;
- This appliance is not intended for use by persons (including children) with reduced physical, sensory or mental capabilities, or lack of experience and knowledge, unless they have been given supervision or instruction concerning use of the appliance by a person responsible for their safety.
If the heater is damaged, it shall be repaired by the manufacturer, its service agent or similarly qualified persons in order to avoid a hazard.
Children should be supervised to ensure that they do not play with the appliance.
In order to avoid overheating, do not cover the device.
- The guard of this heater is intended to prevent direct access to heating elements and must be in place when the heater is in use.
- Do not insert objects into the openings of the device.
- The guard does not give full protection for young children and infirm persons.
- This appliance can be used by children aged from 12 years and above and persons with reduced physical, sensory or mental capabilities or lack of experience and knowledge if they have been given supervision or instruction concerning use of the appliance in a safe way and understand the hazards involved.
- Cleaning and user maintenance shall not be made by children without supervision.
Children of less than 3 years should be kept away unless continuously supervised.
Children aged from 3 years and less than 8 years shall only switch on/off the appliance provided that it has been placed or installed in its intended normal operating position and they have been given supervision or instruction concerning use of the appliance in a safe way and understand the hazards involved.
Children aged from 3 years and less than 8 years shall not plug in, regulate and clean the appliance or perform user maintenance.
- CAUTION - some parts of this product can become very hot and cause burns. Particular attention has to be given where children and vulnerable people are present.
During operation and just after operation
the appliance will be extremely hot. NEVER touch it during operation or just operation. NEVER move the appliance during this time.
- Switch off the appliance when it is unattended.
- Do not cover or obstruct the heater when in use.
If you fail to consult and/or follow up the rules, instructions and explanation, the warranty will no longer be valid, and the manufacturer will no longer deal with any damage to the appliance and/or your environment under the warranty.
- Read the instructions before installation and use.
- This appliance must be installed and the gas cylinder stored in accordance with the regulations in force.
- Do not obstruct the ventilation holes of the cylinder housing.
- Do not move the appliance when in operation.
- Shut off the valve at the gas cylinder and/or the regulator:
a. before moving the appliance b. after use
- The tubing or the flexible hose must be changed within the prescribed intervals
- Use only the type of gas and the type of cylinder specified by the manufacturer
In case of violent wind particular attention must be taken against tilting of the appliance - Have any repairs and/or maintenance carried out by a recognized service engineer only
Make sure that the correct gas is used and that the gas containers are not exposed to heat or extreme temperature changes.
Always store the gas containers in a cool, dry and dark place.
Always use a suitable and approved 700 mbar medium-pressure regulator. In case of any doubt contact your local dealer.
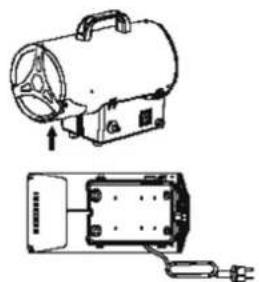
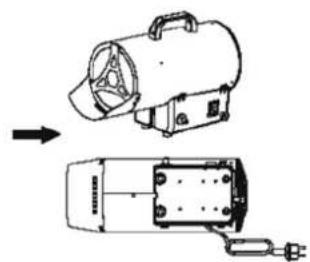
ASSEMBLING THE HEATER
The manufacturer is not responsible for any harm or damage if attention is not paid to the points described above.
The use of this product and the elements required for that purpose is entirely at the end user's own risk.
GFA1015 BAFFLE INSTALLATION INTRODUCTION
To protect your floor ALWAYS mount the baffle to the front outlet of the heater.
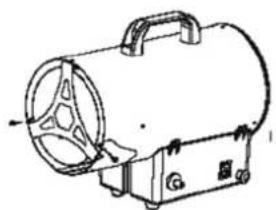
- Take out of the heater from the box. The baffle is installed under the air-output as below arrow part
- Anti-clockwise unscrew the 2 screws for the baffle.
-
Install the baffle as below picture.
-
Clockwise tighten the 2 screws.
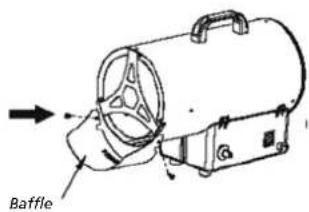
- Finished status
GAS REQUIREMENTS
Use propane, butane or LGP only. See rating label on the appliance.
- The appliance requires approved gas hose in < 150 cm length and a gas regulator. The hose and regulator assembly must conform to local standard codes.
Regulator maximum inlet pressure must not exceed 690kPa
Gas connection 1 / 4'' LH. To be used with 700 mbar regulator
Gas connection 3/8 LH. To be used with 0-2 bar regulator - The installation must conform to local codes, or in the absence of local codes, to the standard for the storage and handling of liquid petroleum gases.
- A dented, rusted or damaged gas cylinder may be hazardous and should be checked by an authorized dedicated gas specialist,
- Never use a gas cylinder with a damaged valve connection.
- The gas cylinder must be arranged to provide for vapor withdrawal from the operating cylinder.
- Never twist the flexible tubes and hoses.
- Never connect an unregulated gas cylinder to the heater.
- Disconnect the gas cylinder when the heater is not use.
LEAK TESTING
Gas connections on the heater are leak tested at the factory prior to shipment. A complete gas tightness check must be performed at the installation site due to possible mishandling in shipment and/or installation or because of excessive pressure being applied to the heater. The heater must be checked with a full cylinder.
- Make sure the safety control valve is in the OFF position.
- Make a soapy water solution of one part liquid detergent and one part water. The soapy water solution can be applied with a spray bottle, brush or rag to all gas connections. Soap bubbles will appear in case of a leak.

WARNING: Never leak test while smoking!
WARNING: In the event of gas leakage, the appliance shall not be used or if alight, the gas supply shall be shut off and the appliance shall be investigated and rectified before it is used again.
- Turn the gas supply ON. And check all the connections with the soapy water solution. No bubbles may appear!
- In case of a leak, turn off the gas supply. Tighten any leaking fittings, then turn the gas supply ON and recheck. Contact your dealer or gas supplier for assistance if bubbles continue to appear.
Note:
- The gas hose is NOT included with the heater
The gas regulator is not included with the heater
Connect the regulator to the gas cylinder (not included) according to the mounting instruction as supplied together with the gas regulator and/or the gas cylinder
OPERATION
Safe operation
This appliance is designed for gas cylinders up to 15kg
Avoid torsional stress to the flexible tubing between gas regulator and appliance.
Torsional stress might lead to gas leakage over time!
Note:
If a new tank has just been connected, please allow at least one minute or more for the air in the gas pipeline to purge out through the pilot hole.
If the burner flame goes out accidentally or it is blown out by wind, turn off the heater and wait at least 5 minutes or more to let the gas dissipate before re-ligh- ting to avoid possible gas explosion.
Warnings:
- The whole gas system. hose, regulator, pilot and burner should be inspected for leak before use. But at least once a month and each time the gas cylinder is changed. Check the hose assembly for sign of extreme abrasion, cuts or wears. Suspected areas should be leak tested. If the hose leaks, it must be replaced with a new one that conforms to local standard codes. ). If it shows signs of cracking, splitting or other deterioration it shall be exchanged for new hose of the same length and of the equivalent quality.
Always keep a dry chemical fire extinguisher readily available. - For safety, always allow a 5-minute complete shut off period before re-ligh-ting a hot heater.
- Replace the gas tube/hose within the interval described with the hose.
REPLACING THE GAS CYLINDER
- Shut off heater.
- Close the valve of the gas cylinder.
- Disconnect the regulator from the cylinder following the instructions that came with your regulator.
- Replace the cylinder.
- Make sure there is no flame. Only when no flame: remove the plug or seal cap from the cylinder valve.
- Check for the presence and good state of the gasket before connecting the regulator to the new cylinder
- Check that the regulator seal is correctly fitted and able to fulfil its function.
- Perform leak test using soapy water solution.

WARNING: only change the gas cylinder in a amply ventilated area, away from any ignition source (candle, cigarettes, other flame producing appliances, ...).
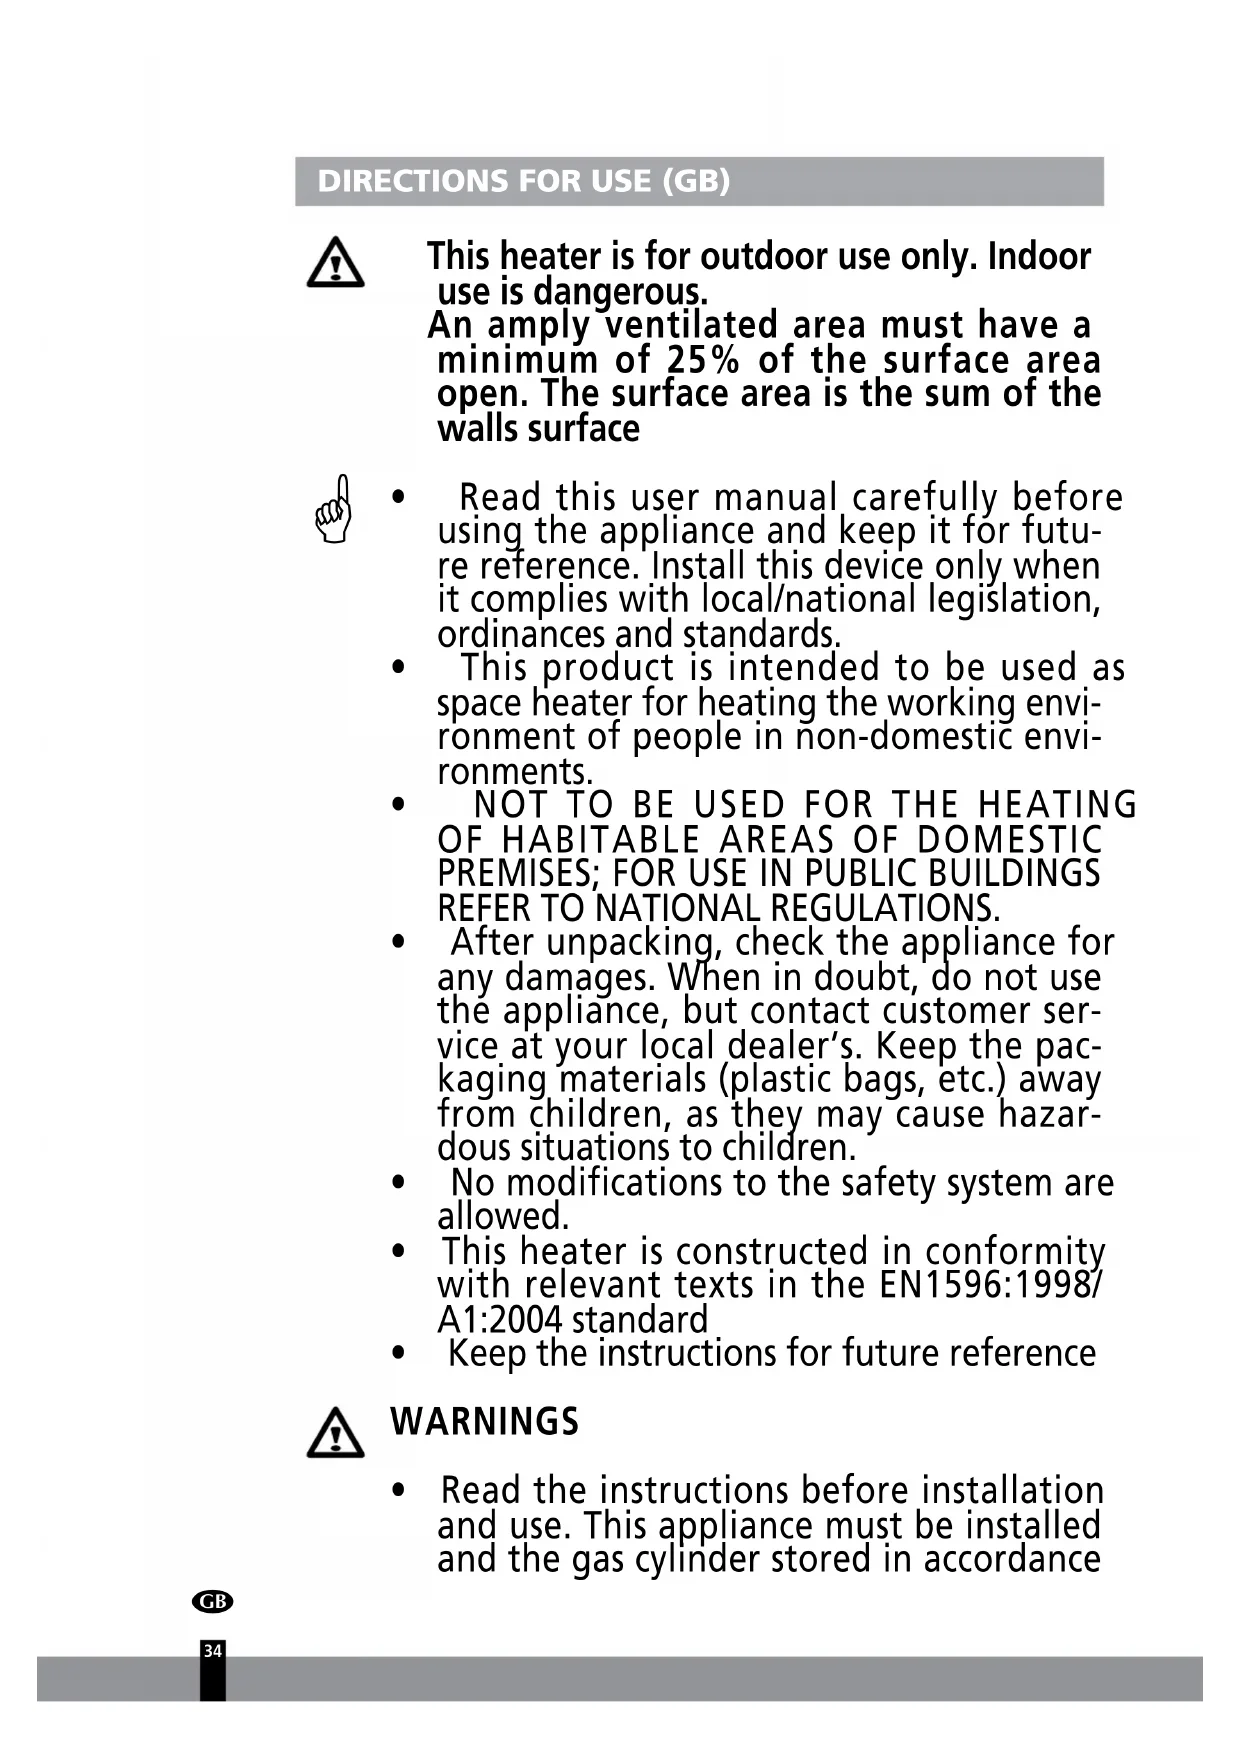
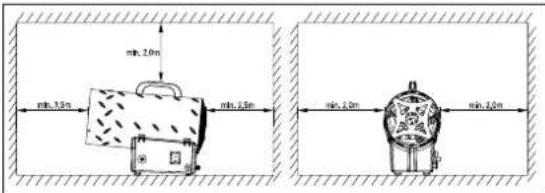
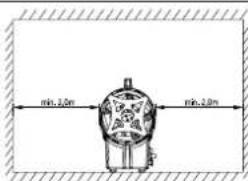
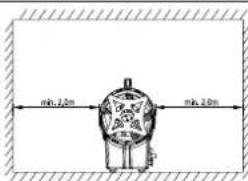
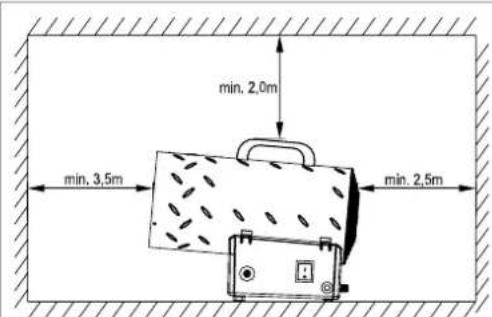
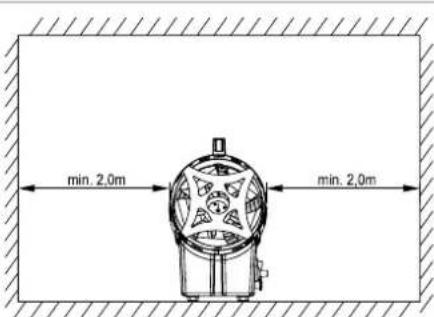
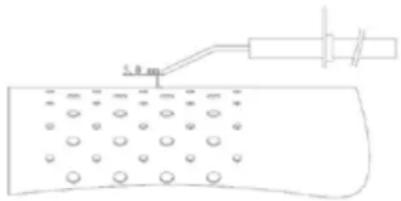
SAFETY CLEARANCE
- For every kW it is necessary to have permanent ventilation of 25~cm^2 , equally distributed between the floor and high level, with a minimum outlet of 250 cm².
- Never direct the hot air flow towards the cylinder.
- Never use the heater without its cover.
- Do not exceed 100 W/m^3 of free room. The minimum volume of the room
must be larger than 100m^3
- Do not obstruct the inlet or outlet sections of the heater.
- If the heater has to work for a long period at its maximum capacity, it's possible that ice will form on the cylinder. This is due to excessive vapour withdrawal. Not for this reason, or for any other, should the cylinder be heated. To avoid this effect, or at least to reduce it, use a large cylinder or two cylinders linked together (Fig 1).
- Do not use the heater in cellars, basements or in any room below the ground level.
After use, turn the gas cylinder tap off.

- The gas bottle must always be replaced following safety rules away from any possible source of ignition.
- The heater must be placed where there is no risk of fire, the hot air outlet must be at least 3m from any flammable wall or ceiling and must never be directed towards the gas bottle.
If in any doubt contact your supplier.
INSTALLATION
- Connect the heater to a suitable electric socket /230V~50Hz
- Make sure that the machine is properly earthed.
- Connect the gas supply hose to the pressure regulator and connect the regulator to a suitable LPG cylinder.
- Open the tap of the cylinder and check the supply hose and fittings for gas leak. For this operation it is recommended to use an approved leak detector.
INSTRUCTION FOR USE
PREPARING FOR OPERATION
- Check the heater for possible shipping damage.
- Connect the hose and regulator assembly to the LPG cylinder.
- Open the cylinder's gas valve and check all gas connections with a soap and water solution.
- Connect power cord to well-grounded 220V 50Hz source of power.

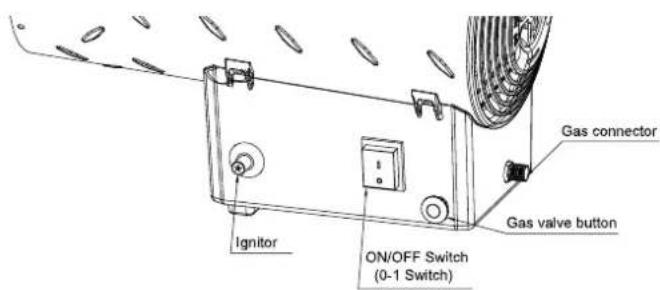
IGNITION / Manual ignition
- Turn the power switch to position I and check that the fan starts running correctly.
-
Push the gas valve button and push repeatedly (!!) the ignitor (piezoelectric lighter) until the flame lights up.
-
As the flame lights up, keep the valve button pushed for 10 seconds approx. Should the heater stop when the valve button has been released, wait one minute and repeat the starting operation keeping the valve button pushed for a longer time.
-
Contact your supplier should any problem continue.

CAUTION
If ignition is difficult or irregular before repeating the ignition operations make sure that the fan is not locked and the air inlet and outlet are unobstructed.
SWITCH OFF
To stop the heater, shut off the gas cylinder tap. Let the fan run until the flame shuts down and then turn the fan switch to position O.
AIR CONDITIONING
- The heater can also be used as a ventilator.
- In this case remove the gas supply hose and connect the plug of heater to a suitable electrical supply.
- Set the fan switch to position I.
ODOR FADE WARNING

Asphyxiation Hazard
- Do not use heater for heating human quarters.
- Do not use in unventilated areas.
- The flow of combustion and ventilation air must not be obstructed.
- Proper ventilation air must be provided to support the combustion air requirements of the heater being used.
- Lack of proper ventilation air will lead to improper combustion.
- Improper combustion can lead to carbon monoxide poisoning leading to serious injury or death. Symptom of carbon monoxide poisoning can include headaches dizziness and difficulty in breathing.
FUEL GAS ODDR
LP gas and natural gas have manmade odorants added specifically for detection of fuel gas leaks.
If a gas leak occurs you should be able to smell the fuel gas. Since Propane (LP) is heavier than air you should smell for the gas odor low to the floor. ANY GAS OROR IS YOUR SIGNAL TO GO INTO IMMEDIATE ACTION!
- Do not take any action that could ignite the fuel gas. Do not operate any electrical switches. Do not pull any power supply or extension cords. Do not
light matches or any other source of flame. Do not use your telephone.
- Get everyone out of the building and away from the area immediately.
- Close all propane (LP) gas tank or cylinder fuel supply valves.
- Propane (LP) gas is heavier than air and may settle in low areas. When you have reason to suspect a propane leak, keep out of all low areas.
- Use your neighbor's phone and call your fuel gas supplier and your fire department. Do not reenter the building or area.
- Stay out of the building and away from the area from the area until declare safe by the firefighters and your fuel gas supplier.
- FINALLY, let the fuel gas service person and the firefighters check for escaped gas. Have them air out the building and area before you return. Properly trained service people must repair any leaks, check for further leakages, and then relight the appliance for you.
MAINTENANCE
- The repairs or maintenance operations must only be carried out by qualified personnel.
- The unit must be checked by a qualified technician at least once a year.
- Regularly check the conditions of gas hose, and gas regulator if it must be replaced only use original spare parts.
- Before starting any maintenance operation on the heater disconnect from both gas and electrical suppliers.
- If the unit has not been used for a long period we advise that a technician carries out a general check up before using. It is important to control the following:
Periodically check the gas supply hose conditions and, should it be changed, use only original spare parts. - Check the starting electrode position (Pic 1)
- Check the connections of the safety thermostat and of the thermocouple: they must always be clean.
If necessary clean the fan blade and the inside of the heater using compressed air.
Pic 1
STORAGE
Make sure the heater is in off position
- Always close the valve of the gas cylinder after use or in case of a disturbance.
- Disconnect the gas container from the gas heater.
- Store the gas container in a well-ventilated room. Position it far away from inflammable, explosive or hot materials and preferably not in the home. In addition it should never be stored in the basement or attic.
- Cylinder must be stored out of the reach of children.
- Disconnected cylinder must have threaded valve plugs tightly installed and
must not be stored in garage or any other enclosed area. Only store in ventilated area!
Storage of heater indoors is permissible only if the cylinder is disconnected and removed from the heater.
- Check the tightness of the gas valve and for damage. If you suspect a damage, have it changed by your gas dealer.
- Never store liquid gas cylinder in a sub-terrain, or at places without adequate air ventilation.
CLEANING AND CARE
Warning: Make sure the heater is in off position and is cool!
Warning: Do not clean heater with cleaners that are combustible or corrosive.
- Wipe off powder coated surfaces with soft, moist rag and soap water.
- Remove debris, spider and insect nests from ventilation opening of the cylinder enclosure, control compartment, burner and circulation air passageways of the heater with heavy duty pipe cleaner or compressed air to keep appliance clean and safe for use.
- Never clear ports or other openings with toothpicks or other article that will break and block the ports.
TROUBLESHOOTING
| Problem Cause Solutions | ||
| The motor does not work | No electricity supply Check the terminal board with a tester | |
| The safety thermostat is on | Wait about one minute then restart | |
| The motor works, but the burner does not light up and after few seconds the heater stops | The cylinder gas tap is closed | Open the gas tap |
| The cylinder is empty Use a new cylinder | ||
| The nozzle is obstructed | Remove the nozzle and clean it. | |
| The solenoid gas valve is not open | Check that the solenoid valve works | |
| There is no spark Check the position of elec -trode | ||
| The burner lights up but after few seconds the heater stops | No connection with the earthing system | Check and connect properly |
| Defective connection between sensor and safety device | Check and connect properly | |
| Defective safety device Replace the safety device | ||
| The heater stops during operation | Excessive gas supply Check the pressure reducer and if required replace it | |
| Insufficient air flow Check that the motor works properly | ||
| Insufficient gas supply due to ice formation on the cylinder | Check and use a larger cylinder or two cylinders connected together. | |
END OF LIFE TIME
If it is decided that the gas heater is not to be used any more, it is recommended that it be disconnected from the gas container. Also cut the rubber hose. If children play with the heater, make sure that dangerous parts are removed.
Never dispose of non-biodegradable products in the environment, but dispose of them in accordance with current national legislation. At the end of its lifetime, the product must not be disposed of as urban waste. It must be taken to a special local authority differentiated waste collection center or to a dealer providing this service.
Disposing of a household appliance separately avoids possible negative consequences for the environment and health deriving from inappropriate disposal and enables the constituent materials to be recovered in order to make significant savings in energy and resources. As a reminder of the need to dispose of household appliances separately.
WARRANTY PROVISIONS
The appliance is supplied with a 24-month guarantee, commencing on the date of purchase. All material and manufacturing defects will be repaired or replaced free of charge within this period. The following rules apply:
- We expressly refuse all further damage claims, including claims for collateral and/or consequential damage.
- Repairs to or replacement of components within the guarantee period will not result in an extension of the guarantee.
- The guarantee is invalidated if any modifications have been made, non-genuine parts are fitted or repairs are carried out by third parties.
- Components subject to normal wear, such as filters, batteries, lamps and heating elements are not covered by the guarantee.
- The guarantee is valid only when you present the original, dated purchase invoice and if no modifications have been made to it.
- The guarantee is invalid for damage caused by neglect and/or by actions that deviate from those in this instruction booklet.
- Transportation costs and the risks involved during the transportation of the appliance or components of the appliance shall always be for the account of the purchaser
- Damage caused by not using suitable spare parts is not covered by the guarantee.
To prevent unnecessary expense, we recommend that you always first carefully consult the instructions for use. Take the appliance to your dealer for repairs if these instructions do not provide a solution.
www.Qlima.com
#
GEURAFNAME WAARSCHUWING!
Verstikkingsgevaar
Distributed in Europe by PVG Holding B.V.
Benotigen Sie weite Informationen oder treten Probleme auf, besuchen Sieitte unsere Website www.qlima.com, oder setzen sie sich mit unserem Kundendienst in Verbindung (Telefonnummer auf www.qlima.com).
For alle yderligere oplysninger ell er ved eventuelle problemer med apparatet hervises til www.qlima.com eller det lokale Kundecenter (telefonumre findes i www.qlima.com).
Si necesita informacion o si Tiene algo problema, visite nuestra pagina Web www.qlima.com, o pongase en contacto con el service客户提供 (hallar a numero de Telefono en www.qlima.com).
Si you souhaitez obtenir des informations supplémentaires ou si you rencontrez un probleme, rendez-vous sur notre site Web (www.qlma.com) ou contactez notre service client (vous trouvezez l'adresse et numero de téléphone sur www.qlma.com).
Jo hau at huoapua, liatetoja tai laiteen kansa tuiee ongelmia, tutustu verkkosivustoon ositteessa www.qima.com tai kysy neuvoa PVG kuluttajapalvelukesukksesta (www.qima.com).
If you need information or if you have a problem, please visit the our website (www.qlima.com) or contact our sales support (you find its phone number on www.qlima.com)
Per informazioni e in caso di problemi, visitate il site Web www.qlima.com oppure contattate il Centro Assistenza Clienti (per conoscere il numero di Telefono, consultate www.qlima.com).
Hvis du trenger informasjon, ellr hvis du har et problem med produktet, kan du gtil nettsidene wwwqlima.com. Alternativt kan du kontakte med PVG' forbrukertjeneste (telefonummerer i www.qlima.com).
Ns Alu inatme nodig hebt of ul een probleem hebt, bezok dan de onze weibite (www.qlima.com) of neem contact op met de afdeling sales support (adres en telefoon op www.qlima.com).
Se necessitar de informacoes ou se tiver problemas, visite o Web site www.qlima.com ou contacte o Centro de Assistencia (nromo de telephone o www.qlima.com)
W przyypadu problemów i w celu uzyskania szczegółowych informaci odwiedź strone internetowa Qlima dostepná pod adresem www.qlima.com lub skontakuji sie z Centrum kontaktów Qlima (www.qlima.com)
Om du behover service aller information aller har problem med apparaten kan du besoka www.qlima.com eller kontakta Qlima kundtjänst (du hittar Telefonumret pa www.qlima.com).
Czite datne inormacie, obicite sptno mesto podjetna na naslovu www.qima.com aliPoklicite na tefonsko (www.qima.com).
Daha fazla bilgiye ihtiayc duyarsaniz vya bir sorunla karsilasiransiz, www.qlima.com adesindeki Qlma Internet sitesini ziyaret edin vya ulkenizde bulunan Qlma muster merkeziyle letisim kurun (telefon numarasini: www.qlima.com).