KM126 - Mixer H.KOENIG - Free user manual and instructions
Find the device manual for free KM126 H.KOENIG in PDF.

| Product Type | Mixing table |
| Brand | H.Koenig |
| Model | KM126 |
| Power supply | 220-240 V ~ 50/60 Hz |
| Power | 800 W |
| Protection class | I (earthed) |
| Bowl capacity | 1.5 kg max mixture |
| Speeds | 8 levels (0-8) + pulse |
| Integrated timer | Yes, adjustable countdown |
| Included accessories | Bowl, hook, beater, whisk, protective cover, funnel |
| Main functions | Mix, knead, beat, whisk, creams, doughs |
| Tilting arm | Yes, with height adjustment lever |
| Materials | Bowl and accessories metal and plastic |
| Maintenance | Hand wash with soapy water, do not put in dishwasher |
| Safety | Automatic stop after 5 min inactivity, overload protection |
| Warranty | 2 years (wear parts excluded) |
| Spare parts | Available at sav.hkoenig.com |
| Use | Household only, indoors |
Frequently Asked Questions - KM126 H.KOENIG
User questions about KM126 H.KOENIG
0 question about this device. Answer the ones you know or ask your own.
Ask a new question about this device
Download the instructions for your Mixer in PDF format for free! Find your manual KM126 - H.KOENIG and take your electronic device back in hand. On this page are published all the documents necessary for the use of your device. KM126 by H.KOENIG.
USER MANUAL KM126 H.KOENIG
When using electrical appliances, basic safety precautions should always be followed including the following:
- To protect against risk of electrical shock do not put stand mixer and power supply cord in water or other liquid. If the supply cord is damaged, it must be replaced by the manufacturer, its service agent or similarly qualified persons in order to avoid a hazard.
- Close supervision is necessary when any appliance is used by or near children.
- This appliance shall not be used by children. Keep the appliance and its cord out of reach of children.
- Always disconnect the appliance from the supply if it is left unattended and before assembling, disassembling or cleaning.
- Switch off the appliance and disconnect from supply before changing accessories or approaching parts that move in use.
- Care shall be taken when handling the sharp cutting blades, emptying the bowl and during cleaning.
- This appliance may be used by persons with reduced physical, sensory or mental capabilities or lack of experience or knowledge, provided that they are supervised or instructed in the safe use of the appliance and that they fully understand the potential hazards.
- Unplug from outlet when not in use, before putting on or taking off parts, and before cleaning.
-
Avoid contacting moving parts. Keep hands, hair, clothing, as well as spatulas and other utensils away from beaters during operation to reduce the risk of injury to persons, and/or damage to the mixer.
-
Do not operate any appliance with a damaged cord or plug or after the appliance malfunctions, or is dropped or damaged in any manner. Return appliance to the nearest authorized service facility forexamination, repair or electrical or mechanical adjustment.
-
The use of attachments not recommended or sold by the manufacturer may cause fire, electric shock or injury.
-
Do not use outdoors. This product is for household use only.
-
Do not let cord hang over edge of table or counter.
-
Remove beaters from mixer before washing.
-
This appliance may be used by children of at least 8 years of age, as long as they are supervised and have been given instructions about using the appliance safely and are fully aware of the dangers involved.
-
Cleaning and maintenance should not be carried out by children unless they are at least 8 years of age and are supervised by an adult.
-
Keep the appliance and its power cord out of reach of children under 8 years of age.
-
When using electrical equipment, safety precautions must always be taken to prevent the risk of fire, electric shock and/or injury in the event of misuse.
-
Make sure that the voltage rating on the type plate corresponds to your main voltage of your installation. If this is not the case, contact the dealer and do not connect the unit.
-
Keep this manual for future reference and pass it on with the equipment to any future users.
-
The machine is only used for household and indoor. Your appliance has been designed for domestic use only. It is not intended for use in the following
situations which are not covered by the warranty:
-
in staff kitchen areas in shops, offices and other professional environments,
-
in farm hostels,
- by guests in hotels, motels and other residential environments,
- in bed and breakfast type environments.
GROUNDING INSTRUCTIONS
This appliance must be grounded while in use to protect the operator from electrical shock. The appliance is equipped with a 3-conductor cord and a 3-prong grounding-type plug to fit the proper grounding-type receptacle.
EXTENSION CORDS
Use only 3-wire extension cords which have 3-prong grounding-type plugs and 3-pole cord connectors that accept the plug from the appliance. Use only extension cords having an electrical rating not less than the rating of the appliance. Do not use damaged extension cords. Examine extension cord before using and replace if damaged. Do not abuse extension cord and do not yank on any cord to disconnect. Keep cord away from heat and sharp edges. Overview of the Components
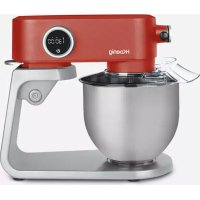
2. Names of parts
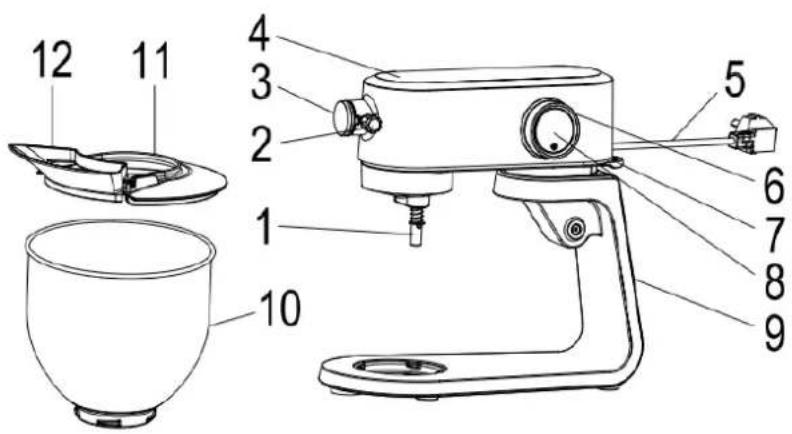
Main Components and Standard Accessories:
| 1 | Driver shaft | 9 | Support |
| 2 | Screw | 10 | Mixing bowl |
| 3 | Front cover | 11 | Splash Cover |
| 4 | Drive arm | 12 | Funnel |
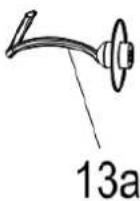
| 5 | Power cord | 13a | Hook |
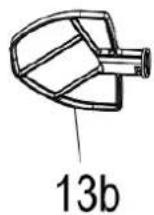
| 6 | Operation and Level regulator | 13b | Beater |
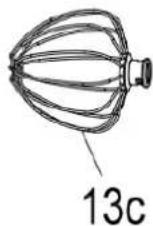
| 7 | Level for raising and Lowering arm | 13c | Whisk |
| 8 | Power Switch&LED |
3、Technical data
Model: KM126
Rated voltage: 220-240V\~, 50/60Hz
Power consumption: 800W
Protection class: I
This device has been tested according to all relevant current CE guidelines, such as electromagnetic compatibility and low voltage directives, and has been constructed in accordance with the latest safety regulations. Subject to technical changes without prior notice!
3. Operating the appliance
3.1 Speed regulator Timing display
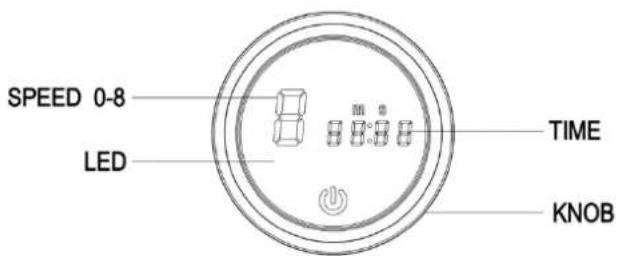
1、Power plug connected to the power supply and press the power switch (8), the speed show "0"and the time show "00:00".
2、When the speed show "0", if the consumer forget to turn off the power switch, 5 minutes the LED will no display and the machine return to standby mode automatically.
3. Turn the knob CW one time, the speed rises 1(0-8), opposite turn the knob CCW one time, the speed falling 1 (8-0).
Countdown Function:
The count-down timer is for any recipe that specifies the length of time ingredients should be mixed.
- To set the count-down time,rotate the knob anticlockwise for 3 seconds.
- Preset time is 2 minutes as 02:00 displayed on the LED screen.
- Rotate the knob clockwise once, time increases 10 seconds, that is 2 minutes plus 10 seconds. Rotate the knob
anticlockwise once, time decreases 10 seconds, that is 1 minute plus 50 seconds.
- Rotate the knob anticlockwise for 3 seconds, timer is fixed and countdown is well set.
- Rotate the knob clockwise to select the speed and machine will start to work. It will automatically turn off when the timer has finished counting down.
(A)

(B)
4. Using the Mixing Bowl
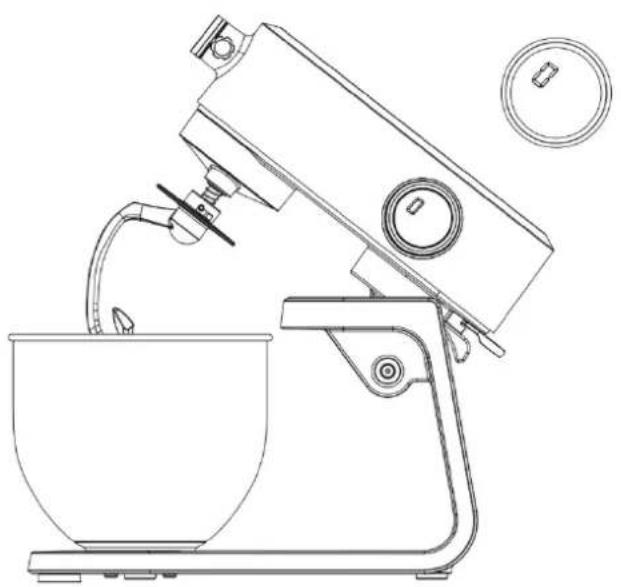
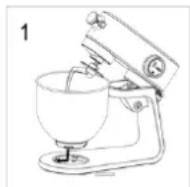
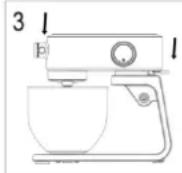
- Place the mixing bowl into its holding device and turn the dish in the direction of LOCK until it locks into place.(picture 1)
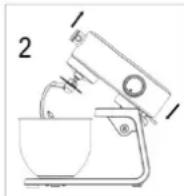
- In order to lift the drive arm, press the lever (7) downwards in the direction of the arrow. The drive arm will now move upwards.(picture 2)
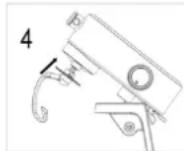
- Mount the required utensil by inserting the top into the drive shaft and locking the cotter pin in the shaft by turning to the right.(picture 4)
- Now fill in your ingredients. Do not overfill the machine - the maximum quantity of ingredients is 1.5kg
- Lower the arm using the lever (7).(picture 3)
6.Insert the mains plug into a properly installed 220 - 240V 50 / 60Hz safety power socket. - Turn the machine using the speed regulator(6) to a speed between 1 and 8 (corresponding to the mixture).
Adjusting the Levels and Using the Hook for not more than 1.5kg of Mixture
| Levels | Use | Type of Mixture |
| 1-3 | Hook | Heavy mixtures(e.g. bread or short pastry)Medium-heavy mixtures(e.g. crepes or sponge |
| 1-8 | hook、beaterWhisk | mixture)Light mixtures (e.g. cream, egg white,blanc mange) |
NOTE:
1 Short operation time: With heavy mixtures, do not operate the machine for more than 10 min, and then allow it to cool down for a further 10 min.
1 Use the splash guard to protect against liquid mixtures.
- Mixing the egg with whisk need 3min
- After kneading/stirring turn the switch (6) back to the "0" position as soon as the mixture has formed a ball. Then remove the mains plug.
-
Press the lever (7) downwards and the arm will be raised.
-
The mixture can now be released with the help of a spatula and removed from the mixing bowl.
- The mixing bowl can now be removed by turning to the left.
12.Clean the parts as described under "Cleaning".
Suggested Recipes
Sponge Mixture (Basic Recipe), Level 3-4
Ingredients:
250grams soft butter or margarine, 250grams sugar, 1 packet vanilla sugar or 1 bag Citro-Back, 1 pinch of salt, 4 eggs, 500grams wheat fl our, 1 packet baking powder, approx. 1/8 litre milk.
Preparation:
Transfer the wheat fl our and the remaining ingredients to the mixing bowl, stir with the stirrer for 30 seconds on level 1, then for approximately 3 minutes on level 3. Grease a tin or cover with baking paper. Fill in the mixture and bake. Before the cake is removed from the oven, test to see if it is done. With a sharp wooden stick pierce the centre of the cake. If no mixture sticks to it, the cake is cooked. Turn the cake on to a cake grid and allow to cool.
Traditional Oven
Insertion height: 2
Heating: electric oven, top and bottom heat 175 - 200^ Celsius; gas oven: level 2-3
Baking time: 50-60 minutes
Depending on taste, this recipe can be changed, for example with 100g raisins or 100g nuts or 100g grated chocolate. In fact, the possibilities are endless.
Linseed Bread Rolls, Level 1-2
Ingredients:
500-550g wheat flour, 50g linseed, 3/8 litre water, 1 cube of yeast (40g), 100g low-fat curds, well drained,
1 tsp salt. For coating: 2 tbsp of water.
Preparation:
Soak the linseed in 1/8 litre of lukewarm water. Transfer the remaining lukewarm water (1/4 litre) into the mixing bowl, crumble in the yeast, add the curds and mix with the kneading hook on level 2. The yeast must be completely dissolved. Put the flour with the soaked linseed and the salt into the mixing bowl. Knead thoroughly on level 1, then switch to level 2 and continue kneading for 3-5 minutes. Cover the mixture and allow to rise in a warm place for 45-60 minutes. Knead thoroughly once more, remove from the bowl and form sixteen rolls. Cover the baking tin with wet baking paper. Place the rolls on this and allow to rise for 15 minutes. Coat with lukewarm water and bake.
Note:
The above formula do not operate the machine for more than 10 min and then allow it to cool down for a further 10 min.
Traditional Oven:
Insertion height: 2
Heating: electric oven: top and bottom heat 200 - 220^ (preheated for 5 minutes), gas oven level 2-3
Baking time: 30-40 minutes
Chocolate Cream, Level 5-6
Ingredients:
200ml sweet cream, 150g semi-bitter chocolate coating, 3 eggs, 50-60g sugar, 1 pinch of salt, 1 packet of vanilla sugar, 1 tablespoon cognac or rum, chocolate flakes.
Preparation:
Beat the cream in the mixing bowl with the whisk until stiff. Remove from the bowl and place somewhere to cool. Melt the chocolate coating in accordance with the instructions on the packet or in the microwave at 200W for 3 min. In the meantime, beat the eggs, sugar, vanilla sugar, cognac or rum and salt in the mixing bowl with the whisk on level 3 to form a foam. Add the
melted chocolate and stir in evenly on level 5-6. Leave a little of the cream for decoration. Add the remaining cream to the creamy mixture and stir in briefly using the pulse function. Decorate the chocolate cream and serve well cooled.
Warning
- Before cleaning remove the mains lead from the socket.
- When leaving the machine at work, please cut off the power of machine.
- Never immerse the housing with motor in water!
- Do not use any sharp or abrasive detergents.
Cleaning
- Before cleaning remove the mains lead from the socket.
- Never immerse the housing with motor in water!
- Do not use any sharp or abrasive detergents.
- After operation, all the accessories should be cleaned as soon as possible in order to avoid the ingredients stick on the accessories for long time and difficult to clean.
- The bowl, dough hook, beater, whisk, pasta maker should put into water and cleaning with dishcloth or brush (Sometimes can dip in water for 10 minutes first, it will be easier to clean)
- The meat grinder and salad maker should be flushed against the tap and use brush to wash (especially the food tray and blade of meat grinder accessories and the cutter of salad maker)
- Be careful you hand get hurt when cleaning.
Motor Housing
- Only a damp rinsing cloth should be used to clean the outside of the housing
Mixing Bowl, Mixing Equipment
CAUTION:
- The components are not suitable for cleaning in a
dishwasher. If exposed to heat or caustic
cleaners they might become misshapen or discolored.
- Components that have come into contact with food can be cleaned in soapy water.
WARNING:
Danger of injury!
-
Allow the parts to dry thoroughly before reassembling the device.
-
Please apply a small quantity of vegetable oil likely to the screens after they have dried.
WARRANTY
The warranty period for our products is 2 years, unless otherwise stated, starting from the date of initial purchase or the date of delivery.
If you have any problems or questions, you can easily access our help pages, troubleshooting tips, FAQ, and user manuals on our service site: https://sav.hkoenig.com.
By typing the reference name of your device in the search bar, you can access all available online support, designed to best meet your needs.
If you still cannot find an answer to your question or problem, then click on "Did the answer solve your problem?" This will direct you to the Customer Support Request Form, which you can fill out to validate your request and get help.
WARRANTY CONDITIONS
The warranty covers all failures occurring under normal use, in accordance with the usage and specifications in the user's manual.
This warranty does not apply to packaging or transportation problems during shipment of the product by the owner. It also does not include normal wear and tear of the product, nor maintenance or replacement of consumable parts.
EXCLUSION OF WARRANTY
-
Accessories and wearing parts (*).
Normal maintenance of the device. -
All breakdowns resulting from improper use (shocks, failure to comply with power supply recommendations, poor conditions of use, etc.), insufficient maintenance or misuse of the device, as well as the use of unsuitable accessories.
- Damage of external origin: fire, water damage, electrical surge, etc.
- Any equipment that has been disassembled, even partially, by persons other than those authorized to do so (notably the user).
- The products whose serial number would be missing, deteriorated or illegible that would not allow its identification.
- The products subjected to leasing, demonstration, or exhibition.
(*) Some parts of your device, called wear parts or consumables, deteriorate with time and frequency of use of your device. This wear and tear are normal but can be accentuated by poor conditions of use or maintenance of your device. These parts are therefore not covered by the warranty.
The accessories supplied with the device are also excluded from the warranty. They cannot be exchanged or refunded. However, some accessories can be purchased directly through our website: https://sav.hkoenig.com/.
ENVIRONMENT
CAUTION:
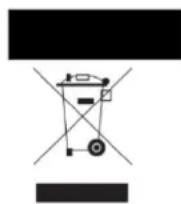
Do not dispose of this product as it has with other household products. There is a separation of this waste product into communities, you will need to inform your local authorities about the places where you can return this product. In fact, electrical and electronic products contain hazardous substances that have harmful effects on the environment or human health and should be recycled. The symbol here indicates that electrical and electronic
equipment should be chosen carefully, a wheeled waste container is marked with a cross.
Adeva SAS / H.Koenig Europe - 8 rue Marc Seguin, 77290 Mitry-Mory, France
www.hkoenig.com - https://en.hkoenig.com - Tél: +33 164 67 00 05