TH379334 - Radio THOMSON - Free user manual and instructions
Find the device manual for free TH379334 THOMSON in PDF.
| Product Type | Clock radio with CD player, cassette and DAB/FM radio |
| Brand | Thomson |
| Model | TH379334 |
| Mains Power Supply | 230 V AC, 50 Hz, 0.3 A |
| Battery Power Supply | 6 UM-2 (C size) 1.5 V batteries |
| Maximum Power Consumption | 10 W |
| Output Power | 1.5 W x 2 (2 channels) |
| Speaker Impedance | 8 ohms |
| FM Frequency Range | 88.8 - 108 MHz |
| DAB/DAB+ Frequency Range | 174.928 - 239.200 MHz |
| Number of Preset Stations | 20 (DAB and FM) |
| Main Functions | Clock, alarm, snooze, sleep timer, CD track programming, cassette playback, cassette recording |
| Supported CD Formats | Audio CD, MP3 CD |
| Auxiliary Input | 3.5 mm AUX socket |
| Display | LCD screen |
| Antenna | Telescopic antenna for FM/DAB |
| Approx. Dimensions | 30 x 20 x 15 cm |
| Approx. Weight | 1.5 kg |
| Supplied Accessories | AC power cable, user manual |
| Care and Cleaning | Clean with a dry cloth; do not use solvents or abrasive products |
| Safety | Do not expose to water, do not open the casing, keep out of reach of children (batteries) |
| Reparability | Any repairs must be carried out by a qualified professional |
Frequently Asked Questions - TH379334 THOMSON
User questions about TH379334 THOMSON
0 question about this device. Answer the ones you know or ask your own.
Ask a new question about this device
Download the instructions for your Radio in PDF format for free! Find your manual TH379334 - THOMSON and take your electronic device back in hand. On this page are published all the documents necessary for the use of your device. TH379334 by THOMSON.
USER MANUAL TH379334 THOMSON
| PRODUIT DE CLASSE II | |
| COURANT CONTINU | |
| COURANT ALTERNATIF | |
| POUR USAGE INTÉRIEUR UNIQUEMENT |
natural_image
Line drawing of a portable electronic device with multiple cylindrical batteries and control panel (no text or symbols)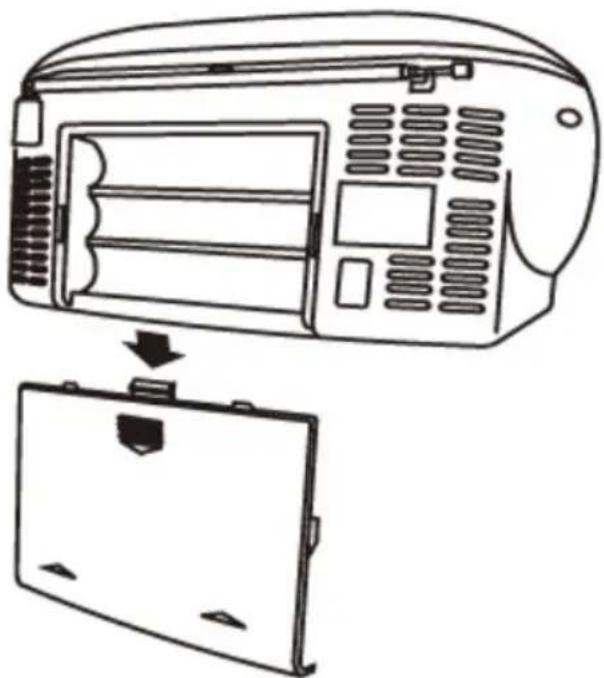
natural_image
Line drawing of a portable air conditioner unit with a side panel showing internal compartments and control buttons (no text or symbols)Système (DAB)
En mode DAB, appuyez sur |◀◀◀◀◀◀◀◀◀◀◀◀◀◀◀◀◀◀◀◀◀◀◀◀◀◀◀◀◀◀◀◀◀◀◀◀◀◀◀◀◀◀◀◀◀◀◀◀◀◀◀◀◀◀◀◀◀◀◀◀◀◀◀◀◀◀◀◀◀◀◀◀◀◀◀◀◀◀◀◀◀◀◀◀◀◀◀◀◀◀◀◀◀◀◀◀◀◀◀◀▶▶▶▶▶▶▶▶▶▶▶▶▶▶▶▶▶▶▶▶▶▶▶▶▶▶▶▶▶▶▶▶▶▶▶▶▶▶▶▶▶▶▶▶▶▶▶▶▶▶▶▶▶▶▶▶▶▶▶▶▶▶▶▶▶▶▶▶▶▶▶▶▶▶▶▶▶▶▶▶▶▶▶▶▶▶▶▶▶▶▶▶▶▶▶▶▶▶▶▶>
1. Langue
2. Réinitialisation
2.2. Mono forcé :
flowchart
graph LR
    A["FM\n<Audio setting>"] --> B["Audio setting*\n<Stereo allowed>"]
    A --> C["Audio setting*\n<Forced mono >"]
Lire un CD
BELGIQUE, customerservice@bigben-interactive.be
NEDERLAND, customerservice@bigben-interactive.nl
ESPANA, sat@bigbeninteractive.es
ITALIA, support@bigbeninteractive.it
www.bigben.eu
THOMSON
RK200DABCD
RK203DABCD
DAB/FM/CD/CASSETTE/AUDIO IN

OPERATING INSTRUCTIONS
PLEASE READ THIS USER MANUAL CAREFULLY BEFORE
OPERATING THIS UNIT AND RETAIN FOR
FUTURE REFERENCE
Contents
Getting Started 1
Safety and Notice 1
Care for your product 2
Care of the environment 3
What's in the box 3
Description of Parts 4
Power
5
Clock and Timers 6
DAB Radio Mode 7
FM Radio 9
Manual Scan 9
Playing a Compact Disc (CD) 10
Remarks 14
Getting Started
- Remove the appliance from the box.
- Remove any packaging from the product.
- Place the packaging inside the box and either or dispose of safely.
Safety and Notice
Read and understand all instructions before you use this product. If damage is caused by failure to follow the instructions, the warranty does not apply.
Safety
Warning
- Never remove the casing of this apparatus.
- Never lubricate any part of this apparatus.
- Never place this apparatus on other electrical equipment.
- Keep this apparatus away from direct sunlight, naked Fames or heat.
- Never look into the laser beam inside this apparatus.
-
Ensure that you always have easy access to the power cord, plug or adaptor to disconnect this apparatus from the power
-
The apparatus shall not be exposed to dripping or splashing and no liquid-filled objects, such as vases, shall be placed on the apparatus.
- To ensure complete disconnection from the power input, the mains plug of the apparatus shall be disconnected from the mains.
- The mains plug of the apparatus must not be obstructed OR must be easily accessed during intended use.
- Minimum distances 10 cm around the apparatus for sufficient ventilations
- The ventilation should not be impeded by covering the ventilation openings with items, such as newspapers, table-cloths, curtains, etc.
- No naked flame sources such as lighted candles should be placed on the apparatus
- Attention should be drawn to environmental aspects of battery disposal
-
The use of apparatus in moderate climates.
-
Read these instructions.
- Keep these instructions.
- Heed all warnings.
- Follow all instructions.
- Do not use this apparatus near water.
- Clean only with dry cloth.
- Do not block any ventilation openings. Install in accordance with the manufacturer's instructions.

-
Do not install near any heat sources such as radiators, heat registers, stoves, or other apparatus (including amplifiers) that produce heat.
-
Protect the power cord from being walked on or pinched, particularly at plugs, convenience receptacles, and the Point where they exit from the apparatus.
-
Only use attachments/accessories specified by the manufacturer.
-
Use only with the cart, stand, tripod, bracket, or table specified by the manufacturer or sold with the apparatus. When a cart is used, use caution when moving the cart/apparatus combination to avoid injury from tip-over.
-
Unplug this apparatus during lightning storms or when unused for long periods of time.
-
Refer all servicing to qualified service personnel. Servicing is required when the apparatus has been damaged in anyway, such as power-supply cord or plug is damaged, liquid has been spilled or objects have fallen into the apparatus, apparatus has been exposed to rain or moisture, does not operate normally, or has been dropped.
-
Apparatus shall not be exposed to dripping or splashing.
-
Do not place any sources of danger on the apparatus (e.g. liquid filled objects, lighted candles).
-
Where the MAINS plug (or AC/DC adaptor) or an appliance coupler is used as the disconnect device, the disconnect device shall remain readily operable.
-
Make sure there is enough free space around the product for ventilation.
-
Batteries (battery pack or batteries installed) shall not be exposed to excessive heat such as sunshine, fire or the like.
-
The rating label is placed on the back side of apparatus.
CAUTION
Danger of explosion if battery is improperly replaced.
Replace only with the same or equivalent type.

WARNING
Do not ingest the battery (chemical burn hazard)
The remote control supplied with this product contains a coin/button cell battery. If the coin/button cell battery is swallowed, it can cause severe internal burns in just 2 hours and can lead to death.
Keep new and used batteries away from children.
If the battery compartment does not close securely, stop using the product and keep it away from children.
If you think batteries may have been swallowed or placed inside any part of the body, seek immediate medical attention.
Care for your product
- Always unplug the appliance when not in use and before cleaning.
- Do not play music at excessive volume levels as damage to hearing and or the equipment may occur.
- Do not use this unit in wet or damp conditions.
- Always disconnect the unit from the mains power supply before cleaning. Clean the appliance with a soft, damp, lint free cloth. Do not use abrasives or harsh cleaners.
Care of the environment

Your product is designed and manufactured with high quality materials and components, which can be recycled and reused.
Your product contains batteries covered by the European Directive 2006/66/EC, which cannot be disposed with normal household waste. Please inform yourself about the local rules on separate collection of batteries because correct disposal helps to prevent negative consequences for the environmental and human health.
When this crossed-out wheeled bin symbol is attached to a product it means that the product is covered by the European Directive 2002/96/EC. Please inform yourself about the local separate collection system for electrical and electronic products. Please act according to your local rules and do not dispose of your old products with your normal household waste. Correct disposal of your old product helps to prevent potential negative consequences for the environment and human health.
| CLASS II MATERIAL | |
| DIRECT CURRENT | |
| ALTERNATING CURRENT | |
| FOR INDOOR USE ONLY |
The lightning symbol inside an equilateral triangle warns the user of the presence inside the product of uninsulated hazardous electric voltages powerful enough to represent an electrocution risk.
What's in the box
Check and identify the contents of your package:
- Main unit
- AC power cable
- User manual
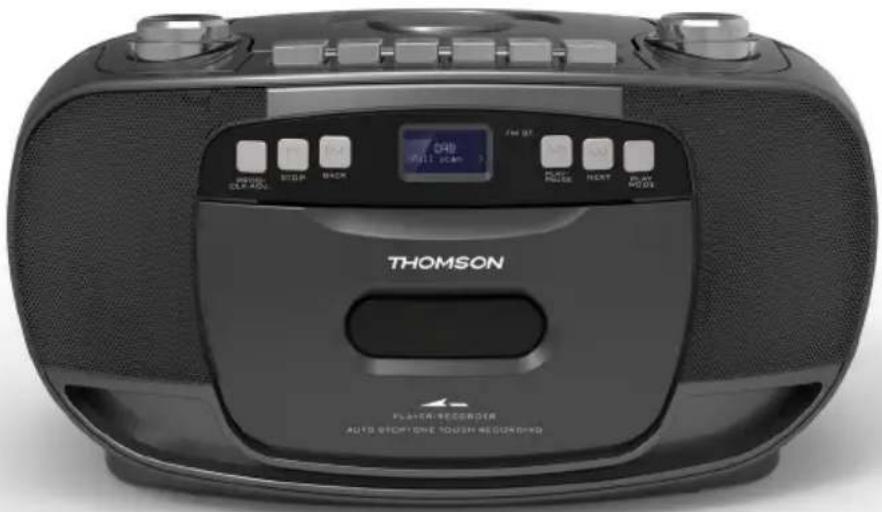
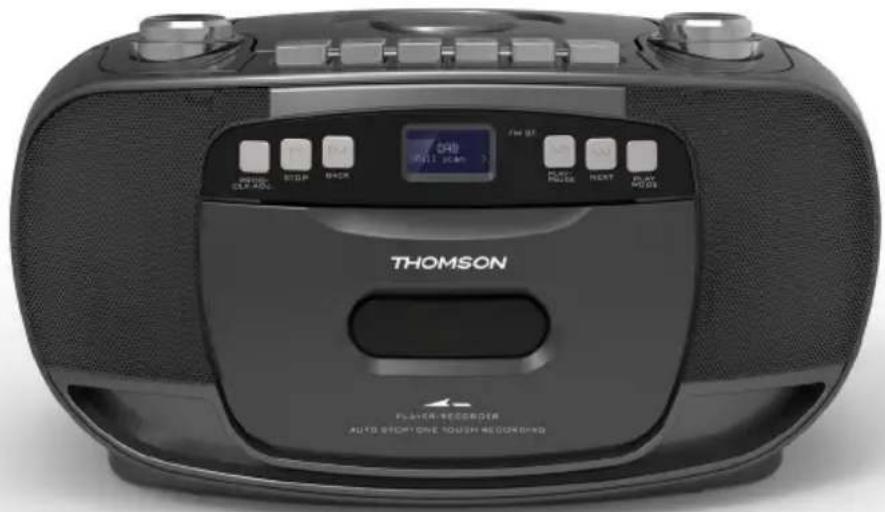
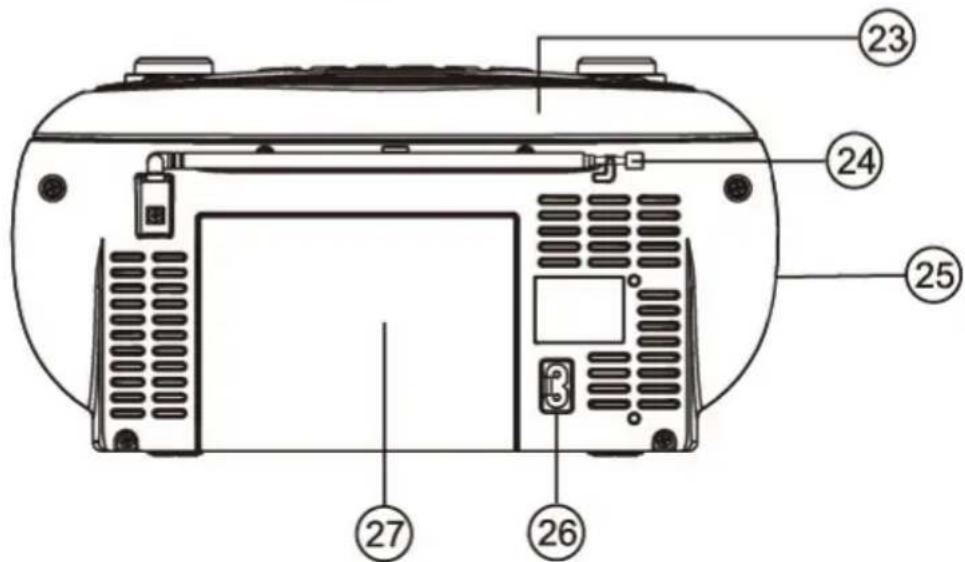
Description of Parts
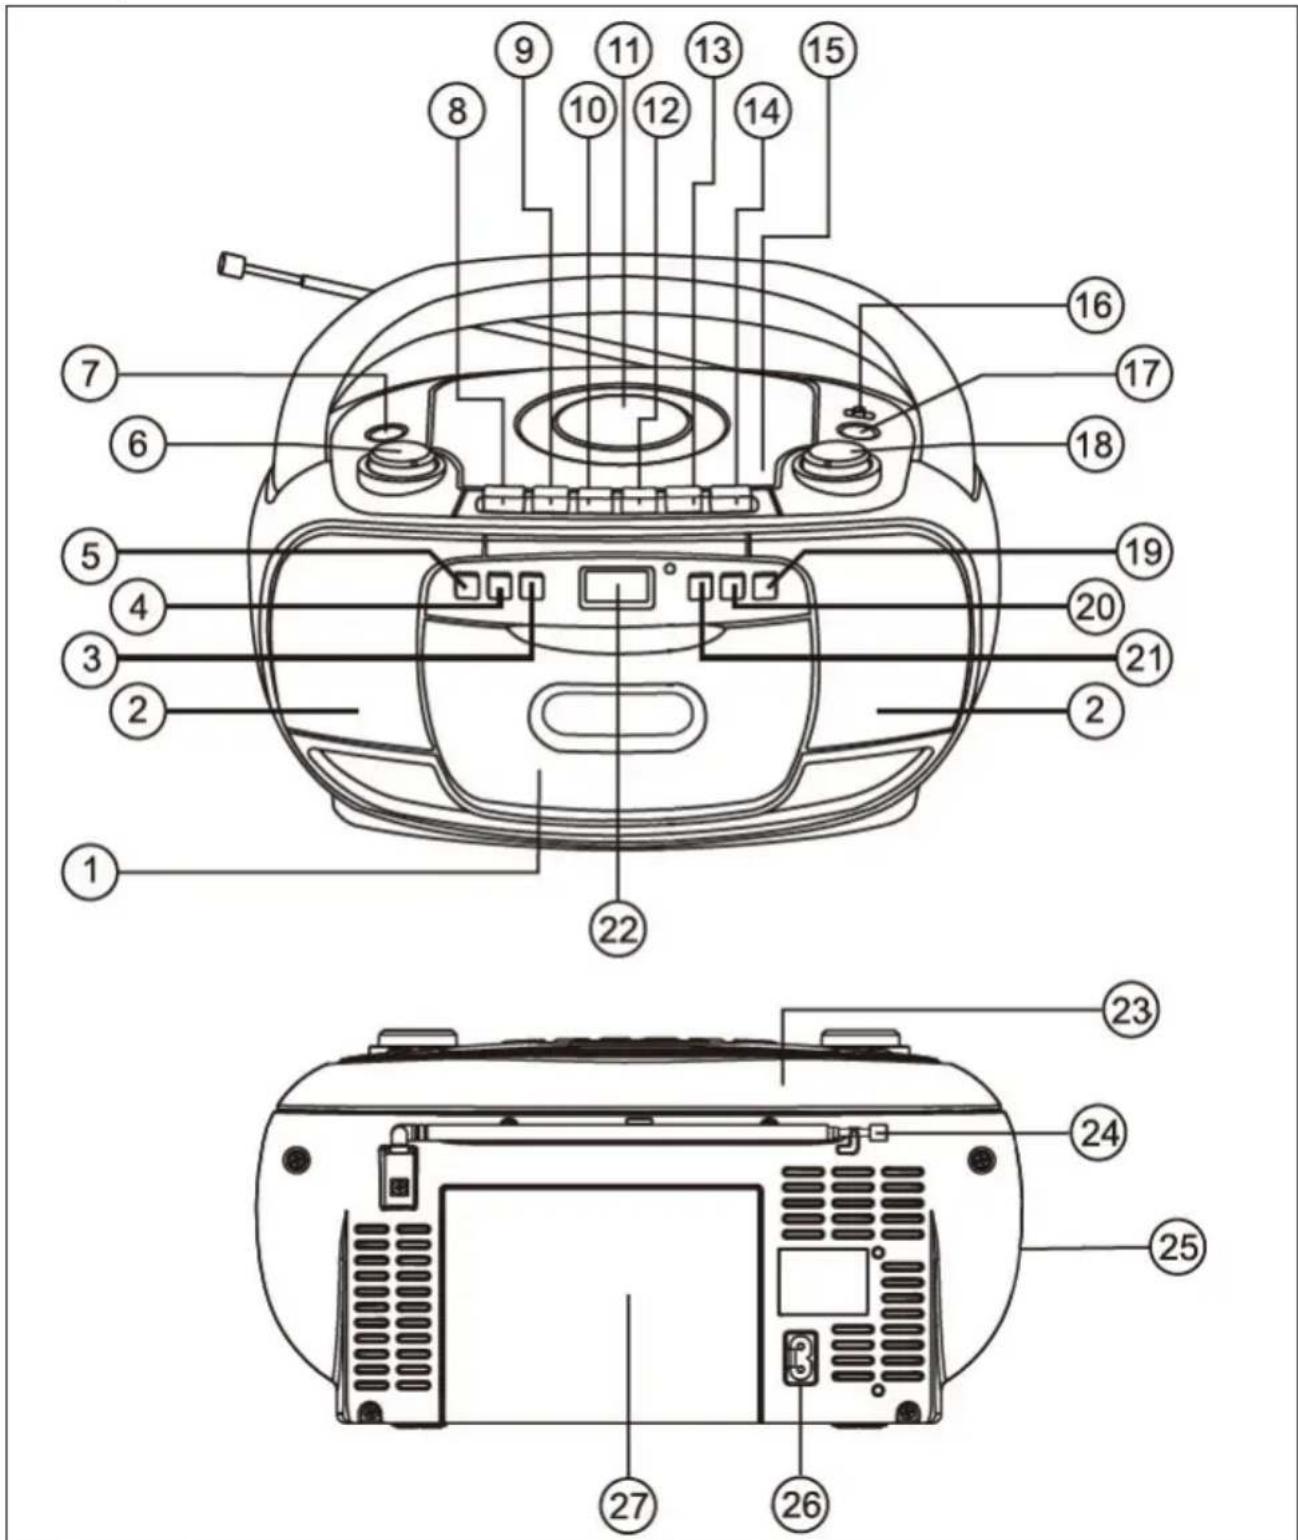
- Cassette door
- Speaker
- D BACK button
- STOP button / snooze
- CD PROGRAMME / MENU / TIME button
- VOLUME control knob
- POWER button
- Cassette PAUSE
-
■ Cassette STOP/EJECT
-
◀csette F.FWD
- CD DOOR
- Cassette REWIND
- ▶Cassette PLAY
- Cassette RECORD
- ▲OPEN/CLOSE CD button
- Mute ON/OFF
- Function button
- Radio TUNING control
-
REPEAT / INFO / ALARM button
-
CD NEXT button
- CD PLAY / PAUSE / ENTER button
- LCD display
-
Carrying handle
-
Telescopic antenna
- AUX in jack
- AC socket
- Battery compartment
Power

CAUTION
- Risk of product damager! Make sure that the power voltage corresponds to the voltage printed on the back label.
- Risk of electric shock! When you unplug the AC power cord always pull the plug from the socket. Never pull the cord.
- Before connecting the AC power cord, ensure you have completed all other connections.
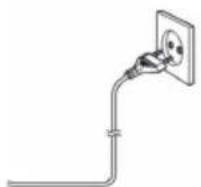
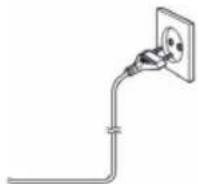
Using Mains Electricity
Place the unit in the desired position and unravel the mains cable.
Insert the cable into the supply socket and switch on if applicable.
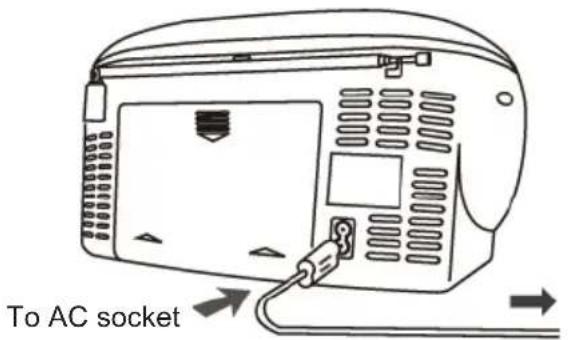
To AC outlet
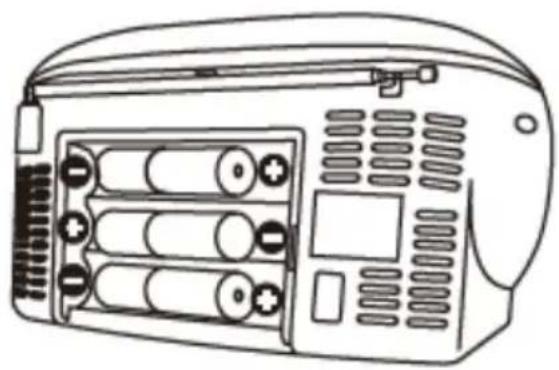
Using Batteries
Disconnect the AC power cord from the unit's AC power inlet.
While the cord is connected, battery power is automatically cut.
Note:
When the volume decreases, or the sound decreases.
Insert six UM-2 (size C) batteries.
natural_image
Line drawing of a portable electronic device with multiple cylindrical batteries and control panel (no text or symbols)
natural_image
Line drawing of a portable electronic device with control panel and buttons (no text or symbols)
natural_image
Simple line drawing of a flatboard with a downward arrow and mounting bracket (no text or symbols)Auto standby
When playing media from a connected device, the Tower automatically switches to standby if:
• No button is pressed for 10 minutes,
- No audio from a connected device for 10 minutes.
Battery Power
- Be sure that the batteries are inserted correctly to avoid damage to the appliance. Always remove the batteries when the appliance will not be used for a long period of time, as leaving them in will cause leakage and subsequent damage to your set.
- Use batteries of the same type. Never use different types of batteries together.
- Do not throw the battery into a fire, or expose it to sunshine or the like.
- If the liquid contained in the batteries comes in contact with eyes or skin, wash the area immediately and thoroughly with clear water and seek medical attention.
Unit power supply (mains 230V/50Hz)
Connect the mains cable plug to the 230V wall outlet.
Warning:
- Before using the unit, check that the local mains supply is compatible with the unit (230V/50Hz).
- Do not plug or unplug the mains cable when your hands are wet.
- When planning not to use this unit for long periods of time (i.e., holidays, etc.), disconnect the plug from the wall outlet.
- When disconnecting the mains cable from the wall outlet, take hold of the plug; do not pull the cord in order to avoid shock risks caused by the damaged cable.
Operation
Press the POWER button to turn the unit ON/OFF.
Adjusting the Volume
Rotate the volume knob clockwise to increase the volume.
Rotate the volume knob anti-clockwise to decrease the volume.
Check the display, which will confirm the volume setting.
Mute
Press the MUTE button to the ON position, then the volume is muted and the message "volume muted" will appear on the LCD display. Press this button to the OFF position to cancel the MUTE function.
(Note: the Volume knob cannot cancel the MUTE function)
Clock and Timers
Setting the Clock and Date
After the unit is plugged into a mains supply or following a mains power failure, the display will show the current time and date on the LCD display. The unit should be in standby mode to set the current clock.
- Press the CLOCK button, and "Time Setup" is displayed; press ENTER to confirm, and "Time Wizard Interval" is displayed.
- Press ◀◀/▶▶ to select "24H" or "12H", then press ENTER to confirm. The "Hour" digits on the display will blink.
- Press |◀◀/▶▶| to set the hour, press ENTER to confirm; the "Minutes" digits on the display will blink.
- Press ◀◀/▶▶I to set the minutes, then press ENTER to confirm; the "Year" digits on the display will blink.
- Press |◀◀/▶▶| to set the Year, then press ENTER to confirm; the "Month" digits on the display will blink.
- Press |◀◀/▶▶| to set the Month, press ENTER to confirm; the "Day" digits on the display will blink.
- Press |◀◀/▶▶| to set the Day, press ENTER to confirm. Press |◀◀/▶▶| "YES/NO" to select and save.
Setting the Alarm
Note: Check that the radio has the correct time and date before you set an alarm.
This unit may be used as an alarm clock. The Bluetooth device, USB device or FM radio is activated to play at a preset time.
- Press POWER to switch the unit to standby mode.
- Make sure that you have set the clock correctly.
- Press ALARM button in shutdown state;
-
"Alarm 1 (or 2) Setup" is displayed. Press the ENTER button to select.
-
"Alarm 1 (or 2) Wizard On Time" is displayed and the hour digits for the alarm will flash.
- Press I/ repeatedly to set the hour. Press ENTER to confirm.
- Press I/▶ to set the minutes, and press ENTER to confirm.
- Press |◀◀/▶▶| to select the Alarm volume from 0 to 30, and press ENTER to confirm.
- Press |◀◀/▶▶| to scroll to the OFF/CD/DAB/FM/BUZZER status. Press ENTER to confirm.
- Press the |◀◀/▶▶| button to scroll to the duration for the alarm. You can choose from 15, 30, 45 or 60 minutes. Press the ENTER button to select. Press |◀◀/▶▶| to select YES and press ENTER to save the alarm,
- The display will show the current time and the alarm time.
Snooze
- Whenever the alarm comes on, it can be temporarily suspended for a short period of approximately 9 minutes, by pressing the "SNOOZE" key once.
- The alarm will then automatically come on again after the approximately 9-minute long "Z _zz " period has ended.
- The “Zsymbol will appear on the display to remind you that the snooze function is active.
- To deactivate the snooze function, press and release the "POWER" key once.
DAB Radio Mode
Carefully extend the telescopic aerial.
Press the POWER button to turn on the unit, which will automatically be in DAB mode.
Auto Scan
- Press the FUNCTION button to select "DAB Mode" (if the unit is not in DAB mode) If this is the first time the unit has entered DAB Mode, it will automatically start an 'Auto Scan' to search for available stations. (Once DAB Mode has been used at least once, the unit will automatically first select the last previously played station)
- Press [ENTER] button to automatically start auto scan to search for available stations. During the scanning process, the lower line of the display shows a bar graph indicating the progress of the scan.

- Rotate RADIO TUNING to listen to the available stations
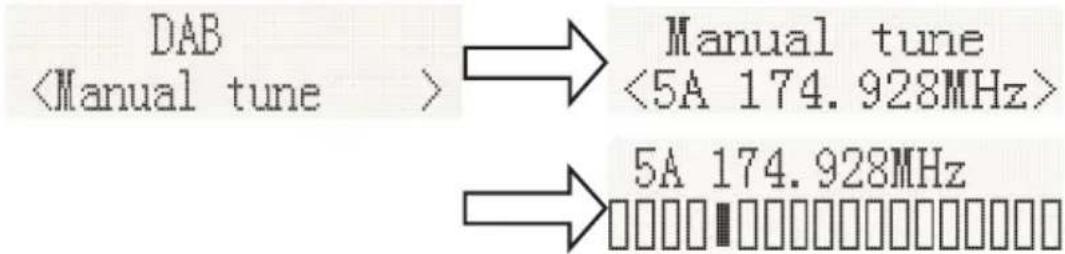
Manual Scan
- Press the FUNCTION key on the main unit to select "DAB MODE".
- Press the [|◀◀] or [▶▶] button to select "Manual Tune", then press the [ENTER] button to enter the service menu.
- Press [ |◀◀ ] or [ ▶▶▶] to tune in the desired channel. The graph will indicate the signal strength.
- Press [MENU] or [ ] exit scan.
- If no stations are found, please ensure that the aerial is extended and test the reception by doing another auto scan in a different location.
- Rotate the RADIO TUNING to listen to the available stations.
DRC (Dynamic Range Control)
Dynamic Range Control (also known as DRC) is a technology used to help make quieter sounds easier to hear in a noisy environment.
-
In DAB mode, press the [|◀◀] or [▶▶] button to select "DRC", press the [ENTER] button to display "*" to the top right.
-
Press MENU to confirm the setting. The display will return to normal.
DRC OFF - DRC is switched off, broadcast DRC will be ignored.
DRC LOW - DRC level is set to 1/2 that sent by broadcaster.
DRC HIGH - DRC level is used as sent by broadcaster.
Prune (To Remove Stations That are Listed But Unavailable)
In DAB mode, press [ ] t▶ display the "Prune" submenu, then press the ENTER button to select the Prune option.

System (DAB)
In DAB mode, press ◀◀◀ to ▶new the "SYSTEM" submenu, then press the ENTER button to go to the system setting submenu.
1. Language
Press ENTER to go to the language selection; the default source language is English. The selected language will have "*" displayed at the top right.
Users may choose between "Deutsch", "Italiano" and "Français".

2. Factory Reset
Press ENTER to go to factory reset. If you wish to perform the reset operation, push the or ▶▶ button until "YES" is highlighted on the display, and press to confirm. A full reset of your radio will be performed. All presets and station lists will be erased.

flowchart
graph LR
    A["System <Factory Reset>"] --> B["Factory Reset? <No> Yes"]
3. SW Version
Press ENTER to view the DAB software version. Press Menu or ▶▶▶ I . The display will return to normal.

*If there are no operations after 30 seconds, the display will return to normal.
Preset
1. Preset Recall
In DAB mode, press [◀] to elect "Preset Recall", then press [ENTER] to tune to the station stored in preset memory.

Note: If you have not previously stored a preset station and the preset button is pressed, "Empty Preset" will be displayed.
2. Saving Presets
You may save your preferred DAB stations to the preset station memory. There are 20 memory presets in your radio. In the event of a power failure, presets are retained by your radio.
The procedure for setting presets and using them to tune stations is the same for DAB modes: In DAB mode, select the desired wave band, rotate RADIO TUNING to view the stored stations, then press 🔊 to tune to the required station as previously described, and then press [ENTER] to select the desired preset number under which you will store the station. Press [ENTER] to confirm.

FM Radio
Carefully extend the telescopic aerial to its full length.
Auto Scan
-
Press the FUNCTION button to select "FM Mode".
-
Long press the button, and your radio will scan and stop automatically when it finds a station of sufficient signal strength.
-
After a few seconds, the display will update. The display will show the station frequency. If the signal is strong enough and the station signal contains RDS data, then the radio will display the station name.
-
To find other stations, press and hold the I button as before.
-
To scan the FM band in the opposite direction (high frequencies to low frequencies), press the ▶ button and hold for 2 seconds.
-
When the waveband end is reached, your radio will recommence tuning from the opposite waveband end.

- Rotate RADIO TUNING to listen to the available stations
Manual Scan
-
Press the [FUNCTION] knob on the main unit to select "FM Mode".
-
Select FM mode as previously described, if required.
-
Press ◀◀◀ or ▶▶▶ to tune to a station. Each press of the tuning button will change the frequency up or down by 100 kHz.
-
When the waveband end is reached, the radio will recommence tuning from the opposite waveband end. If no stations are found, please ensure that the aerial is extended and test the reception by doing another auto scan in a different location.
-
Rotate the RADIO TUNING to listen to the available stations.
Menu
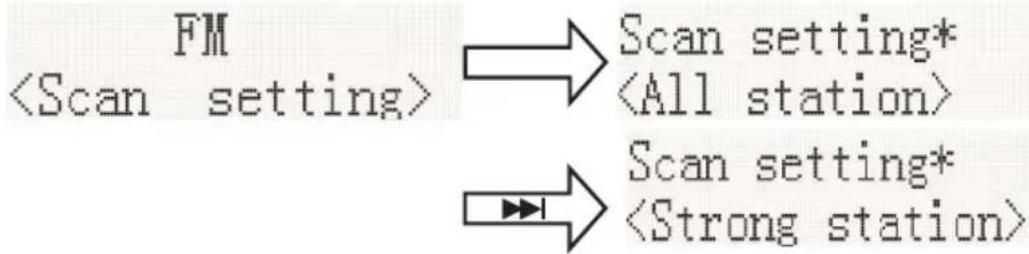
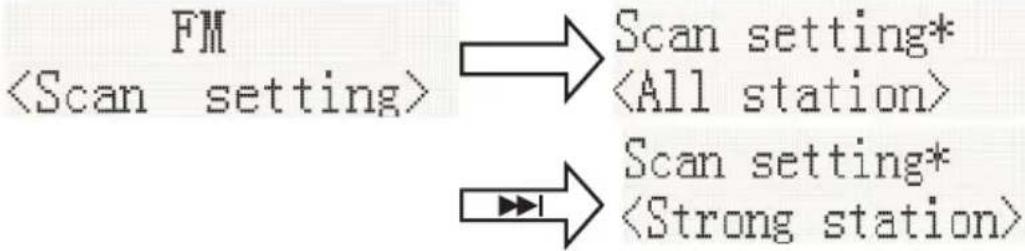
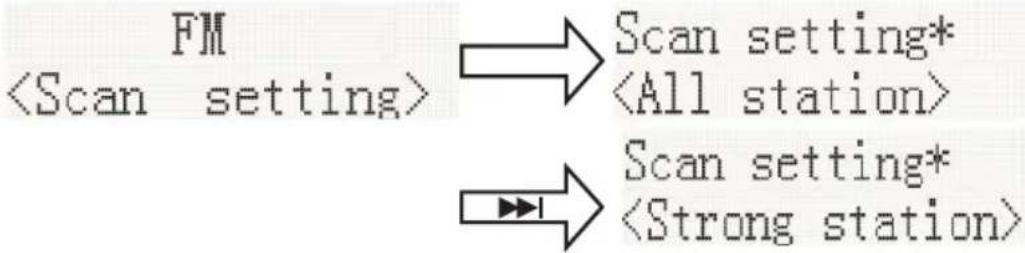
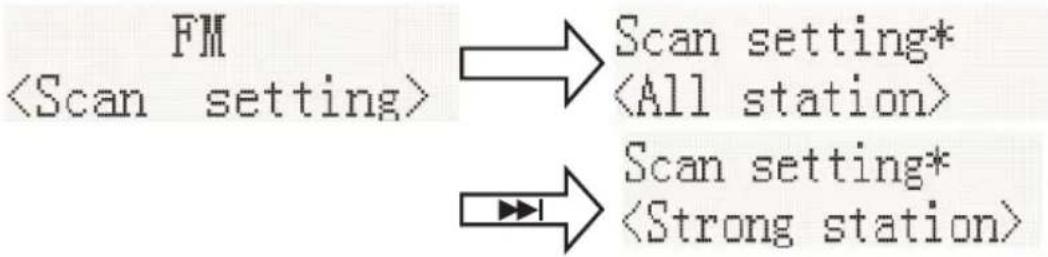
- Scan Setting
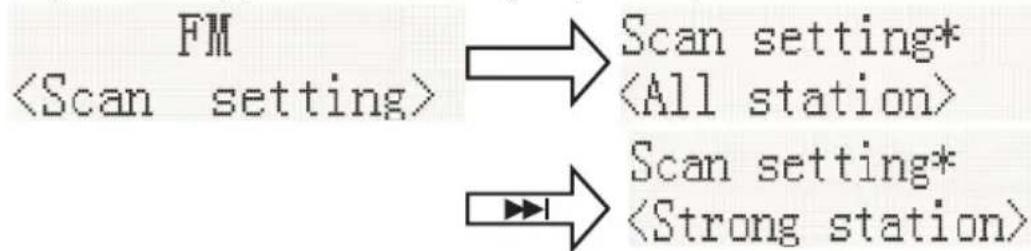
In FM mode, press MENU, enter the FM menu setting, then press ◀◀ or ▶▶ to select [Scan setting], then press ENTER to select the sensitivity setting:
1.1. All stations: \~15dB

1.2. Strong stations only: \~19dB,
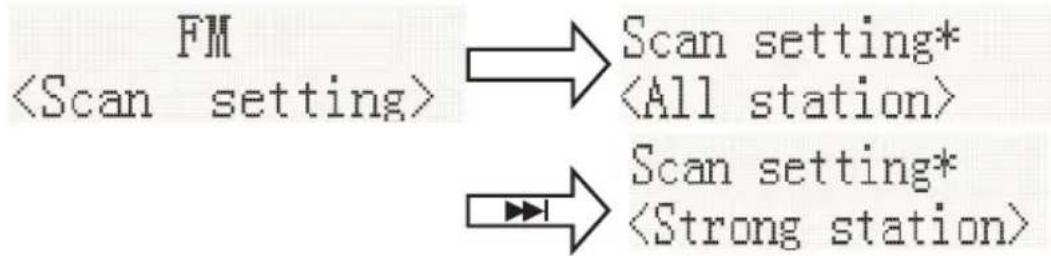
flowchart
graph LR
    A["FM <Scan setting>"] --> B["Scan setting* <All station>"]
    A --> C["Scan setting* <Strong station>"]
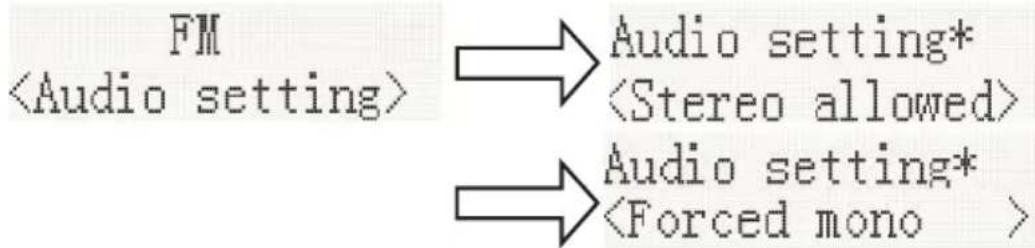
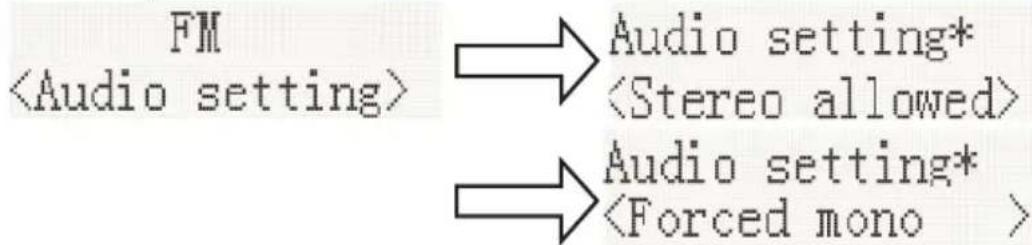
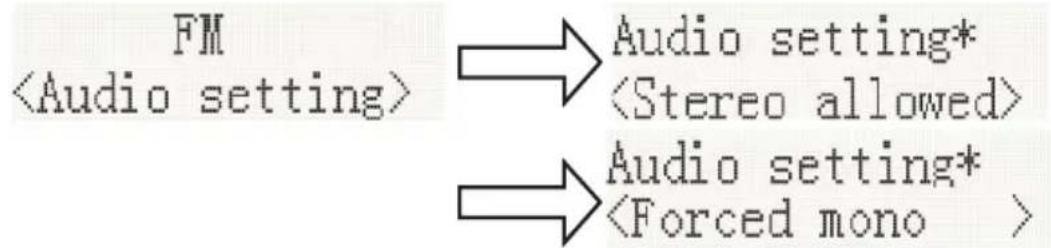
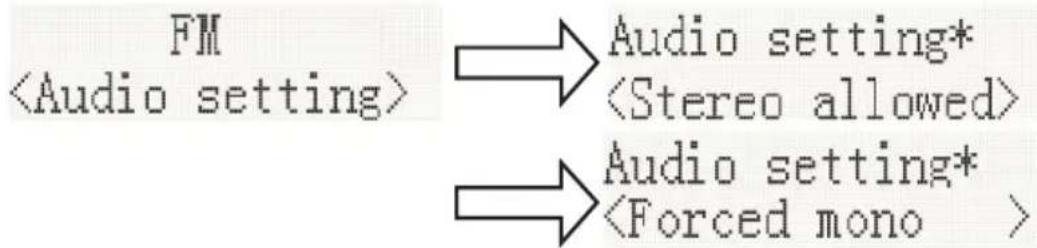
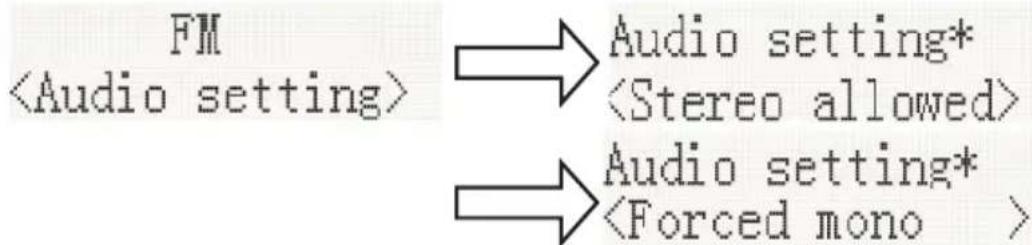
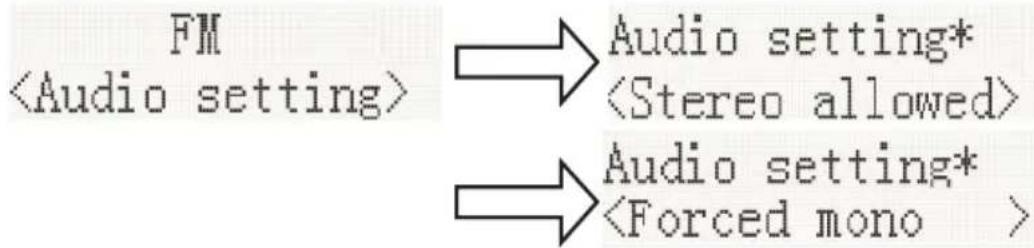
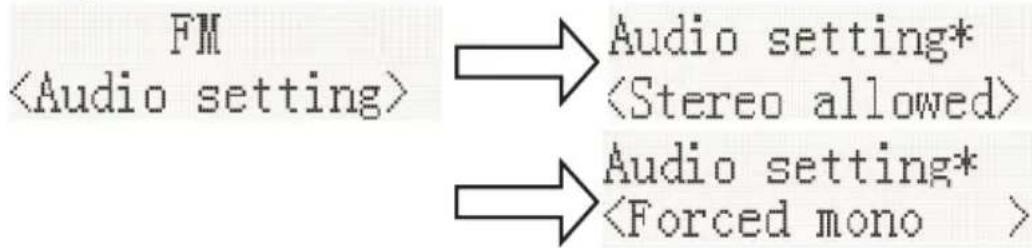
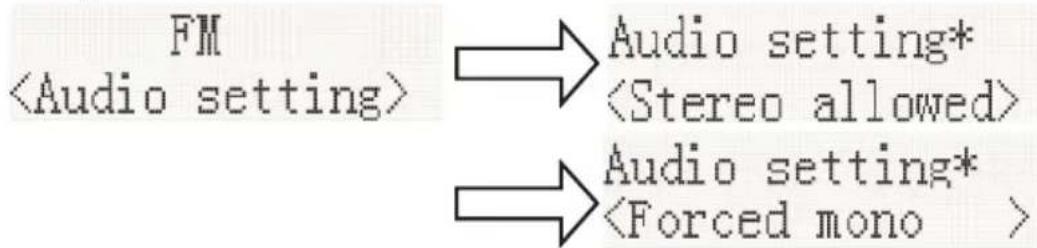
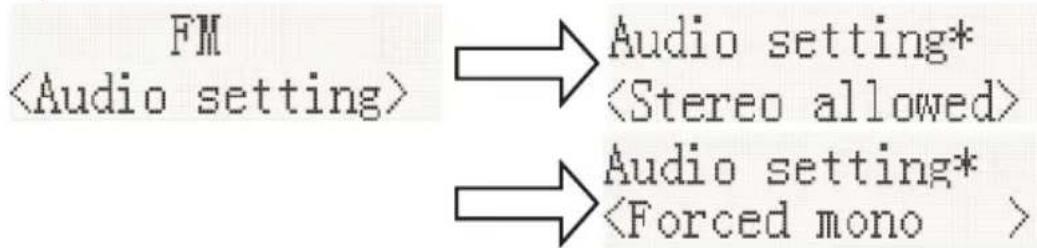
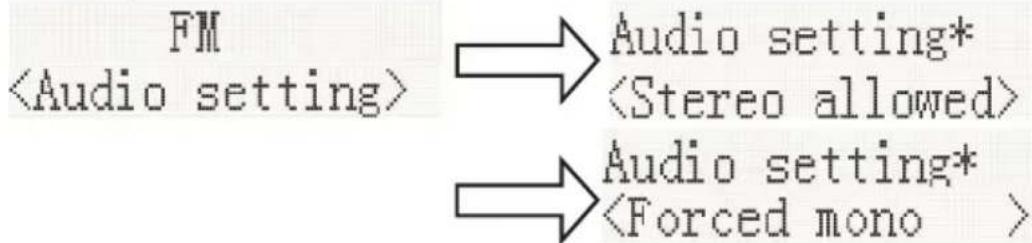
2. Audio Setting
2.1. Stereo allowed:

2.2. Forced mono
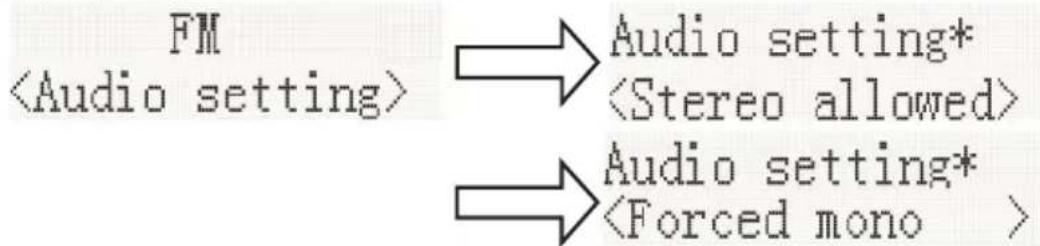
flowchart
graph LR
    A["FM\n<Audio setting>"] --> B["Audio setting*\n<Stereo allowed>"]
    A --> C["Audio setting*\n<Forced mono >"]
2.3. System (FM system), same DAB system setting.
3. PRESET:
3.1. Preset Recall (Choose the Station):
Press ENTER, tune to the station stored in preset memory.
![Preset Recall <1: 90.50MHz > → 90.50MHz St P1 [No RadioText]](/content/2026/03/546519/images/4d2155e218fa2e8d8b1ac3e904a72e953b0b2690bb9bc1e11e2800ebf7306df7.jpg)
3.2. Preset Recall (Choose the Station):
You may store your preferred FM stations to the preset station memories. There are 20 memory presets in your radio. In the event of a power failure, presets are retained by your radio.
The procedure for setting presets and using them to tune stations is the same for DAB modes:
In FM mode, select the desired wave band. Rotate RADIO TUNING to view the stored stations, press [◀] to one to the required station as previously described, and then press [ENTER] to select the preset number under which you will store the station. Press [ENTER] to confirm.

Playing a Compact Disc (CD)
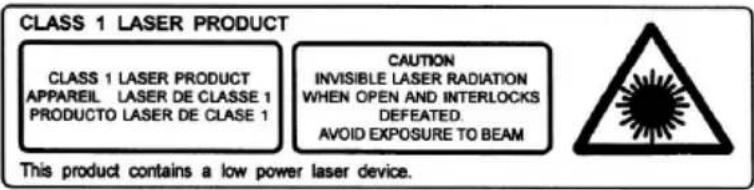
NOTE: Never touch the laser lens inside the CD compartment. Clean the laser lens using a CD cleaner disc if it becomes dirty.
- Press the POWER button to turn on the unit.
- Press the FUNCTION button to select the CD function.
- Press the 🔊 button to open the CD door and insert a disc with the label side facing up.
- Close the CD DOOR and the disc will rotate for a few seconds, then play the 1st track automatically.
- To temporarily stop playback, press the button, and to resume playback, press it again.
- Press the button to STOP play.
REVERSE/FORWARD
- The ◀◀ and ▶▶| buttons are used to jump to a different track number or to scan disc tracks at high speed.
- Press the ◀◀ button once to hear the beginning of the current track. Press it two or more times to hear previous tracks on the disc.
- Press the button to hear the next tracks on the disc.
- Press and hold the button. The current track will be scanned and move backwards to the previous track(s); when the desired track section is found, release the button and normal play will resume.
- Press and hold the ▶▶I button, and the current track will be scanned and move forward to the next track(s). When the desired track section is found, release the selected button and normal playback will resume.
REPEAT FUNCTION
The CD REPEAT button may be used to repeat a single track or repeat all tracks on a compact disc.
- Press the REPEAT button once during playback, the "REPEAT ONE" sign will appear on the LCD display for about 2 seconds. The same track will be repeated over and over.
- Press the REPEAT button a second time to repeat all tracks. The "REPEAT ALL" sign will appear on the LCD display for about 2 seconds.
- To cancel REPEAT PLAY, press the REPEAT button repeatedly until "REPEAT OFF" appears on the LCD display for about 2 seconds.
PROGRAM FUNCTION
The Program feature may be used to program up to 20 tracks to play in a selected order.
- While in the stop mode only (CD is not playing), press the PROG button, and the LCD display will show the wording "P 01" and "T 01" Prog starts to flash.
- Press the lock buttons to allocate the desired track.
- Press the PROG button to select and store the track into memory.
- Repeat steps 2 to 3 to select up to 20 tracks.
- To play the selected tracks (in the program mode), press the ▶|| button.
- Press the ◀◀ button to hear the previous program track or press the ▶▶ button to hear the next program track.
Note: After all programmed tracks have been played, the CD player will return to the stop mode.
- Press the Button to exit the PROGRAM PLAY mode.
MP3 DISC SECTION
- Press the POWER button to turn on the unit.
- Press the FUNCTION button to select "CD Mode".
- Close the CD door and the disc will rotate for a few seconds and then play the 1st track automatically.
- Press the |and buttons to choose a track.
- To temporarily stop playback, press the button; to resume, press the button again.
- Press the button to stop play.
Note: Because MP3 discs have a large capacity, disc access times are a little longer.
REPEAT PLAYING FUNCTION
Single track repeat
Press the REPEAT button once to repeat a single track. The words "Repeat one" appear on the display.
Repeating All Tracks on a Disc
In Play mode, press the REPEAT button twice to repeatedly play all tracks on the disc. The display will show "Repeat All".
To cancel repeat play, press the REPEAT button repeatedly until the "Repeat off" sign appears.
PROGRAM PLAY
The tracks on the disc can be programmed to play in any order (up to 20 tracks can be programmed). Note: this can only be done while in Stop mode
- Press the PROG button while in Stop mode. "P01" "F01" will appear on the display and "T001" will be displayed.
- Press either the ◀◀ or ▶▶I button to select the desired tracks in the album, then press the PROG button to store in the memory.
- The first track number is now stored in memory, and the program number changes to "P02", waiting for your next selection.
- Repeat steps 1-3 to program additional tracks.
After programming is finished, press the ▶ button, and programmed play begins from the first programmed track. The player stops automatically after all programmed tracks have been played. (Press the ■ button twice to cancel the programmed tracks memory).
Tape Playback
- Press the POWER button to turn on the unit.
- Press the FUNCTION button to select the Tape mode; 'Tape Mode' appears on the display.
- Insert the cassette.
- Press the ▶ key to play the cassette.
- Press the ■ key to stop playback
- Press the Ikey to interrupt playback
- Press the ◀◀key▶fast wind
Tape Record
- Inset the cassette tape
- Press the Ikey
- Press the O key
- Prepare to play source to be recorded and play it, press the FUNCTION button to select CD or Radio.
- Press the Ikey
- Press the ■ key to stop the recording
- Press the || key to interrupt recording; to resume recording, press the || key again
To erase a recorded tape
- Press the FUNCTION button to select Tape Mode
- Insert a tape with the side you want to erase facing you
- Press the RECORD button to start erasing
AUX INPUT JACK
- Press the POWER button to turn on the unit.
- Rotate the FUNCTION knob to select the Aux In mode. 'Aux-Input' will appear on the LCD display.
- Connect the AUX connect wire from the AUX out jack of your personal player (e.g. portable MP3 player) to the AUX input jack.
- Start playback from your personal player.
Specification:
Power: AC 230V\~50Hz 0.3A
DC: 9V (6 x 1.5V LR14/ "C"/UM2)
Frequency Ranges: FM 88.8 – 108MHz
DAB/DAB+ 174.829 - 239.200MHz
Max. consumption: 10W
Speaker impedance: 8 ohms
Total music output: 1.5W X 2
Remark: The maximum connection distance is around 10 meters. Please place your Bluetooth speaker as close as possible to this device to prevent disturbances to this connection.
About the disks
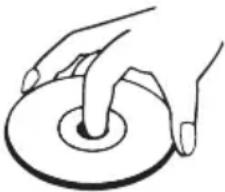 | HandlingDo not touch the underside of disks.Hold disks by the edges to avoid leaving fingerprints on the surface.Any dust, fingerprints or scratches may cause a malfunction.Never affix a label or sticky tape to the disk. |
 | StoragePut disks back in their case after use.Never expose disks to direct sunlight or heat sources. Never leave disks inside a car parked in full sunlight. |
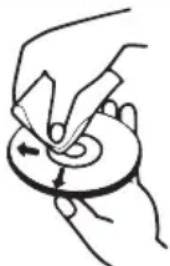 | CleaningUse a clean, soft, lint-free cloth to clean the disk, working from the centre outwards in a straight line. Do not use solvents such as petrol, thinners, commercially available cleaners or antistatic sprays for vinyl disks. |
Remarks:
Don't discard the electrical and electronic appliances in the regular waste disposal.
• Take them to a collection point.
- Some components in these appliances may be hazardous to health and the environment.
- In order to save energy when the unit has no sound output for a while, the unit will be switched to stand-by automatically. It can be switched ON by using the POWER selector again.
- If there is an incoming call while RK200ABCD/ RK203DABCD is connected to your cell phone for music playback, it will pause at once when you answer the call and resume after the call ended (sometimes it will pause after end the call, it depend on your cell phone).
- The Bluetooth® word, mark and logo are registered trademarks owned by Bluetooth SIG, Inc. and any use of such marks by Bigben Interactive is under license.
- THOMSON is a trademark of TECHNICOLOR SA or its affiliates used under license to Bigben Interactive.
DECLARATION OF CONFORMITY
The undersigned, Bigben Interactive declares that the radio equipment of the RK200DABCD / RK203DABCD type complies with the 2014/53/EU directive.
The complete text is available at https://www.bigben-interactive.co.uk/support/
Made in China
Manufactured by BIGBEN INTERACTIVE SA
396, Rue de la Voyette
CRT2 - FRETIN
CS 90414
59814 LESQUIN Cedex - France
www.bigben.eu


Fabricant : Bigben Interactive FRANCE
396, Rue de la Voyette, C.R.T. 2, Fretin, CS90414 - 59814 Lesquin Cedex, France
BELGIQUE, customerservice@bigben-interactive.be
NEDERLAND, customerservice@bigben-interactive.nl
ESPAÑA, sat@bigbeninteractive.es
ITALIA, support@bigbeninteractive.it
www.bigben.eu
THOMSON
RK200DABCD
RK203DABCD
DAB/FM/CD/CASETE/ENTRADA DE AUDIO

| MATERIAL DE CLASE II | |
| CORRIENTE CONTINUA | |
| CORRIENTE ALTERNA | |
| SOLO PARA USO EN INTERIORES |
natural_image
Line drawing of a portable electronic device with multiple cylindrical batteries and control panel (no text or symbols)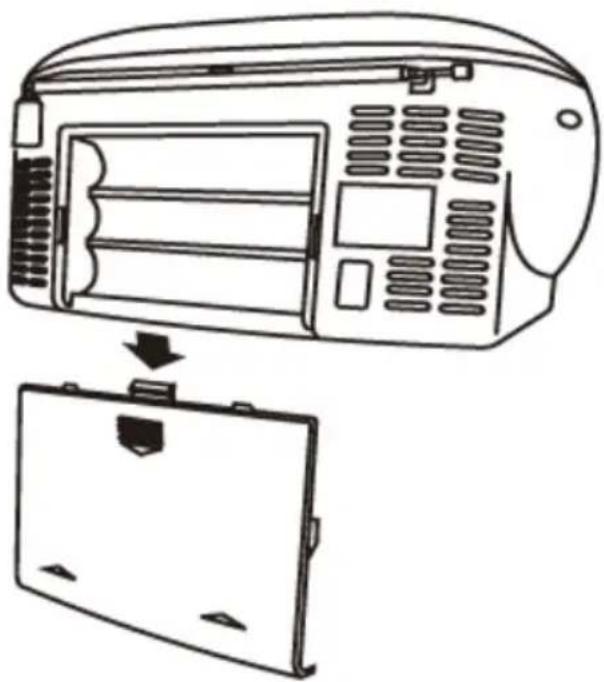
natural_image
Line drawing of a portable air conditioner unit with a close-up of its internal panel (no text or symbols)Standby automático
2. Restablecer ajuste de fábrica
2.2. Mono obligatorio:
flowchart
graph LR
    A["FM\n<Audio setting>"] --> B["Audio setting*\n<Stereo allowed>"]
    A --> C["Audio setting*\n<Forced mono >"]
BELGIQUE, customerservice@bigben-interactive.be
NEDERLAND, customerservice@bigben-interactive.nl
ESPANA, sat@bigbeninteractive.es
ITALIA, support@bigbeninteractive.it
www.bigben.eu
THOMSON
RK200DABCD
RK203DABCD
DAB/FM/CD/MUSICASSETTE/INGRESSO AUDIO

ISTRUZIONI D'USO
PRIMA DI UTILIZZARE L'APPARECCHIO, LEGGERE PER INTERO IL PRESENTE MANUALE E CONSERVARLO PER CONSULTAZIONI FUTURE.
Indice

| MATERIALE DI CLASSE II | |
| CORRENTE CONTINUA | |
| CORRENTE ALTERNATA | |
| UTILIZZARE SOLO IN AMBIENTI CHIUSI |
natural_image
Line drawing of a portable electronic device with three batteries and control panel (no text or symbols)
natural_image
Line drawing of a portable air conditioner unit with a close-up of its internal panel (no text or symbols)Auto standby
2.2. Mono forzato
flowchart
graph LR
    A["FM\n<Audio setting>"] --> B["Audio setting*\n<Stereo allowed>"]
    A --> C["Audio setting*\n<Forced mono >"]
BELGIQUE, customerservice@bigben-interactive.be
NEDERLAND, customerservice@bigben-interactive.nl
ESPANA, sat@bigbeninteractive.es
ITALIA, support@bigbeninteractive.it
www.bigben.eu
THOMSON
RK200DABCD
RK203DABCD
DAB/FM/CD/CASSETE/ENTRADA DE ÁUDIO

| MATERIAL DE CLASSE II | |
| CORRENTE CONTÍNUA | |
| CORRENTE ALTERNADA | |
| APENAS PARA USO INTERIOR |
natural_image
Line drawing of a portable electronic device with multiple cylindrical batteries and control panel (no text or symbols)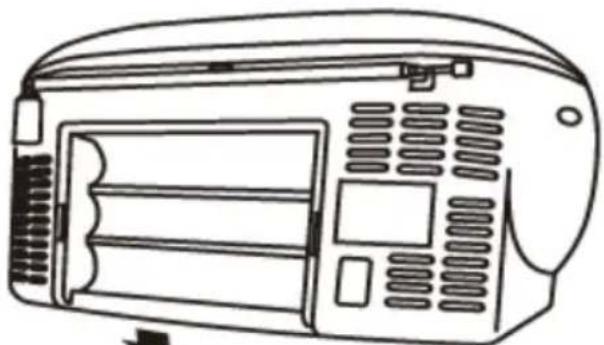
natural_image
Line drawing of a portable air conditioner unit with control panel and buttons (no text or symbols)
natural_image
Simple line drawing of a rectangular device with a downward arrow and mounting bracket (no text or symbols)Espera automática
Sistema (DAB)
flowchart
graph TD
    A["FM\n<Scan setting>"] --> B["Scan setting*\n<All station>"]
    C["..."] --> D["Scan setting*\n<Strong station>"]
- Definição de Áudio
2.2. Mono forçado
flowchart
graph LR
    A["FM\n<Audio setting>"] --> B["Audio setting*\n<Stereo allowed>"]
    A --> C["Audio setting*\n<Forced mono >"]
BELGIQUE, customerservice@bigben-interactive.be
NEDERLAND, customerservice@bigben-interactive.nl
ESPAÑA, sat@bigbeninteractive.es
ITALIA, support@bigbeninteractive.it
www.bigben.eu
THOMSON
RK200DABCD
RK203DABCD
DAB/FM/CD/CD/KASSETTE/AUDIO IN

BEDIENUNGSANLEITUNG

natural_image
Line drawing of a portable electronic device with multiple batteries and control panel (no text or symbols)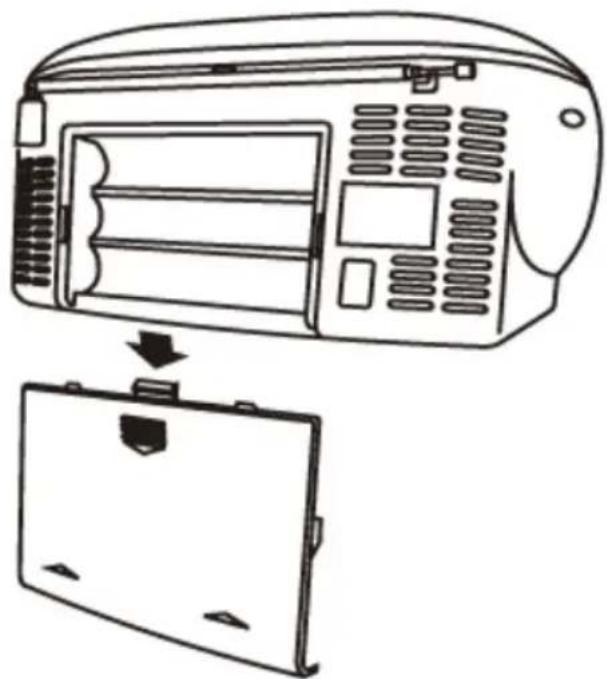
natural_image
Line drawing of a portable air conditioner unit with internal compartments and a separate open panel (no text or symbols)Auto-Stand-by
flowchart
graph LR
    A["FM"] --> B["Scan setting*"]
    C["<Scan setting>"] --> D["<All station>"]
1.2. Strong stations only (nur starke Sendersignale): \~19 dB,
flowchart
graph LR
    A["FM <Scan setting>"] --> B["Scan setting* <All station>"]
    A --> C["Scan setting* <Strong station>"]
- Audio-Einstellung
2.2. Forced mono (Nur Mono)
flowchart
graph LR
    A["FM<br><Audio setting>"] --> B["Audio setting*"]
    B --> C["<Stereo allowed>"]
    D["Audio setting*"]
    E["<Forced mono>"] --> F["Audio setting*"]
BELGIQUE, customerservice@bigben-interactive.be
NEDERLAND, customerservice@bigben-interactive.nl
ESPANA, sat@bigbeninteractive.es
ITALIA, support@bigbeninteractive.it
www.bigben.eu
THOMSON
RK200DABCD
RK203DABCD
DAB/FM/CD/CASSETTE/AUDIO IN
HANDLEIDING
GELIEVE DEZE GEBRUIKSAANWIJZING GOED DOOR TE NEMEN VOOR U HET TOESTEL IN GEBRUIK NEEMT EN BEWAAR HET ZODAT U HET LATER NOG KAN RAADPLEGEN.
Inhoud
Aan de slag 1
| BESCHERMINGSKLASSE II |  |
| GELIJKSTROOM |  |
| WISSELSTROOM |  |
| UITSLUITEND BESTEMD VOOR GEBRUIK BINNENSHUIS |  |
- Cassettedeur
- Luidspreker
- DAVORIGE knop
- STOP knop / sluimer
- CD PROGRAMMA / MENU / TIJD knop
- VOLUMEREGELAAR
- AAN/UIT knop
- Cassette PAUZE
-
■ Cassette STOP/VRIJGAVE
-
Cussette SNEL DOORSPOELEN
- CD-KLEP
- cassette SNEL TERUGSPOELEN
- ▶Cassette AFSPELEN
- Cassette OPNEMEN
- ▲CE OPEN/DICHT knop
- Demping AAN/UIT
- Functieknop
- Radio afstemregelaar
-
HERHALEN / INFO / ALARM knop
-
▶D VOLGENDE knop
-
Telescoopantenne
-
CD AFSPELEN / PAUZE / ENTER knop
-
AUX in-aansluiting
-
LCD-scherm
-
AC-aansluiting
-
Draaggreep
-
Batterijvak
Vermogen
OPGELET

natural_image
Line drawing of a portable electronic device with multiple batteries and control panel (no text or symbols)
natural_image
Line drawing of a portable air conditioner unit with a partially open lid (no text or symbols)Voeding (netstroom 230V/50Hz)
1.2. Alleen sterke stations: \~19dB,
flowchart
graph LR
    A["FM <Scan setting>"] --> B["Scan setting* <All station>"]
    A --> C["Scan setting* <Strong station>"]
- Audio-instellingen
flowchart
graph LR
    A["FM\n<Audio setting>"] --> B["Audio setting*\n<Stereo allowed>"]
    A --> C["Audio setting*\n<Forced mono >"]
BELGIQUE, customerservice@bigben-interactive.be
NEDERLAND, customerservice@bigben-interactive.nl
ESPANA, sat@bigbeninteractive.es
ITALIA, support@bigbeninteractive.it
www.bigben.eu
THOMSON
RK200DABCD
RK203DABCD
DAB/FM/CD/KASSETT/LJUD IN

ANVÄNDARMANUAL
LÄS DENNA ANVÄNDARMANUAL NOGA INNAN PRODUKTEN TAS I BRUK OCH SPARA DEN FÖR FRAMTIDA BRUK
Innehåll
Komma igång 1
 [CAUTIONRISK OF ELECTRIC SHOCKDO NOT OPEN [CAUTIONRISK OF ELECTRIC SHOCKDO NOT OPEN  VARNINGRISK FÖR ELEKTRISKA STÖTARÖPPNA EJ VARNINGRISK FÖR ELEKTRISKA STÖTARÖPPNA EJ | KLASS 2-MATERIAL |  |
| LIKSTRÖM |  | |
| VÄXELSTRÖM |  | |
| ENDAST FÖR INOMHUSBRAUK |  |
- Kassettlucka
- Högtalare
- CBAKÄT-knapp
- D STOPP-knapp
- CD PROGRAM / MENY / TID -knapp
- knapp för VOLYMKONTROLL
- STRÖMKNAPP
- Kassettband PAUS
-
■Kassetband STOPP/ÖPPNA
-
Kissettband SNABBSPOLA FRAMÄT
- CD-LUCKA
- Massettband SPOLA TILLBAKA
- Kassetband SPELA
- Kassetband SPELA IN
- ▲CD ÖPPNA/STÄNG-knapp
- Ljudlös PÅ/AV
- Funktion-knapp
- Radioinställningsknapp
-
UPPREPA / INFO / ALARM-knapp
-
NÄSTA-knapp
- CD SPELA / PAUS / ENTER knapp
- LCD-display
-
Bärhandtag
-
Teleskopisk antenn
- AUX-IN uttag
- AC-strömuttag
- Batterilucka
Ström
WARNING

natural_image
Line drawing of a portable electronic device with multiple cylindrical batteries and control panel (no text or symbols)
natural_image
Line drawing of a portable air conditioner unit with a close-up of its internal panel (no text or symbols)Automatisk standby
3. Programvaruversion (SW Version)
1.2. Endast stationer med stark mottagning: \~19dB,
flowchart
graph TD
    A["FM\n<Scan setting>"] --> B["Scan setting*\n<All station>"]
    A --> C["Scan setting*\n<Strong station>"]
2. Ljudinställning:
2.2. Endast mono
flowchart
graph LR
    A["FM <Audio setting>"] --> B["Audio setting* <Stereo allowed>"]
    A --> C["Audio setting* <Forced mono >"]
BELGIQUE, customerservice@bigben-interactive.be
NEDERLAND, customerservice@bigben-interactive.nl
ESPAÑA, sat@bigbeninteractive.es
ITALIA, support@bigbeninteractive.it
www.bigben.eu
THOMSON
RK200DABCD
RK203DABCD
DAB/FM/CD/KASSETTE/AUDIO IN

BETJENINGSVEJLEDNING
LÆS VENLIGST DENNE BRUGERVEJLEDNING OMHYGGELIGT, F∅R DU BETJENER ENHEDEN, OG GEM DEN TIL EVT. SENERE BRUG.
Indholdsfortegnelse
| MATERIALE KLASSE II | |
| JÆVNSTR∅M | |
| VEKSELSTR∅M | |
| KUN TIL INDEND∅RS BRUG |
- Kassettelåge
- Højttaler
- CDTILBAGE-knap
- STOP-knap / snue
- Knap for CD-PROGRAM-/ MENU-/ KLOKKESLÆT
- Drejeknap for regulering af LYDSTYRKE
- TÄND/SLUK-knap
- Kassette PAUSE
-
■Kassette STOP/KAST UD
-
◀ksette F.FWD (hurtigt fremad)
- CD-LÄGE
- Massette REWIND (tilbagespoling)
- ▶Kassette PLAY (afspilning)
- Kassette RECORD (optagelse)
- ▲nap til at ÅBNE/LUKKE CD
- Tavs FRA/TIL
- Funktionsknap
- Knap til INDSTILLING AF radiostation
-
Knap for GENTAG/INFO/VÆKKEUR
-
▶kap for CD NEXT (næste)
- ▶ Knap for C AFSPIL/PAUSE/ENTER
- LCD-display
-
Bærehåndtag
-
Teleskopantenne
- Jackstik TIL AUX-IN
- Stik til vekselstrøm
- Batterirum
Strøm

FORSIGTIG
natural_image
Line drawing of a portable electronic device with multiple cylindrical batteries and control panel (no text or symbols)
natural_image
Line drawing of a portable air conditioner unit with a close-up of its internal panel (no text or symbols)Auto standby
- Drej på RADIO TUNING for at lytte til de disponible stationer
Manuel scanning
2. Nulstilling til fabriksstandarder
3. Softwareversion
Tryk ENTER for at se DAB«ens softwareversion. Tryk på Menu eller ▶▶▶. Displayet vender tilbage til normal.

90.50MHz Auto scanning...
19 Memory Auto End
- Drej på RADIO TUNING for at lytte til de disponible stationer
Manuel scanning
- Indstilling for scanning
1.2. Kun kraftige stationer: \~19dB
flowchart
graph LR
    A["FM\n<Scan setting>"] --> B["Scan setting*\n<All station>"]
    A --> C["Scan setting*\n<Strong station>"]
- Lydindstilling
2.1. Stereo mulig:

2.2. Tvungen mono
flowchart
graph LR
    A["FM\n<Audio setting>"] --> B["Audio setting*\n<Stereo allowed>"]
    C["Audio setting*\n<Forced mono>"] --> D["Audio setting*\n<Forced mono >"]
2.3. System (FM-system), samme indstilling som for DAB-system.
- FORINDSTILLING:
3.1. Annullering forindstilling (vælg stationen):
Tryk ENTER, stil ind på stationen gemt forindstillingshukommelsen.
![Preset Recall <1: 90.50MHz > → 90.50MHz St P1 [No RadioText]](/content/2026/03/546519/images/abe6b617e1d78d8ef6131283527fb7feea05066a95e24a9052c44ff7df24e317.jpg)
3.2. Annullering forindstilling (vælg stationen):
BELGIQUE, customerservice@bigben-interactive.be
NEDERLAND, customerservice@bigben-interactive.nl
ESPANA, sat@bigbeninteractive.es
ITALIA, support@bigbeninteractive.it
www.bigben.eu
THOMSON
RK200DABCD
RK203DABCD
DAB/FM/CD/KASSETT/LYD
BRUKSANVISNING
LES DENNE BRUKSANVISNINGEN N∅YE F∅R DU BETJENER APPARATET, OG OPPBEVAR DEN TIL SENERE BRUK
Innhold
[TKKCK]  FORSIKTIG FARE FOR ELEKTRISK ST∅T IKKE ÅPNE FORSIKTIG FARE FOR ELEKTRISK ST∅T IKKE ÅPNE | KLASSE II-MATERIALE | |
| LIKESTR∅M | ||
| VEKSELSTR∅M | ||
| KUN TIL INNEND∅RS BRUK |
- Kassettluke
- Høyttaler
- CD TILBAKEKNAPP
- D STOPPKNAPP/ Slumre
- CD-PROGRAMMERING / MENY / TIDSINNSTILLING
- VOLUMKONTROLL
- PA-KNAPP
- Kassett / PAUSE
-
/ ■Kassett STOPP/TA UT
-
Hassett FREMOVERSPOLING
- CD-LUKE
- Kussett TILBAKESPOLING
- Kassett AVSPILLING
- Kassett OPPTAK
- PNE/LUKKE CD-knapp
- Demp AV/PÅ
- STANDBY/FUNKSJON-knapp
- Radio/INNSTILLINGsknapp
-
Info-/alarm-knapp
-
▶D Neste-knapp
- CD Spill av- / pause- / enter-knapp
- LCD-display
-
Bærehåndtak
-
TELESKOPANTENNE
- AUX-INNGANG
- STIKKONTAKT
- Batteriluke
Strømbryter
FORSIKTIG

- Fare for produktskade! Sjekk at strømspenningen tilsvarer spenningen som står oppført på etiketten på baksiden.
- Fare for elektrisk sjokk! Når du kopler fra strømledningen, skal du alltid dra i støpslet. Dra aldri i ledningen.
- Før du kopler til strømledningen, må du forsikre deg om at du har gjort alle andre tilkoplinger.
Bruk av hovedstrøm
natural_image
Line drawing of a portable electronic device with multiple cylindrical batteries and control panel (no text or symbols)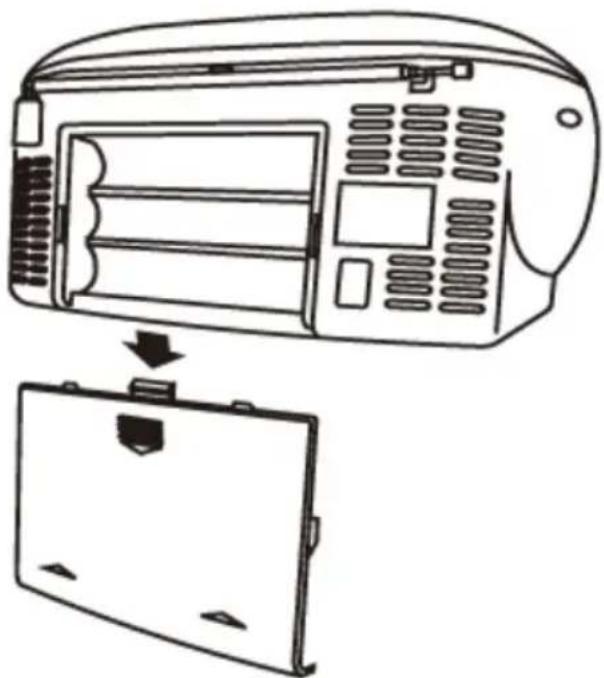
natural_image
Line drawing of a portable air conditioner unit with a close-up of its internal panel (no text or symbols)Automatisk standby
2. Fabrikkinnstilling
flowchart
graph LR
    A["FM<br><Scan setting>"] --> B["Scan setting* <br><All station>"]
    C["..."] --> D["Scan setting* <br><Strong station>"]
- Lydinnstilling
2.1. Stereo tillatt:

2.2. Tvunget mono
flowchart
graph LR
    A["FM\n<Audio setting>"] --> B["Audio setting*\n<Stereo allowed>"]
    A --> C["Audio setting*\n<Forced mono >"]
2.3. System (FM-system), samme innstilling for DAB-system.
- FORHÅNDSINNSTILLING:
BELGIQUE, customerservice@bigben-interactive.be
NEDERLAND, customerservice@bigben-interactive.nl
ESPANA, sat@bigbeninteractive.es
ITALIA, support@bigbeninteractive.it
www.bigben.eu
THOMSON
RK200DABCD
RK203DABCD
DAB/FM/CD/KAZETOVÁ MECHANIKA/AUDIO IN

NÁVOD K POUŽITÍ
PŘED POUŽITÍM SI PEČLIVĚ PŘEČTĚTE TUTO UŽIVATELSKOU
PŘÍRUČKU A USCHOVEJTE JI PRO
POZDĚJŠÍ POUŽITÍ.
Obsah
Začínáme 1
| MATERIÁL TRÍDY II | |
| STEJNOSMĚRNÝ PROUD | |
| STŘÍDAVÝ PROUD | |
| POUZE PRO VNITŘNÍ POUŽITÍ |
natural_image
Line drawing of a portable electronic device with multiple cylindrical batteries and control panel (no text or symbols)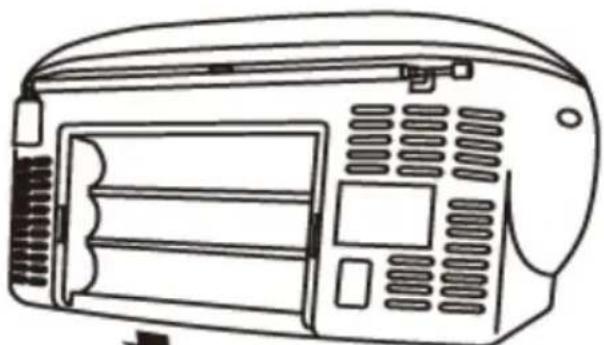
natural_image
Line drawing of a portable electronic device with front panel and control panel (no text or symbols)
natural_image
Simple line drawing of a rectangular device with a downward arrow and mounting bracket (no text or symbols)1.2. Pouze silné stanice: \~ 19 dB,
flowchart
graph LR
    A["FM <Scan setting>"] --> B["Scan setting* <All station>"]
    A --> C["Scan setting* <Strong station>"]
- Nastavení zvuku
2.2. Vynucené mono
flowchart
graph LR
    A["FM\n<Audio setting>"] --> B["Audio setting*\n<Stereo allowed>"]
    A --> C["Audio setting*\n<Forced mono >"]
BELGIQUE, customerservice@bigben-interactive.be
NEDERLAND, customerservice@bigben-interactive.nl
ESPANA, sat@bigbeninteractive.es
ITALIA, support@bigbeninteractive.it
www.bigben.eu
THOMSON
RK200DABCD
RK203DABCD
DAB/FM/CD/CASSETTE/AUDIO IN

HASZNÁLATI ÚTMUTATÓ
KÉRJÜK, A KÉSZÜLÉK MÜKÖDTETÉSE ELÖTT OLVASSA EL FIGYELMESEN EZT AZ ÚTMUTATÓT, ÉS ÖRIZZE MEG KÉSÖBBI TÁJÉKOZÓDÁS CÉLJÁBÓL
Tartalomjegyzék
Első lépések 1
| II. OSZTÁLYÚ ANYAG | |
| EGYENÁRAM | |
| VÁLTAKOZÓ ÁRAM | |
| CSAK BELTÉRI HASZNÁLATRA |
natural_image
Line drawing of a portable electronic device with multiple batteries and control panel (no text or symbols)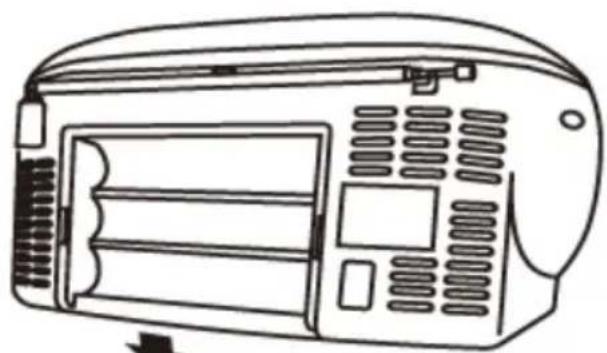
natural_image
Line drawing of a portable air conditioner unit with control panel and buttons (no text or symbols)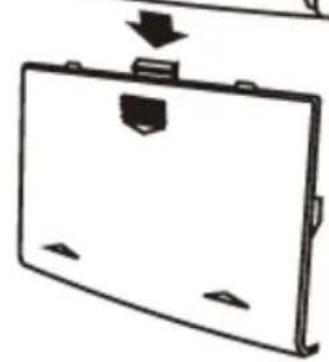
natural_image
Simple line drawing of a rectangular device with a handle and mounting bracket, no text or symbols present.Auto standby
flowchart
graph LR
    A["FM\n<Audio setting>"] --> B["Audio setting*\n<Stereo allowed>"]
    A --> C["Audio setting*\n<Forced mono >"]
BELGIQUE, customerservice@bigben-interactive.be
NEDERLAND, customerservice@bigben-interactive.nl
ESPAÑA, sat@bigbeninteractive.es
ITALIA, support@bigbeninteractive.it
www.bigben.eu
THOMSON
RK200DABCD
RK203DABCD
DAB/FM/CD/MAGNETOFON/AUDIO IN

INSTRUKCJA OBSŁUGI
PRZED UŻYCIEM URZĄDZENIA NALEŻY UWAŻNIE PRZECZYTAĆ NINIEJSZĄ INSTRUKCJĘ OBSŁUGI. INSTRUKCJĘ NALEŻY ZACHOWAĆ NA PRZYSZŁOŚĆ.
Spis treści
Pierwsze kroki 1
| MATERIAL KLASY II | |
| PRĄD STAŁY | |
| PRĄD PRZEMIENNY | |
| TYLKO DO UŻYTKU W POMIESZ-CZENIACH |
natural_image
Line drawing of a portable electronic device with attached cable and ports, no text or symbols presentnatural_image
Line drawing of a portable electronic device with multiple cylindrical batteries and control panel (no text or symbols)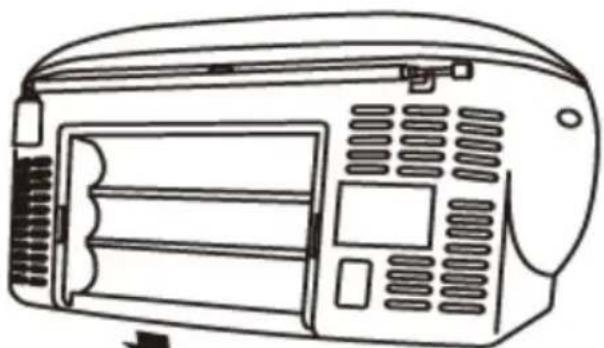
natural_image
Line drawing of a portable air conditioner unit with control panel and buttons (no text or symbols)
natural_image
Simple line drawing of a rectangular device with mounting holes and a small inset showing a black clip (no text or symbols)flowchart
graph LR
    A["FM<br><Scan setting>"] --> B["Scan setting*<br><All station>"]
    A --> C["Scan setting*<br><Strong station>"]
- Nastawianie audio
2.1. Stereo dozwolone:

2.2. Mono wymuszone
flowchart
graph LR
    A["FM<br><Audio setting>"] --> B["Audio setting*"]
    B --> C["<Stereo allowed>"]
    A --> D["Audio setting*"]
    D --> E["<Forced mono >"]
BELGIQUE, customerservice@bigben-interactive.be
NEDERLAND, customerservice@bigben-interactive.nl
ESPAÑA, sat@bigbeninteractive.es
ITALIA, support@bigbeninteractive.it
www.bigben.eu