GR70 - Grill plate H.KOENIG - Free user manual and instructions
Find the device manual for free GR70 H.KOENIG in PDF.
User questions about GR70 H.KOENIG
0 question about this device. Answer the ones you know or ask your own.
Ask a new question about this device
Download the instructions for your Grill plate in PDF format for free! Find your manual GR70 - H.KOENIG and take your electronic device back in hand. On this page are published all the documents necessary for the use of your device. GR70 by H.KOENIG.
USER MANUAL GR70 H.KOENIG
When using electrical products, always follow basic safety precautions, including the following:
READ ALL INSTRUCTIONS BEFORE USE.
WARNING - To reduce the risk of fire, electric shock, or serious personal injury:
1.Use only on AC 220-240 Volt, 50 / 60Hz . Use only for household.
2. Do not touch hot surfaces. Use the Handle.
3. Do not immerse the Power Cord, Plug, or Base in water/liquid.
4. Unplug the Power Cord from the electrical outlet when the product is not in use and before cleaning it. Allow to cool before putting on or taking off parts.
5. Do not use attachments not recommended for use with this product by the product manufacturer. Attachments may become hot during use, so allow them to cool before handling.
6. Do not place the product on or near a hot gas or electric burner, or in a heated oven.
7. Use extreme caution when moving a product containing hot oil or other hot liquids.
8. Do not leave unattended while in use.
9. Do not plug or unplug the product into/from an electrical outlet with a wet hand.
10. Take proper precautions to prevent the risk of burns, fire, or other personal or property damage, as this product generates heat during use.
11. If the product falls into water, immediately unplug it from the electrical outlet.
-
Do not touch or reach into the water.
-
Use in a well-ventilated area. Keep at least 4-6 inches of space on all sides to allow adequate air circulation.
-
Do not operate this appliance if it has a damaged cord or plug, if it is not working properly or if it has been damaged or dropped. If the supply cord is damaged, it must be replaced by the manufacturer or its service agent or a similarly qualified person in order to avoid a hazard.
-
This product has no user-serviceable parts. Do not attempt to examine or repair it yourself. Only qualified service personnel should perform any servicing; take the product to the appliance repair shop of your choice for inspection and repair.
-
This appliance may be used by persons with reduced physical, sensory or mental capabilities or lack of experience or knowledge, provided that they are supervised or instructed in the safe use of the appliance and that they fully understand the potential hazards.
-
Keep the appliance and its cord out of reach of children less than 8 years.
-
This appliance is not intended to be operated by means of external timer or separate remote-control system.
-
Caution, hot surface. 5041(2002-10)].

symbol IEC 60417-
-
This appliance may be used by children of at least 8 years of age, as long as they are supervised and have been given instructions about using the appliance safely and are fully aware of the dangers involved.
-
Cleaning and maintenance should not be carried out by children unless they are at least 8 years of age and are supervised by an adult.
-
When using electrical equipment, safety precautions must always be taken to prevent the risk of fire, electric shock and/or injury in the event of misuse.
-
Your appliance has been designed for household use only. It was not designed to be used in the following cases which are not covered by the warranty:
-
in kitchen areas reserved for staff in shops, offices and other professional environments,
-in farm inns, - by customers of hotels, motels and other residential environments,
- in bed and breakfast type environments.
CAUTION - To reduce the risk of personal injury:
- This product is intended solely for indoor, non-commercial, non-industrial, household use in cooking/heating food for human consumption. Do not use the product outdoors or for any other purpose.
- Do not allow the Power Cord to hang where it may be tripped over or pulled (e.g., over the edge of a table or counter), and do not allow the Cord to touch hot surfaces.
- Always wear protective oven mitts or heat-resistant gloves when using this product and use utensils.
- To disconnect from the electrical outlet, pull directly on the Plug; do not pull on the Power Cord.
- Always use the product on a flat, level, stable, heat-resistant surface.
SPECIAL INSTRUCTIONS:
-
A short power-supply cord is provided to reduce the risk resulting from becoming entangled in or tripping over a longer cord. Extension cords are available and may be used if care is exercised in their use. If an extension cord is used:
-
The marked electrical rating of the extension cord must be at least as great as that of the product;
-
The cord should be arranged so that it will not drape over the countertop or tabletop where it can be pulled on by children or tripped over unintentionally;
- The extension cord must be a grounding-type 3-wire cord.
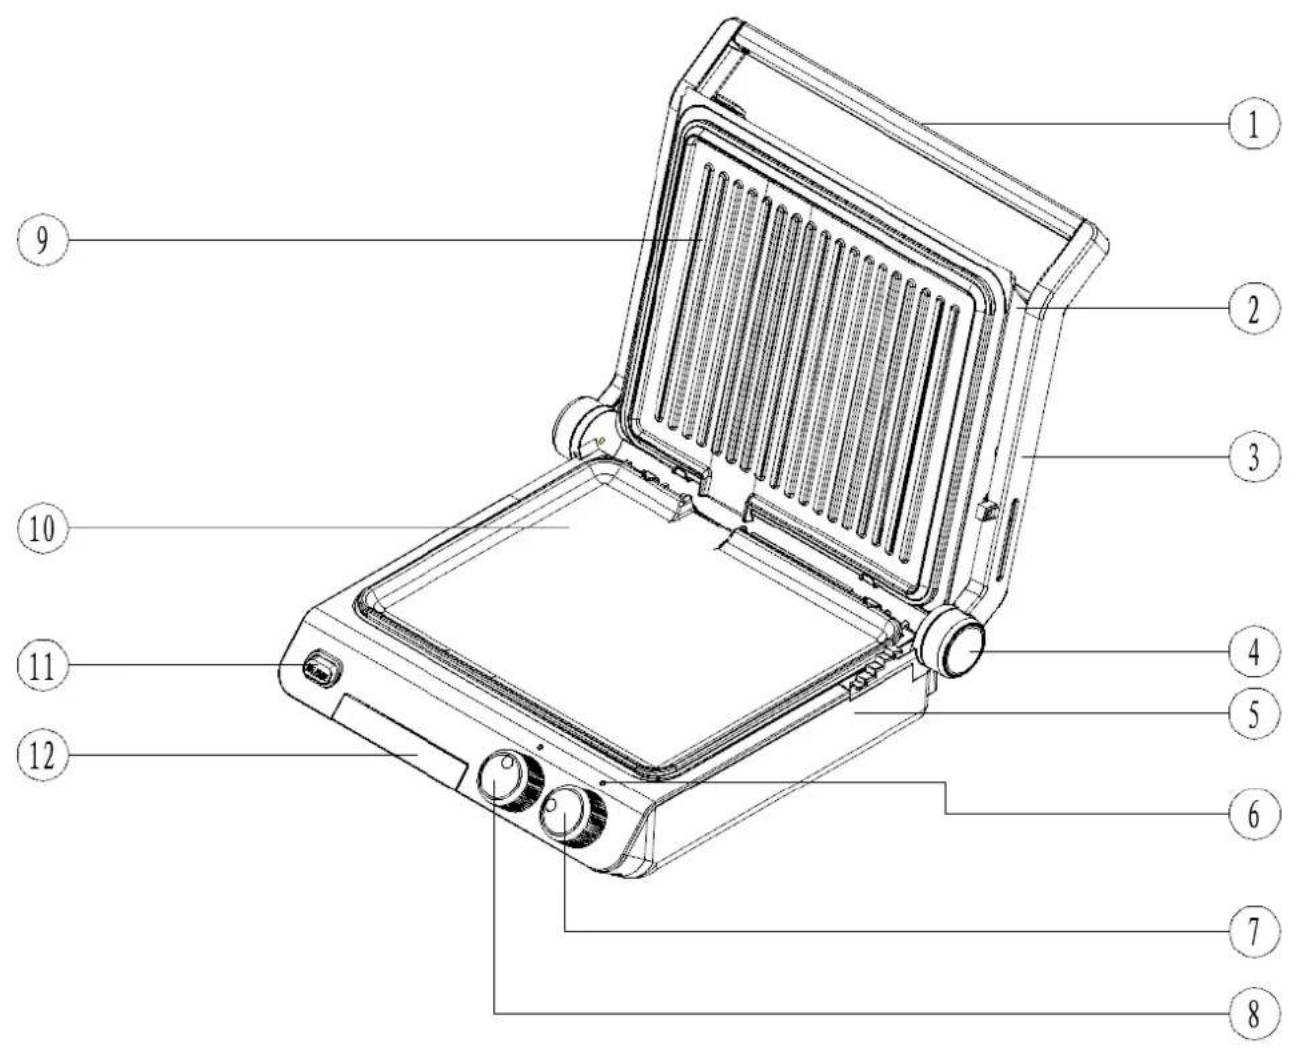
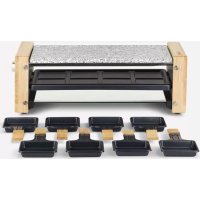
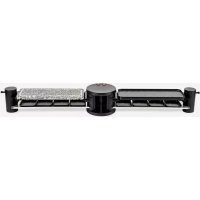
PARTS IDENTIFICATION
- handle
- Timer knob
- Upper cover
- Upper grill
- Handle right
- Lower grill
- Handle cover plate
- button
- Base
- Oil plate
- Led cover
- Thermostat knob
BEFORE FIRST USE
Press the Upper Plate Release Button to remove the upper Grill Plate and then press the Lower Plate Release Button to remove the lower Grill Plate. Clean the Grill Plates, the Drip Cups, and the Scaper/Cleaning Tool in warm, soapy water; rinse and let dry. These parts may also be washed in an automatic dishwasher. NEVER IMMERSE THE BASE INTO OR EXPOSE IT TO WATER. Reinsert the upper and lower Grill Plates into their respective positions before use. See the "Inserting/Changing Plates" subsection below for detailed instructions.
NOTE: When using the Grill Plates for the first time, spray or apply a thin layer of cooking oil onto the nonstick surfaces of the Plates with a paper towel in order to season the nonstick surface. As necessary, reapply a thin layer of cooking oil throughout the life of the Plates to maintain best nonstick performance.
To Assemble
Place the product on a clean, flat, level, stable, heat-resistant surface with at least 4-6 inches of space on all sides to allow adequate air circulation.
Positioning the Upper Housing:
- Closed/Heating Position: The Upper Housing is closed and rests on the Base. Use this position when starting/heating the product and when grilling most foods.
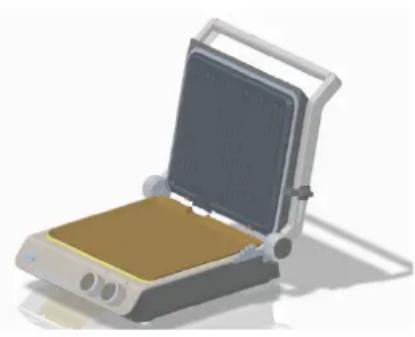
- Open Position: The Upper Housing is open. Place the Product in this position when starting to use the Grill function, and when grilling certain foods in which the upper Grill Plate is not appropriate, such as pizza or fish. Lift the Handle until the Upper Housing is at about a 90^ angle.
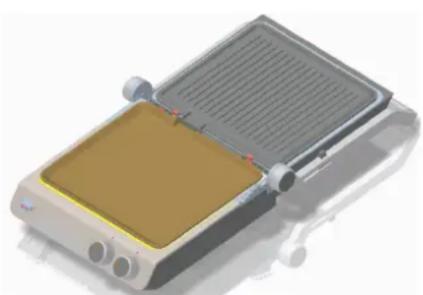
- Flat Position: The
Upper Housing is open and level with the Base, creating two cookingsurfaces.
Use the product in this position when grilling larger amounts of food.
To flatten, pull upon the Hinge Release and push the Handle down.
Inserting/Changing Plates:
Slide the notches in the rear of the lower Grill Plate into the retaining hooks, then press down on the front of the plate to snap it into place. Repeat to attach the upper Grill Plate.
HOW TO USE
WARNING: The Grill Plates and metal surfaces of the Upper Housing and Handle will become very hot during use. To avoid a burn hazard, wear protective oven mitts or heat-resistant gloves when using and touch only the black portion of the Handle.
NOTICE: Use only heat-resistant wooden, plastic, or silicone utensils to add/remove food. Do not use a metal utensil as it may scratch the surface of the item.
NOTE: During the initial use this item may emit some light smoke. This is normal and will subside with further use.
Contact Grill:
Use to cook burgers, boneless or thin pieces of meat and fish, and vegetables. In the "Closed" position, food will cook quickly since both sides cook at the same time.
- Set the product to the "Closed" position and plug the power cord into a standard electrical outlet. The Power Indicator will illuminate red, indicating power is on.
- Place a Drip Cup below the drip spout.
- Turn the Temperature Control to the desired setting, as listed below
| Setting | Temperature |
| min | close |
| max | 425°F(230°C) |
NOTE: It may take up to seven minutes to reach the selected cooking temperature. The Ready Indicator will illuminate green when the product is ready for cooking and will alternate on and off during cooking, indicating the product is maintaining the selected cooking temperature.
- Place food onto the lower Grill Plate and lower the upper Grill Plate onto the food (the "Closed" position). The upper Grill Plate will self-adjust to the thickness of the food. If cooking items in which the upper Grill Plate is not needed, such as kebabs or fish, leave the product in the "Open" position.
NOTE: If cooking more than one piece of food at a time, food items should be similar in thickness to ensure the upper Grill Plate rests evenly on the food for even cooking.
- When cooking is completed, remove food, unplug the product from the electrical outlet, and allow the product to cool (at least 30 minutes) before moving, disassembling, or cleaning it.
CAUTION: Always unplug the product from the electrical outlet when cooking is complete and when the product is not in use.
Panini Press:
Use upper and lower Grill Plates in the "Closed" position to grill any combination of ingredients (for example, vegetables, meats, and cheeses) layered between two pieces of bread or a folded tortilla/pita.
- Follow steps 1 through 3 in the "Contact Grill" section, above.
- Place food on the Lower Grill Plate and lower the upper Grill Plate onto the food. The Upper Housing will self-adjust to the thickness of the food.
NOTE: If cooking more than one piece of food at a time, food items should be similar in thickness to ensure the upper Grill Plate rests evenly on the food for even cooking.
- When cooking is completed, remove food, unplug the product from the electrical outlet, and allow the product to cool (about 30 minutes) before moving, disassembling, or cleaning it.
CAUTION: Always unplug the product from the electrical outlet when cooking is complete and when the product is not in use.
Flat Grill:
Using the product in the "Flat" position doubles the cooking surface area and allows cooking of items with different thicknesses simultaneously, or cooking foods on different plates to avoid combining flavors. Use for cooking French toast, hash browns, open face sandwiches, and kebabs.
- Set the product to the "Flat" position and plug the power cord into a standard electrical outlet. The Power Indicator will illuminate red, indicating power is on.
- Use both Drip Cups when cooking in the Flat position.
- Turn the Temperature Control to the desired setting.
NOTE: It may take up to eight minutes to reach the selected cooking temperature. The Ready indicator will illuminate green when the product is ready for cooking. The Ready indicator will alternate on and off during cooking, indicating the product is heating to maintain the selected cooking temperature.
- Place food onto the Grill Plates.
- When cooking is completed, remove food, unplug the product from the electrical outlet, and allow the product to cool (about 30 minutes) before moving, disassembling, or cleaning it.
CAUTION: Always unplug the product from the electrical outlet when cooking is complete and when the product is not in use.
CLEANING AND CARE
WARNING: Always make sure the product is unplugged from the electrical outlet and allowed to completely cool before relocating, disassembling, or cleaning it.
NOTICE: Do not use harsh or abrasive cleaners or pads to clean the product.
- After completely cooling, gently remove the Drip Cups and discard contents.
- Remove any leftover food from the Grill Plates using the Scaper/Cleaning Tool.
- Clean the Grill Plates, Drip Cups, and Scraper/Cleaning Too in warm, soapy water, rinse and let dry. These parts may also be washed in an automatic dishwasher.
WARNING: Do not immerse the Base into or expose it to water or other liquids.
- Wipe the Upper Housing and Base with a water-dampened sponge and dry with a soft cloth or paper towel.
- Store the product in a cool, dry location.
WARRANTY
The warranty period for our products is 2 years, unless otherwise stated, starting from the date of initial purchase or the date of delivery.
If you have any problems or questions, you can easily access our help pages, troubleshooting tips, FAQ, and user manuals on our service site: https://sav.hkoenig.com.
By typing the reference name of your device in the search bar, you can access all available online support, designed to best meet your needs.
If you still cannot find an answer to your question or problem, then click on "Did the answer solve your problem?" This will direct you to the Customer Support Request Form, which you can fill out to validate your request and get help.
WARRANTY CONDITIONS
The warranty covers all failures occurring under normal use, in accordance with the usage and specifications in the user's manual.
This warranty does not apply to packaging or transportation problems during shipment of the product by the owner. It also does not include normal wear and tear of the product, nor maintenance or replacement of consumable parts.
EXCLUSION OF WARRANTY
- Accessories and wearing parts () .
- Normal maintenance of the device.
- All breakdowns resulting from improper use (shocks, failure to comply with power supply recommendations, poor conditions of use, etc.), insufficient maintenance or misuse of the device, as well as the use of unsuitable accessories.
- Damage of external origin: fire, water damage, electrical surge, etc.
- Any equipment that has been disassembled, even partially, by persons other than those authorized to do so (notably the user).
- The products whose serial number would be missing, deteriorated or illegible that would not allow its identification.
- The products subjected to leasing, demonstration, or exhibition.
(*) Some parts of your device, called wear parts or consumables, deteriorate with time and frequency of use of your device. This wear and tear are normal but can be accentuated by poor conditions of use or maintenance of your device. These parts are therefore not covered by the warranty.
The accessories supplied with the device are also excluded from the warranty. They cannot be exchanged or refunded. However, some accessories can be purchased directly through our website: https://say.hkoeniq.com/.
ENVIRONMENT
CAUTION:
Do not dispose of this product as it has with other household products. There is a separation of this
waste product into communities, you will need to inform your local authorities about the places where
you can return this product. In fact, electrical and electronic products contain hazardous substances that
have harmful effects on the environment or human health and should be recycled. The symbol here indicates that electrical and electronic equipment should be chosen carefully, a wheeled waste container is marked with a cross.
Adeva SAS / H.Koenig Europe - 8 rue Marc Seguin, 77290 Mitry-Mory, France
www.hkoenig.com - https://en.hkoenig.com - Tél: +33 1 64 67 00 05