
GAS 1225 Professional - Vacuum Cleaner BOSCH - Free user manual and instructions
Find the device manual for free GAS 1225 Professional BOSCH in PDF.
| Product type | Wet and dry vacuum cleaner |
| Brand | Bosch |
| Model | GAS 1225 Professional |
| Nominal power input | 1250 W |
| Frequency | 50-60 Hz |
| Gross tank capacity | 25 L |
| Net capacity (liquids) | 15 L |
| Dust bag volume | 20 L |
| Max. vacuum pressure | 19 kPa |
| Max. flow rate | 36 L/s |
| Weight according to EPTA 01:2014 | 8.6 kg |
| Protection rating | IPX4 |
| Protection class | II |
| Sound pressure level | 76 dB(A) |
| Dry vacuuming function | Yes |
| Wet vacuuming function | Yes (with liquid filter) |
| Blowing function | Yes |
| Automatic start/stop | Yes (PL model) |
| L filtration class | For dusts > 1 mg/m³ |
| Filter cleaning system | Semi-automatic cleaning |
| Automatic shut-off for liquids | By float |
| Included accessories | Suction hose, straight nozzle, floor nozzle, sealing lips, pre-filter, main filter, liquid filter |
| After-sales service | Bosch: spare parts and repairs |
Frequently Asked Questions - GAS 1225 Professional BOSCH
User questions about GAS 1225 Professional BOSCH
0 question about this device. Answer the ones you know or ask your own.
Ask a new question about this device
Download the instructions for your Vacuum Cleaner in PDF format for free! Find your manual GAS 1225 Professional - BOSCH and take your electronic device back in hand. On this page are published all the documents necessary for the use of your device. GAS 1225 Professional by BOSCH.
USER MANUAL GAS 1225 Professional BOSCH
Safety information for vacuum cleaners
Read all the safety information and instructions. Failure to observe the safety information and follow instructions may result in electric shock, fire and/or serious injury.
Save all warnings and instructions for future reference.
This vacuum cleaner is not intended for use by children or persons with physical, sensory or mental impairments. It should not be used by persons who have insufficient experience and knowledge. Otherwise, there is a risk of operating errors and injuries.
Supervise children. This will ensure that children do not play with the vacuum cleaner.
Comply with all safety provisions for the substances being extracted.
Do not vacuum beech or oak wood dust, rock dust or asbestos. These substances are considered carcinogenic.
WARNING
Only use the vacuum cleaner if you have been adequately informed
about the use of the equipment, the substances to be vacuumed and how to dispose of these safely. Thorough instruction on how to use the equipment prevents accidental misuse and injuries.
WARNING
The vacuum cleaner is suitable for vacuuming dry substances, and
can also be used to vacuum liquids when taking appropriate measures. The penetration of liquids increases the risk of an electric shock.
- Do not use the vacuum cleaner to vacuum combustible or explosive liquids, such as petrol, oil, alcohol or solvents. Do not vacuum hot, burning or explosive dust. Do not operate the vacuum cleaner in areas subject to explosion hazards. Dust, vapours and liquids can ignite or explode.
WARNING
Only use the socket for the purpose stipulated in the operating
manual.
WARNING
If you notice a foam or water leak, switch off the vacuum cleaner im
mediately and empty the container. Otherwise, the vacuum cleaner can become damaged.
NOTE: The vacuum cleaner must only be stored indoors.
NOTE: Clean the float regularly and check whether it is damaged. Otherwise, the equipment may not function properly.
If operating the vacuum cleaner in a damp location is unavoidable, use a residual current device (RCD). Use of an RCD reduces the risk of electric shock.
Always check the vacuum cleaner, cable and plug before use. Do not use the vacuum cleaner if you discover any damage. Do not open the vacuum cleaner yourself. It should be repaired exclusively by a qualified professional using only genuine spare parts. Damaged vacuum cleaners, cables and plugs increase the risk of electric shock.
- Do not crush the cable or run the device over it. Do not pull on the power cable to pull the plug out of the socket or to move the vacuum cleaner. Damaged cables increase the risk of an electric shock.
Pull the plug out of the socket before cleaning or performing maintenance on the vacuum cleaner, making tool adjustments, changing accessories or putting away the vacuum cleaner. This safety measure prevents the vacuum cleaner from being started accidentally.
Ensure that the workplace is well ventilated.
The vacuum cleaner should be repaired exclusively by a qualified professional using only genuine spare parts. This will ensure that the safety of the vacuum cleaner is maintained.
WARNING
The dust extractor contains dust particles that pose a risk to health.
Emptying and maintenance procedures, including the disposal of dust containers, should only be carried out by professionals. Suitable protective equipment is required. Do not operate the vacuum cleaner unless the complete filter system is correctly inserted. Otherwise, you are putting your health at risk.
Before using the equipment for the first time, check that the vacuum hose is in perfect condition. Leave the vacuum hose fitted to the vacuum cleaner while doing this so that no dust escapes accidentally. Otherwise, you may end up inhaling dust particles.
Do not sit on the vacuum cleaner. You can damage the vacuum cleaner this way.
Take care when using the power cable and the vacuum hose. Improper use of these can put other people at risk.
Do not clean the vacuum cleaner by spraying a jet of water directly at it. Water entering the top of the vacuum cleaner will increase the risk of electric shock.
Do not modify or open the battery. There is a risk of short-circuiting.
In case of damage and improper use of the battery, vapours may be emitted. The battery can set alight or explode. Ensure the area is well ventilated and seek medical
attention should you experience any adverse effects. The vapours may irritate the respiratory system.
If used incorrectly or if the battery is damaged, flammable liquid may be ejected from the battery. Contact with this liquid should be avoided. If contact accidentally occurs, rinse off with water. If the liquid comes into contact with your eyes, seek additional medical attention. Liquid ejected from the battery may cause irritation or burns.
The battery can be damaged by pointed objects such as nails or screwdrivers or by force applied externally. An internal short circuit may occur, causing the battery to burn, smoke, explode or overheat.
When the battery is not in use, keep it away from paper clips, coins, keys, nails, screws or other small metal objects that could make a connection from one terminal to another. A short circuit between the battery terminals may cause burns or a fire.
This is the only way in which you can protect the battery against dangerous overload.
Only charge the batteries using chargers recommended by the manufacturer. A charger that is suitable for one type of battery may pose a fire risk when used with a different battery.
Protect the battery against heat, e.g. against continuous intense sunlight, fire, dirt, water and moisture. There is a risk of explosion and short-circuiting.

Protect the vacuum cleaner against heat, e.g. against continuous intense sunlight, fire, water, and moisture. There is a risk of
explosion.
Connect the dust extractor to a properly earthed power supply system. The plug socket and extension cable must have a fully functioning protective conductor.
Products sold in GB only:
Your product is fitted with an BS 1363/A approved electric plug with internal fuse (ASTA approved to BS 1362).
If the plug is not suitable for your socket outlets, it should be cut off and an appropriate plug fitted in its place by an authorised customer service agent. The replacement plug should have the same fuse rating as the original plug.
The severed plug must be disposed of to avoid a possible shock hazard and should never be inserted into a mains socket elsewhere.
Symbols
The following symbols may provide you with important information pertaining to the use of your dust extractor. Please take note of these symbols and their meaning. Knowing what these symbols mean will help you to use your extractor more effectively and more safely.
Symbols and their meaning


WARNING! Read all the safety and general instructions. Failure to observe the safety and general instructions may result in electric shock, fire and/or serious injury.
GAS 12-25 PL: Dust extractor from dust class L in accordance with IEC/EN 60335-2-69 for the dry extraction of harmful dusts with an exposure limit of >1mg / m^3
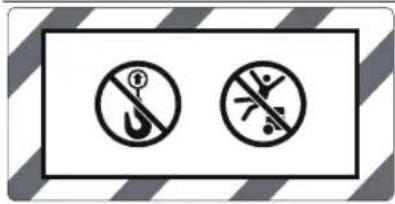

Do not hang the dust extractor on a crane hook, e.g. in order to transport it. The dust extractor is not suitable for moving with a crane. There is a risk of injury and damage if you do this.
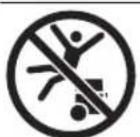
Do not sit or stand on the dust extractor. The dust extractor may tip over and become damaged if you do this. This poses a risk of injury.

GAS 12-25
Off

Switching Off
Extraction
Extracting dust deposits

GAS 12-25 PL
中
Automatic start/stop
Extracting dust that accumulates from working power tools
The dust extractor switches on automatically and off again with a time delay
0

Switching Off
Extraction
Extracting dust deposits
0
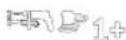
Permitted connected load of the connected power tool (country-specific)
10 | English
Product Description and Specifications
Please observe the illustrations at the beginning of this operating manual.
Intended Use
The tool is intended for collecting, vacuuming, conveying and separating non-flammable dry dust types, non-flammable liquids and a mixture of water and air. It is suitable for the increased demands in professional use, e.g. in trade, industry and workshops, as well as for household/domestic use.
GAS 12-25 PL:
The dust extraction capability of the dust extractor has been tested and corresponds to dust class L.
Dust extractors from dust class L in accordance with IEC/EN 60335-2-69 may only be used to vacuum and extract harmful dust with an exposure limit of >1mg / m^3
Only use the dust extractor if you can fully evaluate all functions and carry them out without restrictions, or if you have received corresponding instructions.
Product features
The numbering of the product features refers to the representation of the vacuum cleaner on the graphic pages.
(1) On/off switch (GAS 12-25)
(1) Mode selector switch (GAS 12-25 PL)
(2) Socket for power tool (GAS 12-25 PL)
(3) Hose connection piece (dust extraction function)
(4) Pull strap
(5) Castor brake
(6) Castor
(7) Container
(8) Wheel
(9) Catch for top part of dust extractor
(10) Top part of dust extractor
(11) Holder for vacuum hose
(12) Carrying handle
(13) Hose connection piece (blowing function)
(14) Holder for suction tubes
(15) Vacuum hose
(16) Extraction adapter (GAS 12-25 PL)
(17) Curved nozzle
(18) Crevice nozzle
(19) Plastic bag/dust baga
(20) Main filter
(21) Wet filter
(22) Pre-filter
(23) Rubber lip
(24) Brush inserts
(25) Floor nozzle
(26) Suction tube
(27) Snap fastener
(28) Pre-filter handle
(29) Filter holder
(30) Filter basket
(31) Intake port
(32) Clips for securing the plastic bag
(33) False air intake
(34) Blowing hose
a) This accessory is not part of the standard scope of delivery.
Technical data
| Wet/dry dust extractor GAS 12-25 GAS 12-25 GAS 12-25 PL | ||||
| Article number | 3601 J7C 0.. 3601 J7C 0C. 3601 J7C 1.. | |||
| Rated power input W 1250 1000 1250 | ||||
| Frequency Hz 50-60 50-60 50-60 | ||||
| Container volume (gross) I 25 25 25 | ||||
| Net volume (liquid) I 15 15 15 | ||||
| Dust bag volume I 20 20 20 | ||||
| Max. vacuumA) | ||||
| -Dust extractor | kPa 19 17 19 | |||
| -Turbine | kPa 20 19 20 | |||
| Max. flow rateA) | ||||
| -Dust extractor l/s 36 33 36 | ||||
| -Turbine | l/s 65 60 65 | |||
| Automatic start/stop | - | - | ● | |
| Weight according to EPTA-Procedure 01:2014 | kg | 8.6 | 8.6 | 9 |
Protection rating IPX4 IPX4 IPX4
A) Measured using a vacuum hose 3 m long and 35 mm in diameter
The specifications apply to a rated voltage [U] of 230 V. These specifications may vary at different voltages and in country-specific models.
Values can vary depending on the product, scope of application and environmental conditions. To find out more, visit www.bosch-professional.com/wac.
Automatic start/stop
3601J7C... Rated voltage Maximum power Minimum power
1L0240V1700W100W
1K0/100/1E0/1HO220-230V2050W100W
1F0/180/1NO220V950W100W
Permitted connected load of the connected power tool.
These values can differ for other country-specific models. Please take note of the information on the socket of the dust extractor.
Noise/Vibration Information
Noise emission values determined according to EN 60335-2-69.
Typically the A-weighted sound pressure level of the dust extractor is 76 dB(A). Uncertainty K = 3 dB. The noise level when working can exceed the volume stated. Wear hearing protection!
Vibration total values a_i (triax vector sum) and uncertainty K determined according to EN 60335-2-69:
a_h < 2.5m / s^2,K = 1.5m / s^2.
Assembly
Pull the plug out of the socket before cleaning or performing maintenance on the vacuum cleaner, making tool adjustments, changing accessories or putting away the vacuum cleaner. This safety measure prevents the vacuum cleaner from being started accidentally.
- Remove the battery before cleaning or performing maintenance on the dust extractor, making tool adjustments, changing accessories or placing the dust extractor in storage. This safety measure prevents the dust extractor from being started accidentally.
Fitting the vacuuming accessories (see figure A)
The vacuum hose (15) is equipped with a clip system which can be used to connect vacuuming accessories (dust extraction adapter (16), curved nozzle (17)).
Fitting the nozzles and tubes
-
Push the curved nozzle (17) onto the vacuum hose (15) until you hear both snap fasteners (27) on the vacuum hose engage.
-
Then attach the required extraction accessory (floor nozzle, crevice nozzle, suction tube, etc.) firmly to the curved nozzle (17).
- To remove the accessory, press the snap fasteners (27) inwards and pull apart the components.
Fitting the dust extraction adapter (GAS 12-25 PL)
Push the dust extraction adapter (16) onto the vacuum hose (15) until you hear both snap fasteners (27) on the vacuum hose engage.
- To remove the adapter, press the snap fasteners (27) inwards and pull apart the components.
Fitting the vacuum hose
Vacuuming function (see figure B1)
Push the vacuum hose (15) into the hose connection piece (3) and turn it as far as possible in the direction of rotation.
Note: The friction generated by the dust in the vacuum hose and accessory during extraction causes an electrostatic charge that the user may experience as static discharge (depending on environmental factors and their physiological state).
Bosch generally recommends using an anti-static vacuum hose (accessory) to vacuum up fine dust and dry materials.
Blowing function (see figure B2)
The vacuum cleaner has a blowing function. Do not blow exhaust air out into the open air. Only use the blowing function with a clean hose. Dust can be hazardous to health.
For the blowing function, only insert the blowing hose (34) (accessory) with the appropriate attachment, as illustrated here. The vacuum hose supplied must not be used for blowing.
12 | English
- Switch on the vacuum cleaner for at least 5 seconds (GAS 12-25: On/off switch (1) to "on"; GAS 12-25 PL: Mode selector switch (1) to the "vacuuming" symbol) to clean the vacuum hose (15) of dust deposits.
- Turn the vacuum hose (15) as far as possible in the direction of rotation and pull it out of the hose connection piece (3).
- Push the blowing hose (34) into the hose connection piece (13) and turn it as far as possible in the direction of rotation
Removing/Inserting the Pre-filter
The pre-filter (22) prevents coarse dirt from getting through and consequently extends the lifetime of the main filter. The pre-filter must be removed from the container if you intend to clean the main filter.
Grasp the pre-filter (22) by the handle (28) for easy removal.
Removing the Pre-filter (see figure D1)
- Open the catches (9) and remove the top part of the vacuum cleaner (10) (see figure C).
Take the pre-filter (22) out of the container (7) by its handle (28).
Inserting the Pre-filter (see figure D2)
- Insert the pre-filter (22) in the container (7), making sure that the arrow is pointing towards the hose connection piece (3).
Put the top part of the vacuum cleaner (10) on and close the catches (9).
Removing/Inserting the Main Filter
Removing the Main Filter (see figure E1)
- Open the catches (9) and remove the top part of the vacuum cleaner (10) (see figure C).
Turn the filter holder (29) as far as possible in the direction of rotation and take the filter holder, together with the main filter (20), out of the top part of the vacuum cleaner (10).
Inserting the Main Filter (see figure E2)
- Place the filter holder (29), together with the main filter (20), over the filter basket (30) and turn the filter holder (29) as far as possible in the direction of rotation
Put the top part of the vacuum cleaner (10) on and close the catches (9).
Note: Ensure that the filter is always fitted correctly. This is particularly important when vacuuming hazardous dust.
Removing/Inserting the Wet Filter
To make disposal easier when vacuuming water-solid mixtures, the vacuum cleaner has a wet filter (21) that separates the liquid from the solids.
Removing the wet filter (see figure F1)
- Open the catches (9) and remove the top part of the vacuum cleaner (10) (see figure C).
Turn the filter holder (29) as far as possible in the direction of rotation and take the filter holder, together with the main filter (20), out of the top part of the dust extractor (10). - Pull the wet filter (21) out of the filter basket (30).
Inserting the wet filter (see figure F2)
- Place the wet filter (21) completely over the filter basket (30).
Put the top part of the vacuum cleaner (10) on and close the catches (9).
Inserting/removing the plastic bag or dust bag (dry vacuuming)
For dry vacuuming, you can insert a plastic bag (19) or a dust bag (accessory) into the container (7). This makes it easier to dispose of coarse dirt.
Inserting the plastic bag (see figures G1-G3)
- Open the catches (9) and remove the top part of the vacuum cleaner (10) (see figure C).
Take the pre-filter (22) out of the container (7) by its handle (28). - Insert the plastic bag (19) into the container (7) with the inlet facing upwards. Secure the plastic bag under the suction hole (31) using the clips (32).
- Make sure that the plastic bag (19) touches all the inside walls of the container (7).
- Fold the rest of the plastic bag (19) over the edge of the container (7).
- Insert the pre-filter (22) in the container (7), making sure that the arrow is pointing towards the hose connection piece (3).
Put the top part of the vacuum cleaner (10) on and close the catches (9).
Removing and sealing the plastic bag
- Open the catches (9) and remove the top part of the vacuum cleaner (10) (see figure C).
- Take the pre-filter (22) out of the container (7) by its handle (28).
- Pull the edge of the full plastic bag (19) backwards out of the clips (32).
- Carefully take the plastic bag (19) out of the container (7) without damaging it.
- When doing so, make sure that the plastic bag does not scrape against the intake port (31) or other sharp objects.
Changing/inserting the dust bag (accessory)
-
Open the catches (9) and remove the top part of the vacuum cleaner (10) (see figure C).
Take the pre-filter (22) out of the container (7) by its handle (28). -
Pull the full dust bag (19) backwards off the connection flange. Close the opening of the dust bag by folding the lid over. Take the closed dust bag out of the container (7).
- Place the new dust bag over the vacuum cleaner's connection flange. Make sure that the entire length of the dust bag touches the inside wall of the container (7).
- Insert the pre-filter (22) in the container (7), making sure that the arrow is pointing towards the hose connection piece (3).
Put the top part of the vacuum cleaner (10) on and close the catches (9).
Fitting the rubber lip (wet extraction) (see figure H)
- Use a suitable tool to lift the brush inserts (24) out of the floor nozzle (25).
- Place the rubber lips (23) in the floor nozzle (25).
Note: The textured side of the rubber lips must be facing outwards.
GAS 12-25 PL:
Note: The requirements for the degree of penetration (dust class L) have only been verified for dry vacuuming.
Operation
Pull the plug out of the socket before cleaning or performing maintenance on the vacuum cleaner, making tool adjustments, changing accessories or putting away the vacuum cleaner. This safety measure prevents the vacuum cleaner from being started accidentally.
- Remove the battery before cleaning or performing maintenance on the dust extractor, making tool adjustments, changing accessories or placing the dust extractor in storage. This safety measure prevents the dust extractor from being started accidentally.
When operating the dust extractor, ensure that the lockable castors on the dust extractor are blocked to prevent the dust extractor from rolling away unintentionally. Test the correct functioning of the castors on the relevant surface before operation.
Start-up
Pay attention to the mains voltage. The voltage of the power source must correspond with the data on the type plate of the vacuum cleaner.
Make sure you inform yourself about the applicable regulations/laws on how to handle harmful types of dust in your country.
The dust extractor must categorically not be used in potentially explosive areas.
To ensure optimum suction power, you must always fully unwind the vacuum hose (15) from the top part of the dust extractor (10).
GAS 12-25 PL:
The dust extractor may be used for vacuuming and extracting the following materials:
Dusts with an exposure limit of >1mg / m^-3
▶ Products that are only sold in AUS and NZ: Use a residual current device (RCD) with a nominal residual current of 30 mA or less.
Dry vacuuming
Note: When carrying out dry extraction, ensure that both the pre-filter (22) and the main filter (20) are inserted into the dust extractor.
Vacuuming up dust deposits (GAS 12-25)
-To switch on the vacuum cleaner, set the on/off switch (1) to the "on" symbol.
-To switch off the vacuum cleaner, set the on/off switch (1) to the "off" symbol.
Extracting dust deposits (GAS 12-25 PL)
-To switch on the dust extractor, set the mode selector switch (1) to the "extraction" symbol.
-To switch off the dust extractor, set the mode selector switch (1) to the "switch off" symbol.


Extracting dust that accumulates from working power tools (GAS 12-25 PL) (see figure I)
There must be a sufficient air exchange rate in the room when the exhaust air comes back into the room. Be aware of the corresponding national regulations.
The dust extractor has a plug socket with a protective earth contact (2) that can be used to connect an external power tool. Observe the maximum permitted connected load of the connected power tool.

-GAS 12-25 PL:Fit the extraction adapter (16).
- Insert the dust extraction adapter (16) into the extraction outlet of the power tool.
Note: When working with power tools that have a low air feed into the vacuum hose (e.g. jigsaws, sanders, etc.), the false air intake (33) of the dust extraction adapter (16) must be opened. This will ensure that the semi-automatic filter cleaning function works correctly.
To do this, turn the ring above the false air intake (33) until the opening is at its maximum size.
-To activate the automatic start/stop function of the dust extractor, set the mode selector switch (1) to the "automatic start/stop" symbol.
- To start the dust extractor, switch on the power tool connected to the plug socket (2). The dust extractor will start automatically.
- To stop dust extraction, switch the power tool off. The automatic start/stop run-on function will run for up to 6 seconds longer in order to extract the remaining dust from the vacuum hose.
14|English
-To switch off the dust extractor, set the mode selector switch (1) to the "switch off" symbol.
0
Wet vacuuming
- Do not use the vacuum cleaner to vacuum combustible or explosive liquids, such as petrol, oil, alcohol or solvents. Do not vacuum hot, burning or explosive dust. Do not operate the vacuum cleaner in areas subject to explosion hazards. Dust, vapours and liquids can ignite or explode.
The vacuum cleaner must not be used as a water pump. The vacuum cleaner is designed for vacuuming air and vacuuming water mixtures.
Note: When wet vacuuming, ensure that the main filter (20) is removed from the vacuum cleaner.
Steps to Take Before Wet Vacuuming
- Open the catches (9) and remove the top part of the vacuum cleaner (10) (see figure C).
- Remove the plastic bag (19) or dust bag if necessary.
Turn the filter holder (29) as far as possible in the direction of rotation and take the filter holder, together with the main filter (20), out of the top part of the vacuum cleaner (10). - Place the wet filter (21) completely over the filter basket (30).
Ensure that the wet filter (21) lies completely over the filter basket (30).
Put the top part of the vacuum cleaner (10) on and close the catches (9). - Place the rubber lip (23) in the floor nozzle (25).
Vacuuming up liquids
- Switch the vacuum cleaner on (GAS 12-25: On/off switch (1) to "on"; GAS 12-25 PL: Mode selector switch (1) to the "vacuuming" symbol).
The dust extractor is equipped with a float. Extraction is stopped when the maximum filling level is reached.
- Set the on/off switch (1) to "off" (GAS 12-25) or set the mode selector switch (1) to the "switch off" symbol (GAS 12-25 PL).
- Empty the container (7).
To prevent mould growth after wet vacuuming: Cleaning the wet filter
Semi-automatic filter cleaning
The filter cleaning function should be activated at the very latest when the suction power is no longer sufficient.
How often filter cleaning needs to be carried out will depend on the type and quantity of dust that has been extracted. With regular use, the maximum conveying capacity will be maintained for longer.
- Switch the dust extractor off for 6-10 seconds and then on again. Repeat this several times in succession.
The pre-filter (22) is cleaned using blasts of air when it is switched off.
- To work after cleaning the filter, switch the dust extractor back on.
Maintenance and service
Maintenance and Cleaning
Pull the plug out of the socket before cleaning or performing maintenance on the vacuum cleaner, making tool adjustments, changing accessories or putting away the vacuum cleaner. This safety measure prevents the vacuum cleaner from being started accidentally.
- Remove the battery before cleaning or performing maintenance on the dust extractor, making tool adjustments, changing accessories or placing the dust extractor in storage. This safety measure prevents the dust extractor from being started accidentally.
To ensure safe and efficient operation, always keep the dust extractor and the ventilation slots clean.
In order to avoid safety hazards, if the power supply cord needs to be replaced, this must be done by Bosch or by an after-sales service centre that is authorised to repair Bosch power tools.
If the battery is no longer working, please contact an authorised after-sales service agent for Bosch power tools.
Wear a dust mask when servicing and cleaning the vacuum cleaner.
Clean the housing of the dust extractor occasionally with a damp cloth.
Do not use compressed air to clean the dust extractor. The filter or other components may become damaged.
At least once a year a technical inspection of the dust extractor must be carried out by the manufacturer or someone who has been trained (e.g. to check for filter damage, to check that the dust extractor is tight and that the control unit is in perfect working order).
Cleaning and maintenance after extracting hazardous substances
- All parts that may have come into contact with the hazardous substances must be considered contaminated.
Vacuum, wipe down and seal the outside of the dust extractor thoroughly before removing it from the area containing the hazardous substances. - Only clean, dismantle and perform maintenance on the dust extractor if this can be done without endangering yourself or other persons. Wear personal protective equipment for cleaning and maintenance tasks. Undertake the work in a well ventilated room.
- First clean the outside of the dust extractor before dismantling it.
-
All parts of the dust extractor that cannot be adequately cleaned must be disposed of in impermeable bags. Please observe the applicable regulations for the disposal of such waste.
-
Clean the maintenance area after completing the work.
Cleaning the container
Wipe the container (7) from time to time using a non-abrasive off-the-shelf cleaning product and leave it to dry.
Cleaning the Filters
Regularly emptying the dust container and cleaning the filters will ensure optimum suction power. If suction power is not achieved after that, the vacuum cleaner is to be brought to the after-sales service.
Cleaning the pre-filter
- Open the catches (9) and remove the top part of the vacuum cleaner (10) (see figure C).
- Take the pre-filter (22) out of the container (7) by its handle (28).
- Shake out the pre-filter (22) over a suitable waste bin.
- Insert the pre-filter (22) in the container (7), making sure that the arrow is pointing towards the hose connection piece (3).
Put the top part of the vacuum cleaner (10) on and close the catches (9).
Cleaning the main filter
- Open the catches (9) and remove the top part of the vacuum cleaner (10) (see figure C).
Turn the filter holder (29) as far as possible in the direction of rotation and take the filter holder, together with the main filter (20), out of the top part of the dust extractor (10).
Brush the folds of the main filter (20) with a soft brush. Replace the main filter (20) if damaged. - Place the filter holder (29), together with the main filter (20), over the filter basket (30) and turn the filter holder (29) as far as possible in the direction of rotation
Put the top part of the vacuum cleaner (10) on and close the catches (9).
Cleaning the wet filter
To prevent mould growth after wet vacuuming:
- Open the catches (9) and remove the top part of the vacuum cleaner (10) (see figure C).
- Leave the top part of the vacuum cleaner (10) to dry thoroughly.
Rectifying faults
If a fault (e.g. a filter damage) occurs, the vacuum cleaner must be switched off immediately. The fault must be repaired before resuming operation.
Problem Corrective measures
Suction turbine will not switch on. - Check the mains cable, mains plug, fuse and socket.
GAS 12-25 PL:
The mode selector switch (1) is set to "automatic start/stop".
- Set the mode selector switch (1) to the "extraction" symbol or switch on the power tool plugged into the plug socket (2).
16|English
Problem Corrective measures
| The suction turbine will not switch on again after the container has been emptied. | - Switch the dust extractor off and wait 5 seconds before switching it back on. |
| The suction power is decreasing. | - Empty the container (7). |
| - Remove any blockages from the vacuum nozzle, suction tube (26), vacuum hose (15) or main filter (20). | |
| - Change the plastic bag (19) or dust bag. | |
| - Make sure the filter holder (29) is engaged correctly. | |
| - Place the top part of the dust extractor (10) on correctly and close the catches (9). | |
| - Change the pre-filter (22), main filter (20) or wet filter (21). | |
| Dust is escaping during extraction | - Check that the main filter (20) has been fitted correctly. |
| - Change the main filter (20). | |
| Automatic switch-off (wet extraction) is not working. | Automatic switch-off will not work in the presence of non-conductive liquids or foaming. |
| - Check the fill level regularly. | |
| The semi-automatic filter cleaning function is not working. | - Empty the container (7). |
After-Sales Service and Application Service
Our after-sales service responds to your questions concerning maintenance and repair of your product as well as spare parts. You can find explosion drawings and information on spare parts at: www.bosch-pt.com
The Bosch product use advice team will be happy to help you with any questions about our products and their accessories.
In all correspondence and spare parts orders, please always include the 10-digit article number given on the nameplate of the product.
India
Bosch Service Center
69, Habibullah Road, (Next to PSBB School), T. Nagar
Chennai-600077
Phone: (044) 64561816
Bosch Service Center
18, Community Center
Phase 1, Mayapuri
New Delhi-110064
Phone: (011) 43166190
Bosch Service Center
Shop no 7&8, Aspen garden
Walbhat road, Goregaon (E)
Near to Ram Mandir Railway Station
Mumbai - 400063
Mobile: 09819952950
Australia, New Zealand and Pacific Islands
Robert Bosch Australia Pty. Ltd.
Power Tools
Locked Bag 66
Clayton South VIC 3169
Customer Contact Center
Inside Australia:
Phone: (01300) 307044
Fax: (01300) 307045
Inside New Zealand:
Phone: (0800) 543353
Fax: (0800) 428570
Outside AU and NZ:
Phone: +61 3 95415555
www.bosch-pt.com.au
www.bosch-pt.co.nz
Malaysia
Robert Bosch Sdn. Bhd.(220975-V) PT/SMY
No.8A,Jalan 13/6
46200 Petaling Jaya
Selangor
Tel.: (03) 79663194
Toll-Free: 1800 880188
Fax: (03) 79583838
E-Mail: kiathoe.chong@my.bosch.com
www.bosch-pt.com.my
Great Britain
Robert Bosch Ltd. (B.S.C.)
P.O.Box 98
Broadwater Park
North Orbital Road
Denham Uxbridge
UB95HJ
At www.bosch-pt.co.uk you can order spare parts or arrange
the collection of a product in need of servicing or repair.
Tel. Service: (0344) 7360109
E-Mail: boschservicecentre@bosch.com
Israel
Ledico Ltd.
31 Lazrov Street
P.O.Box 6018 Rishon Le Ziyon
service@ledico.com
Korea
You can find further service addresses at:
www.bosch-pt.com/serviceaddresses
Disposal
The vacuum cleaner, its accessories and packaging should be recycled in an environmentally friendly manner.
Do not dispose of the vacuum cleaner along with household waste.
Only for EU countries:
According to the European Directive 2012/19/EU on Waste Electrical and Electronic Equipment and its implementation into national law, vacuum cleaners that are no longer usable must be collected separately and disposed of in an environmentally friendly manner.
If disposed incorrectly, waste electrical and electronic equipment may have harmful effects on the environment and human health, due to the potential presence of hazardous substances.
Only for United Kingdom:
According to The Waste Electrical and Electronic Equipment Regulations 2013 (SI 2013/3113) (as amended), products that are no longer usable must be collected separately and disposed of in an environmentally friendly manner.
Français
Robert Bosch Morocco SARL
53, Rue Lieutenant Mahmoud Mohamed
20300 Casablanca
Tel.:+212529314327
E-Mail: sav.outillage@ma.bosch.com
France
Robert Bosch (France) S.A.S.
www.bosch-pt.com/serviceaddresses
www.bosch-pt.com/serviceaddresses
Eliminação
Calle Robert Bosch No. 405
C.P. 50071 Zona Industrial, Toluca - Estado de Mexico
Tel.: (52) 55 528430-62
Tel.: 8006271286
www.bosch-pt.com/serviceaddresses
Eliminación
www.bosch-pt.com/serviceaddresses
Descarte
www.bosch-pt.com/serviceaddresses
处理废弃物
www.bosch-pt.com/serviceaddresses
廢棄物處理
nnuuunnuuunnuuunnuuunnuuuu uauuuuunnuuunnuu uuuu uuuuuuuuuuuuuuuuuuuuuuuuuuuuuuuuuuuuuuuuuuuuuuuuuuuuuuuuuuuuuuuuuuuuuuuuuuuuuuuuuuuuuuuuuuuuuuuuuuuuuuuuuuuuuuuuuuuuuuuuuuuuuuuuuuuuuuuuuuuuuuuuuuuuuuuuuuuuuuuuuuuuuuuuuuuuuuuuuuuuuuuuuuuuuuuuuuuuuuuuuUU
GAS 12-25 PL:
nunu: luusu: uua: uwwuulnuuua: uuuu
12: nuuuvuauuauuuuuuuuuuuuuuuuuuuuuuuuuuuuuuuuuuuuuuuuuuuuuuuuuuuuuuuuuuuuuuuuuuuuuuuuuuuuuuuuuuuuuuuuuuuuuuuuuuuuuuuuuuuuuuuuuuuuuuuuuuuuuuuuuuuuuuuuuuuuuuuuuuuuuuuuuuuuuuuuuuuuuuuuuuuuuuuuuuuuuuuuuuuUU
Wongunwuheon (nwnwusnB2)
Wnwnnnnnaaennnnn nnnn nn nnnnnnnnnnnn nn nnnnnnnnnnnn nn nnnnnnnnnnnn nn nnnnnnnnnnnn nn nnnnnnnnnnnn nn nnnnnnnnnnnn nn nnnnnnnnnnnn nn nnnnnnnnnnnn nn nnnnnnnnnn nn nnnnnnnnnn nn nannnnnnn nn nannnnnnn nn nannnnnnn nn nannnnnnn nn nannnnnnn nn nannnnnnn nn nannnnnnn nn nannnnnnn nn nannnnn nn nannnnn nn nannnnn nn nannnnn nn nannnnn nn nannnnn nn nannnnn nn nannnnn nn nannnnn nn nannnnn nn nannnnn nn nannnnn nn nannnnn nn nannnnn nn nannnnn nn nannnnn nn nannnnn nn nannnnn nn nannnnn nn nannnnn nn nenn
- 55 (GAS 12-25: AnonOnn (1) "On"; GAS 12-25 PL: nnnn (1) "nann"
-nyun(15)wnanynnna (3)
- 134 (34) 111111111111111111111111111111111111
nannn/naia
nana: nanaananaananaananaananaananaananaananaananaananaananaananaananaananaananaananaananaananaananaananaananaananaananaananaananaananaananaananaananaananaananaananaananaananaananaananaananaananaananaananaananaananaananaananaananaananaananaananaananaananaanana anana
aannnnn (20) 1uunnnnnnnnnnnnnnnnnnnnnnnnnnnnnnnnnnnnnnnnnnnnnnnnnnnnnnnnnnnnnnnnnnnnnnnnnnnnnnnnnnnnnnnnnnnnnnnnnnnnn
mngnunnaa (GAS 12-25)
- 1000000000000000000000000000000000000000000000000000000000000000000000
- 100000000000000000000000000000000000000000000000000000000000000000
mnnnun (GAS 12-25 PL)
- 1nnnnaaannnnnnaaennnnnnnnnnnnnnnnnnnnnnnnnnnnnnnnnnnnnnnnnnnnnnnnnnnnnnnnnnnnnnnnnnnnnnnnnnnnnnnnnnnnnnnnnnnnnnnnnnnnnnnnnnnnnnnnnnnnnnnnnnnnnnnnnnnnnn
- 1nnnnae nnnnne nnne nnnnne nnnnne nnnnne nnnnne nnnnne nnnnne nnnnne nnnnne nnnnne nnnnne nnnnne nnnnne nnnnne nnnnne nnnnne nnnnne nnnnne nnnnne nnnnne nnnnne nnnnne nnnnne nnnnne nnnnne nnnnne nnnnee
nngnnnnnnnnnnnnnnnnnnnnnnnnnnnnnnnnnnnnnnnnnnnnnnnnnnnnnnnnnnnnnnnnnnnnnnnnnnnnnnnnnnnnnnnnnnnnnnnnnnnnnnnnnnnnnnnnnnnnnnnnnnnnnnnnnnnnnnnnnnnnnnnn
1
(2)

Off

0

nunun: jnuuunnuuunnuuunnuuunnuuunnuuunnuuunnuuuu (nuu uuuu uuuu uuuu) uuuuuuuuuuuuuuuuuuuuuuuuuuuuuuuuuuuuuuuuuuuuuuuuuuuuuuuuuuuuuuuuuuuuuuuuuuuuuuuuuuuuuuuuuuuuuuuuuuuuuuuuuuuuuuuuuuuuuuuuuuuuuuuuuuuuuuuuuuuuuuuuuuuuuuuuuuuuuuuuuuuuuuuuuuuuuuuuuuuuuuuuuuuuuuuuuuuuuuuuuUU
nnaaannnnnnaanennnna (33)
- uanu Start/Stop, 1nunu 1nunu 1nunu 1nunu (1) 1nnnna "Start/Stop
- 1
- 1000000000000000000000000000000000000000000000000000000000000000000000000
- 1nunu (1) nnnnnnnnnnnnnnnnnnnnnnnnnnnnnnnnnnnnnnnnnnnnnnnnnnnnnnnnnnnnnnnnnnnnnnnnnnnnnnnnnnnnnnnnnnnnnnnnnnnnnnnnn
mssaa
y
1
www.bosch-pt.com/serviceaddresses
1
Arkadia Green Park Tower G-7th floor
JL. Let. Jend. TB. Simatupang Kav.88
Jakarta 12520
Tel.: (021) 3005 5800
Fax: (021) 3005 5801
E-Mail: boschpowertools@id.bosch.com
www.bosch-pt.co.id
www.bosch-pt.com/serviceaddresses
Caramembuang
Alat pengisap, aksesori, dan kemasan harus didaur ulang,.
seara ramah lingkungan.
May hut bui co chu a bui gay hai cho suc khoe. Chi de tho
chuyen mon tien hanh cac qua trinh xa rong va bao duong, bao gom xu ly sinh chu a thu gom bui. Can co mot thiet bj bao ho tuong ung. Khong van hanh may hut bui ma khong co he thong loc day du vu duoc lap can than. Néu khong ban se gay nguy hiem cho suc khoe cua minh.
▶ Truoc khi vanhh, hyi kiem tra tinh trang khong loli cua ong hut. Khi do, hyi cho lap ong hut o may hut bui, de bui khong vo tinh xuat hiien. Néu khong, ban co the hit phai bui.
Khong sur dung may hut bui lam ghe ngoi. May hut bui co the bi hong.
Su dung day dien va ong hut can than. Co the gay nguy hai cho nhung nguoi khac.
86 | Tiéng Viét
Khongve sinh may hut bui bang tia nuoc truc tiep. Nucvao nap trcn cung cua may se lam tang nguy co bi dien giat.
Khong thay dai va mo pin. Nguyen co bi chap mach.
Trong truong hop pin bi hong hay su dung sai cach, hoi nuoc co the boc ra. Pin co the chay hoac no. Hay lam cho thong thoang khi va trong truong hop bi dau phai nhoy te chu a tri. Hoi nuoc co the gay ngua he ho hap.
Khi su dung sai hoac khi pin hong, dung dich de chay tu pin co the tua ra. Neu vo tinh cham phai, hay xoi nuoc de rua. Neu dung dich vao mat, can them su ho tro cua y te. Neu chat long dinh vao mat, yeu cau ngay su giup do cua bac si. Dung dich tiet ra tu pin co the gay ngua hay bong.
Pin co the bi hui hai boi cac vat dung nhon nhu dinh hay tuoc-no-vit hoac boi cac tac dong luc tu ben ngoai. No co the dan toi doan mach nao bo va lam pin bi chay, boc khoi, phat no hoac qua nong.
Khi khong su dung pin, de cach xa cac vat bang kim loai nhu kep giay, tien xu, chia khoa, dinh, oc vit hay cac do vat kim loai nhoc hac, thu co theo su noi tiep tu mot dau cuc voi mot dau cuc khac. Su chap mach cuac cac dau cuc voi nhau co the gay bong hay chay.
Chi bang cach nay, pin se duoc bao vetranh nguy co qua tai.
Chi duoc sac pin lai voi bo nap dien do nha san suat chi dinh. Môt bo nap dien thich hop cho mot bo pin nguón co the gay nguy co chay khi su dung de nap dien cho mot bo pin nguón khac.


Bao vé pin khong de bi lam nong, vi du, chong de lau dai duoi anh nang gay gat, lua, chat ban, nuoc, va su am uot. Co nguy co no va chap mach.
Bao vé may hut bui khong de bi lam nong, vi du, chong de lai dai duoi anh nang gay gat, lua, nuoc, va su
am uot. Su nguy hiem qua no.
Cac buoc truck hi hut bui am
-Mocacnut that(9)va thao thannap may hut (10)(xemhinhC).
-Hay thao tui nhya (19) hoac tui chu a bui neu can.
-Xoay già dō bó loc (29) cho dén cu chan theo hóng xoay wà tháo già dō bó loc cung vòi bó loc chinh (20) ra khoi than nap may hút (10).
- Cam bo loc uot (21) len trén luoi loc (30). Hay dam bao rang bo loc uot (21) nam hoan toan tren luoi loc (30).
-Daynap trcn cung cua may hut bui (10) va dong cac khoa (9).
- Dàt mòi cao su (23) vào dαu hút sān (25).
Hut sach cac chat long
-Bat may hut bui (GAS 12-25: Cong tac Tat/Mo (1) thanh,On"; GAS 12-25 PL: Cong tac chon che do vanh (1) thanh bieu tong,Hut).
May hut bui ducrang bi mot chiec phao do. Neu muc day dat tio da, viec hut bui se dung lai.
-Dat cong tac Tat/Mo (1) thanh ,Off" (GAS 12-25) hoac cong tac chon che do vanh (1) thanh bieu tong ,Tat" (GAS 12-25 PL).
-Lamrongthungchua(7).
Dé tranh hièn tuǒng mòc sau khi hùt bùi uòt: Vé sinh bó loc uòt
Lam sach bo loc ban tu dong
Muon nhat la khi khong cnon hieu suat hut bui nua, can phai lam sach bo loc.
Tán suát lam sach bó loc phu thuc vao loai bui v so luong bui. Su dung thuong xuyen co the duy tri tói da hiéu suat su dung.
Tat may hut bui 6-10 giay va sau do bat lai. Lap lai viec nay nhieu lan lien tiep. Bo loc truc (22) duoc lam sach khi tat bang luong khong khi.
- Dé lam vièc sau khi vê sinh bó loc, hay bát lái may hút bui.
www.bosch-pt.com/serviceaddresses
Su thai bo
May hut bui, phu kien, bao bi phai duoc phan loai de tai che theo huong than thien voi moi truong.
Khong duoc vuit bo may hut buo vao chung voi rac sinh hoat thong thuong!
J 1 J aaii i jgj g S
.1012000000000000000000000000000000000000000000000000000000000000000000000000
(6)
Ig aaiI 0g
(7)
(8)aJgJJI JJI JIJI JJIJIJIJIJIJIJIJIJIJIJIJIJIJIJIJIJIJIJIJIJIJIJIJIJIJIJIJIJIJIJIJIJIJIJIJIJIJIJIJIJIJIJIJIJIJIJIJIJIJIJIJIJIJIJIJIJIJIJIJIJIJIJIJIJIJIJIJIJIJIJIJIJIJIJIJIJIJIJIJIJIJIJIJIJIJIJIJIJIJIJIJIJIJIJIJIJIJIJIJIJ
(9)abgllj0gllj
(10)abglwJgallj
Jaaai Jlaaik
(11)bowl po gagg uog bawg guaui yao jglll
(12)Jus uugwgl wu wu wu wu
(13)(a)
(14)baaii jgiagjglg aclig gajll JlacI
(15)baowpgbj .auiuul joljueauo uusg (16) GAS 12-25 PL
(GAS 12-25 PL)
aiaial abai (17)
gawuI aag (18)
(a) Jue abiw/ SsiwU Ws (19)
(20 1
bj jilé (21)
JgJjJ (22)
ablaa (23)
(24)
UaJla aag (25)
JawwJgwo (26)
jjj (27)
jgljuljuaa (28)
juljol (29)
JJIJI (30)
bawll (31)
| GAS 12-25GAS 12-25GAS 12-25 PL | |||
| - | - | - | - |
| S8,68,69EPA-Procedure 01:2014 | n j gl | ||
| I/⊕ | II/⊕ | a I a I a I a I a I a I a I a I a I a I a I a I a I a I a I a I a I a I a I a I a I a I a I a I a I a I a I a I a I a I a I a I a I a I a I a I a I a I a I a I a I a I a I a I a I a I a I a I a I a I a Ia Ia Ia Ia Ia Ia Ia Ia Ia Ia Ia Ia Ia Ia Ia Ia Ia Ia Ia Ia Ia Ia Ia Ia Ia Ia Ia Ia Ia Ia Ia Ia Ia Ia Ia Ia Ia Ia Ia Ia Ia Ia Ia Ia Ia Ia Ia Ia Ia Ia Iaa Ia Ia Ia Ia Ia Ia Ia Ia Ia Ia Ia Ia Ia Ia Ia Ia Ia Ia Ia Ia Ia Ia Ia Ia Ia Ia Ia Ia Ia Ia Ia Ia Ia Ia Ia Ia Ia Ia Ia Ia Ia Ia Ia Ia Ia Ia Ia Ia Ia Ida Ida Ida Ida Ida Ida Ida Ida Ida Ida Ida Ida Ida Ida Ida Ida Ida Ida Ida Ida Ida Ida Ida Ida Ida Ida Ida Ida Ida Ida Ida Ida Ida Ida Ida Ida Ida Ida Ida Ida Ida Ida Ida Ida Ida Ida Ida Ida Ida Ida Iba Ida Ida Ida Ida Ida Ida Ida Ida Ida Ida Ida Ida Ida Ida Ida Ida Ida Ida Ida Ida Ida Ida Ida Ida Ida Ida Ida Ida Ida Ida Ida Ida Ida Ida Ida Ida Ida Ida Ida Ida Ida Ida Ida Ida Ida Ida Ida Ida Ida Iida Ida Ida Ida Ida Ida Ida Ida Ida Ida Ida Ida Ida Ida Ida Ida Ida Ida Ida Ida Ida Ida Ida Ida Ida Ida Ida Ida Ida Ida Ida Ida Ida Ida Ida Ida Ida Ida Ida Ida Ida Ida Ida Ida Ida Ida Ida Ida Ida Ida Ieda Ida Ida Ida Ida Ida Ida Ida Ida Ida Ida Ida Ida Ida Ida Ida Ida Ida Ida Ida Ida Ida Ida Ida Ida Ida Ida Ida Ida Ida Ida Ida Ida Ida Ida Ida Ida Ida Ida Ida Ida Ida Ida Ida Ida Ida Ida Ida Ida Ida Idd A B C D E F G H I J K L M N O P Q R S T U V W X Y Z A B C D E F G H I J K L M N O P Q R S T U V W X Y Z A B C D E F G H I J K L M N O P Q R S T U V W X Y Z A B C D E F G H I J K L M N O P Q R S T U V W X Y Z A B C D E F G H I J K L M N O P Q R S T U W X Y Z A B C D E F G H I J K L M N O P Q R S T U W X Y Z A B C D E F G H I J K L M N O P Q R S T U W X Y Z A B C D E F G H I J K L M N O P Q R S T U W X Y Z A B C D E F G H I J K L M N O P Q R S TU W X Y Z A B C D E F G H I J K L M N O P Q R S T U W X Y Z A B C D E F G H I J K L M N O P Q R S T U W X Y Z A B C D E F G H I J K L M N O P Q R S T U W X Y Z A B C D E F G H I J K L M N O P Q R S T/U W X Y Z A B C D E F G H I J K L M N O P Q R S T/U W X Y Z A B C D E F G H I J K L M N O P Q R S T/U W X Y Z A B C D E F G H I J K L M N O P Q R S T/U W X Y Z A B C D E F G H I J K L M N O P Q R S T U W X Y Z A B C D E F G H I J K L M N O P Q R S T/U W X Y Z A B C D E F G H I J K L M N O P Q R S T/U W X Y Z A B C D E F G H I J K L M N O P Q R S T U W X Y Z A B C D E F G H I J K L M N O P Q R S T U W X Y Z A B C D E F G H I J K L M N O P Q R S T U W X Y Z A B C D E F G H I J K L M N O P Q R S T TU W X Y Z A B C D E F G H I J K L M N O P Q R S T U W X Y Z A B C D E F G H I J K L M N O P Q R S T U W X Y Z A B C D E F G H I J K L M N O P Q R S T U W X Y Z A B C D E F G H I J K L M N O P Q R S T UT W X Y Z A B C D E F G H I J K L M N O P Q R S T U W X Y Z A B C D E F G H I J K L M N O P Q R S T UT W X Y Z A B C D E F G H I J K L M N O P Q R S T UT W X Y Z A B C D E F G H I J K L M N O P Q R S T UT W X Y Z A B C D E F G H I J K L M N O P Q R S T UT W X Y Z A B C D E F G H I J K L M N O P Q R S T U W X Y Z A B C D E F G H I J K L M N O P Q R S T UT W X Y Z A B C D E F G H I J K L M N O P Q R S T U W X Y Z A B C D E F G H I J K L M N O P Q R S T U W X Y Z A B C D E F G H I J K L M N O P Q R S T U W X Y Z A B C D E F G H I J K L M N O P Q R S TUT W X Y Z A B C D E F G H I J K L M N O P Q R S T U W X Y Z A B C D E F G H I J K L M N O P Q R S T UT W X Y Z A B C D E F G H I J K L M N O P Q R S T U W X Y Z A B C D E F G H I J K L M N O P Q R S TUT W X Y Z A B C D E F G H I J K L M N O P Q R S T U W X Y Z A B C D E F G H I J K L M N O P Q R S TUT W X Y Z A B C D E F G H I J K L M N O P Q R S T U W X Y Z A B C D E F G H I J K L M N O P Q R S T U W X Y Z A B C D E F G H I J K L M N O P Q R S T U W X Y Z A B C D E F G H I J K L M N O P Q R S T T U W X Y Z A B C D E F G H I J K L M N O P Q R S T U W X Y Z A B C D E F G H I J K L M N O P Q R S T U W X Y Z A B C D E F G H I J K L M N O P Q R S T U W X Y Z A B C D E F G H I J K L M N O P Q R s T U W X Y Z A B C D E F G H I J K L M N O P Q R S T U W X Y Z A B C D E F G H I J K L M N O P Q R S T U W X Y Z A B C D E F G H I J K L M N O P Q R S T U W X Y Z A B C D E F G H I J K L M N O P Q R SS T U W X Y Z A B C D E F G H I J K L M N O P Q R S T U W X Y Z A B C D E F G H I J K L M N O P Q R S T U W X Y Z A B C D E F G H I J K L M N O P Q R S T U W X Y Z A B C D E F G H I J K L M N O P Q RSS T U W X Y Z A B C D E F G H I J K L M N O P Q R S T U W X Y Z A B C D E F G H I J K L M N O P Q R S T U W X Y Z A B C D E F G H I J K L M N O P Q R S T U W X Y Z A B C D E F G H I J K L M N O P Q R ss T U W X Y Z A B C D E F G H I J K L M N O P Q R ss T U W X Y Z A B C D E F G H I J K L M N O P Q R ss T U W X Y Z A B C D E F G H I J K L M N O P Q R ss T U W X Y Z A B C D E F G H I J K L M N O P Q Rss T U W X Y Z A B C D E F G H I J K L M N O P Q R ss T U W X Y Z A B C D E F G H I J K L M N O P Q R ss T U W X Y Z A B C D E F G H I J K L M N O P Q R ss T U W X Y Z A B C D E F G H I J K L M N O P Q R sss T U W X Y Z A B C D E F G H I J K L M N O P Q R ss T U W X Y Z A B C D E F G H I J K L M N O P Q R ss T U W X Y Z A B C D E F G H I J K L M N O P Q R ss T U W X Y Z A B C D E F G H I J K L M N O P QR ss T U W X Y Z A B C D E F G H I J K L M N O P Q R ss T U W X Y Z A B C D E F G H I J K L M N O P Q R ss T U W X Y Z A B C D E F G H I J K L M N O P Q R ss T U W X Y Z A B C D E F G H I J K L M N O P QR sss T U W X Y Z A B C D E F G H I J K L M N O P Q R ss T U W X Y Z A B C D E F G H I J K L M N O P Q R ss T U W X Y Z A B C D E F G H I J K L M N O P Q R ss T U W X Y Z A B C D E F G H I J K L M N O PQ R ss T U W X Y Z A B C D E F G H I J K L M N O P Q R ss T U W X Y Z A B C D E F G H I J K L M N O P Q R ss T U W X Y Z A B C D E F G H I J K L M N O P Q R ss T U W X Y Z A B C D E F G H I J K L M N O PQ Rss T U W X Y Z A B C D E F G H I J K L M N O P Q R ss T U W X Y Z A B C D E F G H I J K L M N O P Q R ss T U W X Y Z A B C D E F G H I J K L M N O P Q R ss T U W X Y Z A B C D E F G H I J K L M N O PQ RR ss T U W X Y Z A B C D E F G H I J K L M N O P Q R ss T U W X Y Z A B C D E F G H I J K L M N O P Q R ss T U W X Y Z A B C D E F G H I J K L M N O P Q R ss T U W X Y Z A B C D E F G H I J K L M N O P Q RR ss T U W X Y Z A B C D E F G H I J K L M N O P Q R ss T U W X Y Z A B C D E F G H I J K L M N O P Q RR ss T U W X Y Z A B C D E F G H I J K L M N O P Q R ss T U W X Y Z A B C D E F G H I J K L M N O P Q R ss T U W X Y Z A B C D E F G H I J K L M N O P Q R ss T U W X Y Z A B C D E F G H I J K L M N O PQ RRss T U W X Y Z A B C D E F G H I J K L M N O P Q R ss T U W X Y Z A B C D E F G H I J K L M N O P Q R ss T U W X Y Z A B C D E F G H I J K L M N O P Q R ss T U W X Y Z A B C D E F G H I J K L M N O P Q RRss T U W X Y Z A B C D E F G H I J K L M N O P Q R ss T U W X Y Z A B C D E F G H I J K L M N O P Q R ss T U W X Y Z A B C D E F G H I J K L M N O P Q R ss T U W X Y Z A B C D E F G H I J K L M N O PQRRss T U W X Y Z A B C D E F G H I J K L M N O P Q R ss T U W X Y Z A B C D E F G H I J K L M N O P Q R ss T U W X Y Z A B C D E F G H I J K L M N O P Q R ss T U W X Y Z A B C D E F G H I J K L M N O P QRRss T U W X Y Z A B C D E F G H I J K L M N O P Q R ss T U W X Y Z A B C D E F G H I J K L M N O P Q R ss T U W X Y Z A B C D E F G H I J K L M N O P Q R ss T U W X Y Z A B C D E F G H I J K L M N O PQR ss T U W X Y Z A B C D E F G H I J K L M N O P Q R ss T U W X Y Z A B C D E F G H I J K L M N O P Q R ss T U W X Y Z A B C D E F G H I J K L M N O P Q R ss T U W X Y Z A B C D E F G H I J K L M N O PQRR ss T U W X Y Z A B C D E F G H I J K L M N O P Q R ss T U W X Y Z A B C D E F G H I J K L M N O P Q R ss T U W X Y Z A B C D E F G H I J K L M N O P Q R ss T U W X Y Z A B C D E F G H I J K L M N O P QRR ss T U W X Y Z A B C D E F G H I J K L M N O P Q R ss T U W X Y Z A B C D E F G H I J K L M N O P Q R ss T U W X Y Z A B C D E F G H I J K L M N O P Q R ss T U W X Y Z A B C D E F G H I J K L M N O PQRss T U W X Y Z A B C D E F G H I J K L M N O P Q R ss T U W X Y Z A B C D E F G H I J K L M N O P Q R ss T U W X Y Z A B C D E F G H I J K L M N O P Q R ss T U W X Y Z A B C D E F G H I J K L M N O P Q RL S T U W X Y Z A B C D E F G H I J K L M N O P Q R ss T U W X Y Z A B C D E F G H I J K L M N O P Q R ss T U W X Y Z A B C D E F G H I J K L M N O P Q R ss T U W X Y Z A B C D E F G H I J K L M N O P Q RL T U W X Y Z A B C D E F G H I J K L M N O P Q R ss T U W X Y Z A B C D E F G H I J K L M N O P Q R ss T U W X Y Z A B C D E F G H I J K L M N O P Q R ss T U W X Y Z A B C D E F G H I J K L M N O P Q R iss T U W X Y Z A B C D E F G H I J K L M N O P Q R ss T U W X Y Z A B C D E F G H I J K L M N O P Q R iss T U W X Y Z A B C D E F G H I J K L M N O P Q R iss T U W X Y Z A B C D E F G H I J K L M N O P Q R iss T U W X Y Z A B C D E F G H I J K L M N O P Q R iss T U W X Y Z A B C D E F G H I J K L M N O P Q Riss T U W X Y Z A B C D E F G H I J K L M N O P Q R iss T U W X Y Z A B C D E F G H I J K L M N O P Q R iss T U W X Y Z A B C D E F G H I J K L M N O P Q R iss T U W X Y Z A B C D E F G H I J K L M N O P Q R ss T U W X Y Z A B C D E F G H I J K L M N O P Q R iss T U W X Y Z A B C D E F G H I J K L M N O P Q R ss T U W X Y Z A B C D E F G H I J K L M N O P Q R ss T U W X Y Z A B C D E F G H I J K L M N O P Q R iss T U W X Y Z A B C D E F G H I J K L M N O P Q R iss T U W X Y Z A B C D E F G H I J K L M N O P Q R ss T U W X Y Z A B C D E F G H I J K L M N O P Q R ss T U W X Y Z A B C D E F G H I J K L M N O P Q R ss T U W X Y Z A B C D E F G H I J K L M N O P Q R ess T U W X Y Z A B C D E F G H I J K L M N O P Q R ess T U W X Y Z A B C D E F G H I J K L M N O P Q R ess T U W X Y Z A B C D E F G H I J K L M N O P Q R ess T U W X Y Z A B C D E F G H I J K L M N O P Q R ass T U W X Y Z A B C D E F G H I J K L M N O P Q R ess T U W X Y Z A B C D E F G H I J K L M N O P Q R ess T U W X Y Z A B C D E F G H I J K L M N O P Q R ess T U W X Y Z A B C D E F G H I J K L M N O P Q R ss T U W X Y Z A B C D E F G H I J K L M N O P Q R ess T U W X Y Z A B C D E F G H I J K L M N O P Q R ess T U W X Y Z A B C D E F G H I J K L M N O P Q R ss T U W X Y Z A B C D E F G H I J K L M N O P Q R ss T U W X Y Z A B C D E F G H I J K L M N O P Q R ess T U W X Y Z A B C D E F G H I J K L M N O P Q R ss T U W X Y Z A B C D E F G H I J K L M N O P Q R ess T U W X Y Z A B C D E F G H I J K L M N O P Q R ss T U W X Y Z A B C D E F G H I J K L M N O P Q R ss T U W X Y Z A B C D E F G H I J K L M N O P Q R ss T U W X Y Z A B C D E F G H I J K L M N O P Q R ass T U W X Y Z A B C D E F G H I J K L M N O P Q R ss T U W X Y Z A B C D E F G H I J K L M N O P Q R ass T U W X Y Z A B C D E F G H I J K L M N O P Q R ass T U W X Y Z A B C D E F G H I J K L M N O P Q R ass T U W X Y Z A B C D E F G H I J K L M N O P Q R ass T U W X Y Z A B C D E F G H I J K L M N O P Q R ss T U W X Y Z A B C D E F G H I J K L M N O P Q R ass T U W X Y Z A B C D E F G H I J K L M N O P Q R ss T U W X Y Z A B C D E F G H I J K L M N O P Q R ss T U W X Y Z A B C D E F G H I J K L M N O P Q R ass T U W X Y Z A B C D E F G H I J K L M N O P Q R ass T U W X Y Z A B C D E F G H I J K L M N O P Q R ss T U W X Y Z A B C D E F G H I J K L M N O P Q R ss T U W X Y Z A B C D E F G H I J K L M N O P Q R ss T U W X Y Z A B C D E F G H I J K L M N O P Q Rass T U W X Y Z A B C D E F G H I J K L M N O P Q R ss T U W X Y Z A B C D E F G H I J K L M N O P Q R ass T U W X Y Z A B C D E F G H I J K L M N O P Q R ss T U W X Y Z A B C D E F G H I J K L M N O P Q Rass T U W X Y Z A B C D E F G H I J K L M N O P Q R ass T U W X Y Z A B C D E F G H I J K L M N O P Q Rass T U W X Y Z A B C D E F G H I J K L M N O P Q R ass T U W X Y Z A B C D E F G H I J K L M N O P Q R ass T U W X Y Z A B C D E F G H I J K L M N O P Q R ass T U W X Y Z A B C D E F G H I J K L M N O P Q Rass T U W X Y Z A B C D E F G H I J K L M N O P Q R ass T U W X Y Z A B C D E F G H I J K L M N O P Q Rass T U W X Y Z A B C D E F G H I J K L M N O P Q Rass T U W X Y Z A B C D E F G H I J K L M N O P Q Rass T U W X Y Z A B C D E F G H I J K L M N O P Q Rass T U W X Y Z A B C D E F G H I J K L M N O P Q R ass T U W X Y Z A B C D E F G H I J K L M N O P Q Rass T U W X Y Z A B C D E F G H I J K L M N O P Q Rss T U W X Y Z A B C D E F G H I J K L M N O P Q Rass T U W X Y Z A B C D E F G H I J K L M N O P Q Rass T U W X Y Z A B C D E F G H I J K L M N O P Q Rass T U W X Y Z A B C D E F G H I J K L M N O P Q Rss T U W X Y Z A B C D E F G H I J K L M N O P Q Rass T U W X Y Z A B C D E F G H I J K L M N O P Q Rss T U W X Y Z A B C D E F G H I J K L M N O P Q Rass T U W X Y Z A B C D E F G H I J K L M N O P Q R ss T U W X Y Z A B C D E F G H I J K L M N O P Q Rass T U W X Y Z A B C D E F G H I J K L M N O P Q Rass T U W X Y Z A B C D E F G H I J K L M N O P Q Rass T U W X Y Z A B C D E F G H I J K L M N O P Q Ross T U W X Y Z A B C D E F G H I J K L M N O P Q Rass T U W X Y Z A B C D E F G H I J K L M N O P Q Rass T U W X Y Z A B C D E F G H I J K L M N O P Q Rass T U W X Y Z A B C D E F G H I J K L M N O P Q Ress T U W X Y Z A B C D E F G H I J K L M N O P Q Rass T U W X Y Z A B C D E F G H I J K L M N O P Q Rass T U W X Y Z A B C D E F G H I J K L M N O P Q Rass T U W X Y Z A B C D E F G H I J K L M N O P Q Riss T U W X Y Z A B C D E F G H I J K L M N O P Q Rass T U W X Y Z A B C D E F G H I J K L M N O P Q Rass T U W X Y Z A B C D E F G H I J K L M N O P Q Rass T U W X Y Z A B C D E F G H I J K L M N O P Q Rress T U W X Y Z A B C D E F G H I J K L M N O P Q Rass T U W X Y Z A B C D E F G H I J K L M N O P Q Rass T U W X Y Z A B C D E F G H I J K L M N O P Q Rass T U W X Y Z A B C D E F G H I J K L M N O P Q RAss T U W X Y Z A B C D E F G H I J K L M N O P Q Rass T U W X Y Z A B C D E F G H I J K L M N O P Q Rass T U W X Y Z A B C D E F G H I J K L M N O P Q Rass T U W X Y Z A B C D E F G H I J K L M N O P Q R Ass T U W X Y Z A B C D E F G H I J K L M N O P Q Rass T U W X Y Z A B C D E F G H I J K L M N O P Q Rass T U W X Y Z A B C D E F G H I J K L M N O P Q Rass T U W X Y Z A B C D E F G H I J K L M N O P Q R-assessing the risk of an accident or injury by measuring the amount of time required to perform the necessary procedures for the safety of the user's equipment. The estimated time required to perform the necessary procedures for the safety of the user's equipment is calculated as follows: - Time required to perform the necessary procedures for the safety of the user's equipment to be performed at least once every 30 minutes per day and every 60 minutes per week. - Time required to perform the necessary procedures for the safety of the user's equipment to be performed at least once every 60 minutes per week. - Time required to perform the necessary procedures for the safety of the user's equipment to be performed at least once every 120 minutes per week. - Time required to perform the necessary procedures for the safety of the user's equipment to be performed at least once every 120 minutes per week. - Time required to perform the necessary procedures for the safety of the user's equipment to be performed at least once every 60 minutes per week. - Time required to perform the necessary procedures for the safety of the user's equipment to be performed at least once every 60 minutes per week. - Time required to perform the necessary procedures for the safety of the user's equipment to be performed at least once every 120 minutes per week. - Time required to perform the necessary procedures for the safety of the user's equipment to be performed at least once every 120 minutes per week. | |
35 jboj booi jgj gag jwai p (A
p3Ugbugoo
JlIbIg dll lal yuulll 230 [U] LwI
aUgJsk aal
jglggo lclogloall jol jall. golaiwai ggbg iial qalq
. www.bosch-professional.com/wac
L/1Jai
3601J7C...
1L0b240blg 1700bl
1K0/100/1EO/1HOb230-220blg 2G
1F0/180/1NOLJIe 220blg950blg
alaiai jyjgSJI 8aJ yagawall Jogol Juy
gagallullllcljuaaalldnucugallaaallaagallalia
julalabolwmuo
baWl pgbj uSji
(B1 oJgJJI jbl) JaaIaIb
pogjai jolal (15) baiiogbja
1JgJIolJI aJIJI 3
9 p saiwll 1u u u u u uuuggs
aball gjllgj) jwgiJ
.(paaaalpaasawwlaaasjg
ggbjplsswly ggyasw yogipcLs
sic (gill) 4jLwU U LssuI I b
aJU UoJg aocuI aJbaw
(B2 0jgJJI) aJU cJbJI aJb
aaiiia aiaia aiaiaiaiaiaiaiaiaiaiaiaiaiaiaiaiaiaiaiaiaiaiaiaiaiaiaiaiaiaiaiaiaiaiaiaiaiaiaiaiaiaiaiaiaiaiaiaiaiaiaiaiaiaiaia
.1gJJI 19gJI Jc Jd Jlc Jbc J2.
go bαg goujL cuiiI aIb g pSawl
aannl jno ojckgSj gai pgbj
Ljpaaiy aaiy dabg pssuW liu jauy gaoi y aaiy ggbj plssw iJg y.aaiaai aloggl (34)
.
j5ucJxosJabgWl
(1)/JSSGAS12-25)
gOn:GAS 12-25 PL'
j({boll}j0j1(1) jgj
aJlJI JIJI 15) bOUI pOgOa
.du
olai g aqlil (15) bawll ogbj j
(3) pgbjJU jol JQ dWg gJgJL
pgbjll jolga (34) gail pgbjla
jIgJolai jagaiil oJg (13)
#
golg jog g aalj g abl wll abwllg g g aalJl jgl qall
gio aabui 1i jy o mluu LLa
a#
g|g|g|g|g|g|g|g|
UJyI Ox pLw. aBolwI j
gaaal juc Juswll gio aabuaa
abaiu
(A ojgJJI bai) baoJI gJgJ
jSoyu yu yu joo (15) baiIggbj
(16) baw (jao) bawu g u jwogda
.((17) aiaiaI abaII
UgUgUgUgUgUg
aaiu ufo uao
<laabgl,abolu
-baiuogb△ (1)
-(aog)UgjJb
(27) 1uuljui jjj uui (15)
Egaonogai baiIgbi
ogbawUgul,gawwUdgg,
.(17)aiiaol aoboiIjcpsooJsw (a)
(27)
Jaaalng aon dssjll jalg Jaiu
(GAS 12-25 PL)
(15) bawl ggbj (16) baowl jggo
gj27) jjll
.8gaaogaybai
(27)
auiuieo auiuui 1jglg jai
abiw g|SswwJU|WsJU|Jd|/JLd|
()
SsS SsS sS J liSs aJI bawI j
Sg .7 agll g (g) Iuc abiw g19
aiuill glwgl no valla lac uqpi
aJySll oSll jo bIuall JIbI I
(I ojgJJI pJI) (GAS 12-25 PL) aLsJUJI
gLgglj 1000g
aJgJgJgJgJgJgJgJgJgJgJgJgJgJgJgJgJgJgJgJgJgJgJgJgJgJgJgJgJgJgJgJgJgJgJgJgJgJgJgJgJgJgJgJgJgJgJgJgJgJgJ
.aaJJI aJJI JUaJIJI UJI
(2) jgo aIg mao sji
ooogogjulis.aholu
jogll oJgGclj.ajSjAuljE5
auiuSJI oSSI aagawaiI 5gaiJI
. g g a l l
aJUqSJI
aawlJ 10LgJwJdggj:slwJ
.2JJI JJI aabIb0JI
:GAS12-25PL
aJUdUbljuln gaou po:abgalo
aepwupg gaggaggglgglg
1 1
aBulwJgaaalmu
4.1gabjjg,abSui
UJyS sO pluWly Jss:abgalo
wio)bawlpgbgsgllaaos(g
aagg pui y (dg gllg cJl
jLg.(16)PpJ33)
jull Suiogigai aai ai biiil jaoaag
Jslwogg
ggl a g 9g g g g g g g g g g g g g g g g
g gglgglg (33) gljll
gj jiai piao bua abuill
aJjJ (1)
1/
Jusw .(2) JuaaJb aLgJbJU
JU JSW abelwJ
JU
aJU aJU JU JU JU JU JU JU JU
J 6 Jai dol /
bogjoo jull
joJc1)Ugj
《L》
bbl bawl
gglgllgglbglglgglggl
iJyI o aWluw. abLJI j
gaaal jc uuill gio aolai
aabul
Cunlll 15c aabgul (p)
g. gaaal j 10
Jq qiqolI qoJg oJQalU gBglual Jos
J 1
山
U!dJLJ≤JI
aaggoggagbgyhauuHuln
jolg uJoo
yui yu jiu 1111111111111111
a do jjo g Bosch aSw
auiuusBosch auiuaiu
jblall jzilui
jia1g jiall joey sbaoall
1
aJll jg no jell uag aacjg
g odag ojo ugo yaw jog gl ailll
gag uo UwUwUc) Jaiu
aolw g yuull s abuull pLg julll jluo
.(psalluljagajLac
oallgallbawseaiuallg cbiill
dally
Coo8 69 1gSj la jll 1j 1g jn ci -
aaglo aally oal slgall
abawl lalwlln
Jg JJIaI aI I g gI g
JUy jolgolj gbljda
13 21 guiuogg aabaii
eai jai jg d y qall kssll j
a laJI 1 s20 1 jjU g
Jaaai aag. caiiig aaiil
aagull aas agjc g
Jsai 8 jll ababu11jai gao joo jai
aaiiaieiieuui iueo uusuiuaa
oojolall jaiwll ocljo
山
gll
abwgljJlJoo jOg 7)
.ay dsg algo jc aglso aabjj 1go
wJJI 1
jull cbiu g jusllcgl baiuJIg jaiy
jg jogill pai j. aIio baw oJ
do s j5jal abolull palu uagj eU sJbail
.
jg21 jlll 1
.(Cgjglbl) (10)
Jaaa (22) 1gjilai
(7) 口 ~ l ~ 口 ~ l ~ 口 (28)
bfo gloj jg qabjj gl aolll
abolllg 1g qoIJI jqJI
-10000000000000000000000000000000
Jg j g Off"(GAS 12-25)"
(GAS 12-25 PL) «gä» jüll (1)
:ubllbulac jgusu
jlll jlll
a
aBbI Ijg aJx loic Jd
iJg aJIJI JIO JIJIJIJIJIJIJIJIJIJIJIJIJIJIJIJIJIJIJIJIJIJIJIJIJIJIJIJIJIJIJIJIJIJIJIJIJIJIJIJIJIJIJIJIJIJIJIJIJIJIJIJIJIJIJIJIJIJIJIJIJIJIJIJIJIJIJIJIJIJIJIJIJIJIJIJIJIJIJIJIJIJIJIJIJIJIJIJIJIJIJIJIJIJIJIJIJIJIJIJIJIJ
juaa aagg jilaiu aia lacjSj
jioJ 15g20JI gaiwI aos lc abgaoJI p
pbiu Usuy Igauubi Siigjbl
10-6
-aijglwJsw
doJg Jul
auiIg auiJl
auiu uuaa
4.1qabjjg,abLui
Ig Ig Igai gai
abolw!g,glg qanlJjIg jll
i
abglulgaoJIu
(7) 山 山 山 山 (28)
gI gll abg IaIgI IaIgI
1000 23
.
gaaal juaiy gio aui
.aa
c|101
JUJI JUJI JUJI JUJI JUJI JUJI JUJI JUJI JUJI JUJI JUJI JUJI JUJI JUJI JUJI JUJI JUJI JUJI JUJI JUJI JUJI JUJI JUJI JUJI JUJI JUJI JUJI JUJI JUJI JUJI JUJI JUJI JUJI JUJI J UJI JUJI J UJI J UJI J UJI J UJI J UJI J UJI J UJI J UJI J UJI J UJI J UJI J UJI J UJI J UJI J UJI J UJI J UJI J UJI J UJI J UJI J UJI J UJI J UJI J UJI J UJI J UJI J UJI J UJI J UJI J UJI J UJI J UJI J UJI J UILI
-olj1 g aJIJI (29) jIJIJI JOLaJ 1
(7) IcJI (3) pOJIJI JIOJI OLJI 9
-(10)abJlU
(29)
-10la 20) /j/ jw/ jj jj jj jj jj jj jj jj jj jj jj jj jj jj jj jj jj jj jj jj jj jj jj jj jj jj jj jj jj jj jj jj jj jj jj jj jj jj jj jj jj jj jj jj jj jj jj jj jj jj j
.aaclolw9 g
-oljI g ayqill G 1
.20) 1
-1saiu(20) (20
(29)jilal Jolcui jiae 1
(20)aJnJjilalU
jlll jolg (30) jilal g (20) UJg JI oJI g aJgl (29)
-(10)abglu (204 jolal 30jolalg (20) -abglu (29)
.(9)Ula
-abolwU (5)
(J1-J2 oJgJJI JJIJIg njiJIJI
(9)Jb
1 bJlJIaBjU
.(12)uWbIyIeIyIeIyIeIyIeIyIeIyIeIyIeIyIeIyIeIyIeIyIeIyIeIyIeIyIeIyIeIyIeIyIeIyIeIyIeIyIeIyIeIyIeIyIeIy
.(11)Jolai abaow
-(15)bawl gobjla 10)abw1
-(30)jll lgl
(12)Jaao no abgwl J
.
bjuooa aabwll 1y abglll
- julall 10 (10) abu
a 100000000000000000000000000000000000000000
so 16 (6) aagul Uy. .5
(E1-E2 jgalljull jull jus/gal gall lllglal jull jus
U
(jlll j)
الله الله .الله محيىي علّه و الحرفية الحيرشة بعس الحيرشة الحيرشة الحيرشة الحيرشة – .الله محيىي علّه :GAS 12-25 PL .«الله محيىي الحيرشة» (1) محيىي الحيرشة الحيرشة الحيرشة – .الله محيىي علّه .الله محيىي الحيرشة الحيرشة الحيرشة – .الله محيىي علّه .الله محيىي الحيرشة الحيرشة – .الله محيىي علّه .الله محيىي الحيرشة الحيرشة – .الله محيىي علّه .الله محيىي الحيرشة الحيرشة – .الله محيىي علّه .الله محيىي الحيرشة الحير شة – .الله محيىي علّه .الله محيىي الحيرشة الحيرشة – .الله محيىي علّه .الله محيىي الحيرشة الحيرشة – .الله محيىي علّه .الله محيىي الحيرشة الحيرشة – .الله m报复ه .الله محيىي الحيرشة الحيرشة – .الله م报复ه .الله م报复ه – .الله م报复ه .الله م报复ه – .الله m报复ه .الله م报复ه – .الله m报复ه .الله م报复ه – .الله m报复ه .الله م报复ه – .الله m报复ه .الله م报复ه – .الله m报复ه .الله م报复ه – .الله m报复ه .الله م报复ه – .ł报复ه .الله م报复ه – .ł报复ه .الله م报复ه – .ł报复ه .الله م报复ه – .ł报复ه .الله م报复ه – .ł报复ه .الله م报复ه – .ł报复ه .الله م报复ه – .ł报复ه .الله م报仇 – .ł报复ه .الله م报仇 – .ł报复ه .الله م报仇 – .ł报复ه .الله م报仇 – .ł报复ه .الله م报仇 – .ł报复ه .الله م报仇 – .ł报复ه .الله م报仇 – .ł报复ه .الله م报仇 – .الله م报仇 – .الله م报仇 – .الله م报仇 – .الله م报仇 – .الله م报仇 – .الله م报仇 – .الله م报仇 – .الله م报仇 – .الله م报仇 – .الله م报仇 – .الله م报仇 –
.الله م报仇 – .الله م报仇 –
.الله م报仇 – .الله م报仇 –
.الله م报仇 – .الله م报仇 –
.الله م报仇 – .الله م报仇 –
.الله م报仇 – .الله م报仇 –
.الله م报仇 – .الله م报仇 –
.الله m报仇 – .الله م报仇 –
.الله م报仇 – .الله m报仇 –
.الله m报仇 – .الله m报仇 –
.الله m报仇 – .الله m报仇 –
.الله m报仇 – .الله m报仇 –
.الله m报仇 – .الله m报仇 –
.الله m报仇 – .الله m报仇 –
.الله m报仇 – .الله m报仇 –
.الله m报仇 –
102
aL
-100000000000000000000000000000000000000000000000000
(9)U
.21) 1jll jllg (20) wJl jll.22) JgJl jll
1uUjUJgJ-(20)julu
-.(20)JwjjjldJJ
aJl Jx 8. yjssu algo sglg jilw sg gsc aJy .dIloggJfL
2aLlogjglalai aJl.(bJI bJU)
.1JJIgIiOuOjIJAiwUoS
-.(7) LgHuei yai np aui bui ao1bg Jaoj 2 aui logigil
pIaWJUJluwUg 10
aal aaii 1e Jao jy jy yj y jy jy jy jy jy jy jy jy jy jy jy jy jy jy jy jy jy jy jy jy jy jy jy jy jy jy jy jy jy jy jy jy jy jy jy jy jy jy jy jy jy jy jy jy jy jy jy jy jy jy j
aagll aeg jwlll lilal g caii Ig j s jlu 1uulgl uJluoiwl uJluWj sic iiaIg iua
U
Robert Bosch Morocco SARL
gjoo oo ojjoll gJw.53
JU 20300
+212529314327:
sav.outillage@ma.bosch.com:gjgJxJI
:aaosJuglicoJajll
www.bosch-pt.com/serviceaddresses
aui j 0sJn saai
gug aag aabw u jn yu w g u 10000000000000000000000000000000000000000000000000
!auiiuiuuiui uaiuiui aaiuuiui j


104|w
Lwdu dlc u wJd JyJyJyJbla du 10Sosgjglj j jnogjg o slaiu C
lqj pgeao g puaL
g jai lki jai jiu m
psc. gjlgai I J Loojjgws
Jaoi jgiw g jai U kci
Sijg jgiu cly wui Saa lo
. gsw uol yu/g siaigw

GAS 12-25 PL IEC/ L g L Jc g Ss EN 60335-2-69 sJgLJc g Ss 1 mg/m³ GAS 12-25GAS 12-25GAS 12-25 PL 3601 J7C 1.. 3601 J7C OC. 3601 J7C 0.. الشامعفاني 1250 1000 1250 W الإستعمال بعس 50-60 50-60 50-60 Hz الإستعمال 25 25 25 I الإستعمال بعس 15 15 15 I الإستعمال 20 20 20 I الإستعمال الإستعمال 19 17 19 kPa الإستعمال 20 19 20 kPa الإستعمال ال ☆ 36 33 36 l/s ال ☆ GAS 12-25GAS 12-25GAS 12-25 PL I/s656065 - - kg8,68,69 EPTA-Procedure lqjwsl jg01:2014 I/± II/ LSJWJL IPX4IPX4IPX4 33
Sjlogil gjg/8g
3601J7C...
1L0240V1700W100W
1K0/100/1E0/1H0220-230 V2050 W1
1F0/180/1N0220 V950 W100 W
000000000000000000000000000000000000000000000000000000
(GAS 12-25 PL) uu So j g i l d w
Ssilw (16) uSo yjI 1uW - Silw (27) slaas L Jg (15) .LJLgUgUgUgUgUgUgUgUgUgUgUgUgUgUgUgUgUgUgUgUgUgUgUgUgUgUgUgUgUgUgUgUgUgUgUgUgUgUgUgUgUgUgUgUgUgUgUgUgUgUg U
SoSgJ
(B1 gaa aasg) uSo sJSLac
(3) 0sJg J15) uSo SILW -
aJbJcQg JIg g
JLg gS uJUa JyJg pG aSI
SLBisogjSJIu, cTalao g uSo SILW
JUaJUuJyJusuJG So G u
uJG bUw yua u) Siu SuJSI
(uJL
SILW yJ oLaW Bosch CgW Ug du
uSo CgJ (CtALIO) uJUw d uSo
. Siu daogj Sgo g
(B2 gai dyis gaj) mssdslac slg. cwi dsslac sllsdo sio slosd lgl sla jy glaag jg 1g jg jy jy jy jy jy jy jy jy jy jy jy jy jy jy jy jy jy jy jy jy jy jy jy jy jy jy jy jy jy jy jy jy jy jy jy jy jy jy jy jy jy jy jy jy jy jy jy jy jy jy j yj yj yj yj yj yj yj yj yj yj yj yj yj yj yj yj yj yj yj yj yj yj yj yj yj yj yj yj yj yj yj yj yj yj yj yj yj yj yj yj yj yj yj yj yj yj yj yj yj yj y
uai
gagai jil jllalwgljnl lls Jlalalssu wolololololololololololololololololololololololololololololololololololololololololololololololololololololololololololololol
jagai jai jai jai jai jai jai jai jai jai jai jai jai jai jai jai jai jai jai jai jai jai jai jai jai jai jai jai jai jai jai jai jai jai jai jai jai jai jai jai jai jai jai jai jai jai jai jai jai jai jai
a gw Egj) uSo cIalio a (A g
Sls SjJgauuW u jao (15) o siSo Silw JguiI) u So Ualao u slgi G aS,du L. gswuio ((17) sJwUjli.(16) o siSo
Lgglggljluqai
(15)SsO Silw (gJ (17) SjW JJIu W - Silw (27) sJluq gLo dss Ld j .sJlLg wosgwsg a uu 0
cSJJU wlo) oJgLo sSsO talao uuW - 15gJ psoo I (oJc g uo dgl. gJ jli .J (17) SsW JJIu
L (27) sJluq doS gJ ,JwJy JIu .sJlP JJI JI J
(F1gaaEg)gjo jilj
(10) o s o yu cawg g siS jI (9) qjJ
Cgai dSis Egsj) jJy
6 100
.
(1)gol/s:GAS 12-25) GAS 12-25 PL "On"
(1) Slae elgil
(13)
-0gj(3)
-
- -Silw Jusl J. (F2
jguai Egej) gbo julj
(30) jssw (5gj Jols 1j (21) gjo j
y
LswyLgawS JwS JwS JJ (SwuSo) Jue g Js S awS L
LsWuLduaS Sdyjgo SuSo Cg 1JU (Ulaio) Juc sJ5 duuS Ly (19)
(7)da
aS Egj) Sswu dus JsJ (G1-G3 gU
(10) oisO yu cawg aS jI (9) Lj
Cgagd gS gJ Jy
aS (7) abao j1
Sdss.7 7 (7) daaoo Jy du
Ss S (31) sso sggj gglg Suw
. ss Caw (32) lo
.8g g1g (7) abao 1s
7
Jg (7) abao j3 5u w Jua
.(9)
JWgSswLgAaS JwU (10)oIso Lcawg jSjI (9)Lj (CgaaSg
a5 (7) abao j1
uUsy aC d (32)
.wwj u wJ d a dsi Jg y Jy
.5gwoLo ywJyLw L (31)wso 1g
aJg! jle Jnssu/ uJd
9 10 20 21 22
jol j jol jol gac wjg g s 10
jai j jol jilg dgs o ds ljo .
. jglj ngdabao jI jdlgljilg dy
(28)aJ(22)gjul
(D1gai auiS gaj) dgl jiljulj
(10)osso yu cawg g sis jI (9) Lqj .(Cgai dsiEgaj)JJJ
.1sJ 7)abao jI
(D2gaiyEgaj)gljulj
-1j jg 28) dwsjl (22) qgl jul g (7) adoj3
-5gjg jlgw gjbl (19) Sswu 1S dws
J (9)
15 (19) 1
(E1ggiEgj)Jol j
( 0 < 1) ( 1 - u) u + ( 1 - u) u + 4q = 0. ( u > 0)
(Cguiu (204
jol julg oljam julg ojjg jld
Suiu (10) 5iO uXu Cuaa j (20) a uo Jgj (10) uo Suu Cuao (E2 uo uo Egai) ooi
(20) juljulg oljam (29) julg ojjlq - julog ojjg 30j
. 1
-1jijg uS (28)
Cawdu
-1g 1j
-
-1gJgJgJ
3
1g u (28) aws jI J (22) 1j (9)
aai (g) 1 aaiuag aai g dai:di
oiso jIbL HJ (Hg) Ls uuus
gj jn d /n
S uuus s uus d s uus c g s j u u u u u u u u u u u u u u u u u u u u u u u u u u u u u u u u u u u u u u u u u uu
.ais 1uJ Caw slgo
108|
(15) ssu (10) si so uu Jg Jols auiom I
: GAS 12-25 PL
1go uSo g uS gJg Ugl G yj j 1gai Jlaiu J
3 109
doJg Jul
auiIg auiJl
auiu uuaa 4.1qabjjg,abLui Ig Ig Igai gai abolw!g,glg qanlJjIg jll i abglulgaoJIu (7) 山 山 山 山 (28) gI gll abg IaIgI IaIgI 1000 23 . gaaal juaiy gio aui .aa c|101 JUJI JUJI JUJI JUJI JUJI JUJI JUJI JUJI JUJI JUJI JUJI JUJI JUJI JUJI JUJI JUJI JUJI JUJI JUJI JUJI JUJI JUJI JUJI JUJI JUJI JUJI JUJI JUJI JUJI JUJI JUJI JUJI JUJI JUJI J UJI JUJI J UJI J UJI J UJI J UJI J UJI J UJI J UJI J UJI J UJI J UJI J UJI J UJI J UJI J UJI J UJI J UJI J UJI J UJI J UJI J UJI J UJI J UJI J UJI J UJI J UJI J UJI J UJI J UJI J UJI J UJI J UJI J UJI J UJI J UILI -olj1 g aJIJI (29) jIJIJI JOLaJ 1 (7) IcJI (3) pOJIJI JIOJI OLJI 9 -(10)abJlU (29) -10la 20) /j/ jw/ jj jj jj jj jj jj jj jj jj jj jj jj jj jj jj jj jj jj jj jj jj jj jj jj jj jj jj jj jj jj jj jj jj jj jj jj jj jj jj jj jj jj jj jj jj jj jj jj jj jj j .aaclolw9 g -oljI g ayqill G 1 .20) 1 -1saiu(20) (20 (29)jilal Jolcui jiae 1 (20)aJnJjilalU jlll jolg (30) jilal g (20) UJg JI oJI g aJgl (29) -(10)abglu (204 jolal 30jolalg (20) -abglu (29) .(9)Ula -abolwU (5) (J1-J2 oJgJJI JJIJIg njiJIJI (9)Jb 1 bJlJIaBjU .(12)uWbIyIeIyIeIyIeIyIeIyIeIyIeIyIeIyIeIyIeIyIeIyIeIyIeIyIeIyIeIyIeIyIeIyIeIyIeIyIeIyIeIyIeIyIeIyIeIy .(11)Jolai abaow -(15)bawl gobjla 10)abw1 -(30)jll lgl (12)Jaao no abgwl J . bjuooa aabwll 1y abglll - julall 10 (10) abu a 100000000000000000000000000000000000000000 so 16 (6) aagul Uy. .5 (E1-E2 jgalljull jull jus/gal gall lllglal jull jus U (jlll j)| الله | الله |
| .الله محيىي علّه و الحرفية الحيرشة بعس الحيرشة الحيرشة الحيرشة الحيرشة – | .الله محيىي علّه |
| :GAS 12-25 PL | |
| .«الله محيىي الحيرشة» (1) محيىي الحيرشة الحيرشة الحيرشة – | .الله محيىي علّه |
| .الله محيىي الحيرشة الحيرشة الحيرشة – | .الله محيىي علّه |
| .الله محيىي الحيرشة الحيرشة – | .الله محيىي علّه |
| .الله محيىي الحيرشة الحيرشة – | .الله محيىي علّه |
| .الله محيىي الحيرشة الحيرشة – | .الله محيىي علّه |
| .الله محيىي الحيرشة الحير شة – | .الله محيىي علّه |
| .الله محيىي الحيرشة الحيرشة – | .الله محيىي علّه |
| .الله محيىي الحيرشة الحيرشة – | .الله محيىي علّه |
| .الله محيىي الحيرشة الحيرشة – | .الله m报复ه |
| .الله محيىي الحيرشة الحيرشة – | .الله م报复ه |
| .الله م报复ه – | .الله م报复ه |
| .الله م报复ه – | .الله m报复ه |
| .الله م报复ه – | .الله m报复ه |
| .الله م报复ه – | .الله m报复ه |
| .الله م报复ه – | .الله m报复ه |
| .الله م报复ه – | .الله m报复ه |
| .الله م报复ه – | .الله m报复ه |
| .الله م报复ه – | .ł报复ه |
| .الله م报复ه – | .ł报复ه |
| .الله م报复ه – | .ł报复ه |
| .الله م报复ه – | .ł报复ه |
| .الله م报复ه – | .ł报复ه |
| .الله م报复ه – | .ł报复ه |
| .الله م报复ه – | .ł报复ه |
| .الله م报仇 – | .ł报复ه |
| .الله م报仇 – | .ł报复ه |
| .الله م报仇 – | .ł报复ه |
| .الله م报仇 – | .ł报复ه |
| .الله م报仇 – | .ł报复ه |
| .الله م报仇 – | .ł报复ه |
| .الله م报仇 – | .ł报复ه |
| .الله م报仇 – | |
| .الله م报仇 – | |
| .الله م报仇 – | |
| .الله م报仇 – | |
| .الله م报仇 – | |
| .الله م报仇 – | |
| .الله م报仇 – | |
| .الله م报仇 – | |
| .الله م报仇 – | |
| .الله م报仇 – | |
| .الله م报仇 – | |
| .الله م报仇 – .الله م报仇 – | |
| .الله م报仇 – .الله م报仇 – | |
| .الله م报仇 – .الله م报仇 – | |
| .الله م报仇 – .الله م报仇 – | |
| .الله م报仇 – .الله م报仇 – | |
| .الله م报仇 – .الله م报仇 – | |
| .الله م报仇 – .الله m报仇 – | |
| .الله م报仇 – .الله م报仇 – | |
| .الله m报仇 – .الله m报仇 – | |
| .الله m报仇 – .الله m报仇 – | |
| .الله m报仇 – .الله m报仇 – | |
| .الله m报仇 – .الله m报仇 – | |
| .الله m报仇 – .الله m报仇 – | |
| .الله m报仇 – .الله m报仇 – | |
| .الله m报仇 – .الله m报仇 – |
aL
-100000000000000000000000000000000000000000000000000 (9)U .21) 1jll jllg (20) wJl jll.22) JgJl jll 1uUjUJgJ-(20)julu -.(20)JwjjjldJJ aJl Jx 8. yjssu algo sglg jilw sg gsc aJy .dIloggJfL 2aLlogjglalai aJl.(bJI bJU) .1JJIgIiOuOjIJAiwUoS -.(7) LgHuei yai np aui bui ao1bg Jaoj 2 aui logigilpIaWJUJluwUg 10
aal aaii 1e Jao jy jy yj y jy jy jy jy jy jy jy jy jy jy jy jy jy jy jy jy jy jy jy jy jy jy jy jy jy jy jy jy jy jy jy jy jy jy jy jy jy jy jy jy jy jy jy jy jy jy jy jy jy jy j aagll aeg jwlll lilal g caii Ig j s jlu 1uulgl uJluoiwl uJluWj sic iiaIg iuaU
Robert Bosch Morocco SARL gjoo oo ojjoll gJw.53 JU 20300 +212529314327: sav.outillage@ma.bosch.com:gjgJxJI :aaosJuglicoJajll www.bosch-pt.com/serviceaddressesaui j 0sJn saai
gug aag aabw u jn yu w g u 10000000000000000000000000000000000000000000000000 !auiiuiuuiui uaiuiui aaiuuiui j   104|w Lwdu dlc u wJd JyJyJyJbla du 10Sosgjglj j jnogjg o slaiu Clqj pgeao g puaL
g jai lki jai jiu m psc. gjlgai I J Loojjgws Jaoi jgiw g jai U kci Sijg jgiu cly wui Saa lo . gsw uol yu/g siaigw  GAS 12-25 PL IEC/ L g L Jc g Ss EN 60335-2-69 sJgLJc g Ss 1 mg/m³| GAS 12-25GAS 12-25GAS 12-25 PL | |||
| I/s656065 | |||
| - | - | kg8,68,69 EPTA-Procedure lqjwsl jg01:2014 | |
| I/± | II/ | LSJWJL | |
| IPX4IPX4IPX4 | |||
| 33 | |||
Sjlogil gjg/8g
3601J7C...
1L0240V1700W100W 1K0/100/1E0/1H0220-230 V2050 W1 1F0/180/1N0220 V950 W100 W 000000000000000000000000000000000000000000000000000000 (GAS 12-25 PL) uu So j g i l d w Ssilw (16) uSo yjI 1uW - Silw (27) slaas L Jg (15) .LJLgUgUgUgUgUgUgUgUgUgUgUgUgUgUgUgUgUgUgUgUgUgUgUgUgUgUgUgUgUgUgUgUgUgUgUgUgUgUgUgUgUgUgUgUgUgUgUgUgUgUg USoSgJ
(B1 gaa aasg) uSo sJSLac (3) 0sJg J15) uSo SILW - aJbJcQg JIg g JLg gS uJUa JyJg pG aSI SLBisogjSJIu, cTalao g uSo SILW JUaJUuJyJusuJG So G u uJG bUw yua u) Siu SuJSI (uJL SILW yJ oLaW Bosch CgW Ug du uSo CgJ (CtALIO) uJUw d uSo . Siu daogj Sgo g (B2 gai dyis gaj) mssdslac slg. cwi dsslac sllsdo sio slosd lgl sla jy glaag jg 1g jg jy jy jy jy jy jy jy jy jy jy jy jy jy jy jy jy jy jy jy jy jy jy jy jy jy jy jy jy jy jy jy jy jy jy jy jy jy jy jy jy jy jy jy jy jy jy jy jy jy jy j yj yj yj yj yj yj yj yj yj yj yj yj yj yj yj yj yj yj yj yj yj yj yj yj yj yj yj yj yj yj yj yj yj yj yj yj yj yj yj yj yj yj yj yj yj yj yj yj yj yj yuai
gagai jil jllalwgljnl lls Jlalalssu wolololololololololololololololololololololololololololololololololololololololololololololololololololololololololololololol jagai jai jai jai jai jai jai jai jai jai jai jai jai jai jai jai jai jai jai jai jai jai jai jai jai jai jai jai jai jai jai jai jai jai jai jai jai jai jai jai jai jai jai jai jai jai jai jai jai jai jaia gw Egj) uSo cIalio a (A g
Sls SjJgauuW u jao (15) o siSo Silw JguiI) u So Ualao u slgi G aS,du L. gswuio ((17) sJwUjli.(16) o siSoLgglggljluqai
(15)SsO Silw (gJ (17) SjW JJIu W - Silw (27) sJluq gLo dss Ld j .sJlLg wosgwsg a uu 0 cSJJU wlo) oJgLo sSsO talao uuW - 15gJ psoo I (oJc g uo dgl. gJ jli .J (17) SsW JJIu L (27) sJluq doS gJ ,JwJy JIu .sJlP JJI JI J (F1gaaEg)gjo jilj (10) o s o yu cawg g siS jI (9) qjJ Cgai dSis Egsj) jJy 6 100 . (1)gol/s:GAS 12-25) GAS 12-25 PL "On" (1) Slae elgil (13) -0gj(3) - - -Silw Jusl J. (F2 jguai Egej) gbo julj (30) jssw (5gj Jols 1j (21) gjo j y LswyLgawS JwS JwS JJ (SwuSo) Jue g Js S awS L LsWuLduaS Sdyjgo SuSo Cg 1JU (Ulaio) Juc sJ5 duuS Ly (19) (7)da aS Egj) Sswu dus JsJ (G1-G3 gU (10) oisO yu cawg aS jI (9) Lj Cgagd gS gJ Jy aS (7) abao j1 Sdss.7 7 (7) daaoo Jy du Ss S (31) sso sggj gglg Suw . ss Caw (32) lo .8g g1g (7) abao 1s 7 Jg (7) abao j3 5u w Jua .(9) JWgSswLgAaS JwU (10)oIso Lcawg jSjI (9)Lj (CgaaSg a5 (7) abao j1 uUsy aC d (32) .wwj u wJ d a dsi Jg y Jy .5gwoLo ywJyLw L (31)wso 1g aJg! jle Jnssu/ uJd 9 10 20 21 22 jol j jol jol gac wjg g s 10 jai j jol jilg dgs o ds ljo . . jglj ngdabao jI jdlgljilg dy (28)aJ(22)gjul (D1gai auiS gaj) dgl jiljulj (10)osso yu cawg g sis jI (9) Lqj .(Cgai dsiEgaj)JJJ .1sJ 7)abao jI (D2gaiyEgaj)gljulj -1j jg 28) dwsjl (22) qgl jul g (7) adoj3 -5gjg jlgw gjbl (19) Sswu 1S dws J (9) 15 (19) 1 (E1ggiEgj)Jol j ( 0 < 1) ( 1 - u) u + ( 1 - u) u + 4q = 0. ( u > 0) (Cguiu (204 jol julg oljam julg ojjg jld Suiu (10) 5iO uXu Cuaa j (20) a uo Jgj (10) uo Suu Cuao (E2 uo uo Egai) ooi (20) juljulg oljam (29) julg ojjlq - julog ojjg 30j . 1 -1jijg uS (28) Cawdu -1g 1j - -1gJgJgJ 3 1g u (28) aws jI J (22) 1j (9) aai (g) 1 aaiuag aai g dai:di oiso jIbL HJ (Hg) Ls uuus gj jn d /n S uuus s uus d s uus c g s j u u u u u u u u u u u u u u u u u u u u u u u u u u u u u u u u u u u u u u u u u uu .ais 1uJ Caw slgo 108| (15) ssu (10) si so uu Jg Jols auiom I : GAS 12-25 PL 1go uSo g uS gJg Ugl G yj j 1gai Jlaiu J 3j u So jU y aJg U S W J ggl sJy Ugjo jul
julogai daj sJd
www.bosch-pt.com/serviceaddresses
olwss jJs aJjI
gduu 15duu gulaloo gj
g jj j j j j j j
.
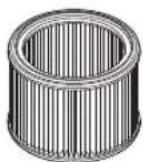
1619PB32821619PB3284
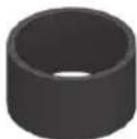
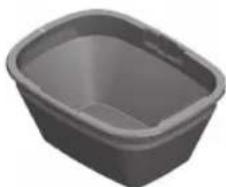

1600A02EM21619PB3255
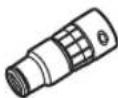
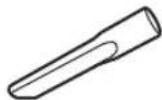


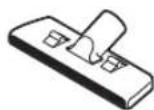
2608000585260700016526070001662607000170
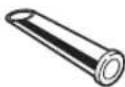
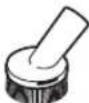
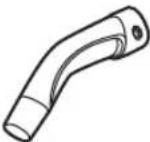
2608000573
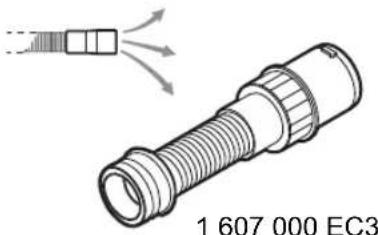
160920123016092012291609390481
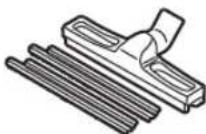
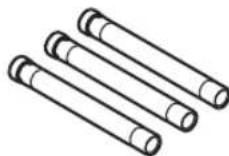
16093904782608000575
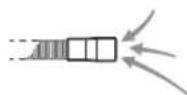
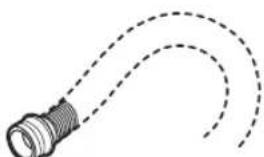
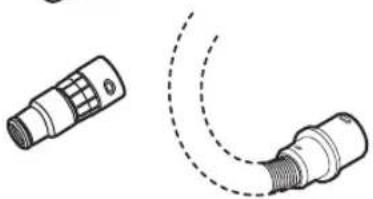


5m 35mm 2608000565
5m 35mm 2608000566
5m 22mm - 2608000567
5m 22mm 2608000568
