PV40P1M1 - Doorbells ELRO - Free user manual and instructions
Find the device manual for free PV40P1M1 ELRO in PDF.
User questions about PV40P1M1 ELRO
0 question about this device. Answer the ones you know or ask your own.
Ask a new question about this device
Download the instructions for your Doorbells in PDF format for free! Find your manual PV40P1M1 - ELRO and take your electronic device back in hand. On this page are published all the documents necessary for the use of your device. PV40P1M1 by ELRO.
USER MANUAL PV40P1M1 ELRO
Home is not a place. it's a feeling
Table of contents
English 3
Deutsch -25-
Nederlands 48
Francais 70
English - Instruction manual
Introduction 5
Contents of the package 5
Product description - 6
Outdoor unit 6-
Monitor 7-
Getting started 8
Necessary materials. 8
Step 1: outdoor unit. -8-
Step 2: Monitor. 9
Using the video door intercom 12
Main menu. 12
File management 13
Incoming calls. 14
Answering calls 15
Voicemail function 16
Activate voicemail function. 16
Record outgoing messages - 16
Motion detection recording. - 17
Activate motion detection recording. 17
Change settings. 17
General settings. 17
Time settings. 20
Sound settings. 20
Frequently asked questions (FAQ) 21
Safety and conformity 22
Technical specifications 23
Service and contact 23
Would you rather watch a video in which the installation and use of this product are explained? Then please visit www.elro.eu! There you will find the latest version of this manual, answers to frequently asked questions, and more useful information.
Read this manual carefully and keep it in a safe place for future reference.
Introduction
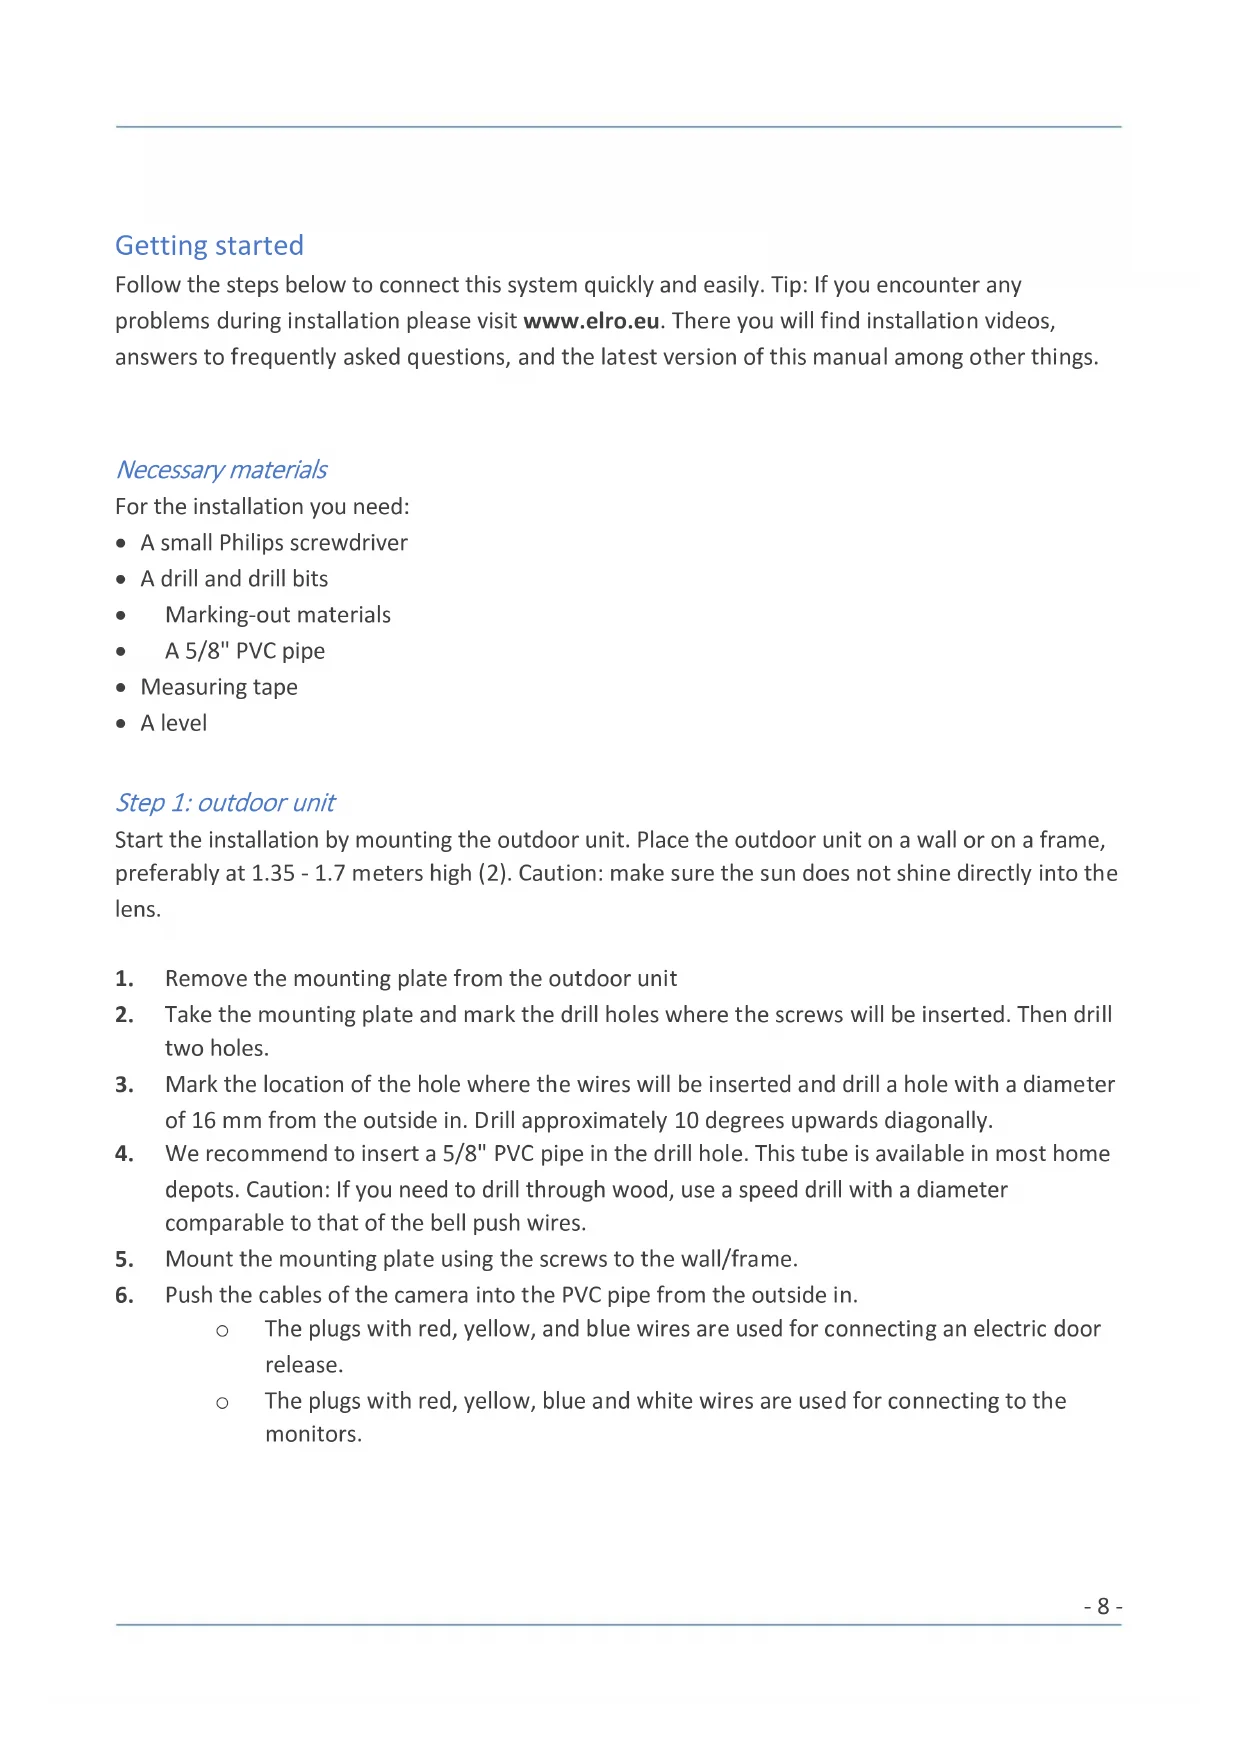
Congratulations on the purchase of your new ELRO PRO PV40 HD Video Door Intercom. This set consists of an outdoor unit with camera and 1 doorbell and 1 monitor, which makes it suitable to use in an apartment or in a home with a front door. The set can be upgraded with additional monitors. (not included)
Contents of the package
- Monitor
- Outdoor unit with camera and 1 bellpush
- Adapter with 1.5 metre cable
- Connection cable 15 metres
- Connecting cable 50 cm
- Mounting brackets Monitor
- Mounting materials for monitor
a. Screws (2x)
b. Wall Plugs (2x)
c. Mini cables. Caution: these small cables are not needed to connect this set and will remain unused.
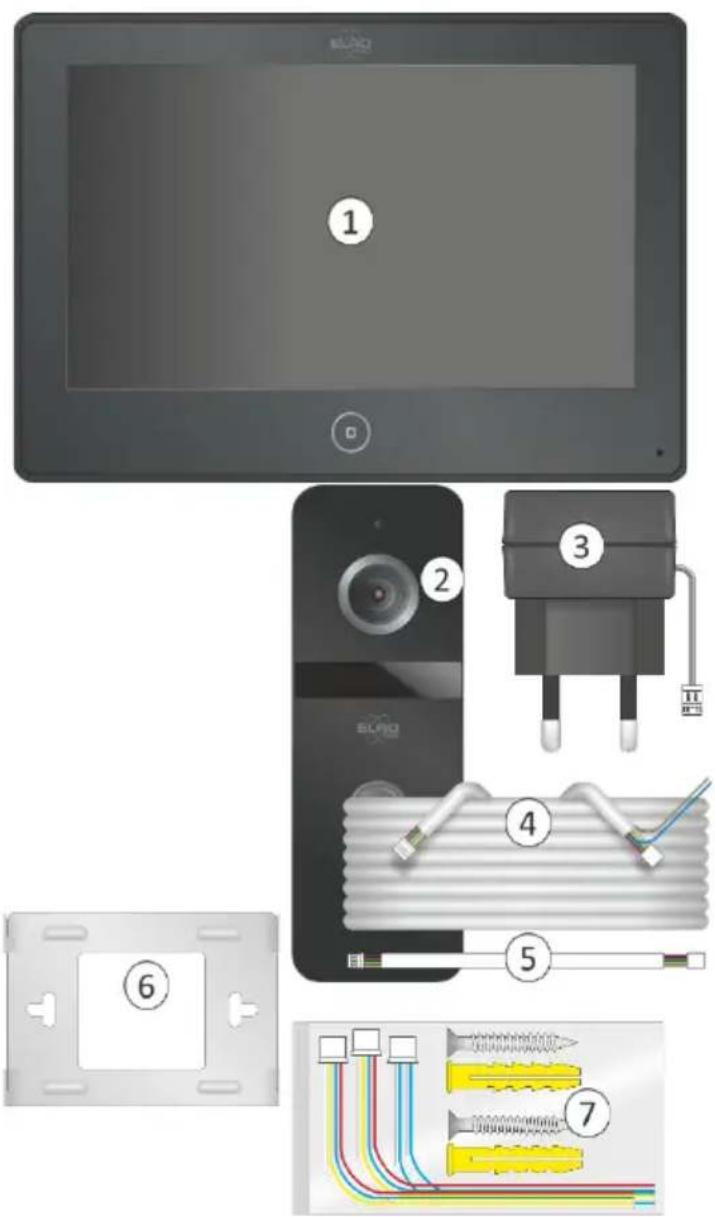
- Mounting materials for outdoor unit
a. Screws (2x)
b. Wall plugs (2x)
c. Double-pole cable clamp
d. Pricking tool
e. House number card
f. Hex screws (3x)
g. Hex key
h. Mini cable. Caution: these small cables are not needed to connect this set and will remain unused.
- User manual

Product description
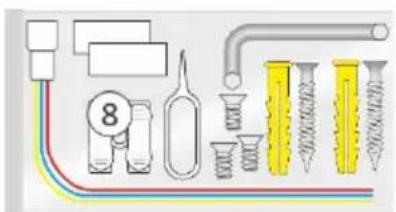
Outdoor unit
- Microphone
- Camera
- IR LEDs for night vision
- Doorbell
- Speaker
- Connection cable
- Mounting plate
- Hex screw
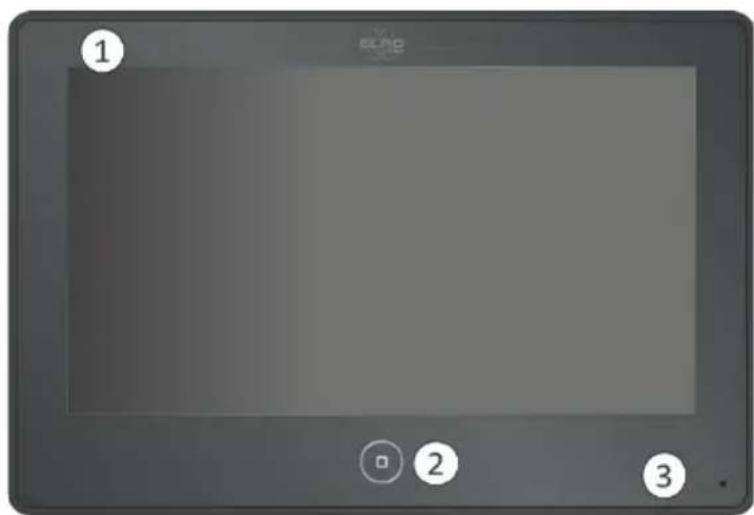
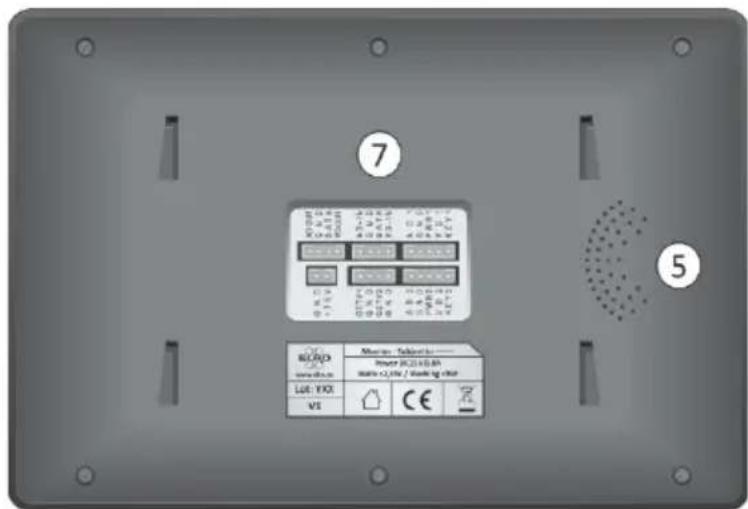
Monitor
Frontside
- LED power indicator
- Home button
- Microphone
Side view
- On/off switch
- Speaker
- Micro SD card slot
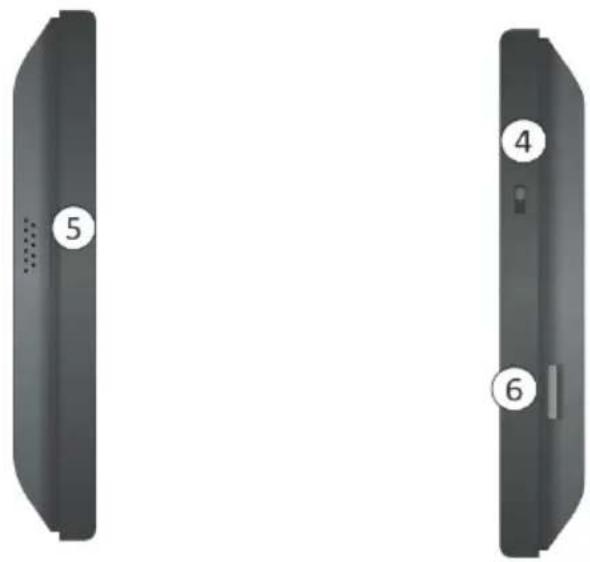
Backside
- Connection panel
Getting started
Follow the steps below to connect this system quickly and easily. Tip: If you encounter any problems during installation please visit www.elro.eu. There you will find installation videos, answers to frequently asked questions, and the latest version of this manual among other things.
Necessary materials
For the installation you need:
- A small Philips screwdriver
- A drill and drill bits
Marking-out materials
A 5 / 8'' PVC pipe - Measuring tape
A level
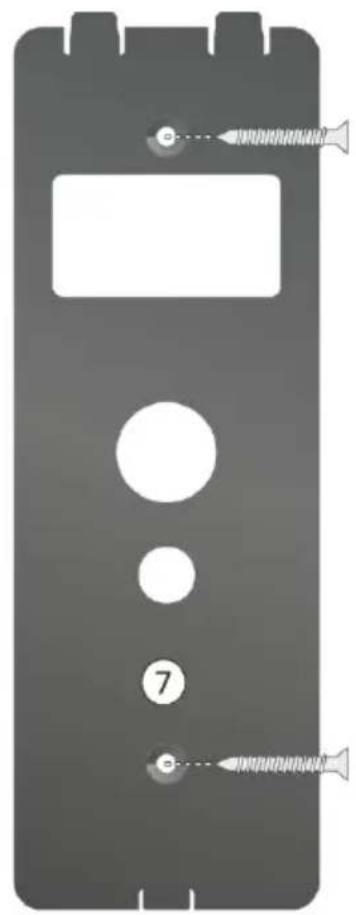
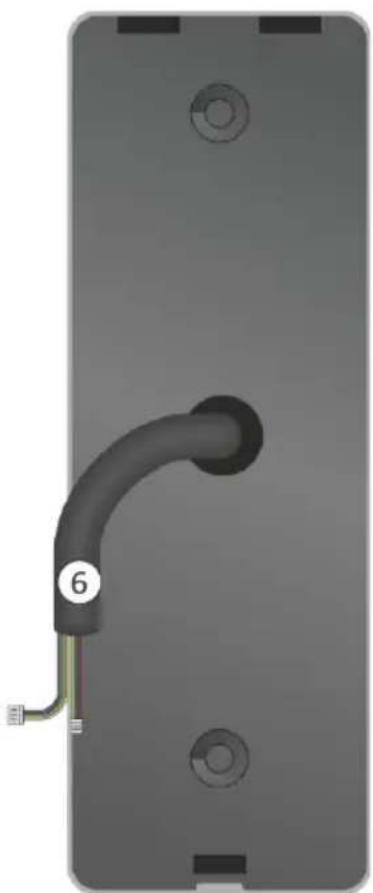
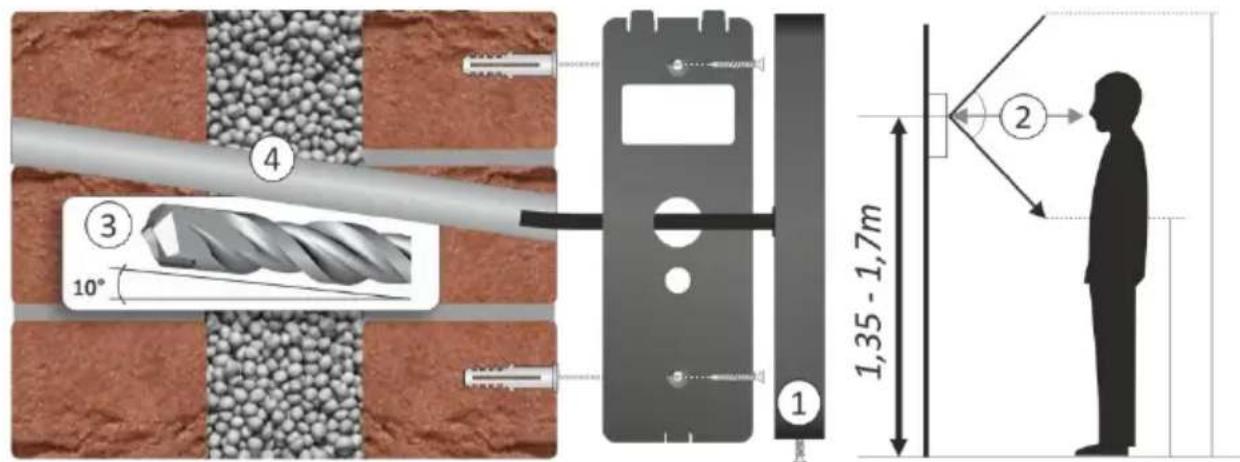
Step 1: outdoor unit
Start the installation by mounting the outdoor unit. Place the outdoor unit on a wall or on a frame, preferably at 1.35 - 1.7 meters high (2). Caution: make sure the sun does not shine directly into the lens.
- Remove the mounting plate from the outdoor unit
- Take the mounting plate and mark the drill holes where the screws will be inserted. Then drill two holes.
- Mark the location of the hole where the wires will be inserted and drill a hole with a diameter of 16mm from the outside in. Drill approximately 10 degrees upwards diagonally.
- We recommend to insert a 5/8" PVC pipe in the drill hole. This tube is available in most home depots. Caution: If you need to drill through wood, use a speed drill with a diameter comparable to that of the bell push wires.
- Mount the mounting plate using the screws to the wall/frame.
- Push the cables of the camera into the PVC pipe from the outside in.
The plugs with red, yellow, and blue wires are used for connecting an electric door release.
The plugs with red, yellow, blue and white wires are used for connecting to the monitors.
- Place the camera on the mounting plate and attach the hex screw to the bottom of the bell push. Now, the camera has been mounted to the mounting plate.
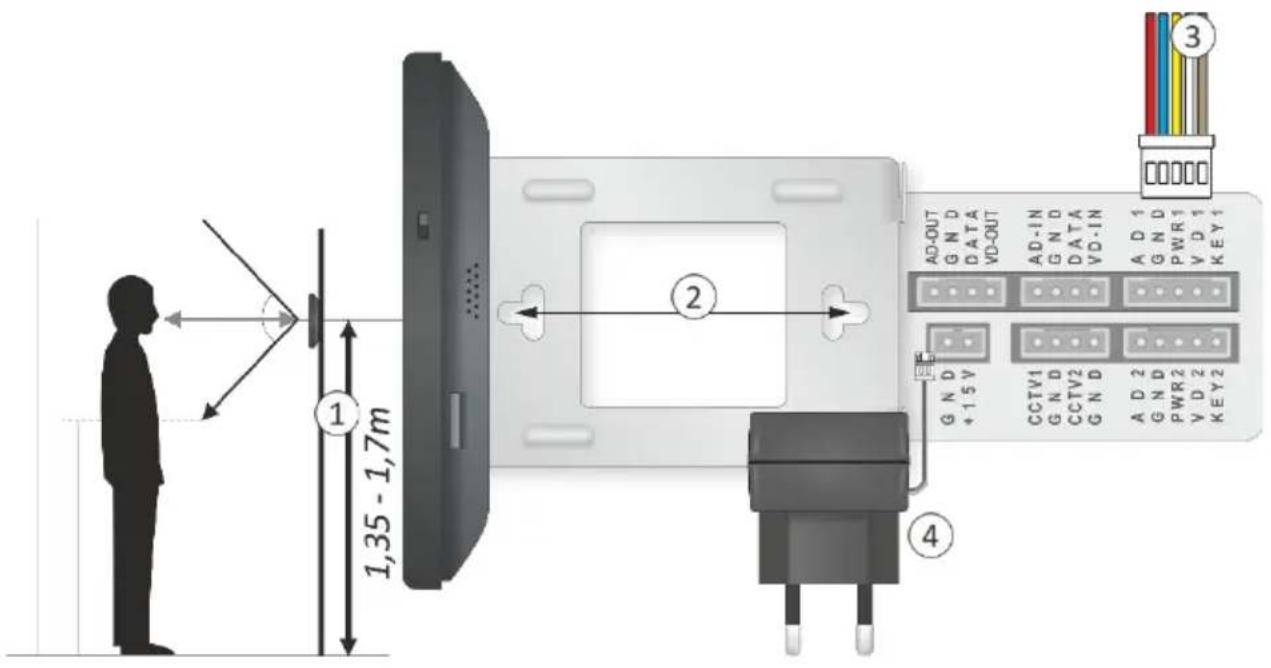
Step 2: Monitor
Connecting and mounting the monitor is the next step of the installation. The perfect mounting height of a monitor is between 1.35 and 1.7 meters depending on the height of the users (1).
- Take the mounting bracket for the monitor and mark the drill holes where the screws should be inserted.
- Drill two holes and mount the mounting bracket with the included materials.
- Connect the bell push to the monitors:
a) Take the 50-cm connecting cable and link it to the outdoor unit's connection cable.
b) Take the 15-metre connection cable and link it to the 50-cm connecting cable.
c) Connect the other end of the connection cable to the monitor.
d) Link the cables with red, yellow, blue, and white wires to the included extension cables.
e) Plug the connectors of the extension cables into the monitor (top right, AD1)
-
Plug the adapter into the monitor (bottom left, GND) and into a power socket.
-
Carefully slide the monitor over the hooks of the mounting bracket. Now, the video door intercom is ready to use!
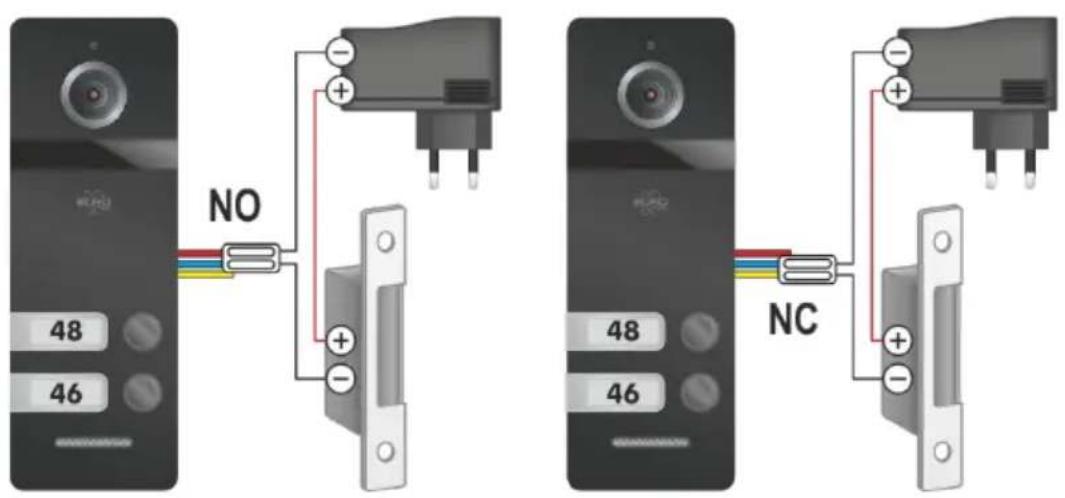
Connection diagram and electric lock
Below you will find the comprehensive connection diagrams for extra monitors or door locks. Based on safety guidelines, we recommend to connect an electric door release via the monitor. This diagram also indicates how to link a second monitor (1). The electric door release can also be released using the second monitor. The 2 connecting cables (2) are not used if no electric door release is linked during the installation. In this case, use the cable clamps (2) to seal the separate brown KEY1 wires.

An externally powered electric door release (AC/DC 5V ~ 24V) can be connected via the bell push/camera optionally. Check the NO red and blue or NC blue and yellow connection. Consult the lock's user manual for the right connection.
Using the video door intercom
Now that the outdoor unit and the monitors have been connected and powered it is time to setup the system. Slide the on/off switch (see chapter Monitor Product Overview) on the monitor upwards to power the system.
Main menu
The main menu provides access to the submenus below. Press the home button (see chapter Monitor Product Overview) to go from standby mode to the main menu, to go back from a sub menu to the main menu, or to go from the main menu to standby mode.
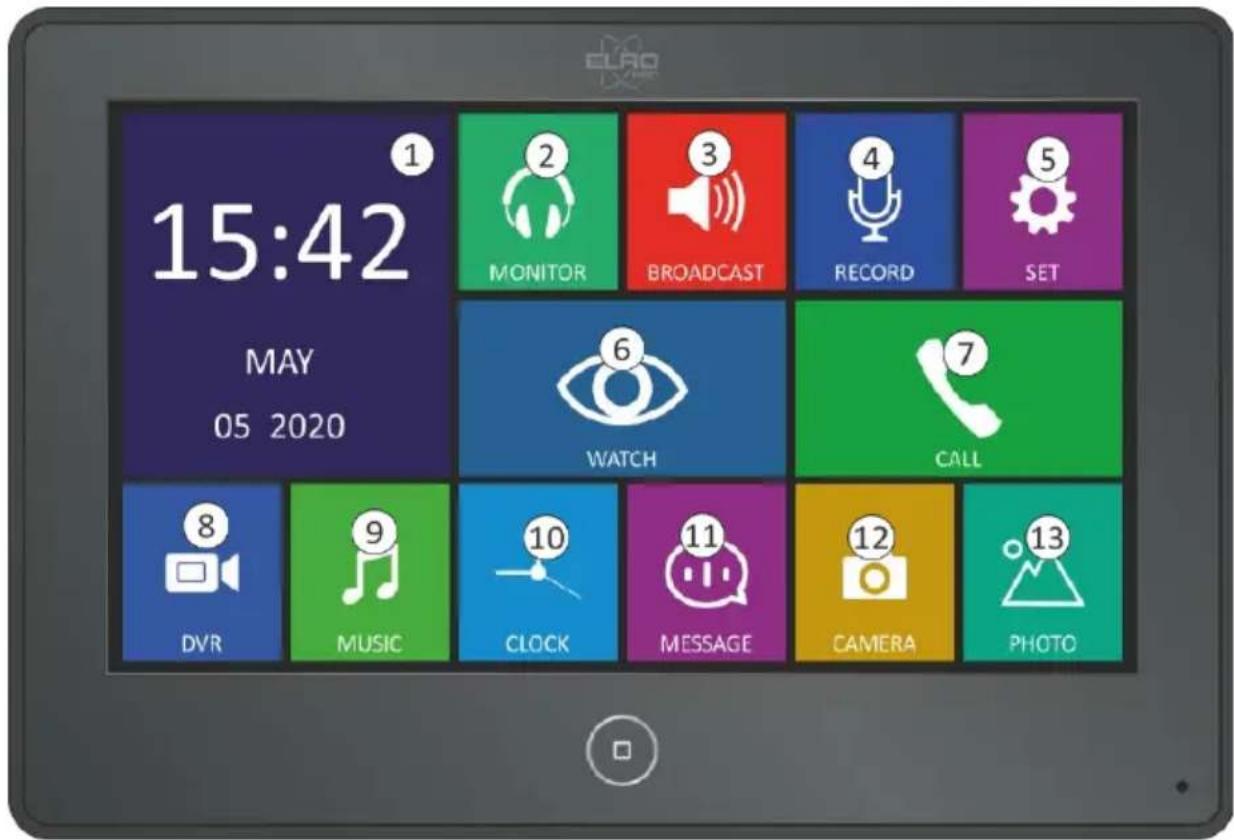
- Time and date
Display current time and date
- Monitor Listen along with other monitors. Caution: this functionality only works if several monitors are connected.
- Broadcasting Communicate via the other monitor. The sound is recorded and played live on the other monitor. Caution: This function is only available if multiple monitors are connected.
- Recording Press the Record icon to start a sound recording and press it again to end the sound recording. You can listen to sound recordings via the Message menu. Caution: this function is only available if a micro SD card is inserted.
- Settings Change settings.
- View View live images from the outdoor unit. Via the View menu you can also change display settings such as volume, contrast, brightness, and opacity (colour). Aside from that, in this menu you can also open the gate and door, talk to someone outside, take pictures, and record videos.
- Calling Call a monitor in another room.
- Recording Watch video recordings which were earlier recorded by the outdoor unit. Caution: this function is only available if a micro SD card is inserted.
- Music Play music from the micro SD card. Caution: this function only works if a micro SD card is inserted.
- Clock Display calendar and time in standby mode.
- Message Listen to voice messages from visitors and yourself.
- Camera Look at images made by the outdoor unit and saved in the monitor's internal memory.
- Image This allows you to look at photo's saved on the micro SD card. Moreover, you will see a slideshow of all the pictures saved on the SD card. This enables you to transform your monitor into a digital picture frame!
File management
When files are saved they are stored in different locations. Here you can read how to manage and remove them.
- Displaying files:
a. Swipe left / right on the screen to display the last / next file;
b. Swipe up to return;
c. Tap the screen to adjust the volume.
- In the Files menu, swipe the slides up /down to see more pictures. This can also be done by pressing the arrow buttons.
- Files can be removed by pressing and then by selecting the images you want to remove. Subsequently, you press again and you are asked if you are sure you would like to remove the files.
Incoming calls
When the bell is rung both the monitor and the outdoor unit play a ringtone (selection of 13 melodies included) until the call is answered. The duration of the ringtone can be set between 10 and 60 seconds in the sound settings menu. The outdoor unit automatically takes a picture when the bell is rung. This picture is saved in the monitor's internal memory, which has the capacity to store 100 pictures. You can view the pictures stored in the internal memory via the Camera menu. If a micro SD card is inserted in the monitor, pictures are automatically saved there. Pictures saved in the internal (flash) memory can be transferred to the micro SD card. When the outdoor unit has taken a new photo, after receiving an incoming call, a red ball indicator becomes visible at Camera in the main menu to indicate that a new, unseen picture has been saved.
Answering calls
Both the monitor and the outdoor unit play a melody when a visitor rings the bell, and the message INCOMING CALL is displayed on the monitor.
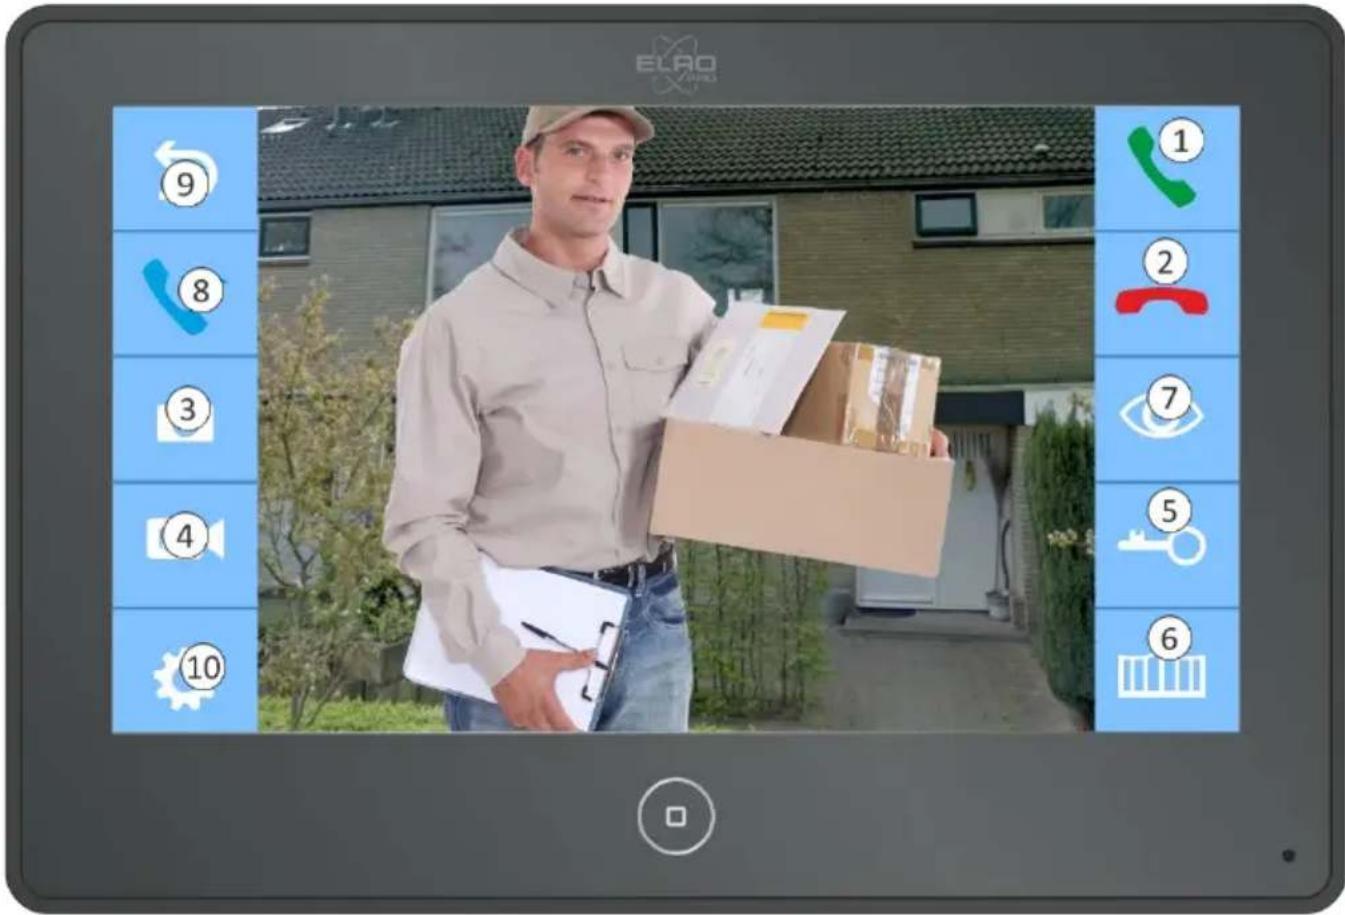
- Press to answer the call and talk with the visitor. The green telephone receiver icon now changes into a By pressing on the microphone you can activate or deactivate the microphone.
- Press to end or reject the call.
- Press to take a picture. Pictures are saved in the monitor's internal memory or on an inserted SD card.
- Press to record a video. This function only works if a micro SD card is inserted. A red ball indicator is now visible in the main menu to indicate that a new, unseen video has been saved.
- Press to release the door. This function is only available if an electric door release is connected.
-
Press to release the gate. This function is only available if a gate lock release is connected.
-
By pressing you change the point of view. (only available if more than one camera/bell push is connected).
- Press to forward a conversation to a second monitor (only available if more than one monitor is connected).
- Press to return to the main menu
- Press to enter the video settings
If the call is not answered the monitor switches back to standby mode. The time you have to answer incoming calls can be set at "Melody Duration" in the Settings menu.
Voicemail function
This video door intercom is equipped with a voicemail function. If an incoming call is rejected or unanswered a standard message or message selected by the user, is played after the ringtone has finished. Subsequently, the visitor is given the option to leave a message of approximately 20 seconds. This is followed by a closing message, selected by the user. If a visitor has left a message, a red ball indicator becomes visible in the main menu at Message to indicate that a new message has been saved.
Activate voicemail function
- Go to the Settings menu.
- Select.
- Swipe to the second page and activate the voicemail function by selecting "Leave automatic message".
Record outgoing messages
The standard outgoing messages are saved in the monitor's internal memory and cannot be changed. If you would like to record your own outgoing message, it is necessary to insert an SD card in the monitor
- In the main menu select Record and record your welcome message (e.g. "unfortunately, your call cannot be answered right now but please leave a message after this message ends"). Select Record again to end the recording.
- Repeat this step to record a concluding message (e.g. "Thank you for your message, we will get in touch with you soon").
-
In the main menu at Message, a red ball indicator becomes visible to indicate that new messages have been recorded.
-
Click Message in the main menu and select the recorded welcome message. As soon as the welcome message starts playing tap on in this screen to configure the voicemail function.
- Subsequently, change the TONE TYPE from SYSTEM TONE to USER TONE.
- Subsequently, for the welcome message select (WELCOMEMESSAGE).
- Return to the recorded messages, select your concluding message. As soon as the concluding message starts playing tap on this screen to configure the voicemail function.
- Where you selected welcome message (STARTING TONE) before, you now select concluding message (CONCLUDING TONE).
- Here you can also set the volume of the voicemail function.
Motion detection recording
The motion detection recording function enables you to know at all times if someone is at your front door. Once this function is enabled, the outdoor unit starts recording at set times if motion is detected. The standard recording time is set to 1 minute. The motion sensitivity level of the motion detector can be adjusted accordingly. Caution: A micro SD card is required to use this function.
Activate motion detection recording
In order to enable the motion detection recording function, take the following instructions into account:
- A micro SD card of at least 2 GB or more should be inserted in the monitor. For optimal performance of the DVR function we recommend using a SD card of 8 GB or more.
- For high quality video select the 1280x720 resolution in the settings menu.
Follow the steps below to enable motion detection recording:
- In the main menu select.
- Subsequently select.
- Then make sure to set DVR to ENABLE and activate Motion detect sensitivity.
- Now the fuction is ready to use.
Change settings
Tap the left/right arrow to change the settings. Swipe up or down to scroll through the menu.
General settings
In this menu you will find the general settings of the device.
| Language | Select a system language. |
| Do not disturb | No sound is played by the monitor during incoming calls if do not disturb is enabled. |
| Listening on other monitors | Enable/disable the option to listen on other monitors (relevant only if more than one monitor is connected). |
| Monitor unlock | Once this function is enabled, you can release the gate or door in Watch mode. In this case, no incoming call is required to release the door/gate. |
| Connection ports | This function is unavailable for this system. |
| Monitor location | Assign a room to the monitor (available selection: rooms 1, 2, 3, or 4). Caution: room 1 must be assigned to the main monitor. |
| Reset to factory settings | Reset to default settings. |
| Format flash memory | Remove all files stored in internal memory. |
| Format SD card | Remove all files stored on the micro SD card. |
| Copy to SD card | Copy all files from the internal memory to the SD card. |
| Automatic picture incoming calls | Set how many pictures are taken during an incoming call: 00: no automatic pictures 01: 1 automatic picture. |
| Leave automatic message (Absence Assistant) | Enable if you want visitors to be able to leave a message via the outdoor unit. This function works only if an SD card is inserted. In order to use this function, a welcome message and concluding message should be recorded. If you decide not to, a standard message is played. |
| Screensaver time | Set the time for the monitor to switch to standby mode if inactive (between 30 seconds and 1 hour) |
| Software version | System software version |
| DVR | Enable/disable DVR function |
| FRAME RATE | Set the number of frames per second (5 - 10 - 15 - 20 - 25). More frames per second means a higher streaming quality of recorded videos. |
| SCREEN RESOLUTION | Set the screen resolution of video recordings (640x480, 1280x720, 1920x1080). A higher screen resolution means sharper video quality. |
| MOTION DETECTION | Set the motion detector's sensitivity (off - low - medium - high). This setting determines at which degree of motion the camera starts recording. |
| START TIME | Set at what time the DVR function switches on. |
| END TIME | Set at what time the DVR function switches off. |
| RECORDING LOCATION | Set to door 1. |
| SCREENSAVER TIME | On = The screen displays the time when the DVR function is active and when the screen is in standby mode. Off = The screen is in standby mode only when the DVR function is active. Nothing is displayed on the monitor. |
| SCREENSAVER - MOTION | On = When the DVR function is enabled, the monitor switches on if motion is detected. In this case you can tell what caused motion detection to be activated. Off = The screen remains black when the DVR function is enabled and if motion is detected. |
Time settings
In this menu you will find all the device's time settings. It also provides the option to set an alarm.

| Current time | Set the current time (hour-minute-second). |
| Current date | Set the current date (day - month - year) |
| Alarm tone selection | Set an alarm tone. There are 13 available melodies. |
| Alarm clock 1 | Set an alarm. Choose the preferred time and day (off-always-per day-time). |
| Alarm clock 2 | Set an alarm. Choose the preferred time and day (off-always-per day-time). |
| Alarm clock 3 | Set an alarm. Choose the preferred time and day (off-always-per day-time). |
| Alarm clock 4 | Set an alarm. Choose the preferred time and day (off-always-per day-time). |
Sound settings
In this menu you will find all the device's sound settings.

| Melody duration | Set the cancellation time for unanswered calls. Once this time runs out, the incoming call will be cancelled. An automatic message is played if the absence assistance is enabled (only if a micro SD card is inserted in the monitor and the function is enabled). |
| Ringtone volume | Set the ringtone volume: 00 = Off 09 = Maximum volume |
| Door 1: Ringtone selection | Set the ringtone that is played when someone rings at door 1. |
| Door 2: Ringtone selection | Set the ringtone that is played when someone rings at door 2. |
| Intercome 1: Ringtone selection | This setting adjusts the sound during a call between the monitors. |
| Repeat incoming-call ringtone | Set if you want the ringtone to be repeated during an unanswered call. |
| Night mode: 22:00 - 07:00 | Enable or disable night mode. This mode automatically lowers the ringtone volume to the set volume between 22:00 and 07:00.00 = Off05 = Maximum volume |
Frequently asked questions (FAQ)
How can I use a door lock release to release the door?
You can do this by pressing in the lower right corner of the screen during an incoming call or at any other time.
How do I change the volume of the bel push?
The volume of the bell push can be changed by removing the small cap on the back of the bell push.
- Does the camera have a motion detection sensor?
Yes, the camera has a motion detection sensor that enables automatic video recording. See chapter Motion Detection Recording.
The sound quality is bad or there is no sound at all.
Try to link the cables again and make sure you are using the indicated colours.
- The monitor remains blank.
Try to link the wires again. Check the power supply if this does not resolve the issue. Only use the included power adapter. Using an extension cable might cause low power resulting in poor functioning of the product.
- Is the outdoor unit waterproof?
The outdoor unit is water and dust resistant and is suitable for any type of weather. The bell push has an IP value of IP66.
- Can I connect the PV40 to an app?
It is not possible to connect the PV40 to an app.
Safety and conformity
Disclaimer
ELRO is not liable in any way to damage caused during mounting/installation. In doubt always consult a professional.
Caution
- Do not plug in more than one power plug at the same time. This may cause excessive heat or a fire.
- Do not connect other products to the device while using it. This may cause malfunction.
- Do not use water, thinners, or detergents used for cleaning oil products when cleaning the outside of the device. Clean it with a dry cloth to prevent malfunction or electric shocks.
- Do not install the product in a damp environment. This may cause an electric shock or a fire.
- Unplug the power cord gently. If damaged, the power cord may cause a fire or an electric shock.
- Do not plug in the power plug with a wet hand. This may cause an electric shock.
- Do not disassemble, repair, or alter the product. This may cause a fire, an electric shock, or an injury due to malfunctioning of the product.
- Do not use an alternating current interruptor. This may cause an electric shock.
- Do not plug in the power plug if the holes in the socket are bigger than usual. This may cause an electric shock or a fire.
Make sure no dust or other substances are collected on the product.
Make sure no substances get into the product. This may cause malfunction. - Do not place heavy objects on the product. This may cause malfunction.
- Do not disassemble the product and prevent any damage.
- Avoid direct sunlight on the heating systems during installation.
Install the product on a flat and stable surface to ensure optimal functioning. - Unplug the device if unused for a long period of time.
- Immediately unplug the device if it produces unusual sounds and contact the service centre.
Technical specifications
| Monitor | |
| Power supply | DC15V/0.8A |
| Power consumption | 9W (max) 2.5W (inactive) |
| Working temperature | 0 °C/ + 40 °C |
| Humidity | 0% - 95% |
| Display | 7" (800x480 pixels) |
| Supports CVBS input signal | AHD/CVI/TVI (up to 1080p) |
| Connection | 4-core |
| Dimensions | 186 x 127 x 19 mm |
| Weight | 430 grams |
| Bell push/camera | |
| Camera | 1/3" colour CMOS |
| FOV angle | 110° |
| Night vision | IR |
| Power supply | DC 10-15V |
| Power consumption | 2.5 W |
| Working temperature | -30 °C /+ 60 °C |
| Waterproof | IP66 |
| Casing | Metal/vandal resistant |
| Screen resolution | 800 TVL/1080p |
| Connection | 4-cores |
| Dimensions | 154mm x 55mm x 18 mm |
| Weight | 340 grams |
Service and contact
Do you want to contact us? You can! In order to provide the best and fastest service as possible we ask you to take the following information into account:
For questions concerning installation, use, or functioning of the product:
- Visit www.elro.eu to quickly find an answer to your question. There you will find answers to frequently asked questions, detailed installation videos, and the latest version of your product's manual.
If the website has not resolved your issue you can leave a message via the product page or send an email to info@elro.eu. We will help you as soon as possible.
For other questions:
- Send an email to info@elro.eu. We will get back to you shortly.
This product is produced by:
ELRO Europe
PO box 9607 - box E800
1006 GC Amsterdam
The Netherlands
www.elro.eu
Specifications techniques 90