
SX201W - Doorbell ELRO - Free user manual and instructions
Find the device manual for free SX201W ELRO in PDF.


| Product Type | Wireless Doorbell Chime |
| Model | SX201W |
| Brand | Elro |
| Color | White |
| Dimensions (approx.) | 8 x 8 x 3 cm |
| Weight (approx.) | 100 g |
| Power Supply | 2x AA batteries (not included) or USB-C (optional) |
| Battery Life | Up to 12 months with normal use |
| Transmission Range | Up to 150 meters in open area |
| Number of Melodies | 36 selectable chimes |
| Volume Levels | 5 adjustable levels |
| Flashing Light | Yes, for visual alert |
| Waterproof Rating (outdoor push button) | IP44 |
| Installation | Wall mountable with included screws |
| Compatibility | Works with Elro push buttons and most third-party bell buttons |
| Maintenance | Wipe with a dry cloth; avoid moisture |
| Safety | Low voltage; no risk of electric shock |
| Spare Parts & Repairability | Batteries replaceable; other parts not user-serviceable |
| Certifications | CE, RoHS |
Frequently Asked Questions - SX201W ELRO
User questions about SX201W ELRO
0 question about this device. Answer the ones you know or ask your own.
Ask a new question about this device
Download the instructions for your Doorbell in PDF format for free! Find your manual SX201W - ELRO and take your electronic device back in hand. On this page are published all the documents necessary for the use of your device. SX201W by ELRO.
USER MANUAL SX201W ELRO
Wire Free Rechargeable Door Chime Kit
SX-201i/201W
1

Push Button
- Open up the push button by pushing in the tab at the bottom of the push with a small flat screwdriver. - Remove the isolation strip from the battery compartment then it is ready to use. - When replacing the battery, ensure the battery polarity matches the internal markings ("+" facing upwards), then press the battery down so that it is sitting firmly in its compartment.
2
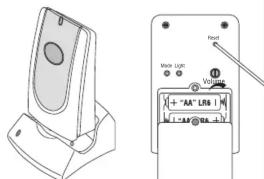
Door Chime
- The rechargeable batteries are installed; charge the batteries fully before use. - Use a small pin insert into the small hole marked "Reset" and press. It will beep twice to indicate that it is ready for the new operation code registration (Please see Digital Code Set Up). - Place the Chime unit onto the charger, the LED on the charger will light up in Red to indicate that the batteries are charging. - When the LED on the charger lights up in Green colour, it is indicating that the charging procedure is completed and the chime unit is ready to use.
3

Melody Selection
Press the melody selector once to select a melody as your door chime sound. There is a total of 8 melodies for selection: 1) Tubular 3-notes 5) Tubular Scare 2) Big Ben 6) Clarinet 3) Tubular 2-notes 7) Saxophone 4) Solo 8) Morning Dew Additional Byron "SX" range products can be purchased for compatibility.
4

natural_image
Illustration of a hand pressing a button on a circular device (no text or symbols visible)Signal Sent Indicator Light
Digital Code Set Up
- Press the Push Button once, a new operation code is generated randomly and sent to the Door Chime unit. - The Door Chime will sound to indicate that a new operation code is registered and memorised.
5

Push Button Installation
- Using the holes on the back of push button as a template, mark the fixing position for the unit. - Drill holes and fit wall plugs and secure the push button unit to the wall with screws. - Do not mount it on any metal surface or UPVC door frame.
6

Door Chime Installation
Place the Door Chime unit on any table top or flat surface, then it is ready to use.
Adjust the volume
Use a small flat screwdriver to adjust the sound volume.
Mode Selector
Press the mode selector to select the following functions:
a) Sound and Light b) Light Only c) Sound Only
7
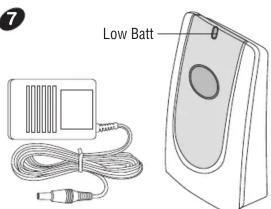
Low Battery Indicator
Red LED indicator on the top of Door Chime unit will flash when the batteries are running low to the point that they need to recharge. Simply place the chime unit onto the charger to recharge the batteries. Charger Connect the charger with A/C-D/C 9volt 300mA adaptor (Byron model SX-36 - included), then plug the adaptor into any convenient wall socket, after then it is ready to use.
8
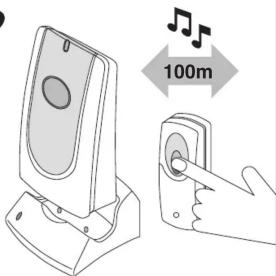
Operation
- Press the button on the Push Button unit once, it sends a wireless signal to the Door Chime and your Door Chime unit will sound. - Operate the Door Chime unit within the operation range, test it before final installation.
Wire Free Rechargeable Door Chime Kit SX-201i/201W
Push Button unit
Power: 1 x 3volt Lithium battery (CR2032 - included)
Door Chime unit
Power: 3 x 1.2volt "AA" Ni-MH batteries (included)
Melody Selection
There are 8-melodies for selection
1) Tubular 3-notes 3) Tubular 2-notes 5) Tubular Scare 7) Saxophone
Additional Byron "SX" range products can be purchased for compatibility.
Digital Code Set Up
The Door Chime kit is equipped with an advanced random and self-learning operation coding ability
therefore no setting is needed. Read the following instructions before use.
- First time operation:
After battery installation on the Push Button, then reset the Door Chime unit by insert a small pin into the small hole marked "Reset" on the back of chime unit and press, the door chime unit will beep twice to indicate that it is ready for new operation code registration. Press the Push Button once and it will generate a new operation code randomly and send a wireless signal to the Door Chime unit, the door chime will sound to indicate that a new operation code is registered and memorised.
- Interference from similar unit operating nearby:
a) Simply remove the battery from the Push Button and rest for 10 seconds, after then insert a small pin into the small hole marked "Reset" on the back of chime unit and press, this will erase the memory. The Door Chime unit it will give 2-beeps to indicate that it is ready for the new code registration.
b) Re-insert the battery into the Push Button, then press the Push Button once, it will generate a new operation code randomly and send a wireless signal to the Door Chime and it will sound to indicate that a new operation code is registered and memorised.
- Front and back door Bell Push operation:
a) Remove the battery from the Push Buttons (Front & Back Door) and rest for 10 seconds, after then reset the Door Chime units and this will erase the memory. The Door Chime unit it will give 2-beeps to indicate that it is ready for the new code registration.
b) Insert the battery into the Push Buttons (Front & Back Door).
c) Press the front door Push Button once, it will generate a new operation code randomly and send a wireless signal to the door chime unit and it will sound to indicate that a new operation code is registered and memorised.
d) After, (within 2 minutes) press the back door Push Button once, it will generate a new operation code randomly and send a wireless signal to the door chime unit and it will sound to indicate that a new operation code is registered and memorised. The door chime unit has ability to memorize both operation codes and will only work with it.
e) Test to ensure correct operation before final installation.
Door Chime Operation
The function (Mode) selector is located at the back of the unit; press the button to select one of the following functions to operate the chime unit accordingly:
a) Sound and Light: The Door chime will sound as well as the Super Bright LED Light will flash to maximizing attention
b) Light Only: The Super Bright LED Light on the Door Chime unit will flash
c) Sound Only: Door Chime unit will sound
The door chime will start operate at "Sound Only" function initially.
For repeat sound, press the button again. Holding the button in will NOT repeat the sound.
Flashing Light Pattern
When (a) Sound + Light OR (b) Light Only mode is selected, press the flashing light pattern button "Light" at the back of the chime unit to select the operation in the following pattern:
1) Sound + Light mode - When the door chime sound, it will flash in following pattern:
a) Slow flashing for 5 seconds
b) Fast flashing for 5 seconds
c) Flashing intermittent, 2 seconds "On", 1 second "Off" and 2 seconds "On" again
2) Light Only mode - The door chime will flash in following pattern without the chime sound:
a) Slow flashing for 10 seconds
b) Fast flashing for 10 seconds
c) Flashing intermittent, 2 seconds "On", 1 second "Off" and 2 seconds "On" again for 2 times.
Door Chime Unit – Charging Procedure
-
Connect the charger with A/C-D/C 9volt 300mA adaptor (Byron model SX-36 - included), then plug the adaptor into any convenient wall socket, after then the charger is ready to use.
-
Place the Chime unit on to the charger, the LED on the charger will light up in "Red" to indicate that the batteries are charging.
-
When the LED on the charger lights up in "Green" colour, it is indicating that the charging procedure is completed and the chime unit is ready to use.
Note: Charge the batteries fully before use.
Important
-
Do not mount either unit close to fireplace or expose to high temperatures.
-
Do not expose the Door Chime unit to direct sunlight or moisture
-
Always use alkaline battery. Please dispose of old, defective batteries in an environmentally friendly manner in accordance with the relevant legislation.
-
Make sure that no naked flame sources, such as lighted candles, should be placed on the unit.
-
The unit should not be exposed to dripping or splashing and no objects filled with liquids, such as vases, should be placed on the unit.
-
CAUTION: Replace only with the same or equivalent type of battery that is recommended by the manufacturer.
-
CAUTON: Make sure batteries are installed correctly as per the internal markings.
-
CAUTION: Danger of explosion if battery is incorrectly installed or replaced.
-
IMPORTANT: There are no serviceable parts in the units, do not attempt to repair it.
User Hints
If the door chime unit does not sound, please check the following:
a) Flat batteries in either Push Button or Door Chime units - change the Push Button battery and re-charge the Door Chime batteries.
b) Wrong battery polarity in either Push Button - re-insert the batteries.
c) Push Button and Door Chime units are not on the same operation codes - reset the code (see digital code set up)
d) Units are out of range - Operate the Chime unit within the operation range.
e) Reset the door chime unit if it does not sound, or has sound distortion.
Specification
Operating Temperature: -10C - +40C
Operating Distance: 100metre (330ft approx. - in open field & at suitable condition)
Selectable Tone: Total Eight (8) melodies available
Selectable Digital Code: Total two hundred fifty six (256) possible digital codes
“Type R2 Device - device where the sound output is created by the initial operation of the control and where the period of sound output continues for the designed duration irrespective of condition of the control.”
CH Byron Electrical Ltd
Byron House
34 Sherwood Rd, Astonfield
Bromsgrove, B60 3DR
UK
Tel: 0845 2301231
e. support@chbyron.com w: www.chbyron.com


- Wire Free Rechargeable Door Chime Kit
- SX-201i/201W
- Push Button
- Door Chime
- Melody Selection
- Digital Code Set Up
- Push Button Installation
- Door Chime Installation
- Low Battery Indicator
- Operation
- Wire Free Rechargeable Door Chime Kit SX-201i/201W
- Push Button unit
- Door Chime Operation
- Flashing Light Pattern
- Door Chime Unit – Charging Procedure
- Important
- User Hints
- Specification
Brand : ELRO
Model : SX201W
Category : Doorbell