
Trigger Finger Pro - Electronic musical instrument M-AUDIO - Free user manual and instructions
Find the device manual for free Trigger Finger Pro M-AUDIO in PDF.

| Product Type | Pad MIDI Controller |
| Brand | M-Audio |
| Model | Trigger Finger Pro |
| Dimensions (approx.) | 419 x 259 x 56 mm |
| Weight (approx.) | 1.13 kg |
| Power Supply | USB bus or 6 V DC, 1 A power adapter (center positive, sold separately) |
| Number of Pads | 16 velocity- and pressure-sensitive pads, 4 banks (64 total) |
| Number of Rotary Knobs | 8 endless knobs |
| Number of Potentiometers | 8 potentiometers |
| Number of Assignable Buttons | 8 buttons |
| Connectivity | USB, 5-pin MIDI output, power input |
| Main Features | MIDI control, built-in sequencer, roll mode, 4 command banks, Mackie Control / HUI compatibility, integration with Arsenal, AIR Drums, Hybrid 3.0 software |
| Operating Modes | Performance, Pad, Control, Sequence, Select, Next Sequence, Solo, Mute |
| Included Software | Arsenal, AIR Drums, Hybrid 3.0 (download) |
| Maintenance and Cleaning | Clean with a soft, dry cloth. Do not use chemicals. |
| Safety | Do not expose to moisture or excessive heat. Use only the recommended adapter. Disconnect during thunderstorms. |
| Spare Parts and Repairability | No spare parts provided. For repairs, contact M-Audio customer service. |
Frequently Asked Questions - Trigger Finger Pro M-AUDIO
User questions about Trigger Finger Pro M-AUDIO
0 question about this device. Answer the ones you know or ask your own.
Ask a new question about this device
Download the instructions for your Electronic musical instrument in PDF format for free! Find your manual Trigger Finger Pro - M-AUDIO and take your electronic device back in hand. On this page are published all the documents necessary for the use of your device. Trigger Finger Pro by M-AUDIO.
USER MANUAL Trigger Finger Pro M-AUDIO
Arsenal software (download)
Hex Key
AIR Drums software (download)
Quickstart
Guide
Hybrid 3.0 software (download)
User Guide (download)
Software Download Card Safety & Warranty Manual
Important: Visit m-audio.com/TFP to download the complete User Guide and all software applications.
Support
For the latest information about this product (system requirements, compatibility information, etc.) and product registration, visit m-audio.com/TFP.
For additional product support, visit m-audio.com/support.
Getting Started
1. Download and Install the Software
We highly recommend downloading and installing the included software applications and their sound content: Arsenal, AIR Drums, and Hybrid 3.0.
- Go to m-audio.com/softwaredownload and download the installation files for the software applications (for your computer's operating system) and sound content.
- Open the first file and double-click the .exe (Windows) or .dmg (Mac OS X).
- Follow the on-screen instructions to complete the installation.
- Repeat Steps 2-3 for the remaining files. Sound content libraries can be large, so those installations may take a while!
2. Connect
Here is just an example of how to use Trigger Finger Pro to your setup:

3. Set Up Trigger Finger Pro with Your Software
To select Trigger Finger Pro as a controller for your digital audio workstation (DAW):
- Connect Trigger Finger Pro to your computer using a standard USB cable. (If you are connecting Trigger Finger Pro to a USB hub, make sure it is a powered hub.)
- Power on Trigger Finger Pro.
- Open your DAW.
- Open your DAW's Preferences (or Options, Device Setup, etc.), and select Trigger Finger Pro as your controller. Make sure that MIDI Port 1 is enabled for standard MIDI, MIDI Port 2 is enabled for Mackie Control or HUI communication, and MIDI Port 3 is disabled (Trigger Finger Pro uses this port to communicate with Arsenal).
- Turn Trigger Finger Pro's Value Dial to browse through the available Presets, and then push it to select one that corresponds to your DAW.
Your Trigger Finger Pro can now communicate with your DAW.
Important: If you are using Arsenal and AIR Drums, we recommend using a Preset whose name includes Arsenal. If you are using Hybrid 3.0, we recommend using a Preset whose name is a scale (e.g., A Major, C Minor, etc.); these Presets are tailored for melodic synths. You can use Arsenal presets with Hybrid 3.0 to automap Hybrid 3.0's controls, but the pads' mapping will be different.
To set up Arsenal for use with Trigger Finger Pro (within your DAW):
- Open your DAW and make sure Trigger Finger Pro is selected as a controller for your DAW (described above).
- Create a MIDI track in your DAW, and load Arsenal onto that track as you would with a typical plugin, and select that track.
Important: You may need to open your DAW's Preferences (or Options, Device Setup, etc.) and select the directory where Arsenal was installed before it appears in your DAW's list of available plugins.
To set up AIR Drums, Hybrid 3.0, and other instrument plugins (within Arsenal):
- Set up Trigger Finger Pro with Arsenal (described above).
- In Arsenal, follow the on-screen instructions to locate and scan AIR Drums, Hybrid 3.0, or other instrument plugins you have.
- In the Plugin category pane, click the desired plugin to select it.
- In the Preset pane on the right side of the window, click one of the available presets to load it.
Basic Operation
This chapter briefly explains Trigger Finger Pro's most basic features to help you get started quickly. To learn more and get the most use out of your Trigger Finger Pro, though, we recommend downloading the full User Guide from m-audio.com/TFP.
Navigation
Knobs
Function Buttons
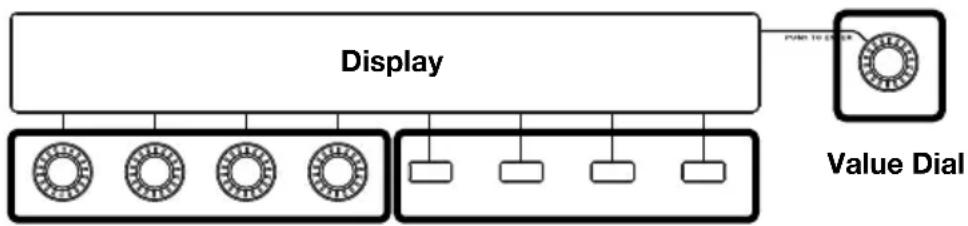
Trigger Finger Pro's display shows information about its current mode and operations. You can navigate Trigger Finger Pro's different menus by using the following controls that surround the display:
- Value Dial (Push to Enter): Use this dial to change the Preset, parameter values, settings, etc. Press the dial when you want to "enter" a command or setting.
- Function Buttons: Press these buttons to execute the command shown right above it in the display.
- Knobs: In certain modes, you can use these knobs to adjust the parameters shown right above them in the display.
Modes
Performance Mode is Trigger Finger Pro's default state. In this mode, you can play the pads, adjust the knobs or faders, press assignable buttons, etc. without editing anything (as you are in the other modes listed below). You are in Performance Mode when the Pad Button, Control Button (Ctrl), and Sequence Button (Seq) are not lit.
- load another Preset or Sequence by turning the Value Dial to browse through them and pressing the third Function Button (Load) to load it. Press the Value Dial to switch from browsing your Presets or Sequences.
edit your Preferences by pressing the third Function Button (Prefs), which include MIDI channel/routing settings, MIDI clock settings, LED behavior, and more.
Pad Mode lets you adjust various parameters that determine how the pads behave. Press the Pad Button to enter or exit this mode. When in Pad Mode, the button will light up and Trigger Pads will appear in the display. In Pad Mode, you can:
edit timing-related parameters affecting tempo and Pad Roll Mode
- set the pads' velocity to be sent in Fixed Mode
- set each pad's MIDI note number, minimum velocity, and maximum velocity (in each bank)
- set each pad's pressure sensor to send MIDI CC messages or aftertouch (in each bank)
- set each pad's "on" and "off" colors (in each bank)
- set whether each pad bank uses custom MIDI settings for each pad or fixed settings for the whole pad bank with Arsenal
edit other pad-related functions
Control Mode lets you adjust various parameters affecting the knobs, faders, and assignable buttons. Press the Control Button (Ctrl) to enter or exit this mode. When in Control Mode, the button will light up and Knobs, Faders, Buttons, or Advanced will appear in the display, depending on what page you are viewing. In Control Mode, you can:
- set each knob's, fader's, and assignable button's MIDI CC number, minimum value, and maximum value (in each bank)
- set each assignable button's behavior (in each bank): momentary, toggle, or single-press
- set each assignable button's "on" and "off" colors (in each bank)
- set each bank of knobs, faders, or assignable buttons to communicate with your software using standard MIDI, Mackie Control, or HUI protocols or to communicate with Arsenal.
edit other functions related to the knobs, faders, and assignable buttons as well as the transport controls and DAW Control buttons

Sequence Mode lets you adjust various parameters affecting the Sequencer's overall function. Press the Sequence Button (Seq) to enter or exit this mode. When in Sequence Mode, the button will light up and Sequencer will appear in the display. In Sequence Mode, you can:
- select a new Sequence
- set the number of steps and bars in a Sequence
edit the velocity of each pad (in each bank) for each step in a Sequence - press a pad to see its steps (in the currently shown bar) represented by the lit-up Step Switches
- enter steps in a Sequence with specific and editable velocities for each pad
- erase all steps for a specific pad in a Sequence
- erase an entire Sequence
- disable the Sequencer (so the transport controls communicate with your DAW only rather than with the Sequencer)
SELECT

Select Mode lets you use the Step Switches to view or edit settings that affect the current Sequence (rather than the Sequencer's overall function). Press and hold the Select Button to enter this mode. When in Select Mode, the button will light up and Select Mode will appear in the display. In Select Mode, you can:
- press a pad and then release the Select Button to see its steps (in the currently shown bar) represented by the lit-up Step Switches (the same as pressing a pad in Sequence Mode)
- set which bar of the Sequence will be shown in the Step Switches. Press Step Switch 1, 2, 3, or 4 to view the bar of that number, or press Step Switch 5 (Auto) if you always want the currently playing bar to be shown.
- copy and paste a pad's step pattern from one bar to another. Use Step Switches 7 (Copy) and 8 (Paste) to do this—please see the User Guide to learn about this feature.
- duplicate a pad's sound and step pattern immediately to the next bar. (You can do this multiple successive times to quickly copy the same pattern to multiple bars.) Use Step Switch 9 (Duplicate) to do this—please see the User Guide to learn about this feature.
- set the Time Division of the Sequence and Pad Roll Mode. Use Step Switches 12-16 to select a quarter-note (1/4), eighth-note (1/8), sixteenth-note (1/16), or thirty-second-note (1/32) Time Division. You can use a triplet-based Time Division by pressing Step Switch 16 (Triplet).
Important: The Time Division setting affects both Sequence playback and Pad Roll Mode. In other words, the rate of a pad roll will always correspond to the Sequence's Time Division.
Again, please download the complete User Guide from m-audio.com/TFP for a more complete explanation of how to use all of Trigger Finger Pro's features!
Features Overview
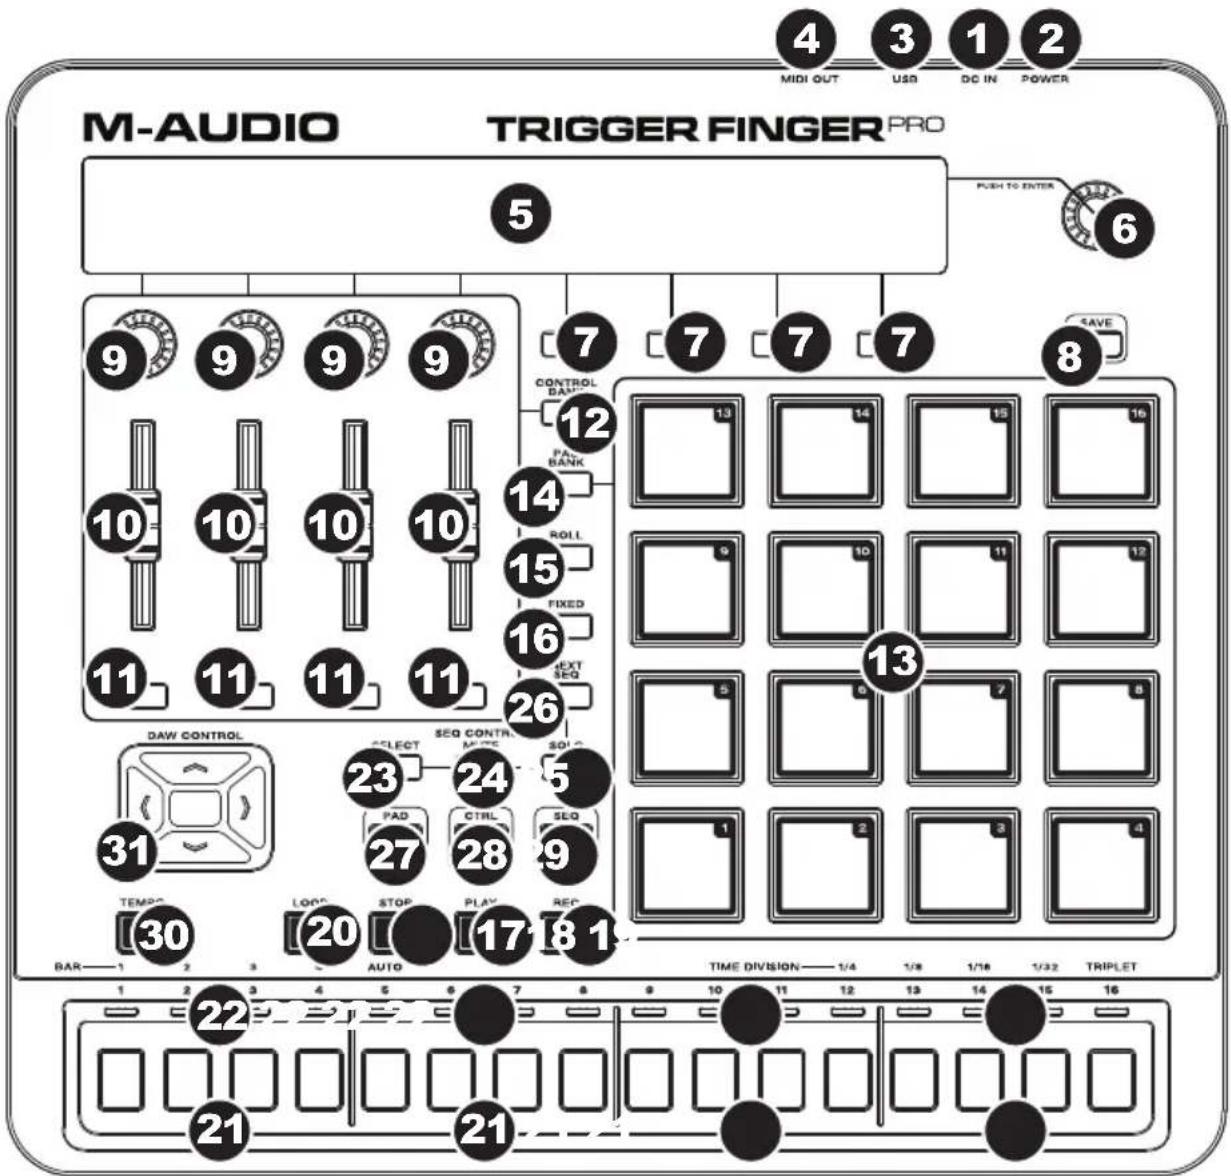
- Power Input: If you do not want to use a computer in your setup (i.e., if you are using Trigger Finger Pro to control an external MIDI module), connect this input to a power outlet using an optional power adapter (6V DC, 1A, center-positive, sold separately). You do not need this connection when using Trigger Finger Pro with a computer; it will be powered by the USB bus.
- Power Switch: Press this button to power Trigger Finger Pro on or off.
- USB Port: Use a standard USB cable to connect this USB port to your computer. The computer's USB port provides ample power to Trigger Finger Pro. This connection is also used to send and receive MIDI data to and from your computer.
- MIDI Out: Use a standard five-pin MIDI cable to connect this MIDI Out to the MIDI In of an external MIDI device (e.g., a synthesizer, sequencer, drum machine, etc.).
- Display: Use this LCD to view Trigger Finger Pro's menus, options, parameters, and settings.
- Value Dial (Push to Enter): Use this dial to change the Preset, parameter values, settings, etc. Pressing the dial also functions as an Enter button.
-
Function Buttons: Press these buttons to execute the command shown right above it in the display.
-
Save: Press this button to save the current Preset, Sequence, Preferences, or all three. Press and hold this button for 2-3 seconds to save all of Trigger Finger Pro's settings and current state.
- Knobs: Use these 360^ knobs to send MIDI CC messages to your software or external MIDI device. Alternatively, you can set the knobs to communicate with your software using the Mackie Control or HUI protocols or to communicate with Arsenal. See the Basic Operation: Modes section of this guide for more information.
In Pad Mode and Sequence Mode, use these knobs to adjust the parameters shown right above them in the display.
- Faders: Use these faders to send MIDI CC messages to your software or external MIDI device. Alternatively, you can set the faders to communicate with your software using the Mackie Control or HUI protocols or to communicate with Arsenal. See the Basic Operation: Modes section of this guide for more information.
- Assignable Buttons: Use these buttons to send MIDI CC messages or Program Change messages to your software or external MIDI device. They can function as toggle (latching), or single-message buttons. Alternatively, you can set the buttons to communicate with your software using the Mackie Control or HUI protocols or to communicate with Arsenal. See the Basic Operation: Modes section of this guide for more information.
- Control Bank: Press this button to cycle through the four independent banks of knobs, faders, and assignable buttons. The current control bank letter (A-D) will appear in the display. All 12 physical controls will always be in the same bank (e.g., you cannot adjust a knob in Control Bank A and a fader in Control Bank B simultaneously).
Press and hold this button to see an overview of the control mapping (MIDI, Mackie Control, HUI, or Arsenal) for the entire control bank. Use the assignable buttons to select the control bank you are viewing.
- Pads: Use these pads to trigger drum hits or other samples in your software or external MIDI sound module. The pads are pressure- and velocity-sensitive, which makes them very responsive and intuitive to play.
- Pad Bank: Press this button to cycle through the four independent banks of pads. The current pad bank letter (A-D) will appear in the display.
Press and hold this button to access the pads' secondary functions:
- Press Pad 1, 2, 3, or 4 to directly select Pad Bank A, B, C, or D (respectively).
- Press and hold Pad 9, 10, 11, or 12 to mute or unmute Pad Bank A, B, C, or D (respectively) in the current Sequence. This is essentially a momentary mute feature for each pad bank.
-
Press Pad 13, 14, 15, or 16 to mute or unmute Pad Bank A, B, C, or D (respectively) in the current Sequence. This is essentially a toggle (latching) mute feature for each pad bank.
-
Roll: Press this button to activate or deactivate Pad Roll Mode. When you press and hold a pad while in this mode, the sound will repeat at the rate determined by the current Time Division setting.
Important: The Time Division setting affects both Sequence playback and Pad Roll Mode. In other words, the rate of a pad roll will always correspond to the Sequence's Time Division.
-
Fixed: Press this button to activate or deactivate Fixed Mode in which all pads will play their sounds at a fixed velocity level (which can be set in Pad Mode), regardless of how hard you hit them.
-
Play: Press this button to start playback of Trigger Finger Pro's Sequencer and your DAW.
- Stop: Press this button to stop playback of Trigger Finger Pro's Sequencer and your DAW.
- Record (Rec): Press this button to record-arm Trigger Finger Pro's Sequencer.
- Loop: Press this button to activate or deactivate the Loop feature for the current bar of the Sequence.
- Step Switches: When playing a Sequence, these switches will light up to indicate which steps contain a pad event. Press a switch to enable it (place an event) or disable it (delete an event). Press and hold a switch for 1 second to enter a "tie" event (the note from the previous step will continue sounding into the tied step).
When you press and hold Select, these switches perform secondary functions, which will appear in the display. See the Basic Operation: Modes section of this guide for more information.
- Step Indicators: When playing a Sequence, these LEDs will light up to indicate different parameters. In Performance Mode, they show: the bar currently being played (a green LED), the bar currently shown in the Step Switches (an aqua LED), and the current step being played (a blue LED).
- Select: Press and hold this button to enter Select Mode in which you can access the secondary functions of the Step Switches (which will appear in the display). Release the button to exit Select Mode. See the Basic Operation: Modes section of this guide for more information.
- Mute: Press this button to activate or deactivate Pad Mute Mode. In this mode, press a pad to mute or unmute it. You can mute multiple pads simultaneously. You can also press the third Function Button to unmute all pads simultaneously.
- Solo: Press this button to activate or deactivate Pad Solo Mode. In this mode, press a pad to solo or un-solo it. You can solo multiple pads simultaneously. You can also press the third Function Button to un-solo all pads simultaneously.
- Next Sequence (Next Seq): Press this button to enter Next Sequence Mode in which you can press the pads to trigger the Sequence with the same number. You can also use the Function Buttons to set how the Sequences play back (Mode) and move from one to another (When and Timing).
- Pad Button: Press this button to enter or exit Pad Mode where you can adjust various parameters that determine how the pads behave.
- Control Button (Ctrl): Press this button to enter or exit Control Mode where you can adjust various parameters affecting the knobs, faders, and assignable buttons.
- Sequence Button (Seq): Press this button to enter or exit Sequence Mode where you can adjust various parameters affecting the Sequencer.
- Tempo: Tap this button at the desired rate to enter a new tempo.
- DAW Control: You can configure these buttons to send messages to your digital audio workstation (DAW, or your music software) using the Mackie Control or HUI protocol. To learn how to do this, see the complete User Guide.
Software AIR Drums (descargar)
Guía de inizio=rápido
Assistance technique
AIR Drums Software (Download)
Technical Specifications
| Display | Monochromatic LCD, 68x4 characters |
| Pads | 16 pads (in a 4x4 grid), velocity- and pressure-sensitive, RGB-backlit with assignable colors; 4 banks |
| Assignable Knobs | 4 360° encoders; 4 banks |
| Assignable Faders | 4 60mm faders; 4 banks |
| Assignable Buttons | 4 RGB-backlit buttons; 4 banks |
| Step Switches | 16 backlit buttons with 16 LED indicators above |
| Inputs / Outputs 1 | USB port 1 5-pin MIDI out |
| Power | USB-bus-powered Power adapter (optional, sold separately): 6V DC, 1A, center-positive |
| Dimensions (width x depth x height, angled towards you) | 13.25" x 12.13" x 2.75" 33.7 cm x 30.8 cm x 7.0 cm |
| Weight (with stand) | 4.3 lbs. 1.95 kg |
Specifications are subject to change without notice.
Trademarks and Licenses
M-Audio and AIR Music Technology are trademarks of inMusic Brands, Inc., registered in the U.S. and other countries.
Mac and OS X are trademarks or service marks of Apple Inc., registered in the U.S. and other countries.
Mackie Control and HUI are trademarks or registered trademarks of LOUD Technologies Inc.
Windows is a registered trademark of Microsoft Corporation in the United States and other countries.
All other product or company names are trademarks or registered trademarks of their respective owners.