
BX6 Carbon - Loudspeaker M-AUDIO - Free user manual and instructions
Find the device manual for free BX6 Carbon M-AUDIO in PDF.


| Product Type | Active monitor speaker |
| Brand | M-Audio |
| Model | BX6 Carbon |
| Dimensions (W x H x D) | 254 x 203 x 305 mm |
| Weight | 7.5 kg |
| Power Supply | 100-240 V AC, 50/60 Hz |
| RMS Power | 100 W (50 W per channel) |
| Frequency Response | 50 Hz – 22 kHz |
| Audio Inputs | Balanced XLR and 6.35 mm TRS jack |
| EQ Adjustments | Bass (HF shelving) and Treble (LF shelving) |
| Cabinet Material | MDF with black vinyl finish |
| Main Functions | Built-in amplification, volume control, power-on LED indicator |
| Maintenance and Cleaning | Clean with a soft, dry cloth. Do not use solvents. |
| Safety | Disconnect before cleaning. Do not expose to moisture or extreme temperatures. |
| Spare Parts and Repairability | Contact M-Audio customer service for parts and repairs. |
| General Information | Bi-amplified studio monitor speaker. CE certified. |
Frequently Asked Questions - BX6 Carbon M-AUDIO
User questions about BX6 Carbon M-AUDIO
0 question about this device. Answer the ones you know or ask your own.
Ask a new question about this device
Download the instructions for your Loudspeaker in PDF format for free! Find your manual BX6 Carbon - M-AUDIO and take your electronic device back in hand. On this page are published all the documents necessary for the use of your device. BX6 Carbon by M-AUDIO.
USER MANUAL BX6 Carbon M-AUDIO
User Guide (English)
Introduction
The BX6 Carbon was designed and tested by veteran audio engineers to meet your needs in a studio monitoring environment. It is focused on the functional goal of delivering pure, original sound without any additional coloration. The BX6 Carbon monitor is self-powered, directly accepting a line-level signal from a variety of sources.
The BX6 Carbon is designed to overcome all the limitations of conventional studio reference monitors within the digital audio environment. This system delivers a wide-range frequency response by employing two extraordinary drivers and unique crossover technology licensed by M-Audio. It boasts a stable and balanced low-mid frequency response along with a defined mid and high frequency response as well. Both drivers are magnetically shielded for desktop music production.
For pro engineers at commercial studios to home studio owners, the BX6 Carbon sets a new affordable standard in studio monitoring.
Box Contents
- BX6 Carbon (1)
- Power Cable
- User Guide
- Safety & Warranty Manual
Support
For complete system requirements, compatibility information, and product registration, visit the M-Audio website: m-audio.com/bx6carbon.
For additional product support, visit m-audio.com/support.
Features
Rear Panel
- XLR Input: This jack accepts XLR input connections with either balanced or unbalanced wiring. The input wiring of an XLR connector should be as follows:
• XLR Pin 1: signal ground (shield)
• XLR Pin 2: signal positive (+)
- XLR Pin 3: signal negative (−)
- TRS Input: This jack accepts 1/4" connections with either balanced or unbalanced wiring. For balanced wiring, a three-conductor TRS plug is necessary. The input wiring of a TRS connector should be as follows:
• TRS Tip: signal positive (+)
- TRS Ring: signal negative (−)
• TRS Sleeve: signal ground (shield)
Unbalanced 1/4" wiring can be done with either a two- or three-conductor (TS or TRS) plug. A two-conductor (TS) plug automatically grounds the signal negative input, whereas a three-conductor (TRS) plug, wired unbalanced, provides the option of leaving the negative input open or grounded.

M-AUDIO
We recommend that you ground the unused negative input (this can be done by wiring the ring and sleeve of the TRS plug together). The TRS input is summed through a balanced input amplifier with the XLR input, allowing both inputs to be used simultaneously. Input specifications apply to both.
- Sub-Frequency Vent Port: This port aids in reproduction of very low frequencies by discharging frequencies below 60 Hz and to act as a cooling mechanism to prevent overheating. This port should not be blocked.
- Acoustic Space Switch: Your BX6 monitors should ideally be placed at least one foot away from the nearest wall, ceiling, or other large, flat surface. In the real world, this may be impractical due to space limitations within your studio. For that reason, BX6 monitors feature an acoustic space switch. This switch compensates for placement near walls.
Tip: Be sure to leave at least 3" of space between the rear of the speaker and a wall to allow the rear-firing port to "breathe" properly. Placing the speaker any closer than 3" may adversely affect low-frequency response. - Volume Control: Use the volume control to set the output sound pressure from the BX6 Carbon to proper levels as required.
- Power Switch: This switch turns the monitor on and off.
- Power Receptacle: Accepts a detachable 3-circuit line cord in order to power the monitor.
- Fuse Holder: Holds the external main fuse.
- Voltage-Select Switch: Provides two selections, 115V AC and 230V AC, and should be set to match the "house supply" (receptacle) voltage of the country or location in which the speaker is used. The 115V setting is correct for the USA, while the 230V setting is correct for most of the UK and Europe.
Front Panel
The front panel houses the Power LED, which indicates whether the speakers (amplifier) power is on or off.
- Power LED
- HF Driver (tweeter)
- LF Driver (woofer)

Installation
For optimal performance of the BX6 Carbon, please read the following thoroughly and carefully prior to installation.
Precautions
- Handling: Please do not touch the speaker cones. The BX6 Carbon set is packaged in the box tightly, so your attention is required when taking the monitors out of the box.
To avoid possible damage to the speaker units, hold both sides of the monitor in order to pull it out of the box. The speaker cones should not be touched in order to avoid damage even after they are out of the box.
- Correct Power Operation: Since the BX6 Carbon contains its own amplifier, it must be connected to a power outlet using the detachable AC cable provided. Before connecting power, please make sure that the Voltage-Select Switch located on the speaker's rear panel is set to the appropriate position, as described in the rear-panel features list appearing earlier in this manual.
WARNING! Use of improper Voltage-Select Switch combinations may result in hazardous conditions and/or damage to speaker components not covered by speaker warranty.
- Connections: You can connect either an XLR balanced cable or TRS balanced/unbalanced cable from the input of each BX6 Carbon to your corresponding preamp, computer or game console outputs. We recommend that you use high-quality balanced or unbalanced cables for input connections. Also, ALWAYS turn off the power of the BX6 Carbon and turn the volume of the BX6 Carbon down to a minimum before making the necessary connections.
Setup
The configuration and placement of your BX6 Carbon monitors on speaker stands or your desktop workstation may affect the performance of the speakers. Use the following tips to achieve the best performance out of your BX6 Carbon monitors.
Tip: If possible, place your BX6 Carbon monitors on speaker stands instead of your desktop. Desks tend to resonate sympathetically at low frequencies and may adversely affect the bass response of your monitors. If speaker stands are not possible due to space restrictions and you notice a buildup in bass, try placing the monitors on isolation pads to acoustically de-couple the monitors from the desk.
XLR Balanced Connection
Assure that the power switch of the BX6 Carbon is turned off and that the volume control of the BX6 Carbon is turned down to a minimum. Connect the male end of an XLR balanced cable to the balanced input of the BX6 Carbon (refer to the following diagram for balanced connection).
TRS Balanced/Unbalanced Connection
Assure that the power switch of the BX6 Carbon is turned to off and that the volume control of the BX6 Carbon is turned down to a minimum. Connect the male end of a TRS balanced or TS unbalanced cable to the TRS input of the BX6 Carbon (refer to the following diagram for TRS connection).
Connecting to Preamp or Computer Outputs
Before connecting, make sure the output device's power has been turned off. Plug the XLR balanced, TRS balanced or TS unbalanced cable to the corresponding output connectors of a pre-amplifier, computer or game console.
Speaker Placement
Placing speakers is one of the most important procedures in order to monitor sound accurately. To monitor with the BX6 Carbons performing to their maximum capability, an appropriate listening environment and correct placement are required. Please refer to the following for correct BX6 Carbon placement.
- The monitors and the listener should basically align to form a regular triangle. Refer to the following diagram.
- Position the monitors so that the top of the woofers are level with your ears in a normal listening environment. Refer to the following diagram.
- Place the monitors vertically with the woofer on the bottom. Placing the BX6 Carbon horizontally is not recommended.
Remarks: DO NOT place any obstacles that may block the flow of air in front or between the monitors. Also remove reflective materials such as glass, mirrors or metal from the monitoring environment. PLACE THOSE MATERIALS AWAY FROM THE PATH OF THE SOUND FROM THE BX6 Carbons.
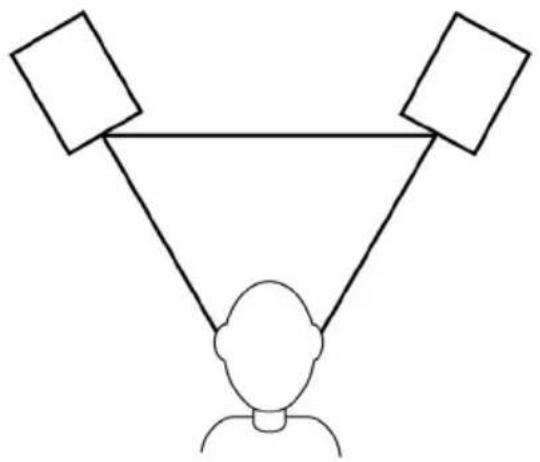
natural_image
Simple line drawing of a person at the bottom with two empty square boxes above, no text or symbols present.
natural_image
Illustration of a person sitting at a desk facing two speakers (no text or symbols present)
natural_image
Simple line drawing of two speakers on a platform with a crossed black X mark (no text or symbols)natural_image
Simple line drawing of a person with two triangular heads, no text or symbols present
natural_image
Illustration of a person sitting at a desk facing two speakers (no text or symbols present)
natural_image
Simple line drawing of two rectangular blocks with circular eyes on a flat base, crossed by two black X marks (no text or symbols)Installation
Technical Specifications
| Type | 2-way near-field studio reference monitors |
| LF Driver | 5-inch (127 mm) Kevlar curved cone with high temperature voice coil and damped rubber surround. Magnetically shielded |
| HF Driver | 1-inch (25 mm) magnetically shielded natural silk dome |
| Frequency Response | 45 Hz – 22 kHz |
| Crossover Frequency | 3 kHz |
| LF Amplifier Power | 60 W |
| HF Amplifier Power | 40 W |
| Signal-to-Noise Ratio | 100 dB typical A-weighted |
| Input Connectors | 1 x XLR balanced input connector1 x TRS balanced/unbalanced input connector |
| Polarity | Positive signal at + input produce outward LF cone displacement |
| Input Impedance | 20 KΩ balanced, 10 KΩ unbalanced |
| Input Sensitivity | 85 mV pink noise input produces 90 dBA output SPL at 1 meter with volume control at maximum |
| Protection | RF interference, output current limiting, over temperature, turn-on/off transient, subsonic filter, external mains fuse. |
| Indicator | Power on/off indicator on rear panel |
| Power Requirements | Factory-programmed for 115 V ~50/60 Hz, 230 V ~50/60 Hz, or 100 V ~50/60 Hz |
| Cabinet | Vinyl-laminated high-acoustic-efficiency MDF |
| Dimension (height x width x depth) | 12.5" x 8.4" x 9.8"318 mm x 213 mm x 249 mm |
| Weight (without packing) | 16 lbs.7.5 kg |
* Specifications are subject to change without notice.
Trademarks and Licenses
All other product or company names are trademarks or registered trademarks of their respective owners.
m-audio.com


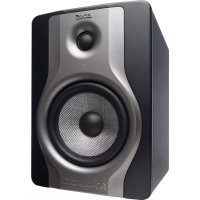
Brand : M-AUDIO
Model : BX6 Carbon
Category : Loudspeaker