
DPI7888BH - Cooker DE DIETRICH - Free user manual and instructions
Find the device manual for free DPI7888BH DE DIETRICH in PDF.
| Product type | Built-in cooker with induction hob and integrated hood |
| Brand | De Dietrich |
| Model | DPI7888BH |
| Power supply | 230 V single phase, 50 Hz |
| Number of cooking zones | 4 induction cooking zones |
| Main cooking zone (Horizon) | 4000 W, diameter 18 cm, compatible with oval and fish kettles |
| Power levels | 1 to 19, with presets: 2 (keep warm), 10 (simmer), 19 (sear) and Boost |
| Main functions | Per-zone timer, independent timer, elapsed time, recall, boil (boiling and holding), clean lock, child lock |
| Integrated hood | Yes, touch controls, speed slider, 10-minute timer, auto-off after 4 h |
| Extraction modes | Recirculation (with charcoal filter) or external extraction |
| Filters | Metal grease filter (dishwasher safe) and charcoal filter (replace every 6 months) |
| Hob maintenance | Sanitary sponge, special glass scraper for burnt-on stains, white vinegar for limescale |
| Hood maintenance | Warm water and mild soap, do not use abrasive products |
| Safety features | Auto shut-off, residual heat indicator (H), temperature limiter, overflow protection, control lock |
| Pan detection | Magnetic bottom (induction), minimum diameter per zone |
| Repairability index | Not communicated, but spare parts available via after-sales service |
| Consumer service | Tel. 0892 02 88 04 (€0.50/min) or 09 69 39 34 34 (free + call charges) |
Frequently Asked Questions - DPI7888BH DE DIETRICH
User questions about DPI7888BH DE DIETRICH
0 question about this device. Answer the ones you know or ask your own.
Ask a new question about this device
Download the instructions for your Cooker in PDF format for free! Find your manual DPI7888BH - DE DIETRICH and take your electronic device back in hand. On this page are published all the documents necessary for the use of your device. DPI7888BH by DE DIETRICH.
USER MANUAL DPI7888BH DE DIETRICH
FR GUIDE D'UTILISATION
INDUCTION HOB & BUILT-IN HOOD
PLACA DE INDUCCION Y CAMPANA INTGRADA
INDUKTIOTASO JA KIINTEÄ LIESITUULETIN
RELATIONS CONSOMMATEURS FRANCE
Discovering a De Dietrich product means experiencing a range of unique emotions.
The attraction is immediate, from the moment you set eyes on the product. The sheer quality of the design shines through, thanks to the timeless style and outstanding finishes which make each component an elegant and refined masterpiece in its own right, each one in perfect harmony with the others. Next, comes the irresistible urge to touch it.
De Dietrich design makes extensive use of robust and prestigious materials; authenticity is our watchword. By combining state-of-the-art technology with top quality materials, De Dietrich produces beautifully crafted products to help you get the most from the culinary arts, a passion shared by all lovers of cooking and fine food. We hope that you enjoy using this new appliance.
Thank you for choosing a De Dietrich product.
De Dietrich

CONTENTS
EN
Important safety advice and precautions. 3
Installing the induction hob. 7
Unpacking 7
Fitting 7
Connection 7
Installing the hood. 8
Fitting operations 8
Recycling operation 8
Extraction operation. 8
Final operations 9
Wiring 9
Using the hob. 10
Control panel glossary 10
Choice of cookware 11
Cooking ring selection 11
Powering On/Off 11
Power setting 11
Horizon 12
Setting the timer 12
Elapsed time key 13
Locking the controls. 13
Clean lock function 13
Recall function 14
Boil function 14
Safety and recommendations. 15
Using the hood 16
Care 17
Problems 18
Environment. 19
Customer service 20

IMPORTANT SAFETY ADVICE AND PRECAUTIONS
This user guide is also available on the brand's web site.
Please read these instructions before installing and using your appliance. These instructions are intended to protect your safety and the safety of others. Keep this user guide with your appliance. If the appliance is ever sold or given to another person, ensure that the new owner receives the accompanying guide.
- With a view to constantly improving our products, we reserve the right to make changes to their technical, functional or aesthetic characteristics in line with technological progress.
- To easily locate the make, model number, etc. of your appliance, we recommend that you note this information on the "After-Sales Service Department and Customer Support" page.
Your appliance complies with applicable European Directives and regulations.
This appliance may be used by children aged 8 years and older, and by persons with impaired physical, sensory or mental capacities, or without experience or knowledge, if they are supervised or have received prior instructions on how to use the appliance safely and have understood the risks involved. Children must not be allowed to play with the appliance. The appliance should not be cleaned or maintained by unsupervised children.
It must be possible to disconnect the appliance from the power supply;
fit a switch on the fixed wiring system in accordance with installation rules. The green-yellow earth wire must be connected to the installation's earth terminal.
If the power cable is damaged, it should be replaced by the manufacturer, its after-sales service department or by a similarly qualified person in order to avoid danger.
WARNING: If the surface is cracked, unplug the appliance from the power supply to avoid any risk of electrical shock.
WARNING: The cooking process must be supervised. A short cooking process must be continuously supervised. Do not use a steam cleaner.

IMPORTANT SAFETY ADVICE AND PRECAUTIONS
It is not recommended to place metal objects such as knives, forks, spoons and lids on the cooking surface as they may heat up.
After use, turn the control knob to switch off the hob and do not rely on the pan sensor.
The appliance is not designed to be switched on using an external timer or separate remote control system.
This applicants is designed to be fitted only on a worktop.
WARNING: Cooking with oil or fat left unattended on a hotplate can be dangerous and can cause a fire. Never attempt to extinguish a fire with water, but switch off the appliance and then smother the flame with a cover or fire-retardant blanket.
WARNING: Fire risk: Do not store items on the cooking surface areas.
We do not recommend using any hob protection mechanisms. The use of unsuitable protectors could cause accidents.
The appliance and its accessible parts become hot during use.
Children under 8 should not be allowed near the appliance unless they are constantly supervised.
- Electrical risks:
-
If the power cable is damaged, it should be replaced by the manufacturer, its after-sales service department or by a similarly qualified person in order to avoid danger.
-
The appliance can be disconnected by using an accessible power outlet or by incorporating a switch in the fixed lines, in accordance with the installation rules.

IMPORTANT SAFETY ADVICE AND PRECAUTIONS
-
Do not change or attempt to change the characteristics of this appliance. Doing so could be dangerous.
-
The appliance must only be repaired by an approved specialist.
-
Always disconnect the hood before carrying out cleaning or maintenance.
-
Never use steam or high-pressure equipment to clean your appliance (due to electrical safety considerations).
- Risk of asphyxiation:
-
Regulations on the evacuation of air must be complied with. Air must not be sent into a duct used to evacuate fumes from appliances that use gas or other fuels (this does not apply to appliances that only emit air into the room).
-
The room must be suitably ventilated when the cooker
hood is used at the same time as appliances that use gas or other fuels (this does not apply to appliances that only emit air into the room).
- Risk of fire:
- There is a risk of fire if the appliance is not cleaned and the filters are not replaced as often as stated in the instructions. Accumulated deposits of grease could cause a fire.

IMPORTANT SAFETY ADVICE AND PRECAUTIONS
Keep these instructions near the appliance. If you sell this appliance or pass it on to anyone else, be sure to include this guide. Please heed these recommendations before installing and using the appliance; they are intended to protect your safety and that of others.
When taking delivery of the product, check the packaging and its general appearance. Write any objection on the delivery document, and keep a copy of it. Your appliance is intended for normal household use. It must not be used for commercial or industrial purposes and must only be used for its intended purpose.
No guarantee will be granted for any damage or other problems resulting from incorrect fitting or use of the appliance.
With a view to constantly improving our products, we reserve the right to make changes to their technical, functional and aesthetic characteristics. The appliance is already designed to operate either in recycling or in extraction mode. Before fitting the appliance, all its parts must be verified. If any parts are damaged or missing, contact the dealer and do not attempt to fit it.
1 INSTALLING THE HOB

1.1 UNPACKING
Remove all the protective packing pieces.
Check the appliance's characteristics on the nameplate and be sure to comply with them (1.1).
Note the service and standard references shown on this plate in the boxes below for future reference.
Service:
Type:
1.2 FITTING THE HOB INTO THE BASE UNIT
Check that the air intakes and outlets are free of obstruction. Comply with the information concerning the dimensions (in millimetres) of the base unit in which the hob will be fitted.
Bear in mind that your hob requires special fitting arrangements, because it is not a traditional hob; room must be made for the extraction system's motor. Therefore it requires a made-to-measure unit underneath it. Generally we fit a unit with two ordinary and one pan drawer under the hob. In this instance, be aware that the upper drawer will be blocked up. Furthermore, the depth of the unit must be reduced. By the same token, there is never enough room for an oven under this type of appliance. But your kitchen specialist will explain this to you in detail, depending on the model you choose and the units offered in his catalogue.
- Fitting into the worktop
See diagram (1.2.1)
- Fitting flush with the worktop See diagram (1.2.2)
Apply the seal all around the glass edge of the hob (1.2.3)
1. 3 ELECTRICAL CONNECTIONS (1.3.1)
These hobs must be connected to the mains via an all-pole cutoff device that complies with current installation regulations. A disconnection device must be incorporated into the fixed wiring.
Identify the type of your hob's cable according to the number of wires and colours (1.3.1).
When power is first supplied to your hob, or after a prolonged power cut, a light code will appear on the control panel. Wait approximately 30 seconds or press any touchkey on the control panel to make the information disappear and use your hob (this display is normal and is reserved for use by After-Sales Service, where applicable). In all cases, it should be disregarded.
1 FITTING THE HOOD
IDENTIFICATION
A-Motor
B - Pipework
C - Metal grille
D-Adapter
E - Elbow fittings
F-User guide
G - Air vent
H - Adhesive
I - Charcoal filters
J - Grease filter
K - Adhesive clips
L - Check valve
M - Motor fixing screw
Before starting the installation, make sure the appliance is disconnected from the power supply.
1.4 FITTING OPERATIONS
Place the hob upside down on an appropriate surface to avoid scratching the glass. Take the hood out of its packaging and fit it as shown (1.4.1).
The metal hooks of the exhaust hood must be inserted into specific slot, as shown (1.4.2).
After attaching the hood (A) to the hob, fix it with the supplied metric screw (M), use as shown (1.4.3).
Now fit the adapter (D) and elbow fitting (E) (1.4.5 - 1.4.6).
The controls under the hob's glass top have a cable that must be connected to the control box (1.4.9).
Fit the hob in with the built-in hood.
FOR RECYCLING MODE (1.4.4)
The product's air outlet must be connected to the unit's opening so that the outgoing air can be recycled in the kitchen. Charcoal filters (I) are needed in this configuration. They must be fitted as shown (1.4.7).
The charcoal filters (I) are located just under the grease filters (J), so fit them before fitting the grease filters. A pipework kit (B) with grille (G) (at the end to be fitted into the unit) is supplied with the product.
1 FITTING THE HOOD

Tip
Use a hacksaw to cut the pipes.
FOR EXTRACTION MODE (1.4.5)
The product's air outlet must be connected to the outside of the house. The duct to be fitted between the product's air outlet and the outside of the house is not supplied with the appliance. It is imperative to fit the supplied check valve (L).

Tip
If a duct is fitted, limit the number of elbow sections, as each bend reduces the efficiency of the ductwork by one running metre. Avoid any sudden change in direction in the ductwork.
The duct connected to the fan's air outlet must have a constant section of 220x90 mm; it must be made in a material approved by current regulations. Non-observation of the aforementioned instructions may result in performance or noise problems, for which no guarantee will be provided.
We advise you to glue the ducts and elbow sections together (except for the adapter (D) at the hood's outlet), or use the supplied adhesive (H) to facilitate any after-sales work.
The product is fitted with 220 × 90 mm ducts.
FINAL OPERATIONS
Fit the grease filters (J) in their housing, passing them through the hob's central opening (1.4.7).
To close the hob's central opening, place the metal grille (C) on it as shown (1.4.8).
WIRING (1.3.2)
The product's connection to the power supply must be compliant with current international and local regulations.
The various parts of this appliance can be interconnected by a qualified technician in accordance with wiring rules.
It must be connected to the power supply with a plug and this can also be done by the end user.
Adhesive clips (K) are supplied with the products for arranging and organizing the cables along the sides of the unit.
We cannot accept any liability in the event of an accident caused by incorrect layout of the earthing cable or connection.
2 USING THE HOB
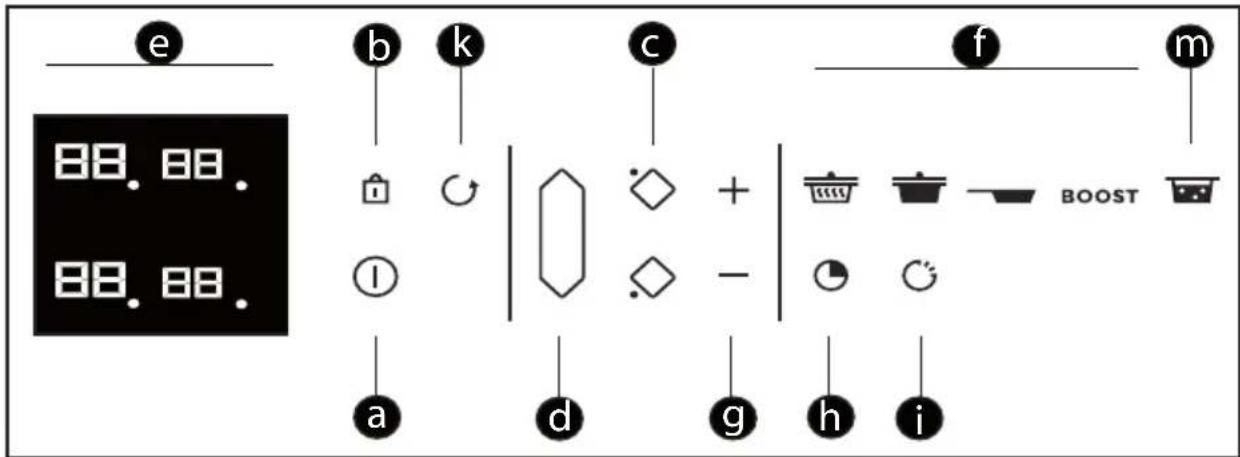
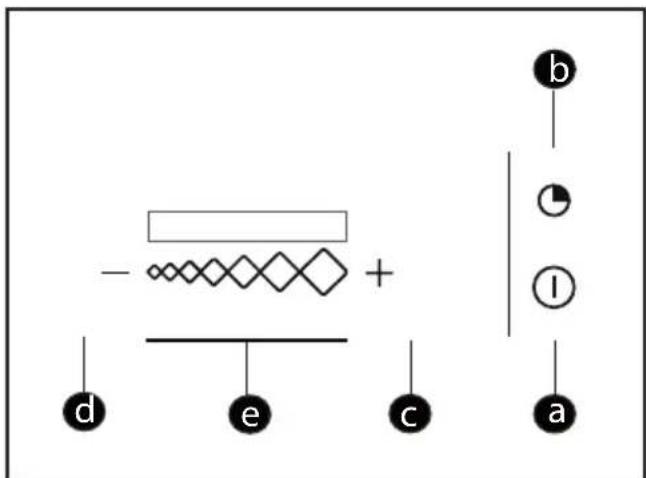
Control panel glossary
a = Switch on and off
= Locking/Clean Lock
C = Choice of cooking ring
Horizon
e = Display
f = Pre-selection
9 = Power/time setting
= Timer
i = Elapsed time function
k = Recall function
Boil function
2.1 CHOICE OF COOKWARE
Most cookware is compatible with induction. Only glass, terracotta, aluminium without a special base, copper and some non-magnetic stainless steels do not work with induction cooking.

We suggest that you choose cookware with a thick, flat bottom.
The heat will be distributed better and cooking will be more uniform. Never leave an empty pan to heat unattended.

Avoid putting cookware on the control panel and the metal grille.
2.2 COOKING RING SELECTION
You have several cooking rings available. Select one that is suitable, based on the size of the pan. If the base of the cookware is too small, the power indicator will start to flash and the cooking ring will not work, even if the cookware's material is recommended for induction. Take care not to use pans which are smaller in diameter than the cooking ring (see table)
| Cooking ring diameter | Cooking ring's maximum wattage | Diameter of bottom of cookware |
| Horizone | 4000 | 18 cm, oval, fish |
2.3 SWITCHING ON/OFF
Press the On/Off touchkey ①. A "0" flashes for 2 seconds on each ring then stays on fixed for 8 seconds (2.3.1). If no pan is detected, select a ring (2.3.2). If a pan is detected, the "0" flashes with a dot. You can then adjust the power. If you do not select a power level, the cooking ring will automatically turn itself off.
Switching off a ring on the hob
Press and hold down the ring's touchkey, a long beep sounds and the display turns itself off or the "H" symbol (residual heat) appears (2.11.1).
Press the On/Off touchkey to switch the hob off completely.
2.4 SETTING THE POWER
Press the + or - (2.4.1) to set the power level from 1 to 19. When switching on, you can directly select maximum power (apart from boost) by pressing the ring's " - " touchkey.
Power presets:
There are four touchkeys available that provide direct access to pre-set power levels:
=level2-Keepwarm
=level10-Simmer
=level19-Sear
BOOST = maximum power (2.4.2)
2 USING THE HOB
All these power values apart from BOOST can be modified.
Proceed as follows:
The hob must be switched off.
-
Select or by pressing and holding it.
-
Set the new power level by pressing + or - .
- After a few moments, a beep confirms your action.
Note: Power levels must be between
1 and 3 for
4 and 11 for
12 and 19 for
2.5 HORIZONE
The free ring is selected with (2.5.1). The power and timer are adjusted as for a normal cooking ring.
To switch the ring off, press and hold the key; a long beep sounds and the displays go off or the "H" symbol appears.
Pressing the touchkey in front of or behind the ring deactivates the function and transfers the settings to the selected ring.
2.6 SETTING THE TIMER
Each cooking ring has a dedicated timer. This can be set once the relevant cooking ring is on.
To switch it on or change it, press the timer touchkey (2.6.1) then the + or -key (2.6.2).
To easily set a very long cooking time, you can go straight to 99 minutes by pressing the touchkey.
At the end of cooking, the display indicates 0 and a warning beep sounds. To cancel this information, press any button for the particular cooking zone being used. Otherwise, they will switch off after a few seconds.
To stop the timer during cooking, press the + and - keys or reset to 0 with the - key.
Independent timer
With this function, you can time an event without cooking.
-
Select a free ring (2.6.3).
-
Press it briefly
-
Set the time with + or -
A "t" flashes in the display (2.6.4).
- When you have set the time, the "t" becomes fixed and the timer starts.
You can stop the timer by pressing and holding down the cooking ring selection key.
2 USING THE HOB
2.7 ELAPSED TIME key
This function displays the time since the power setting was last changed for a selected cooking zone.
To use this function, press the key. The elapsed time flashes in the selected ring's timer display (2.7.1).
If you want cooking to end within a specified time, press the key then, within 5 seconds, press + on the timer to increase the desired cooking time. The elapsed time is displayed fixed for 3 seconds and then the remaining time is displayed. A beep sounds to confirm your choice.
This function is available with or without the timer function.
Remark: if the timer displays a time, it cannot be changed for 5 seconds after pressing. After 5 seconds, cooking time can be modified.
2.8 LOCKING THE CONTROLS:
Child safety
Your hob has a child safety device which locks the controls when the hob is not in use or during cooking (to maintain the current settings). For safety reasons, only the stop control and ring selection keys are still active, allowing the hob or a cooking ring to be switched off.
Locking
Press the key padlock) until the "bloc" lock symbol appears and a beep confirms your action (2.8.1).
Table locked in operation
The displays of cooking rings that are on alternately indicates power and the locked symbol.
When you press the power or timer controls for the rings which are "on":
"bloc" appears for 2 seconds and then goes off.
Unlocking
Press the key until the "bloc" locked symbol disappears and a beep confirms this.
CLEAN LOCK function
This function locks the hob off while it is being cleaned.
To activate Clean lock :
Press the key padlock) briefly. A beep sounds and the "bloc" symbol flashes in the display.
After a predefined time, the lock will automatically disengage. Two beeps sound and "bloc" switches off. You can stop Clean Lock at any time by pressing and holding the touchkey.
2 USING THE HOB
2.9 RECALL FUNCTION
This function lets you display the last "power and timer" settings for all the burners which were switched off less than 3 minutes previously.
To use this function, the hob must be unlocked. Press the On/Off touchkey then briefly press (2.9)
When the hob is on, the function shown the power and timer settings for the ring(s) that have been switched off for less than 30 seconds.
2.10 BOIL FUNCTION
With this function you can boil and simmer water, to cook pasta for example. Select your ring and briefly press the "Boil" key (2.10.1).
The default quantity of water displayed is 2 litres, but you can change it using the + or - keys (2.10.2).
Set the quantity of water required (from 0.5 to 6 litres).
Confirm by pressing the "Boil" symbol or wait a few seconds for automatic confirmation.
Cooking starts.
A beep sounds when the water is boiling and the "Boil" symbol scrolls (2.10.3).
You can then add the pasta and confirm by pressing the "Boil" key.
By default, the display shows the power and a cooking time of 8 minutes.
You can still adjust the power and the cooking time suggested.
A beep sounds out when cooking is finished.
NOTE: It is important that water is at ambient temperature at the start of cooking or the final result will be distorted.
Do not use a cast iron pan with this function.
You can also use this function to boil any food that needs to be cooked in boiling water.

Advice on how to save energy
Cooking with the correctly sized lid saves energy. If you use a glass lid, you can control your cooking perfectly.
2 USING THE HOB
2.11 SAFETY PRECAUTIONS AND RECOMMENDATIONS
Residual heat
After intensive use, the cooking ring you have just used will remain hot for several minutes, during which time an "H" is displayed (2.11.1). So avoid touching the rings concerned.
Temperature limiter
Each cooking ring is fitted with a safety sensor that continuously monitors the temperature of the bottom of the pan. In the event that an empty pan is left on a zone that is switched on, the sensor automatically adapts the power delivered by the hob and limits the risk of damaging the cookware or the hob.
Spillage protection
The hob may be switched off in the following three cases:
- Overflow that spills onto the control keys (2.11.2).
- Damp cloth placed over the keys.
- Metallic object placed on the control keys (2.11.3).
Remove the object or clean and dry the keys and resume cooking. In such cases, the symbol is displayed and an audible signal sounds.
"Auto-Stop" system
If you forget to switch off a pan, your hob has an "Auto-Stop" safety function that automatically switches off the forgotten cooking ring after a pre-set time (between 1 and 10 hours based on the power level setting).
If the safety system is triggered, the cooking ring is shown as switched off with "AS" displayed on the control panel and a beep sounds for about 2 minutes. To stop it, simply press any of the control keys.
Sounds similar to the ticking of a clock may be heard.
These sounds occur when the hob is in operation and disappear or decrease according to the heating configuration. Low whistling or humming may also occur depending on the model and on the quality of your pan. Such noises are a normal part of induction technology and do not indicate a fault.
2 HOOD USAGE

Control panel glossary
= On/Off switch
= Timer
C = + key
d = -key
e = Speed setting slider
LED display
2.12 Switching on
Press the On/Off touchkey ①. The hood starts at speed 2. Pressing On/Off again ① stops the hood, regardless of its power setting.
2.13 Changing speed
Swipe the slider with your finger to change fan speed. The LEDs light up according to speed.
Automatic speed reset:
At maximum speed, the hood will automatically change to the lower speed setting after 9 minutes.
2.14 Timer
Press the timer key to maintain ventilation at the selected speed for 10 minutes.
Your hood will switch off automatically after 4 hours' operation or if no touch keys have been pressed for 4 hours.
2.15 Saturated filters
After 30 hours' operation and when all the LEDs flash simultaneously, this means that the grease filters are saturated and need to be cleaned or replaced. A long press on the timer key switches off the LEDs and resets the process.

Tip
Avoid rubbing the containers on the grid.
3 CARE
TABLE
For light soiling, use a kitchen sponge. Use hot water to wet the area to be cleaned and then wipe dry.
For a build-up of baked-on dirt or sugary spillages, use a disinfectant sponge and/or a special glass scraper. Use hot water to wet the area to be cleaned, use a special glass cleaning scraper to remove the dirt, finish off with a scouring sponge and then wipe dry.
For rings and hard water residue, apply warm white vinegar to the stain, let stand, then wipe with a soft cloth.
For shiny metal streaks and weekly maintenance, use a special vitroceramic glass product. Apply the special product (which contains silicon and preferably has a protective effect) to the vitroceramic glass.
Important note: do not use abrasive powders or scourers. Use cleaning creams and special gentle washing up sponges.
COOKER HOOD
Before any cleaning or maintenance, the appliance must always be disconnected from the power supply.
- If the power cord is damaged, it can only be replaced by the After-Sales service or by experienced staff.
Do not attempt to alter or repair the appliance, this could be very dangerous. Maintenance or repairs must be carried out by experienced staff.
If there is a problem, disconnect the appliance from the power supply.
Cleaning and maintenance must not be carried out by unsupervised children.
Precise maintenance guarantees the good working order and performance of the appliance over time.
The grease filter can be cleaned either by hand or in the dishwasher.
Filters should be cleaned according to use, but at least once every other month. Filters should be replaced according to use, but at least once every six months.
The bottom of the grid filter holder is fitted with a drain plug to help drain the water build-up.
We recommend cleaning the appliance and the grille with warm water and mild soap. Abrasive products must be avoided.
4 PROBLEMS

When using for the first time
You notice that something appears in the display. This is normal. It will disappear after 30 seconds.
The circuit breaker trips/blows a fuse or only one side of the hob works.
The hob has been wired incorrectly.
Check the wiring (see connections section).
The hob gives off a smell during the first few uses. The appliance is new. Heat each ring for half an hour with a pan full of water.
When you switch it on
The hob does not work and the lights on the panel stay off.
There is no power to the hob. The power supply or connection is faulty. Inspect the fuses and the circuit-breaker.
The hob does not work and another message is displayed. The electronic circuit is faulty. Call the After-Sales service.
The hob does not work, the "bloc"information is displayed. Unlock the child safety lock.
Fault code F9: voltage less than 170 V.
Fault code F0: temperature less than 5^ .
During use:
The hob does not work. The information is displayed and a beep sounds.
There was a spillage or an object obstructing the control panel. Clean or remove the object and resume cooking.
Code F7 is displayed.
The electronic circuits have overheated (see the 'fitting in' section).
While a heating area is on, the control panel's illuminated symbols continue to flash.
The pan being used is not suitable.
The cookware makes a noise and your hob clicks during cooking (see "Safety precautions and recommendations").
This is normal. With certain types of pan, heat passing from the hob to the pan causes this clicking.
The ventilation continues to operate after the hob is switched off.
This is normal. It cools the electronics.
In the event of a persistent fault, switch off your hob for 1 minute. If the problem persists, contact the After-Sales service.
ENVIRONMENTAL COMPLIANCE
The packaging material of this appliance is recyclable. Please recycle it and help protect the environment by depositing it in municipal containers provided for this purpose.
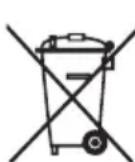
Your appliance also contains many recyclable materials. It is therefore marked with this logo to indicate that used appliances should not be mixed with other waste.
Recycling of appliances organised by your manufacturer is carried out under the best conditions, in accordance with the European regulation in force on waste disposal of electronic and electrical equipment.
Contact your local authority or retailer for information on used appliance collection points close to your home.
We thank you for your help in protecting the environment.
ENERGY LABELLING AND ECODESIGN REGULATIONS
As European Commission Regulation (EU) No 65/2014 on energy labelling and Regulation (EU) No 66/2014 on Ecodesign came into force on 1st January 2015, our products have been brought into compliance with their requirements. All products in the Energy Label version feature electronics that limit duct speeds to 650~m3 / h .
6 CUSTOMER SERVICE
SERVICING AND REPAIRS FRANCE
Any repairs to your appliance must be made by a qualified professional accredited to work on the brand. When calling, please provide the full references of your appliance (commercial reference, service reference, serial number), so that we can handle your call more efficiently. These details are on the nameplate.
ES
ESTIMADO/A CLIENTE/A:
1.4 TEKNISET TOIMINNOT
Keittotason on oltava sammutetty.
1.2 INCASSO NEL MOBILE
| Symbol Unit | Value | |||||||||||||||||||||||||||||||||||||||||||||||||||||||||||||||||||||||||||||||||||||||||||||||||||||
| LUXxxx | ||||||||||||||||||||||||||||||||||||||||||||||||||||||||||||||||||||||||||||||||||||||||||||||||||||||
| Model identification | ||||||||||||||||||||||||||||||||||||||||||||||||||||||||||||||||||||||||||||||||||||||||||||||||||||||
- RELATIONS CONSOMMATEURS FRANCE
- De Dietrich
- CONTENTS
- EN
- Important safety advice and precautions. 3
- Installing the induction hob. 7
- Installing the hood. 8
- Using the hob. 10
- Using the hood 16
- Care 17
- Problems 18
- Environment. 19
- Customer service 20
- IMPORTANT SAFETY ADVICE AND PRECAUTIONS
- - Electrical risks:
- - Risk of asphyxiation:
- - Risk of fire:
- INSTALLING THE HOB
- UNPACKING
- FITTING THE HOB INTO THE BASE UNIT
- 3 ELECTRICAL CONNECTIONS (1.3.1)
- FITTING THE HOOD
- IDENTIFICATION
- FITTING OPERATIONS
- FOR RECYCLING MODE (1.4.4)
- FOR EXTRACTION MODE (1.4.5)
- FINAL OPERATIONS
- WIRING (1.3.2)
- USING THE HOB
- Control panel glossary
- CHOICE OF COOKWARE
- We suggest that you choose cookware with a thick, flat bottom.
- COOKING RING SELECTION
- SWITCHING ON/OFF
- Switching off a ring on the hob
- SETTING THE POWER
- Power presets:
- HORIZONE
- SETTING THE TIMER
- Independent timer
- ELAPSED TIME key
- LOCKING THE CONTROLS:
- Child safety
- Locking
- Table locked in operation
- Unlocking
- CLEAN LOCK function
- RECALL FUNCTION
- BOIL FUNCTION
- Advice on how to save energy
- SAFETY PRECAUTIONS AND RECOMMENDATIONS
- Residual heat
- Temperature limiter
- Spillage protection
- "Auto-Stop" system
- Sounds similar to the ticking of a clock may be heard.
- HOOD USAGE
- Switching on
- Changing speed
- Automatic speed reset:
- Timer
- Saturated filters
- CARE
- TABLE
- COOKER HOOD
- PROBLEMS
- When using for the first time
- When you switch it on
- During use:
- ENVIRONMENTAL COMPLIANCE
- ENERGY LABELLING AND ECODESIGN REGULATIONS
- CUSTOMER SERVICE
- SERVICING AND REPAIRS FRANCE
- ES
- ESTIMADO/A CLIENTE/A:
- TEKNISET TOIMINNOT
- INCASSO NEL MOBILE
Brand : DE DIETRICH
Model : DPI7888BH
Category : Cooker