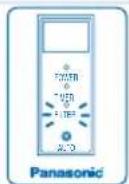
S56MA1E5 - Air-conditioner PANASONIC - Free user manual and instructions
Find the device manual for free S56MA1E5 PANASONIC in PDF.
User questions about S56MA1E5 PANASONIC
0 question about this device. Answer the ones you know or ask your own.
Ask a new question about this device
Download the instructions for your Air-conditioner in PDF format for free! Find your manual S56MA1E5 - PANASONIC and take your electronic device back in hand. On this page are published all the documents necessary for the use of your device. S56MA1E5 by PANASONIC.
USER MANUAL S56MA1E5 PANASONIC
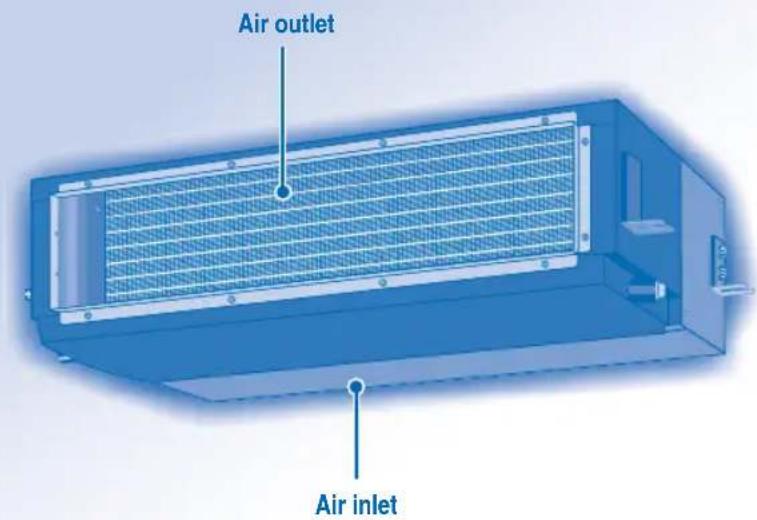
Operating Instructions FS Multi Air Conditioner
Model No.
Indoor Unit Outdoor Unit
S-45MA1E5 U-4LA1E5
S-56MA1E5 U-5LA1E5
S-63MA1E5 U-6LA1E5
S-71MA1E5 U-4LA1E5-1
S-90MA1E5 U-5LA1E5-1
- S-100MA1E5 U-6LA1E5-1
-
S-125MA1E5 * U-8EA1E8
-
U-10EA1E8


ENGLISH
2~13
Before operating the unit, read these operating instructions thoroughly and keep them for future reference.
- Available to selected country
FRANCAIS
14~25
© Panasonic Manufacturing Xiamen Co., Ltd. 2010. Unauthorized copying and distribution is a violation of law.
P07-T10850-01
Thank you for purchasing Panasonic Air Conditioner
TABLE OF CONTENTS
SAFETY PRECAUTIONS
2~3
INFORMATION
4
MULTI AIR CONDITIONER FUNCTION
5
PRODUCT OVERVIEW & OPERATIONS (WIRELESS REMOTE CONTROL)
6~7
PRODUCT OVERVIEW & OPERATIONS (WIRED REMOTE CONTROL)
8~10
CARE & CLEANING
11
TROUBLESHOOTING
12~13
QUICK GUIDE
BACK COVER
NOTE
The illustrations in this manual are for explanation purposes only and may differ from the actual unit. It is subjected to change without notice for future improvement.
SAFETY PRECAUTIONS

To prevent personal injury, injury to others, or property damage, please comply with the following. Incorrect operation due to failure to follow instructions below may cause harm or damage, the seriousness of which is classified as below:

WARNING
This sign warns of death or serious injury.

CAUTION
This sign warns of injury or damage to property.
The instructions to be followed are classified by the following symbols:

This symbol denotes an action that is PROHIBITED.

This symbol denotes an action that is COMPULSORY.

WARNING
INDOOR UNIT AND OUTDOOR UNIT

This appliance is not intended for use by persons (including children) with reduced physical, sensory or mental capabilities, or lack of experience and knowledge, unless they have been given supervision or instruction concerning use of the appliance by a person responsible for their safety. Children should be supervised to ensure that they do not play with the appliance.

Please consult authorized dealer or specialist to repair, install, remove and reinstall the unit. Improper installation and handling will cause leakage, electric shock or fire.
Do not install the unit in a potentially explosive or flammable atmosphere. Failure to do so could result in fire.
Do not insert your fingers or other objects into the air conditioner indoor or outdoor unit, rotating parts may cause injury.

Do not touch the outdoor unit during lightning, it may cause electric shock.
REMOTE CONTROL

Do not allow infants and small children to play with the remote control to prevent them from accidentally swallowing the batteries.


| WARNING | |
| POWER SUPPLY | |
| Do not use modifi ed cord, joint cord, extension cord or unspecifi ed cord to prevent overheating and fi re. | |
| Do not share the same power outlet with other equipment to prevent overheating and fi re. | |
| Do not operate with wet hands to prevent electric shock. | |
| If the supply cord is damage, it must be replaced by the manufacturer, its service agent or similarly qualifi ed persons in order to avoid a hazard. | |
| It is strongly recommended to be installed with Earth Leakage Circuit Breaker (ELCB) or Residual Current Device (RCD) to prevent electric shock or fi re. | |
| This equipment must be earthed to prevent electrical shock or fi re. | |
| Prevent electric shock by switching off the power supply when: - Before cleaning or servicing. - Extended non-use. - Abnormally strong lightning activity. | |
| Stop using the product when any abnormality/failure occurs and disconnect the power plug or turn off the power switch and breaker. (Risk of smoke/air re/electric shock) | |
| Examples of abnormality/failure | ·The ELCB trips frequently. ·Burning smell is observed. ·Abnormal noise or vibration of the unit is observed. ·Water leaks from the indoor unit. ·Power cord or plug becomes abnormally hot. ·Fan speed cannot be controlled. ·The unit stops running immediately even if it is switched on for operation. ·The fan does not stop even if the operation is stopped. |
| Contact immediately your local dealer for maintenance/repair. | |
| CAUTION | |
| INDOOR UNIT AND OUTDOOR UNIT | |
| Do not wash the indoor unit with water, benzene, thinner or scouring powder. | |
| Do not use for other purpose such as preservation of food. | |
| Do not use any combustible equipment in front of the airflow outlet to avoid fire propagation. | |
| Do not expose yourself directly to cold air for a long period. | |
| Do not sit or step on the unit, you may fall down accidentally. | |
| Do not touch the sharp aluminium fi n, sharp parts may cause injury. | |
| Do not switch ON the indoor unit when waxing the fi oor. After waxing, aerate the room properly before operating the unit. | |
| Do not install the unit in oily and smoky areas. | |
| Ensure drainage pipe is connected properly. Otherwise, leakage may occur. | |
| Aerate the room regularly. | |
| After long period of use, make sure the installation rack is not deteriorate to prevent the unit from falling down. | |
| REMOTE CONTROL | |
| Do not use rechargeable (Ni-Cd) batteries. It may damage the remote control. | |
| Remove the batteries if the unit is not going to be used for a long period of time. | |
| New batteries of the same type must be inserted following the polarity stated to prevent malfunction of the remote control. |
INFORMATION INFORMATION
OPERATION CONDITION
Use this air conditioner under the following temperature range
| Temperature (°C) Indoor Outdoor | |||
| COOLING | Maximum 32 43 | ||
| Minimum 21 -5 | |||
| HEATING | Maximum 27 24 | ||
| Minimum 16 -15 | |||
NOTICE: This unit is still able to operate as a cooler with outdoor temperature as low as -5^ in a non-living room, such as a computer room, with a room temperature of 21^ or above, and room humidity up to 80% .
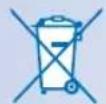
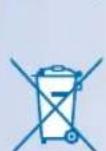
Information for Users on Collection and Disposal of Old Equipment and used Batteries
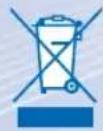
These symbols on the products, packaging, and/or accompanying documents mean that used electrical and electronic products and batteries should not be mixed with general household waste.
For proper treatment, recovery and recycling of old products and used batteries, please take them to applicable collection points, in accordance with your national legislation and the Directives 2002/96/EC and 2006/66/EC.
By disposing of these products and batteries correctly, you will help to save valuable resources and prevent any potential negative effects on human health and the environment which could otherwise arise from inappropriate waste handling.
For more information about collection and recycling of old products and batteries, please contact your local municipality, your waste disposal service or the point of sale where you purchased the items.
Penalties may be applicable for incorrect disposal of this waste, in accordance with national legislation.
For business users in the European Union
If you wish to discard electrical and electronic equipment, please contact your dealer or supplier for further information.
[Information on Disposal in other Countries outside the European Union]
These symbols are only valid in the European Union. If you wish to discard these items, please contact your local authorities or dealer and ask for the correct method of disposal.
Note for the battery symbol (bottom two symbol examples):
This symbol might be used in combination with a chemical symbol. In this case it complies with the requirement set by the Directive for the chemical involved.
MULTI AIR CONDITIONER FUNCTION MULTI AI
DEFINITION
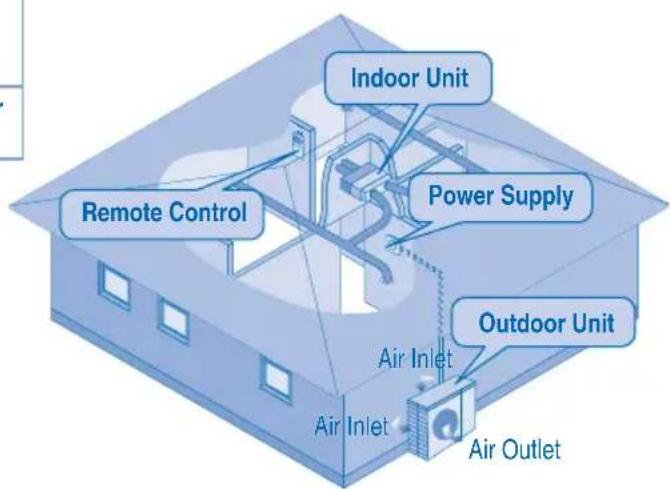
Multi air conditioner system has one outdoor unit connected to multiple indoor units.
INDOOR UNIT
- It is possible to operate the indoor units individually or simultaneously.
- The operation mode priority is given to the first unit that turned on.
- During operation, heating and cooling mode could not be activated at the same time for different indoor unit.
- The power indicator blinks to indicate the indoor unit is standing by for different operation mode.

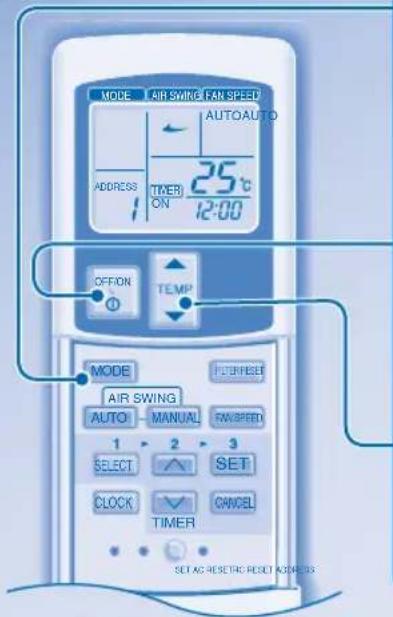
PRODUCT OVERVIEW & OPERATIONS (WIRELESS REMOTE CONTROL)
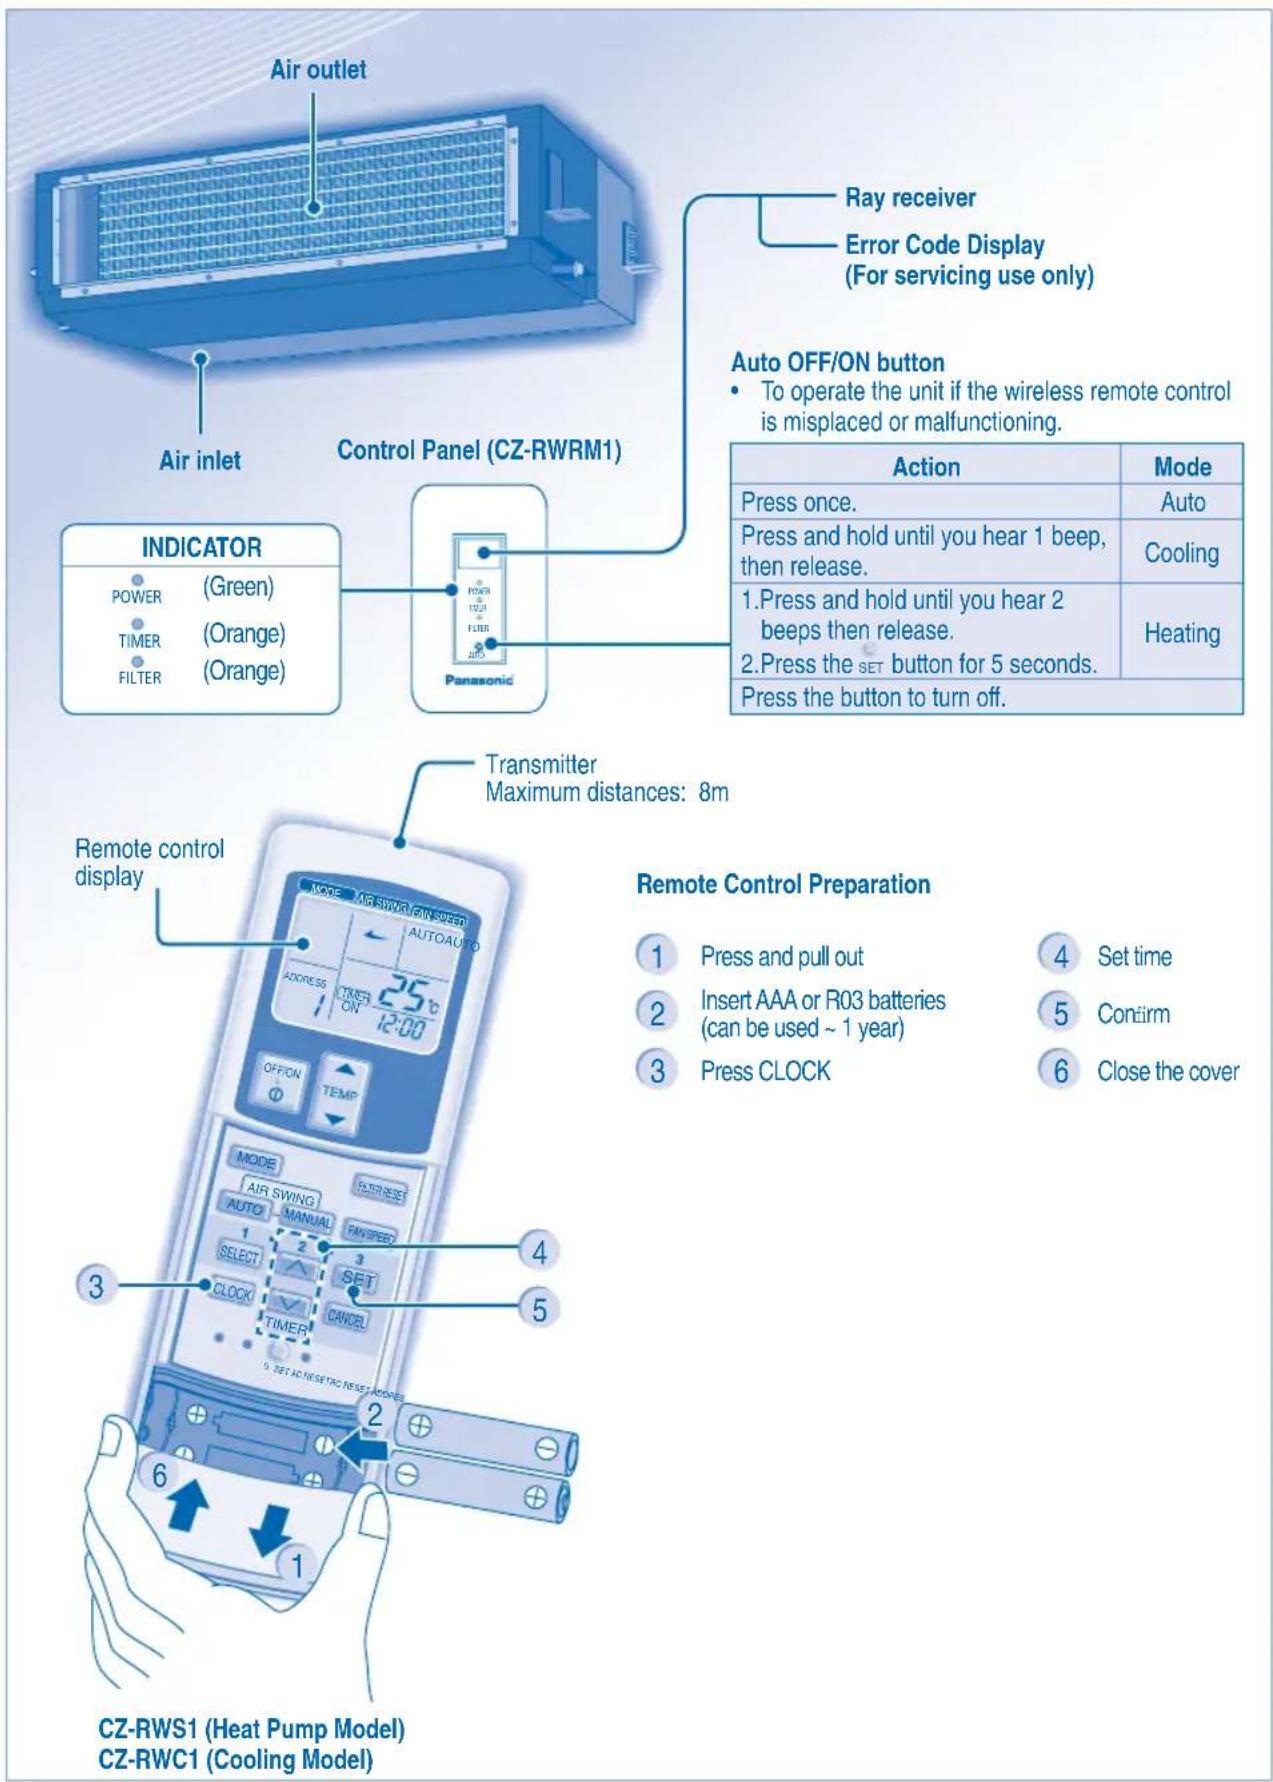

TO TURN ON OR OFF THE UNIT

TO SET TEMPERATURE
Selection range: 16^ 31^ .

- Unit selects operation mode according to temperature setting, outdoor and room temperature.
HEAT mode - To enjoy warm air
Unit takes a while to warm up.
FAN mode - To enables air circulation in the room
COOL mode - To enjoy cool air
DRY mode - To dehumidify the environment
- Unit operates at low fan speed to give a gentle cooling operation.
- During soft dry operation, the indoor fan operates at a low fan speed.

TO SELECT FAN SPEED (3 OPTIONS)
- For AUTO, the indoor fan speed is automatically adjusted according to the operation mode.
- If the operation mode is set to Fan, the fan speed will be fixed at MEDIUM regardless of the temperature setting.
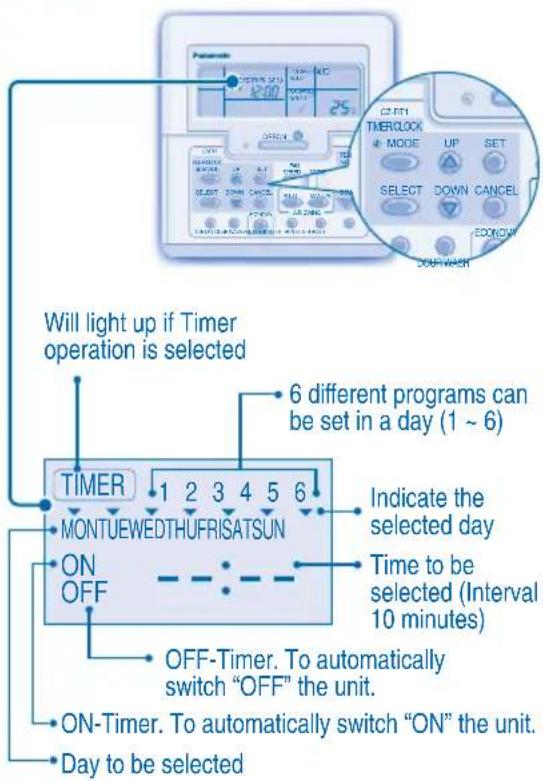
TO SET DAILY TIMER
- To turn ON or OFF the unit at a preset time.

Select ON or OFF timer.


Set the time. Confirm.
To cancel ON or OFF timer, press CANCE.
- When ON timer is set, the unit may start early before the actual set time in order to achieve the desired temperature on time.
- Timer operation is based on the clock set in the remote control and repeats daily once set. For clock setting, please refer to Remote Control preparation.
The timer closest to the current time will be activated first.
If timer is cancelled manually, you can restore the previous setting by pressing SET.
If the main power is switched off for an hour or more, the clock and timer will need to be set again.
OPTIONAL SETTINGS

- To avoid unintentional operation, you can assign a different address to each indoor unit.
- Press repeatedly to select your desired address setting.
RCRESET

- By default, ADDRESS 1 is selected. You do not need to change this setting for normal operation.
If the address is set to GROUP, more than one indoor unit can be operated at the same time.

Press to restore the remote control's default setting.

Not used in normal operations.
HINT
- Use curtains to screen off sunlight and outdoor heat to reduce power consumption during cool mode.
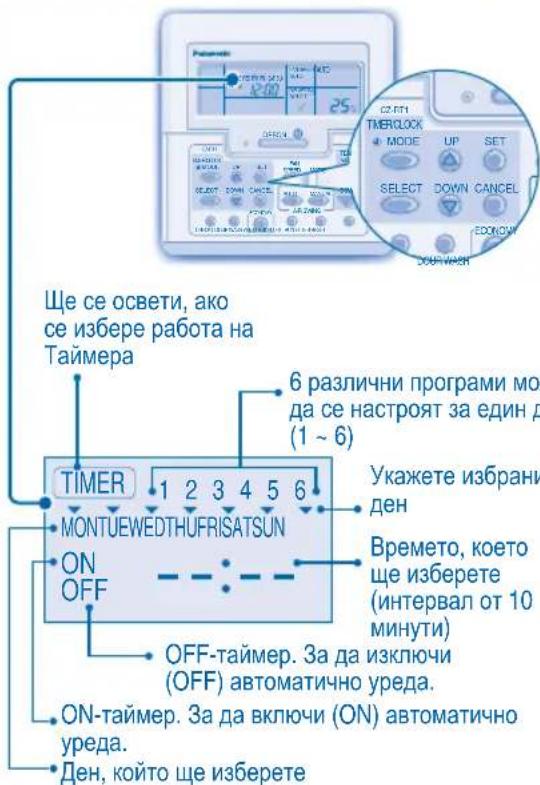
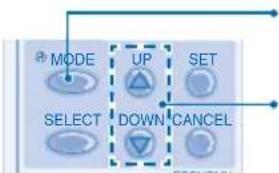
PRODUCT OVERVIEW & OPERATIONS (WIRED REMOTE CONTROL)
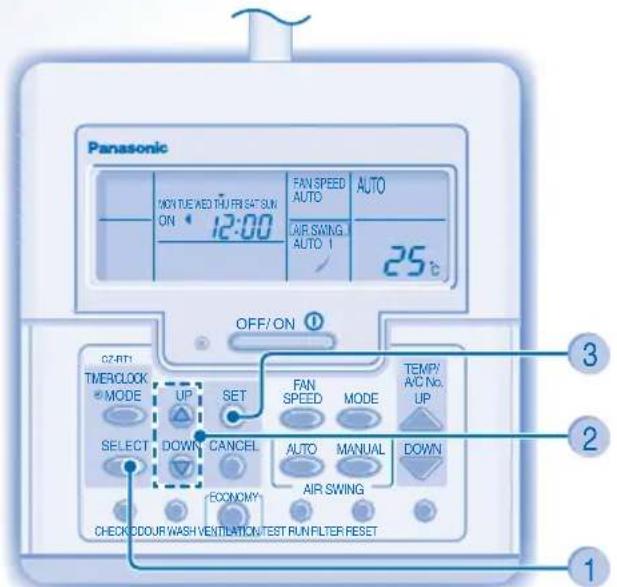
CZ-RT1
ECONOMY For normal operation, the oocurwash, VENTILATION and TEST RUN buttons are not in use.
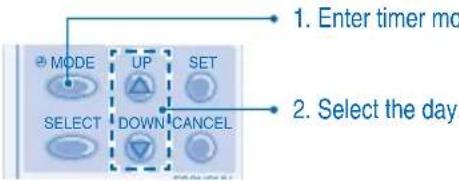
Remote Control Preparation
1 Press SELECT
2 Press to set day
3 Conf. m
Repeat steps 2 and 3 to set the current time.

TO TURN ON OR OFF THE UNIT

TO SET TEMPERATURE
Selection range: 16^ 31^ .

- Unit selects operation mode according to temperature setting, outdoor and room temperature.
HEAT mode - To enjoy warm air
Unit takes a while to warm up.
FAN mode - To enables air circulation in the room
COOL mode - To enjoy cool air
DRY mode - To dehumidify the environment
- Unit operates at low fan speed to give a gentle cooling operation.
- During soft dry operation, the indoor fan operates at a low fan speed.

TO SELECT FAN SPEED (3 OPTIONS)
- For AUTO, the indoor fan speed is automatically adjusted according to the operation mode.
- If the operation mode is set to Fan, the fan speed will be fixed at MED regardless of the temperature setting.
TO SET DAILY TIMER
- To turn ON or OFF the unit at a preset time.


Enter daily timer mode. Select ON or OFF timer.

4

Set the time. Confrm.
- To cancel ON or OFF timer, press

- When ON timer is set, the unit may start early before the actual set time in order to achieve the desired temperature on time.
- Timer operation is based on the clock set in the remote control and repeats daily once set. For clock setting, please refer to Remote Control preparation.
- The timer closest to the current time will be activated first.
If timer is cancelled manually, you can restore the previous setting by pressing SET
If the main power is switched off for an hour or more, the clock and timer will need to be set again.
HINT
- Use curtains to screen off sunlight and outdoor heat to reduce power consumption during cool mode.
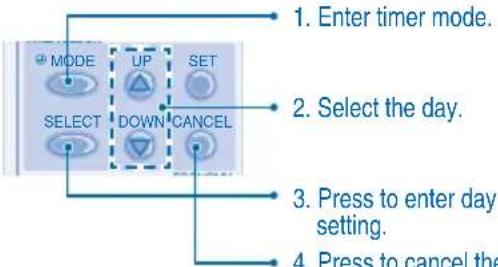
TO SET WEEKLY TIMER
Change Display
- Press MODE for 3 seconds to change the display to weekly timer.
Select days to run timer
- Press SELECT to enter day setting.
- Press to select your desired day. The selected day will be highlighted with Press to deselect or select mark. Repeat this step includes other day.
Select ON/OFF Timer
- Press SELECT to enter Timer 1.
- Press to choose ON or OFF.
- Press SET to confirm the selection.
Select Timer
- Press to select your desired time. If you want to set together with your desired temperature, press DOWN to select the temperature.
-
Press to confirm the setting.
-
Repeat steps 5 to 8 to set Timer 2 to 6, or press to cancel the related timers.
OPERATION DETAILS
Weekly timer is only applicable for wired remote control, press MODE for 3 seconds to select daily timer or weekly timer.
- Daily timer and weekly timer could not be set at the same time.
Promotes energy saving by allowing you to set up to 6 timers in any given day.
- Same timer program cannot be set on the same day.
Check Timer
- The display will show the program for each of the selected day.
Modify Or Add Timer
Perform check timer operation to select the day. Repeat steps 4 to 8 to modify existing timer program, or add any new timer program.
Cancel Timer
- Perform the step below to cancel the timer program for a particular day.
Disable Weekly Timer
To disable weekly timer setting, press MODE, then press CANCEL
Enable Weekly Timer
To enable previous weekly timer setting, press set then press
CARE & CLEANING CARE & CLEANING

CAUTION
- Switch off the power supply before cleaning.
- Do not touch the aluminium fin, sharp parts may cause injury.
CLEANING INSTRUCTIONS
- Do not use benzene, thinner or scouring powder.
- Use only soap ( pH7) or neutral household detergent.
- Do not use water hotter than 40^ .
HINTS
Clean the filter regularly for best performance and to reduce power consumption.
- Please consult your nearest dealer for seasonal inspection.
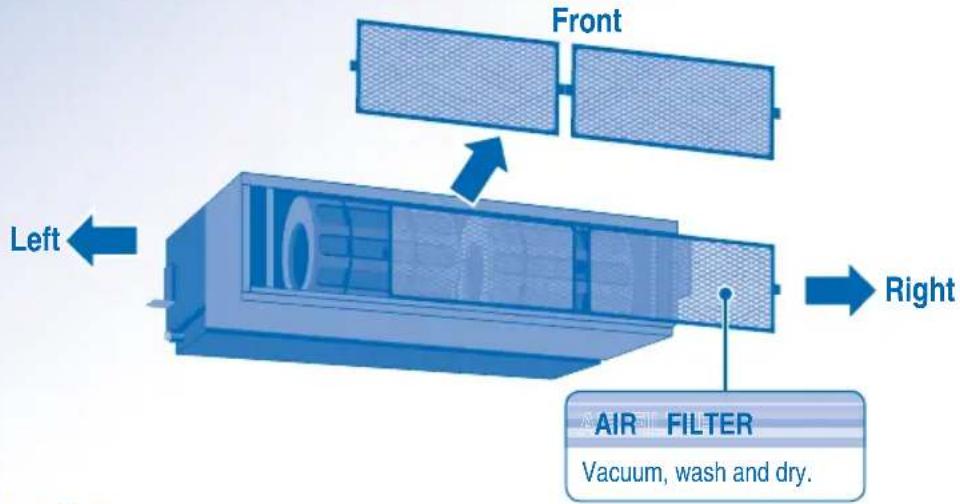
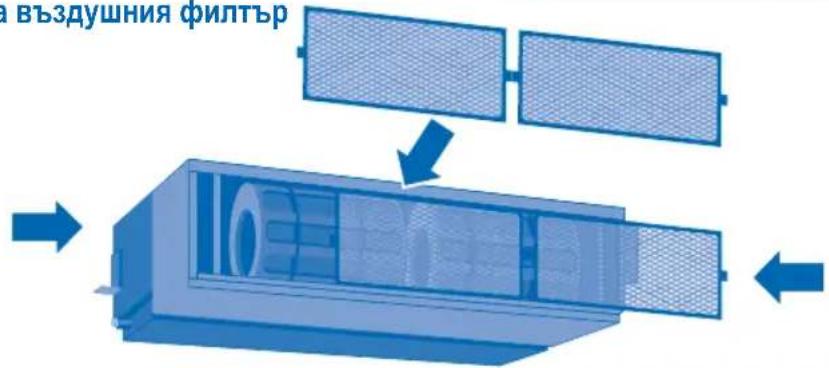
Remove Air Filter
3-Way Removable Air Filter
The air filter can be removed in three directions for easier maintenance.
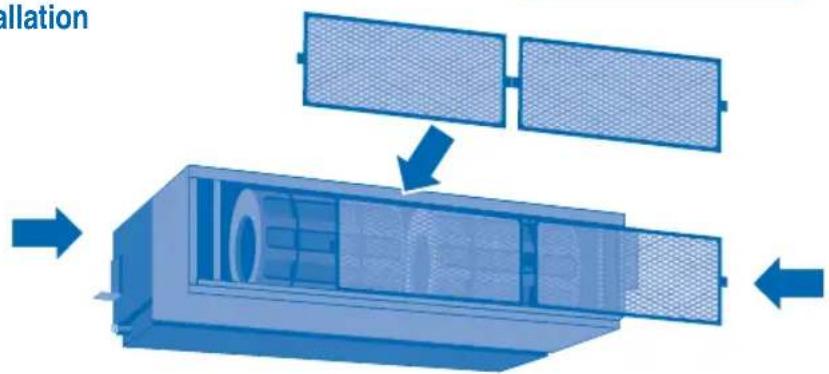
Air Filter Installation
Air Filter Maintenance
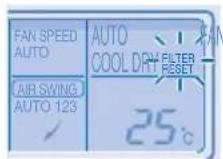
Cleaning is needed when:
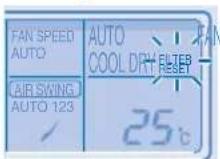
"FILTER RESET" appears on the remote control display. (For wired remote control)
"FILTER" lights up on the indicator display. (For wireless remote control)
It is recommended to clean the air filter every 6 weeks.
After the air filter is cleaned, press / to reset.
- Do not operate without an air filter.
- Wash/rinse the air filter gently with water to avoid damage to the air filter surface.
- Do not dry the part with a hair dryer or a stove.
- Replace any damaged air filter.
TROUBLESHOOTING TROUBLESHOOTING
The following symptoms do not indicate malfunction.
Symptom
Cause
Mist emerges from indoor unit. Condensation effect due to cooling process.
Water flowing sound during operation.
- Refrigerant flow inside the unit.
The room has a peculiar odour. This may be due to damp smell emitted by the wall, carpet, furniture or clothing.
Indoor fan stops occasionally during automatic fan speed setting.
- This helps to remove the surrounding odours.
Operation is delayed a few minutes after restart.
- The delay is a protection to the unit's compressor.
Outdoor unit emits water/steam. Condensation or evaporation occurs on pipes.
Timer indicator is always on. The timer setting repeats daily once set.
Indoor fan stops occasionally during heating operation.
- To avoid unintended cooling effect.
Cracking sound can be heard during operation.
Changes of temperature cause the expansion/contraction of the unit.
Unit switch to FAN operation and air become humid.
- This happens when the room temperature reaches the set temperature, operation switches to FAN mode and the humidity increase.
Outdoor unit emits noise during heating operation.
- This is due to changes inflow of refrigerant gas when operation stops and starts.
Operation does not stop immediately after pressed the OFF/ON button.
- Discharging heat is in process. Operation will stops automatically after approximately 60 seconds.
Operation stops occasionally. ("DEFROST" appears on the remote control display)
- The unit is in defrosting mode, and the melted frost is drained from the outdoor unit.
Airflow does not start immediately after operation is started. ("PRE HEAT" appears on the remote control display)
The unit is warming up to provide warm air.
Operation starts after power resumes. - Auto restart is in function and operates under previous setting.
During dry mode, cold air blow out.
- The unit is running cooling operation with low fan speed to dehumidify the room.
Fan speed change occasionally during heating mode.
- The room temperature has reached the remote control setting. When the room temperature drops again, the fan speed will resume to the remote control settings.
Outdoor unit emits steam during heating mode.
- This is due to defrost operation happens at the heat exchanger.
Check the following before calling for servicing.
| Symptom | Check |
| Heating/Cooling operation is not working eficiently. | ·Set the temperature correctly. ·Close all doors and windows. ·Clean or replace the filters. ·Clear any obstruction at the air inlet and air outlet vents. |
| Heating mode cannot be operated. • The unit is forced to operate at cooling mode only in a non-living room, such as a computer room. | |
| Noisy during operation. • Check if the unit has been installed at an incline or the intake grille is not closed properly. | |
| Remote control does not work. (Wireless remote control display is dim or transmission signal is weak.) | ·Insert the batteries correctly. ·Replace weak batteries. |
| The unit does not work. • Check if the circuit breaker is tripped. ·Check if timers have been set. | |
| The unit does not receive the signal from the remote control. | ·Make sure the receiver not obstructed. ·Make sure the address is set correctly. ·Make sure the remote control signal transmission is within the range. ·Certain fluorescent lights may interfere with signal transmitter. Please consult your nearest dealer. |
| The unit stopped and TIMER indicator blinks. • Turn OFF the power supply to reset the unit (TIMER indicator stop blinking). ·Turn ON the power supply and restart the unit ·If TIMER indicator blinks again, please consult your nearest dealer. | |
FOR SEASONAL INSPECTION AFTER EXTENDED NON-USE
- Checking of remote control batteries (wireless remote control).
- No obstruction at air inlet and air outlet vents.
- Use Auto OFF/ON button to select Cooling/Heating operation, after 15 minutes of operation, it is normal to have the following temperature difference between air inlet and air outlet vents:
Cooling: ≥ 8^ Heating: ≥ 14^
FOR EXTENDED NON-USE
- Activate Heat Mode for 2~3 hours to remove moisture left in the internal parts thoroughly to prevent mould growth.
- Turn off the power supply.
- Remove the remote control batteries (wireless remote control).
NON SERVICEABLE CRITERIAS
TURN OFF POWER SUPPLY then CALL Authorized Distributor under the following conditions:
Abnormal noise during operation.
Water/foreign particles have entered the remote control.
Water leaks from Indoor unit.
- Circuit breaker switches off frequently.
Power cord becomes unnaturally warm.
- Switches or buttons are not functioning properly.
INFORMATIONS INFORMATIONS
CONDITION D'UTILISATION
Address 1 Address 2Group-Address 3
RCRESET

ADDRESS
Address 1 Address 2 Group Address 3
UNITÀ INTERNA E UNITÀ ESTERNAR

INFORMATIE INFORMATIE
GEBRUIKSOMSTANDIGHEDEN
MEER INFORMATIE OVER DE WERKING
Address 1 Address 2Group Address 3
m = 311
TIA NA ENEPTOIOIHSETE (ON)
TH NA ANIENEPTOIOIHSETE
(OFF) TH ΣYΣKEYH


TIA NA PYOMIETE TH OEPMOKPAEAIA
Eupoc Etniaoyns: 16^ 31^

TIA THN EIIIOH TOY TPOIOY AEITOYPFIAZ
AYTOMATH KATAZAH AIEIOTYPIA2 - Ia peyauteep eukoia
Hovada etilevei ia letoupyia avaloya me tn puoiion tns 0epokpaia, nTv Ewetepikn 0epokpacia kai tn 0epokpacia domegaiou.
KATAZTAH AEITOYPIA GEPMANE -TIA v a aTIOaouavet ETOAep
Hovada xpeiaεtai lyo xpovo ia va zεotαθεi.
TpoTROiOnn n pOoBKn npoypaMaTOs xpovoiakottn
EKTAEOTN AEIOUPYEA EYEYXU XPOVODIAKOTTN, YIA VA ETNIIEETENY Nmu.
ETTavaaABETe TA BnJATA 4 EwC 8, YIA VA
TPOTTTOINOETO UTTAPXOV TPOVPAUMA TO
XPOVODIAKOTTN N VA TPOOThetaE VEO TPOVPAUMA
XPOVODIAKOTTN.
Akupwn xpovoiaokntn
EKTLEOTE TO TIPAKATW Bnma, VIA VA AKUPwOETTO PPoypaumxpoovoiakottnVia mouykepivn npepa.

- Kataxwpnte Tn Aetoupyia Tou Xpovoiakottn.
-
Eπιλεξτην ημέρα.
-
Patnote, yia va kataxwpoete TN puqian nepac.
- Patnote, ia va akupwate tn puthetaion tou xpoovoiakottn.
Atevepyoioinog E0aiaiou Xpovodiaokntn
Ia va aTVEpyoToiOeTe TpuBIOJTOU EouiaoiXpovoiAikOttn,ATnOT To KOUPTI MODE KAI,OTN OUVEXEA,TO KOUPTI CACEL
Evpyoioiog eBdoiaiou xpvodiaokntn
Ia va evpyoioiae Tny pponyouevn puouion Tou eBopoudiaiou xpvovoiokottn, natane To kouptI MODE KAI,OTN ouvexia,TOKouptI
ΦPONTIΔA & KAOAPIΣMOΣ

3A DA IN36EPETE PEXKIM HA PABOTA
ABTOMATUHEPPEKIM HA PABOTA-3aBaue ydo6ctbo
- YpeIbT n36papa pexkma Ha pa60Ta B 3aBNCIMoCT OT 3aDaHeHATA Tempepatypata, BbHnHaTn CTaHata Tempepatya.
PEXKIM HA OTONJIENHE - 3a da ce hacnaKdaBaTe Ha TOnbI Bb3dyx
HyXHO e Bpeme 3a 3aqrBaHe Ha ypea.
PEKIM HA BEHTUNATOP -ПОЗВОЛЯВa
CπpkylaucnraTa Hb3dyxa BCTaTa
PEXIM HA OXIAKDAHE - 3a da ce hacnaKaBaTe Ha CTyden Bb3dyx
PEKIM HA MEKO N3CYUABAHE - 3a da ce HacnaiTe Ha Tnxa cpeda
- YpeBt pa60n Ha HnCKa CKOpOCT, 3a Da rapaHTnpa yMepeHO OxnaXdaHe Ha Bb3dyxa.
- No Bpeme Ha pexkma Ha Meko n3cyuabaHe BBtpeWHnT BeHTnIaTOp pa6OTn HA HnCKa CKopoCT.

3A HACTPOBAAE CKOPOCTTA HA BEHTNATOPA (3 Bb3MOXHOCTN)

PnpeKIM AUTO CKOPoCTTHa BbTpEHHBENTHINATOp Ce HAcTPOBa ABTOMaTHUHO CIOpeDpeKIma Ha paOta.
- Ako pekimmbt Ha pa6oTa e 3aJaDen Ha BeHTnlaTop, ckopocTt Ha BeHTnlaTopa Ue 6bJe fKcnpaHa Ha MEDIUM (cpeHa) He3aBnMo OTo 3aJaHeHaTa TemnepaTypa.
3A DA CE HACTPON BCEKNHEBHN TAIMEP
3a Da BKJIOUHTE INN N3KJIOUHTE KINMaTnKa B npedBaupTeJIHO 3aJaDeHo BpeMe.

I36epete ONnn OFF TaMep.


3aJaTe JKeJHaHOTo BpeMe.


NotbpeTe Nahtpokkata.
3a da OTMeHnTe ON nnn OFF TaImepe,HaTncHeTe

Ako TaImepbTe HAcTpoEH BpeKIM ON, ypeBt MoKeJa 3aNoUHe Da pa6OTn NO-paHO OT DeHCTBNTeH03aDaJeHTo Bpeme, 3a Da IOCTNfHe HABPeme DoJenahata O TaBcTemnepaTypa.
TaimepbCTeBa3npaHaHactpoKnteHa YacaOT DnctaHcNOHHOTO ynpabNHeHneI Ce NOBtapReEkeDHeBHO, CNeI KaTO BeHbXe HAcTPOeH.3aHacTPOkNTe Ha YacOBHnKa, MoJBAxTe POnrToBHeHa DnCTaHcNoHHOTo ynpabNHeHne.
HaHnpeD 1e ce 3aedCTBa Hau-6n3KnTdo TekyoTO BpeMe TaMep.
Ako TaImepeTe OTMHeH pBuHO,MOKe Da Bb3CTaHOBnTE npeDmHnHa TnAcTPOKa,KaTO HaTNCHeTe 6yToHa SET.
Ako OCHOBHOTO 3axpaHbAe E n3KnUoyeHO 3a Yac NnN NOBuey, YACOBHNkBT N TaIMepbT Tpr6Ba OTHOBO da 6bDat HAcTpoEHN.
DONJIHINH HACTPOIKN

3a da n36eHETe HEBONHO BKJIOUbaHe Ha ypeDa, Bne moXe Da npucBOnte pa3nueH aDPEC HA BCAKO BVTPeuH O TNO.
HaTnCHTe HeKoIkoKpaTHO,3a Da n36epTe XeNaHaTa ot Bac hAcTppoKa ha aDpec.
Address 1 Address 2 Group Address 3
- No noДраЗбиразе ce n3бираз ADORESS 1. He e hyжно有很大nomeнгte ta3n Hactpoikka 3a HopmaHna pa6ota.
Ako aDpeBt e Hactpoeh Ha GROUP, NOBuee OT eHNO BbTpeHIO TnO MoKe da pa6aTN no eHNo CbU O Bpeme.
RCRESET
HaTnCHete,3a Da Bb3CTaHOBNTe
fa6bpnuHHTe HAcTPOKn Ha
DnCTaHcMOHOTO ynpabJIeHHe.

AC RESET He ce n3no3Ba npn HopmaHnO npaun.
CbET
3a da HamaIte pa3xOda Ha eNeKtpoeHepnra, KOraTO ypeBt E B pexIM HA OxJaHahe, DpbHHeTe NepDeTa, 3a da IpeD0BpATne IpoHkBaHe Ha CbHcEBA CBETINHa U TOINHa OTbH.

I36peTe ON nnn OFF TaMep.
4

TbpeTa
3a da OTMeHnTe ON nIN OFF TaIMep, HATNCHeTc CANCEL
Ako TaImepbTe HAcTpoEH BpeXM ON, ypeBt MoKe Da 3aNoUHe Da pa6Otn No-paHO OT DeNCTBNTeH0 3aJaDEHoTo Bpeme, 3a Da DoCTnRHe HABpeMe Do Xenahata ot Bac TemnepaTypa.
TaimepbCTe6a3npaHaHacptpoknteHa yaca OT DnctaHcnoHHoTO ynpabHeHneIe NOBtapr EKeJeHBeHNO, CNEI KATO BeNbXe HAcTpoEH.3a HAcTPOKNTe Ha YacOBHnKa, MoJI BnXTe IOnIroTBHe HA DnCTaHcNoHHOTo ynpabHeHne.
- Hai-Hanpei 1e ce 3aedCTBa Hai-6n3KnT DO TEkyuOTo BpeMe TaMep.
Ako TaMepbTe OTMHeH pBHyO,MOKe Da Bb3ctaHOBNTe npeduHaTa HAcTPOKa,KaTO HaTNCHe 6yToHa SET
Ako OCHOBHOTO 3axpaHbHe e n3KJIOUeHO 3a Yacnnn NOBuey, YACOBHNkBT TaMepbT Tp6Ba OTHOBO da 6bDaT HAcTPOeH.
CbBet
3a da HamaNTe pa3XoHa eNeKtpoeHepnra, KOraTo ypeBt E B peXMM Ha OxnaJdaHe, DpBnHeTe nepDeTa, 3a da PpeObPaTne IpoHKBaHe Ha CbHcBeBA CBETInHa N TOINHa OTbH.
3A DA HACTPONTE CEDMNUHNA TAMMEP
PpomraHa dncnne
1.HatncheTe 3a3cekyndn,3a da npomeHnte HNCIIeHa CeDMUeH TaMep.
136epete dHnte 3a pa6ota Ha taMepa
2.HaTnCHete 3a da Bne3eTe B HAcTpOikata 3a DEHA.
3. HataHcHete 3a da n3bepeTe XeNaHnO T Bac
136paHnT DeH ue 6bDe COCBteH 3hak
HaTnCHTe SET,3a da pa3MapKnpate nn n36epeTe 3Haka
Tobopete Ta3n CtbnkA, KaTo BkIouHte Dpyr DeH.
№6peTe ON/OFF TaMep
- HatncheTe 3a da Bne3eB TaMep 1.
- HatncheTe 3a da n36epeTe ON uIN OFF.
- HatncheTe SET 3a da notBbPnTe n3bopa cn.
№36peTe TaHMeP
- HatncheTe 3a da n36epete keenaHOTo ot Bac BpeMe.AKO uCKaTe Da HAcTPOnte 3aeDnO cKeenaHaTa
OT Bac TEMnepaTypa,HaTNCHeTe DOWN ,3a Da n36peTe TEMnpaTypa.
- HatncheTe 3a da notBbprnte Hactpoikata.
IIOBTOpeCTbIKN5do8,3aJaHAcTPOnte TaIMep 2do6,NHnHaTHNCHeT CANCEL ,3aDaOTMeHInTe CBoTBETHNE TaIMepn.
IPODPOBHOCTN 3A PABOTATA HA TAYMEPNTE
CeMnHnT TaMep e npnIOXM cMo 3a KNUHO DnCTaHcUOHHo ynpaBHeHne, HATNCHEe 3a 3ceKHyDn, 3a da n36peTe dHeBeH Nn CeMnueh TaMep.
- IHeBnIaT TaMep n CeMnHnT TaMep He 6nxa MoIIN Da ce HAcTpO rN eEHO n CbIo BpeMe.
Hacbpyaba eheprocectraBaHeto, kato Bn daBa Bb3MOxHOCT Da HAcTpoBate Do 6 TaIMepa BBB BCEKN eINH DeH.
- Edha n cbua nporpama Ha taMepa He moke da 6bnde HactpoeHa Ha cbuia deH.
PpOBepTe TaMepa
- Bne3Te B peXIM Ha TaImeP.
2.ИЗбете Деня.
3.Диспгггт�е noka3Ba nporpaMaTa 3a BCEKn OT n36paHHTe DnH.
MoDnOuPauTe uJIn doabete TaMep
-3nblhHeTe onepaunra 3a npOBepKa Ha TaMepa, 3a Da n36epe DeHr. NobTOpTe CTbKn 4 Do 8, 3a Da MoDnΦuPate CbIeCTByBaata npOrpMa Ha TaMepa IIN da DoabNTe HkaKbHOBa npOrpMaHa TaMepa.
OTMeHete TaMepa
- 3nBnHeTe CTbNkata No-DoNY, 3a Da OTMeHInTe nporpaMATA Ha TaMepa 3a OnpeDeIeH DeH.
- Bne3Te B peXIM Ha TaIMeP.
2.ИЗберетe Деня. - HatncheTe, 3a da Bne3eTe B HactpoKaTa 3a DeH.
- HatncheTe, 3a da OTMeHnTe 3aJaDeHnTaMep.
3a6paHTe CeDMnHn TaHmep
3a da 3abpaHnte HactpOkaTHa CeMmUHn TaIMeP, HATNCHE MODE CNEKoETo HAHTNCHE T CANCEL
Pa3peweTe ceDMnHnTaMep
3a da pa3peuTe npednHa HacTroKa Ha ceDMHnra TaMep,HaTNCHeTe MODE ,CneKoETO HA TNCHeTe
ГРИЖИ & NOΥNWCTBAHE

BHIMAHNE
- N3KJIouyete 3axpaHbHaTeTo npedn nouchBaHe.
He dokocbaTe anyMHHneBOTo pe6po, ocTpata yact MoKe da npuHn HapaHaBaHe.
NHCTPYKUN 3A N3MBAHE
He n3no3BaIte 6eH3nH, pa3peiTe Inn a6pa3nBn npaxOBE.
- 3nON3BaIe cAmO canyHn (pH7) JIN HeYtpaJIHN DOMAKINHCN INPaxOBe.
He n3noJIbAaTe BOda, no-ropeuca ot 40^
C'bbETN
- POnCTBaIteФHITbpa peIOBHO 3a OcHrypRAHe Ha ONTMAJHa IPOUN3BOIDTEJIHOCT N3a HAMAJBAHe Ha pa3XoJa Ha eHepn.
MOna, KOHCyTTnpaIte Ce c HAMpaUmaCe Ha-6n3Ko Do BAc dnnbp 3a ce3OHeH nprrne.
CbaeneBb3duhna qnIITbp
- 3-ntbTeH CBaJIeM Bb3dUweH qnTTbp
Bb3dyuHnIaTfumItbpMoKe Da ce CBAJIaB TpN NocOKn 3a No-JeCNO IopDbpxaHe.

IocTabaHHe Ha Bb3dUshnna fHNTbP
PpKaHa Bb3dywnn qntlbp
Ima hyjda ot nouchtahe, koraTo:
Ha dncnne Ha nctaHcnoHto ynpabnene ce noBn cb6eHnTo "FILTER RESET". (3a xuH NoCTaHcnoHoo ynpabnene)
Ha HnDikatopHnI DnCnIeBcETBa Cbo6ueHMeTo "FILTER".(3a 6e3KmHo DnCTAHnOHOynpaBHeHne)
- PpenopbUba Ce Bb3dyuHnT fnnIbP da ce noCTBa Ha BCEK 6 ceMn.
Cne KaTO B3dUHnTФnTbp e NoCTeH, HATNCHE T/ITERPSET, 3a Da BbPHTe B HaayanHO CbCTOHRHe.
He n3non3BaTe ypea 6e3 Bb3dyuen p
BHMMATEJHO NOUCTBaIe/TINMBAITe B3DyHnHnФHtbp,3a Da He HapaHNTe NOBbpxHOCTTa My.
He n3cyuabaTe yacTc bC cewoap nn neyka.
CmeHnTe BceKn NobpeDen Bb3DyWeH hntbp.
OTCTPAHRAHE HA NPOBJIEMN
CneHnTe cHmntomn npn pa6oTaHa ypeDa He 03NaUaBt Henn3npaBHOcT.
| СИМПТOM | Прочины |
| ОТ ВБТРЕШАТа чAST ИЗЛЗАЗмБгELENВБ3dух. | ·Кондэнзurance поади п ropеса на охлajжданe. |
| Звук OT Teчаша вODA NO ВРЕме на равота. | ·Охлajждаша Тechност ВБТр В урета. |
| Стаята Има STРANHA МИРИЗм. | ·Тoba може дa e мИрИЗмatura на Вlarага, OTделяна OT StelHITE,КИПIMa, MeбелITE илДрхITE. |
| ВБТРЕSHИТВЕNTIATOPспра OTВРЕм На ВРЕм РИ НASTROКAZA abTOMATNUHOPergILIPANe Ha SCOKOCTTA. | ·Тoba сponмara 3a OTSTРANBAHE Na OKOLNITe МИрИЗМ. |
| РавOTATA ce 3a6abra C hЯкOLKO MINHTIcpeTAPITPANAe. | ·ЗakьсеньеTO сLУЖи 3a 3aцHTA Na KOMPecOPa Na UPEDA. |
| ВБнIHATAЧAST OTDELA BODA/napa. | ·ПО TrьБITE ce ПОлчава КОнDEH3AZAИ NII N3PAPRAVAHe. |
| ИнDIИКATOPBT Na Taimepa e NOCTOYHNOBKKLOUChEN. | ·HAcTPOIKAta Na Taimepa ce NOBTPARe EJKeDNeBHO, cIed KaTO BeDnBJK eZaJaDeHEn. |
| ВБТРЕSHИТВЕNTIATOPспра OTВРЕм Na BPEMпpr OTOPIBAVe. | ·С龟Да ce I36BerHe NEHexeHAn OXlanqdauchefekt. |
| ЧУВа ce 3bYk OT ИЗЛКВАнe NO ВРЕм Na PABOTa. | ·TempeparatypHTe ПоремпуMorat Дa IOBEdaTdo pa3шрЯВанe ИП CBIVaHne Ha UPEDA. |
| УрдБТ e INPEKЛQUECHEN Na PEXIM NaBEHTIATOPи ВБ3dUxTB CTABA BNLAZhen. | ·Тoba сLYCbA, korATO StaiHATA Tempepatура DoCTHnHEZaDAHEna TEmpepaTpya -ОпepaцHTa Na PpeBKnUoyBa Na PEXIM NaBEHTIATOPи BNLAXHOCCTTa ce YBeJIuCBya. |
| ВБнIHATAЧAST ИЗДава Shum no ВРЕм Na PEXIM Na OTOPIBAVe. | ·Тoba e B pe3yPTa Na IprOmeHb Na OXlanqdauchia ra3, koratoОпepaцHTA сLIPA Na IINCEPRTa. |
| ОпepaцHTA He cIIPA BeDHLa cIeDHa НатSCaHETo Ha 6byToHa OFF/ON. | ·ИЗБршBa ce ИЗПСКанe Na TOnПиHa.ОпepaцHTA ue cIpe abTOMATNUHOb cIeD Na PInBISNITeHNo 60 cekHyd. |
| ОпepaцHTA сIIPA OT ВРЕм Na PEXIM. ("DEFROST" ce NOYIBa Na DlcNPIEg Na ДИSTAHIOHOTU ynpABLeHIne) | ·УрдБТ e B pexIM Na p3Mpa3RbAbe N CTOnEHnT OXlanHTe Ce OTTHa PrE 3 BbHUNaTAt Yact. |
| ВБ3dUshIATOTOK He 3anOчBa BeDHLa cIeDcTAPITPAnTo Na OpepazrTa. ("PRE HEAT"ce NOYIBa Na DlcNPIEg Na DlcSTAHIOHOTO ynpABLeHIne) | ·УрдБТ ce 3aRpyBa, 3a Da IOCTaBn TOnBJ Bb3dUx. |
| ОпepaцHTA ZanOчBa cIeD bS3ctAHOBaBaHn Ha 3axPahBaHTo. | ·АВТOMATUHOTOp pectapTIPAne e B DeiCTBnE i pa6OTn No npedniSHA HACTPOIka. |
| ПО ВРЕм Na PEXIM Na I3CSUWABaHd Uxha STyDhen Bb3dUx. | ·УрдБТ e B onepaizna Na OXlanqdaHn C HsCKa SKopocT Na BEHTIaTopa, 3a da OTSTPANn BnAraTa OT NOMEseHMeTo. |
| СКорOCTTa Na BEHTIATOPa ce IprOmeHry OT ВРЕм Na PEXIM, korATO ypeDbT e B pexIM Ha OTOPIBAVe. | ·СтайнATER Tempepatура e ДОCTИналa NaHCTpoKATA Na ДИSTAHIOHOTO ynpABLHee. Korato StaiHATA Tempepatуca snadhe OTHBO, SKOPOCTTa Na BEHTIaTopa ce BrBya Na HAcTpoKnTe Ha ДИSTAHIOHOTO ynpABLHee. |
| ВБнIHATA Chast ИЗПУСКApap no ВРЕм Na PexIM Na OTOPIBAVe. | ·Тoba e npaDi Na epaPazrTa Na pa3mP3a3BaHne, n3BbPbUbaSa ce B TOnlloo6MeHNHa. |
PpOBepeTe cIeHNHTe Heuca, npei da ce o6aHte Ha otOpn3npaH cepBn3.
| СимпTom | Пюверka |
| Урелов.T He paBOTи eФИКасно в рекIM Ha OTONJIeHne/OxIIaJdAne. | 3aДaIe ПраВИнNo TempepaTypaTe. 3aTbOpeTe BCuKn BpAtn I pOZOpZn.ПочeTe He CmEHeTeФИTpIte.ПочeTe BxODHne I N3XODHn BeHTNlauCIOHn OTBOPn. |
| РекIMТ Na OTONJIeBaHne He ФунКцIOHnpa. | UpeIbT e NOCTaBeH PrinHyDITeLHO Da paBOTn Camo B pekIM Ha OXIAJdaHne B HeOBITaBaHa CTaR, KATO HApPIMeK COMIOTbPNO NOMEseHne. |
| ШуМ no ВсЕм Na paBOTa. | ПювEpTe ДдИ YupeIbT He e 6bl NcHCTaIINpAN Pod HaknoH ИП reWeTkata 3a BxODHry Bb3dUx He e 3aTbOpeH n pravilno. |
| ДиStaHcIOnHToупавLEHne He paBOTn. (ДиСПЯЯТ ha 6e3KmYHOTO DnCTaHcIOnHNo ynpaBLeHne e ɪzračhən Ili npedabatelHnTc rɪgən e cIa6.) | ПочeTe ПраВИнNo batepynte. CmEHeTe N3Xa6eHnTe batepyn. |
| Урелов.T He paBOTn. | ПювEpTe ДдИ ATOMaTNUHnT npeKbCBaU e N3KlIouhen. ПювEpTe ДдИ TaimePbT e NaCTpoH. |
| Урелов.T He poluyaba CnIHaNi OT DnCTaHcIOnHTo ynpaBleHne. | UbePte Ce, Ye HЯMa PperpaDi. YbePete Ce, Ye aIpeCsT e 3aJaDen H praBUNHO. YbePete Ce, Ye N3JIbYBaHeto Ha CnIHaJa Ha DnCTaHcIOnHTo ynpaBleHne E B obXbata. Hяkon φIyopecsIeTHn CBetJIInH MoRat Da DoBEdaT Do CMUeHnЯ рni ppeDaBaHTo Ha CnIHaJa. MOnJ, KOHCyItpaIte Ce c Hai-6blN3Kndo BAC dIINbp. |
| Урелов.T ecPraIи ИndikatopbT ha TAIMEPA MIRa. | ИЗКlIQUeTe 3axpaHbAHeTo (OFF), 3a da BvRheTe уpeDA B hauJIHNo cIbSTOHne (ИнДИКATopbT ha TAIMEPA cIpuJa DA MIRa). BkIQUeTe 3axpaHbAHeTo (ON) I pecTaTpaIte ypeDA. Ako ИndikatopbT ha TAIMEPA 3anOHe DA MIRa OTHOB, MOnJ KOHCyItpaIte Ce c Hai-6blN3Kndo BoB dIINbp. |
PNI CE3OHEH PPERLEC JIENIPOJbIXKHTELHO HEN3IOJ3BAHE
-Поверка на батейпente на дuctанционно управлени (6e3knHNO duCTaHUNHOурвени).
HnKaBnIpepradnHaBXoHNTe n3XoHNBeHTnlaOHHNOTBOpN.
- 3n0n3BaTe 6yToHa 3a ABTomTuHb BKJ./I3KJI. (Auto OFF/ON), 3a da n36peTe pexm Ha oxnaXdaHe/ oToPHeHne. HopMaHNo e, cNe15 MInHyTu pa6Ota, da Imate cneHata TemnepaTyPha pa3Nka MeJxNy OTBOpHTe 3a BxOJaU n3XoDraBb3dyX:
OxnaXdane: ≥ 8^
OTonPbBaHe: ≥ 14^
PPIIPOIDbJXKITEJIHO HEN3NOJ3BAHE
- AkTbBpAtepeKMaHaOTOnnHeNe3a2~3yaca,3a da OTCTpaHHTe HAnbIHO BnaraTa,OCTaHnla BvB BvTpEHNITe eIeMeHTN,CueJdaCePpeoTbPaTu pa3BNTneTo Ha PJIeCEH.
- ɪnəkʌnɪyəte 3axpaɪhbaHætɔ.
- 3BaIeTe 6aTePNITE Ha nCTaHnOHHO ynpabHeHne (6e3KNUHO nCTaHnOHHO npabHeHne).
KPNTEPIN 3A IOBPEDA
N3KJIIOUETE 3AXPAHBAHETO, cne Kceto CE OBADETE Ha oTopnunap an nctpn6byTop B cneHNITE cnuyan:
HeobuaeH 3Byk no BpeMe ha pa60Ta.
Boda/yykndyactnncsca nonaHaBnB dNCTaHNOHOTO ynpabIeHne.
- ɪətɪya Bɔːda O T Bbɪtpeɪnɪya ypeɪd.
- PpeKbcBaHbT Ha eJ. BepurA ce N3KJIIOvBa YecTo.
3axpaHbauT Kaben ce 3aqrba HeoohayHO.
KoHcyTATA nn 6yToHnTe He yHKuOnHpaT npabunHO.


MEMO MEMO


MEMO MEMO


QUICKGUIDEGUIDERAPIDE/GUIARAPIDAKURZANLEITUNG/GUIDARAPIDASNELLE GIDS/GUIARAPIDO/ΣYNTOMOΩOAHFOΩ/EBP3 CNPABOHTHK
WIRELESS REMOTE CONTROL • TELÉCOMMANDE À INFRAROUGE • MANDO A DISTANCIA INALÁMBRICO • KABELLOSE FERNBEDIENUNG • TELECOMANDOSENZA FILI • DRAADLOZE AFSTANDSBEDIENING • CONTROLRO REMOTO SEM FIOS • AYZPMATO THAEXEIPITPHIO • B3XNUHO INCCTAUHNO YYPABILEHNE
1

Pursuant to the directives 2004/108/EC, article 9(2) and 2006/42/EC, Annex I article 1.7.3
Panasonic Testing Centre
Panasonic Marketing Europe GmbH
Winsberging 15, 22525 Hamburg, Germany
Printed in China OYYF1006-00
Panasonic Corporation Website: http://panasonic.net
P07-T10850-01