
VM44 - Fan Bimar - Free user manual and instructions
Find the device manual for free VM44 Bimar in PDF.
| Product Type | Wall Fan |
| Brand | Bimar |
| Model | VM44 |
| Electrical Class | Class II (double insulation) |
| Power Supply | 220-240 V ~ 50 Hz |
| Power | 45 W (estimated) |
| Speeds | 3 (Low, Med, High) |
| Operating Modes | Normal, Natural (Rhy), Sleep |
| Timer | Yes, up to 7.5 hours (in increments of 0.5 h, 1 h, 2 h, 4 h) |
| Remote Control | Yes (AAA battery included) |
| Horizontal Oscillation | Automatic (left-right) |
| Vertical Tilt | Manual |
| Installation | Wall-mounted (fixing kit supplied) |
| Material | Plastic and metal |
| Weight | Approximately 3 kg |
| Dimensions (approx.) | 45 x 50 x 30 cm |
| Usage | Indoor, domestic use only |
| Max Ambient Temperature | 40 °C |
| Minimum Distance from Water | 2 meters |
| Cleaning | Soft damp cloth, do not immerse |
| Batteries | Type AAA, remove before disposal |
Frequently Asked Questions - VM44 Bimar
User questions about VM44 Bimar
0 question about this device. Answer the ones you know or ask your own.
Ask a new question about this device
Download the instructions for your Fan in PDF format for free! Find your manual VM44 - Bimar and take your electronic device back in hand. On this page are published all the documents necessary for the use of your device. VM44 by Bimar.
USER MANUAL VM44 Bimar
type VM44 (mod. WLWF-4018R)

text_image
SINCE 1974 bimar® LIVE • SMART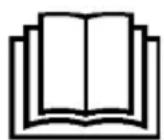
text_image
Technical diagram of a device with numbered parts, including a motor and a handheld device labeled 7 and 9.natural_image
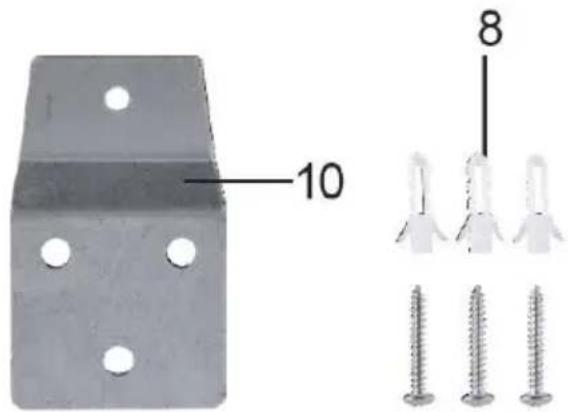
Metal bracket with four holes and three screws, alongside a series of metallic screw fasteners (no text or symbols)ASSEMBLAGGIO
natural_image
Metal bracket with four holes and four arrows indicating direction (no text or symbols)Fig.2

natural_image
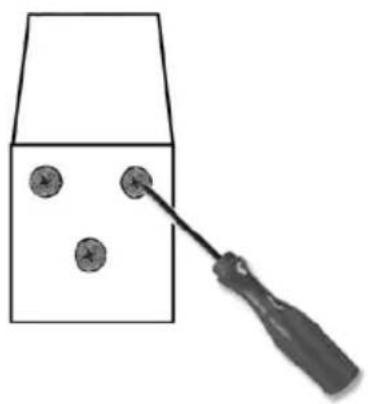
Simple line drawing of a tool interacting with three circular objects inside a container (no text or symbols)Fig.3
natural_image
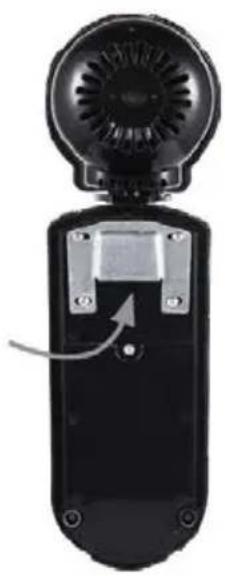
Close-up of a black handheld device with a circular top and internal components, showing a small rectangular component with an arrow pointing to it (no text or symbols visible)Fig.4
text_image
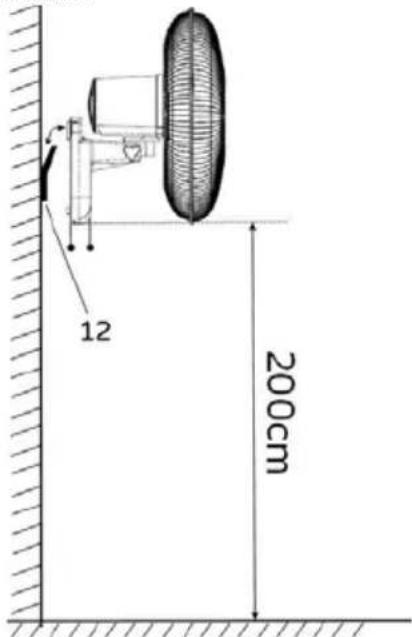
12 200cmtext_image
NOR 4H 2H 1H 0.5H NAT SLP HIG MED LOW ON SPEED TIMER SWING OFF A B D E ATelecomando
text_image
A B C D E OFF ON SPEED MODE TIMER SWING bimar LiveSmartnatural_image
Diagram of a hand holding a rotating object with curved arrows indicating rotation (no text or symbols)Please read these instructions carefully before using the appliance, and instruct other persons using it, too, if necessary. Keep the manual handy for future use.
If when reading these instructions manual certain parts should be difficult to understand, or if there is any confusion, contact the company indicated on the last page before using the product.
This symbol indicates that the appliance is a class II appliance. This means the plug on the power cord is not earthed
This symbol highlights instructions and precautions for safe use. Warnings and appliance installation, use, cleaning and maintenance procedures may be updated slightly from those described in this manual; for further details, please consult the updated on-line manual at www.bimaritaly.it.
GENERAL NOTICES
- This device is intended for home use only, to ventilate internal rooms, and in the manner described in this manual: do not use it for any other purpose. Any other use is to be considered inappropriate and therefore dangerous. The manufacturer cannot be held responsible for eventual damage caused by inappropriate, improper or irresponsible use and/or for repairs made to the product by unauthorised personnel.
This appliance is intended to be used in household and similar applications such as:
- staff kitchen in shops, offices and other working environments;
- farm houses
- by clients in hotels, motels and other residential type environments
- bed and breakfast type environments
- Do not touch the appliance with wet hands or feet.
- Do not insert any tool, or your fingers, into the grille protecting the blades.
- This appliance can be used by children aged from 8 years and above and persons with reduced physical, sensory or mental capabilities or lack of experience and knowledge if they have been given supervision or instruction concerning use of the appliance in a safe way and if they understand the hazards involved. Children shall not play with the appliance. Cleaning and user maintenance shall not be made by children without supervision.
- The appliance must be kept out of children’s reach.
- Ensure that the fan is switched off from the supply mains before removing the guard.
- Attention: when using electric appliances, the basic safety precautions must always be observed to avoid risks of fire, electric shocks and physical injury.
- Do not use the appliance if it is not operating correctly or seems damaged; if in doubt, contact professionally qualified personnel.
- Always unplug the appliance before you assemble, disassemble or make adjustments to the appliance.
- Check that the fan does not come into contact with water or other liquids. If it is accidentally wet or immersed in a liquid, first disconnect the power supply by turning off the control panel switch, and only then remove the plug from the power socket. Dry both the plug and the power socket carefully
before reactivating the power socket. Reconnect the plug to the power socket and then use the appliance. If in doubt, call in qualified staff.
- Make sure that the appliance is working correctly: if not, turn the appliance off and have it checked by professionally qualified personnel.
- Do not move the appliance when it is operating.
- Unplug the appliance when not in use.
- Do not use the device at room temperatures above 40 °C.
- Do not move the appliance when it is in function.
- Do not leave the device exposed to the weather (sun, rain, etc.).
- Do not pull on the cord to disconnect the plug from the socket.
- If the electric cord is damaged, it has to be replaced by the supplier or an authorized service center or a professionally qualified, to avoid any risks.
- Do not use the appliance with a timer or a programmer or with a system that can switch on the appliance automatically, to avoid risk of fire, since a fire risk exists if the heater is covered or positioned incorrectly.
- In the event of a breakdown or poor operation, turn the fan heater off and ask for professionally qualified help: repairs made by unqualified persons can be dangerous and render void the warranty.
WARNINGS ABOUT BATTERIES
- KEEP BATTERIES OUT OF THE REACH OF CHILDREN. Swallowing can lead to chemical burns, perforation of soft tissue, and death. Severe burns can occur within 2 hours of ingestion. Seek medical attention immediately.
- Do not allow children to replace batteries.
- Always insert batteries correctly with regard to polarity (+ and -) marked on the battery and the equipment. Do not short-circuit batteries. Do not charge batteries.
- Do not force discharge batteries. Do not mix new and used batteries or batteries of different types or brands.
- Exhausted batteries should be immediately removed from equipment and properly disposed of. Do not heat batteries. Do not weld or solder directly to batteries.
- Do not dismantle batteries. Do not deform batteries.
- Do not dispose of batteries in fire.
- A lithium battery with a damaged container should not be exposed to water.
• 18 Do not encapsulate and/or modify batteries. - Store unused batteries in their original packaging away from metal objects. If already unpacked, do not mix or jumble batteries.
- Remove batteries from equipment if it is not to be used for an extended period of time unless it is for emergency purposes.
- Clean the battery contacts and also those of the equipment prior to battery installation.
- In case of leak from batteries, avoid any contact with it; in case of contact, wash the affected part with water and seek medical attention.
INSTALLATION
- After removing the packing materials, check the integrity of the appliance; if you are unsure, do not use it and ask for qualified professional help. The packing materials (plastic bags, polystyrene foam, nails, etc.) must be kept out the reach of children because they are potential sources of danger. Attention: any stickers or advertising material applied to the grid removed before using the appliance. The manufacturer declines all responsibility in case this is not safe working practices will be respected.
- Before connecting the appliance, check that the voltage values shown on the data plate correspond to those of the electricity supply network. In the event of incompatibility between the electric outlet and the plug of the appliance, have the outlet replaced with another more suitable type by professionally qualified personnel, who will make sure that the section of the wires of the outlet is appropriate for the absorbed power of the product. In general, the use of adapters or extension cords is not recommended; if their use is indispensable, they must conform to existing safety standards and their current capacity (amperes) must not be less that the maximum of the appliance.
- The power socket must be easy to reach so the plug can be removed quickly in case of emergency.
- To not place the appliance near sinks or other container of liquids (minimum distance of 2 meters) to avoid the risk of it falling in.
- Do not place the appliance near an open flame, cooking or other heating appliance.
- Keep the fan far away from fabrics (curtains, etc.) or unstable materials that could obstruct the air intake grille; make sure that the front is free of unstable materials (dust, etc.).
- This device is NOT suitable to use it in an explosive environment (in the presence of flammable substances such as gas, vapor, mist or dust, in atmospheric conditions when, after ignition, the combustion is spread in the air).
- Do not place the wall fan into the room to avoid the back-flow of gases from the open flue of gas or other fuel-burning appliances (for duct and partition fans).
- Make sure that the electric cord is not touching rough, hot or moving surfaces and not twisted or wrapped around the appliance.
text_image
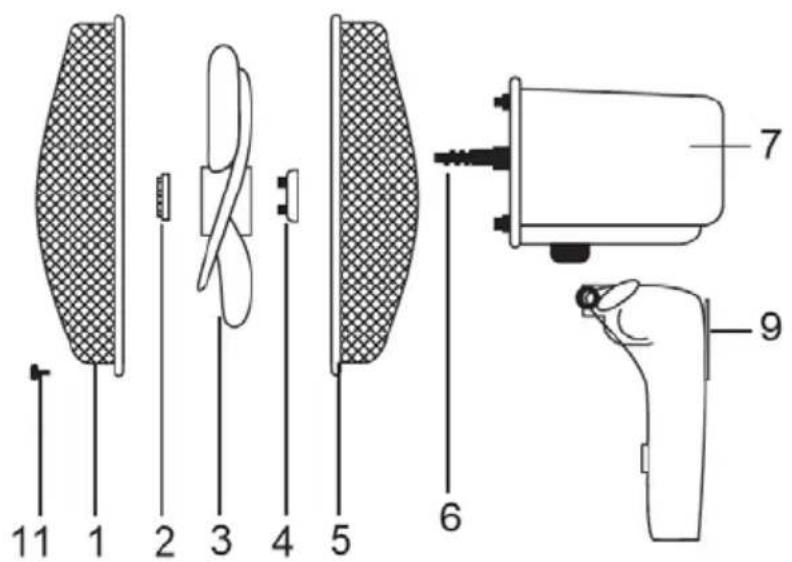
11 1 2 3 4 5 6 7 9Wall installation kit
text_image
10 81) Front grille
2) Fan attachment ring nut
3) Fan
4) Grille attachment ring nut
5) Rear grille
6) Motor shaft
7) Body
8) Screws and plugs
9) Base
10) Mounting plate of the fan
11) Screw fix the grids
12) Mounting plate
ASSEMBLY
Attention: always unplug the appliance before you assemble the appliance.
If in doubt, have the appliance checked or assembled by a qualified professional person.
Attention: the fan can be used only when completely and correctly assembled, that is complete with protection grids (rear and front).
For assembly, refer to below pictures.
Ventilator
- Fasten the rear grid (5) to the motor casing, positioning the corresponding pins and holes, and lock using the appropriate ring nut (4).
- Insert the fan (3) on the motor shaft (6) and lock with the appropriate ring nut (2) turning it tightly anti-clockwise.
- Couple the front grid (1) with the rear grid (5) and lock with the plastic ring and ensure the fastening with the appropriate locking screw (11). Having done this, check that the protection grid is firmly coupled and fastened to the motor.
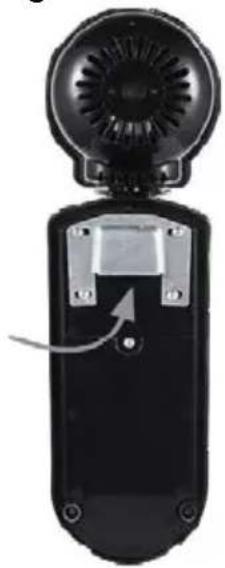
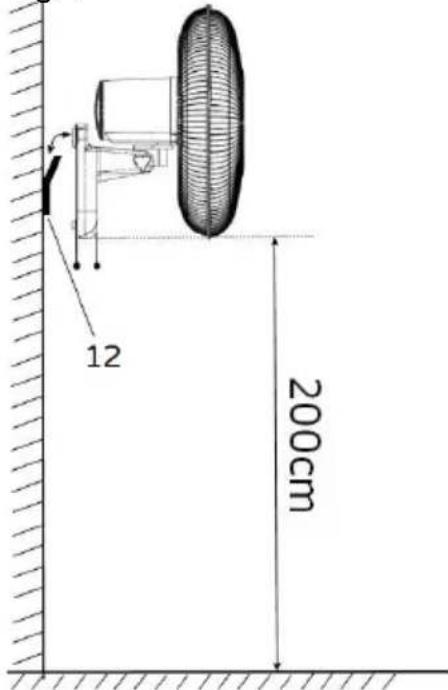
Wall installation
- The appliance must only be used if secured to a wall: the wall must be flat, smooth, very stable (as the appliance could tip over) and resistant.
- Position the appliance far from other sources of heat, inflammable materials (curtains, carpets, etc.), inflammable gases or explosive materials (spray cans).
- If the appliance is fitted to a wall, the same must be made of masonry and/or of resistant material (not of wood or synthetic material); follow the indications below for installation:
- The wall fan must be installed at least 2 m above the floor
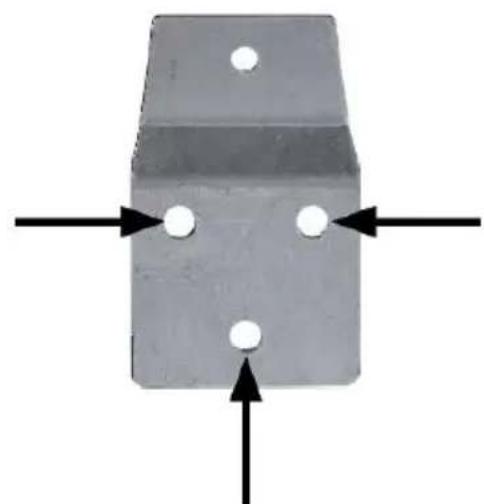
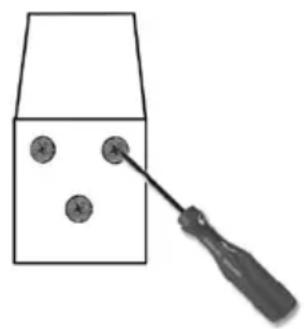
- Place the metal plate to the wall, make 3 holes in the wall, (before drilling holes is good to measure the distance between the slots above), insert the screw anchors into the holes, place the plate metal and tighten the screws as shown in Figure 2, Fix the fan on the wall's plate (10) making sure that the flap fits into the fixing plate (9) on the back of the fan.
Fig.1
natural_image
Metal bracket with four holes and three arrows pointing outward (no text or symbols)Fig.2

natural_image
Simple line drawing of a tool interacting with three circular objects on a rectangular base (no text or symbols)Fig.3
natural_image
Black handheld device with a circular fan and mechanical components, no visible text or symbols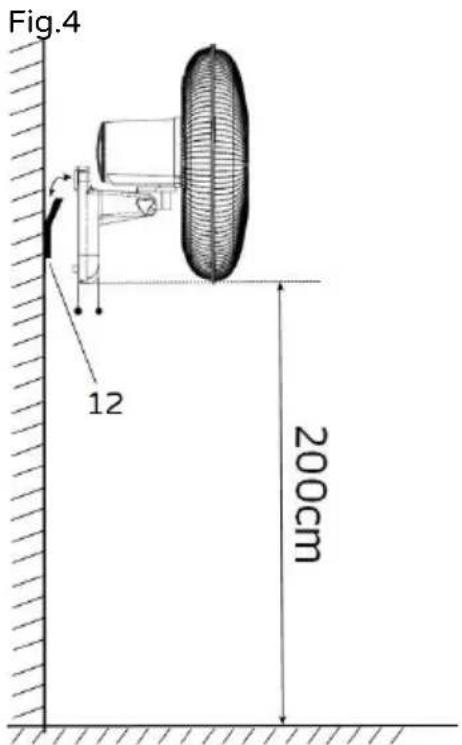
text_image
Fig.4 12 200cmIf fixed in a bathroom shall state that the heater is to be installed so that switches and other controls cannot be touched by a person in the bath or shower.
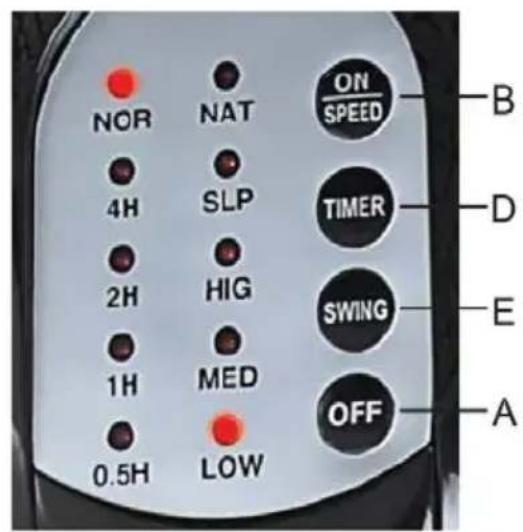
Control panel
text_image
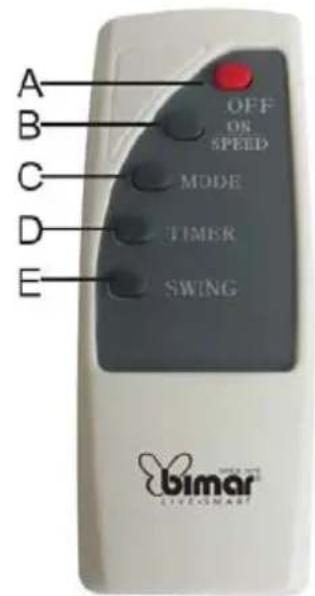
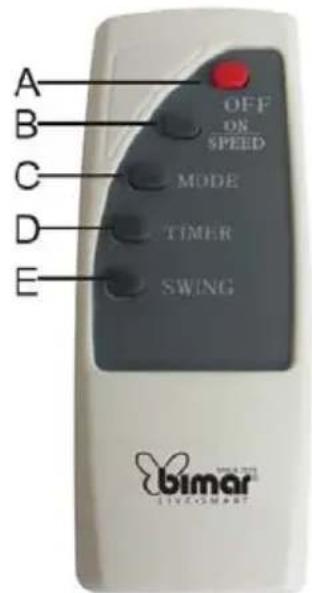
NOR 4H 2H 1H 0.5H NAT SLP HIG MED LOW ON SPEED TIMER SWING OFF A B D E ARemote control
text_image
A B C D E OFF ON SPEED MODE TIMER SWING bimar LIVE SMARTA. "Off" button
B. "On/Speed" button
C. "Mode" (only on the remote control): normal, natural, sleep
D. "Timer" button
E. "Swing" button
- Warning: don't use wet hand touch the working machine and don't cover the wind outlet and inlet.
- Before each use, verify that the heater is in good condition and that the electrical cord is not damaged: in the case of doubt, ask for professionally qualified help.
- Make sure that the cable is correctly positioned and that it is not in contact with hot parts or sharp edges, nor wrapped around the device or twisted.
- The power socket must be easy to reach so the plug can be removed quickly in case of emergency.
Use
Attention: the fan can be used only when completely and correctly assembled, that is complete with its base.
Before each use, verify that the unit is in good condition, the electric cord is not damaged, if the power cord is damaged, it must be replaced by the manufacturer or a competent qualified electrician or a person with similar qualifications, in order to avoid any risk.
The fan's functions can be controlled either with the keypad located on the control panel or with the remote control.
Remote control is supplied without batteries; before use remote control open the batteries holder placed on the back of remote control and insert 2 batteries LR03 1,5V AAA. To remove batteries, open the batteries holder placed on the back of the remote control, by sliding the cover to the outwards.
Insert the plug in the socket.
Ventilation:
1) To turn the fan on, press the "ON/SPEED" key on the remote control or the control panel.
2) To select the desired speed in normal mode “NOR”, repeatedly press the “ON-SPEED” key: on the control panel shows the selected speed (Low=minimum, Med=medium, Hig=maximum) and “NOR”.
Horizontal oscillation (right-left): this is controlled by the “SWING” key on the remote control or the pushbutton panel (E). To eliminate this motion, press the “SWING” key again.
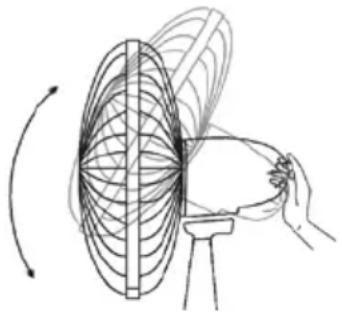
Vertical inclination (high-low): it is regulated by gripping the motor body and orienting it in the direction desired.
natural_image
Diagram of a hand drawing a circular pattern on a stand with an arrow indicating direction (no text or symbols)Timer: this function allows setting the operating time and the fan will automatically stop at the end.
- To set the operating time, repeatedly press the “TIMER” key on the remote control: every time the key is pressed, the time set is changed and the indicator light on the control panel lights corresponding to the time selected (0.5 hour, 1 hour, 2 hours, 4 hours, ecc....): the maximum time is 7,5 hours. To eliminate this motion, press the “0-OFF” key again.
Mode: the fan can work at a constant speed “NOR” or with two different intermittent speeds: In “Nat” mode, the fan alternates between the maximum and minimum speed and turns-off for several seconds. In “Sleep” mode, the fan alternates with speeds and interruptions different from the preceding. The mode is selected by pressing the “MODE” key on the remote control.
To turn the fan off, press the "OFF" key on the remote control or control panel, then remove the plug from the socket.
When not in use for long periods, the plug must always be removed from the socket.
CLEANING AND MAINTENANCE
Attention: before normal cleaning, remove the plug from the socket.
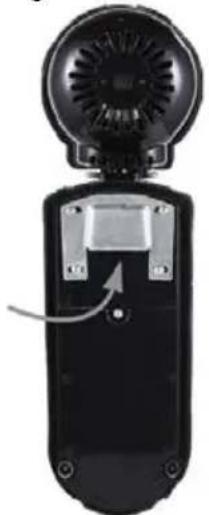
- Ensure that the fan is switched off from the supply mains before removing the guard (12).
- Clean the body with soft, slightly damp, cloth; do not use abrasive or corrosive products.
- Do not immerse any part of the fan in water or other liquid: if this should happen, do not put your hand in the liquid, but first remove the plug from the socket. Carefully dry the appliance and make sure that all the electrical parts are dry: in the case of doubt, ask for professionally qualified help.
- It is essential that the motor's air holes be kept from dust and lint.
- If the fan will not be used for long periods, it must be protected from dust and humidity; we recommend storing it in its original packaging.
- Should you decide not to use the appliance any more, we recommend making it inoperative by cutting the power cord (after making sure you have disconnected the plug from the socket) and make dangerous parts harmless if children are allowed to play with them (such as the blade).
BATTERIES - Remove the batteries from the appliance before its disposal. Do not dispose the batteries with domestic waste. The batteries must be disposed of in the appropriate containers or in the specific collecting centre. Suitable segregated collection helps prevent damage to the environment and to human health.
To remove batteries, refer to Instructions for use.

DISPOSAL
Pursuant to Directive 2012/19/EU on waste electrical and electronic equipment (WEEE), the crossed bin symbol on the appliance or its packaging indicates that the appliance must be disposed of separately from other waste at the end of its useful life. The user must therefore take the appliance to an appropriate recycling centre for electrical and electronic equipment. Alternatively, instead of handling the disposal, the user can hand over the appliance to the retailer when a new, equivalent one is purchased. The user can hand over electronic products measuring less than 25 cm to retailers of electronic products having a sales area of at least 400 m ^2 free of charge and with no obligation to buy. Appropriate separate collection for the subsequent procedure for the decommissioned appliance for recycling, which includes treatment and environmentally friendly disposal helps prevent adverse effects on the environment and health and promotes reusing and/or recycling materials that the appliance consists of.
text_image
Technical diagram of a mechanical device with numbered parts, including a brush and tool assembly.Wandinstallations-Kit
natural_image
Metal bracket with mounting holes and three screws, alongside a close-up of screw fasteners (no text or symbols)MONTAGE
natural_image
Metal bracket with four holes and three arrows pointing outward (no text or symbols)Abb.2
natural_image
Simple line drawing of a screwdriver inserted into a container with three circular holes (no text or symbols)Abb.3
natural_image
Close-up of a black handheld device with a fan and button, showing a circular top and internal components (no text or symbols visible)Abb.4
text_image
12 200cmtext_image
NOR 4H 2H 1H 0.5H NAT SLP HIG MED LOW ON SPEED TIMER SWING OFF A B D E A
text_image
A B C D E OFF OS SPEED MODE TIMER SWING bimar LIVE/MARATA. Off Drucktasten
B. On/Speed Drucktasten
C. Mode Drucktasten
D. Timer Drucktasten
E. Swing Drucktasten
GEBRAUCH
natural_image
Diagram of a rotating fan with magnetic field lines around it, no text or symbols presentnatural_image
Metal bracket with four holes and a labeled dimension of 10 (no text or symbols beyond the label)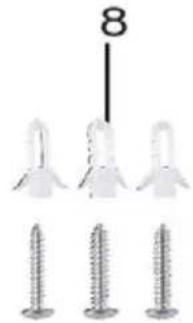
natural_image
Three screws arranged in a row, one with a number 8 above them (no text or symbols on the screws themselves)ASSEMBLAGE
natural_image
Metal bracket with four holes and four arrows indicating direction (no text or symbols)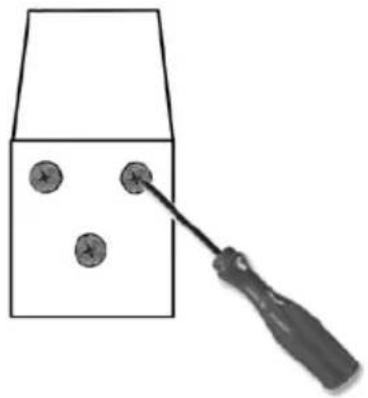
natural_image
Simple line drawing of a screwdriver touching a rectangular object with three circular holes (no text or symbols)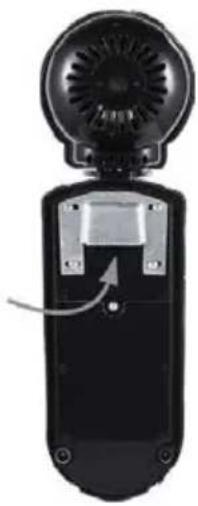
natural_image
Black handheld device with a circular top and ventilation grille, showing a button or scroll (no text or symbols visible)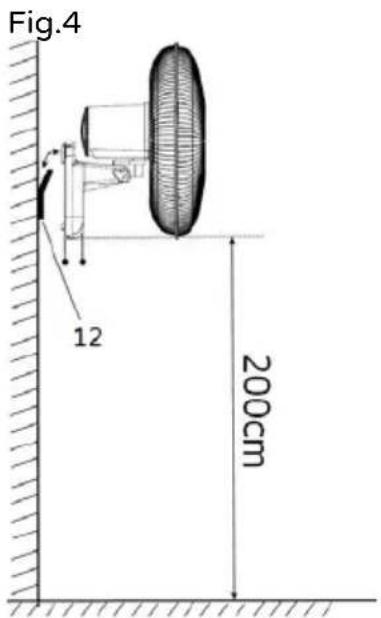
text_image
Fig.4 12 200cmtext_image
NOR 4H 2H 1H 0.5H NAT SLP HIG MED LOW ON SPEED TIMER SWING OFF A B D E A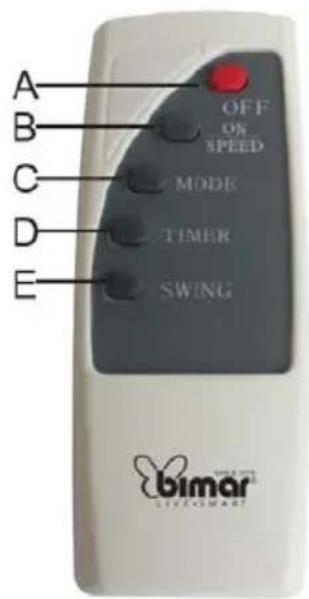
text_image
A B C D E OFF ON SPEED MODE TIMER SWING bimar LIVE/MARAYA. Touche Off
B. Touche oscillation
C. Touche Mode
D. Touche Minuterie
E. Touche on-vitesse
UTILISATION
natural_image
Diagram of a hand holding a rotating fan with concentric lines, illustrating the motion or rotation (no text or symbols present)text_image
Technical diagram of a mechanical device with numbered parts, including a motor and a handheld tool.natural_image
Metal bracket with four holes and four arrows indicating direction (no text or symbols)Fig.2
natural_image
Simple line drawing of a tool interacting with three circular objects inside a container (no text or symbols)Fig.3

natural_image
Close-up of a black handheld device with a fan and ventilation grille (no visible text or symbols)
text_image
Fig.4 12 200cmtext_image
NOR 4H 2H 1H 0.5H NAT SLP HIG MED LOW ON SPEED TIMER SWING OFF A B D E A