
VP61A - Fan Bimar - Free user manual and instructions
Find the device manual for free VP61A Bimar in PDF.


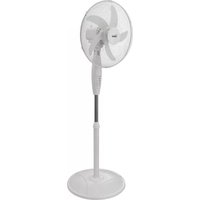
| Product type | Pedestal fan |
| Brand | Bimar |
| Model | VP61A |
| Dimensions (height) | 130 cm |
| Blade diameter | 40 cm |
| Net weight | 4 kg |
| Power supply | 220-240 V ~ 50 Hz |
| Rated power | 50 W |
| Number of speeds | 3 speeds |
| Oscillation function | Yes, automatic rotation |
| Timer | Not included |
| Remote control | Not included |
| Adjustable height | Yes, telescopic rod |
| Adjustable tilt | Yes, manually |
| Blade material | ABS plastic |
| Protective grille | Lacquered steel, fine mesh |
| Noise level | ~55 dB (max) |
| Maintenance and cleaning | Unplug before cleaning; use a damp cloth; do not immerse |
| Safety | Stable base; grille prevents contact with blades |
| Spare parts and repairability | Blades, grille, base available; repair by authorized center |
| Warranty | 2 years |
| General information | Household use only |
Frequently Asked Questions - VP61A Bimar
User questions about VP61A Bimar
0 question about this device. Answer the ones you know or ask your own.
Ask a new question about this device
Download the instructions for your Fan in PDF format for free! Find your manual VP61A - Bimar and take your electronic device back in hand. On this page are published all the documents necessary for the use of your device. VP61A by Bimar.
USER MANUAL VP61A Bimar
I
- Motor shaft
- Oscillation button
- Body
- Pole attachment ring nut
- Cover
- Feet attachment screw
- Foot
- Selector
- Fixed pole
- Adjustable pole
- Handle
- Front grille
- Fan attachment ring nut
- Screw for the plastic ring
- Grille attachment ring nut
- Rear grille
- Fan
- Metric screw
D
- Please read these instructions carefully before using the appliance and keep the booklet for future consultation.
- This device is intended for home use only, to ventilate rooms, and in the manner described in this manual: do not use it for any other purpose.
- Do not touch the appliance with wet hands or feet.
- Do not insert any tool, or your fingers, into the grille protecting the blades.
- This appliance is not intended for use by persons (including children) with reduced physical, sensory or mental capabilities, or lack of experience and knowledge, unless they have been given supervision or instruction concerning use of the appliance by a person responsible for their safety. Children should be supervised to ensure that they do not play with the appliance.
- Do not use the appliance if it is not operating correctly or seems damaged; if in doubt, contact professionally qualified personnel.
- Make sure that the appliance is working correctly: if not, turn the appliance off and have it checked by professionally qualified personnel.
- Do not move the appliance when it is operating.
- Unplug the appliance when not in use.
- Do not use the device at room temperatures above 40^ .
- Do not move the appliance when it is in function.
- Do not leave the device exposed to the weather (sun, rain, etc.).
- Do not pull on the cord to disconnect the plug from the socket.
- If the electric cord is damaged, it has to be replaced by the supplier or an authorized service center or a professionally qualified, to avoid any risks.
INSTALLATION
- After removing the packing materials, check the integrity of the appliance; if you are unsure, do not use it and ask for qualified professional help. The packing materials (plastic bags, polystyrene foam, nails, etc.) must be kept out the reach of children because they are potential sources of danger.
- Before connecting the appliance, check that the voltage values shown on the data plate correspond to those of the electricity supply network. In the event of incompatibility between the electric outlet and the plug of the heater, have the outlet replaced with another more suitable type by professionally qualified personnel, who will make sure that the section of the wires of the outlet is appropriate for the absorbed power of the heater. In general, the use of adapters or extension cords is not recommended; if their use is indispensable, they must conform to existing safety standards and their current capacity (amperes) must not be less than the maximum of the heater.
- The power socket must be easy to reach so the plug can be removed quickly in case of emergency.
- To not place the appliance near sinks or other container of liquids (minimum distance of 2 meters) to avoid the risk of it falling in.
- Do not place the appliance near an open flame, cooking or other heating appliance.
- Keep the fan far away from fabrics (curtains, etc.) or unstable materials that could obstruct the air intake grille; make sure that the front is free of unstable materials (dust, etc.).
- Make sure that the electric cord is not touching rough, hot or moving surfaces and not twisted or wrapped around the appliance.
- Stand the appliance on a horizontal, flat surface or table; do not stand on a inclined plane (the appliance could upset).
- Do not use the appliance with a timer or a programmer or with a system that can switch on the appliance automatically, to avoid risk of fire, since a fire risk exists if the heater is covered or positioned incorrectly.

- Stand the appliance on a horizontal, flat surface or table; do not stand on a inclined plane (the appliance could upset).
- In the event of a breakdown or poor operation, turn the fan heater off and ask for professionally qualified help.
ASSEMBLY
Attention: the fan can be used only when completely and correctly assembled, that is complete with its base and support and protection grid. If in doubt, have the appliance checked or assembled by a qualified professional person. For assembly, refer to fig. 1.
Upright
1) Cross the two feet (7) and fasten them to the fixed rod (9) using the 4 screws provided, cover the joint between the feet and the fixed rod using the cover (5).
2) Lengthen the adjustable rod (10) to the required height and lock tightly using the rod fixing ring nut (4).
Ventilator
3) Insert the handle (11) in the motor casing so the 4 pins enter the corresponding slots. The handle must be positioned correctly (upwards and towards the back part), otherwise the grid cannot be fastened.
4) Fasten the rear grid (16) to the motor casing, positioning the corresponding pins and holes, and lock using the appropriate ring nut (15).
5) Insert the fan (17) on the motor shaft (1) and lock with the appropriate ring nut (13) turning it tightly anti-clockwise.
6) Couple the front grid (12) with the rear grid (16) and lock with the plastic ring and ensure the fastening with the appropriate locking screw (14), (the screw must be in the lower part). Having done this, check that the protection grid is firmly coupled and fastened to the motor.
7) Fasten the fan to the upright, inserting the lower hole on the adjustable rod of the upright. Make sure that the fastening holes correspond: the passage is close to the feed cable, the nut screw (for fastening) is more or less at the top of the rod. Lock the special metric screw (18) in the holes describe and tighten normally. Cover the hole with the plug provided.
USE
Before each use, make sure the electric cord is in good condition.
Insert the plug of the fan in the power supply.
Ventilation: select the desired speed by turning the switch (8) to one of the following positions:
1– Minimum speed 2–Medium speed 3–Maximum speed To turn off, turn the switch to position 0 and then remove the plug from the socket.

Horizontal oscillation (right-left): this is selected with the button (2) located on the motor body. To stop the motion and keep the ventilator still, press the button.
Vertical inclination (high-low): it is regulated by gripping the motor body and orienting it in the direction desired.
CLEANING AND MAINTENANCE
Attention: before normal cleaning, remove the plug from the socket.
- Ensure that the fan is switched off from the supply mains before removing the guard.

- Clean the body with soft, slightly damp, cloth; do not use abrasive or corrosive products.
- Do not immerse any part of the fan in water or other liquid: if this should happen, do not put your hand in the liquid, but first remove the plug from the socket. Carefully dry the appliance and make sure that all the electrical parts are dry: in the case of doubt, ask for professionally qualified help.
- It is essential that the motor's air holes be kept from dust and lint.
- Periodically check the electric cord for damage; its replacement requires a special tool: contact an authorized service center, also for any repairs.
- If the fan will not be used for long periods, it must be protected from dust and humidity; we recommend storing it in its original packaging.
- Should you decide not to use the appliance any more, we recommend making it inoperative by cutting the power cord (after making sure you have disconnected the plug from the socket) and make dangerous parts harmless if children are allowed to play with them (such as the blade).
- Do not dispose of non-biodegradable products in the environment but dispose of them in accordance with current law. At the end of its working life, the product must not be disposed of as urban waste. It must be taken to a special local authority differentiated waste collection centre or to a dealer providing this service. Disposing of a household appliance separately avoids possible negative consequences for the environment and health deriving from inappropriate disposal and enables the constituent materials to be recovered to obtain significant savings in energy and resources. Keep in mind that: -the ring nut, control panel, the fan and the body are plastic. -the grille, the feet, adjustable and fixed pole are metal. -wires of copper covered with rubber. -Electric motor is of iron and copper made.
ALLGEMEINE HINWEISE


Brand : Bimar
Model : VP61A
Category : Fan