AZ600 - Car accessory ULTIMATE SPEED - Free user manual and instructions
Find the device manual for free AZ600 ULTIMATE SPEED in PDF.
User questions about AZ600 ULTIMATE SPEED
0 question about this device. Answer the ones you know or ask your own.
Ask a new question about this device
Download the instructions for your Car accessory in PDF format for free! Find your manual AZ600 - ULTIMATE SPEED and take your electronic device back in hand. On this page are published all the documents necessary for the use of your device. AZ600 by ULTIMATE SPEED.
USER MANUAL AZ600 ULTIMATE SPEED
Assembly and safety advice
FR BE
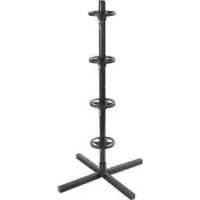
PORTE-ROUES
GB/IE Assembly and safety advice Page 8
We congratulate you on the purchase of your new product. You have chosen a high quality product. Familiarise yourself with the product before using it for the first time. In addition, please carefully refer to the operating instructions and the safety advice below. Only use the product as instructed and only for the indicated field of application. Keep these instructions in a safe place. If you pass the product on to anyone else, please ensure that you also pass on all the documentation with it.
Intended use
The tyre stand is intended for the storage of wheel rims with or without tyres. This product is not intended for commercial use.
Description of parts
Central linking piece
Spring washers x4
3 Screws x4
4 Down rod section (without plug)
5 Endrodsection(withplug)
6 Extension legs x4
7 Plate x4
8 Integrated pin x4
9 Tread depth gauge
Air pressure gauge
11 Tyre protection cover
12 Tyre chips x4, 4 different colours
13 Hexagon wrench
Technical data
Suitable for all currently available car rims up to 18 inches (approx. 46~cm ).
Suitable for all common car wheel rims with tyre widths up to 225mm (225/55 R18).
Material: Steel, aluminium,
PP (polypropylene)
Total height
(without container): approx. 1 m
Weight
(without accessories): approx. 2.65kg
Max. load capacity: 100kg
Max. load per disc: 25kg
Accessories
Tyre protection cover 11
With hook-and-loop tape fastening
Tyre chips 12
In 4 different colours.
Labelling: front left, right front, left rear, right rear
Air pressure gauge 10
For easy measurement of air pressure.
Measurement range: 0.7 to 3.5 bar / 10 to 50 psi
Tread depth gauge 9
Measurement range: 0 to 20mm ; shows statutory minimum tread depth (1.6 mm) and recommended tread depth for winter tyres (4 mm).
The required profile measurements may vary by country. Therefore please find out about the specific regulations in your country.

Safety information

Do not tilt the tyre stand!
WARNING! RISK OF INJURY TO PERSONS! DANGER OF TIPPING!
Place the tyre stand only on a level, flat and solid surface. The base must not slope, as the stability of the rack cannot then be guaranteed (use spirit level to check).
The tyre stand may not be used for any other purpose since this could cause injury.
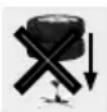
The tyre stand may not be moved when supporting a load (rims + tyres) since there is a danger that it could tip over.
The tyre stand may not be tipped since this could cause injury.
The tyre stand may not be used if damaged since this could cause injury.
Always operate the tyre stand using two hands.

Due to danger of tipping, load tyre stand ONLY from above, in
order to avoid injury.
Check the tyre holder regularly for damage and wear and stop using it in case of any defects.
Do not use the tyre holder for any other purposes (e.g. as ladder or safety stand).
Keep children away from the tyre holder.
Do not load the tyre holder beyond the maximum permissible load (see Technical data).
Assembly
Decide on the final location for your tyre holder before putting the wheels on to it.
- First of all fit the central linking piece 1 and the extension legs 6 together (if necessary a rubber hammer can help with this). Fasten with the spring washers 2 and screws 3 supplied (see Fig. A).
- Insert the down rod section (without plug) into the linking piece (see Fig. B).
-
Then slide the plate over the centre length of the pipe. Insert the pin through the lowest borehole and attach the plate (see Fig. C).
-
Load the rim with tire (see Fig. D). Proceed in same sequence for the next tire (see Fig. E & F).
- Now, put in place the end rod section (with plug) 5 (see Fig. F). Proceed as described above, until all 4 tires are properly stored (see Fig. G).
- Instructions for use of accessories
The tyre chips 12 are placed on the valves as a simple means of labelling when storing tyres. The air pressure gauge 10 is used for taking rough measurements. If needed, go to the nearest petrol station to check the pressure more accurately.
Use: Push in the measuring rod of the air pressure gauge 10 fully before use.
Then place on valve and read off pressure in desired units on the measuring rod (See Fig. H). If the pressure is too high, the valve can be pressed in using the button on the side of the gauge to let out air.
The tread gauge 9 is used for taking rough measurements.
Go to a garage if necessary.
- Maintenance and care
The tyre stand and the central linking piece 1 should be checked regularly for damage or wear.
Use a damp cloth for cleaning. Do not use any cleaning fluids, solvents or sharp objects.
The tyre protection cover is used for storage of the tyres (See Fig. 1).

Disposal
The packaging is made entirely of recyclable materials, which you may dispose of at local recycling facilities.
Contact your local refuse disposal authority for more details of how to dispose of your worn-out product.

Warranty
The product has been manufactured to strict quality guidelines and meticulously examined before delivery. In the event of product defects you have legal rights against the retailer of this product. Your legal rights are not limited in any way by our warranty detailed below.
The warranty for this product is 3 years from the date of purchase. Should this product show any fault in materials or manufacture within 3 years from the date of purchase, we will repair or replace it - at our choice - free of charge to you.
The warranty period begins on the date of purchase. Please keep the original sales receipt in a safe location. This document is required as your proof of purchase. This warranty becomes void if the product has been damaged, or used or maintained improperly.
The warranty applies to defects in material or manufacture. This warranty does not cover product parts subject to normal wear, thus possibly considered consumables (e.g. batteries) or for damage to fragile parts, e.g. switches, rechargeable batteries or glass parts.
PORTE-ROUES