
MOD36 - Vacuum Cleaner MPM - Free user manual and instructions
Find the device manual for free MOD36 MPM in PDF.
| Product type | Cordless vacuum cleaner with cyclonic technology |
| Model | MPM MOD36 |
| Power supply | Rechargeable lithium-ion battery, 100-240 V mains charger |
| Runtime | Up to 40 minutes on low power |
| Charging time | Approximately 3.5 to 4 hours |
| Suction power | 2 adjustable levels |
| Dust container capacity | Approximately 0.5 L (estimate) |
| Filtration | Mesh pre-filter + motor filter, washable |
| Noise level | 76 dB maximum |
| Included accessories | Electric brush with LED lighting, extractable multi-function accessory, suction hose, wall mount |
| Maintenance | Clean the filters and container after each use; wash filters with water and dry completely before reassembling |
| Safety | Do not use without filter; do not vacuum liquids, hot ashes or sharp objects; keep away from heat sources; supervise children |
| Weight | Approximately 2.5 kg (estimate) |
| Dimensions | Approximately 25 x 20 x 110 cm (estimate) |
| Housing material | Plastic |
| Use | Domestic, for hard floors and carpets |
| Repairability | Removable battery replaceable by same type; replaceable filters |
| Warranty | Refer to the manufacturer's warranty |
Frequently Asked Questions - MOD36 MPM
User questions about MOD36 MPM
0 question about this device. Answer the ones you know or ask your own.
Ask a new question about this device
Download the instructions for your Vacuum Cleaner in PDF format for free! Find your manual MOD36 - MPM and take your electronic device back in hand. On this page are published all the documents necessary for the use of your device. MOD36 by MPM.
USER MANUAL MOD36 MPM
Read carefully this manual before using the appliance.
Always remove the plug from the power outlet when not used, or before cleaning the appliance.
Before the first use check if mains voltage conform with vacuum cleaner.
Do not hang the power cord over sharp edges and do not allow the power cord to touch hot surfaces.
Do not pull the cord to unplug the appliance.
Do not leave the operating vacuum cleaner unattended.
- Close supervision is necessary when using the appliance near children.
Do not allow the vacuum cleaner to go over the power cord in case it can damage its insulation.
- Do not try to use the vacuum cleaner if you suspect any technical damage.
- Do not use the appliance, also if the power cord or plug is damaged - return the appliance for repair to an authorized service centre.
To avoid the risk of damage, fire or injury, always use the attachments recommended by the manufacturer.
Take extreme caution when cleaning the stairs.
Do not immerse the appliance, its cord and plug in water or any other liquids, keep it dry at all times.
Do not use the vacuum cleaner to collect flammable and corrosive liquids, solvents, matches, ash, cigarette ends, oil, sharp items etc. It can cause damage or even fire! Do not vacuum-clean near flammable liquids and substances!
Because of the vacuum cleaner plastic housing keep the appliance away from any heat sources (heaters, stoves etc.)
Do not cover the vacuum cleaner outlet and inlet!
This vacuum cleaner is designed for domestic use only.
This appliance is not intended for use by children under 8 years of age and individuals with reduced physical, sensory or mental capabilities, or lack of experience and knowledge, unless they have been given supervision or instruction concerning use of the appliance in a safe way and if they understand the hazards involved. Cleaning and user maintenance shall not be carried out by children without supervision.
Children should be supervised to ensure that they do not play with the appliance.
- Store the appliance and its cord out of reach of children under 8 years of age.
- Do not vacuum-clean people or animals, take special care not to move suction nozzles near eyes and ears.
Turn off and disconnect the appliance from supply circuit before replacing accessories.
Do not vacuum without bag, filters and in case of damage.
- Check the hose, wand and suction nozzles and remove any litter from them.
Use the vacuum cleaner only indoors and on dry surfaces. Dry the washed carpets before vacuum-cleaning.
- Keep your children safe: do not leave any parts of the packaging readily accessible (i.e. plastic bags, cardboard boxes, polystyrene inserts, etc.).
WARNING! Never let children play with plastic film or bags. Choking/ asphyxiation hazard!
SAFETY INSTRUCTIONS FOR THE BATTERY
The device contains a lithium-ion battery. Read the following tips carefully. Failure to comply with them may result in equipment damage, electric shock or fire.
Do not open the battery housing. Do not replace the battery cells.
- Protect the battery against moisture, sunlight and fire. Do not place the battery near other electrical and heating equipment.
Store and use the battery in a temperature range of 5 - 40^ . Too high temperature may damage the battery. Low temperature reduces the capacity and lifetime of the battery.
Always replace the same type of battery dedicated to the device. Do not use a different type of battery.
Protect the battery from mechanical damage, do not allow the battery to shake or fall.
Do not charge the battery unattended. Charge only with the dedicated charger on the battery pack.
After charging the battery, disconnect the charger from the mains.
Do not short circuit the battery contacts. Short-circuiting can cause battery damage and even fire. Keep the battery away from paper clips, nails, coins and other metal objects.
Charge the battery fully before using the device for the first time.
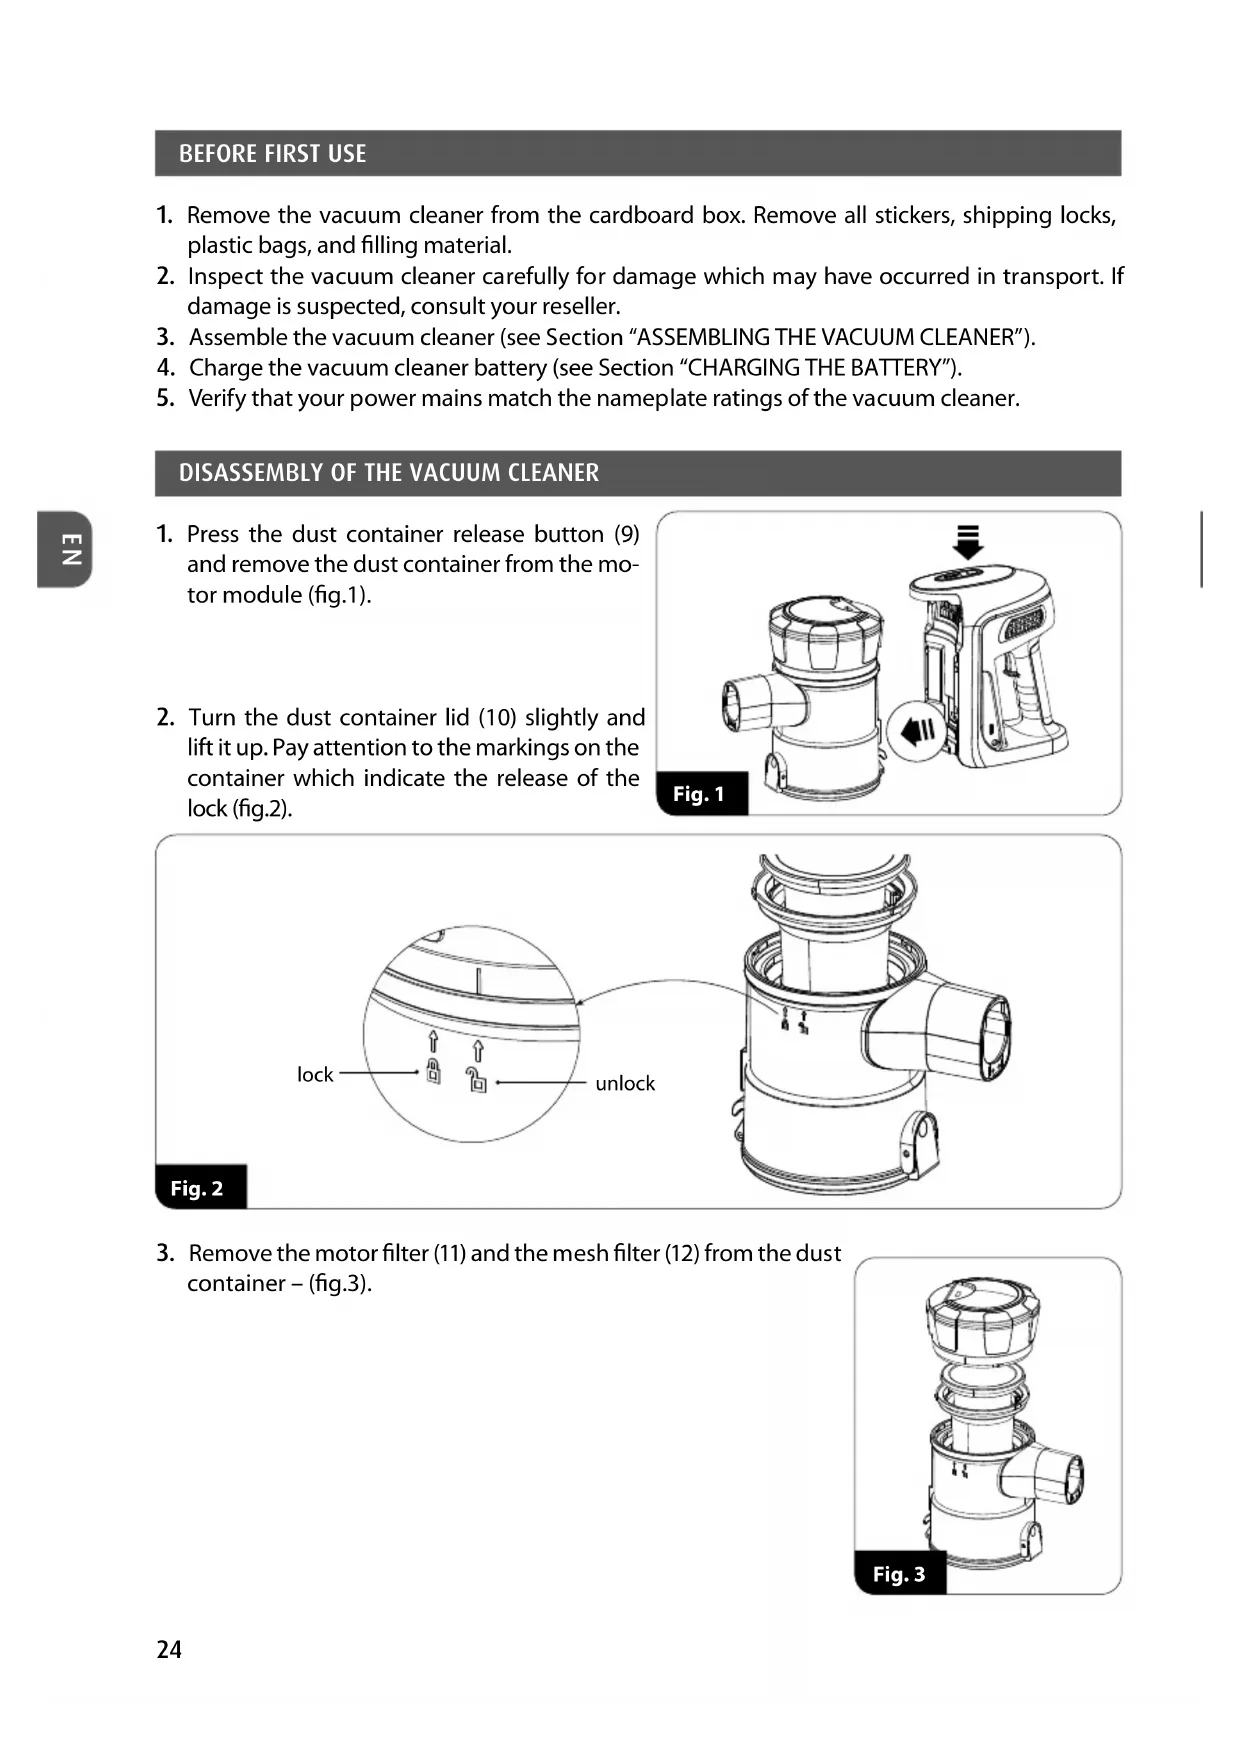
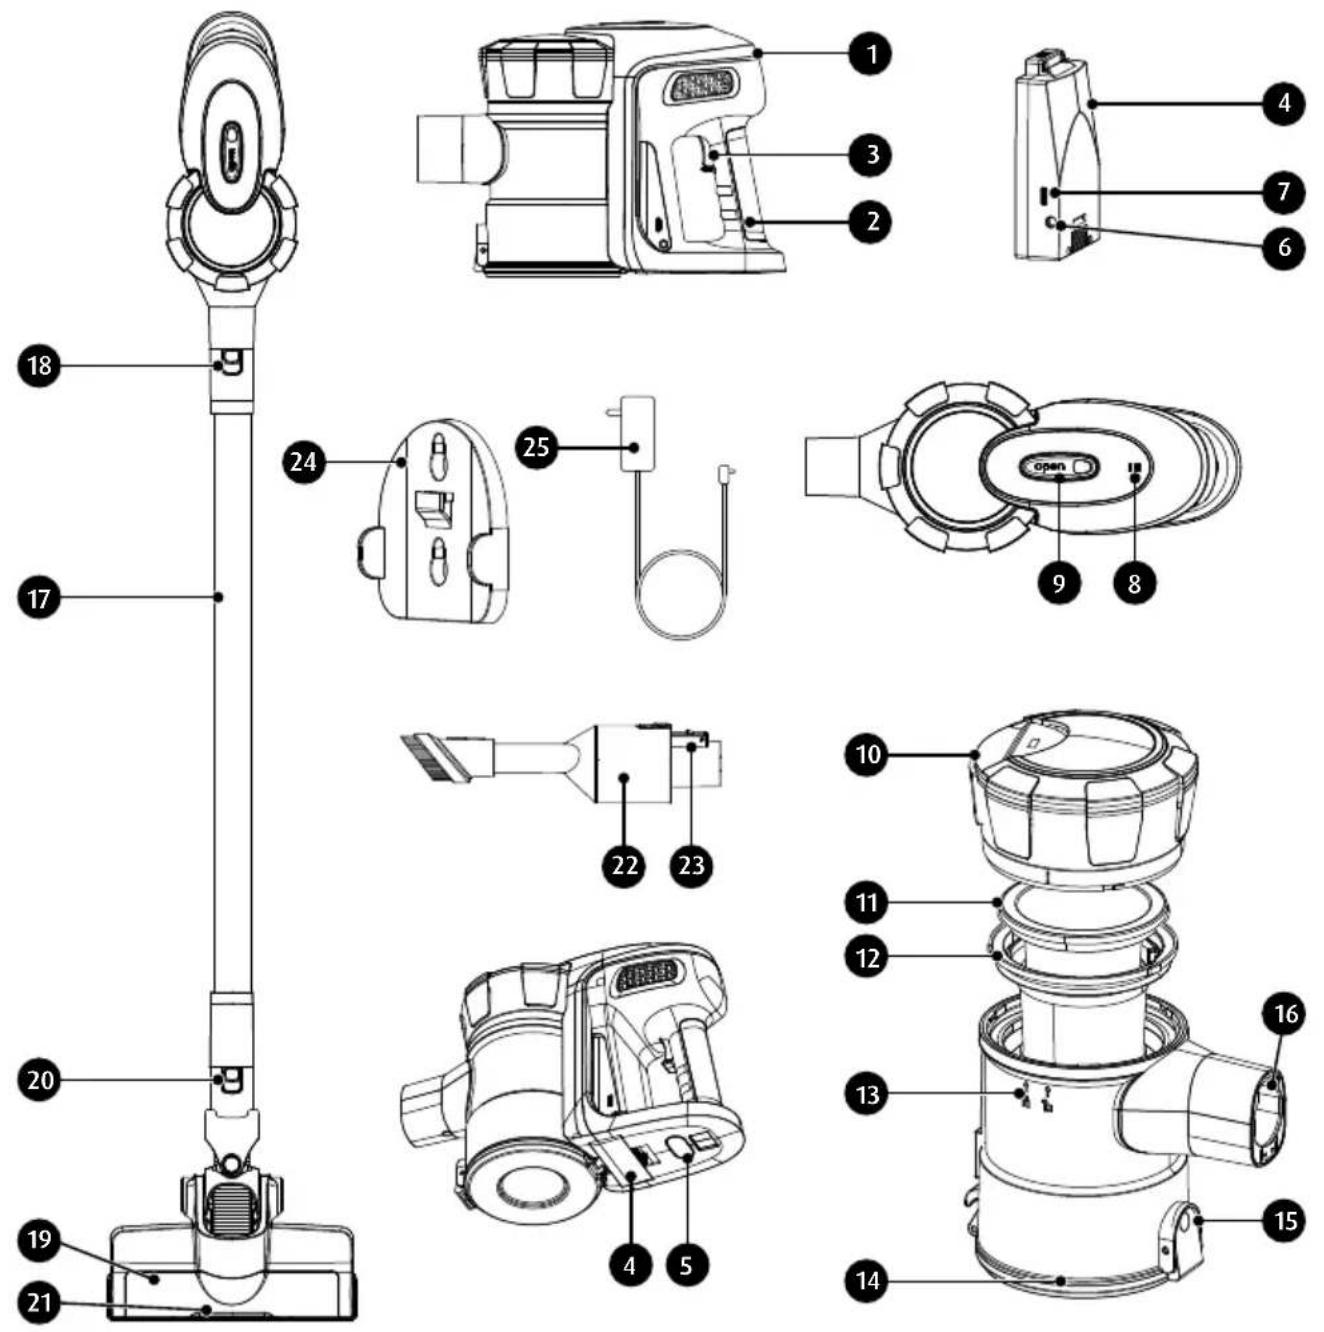
OVERVIEW
MOD-36 features the operating convenience of a cordless cyclone vacuum cleaner. The cyclone operation helps filter out the collected dust with a centrifugal effect and without any dust bags. The dust is collected into a canister, which is easily emptied to a dust bin. The lithium-ion battery features one of the highest capacity to mass ratio to make the vacuum cleaner light in weight and run for a long time before recharging. The vacuum cleaner has two suction power levels to choose from.
- Motor module
- Handle
- Vacuum cleaner on/off switch
- Capacitor, lithium-ion battery
- Battery release button
- Charger socket
- Charging indicator
- Indicator lights for operation and battery charge status
- Dust container release button
- Dust container lid
- Motor filter
- Pre-filter (mesh)
-
Dust container
-
Dust container lid
- Lid release button
- Suction pipe socket
- Suction pipe
- Suction pipe release button
- Electric brush
- Electric brush release button
- Backlight diodes (LED)
- Pull-out multifunctional attachment
- Multifunction attachment release button
- Wall mounting bracket
- Charger
BEFORE FIRST USE
- Remove the vacuum cleaner from the cardboard box. Remove all stickers, shipping locks, plastic bags, and filling material.
- Inspect the vacuum cleaner carefully for damage which may have occurred in transport. If damage is suspected, consult your reseller.
- Assemble the vacuum cleaner (see Section "ASSEMBLING THE VACUUM CLEANER").
- Charge the vacuum cleaner battery (see Section "CHARGING THE BATTERY").
- Verify that your power mains match the nameplate ratings of the vacuum cleaner.
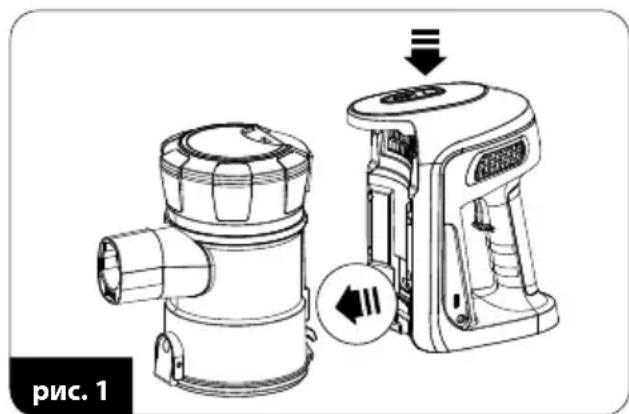
DISASSEMBLY OF THE VACUUM CLEANER
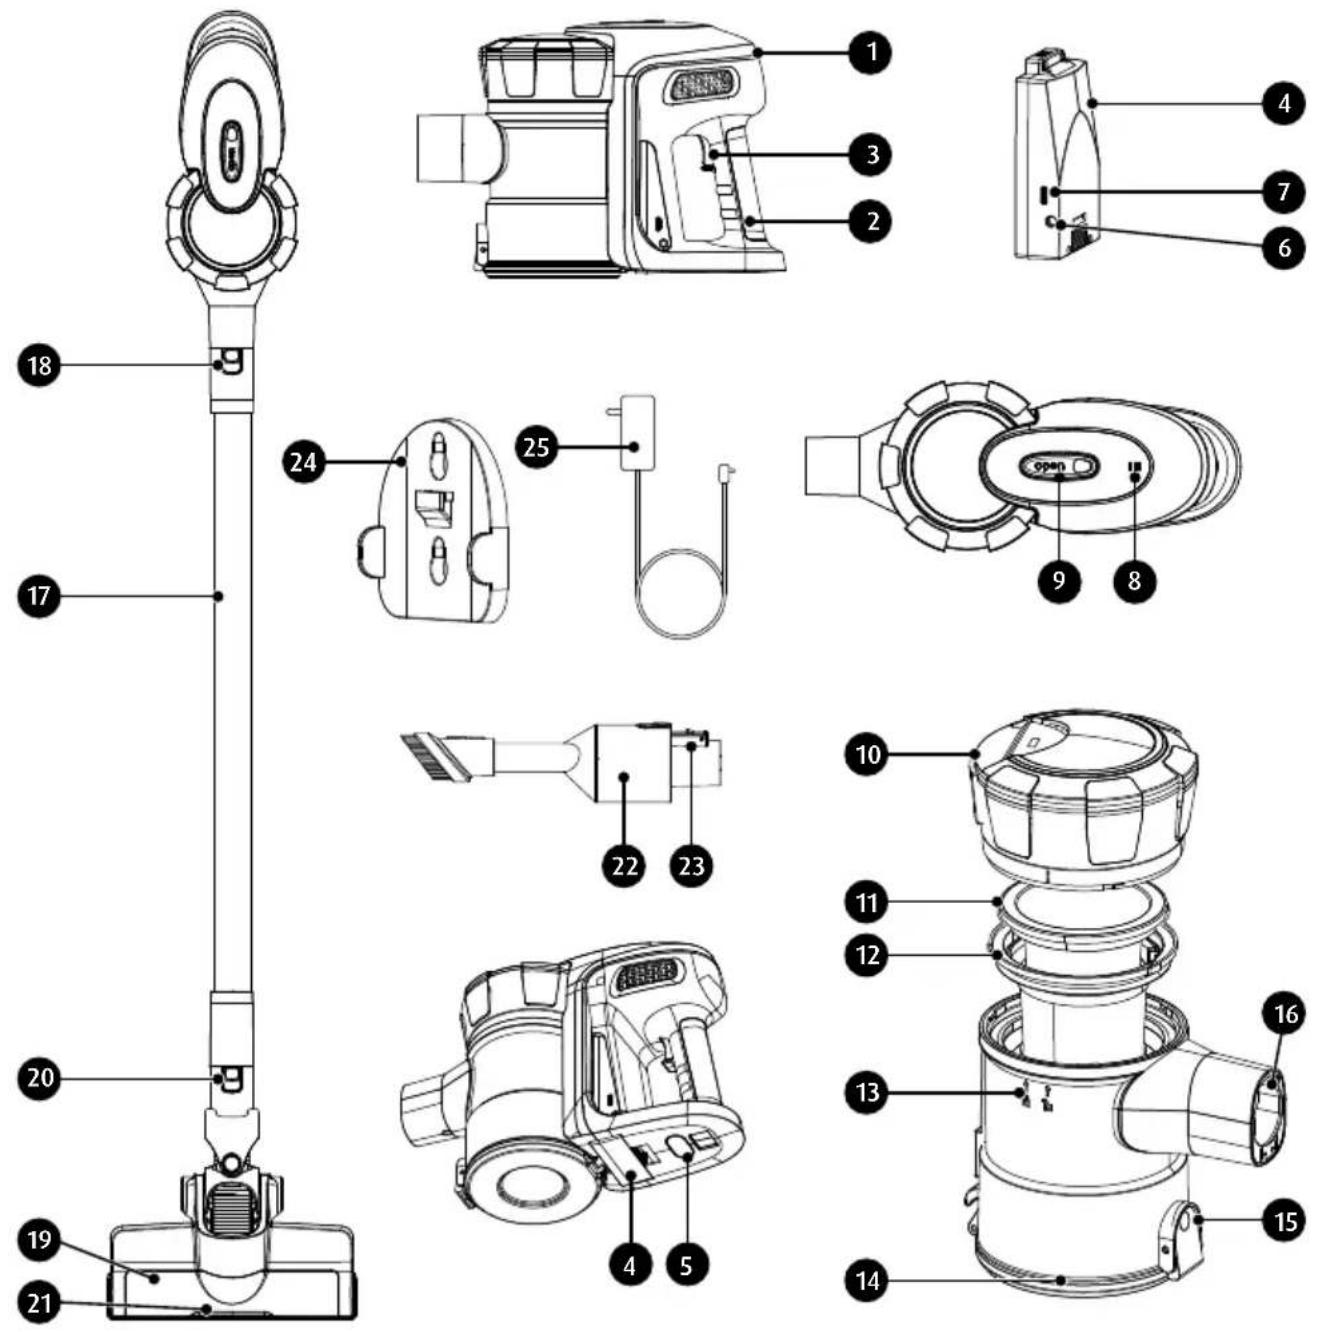
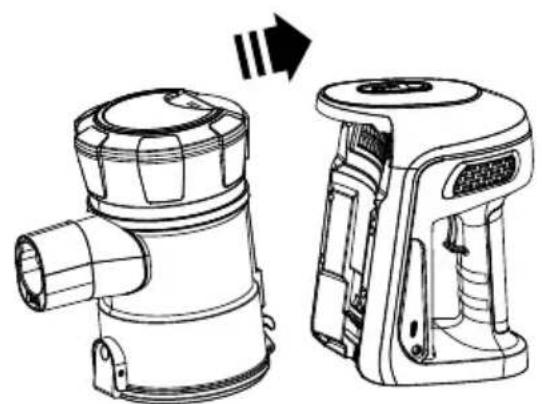
- Press the dust container release button (9) and remove the dust container from the motor module (fig.1).
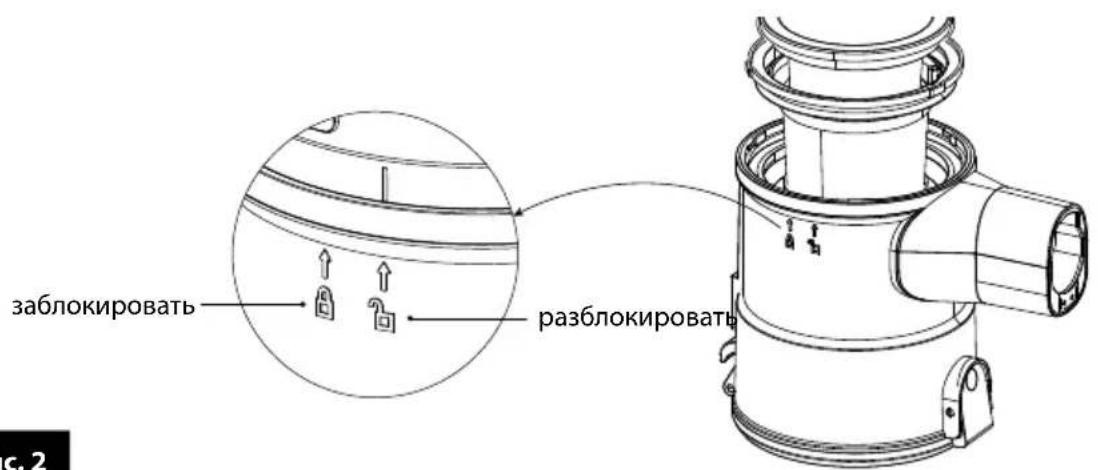
- Turn the dust container lid (10) slightly and lift it up. Pay attention to the markings on the container which indicate the release of the lock (fig.2).
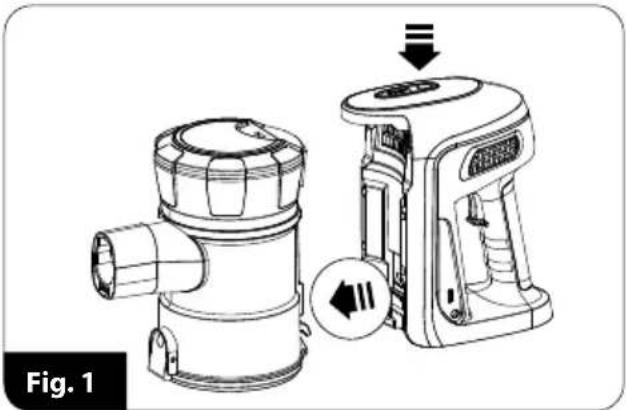
Fig. 2
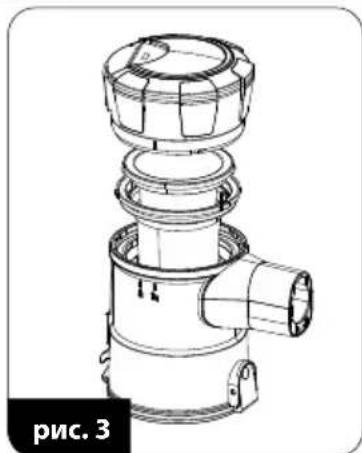
- Remove the motor filter (11) and the mesh filter (12) from the dust container - (fig.3).
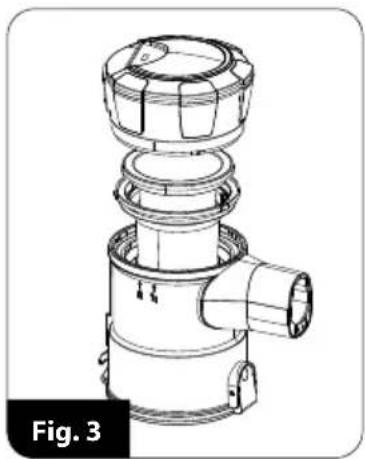
ASSEMBLY OF THE VACUUM CLEANER
- Insert the mesh filter (12) into the dust container – make sure that the three tabs on the outer ring of the filter take their places in the dust container.
- Place the motor filter (11) on the mesh filter (12).
- Fit the dust container lid onto the container and twist it slightly – mind the markings on the container.
- Insert and lock the dust container in the motor module, note that the container at the bottom has a hook which must catch on the corresponding part in the motor module; then press the container against the motor module (fig.4).
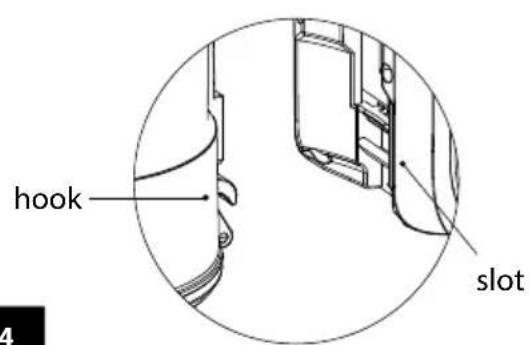

Fig. 4
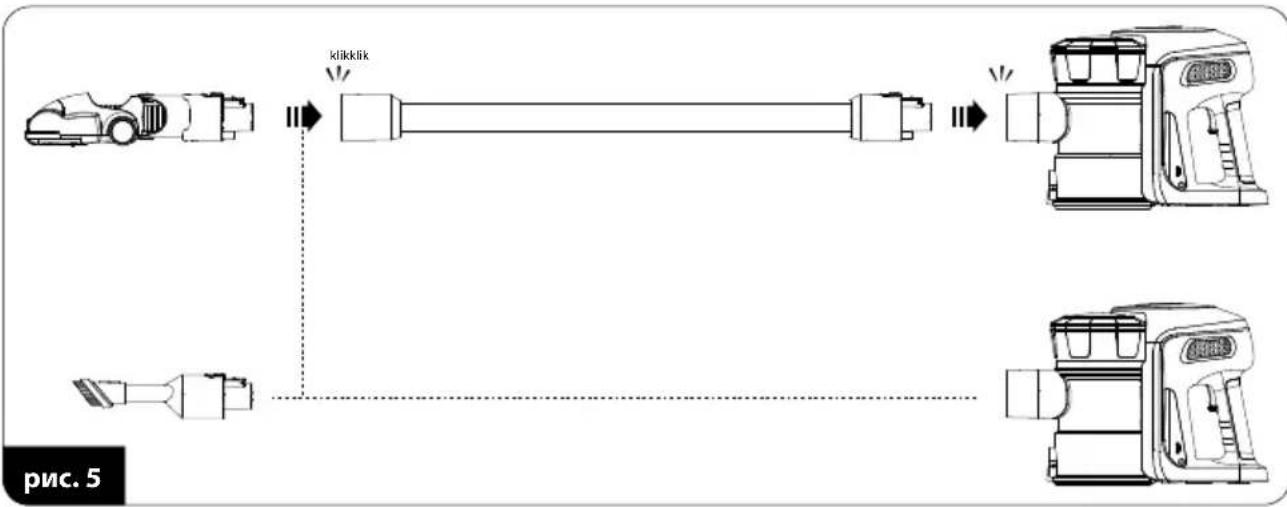
- Connect the suction pipe (17) or the appropriate equipment directly to the suction pipe socket (16) (fig.5). Removal of the pipe or equipment is only possible by pressing the lock release button (18), (20) or (23).

CAUTION! Do not operate the vacuum cleaner when it is not assembled!
CHARGING THE BATTERY
CAUTION! Charge the battery before using the vacuum cleaner for the first time. The time required to charge the battery is approximately 3.5 - 4 hours.

CAUTION! Only charge the battery with the supplied charger. While the battery is charging, the vacuum cleaner cannot be started.
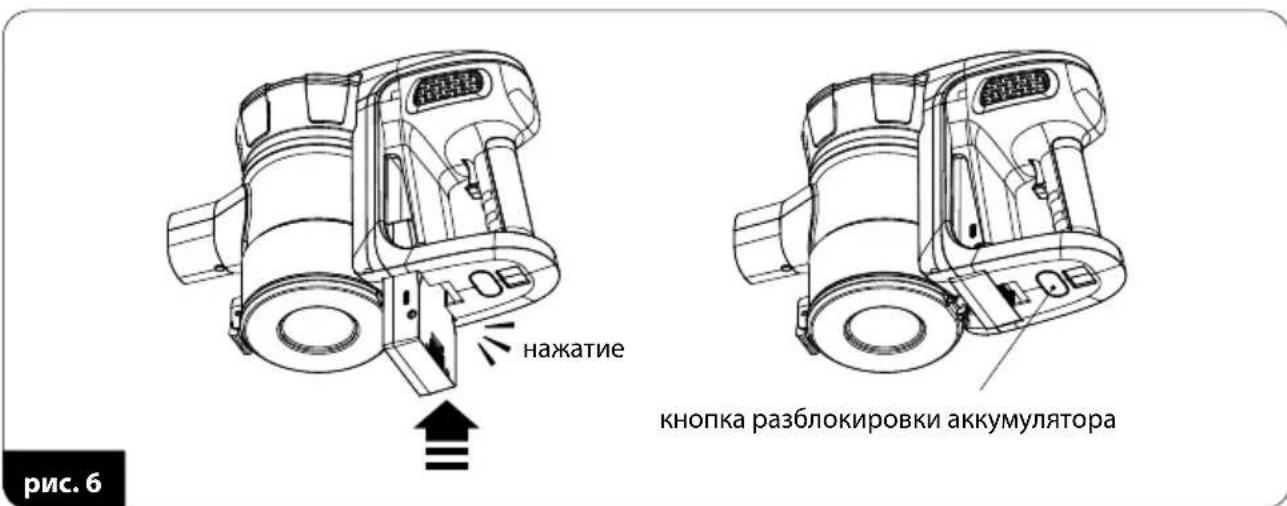
- Install the battery pack (4) in the motor module (1). Make sure it has taken its place in the vacuum cleaner correctly (fig.6). Removing the battery from the vacuum cleaner is only possible when the button (5) is pressed and held down.
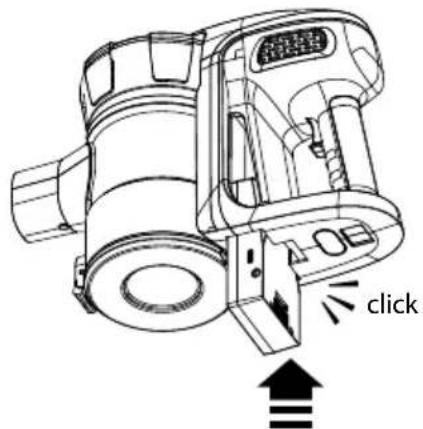

the battery release button
Fig. 6
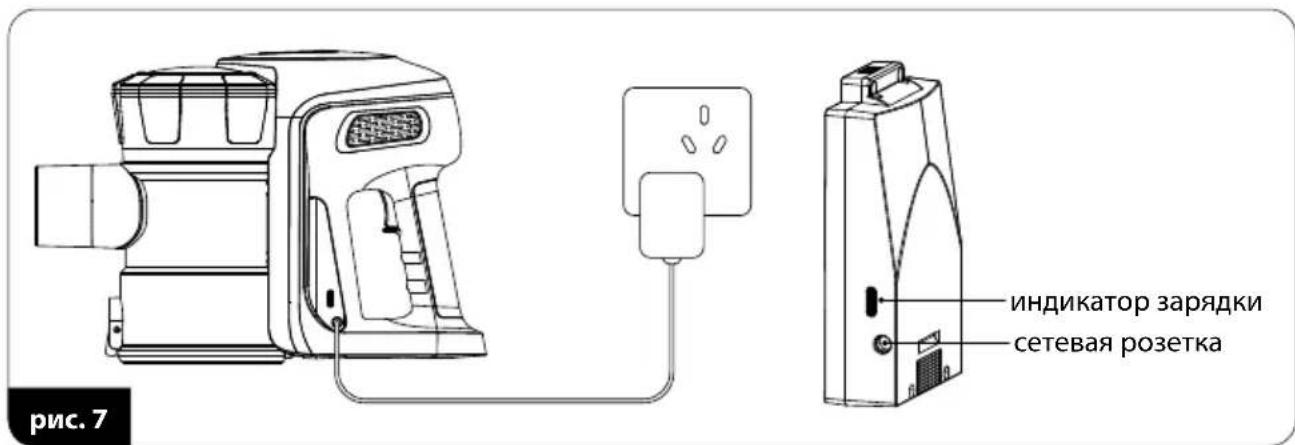
- Connect the charger cable (25) to the charger socket (6) and the charger to the mains socket (fig.7) - the charging indicator (7) will light up red to indicate charging.
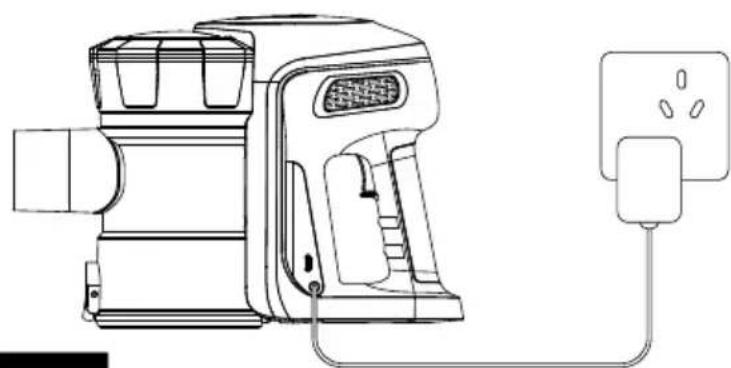
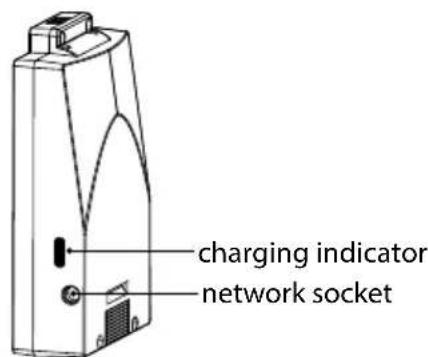
Fig. 7
-
Charging of the battery will be signalled by the indicator (7) turning blue.
-
Disconnect the charger from the mains supply and the charger cable from the battery.
-
Make sure that the vacuum cleaner has been assembled properly and the battery is charged.
-
Attach appropriate tools:
-
multi-purpose electric brush with lighting (19) – for all types of solid surfaces and carpets, LED lighting illuminates the cleaned surface, ensuring perfect vacuuming
- slide-out multi-purpose tool (22) – intended for vacuuming of blinds, lampshades, mirrors and all areas which require gentle cleaning, adjustable length of the brush makes it suitable for different vacuuming conditions
Depending on the needs, plug the tools to the suction wand (17) or the socket (16).
- Turn on the vacuum cleaner with the switch (3). The vacuum cleaner with operate at low suction power. After turning the vacuum cleaner on, the battery charge indicator also lights up (8).
- Press the switch (3) again to start high suction power.
- Monitor the capacity of the dust canister (13). An overfilled canister reduces the vacuuming efficiency, increases energy consumption and leads to quicker accumulation of dust on the filters.
CAUTION! Do not allow the dust canister to become overfilled! The dust level in the canister cannot exceed the "MAX" level.
CAUTION! If the suction power of the vacuum cleaner dropped significantly, it means that the wand and/or the suction nozzle are clogged and/or the dust canister is full. Clear the wand and/or the suction nozzle and/or empty the dust canister.
-
Should you require to empty the dust canister, proceed as follows:
-
turn off the vacuum cleaner with the switch (3)
-
place the dust canister over a waste bin
-
press the hinge cover release button (15) and empty the contents of the canister into the waste bin
- close the hinged cover (14)
-
turn on the appliance and resume vacuuming.
-
After the vacuuming is complete, turn off the vacuum cleaner with the switch (3), clear the dust canister and charge the battery. A fully charged battery provides up to 40 minutes of operation at low suction level. Apart from the battery charge indicator (8), the vacuum cleaner will signal the necessity of recharging by a significant loss of suction power.
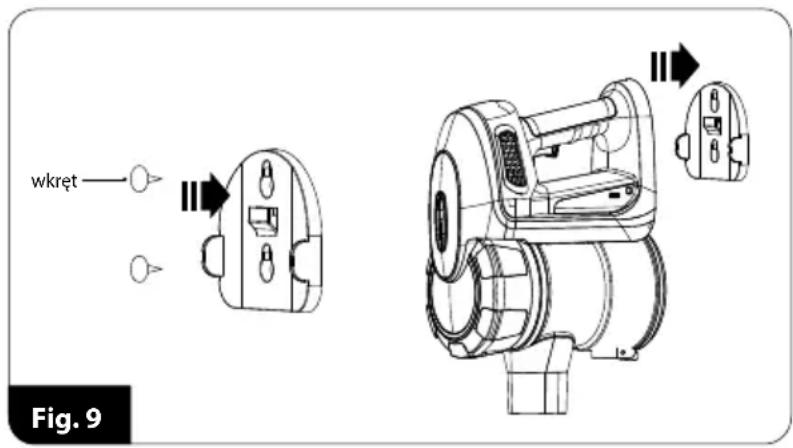
PARKING THE VACUUM CLEANER IN THE WALL MOUNT
The MOD-36 vacuum cleaner includes a wall parking mount (24) for easy and space-saving storage. Install the wall parking mount on a wall to use it:
-
Choose a suitable place at the right height to accommodate the vacuum cleaner together with the pipe and the electric brush (the brush must rest on the floor).
-
Ensure that no electrical cables have been laid in the wall at the chosen location.
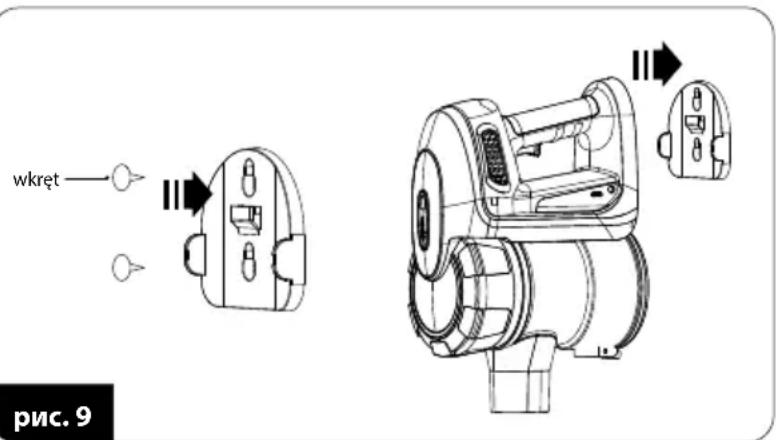
- Place the bracket (24) in the desired location on the wall, furniture, etc. and mark with a pencil the locations for the screws supplied with the vacuum cleaner.
- Tighten the screws (fig.9) but do not tighten them completely so that the handle can be put on easily.
- Park the vacuum cleaner in the holder.
CAUTION! Never immerse the vacuum cleaner, the battery charger, the battery or the battery dock in water!
CAUTION! Empty the dust canister and clean the filters after each use for the best performance.
CAUTION! Maintain the vacuum cleaner powered off and disconnected from the battery charger!
- Clean the outer surfaces of the vacuum cleaner with a damp cloth and wipe them dry. Use a bit of a neutral detergent to remove persistent dirt.
- Clean the mesh filter (12) and the motor filter (11) of dust with a fine brush. You can also wash them under running water, but dry them thoroughly before reassembling. Wipe the inside of the dust container with a damp cloth.
- CAUTION! The filters must be completely dry before installation. Do not immerse the dust container in water. Recharge the battery after each use. Do not store the vacuum cleaner with the discharged battery. Use the supplied battery charger only. Do not short the battery poles. Use the identical battery type for replacement.
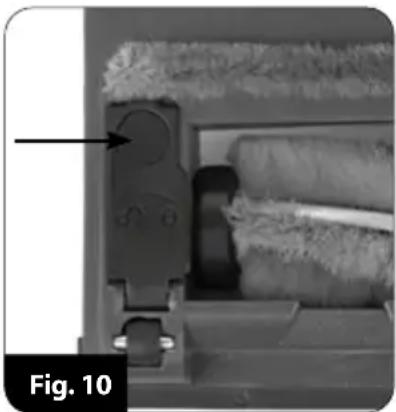
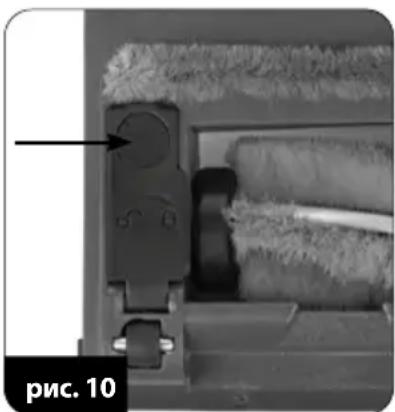
- Regularly clean the rotary shaft of the electric brush. The shaft can be detached after disengaging the lock in the bottom part of the electric brush, indicated by an arrow in fig. 10. After cleaning the shaft, insert it into the electric brush and engage the lock.
CAUTION! Do not dispose of used batteries with household waste. Dispose of batteries by returning them to an authorized waste collection point or the original reseller. Never throw batteries into fire!
TROUBLESHOOTING
| PROBLEM CAUSE SOLUTION | ||
| The vacuum cleaner fails to start. | Discharged battery. Recharge the battery. | |
| Battery charging in progress. Wait until complete. | ||
| Low suction power. | Clogged wand and/or tool. Unclog. | |
| Dust canister full. Empty the dust canister. | ||
| The vacuum cleaner blows out dust. | Clogged filters. Clean the filters. | |
| The dust canister is poorly installed. Install the dust canister properly. | ||
Note! MPM agd S.A. may introduce technical modifications to its products without notice.
PROPER DISPOSAL OF THE PRODUCT (waste electrical and electronic equipment)
Marking on the product indicates that after the service-life of the product expires, it should not be disposed with other type of municipal waste. Used equipment may have a negative impact on the environment and health of people due to potentially containing hazardous substances, mixtures and components. Mixing electric waste with other types of waste or disassembling those in an unprofessional manner may cause a release of substances that are hazardous to the environment and health. Used equipment should be hand
ed-over to a point for collection of electric waste. In order to obtain detailed information regarding the electric waste collection points, the user should contact the municipal point of electric waste collection or used equipment processing department.
ANTES DEL PRIMER USO, LEE ATENTAMENTE LAS INSTRUCCIONES DE FUNCIONAMIENTO
BESCHRIJVING VAN HET APPARAAT
YKA3AHnI IO B30PACHOCTN IJIy AKKUMyJrTOPHOJ BATAPEI
Pnp6opcoepkntnHIOHHbAkkymyIaTOp.BHmATEbHO npoTuTe cJeDyUOuine coBtbl. HecobJIOeHne nx MoKeT npuBeCTN K NOBpeXdEHNIO np6opa,napxHeNIO 3JIeKTPnuCeCKM TOKOM nII NOxApy.
He otKpbBaIte Kopnyc aKKymyIaTopa. He 3ameHnTe JIeMeHTbI nITaHnA KymyIaTopa.
3aunuane akkymyIaTOp OT BO3dEiCTBnB BlaRn, COJIHeuHbIX LyueN orHr. He depKInTe aKKymyIaTOp B6n3n dpynx 3JeKTPnueCKNX IOTOnITeNbHbIX npn6opOB.
XpaHnTe n nCNoB3yIe aKKymJrTOp npi Tempeatype, haxoJaIeIc B dna- nataOHe 5-40°C. CInuKOM BbICOKaY TemepaTypa moKeT npuBeCTN K NOBpeJdeHnIO aKKymJrToPa. Hn3KaY Tempeatypa yMeNbShaet EMKOCTb N CpOK cIyJkbI aKKymJrToPa.
BceTda 3aMeHnTe aKKymyIaTOP Ha TOT Xe TIN aKKymyIaTOPa, npedHa3HaueHHbI dIra daHHoro npnbopa. He nCnoJIb3yIte dpYroTnTIN aKKymyIaTOPa.
Bauntte aKKymyIaTOp OT mexaHnuecknx NOBpeKdEHH, He dOpyckaTe yapOB nII naeHnaAkkymyIaTopa.
He 3apjkaIte aKKymyIaTOp 6e3 npncMOTpa. NcnoJIb3yIe ToIbKO cpeIaJIbHOe 3apJdHoe yCTPOIcTBO, BXOJaIee B KOMIIeKT aKKymyIaTOpa.
Tocne 3apydkn aKKymyIaTopa OTcoeHNHTe 3apyHoe yCTPOJCTBO OT 3JIeKtpn-ueckoCetn.
He 3ambikaTe KOHTaKTbI aKKymyJrTopa. KopOTkoe 3ambikaHne MoKet npINBeCTN K IOBpeJdeHIO aKKymyJrTopa nII dJaKe noJapy. DePJIte aKKymyJrTop BdJIIn OT 3aJIMOB, rBO3Je, MOHeT N dpyRnx MeTaJInueCKNX pPeDMeTOB.
ONCAHNE INPMBOPA
Ibilecoc MOD-36 coyemaem b cebe ydo6cm8o kcnnyamau uukhoHoo u 6ecnpobodho zblncocca. UknoHHa mexHOZua no3boJeem fumpbomb nbIb 6e3 uonb3ObaHua MeuKOB dna nbu c nomouzuo uehmpobexHQCUbI, 6la2o4apr yemy docamouho ouucmmb nbIle6opHK had mycopbHM 6akOM. Bla2o4apr npumeHenUo Iumu-uOHHO aKKymnnapocdnum u3 cambx 6oBwhux Ko3phiueHMOB obema hakonneHou 3hepuu no omhoweHUo K ezo Becy, npubop nekuu u pa6omaem b meuenue dnumelbHOz OpeMeHu nocne noHou 3apadku. Ibilecoc ochauen debyxcmyneHamy o peynupobko CUb BCacsbHua.
- Modynb DnurataTeJia
2.ДерхаTeJB - BkIIOuATEb/BbIKIOUaTeJIb nbIeCoca
4.ЛNTи-нOHьий aKKymyIaTOp - Khonka pa36noknpobkn aKKymyIaTopa
- Геоздя полюецни зардноустpoиства
7.Индикаторзардкn - KoHTpoJIbHbIe IaMNoUcKn pa6Otbl n COCToHnIa3apJa aKKymyJrToPa
- Khonka pa36noKupOBKn nbine6opHnKa
- KpbuHa Ka nblnc6OpHnKa
- Φильтpr Двигатуя
- PpeBapnteJbHbI (ceToUHbI) nJIbTp
-
Пылесборнк
-
DoHbIshko nbIine6OpHnka
- Khonka pa36loKnpOBKn DOhbluka
- THe3do BCacbBaIOuIe Tpy6Kn
- BcacbBaioa Tpy6ka
- Khonka pa36noknpOBKn BcacbBaIOuSei Tpy6kn
- ΘηεκτρούςτKa
- Khonka pa36JIOKINPOBKN 3JIeKTPOUeTKN
21.Дионы падсветки (LED) - MHorOfoyHKUHOHaJIbHaB YbIDBuXHa HaCaJaKa
- KhoNka pa36IoknpoBKn IЯ MHOO-Функционьн HoH HacdKn
- Kpenexдя кpenneHna cTeHe
- 3apnHoe yctpoiCTBO
IPEDAEPBBbIMNCIOJIb3OBAHHEM
- ɪЗbvěknte nbilecoc n3 kopo6kn, ydaIte BCE haKneiKN, trpaHcnpTbIe 6noknpOBKn, Meu-Kn, HanoJIHNTeTI.
- Поберпгпьорпибор на наличne пораздени, кOTOPье могут пяВNTьСВ ВрмЯ ТраHC-nopтуровки.Еслу вас ecTB comHeHЯ,TO obpaTITecb K CBOeMy npOdaBу.
- Правильно соберпесьлесoc (см. галу: „СБОРКА ПыЛЕCOCA").
- 3apädnte akKymyIaTOp nbIeNcoCa (cM. rIaBy: „3APÄДKA AKKYMЛЯTOPA").
- Y6eHntecb, yTO npaMeTpbl BaSei 3JIeKtpnuecko CETN COOTBeTCTBYOT daHHbIM, yKa3aHNbIM Ha 3aBOdCKo Ta6nUKe npnbopa.
PA360PKA IIbIIECOCA
- HaxmTe KhoNky pa36nOKnpOBKn nbIlec6OpHnka (9) n cHmTe nbIe6OpHnK C 6loka dBnraTeTn (pnc.1).
- Cserka noBepHnTe KpbIshky nbIeSc6OpHnKa (10) n noDnHMnTe ee. O6paTne BnHaHne Ha o6o3NaueHne Ha KOHTeHHepe, noka3bIBaIOuSe, yTO 3AMOK OTKpbIT (pnc. 2).
pnc.2
- BbInbTe n3 nbIe6OpHnka noouepeDHO fNtBp DnRaTeTn (11) n ceTuAtbI NtBtp (12) - (pnc. 3).
CBOPKA NblNECOCA
- BCTaBbTe B nbIeSc6OpHnK ceTtAbyi nIbTp (12).Y6eIITecb, YTO TpN BbICTyNa Ha BHeuHem KOJIbue nIbTppa 3aHraNN CBOIN MeCTa B nbIeSc6OpHnke.
- YcTaHOBnTe 0nIbTp DnIraTeJra (11) Ha ceTcaTbI 0nIbTp (12).
- ПпкpenTe кршky nbilec6opHnka K nbilec6opHnky n cIeRka noBepHnte ee, He 3a6bBA8 o6 o6o3HaueHnX Ha nbilec6opHnke.
- Hadehbe Tn 3aФИKcnpyIe nbIe6bOpHb K 6Noke DBnraTeJIa. O6paTne BHNMaHne Ha To, YTO nbIe6bOpHbN IMeET B HIXHeJ qACTN KpOyOK, KOToPbI JOnKeH 3aueJIrTaBc 3a COOTBeTCTByUoIuI NJIeMeHT B 6Noke DBnraTeJIa; 3aTeM npNXmTe nbIe6bOpHbK K 6NoKy DBnraTeJIa (pnc.4).
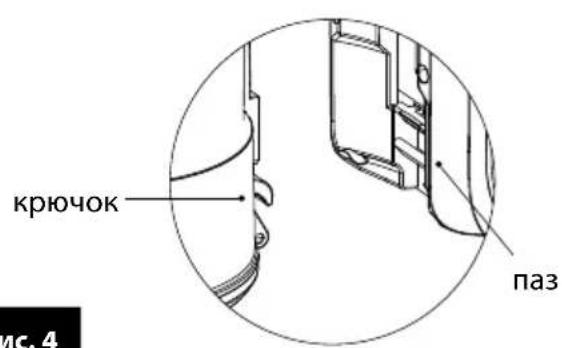
pnc.4
- K rhe3dy BCacbIBaIOSeI Tpy6Kn (16) NOcOeHNHTe BCacbIBaIOUy IO Tpy6Ky (17) nnn HenoCpeiCTBeHHo COOTBeTCTByIOUne npHaJNeKHOCTn (pnc. 5). ChrTne Tpy6Kn nn npHaJNeKHOCTe BO3MOXHO TOJIbKO NocHe HaxATNa KHONKn pa36NoKIpOBKn (18), (20) nnn (23).
BHIMAHHE! He BkIouaIte nbilecoC b pa3o6paHHOM coCTOHN!
3APЯДKA AKKUMYЛТОРА
BHIMAHHE!пелдпьимнспьзовимпьиесca зардte akумлготop.Врм, Heo6xodmoe dna 3apdkn aKKymyITopa, coCTabIЯт npIMepHo 3,5-4 qaca.
BHIMAHNE! 3apjaaTe aKKymyIaTOp TOnbKO c nOmoUbIO npnlaraeMoro 3apdHoro yctpoiCTBa. Bo Bpemr 3apdKn aKKymyIaTopa, 3anyck nbinecoca 3a6loKnpoBaH.
- YctaHOBnTe aKKymyIaTOp (4) B 6IIOKe dBnIaTeIe (1).Y6eINTEcB, yTO OH npaBnIbHO yCTaHOBJIen B IIIEcOce (pnc.6). AKKymyIaTOp MOXHO n3BJeU b I3 IIIEcOca, TOnbKO HaJkAB n ydepKJBBa KHOJKy (5).
- Побкючпс Ka6eь 3apянoro yctpoiCTBa (25) K rHe3dу 3apянoro yctpoiCTBa (6), a 3a-pядhoe yctpoiCTBO K cTeBOI po3eTke (pnc.7).ИнdkaTop 3apяdkn (7) 3aropntcKpaCHbIM CBetOM,чTO O3HaayET npouecc 3apяdkn.
- O 3aprakke akKymyIaTOPa CBnTeJIbCTByET n3MeHHe NcBETA HnDnKaTopa (7) Ha cnHn.
- OTKIIOHTe 3apAHOe yCTPOIcTBO OT 3JIeKTPocETn I OTCoEINHITe Ka6eNb 3apAHorO yCTPOIcTBA OT aKKyMylrTopa.
NcnoJIb3OBAHnE PbIJIeCOCA
-
Y6eIntecb, yTO nbIeCoc npabunbHo co6paH n aKKymyIaTOp 3apJxKeH.
2.Подсоeннite coOTbETCTByUoee akceccyapbl: -
MHOROΦyHKUHOHaJIbHЯ 3NeKTPoUeTKa C NODCBETKOJ (19)-IpeHa3NaueHaДЯ BCEx BIVOB TBepdIX NOBepXHOCTeN KOBoB, CBETOIOHOE OCBeUeHne OCBeUaET ONUUaEMYIO NOBepXHOCTb, YTO N03BOJIaRr IDeaJIbHO NblNEcOCNTb
-
MHOROΦyHKUHOHaBbHbBbBxHbHa HacdKa (22) - npedHa3NaYeHa dIra OUnCTKn 1TOp, a6aJyPoB, 3epKaI n Be3De, rIe npOpNTom YBJIeTcR deJIHKaTHa OUnCTKa, perynpyeMa JINHa 0eTK N03BOJAErN3MeHrTe B 3aBNCUMOCTn OT yCIOBn y6OpKn B 3aBVCIMoCTn OT notpe6HoCTe OChaSeHne CNeDyET NOCDoeHNHTb K BCaCbBaIOuSe Tpy6e (17) nn K pa3bemy (16).
-
BkIIOHTe nbIEcOC BbIKIOUaTeJeM (3). IbIeCoc 6ydt pa6oTaB c He6OJIbwoi CnOn BCAc bHaHn. Nocne 3anycka 3acBETcraTakKe INHdkaTop ypOBH aKKymyIaToP a (8).
- 4To6bI BKNIOUHTB BBICOKYIO CUNy BCaCbIBAHN, CHOBA HaXMMTe BbIKIOUaTeJIb (3).
- NOCTOARHNO KOHTPOINpyuTe 3aONJHeHne KOHTeHepa Ira NbIIN (13).IpepeoJIHeHHbIKOHTeHep CHnJaET aΦΦeKtNBHOCTb y6OpKn, yBeJIuHBAe T OITpe6JIeHne 3JIeKTPo3Heprnn N Bbl3bIBAeT 6bICTpoe 3aFpa3HeHne fNlTpOB.
BHIMAHNE! He donyckaite nepenonneHna KOHTeHepa Ira nbIn! YpOBeHb nbIn B KOHTeHepe He donKeH npEblaTb OTMeTKN "MAX".
BHUMAHNE! Ecnn Cnna BcscbHaHn Nblneocca ABHO CHN3HNaCb, 3NaHT npOn3oJNo 3acopeHne Tpy6bl nnn/n BcscbBaIOSeH hAcdKn N/nn 3aONHeHne KOTheHepa DnA nbIn. PpOuHCTte Tpy6by nnn / n BcscbBAIOUyO HacdKy nn/N onOpOxHnTe KOTheHep dnn nbIn.
-
Ecln Heo6xOJIMO ONOpoxHHTb KOHTeHep IJIyIbIN, BblONHInTe CJeNyUOuNe JeiCTBna: - BbIKIOHTe NbIeOC BblIOUaTelem (3)
-KOHTeHepIJIyIbJIINIOMeCTIteHaIM MyCOPHbIM 6aKOM -
HaxMMTe KhoNky OTKpbIBaHnA dHnua (15) n BbITpXHnTe cOePXMoe KOHTeHepa B MycOpHbI 6aK
-3aKpOInTe OTKnDHoe dHnIe (14).
- BkIIOUHTe np6Op n npOdoJkaaTe nbIneocNTb.
- После Okончаня уборки ВькючITE nbilecoc Bbikioчatelem (3), ounstte kohtenhepдя nbiNи 3apynte akKymyIaTOp.ПонoctbIOЗapxkeHbIakKymyIaTOp cnoco6eH obecneuTbdo 40 mHyr pa6Otbi nbilecoca c He6oIbwoCnIoB BCacbIBaHn. Kpome nHdIkataTopa 3apya (8) nbilecoc CURHaIN3npye THeo6xoDmOCTb 3apya akKymyIaTopa BblpaXeHNbIM CHIXKeHnEM MOUHOCTN BCaCbIBaHn.
IAPKOBKA IIIECOCA HA DEPXATEJE
Пылесoc MOD-36 осашен HabTeHHbIM deprжatelem (24) Дд Креленя nbIneocca Ha cTeHe.УTO6bl BOCNoIb3OBA TbCSd deprxkaTelem,прИКpeNITe erO K cTeHe:
- BbI6epnte nOxOJaee MeTo Ha nOxOJaee BbICote, YTO6bl Tya NOMeCTINcra nbilecoC Tpy6koN n3JeKTPoSeTKoN (UeTka DOJXHa ONnpaTbcra Ha nO).
- Y6eIITecb, yTO B BBbIbpaHHOM MeCTe B CTeHe He npOIOKeHbI 3JIeKTPnueCKne npoBOda.
3.ПиСТаББTepyKy(24)ВВbl-6paHHOMMeCTeKCTeHe,Me6eIN N.T.I.NOTMeTbTeKaPAHdaWOM MeCTaДЯВHTOB,BXODAUX B KOMJIeKT CПьIIECOCOM. - PnKpyTne BnHTbI (pnc. 9), Ho He 3aTaNBaIte INX NOnHOCTbIO, YTO6bl MOxH0 6blIO CBO6OdHO HaTeB DePkaTeIb.
- NomeCTe nbilecoc B depeXaTeJIb.
OuNCTKA IN TEXHnueCKOE OBCnyKINBAHNE
BHIMAHNE! He norpykaTe nbineoc, 3apndHoe yctpoiCTBO, aKKymyIaTOp n DOK-CTaHcNIO B Body!
BHUMAHNE! ДяdoeschkeHЯнушпй роиьдentьноctи пибopa ouишаite phinbtpbl nblne6opHNK посе КжdorO wCnoIb30BaHn.
BHIMAHNE! DeiCTBn no yxOdy DoJXhbl npOn3BODntbCra TOnbKO npN BbyIKNoyeHHOM nbIeCOce N OTKIOueH Hom npoBoDe 3apArdHoro yctpoiCTBa!
- HapyKHyIO NOBepXHOCbI NbIeCocA OUnuAaTe BnaXHO TkaHbIO, NocJe Yero BbyTPnTe HaCyxo. Pn CnIbHbIX 3aRpa3HeHnAx Bbl MoKeTe IcNoIb3OBaTb HeMHoro MmKOrO MOUeero CpeDCTBa.
- OuICTIe cetTaBbI nIbTp (12) n nIbTp dBnraTeJra (11) OT nbInn C NOMOu bIO MArKoN KnCTOcKn.MoXHO TaKKe IpnMbITb INx NOD pPoTOUHO BOOn, ODAKO CJeDyET TuaTeJIbHO BblCyuHTb INx neped c6OpKoN. IpOTpNTe PbInec6OpHnK IN3HyTpN BlaXHoT KaHbIO.
BHUMAHNE! Npeed c6opkoi fNbTpbl dOnxHbI 6bItb nonnoctbIO cyxMn. He norpykaTe nbinec60phNK B Body.
- 3apjkaTe aKKymyIaTOp nocLe KaJDoRo NcNoB3OBAHn RaIeCoca. He xpaHnte nbIeCoc c pa3pJKeHHbIM aKKymyIaTOpom. Bcerda 3apjkaTe aKKymyIaTOp nckIoUHTeNbHO nOCTaBJIaEMbIM 3apJdHbIM yCTpoiCTBOM. He 3amblKaIte KOHTaKTbI aKKymyIaTOpa! 3aMeHrTa aKKyMyJIaTOp TOnbKO Ha TaKoJ Xe TIN.
- Перноюческ Oчшайт Врашалшпявалд Злелктоштк.Валд мохно Демонтуровь посе pa36лokиювкВ Нжней част Nлелктоштк,об0з nauseен стpeлков на рис.10.Поссе очирten валкаnomecтente erо obpathoВ Злелктоштку И заблокупte.
BHIMAHVE! He BbI6paCbIbAIte NcNoJIb3OBAHHbI aKKyMylrTop B MycOpHny KOp3Hny. Bbl6paCbIbAIte erO, OTdABaB B COOTBeTCTByIOUne NyHKtblc6opa Mycopa Hn ToproBble ToKn. He 6pocaiTe aKKyMylrTop B orOnb!
HENCPABHOCTN IN CNOCObI INX YCTPAHEHIN
HENCPABHOCTb PIPNINA CnOCOB YCTPAHEHNA
Tbilecoc He Bknoaetca
Pa3paJKeHnBn aKKymyIaTOp 3apAInTe aKKymyIaTOp
IeT npoecc 3apAnKn Ptookdno KOHua npocecca
Hn3Ka MoUHOCb BCaCbIBaHn
3a6nta Tpy6ka nnn 1eTka YcTpaHnTe npNnHy 3acopEnna
Tbile660pHnK 3aonnonHe OunCTne Tbile660pHnK
We wish you satisfaction from using the product and invite you to check a wide range of other MPM appliances
- SAFETY INSTRUCTIONS FOR THE BATTERY
- OVERVIEW
- BEFORE FIRST USE
- DISASSEMBLY OF THE VACUUM CLEANER
- ASSEMBLY OF THE VACUUM CLEANER
- CHARGING THE BATTERY
- PARKING THE VACUUM CLEANER IN THE WALL MOUNT
- TROUBLESHOOTING
- PROPER DISPOSAL OF THE PRODUCT (waste electrical and electronic equipment)
- ANTES DEL PRIMER USO, LEE ATENTAMENTE LAS INSTRUCCIONES DE FUNCIONAMIENTO
- BESCHRIJVING VAN HET APPARAAT
- YKA3AHnI IO B30PACHOCTN IJIy AKKUMyJrTOPHOJ BATAPEI
- ONCAHNE INPMBOPA
- IPEDAEPBBbIMNCIOJIb3OBAHHEM
- PA360PKA IIbIIECOCA
- pnc.2
- CBOPKA NblNECOCA
- pnc.4
- 3APЯДKA AKKUMYЛТОРА
- NcnoJIb3OBAHnE PbIJIeCOCA
- IAPKOBKA IIIECOCA HA DEPXATEJE
- OuNCTKA IN TEXHnueCKOE OBCnyKINBAHNE
- HENCPABHOCTN IN CNOCObI INX YCTPAHEHIN
- HENCPABHOCTb PIPNINA CnOCOB YCTPAHEHNA
Brand : MPM
Model : MOD36
Category : Vacuum Cleaner