IAN 355244 - Exercise bike CRIVIT - Free user manual and instructions
Find the device manual for free IAN 355244 CRIVIT in PDF.
| Product type | Exercise bike |
| Brand | Crivit |
| Model | IAN 355244 |
| Dimensions (L x H x D) | Approx. 96.5 x 133.4 x 54 cm |
| Weight | Approx. 30 kg |
| Maximum user weight | 150 kg |
| Power supply | 2 LR06 AA batteries (1.5 V) |
| Braking system | Speed-independent magnetic brake |
| Adjustable resistance | 8 levels via rheostat |
| Training computer | Display of speed, time, distance, energy, heart rate |
| Recovery measurement | Yes (rating F1 to F6) |
| Chest strap compatibility | Standard 5 kHz (not included) |
| Smartphone/tablet holder | Integrated, maximum load 1 kg |
| Moment of inertia | 5.026 kgm² |
| Free space around the device | 0.6 m on each side |
| Usage | Indoor, domestic use (class HC) |
| Standards | DIN EN ISO 20957-1:2014, DIN EN ISO 20957-5:2017, EN 60335-1 |
| Materials | Steel, plastic |
| Care and cleaning | Clean with a slightly damp cloth, no steam cleaner |
| Warranty | 3 years |
| After-sales service | Swiss hotline: 0842 665566 |
| Spare parts | Available during the warranty period |
Frequently Asked Questions - IAN 355244 CRIVIT
User questions about IAN 355244 CRIVIT
0 question about this device. Answer the ones you know or ask your own.
Ask a new question about this device
Download the instructions for your Exercise bike in PDF format for free! Find your manual IAN 355244 - CRIVIT and take your electronic device back in hand. On this page are published all the documents necessary for the use of your device. IAN 355244 by CRIVIT.
USER MANUAL IAN 355244 CRIVIT
natural_image
Exterior view of a black stationary exercise bike (no text or symbols visible)
HEIMTRAINER
CHINA TECHNOLOGY
Anglo-10·DG2571b, and
1.2018
n
(9)2(2)
Transparency: 1052-64
图
E
B
V
(3) (4) (5)
HEIMTRAINER
[Unreadable]
beachong.mia.tong
(II) (III)
Figure 2.10.14: A new version of the first two versions of the second version of the third version of the fourth version of the fifth version of the sixth version of the seventh version of the eight versions of the nine versions of the ten versions of the ten versions of the ten versions of the ten versions of the ten versions of the ten versions of the ten versions of the ten versions of the ten versions of the ten versions of the ten versions of the ten versions of the ten versions of the ten versions of the ten versions of the ten versions of the ten versions of the ten versions of the ten versions of the ten versions of the ten versions of the ten versions of the ten versions of the ten versions of the ten versions of the eleven versions of the twelve versions of the twelve versions of the twelve versions of the twelve versions of the twelve versions of the twelve versions of the twelve versions of the twelve versions of the twelve versions of the twelve versions of the twelve versions of the twelve versions of the twelve versions of the twelve versions of the twelve versions of the twelve versions of the twelve versions of the twelve versions of the twelve versions of the twelve versions of the twelve versions of the twelve versions of the twelve versions of the twelve versions of the twelve versions of the eleven versions of the eleven versions of the eleven versions of the eleven versions of the eleven versions of the eleven versions of the eleven versions of the eleven versions of the eleven versions of the eleven versions of the eleven versions of the eleven versions of the eleven versions of the eleven versions of the eleven versions of the eleven versions of the eleven versions of the eleven versions of the eleven versions of the eleven versions of the eleven versions of the eleven versions of the eleven versions of the eleven versions of the eleven versions of the twelve versions of the twelve versions of the eleven versions of the eleven versions of the eleven versions of the eleven versions of the eleven versions of the eleven versions of the eleven versions of the eleven versions of the eleven versions of the eleven versions of the eleven versions of the eleven versions of the eleven versions of the eleven versions of the eleven versions of the eleven versions
Before missing, told our illustration on page and parts known all of the functions on your unit.
(a) / (b) / (c) Borensen and Sevistrophenic 50%
The limited amount of industrial surplus (for the N
(1) 3.4.2023
50 Operating and stock information
Page 20
text_image
Technical diagram showing exploded view of mechanical components with labeled parts and directional arrows
text_image
Technical diagram of a mechanical device with labeled components and motion indicators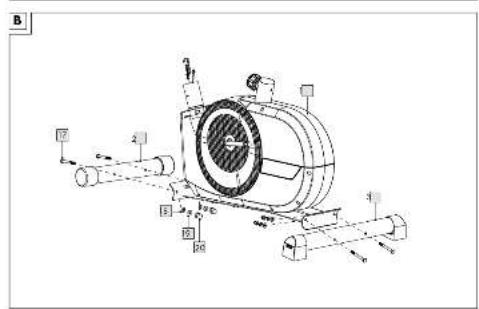
text_image
Technical diagram of a mechanical device with labeled components and motion indicators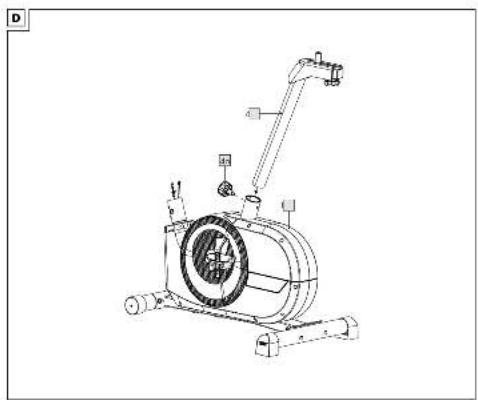
natural_image
Technical line drawing of a mechanical device with no visible text or symbolsE
text_image
Technical diagram of a stationary exercise machine with labeled components and six numbered parts showing various measurement setups.F
text_image
Technical diagram of an exercise machine with labeled components including 6a, 5, and φa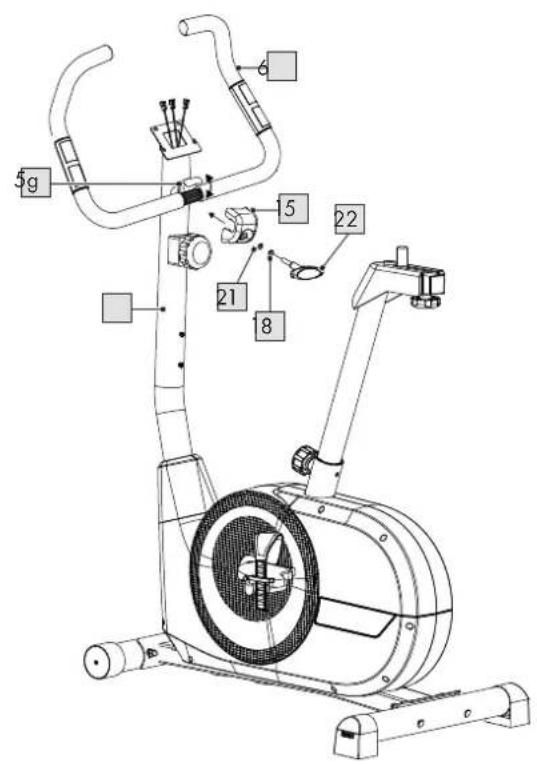
text_image
5g 5 22 21 8G
text_image
7 7b 7b 7a 6a 6a 5h 7cH
text_image
Technical diagram of an exercise machine with labeled parts including 1, 3, 4, and 5i.|
text_image
Technical diagram of a stationary exercise machine with labeled parts including 1, 5, and 6.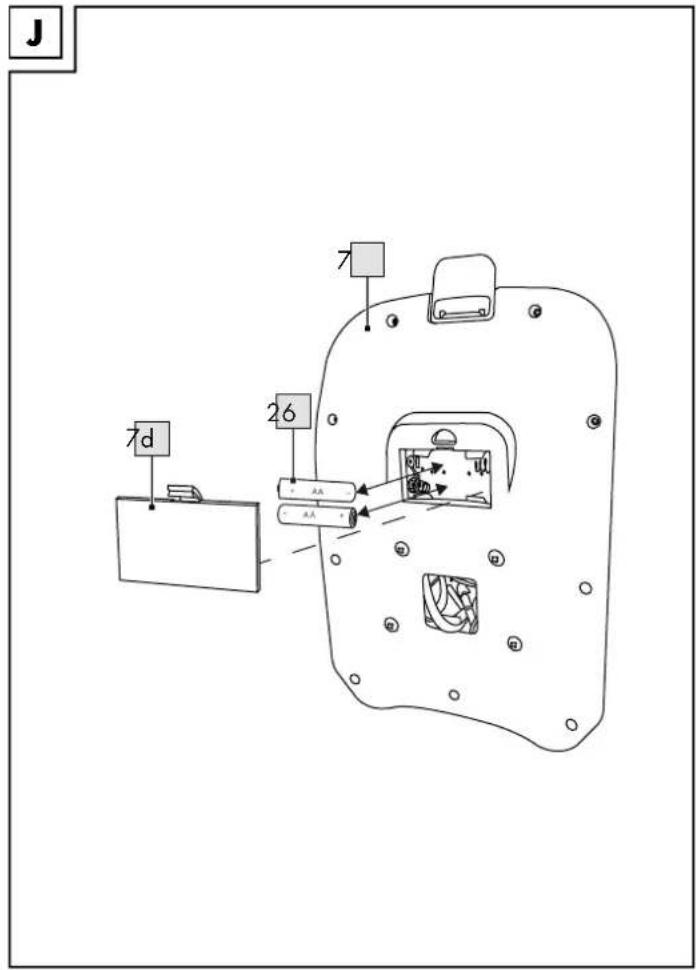
text_image
J 7d 26 7 7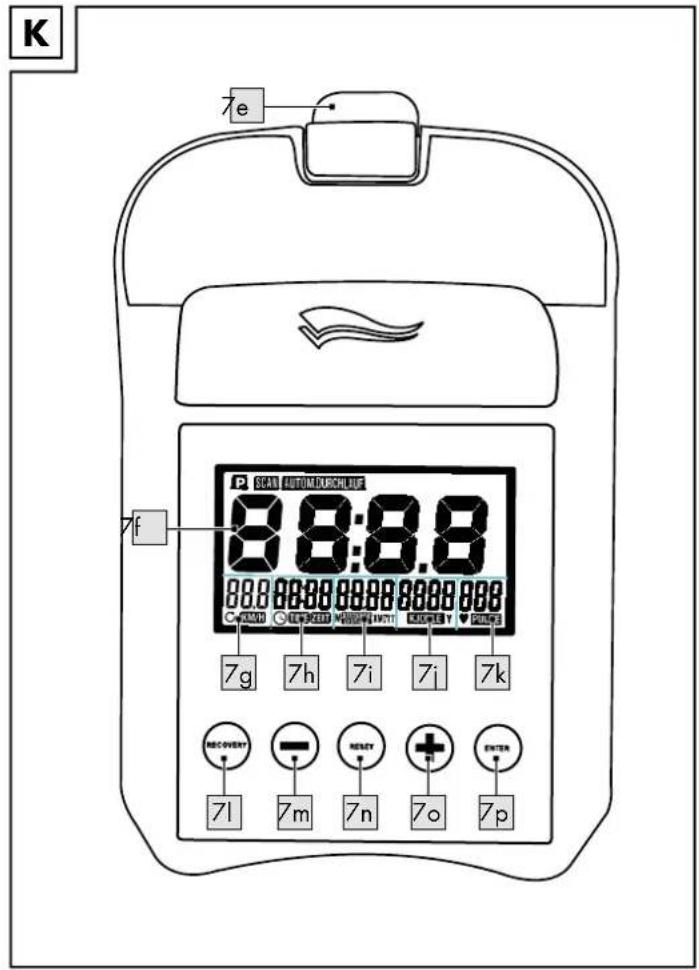
text_image
K 7e SCAN AUTOMUSBLUE 8:8:8.8 000000000000000000000000000000000000000000000000000000000000000000000000000000000000000000000 7g 7h 7i 7i 7k RECOVERY 71 7m 7n 7o 7p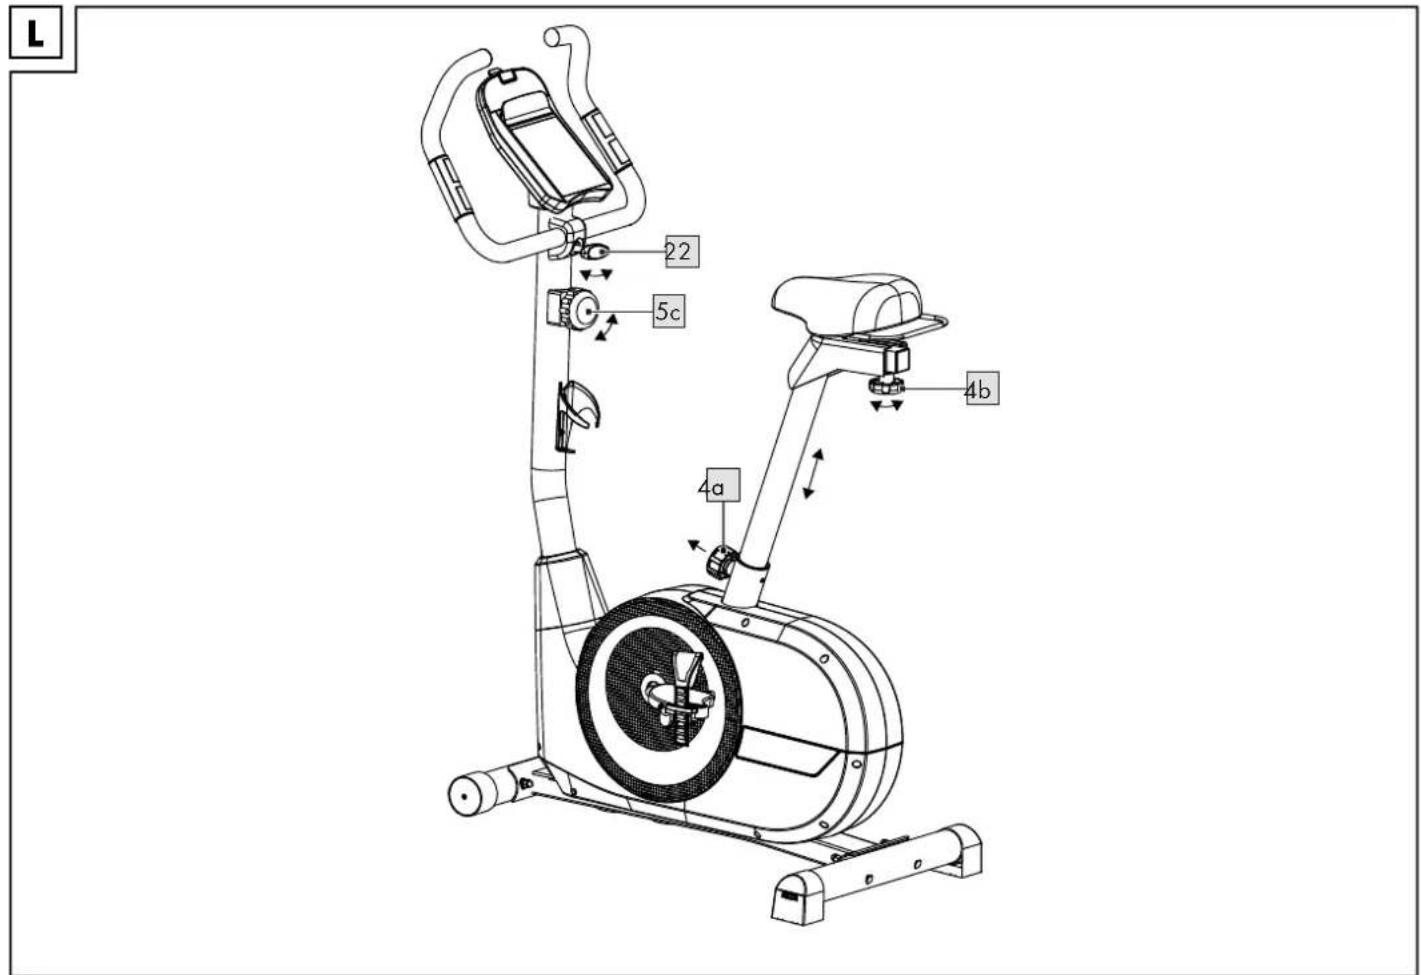
text_image
L 22 5c 4a 4b
Risk of injury 26 - 27
Risk of electric shock! 27
Extra caution - risk of injury to children ..... 27
Dangers due to wear and tear 27
Battery warning notices! 27
Assembly 27 - 28
Disassembly 28
Use 28
Operating the computer 28 - 29
General training instructions 29
Full workout 29
Intensity level of training 29
Transportation 29
Storage, cleaning 29
Disposal 29-30
Notes on the guarantee and service handling 30
1 x Pedal, links (8)
2011/65/UE - Directive RoHS
You have chosen to purchase a high-quality product. Familiarise yourself with the product before using it for the first time.

Read the following operating instructions carefully.
Use the product only as described and only for the given areas of application. Store these operating instructions carefully. When passing the product on to third parties, please also hand over all accompanying documents.
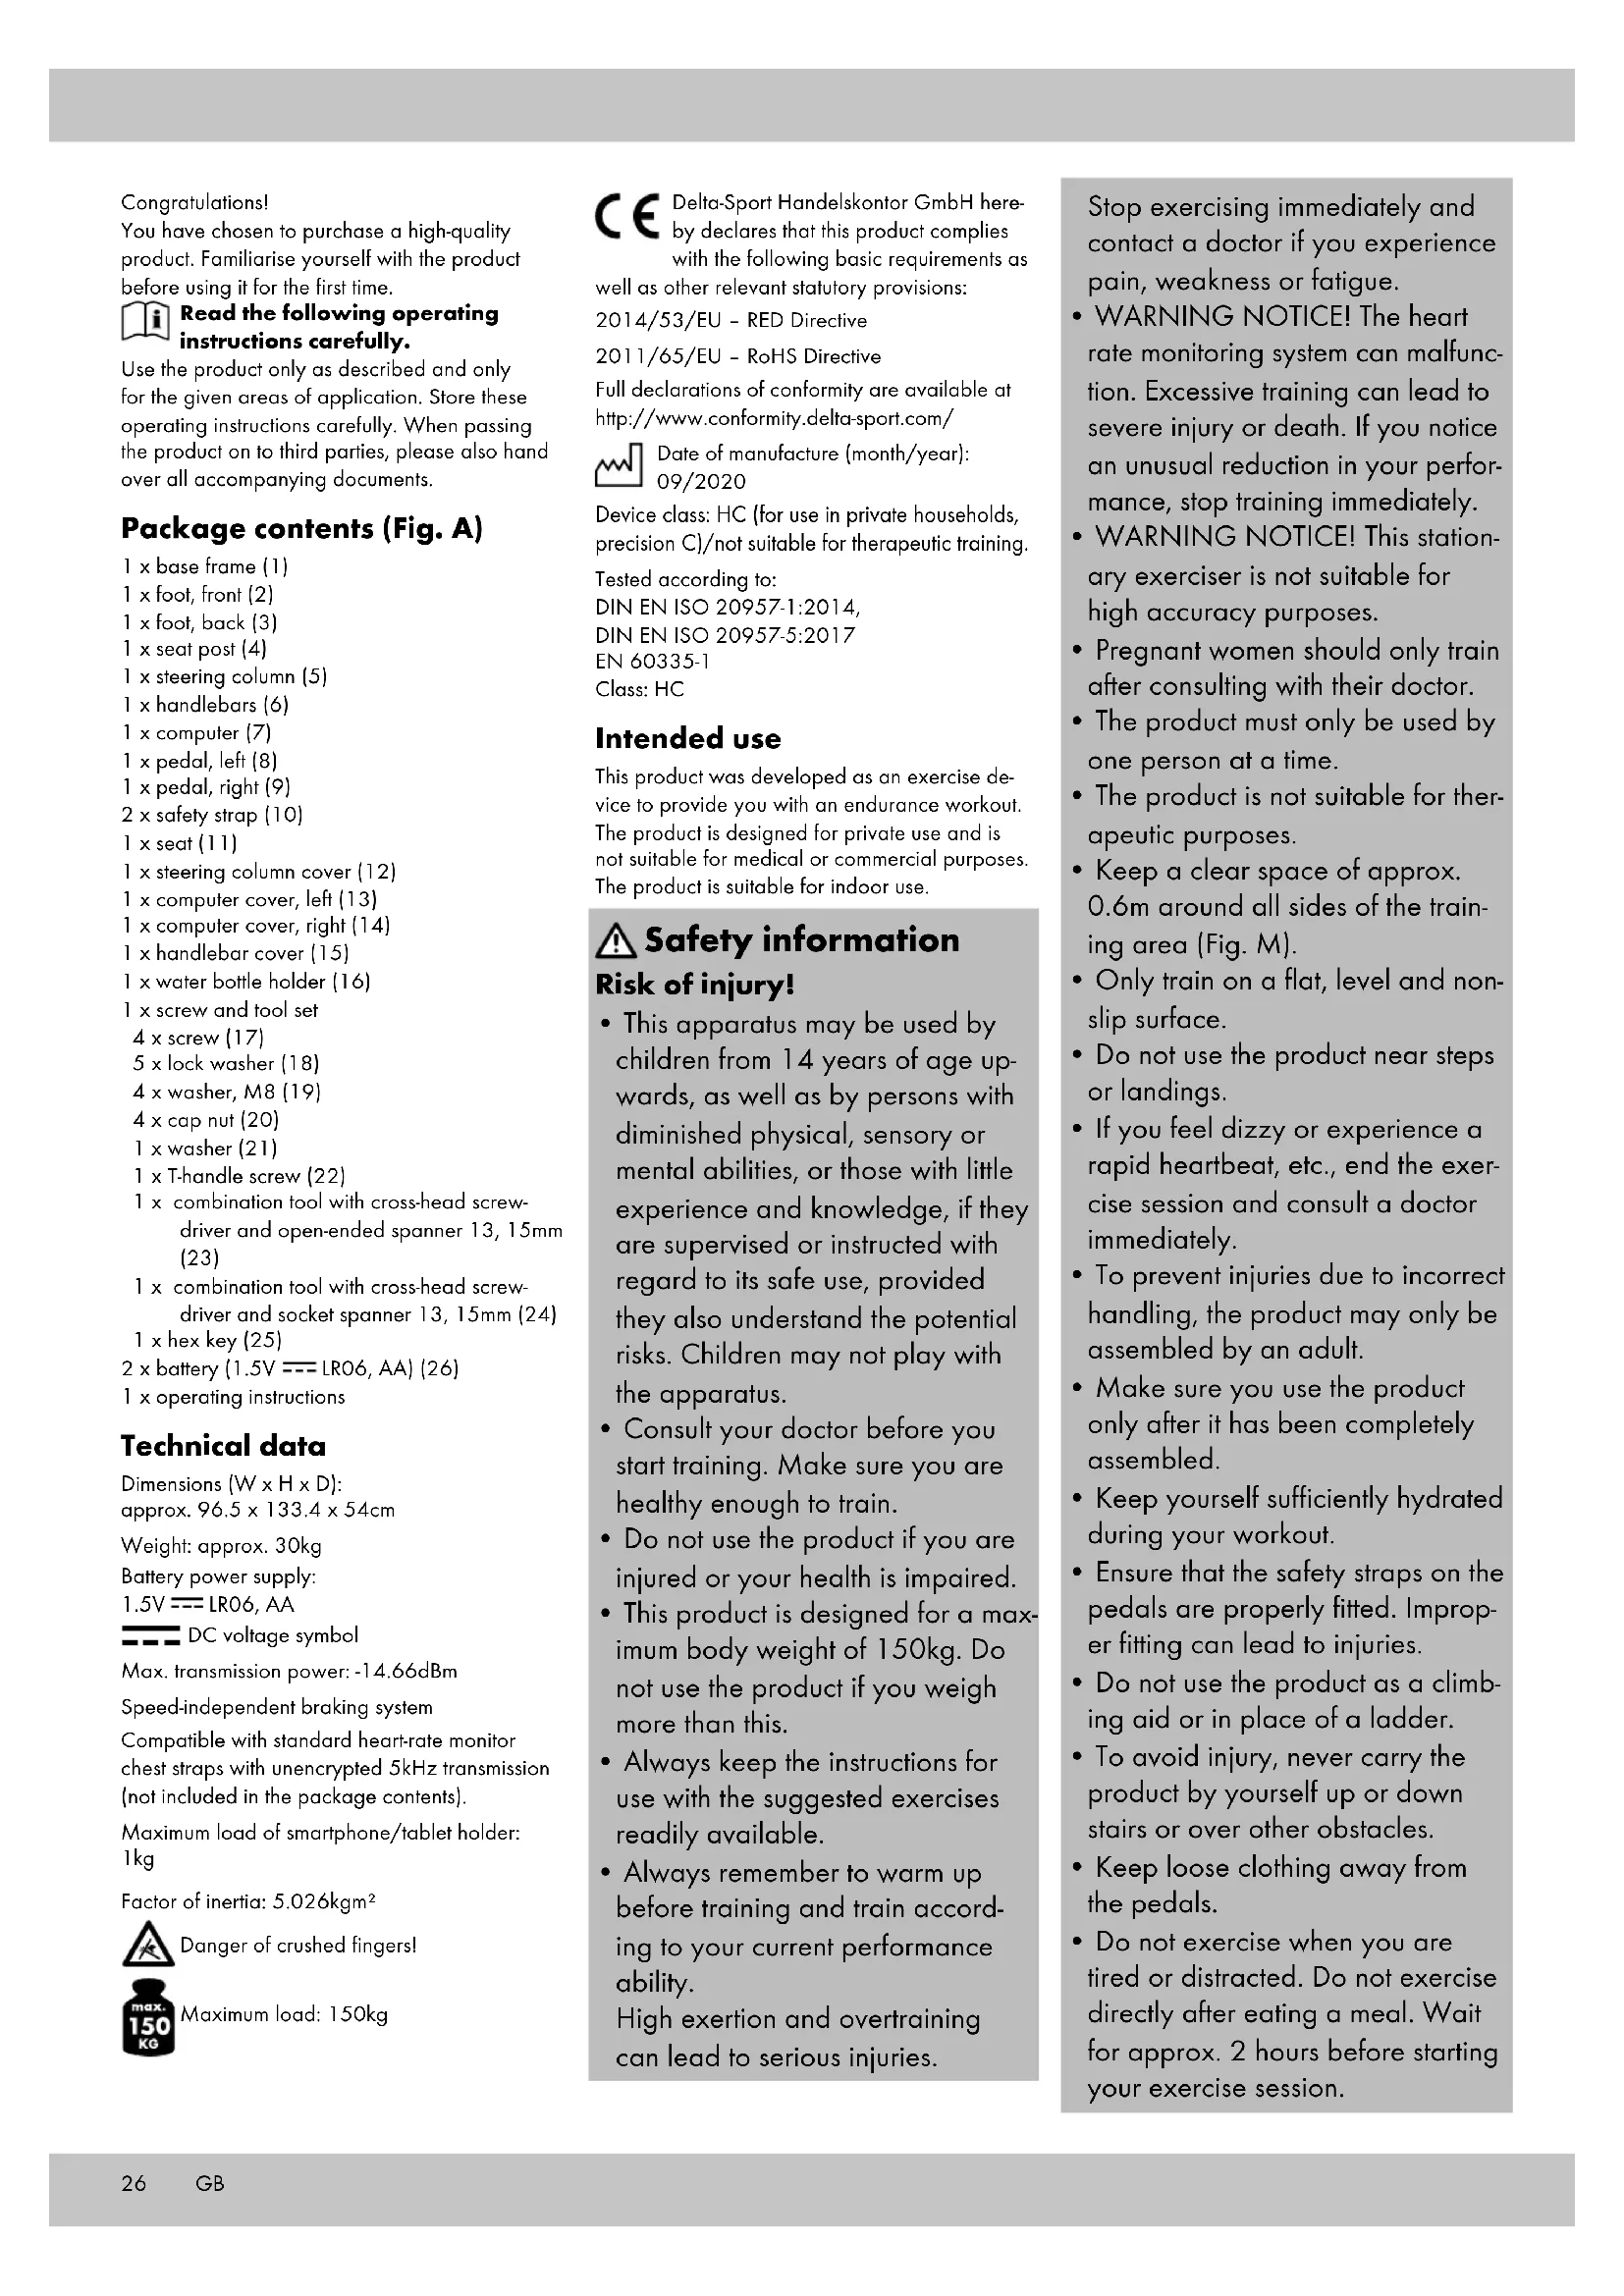
Package contents (Fig. A)
1 x base frame (1)
1 x foot, front (2)
1 x foot, back (3)
1 x seat post (4)
1 x steering column (5)
1 x handlebars (6)
1 x computer (7)
1 x pedal, left (8)
1 x pedal, right (9)
2 x safety strap (10)
1 x seat (11)
1 x steering column cover (12)
1 x computer cover, left (13)
1 x computer cover, right (14)
1 x handlebar cover (15)
1 x water bottle holder (16)
1 x screw and tool set
4 x screw (17)
5 x lock washer (18)
4 x washer, M8 (19)
4 x cap nut (20)
1 x washer (21)
1 x T-handle screw (22)
1 x combination tool with cross-head screw-driver and open-ended spanner 13, 15mm (23)
1 x combination tool with cross-head screw-driver and socket spanner 13, 15mm (24)
1 x hex key (25)
2 x battery (1.5V --- LRO6, AA) (26)
1 x operating instructions
Technical data
Dimensions (W x H x D):
approx. 96.5 x 133.4 x 54cm
Weight: approx. 30kg
Battery power supply:
1.5V --- LRO6, AA

DC voltage symbol
Max. transmission power: -14.66dBm
Speed-independent braking system
Compatible with standard heart-rate monitor chest straps with unencrypted 5kHz transmission (not included in the package contents).
Maximum load of smartphone/tablet holder: 1kg
Factor of inertia: 5.026kgm ^4

Danger of crushed fingers!

Maximum load: 150kg
CE Delta-Sport Handelskontor GmbH hereby declares that this product complies with the following basic requirements as well as other relevant statutory provisions:
2014/53/EU - RED Directive
2011/65/EU - RoHS Directive
Full declarations of conformity are available at http://www.conformity.delta-sport.com/

Date of manufacture (month/year): 09/2020
Device class: HC (for use in private households, precision C)/not suitable for therapeutic training.
Tested according to:
This product was developed as an exercise device to provide you with an endurance workout. The product is designed for private use and is not suitable for medical or commercial purposes. The product is suitable for indoor use.

Safety information
Risk of injury!
- This apparatus may be used by children from 14 years of age upwards, as well as by persons with diminished physical, sensory or mental abilities, or those with little experience and knowledge, if they are supervised or instructed with regard to its safe use, provided they also understand the potential risks. Children may not play with the apparatus.
- Consult your doctor before you start training. Make sure you are healthy enough to train.
- Do not use the product if you are injured or your health is impaired.
- This product is designed for a maximum body weight of 150kg. Do not use the product if you weigh more than this.
• Always keep the instructions for use with the suggested exercises readily available.
• Always remember to warm up before training and train according to your current performance ability.
High exertion and overtraining can lead to serious injuries.
Stop exercising immediately and contact a doctor if you experience pain, weakness or fatigue.
- WARNING NOTICE! The heart rate monitoring system can malfunction. Excessive training can lead to severe injury or death. If you notice an unusual reduction in your performance, stop training immediately.
- WARNING NOTICE! This stationary exerciser is not suitable for high accuracy purposes.
- Pregnant women should only train after consulting with their doctor.
- The product must only be used by one person at a time.
- The product is not suitable for therapeutic purposes.
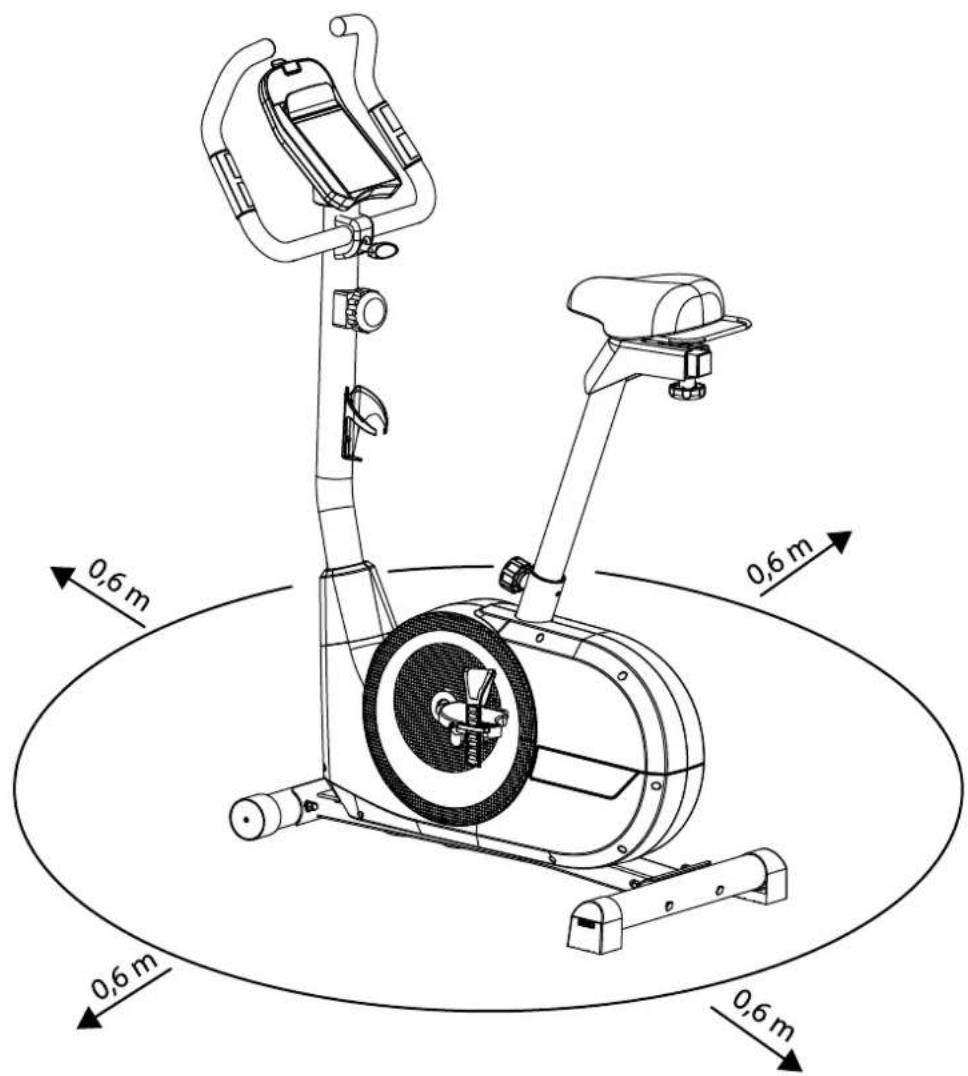
- Keep a clear space of approx. 0.6m around all sides of the training area (Fig. M).
- Only train on a flat, level and non-slip surface.
- Do not use the product near steps or landings.
- If you feel dizzy or experience a rapid heartbeat, etc., end the exercise session and consult a doctor immediately.
• To prevent injuries due to incorrect handling, the product may only be assembled by an adult. - Make sure you use the product only after it has been completely assembled.
- Keep yourself sufficiently hydrated during your workout.
- Ensure that the safety straps on the pedals are properly fitted. Improper fitting can lead to injuries.
- Do not use the product as a climbing aid or in place of a ladder.
• To avoid injury, never carry the product by yourself up or down stairs or over other obstacles. - Keep loose clothing away from the pedals.
-
Do not exercise when you are tired or distracted. Do not exercise directly after eating a meal. Wait for approx. 2 hours before starting your exercise session.
-
Ventilate the exercise room sufficiently but beware of draughts.
• Warning! The product must not be used by people who have a pacemaker!
Risk of electric shock!
- Do not open the case, leave that to the repair specialists. Contact a specialist repair workshop for this. Liability and warranty claims are excluded for repairs that are independently carried out, improper connection or incorrect operation.
- Only use the product indoors.
• Always turn off the product when you are not using it or when you are cleaning it or if a malfunction occurs. - Never pour liquid into the product or the computer.
- Do not use steam cleaners to clean the product. This could damage the product.
Extra caution – risk of injury to children!
- Keep children away from the packaging materials. There is a risk of suffocation!
• Children must not be allowed to play with the product. - The product is not suitable play equipment and must be stored somewhere that is inaccessible to children when not in use. To eliminate the risk of injury, the product must not be within reach of children during the workout.
- Cleaning and maintenance must not be carried out by children without supervision.
- Point out to children specifically that the product is not a toy.
⚠️ Dangers due to wear and tear
- The product may only be used if it is in perfect condition. Check the product for damage or wear before each use.
- The safety of the product can only be guaranteed if it is regularly inspected for damage and wear.
If for example the V-belt or handles show signs of damage, cease using the product.
- Use only original replacement parts.
- Protect the product from extreme temperatures, sun and dampness. Improper storage and use of the product could lead to premature wear and tear, and possible breakages in the structure, which could result in injuries.
- Check the product regularly for damage or deterioration.
- Do not use the product anymore if it is damaged.
- Do NOT permanently screw or fasten the product to the floor. Non-compliance can cause considerable damage to the device.
- Tighten the screw connections regularly.
- Ensure that defective parts, e.g. connecting parts, are replaced immediately and by a specialist only. Only use the product again once all defective parts have been replaced.
- Check the product regularly for visible signs of wear and damage. Check the screwed connections regularly. Only use the product if it is in perfect condition!
⚠️ Battery warning notices!
- Remove the batteries when they are flat, or if the product is not in use for an extended period.
- Do not use different types or brands of battery or new and used batteries together or batteries with different capacities as these can leak and cause damage.
- Ensure the polarity (+/-) is correct when inserting the batteries.
- Replace all batteries at the same time and dispose of the old batteries as prescribed.
- Warning! Batteries must not be charged or reactivated by other means, taken apart, thrown into fire or short-circuited.
• Always keep batteries out of reach of children.
- Do not use rechargeable batteries!
- Cleaning and maintenance must not be carried out by children without supervision.
- Clean the battery and device contacts as needed and before inserting.
- Do not expose the batteries to extreme conditions (e.g. radiators or direct sunlight). Otherwise there is an increased risk of leakage.
- Batteries can be life-threatening if swallowed. Therefore, store batteries in a place inaccessible to small children. Medical attention must be sought immediately if a battery is swallowed.
Danger!
- Handle damaged or leaking batteries with extreme caution and dispose of them properly as soon as possible. Wear gloves when doing so.
- If you come into contact with battery acid, wash the affected area with soap and water. If battery acid gets in your eye, rinse it with water and seek medical attention immediately!
- The connection terminals must not be short-circuited.
Assembly
The product should be assembled by two people.
Take care with floors that are susceptible to damage! Use a mat or the like, if necessary, to protect the floor.
Step 1 (Fig. B)
- Stand the base frame (1) on a solid, level floor. Warning: to protect the floor from being scratched, cover it with a suitable material.
- Screw the front foot (2) onto the front side of the base frame with two screws (17), two lock washers (18), two washers (19) and two cap nuts (20).
Note: make sure that the transport wheels on the front foot (2) are pointing forward.
- Screw the back foot (3) onto the back side of the base frame with two screws (17), two lock washers (18), two washers (19) and two cap nuts (20).
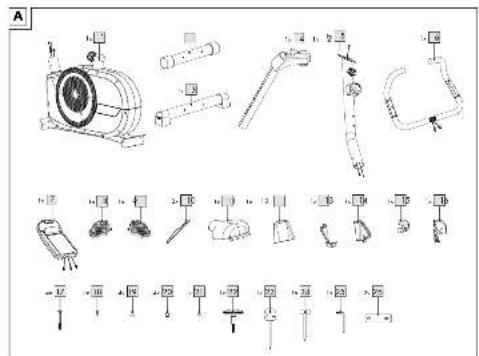
Step 2 (Fig. C)
- Screw the right pedal (9) clockwise onto the crank.
Note: observe the marking (R) and direction of rotation for the right pedal.
- Screw the left pedal (8) anti-clockwise onto the crank.
Note: observe the marking (L) and direction of rotation for the left pedal.
- Fasten the straps (10) onto the pedals (8)/(9).
Note: the straps on the pedals must be able to keep your feet firmly secured. If the straps feel uncomfortably tight, loosen them.
Step 3 (Fig. D)
-
Insert the seat post (4) into the back opening of the base frame (1).
-
Fasten the seat post with the setting screw (4a).
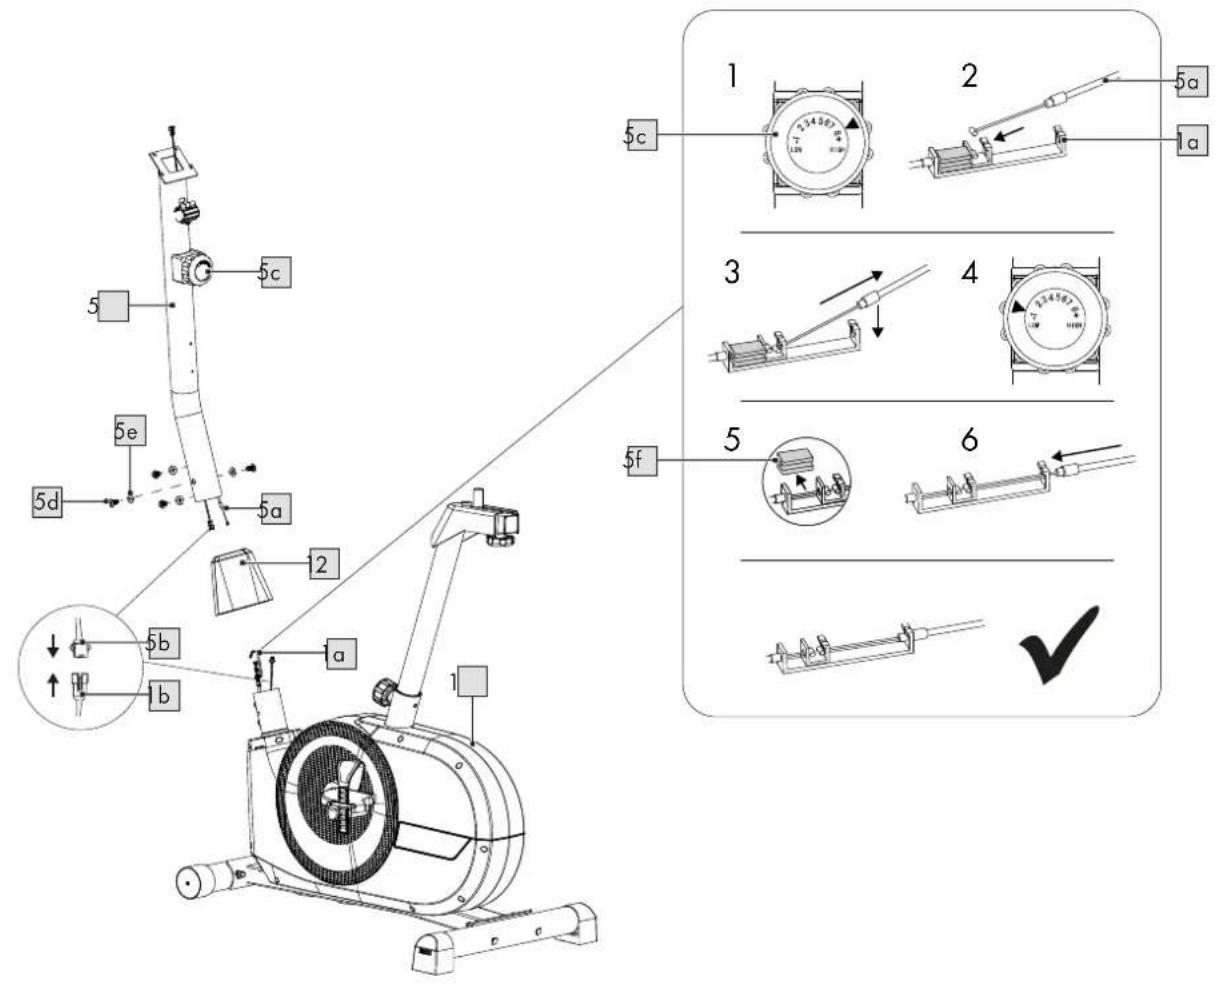
Step 4 (Fig. E)
-
Hold the steering column (5) against the front opening of the base frame (1).
-
Push the steering column cover (12) just over the steering column (5).
-
Set the resistance controller (5c) to the highest level of resistance (level 8).
-
Insert the end of the draw cable (5a) into the end of the draw cable (1a).
Note: make sure that the draw cables are firmly connected.
- Set the resistance controller (5c) to the lowest level of resistance (level 1).
Note: this tightens the draw cable (5a).
-
Remove the plastic cover (5f).
-
Connect the sensor cable (5b) to the sensor cable (1b).
Note: make sure that both sensor cables are firmly connected, otherwise there will be no signal transmission.
- Place the steering column (5) onto the base frame (1).
Note: make sure that the sensor cable and draw cable are within the frame.
-
Screw the steering column (5) onto the base frame (1) with the screws (5d) and the washers (5e).
-
Push the steering column cover (12) over the screws (5d) to cover them.
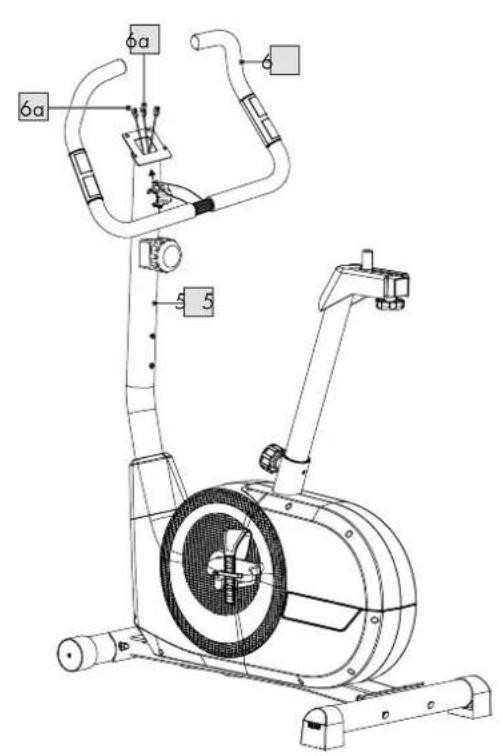
Step 5 (Fig. F)
- To assemble the handlebars (6), first guide the sensor cable (6a) up through the bottom opening of the steering column (5).
Note: pull the cable out from the steering column somewhat.
-
Open the holding clamp (5g) and place the handlebars (6) into the holding clamp.
-
Close the holding clamp (5g) and place the steering column cover (15) over it.
-
Fasten the handlebars (6) and the steering column cover (15) with a lock washer (18), a washer (21) and the T-handle screw (22).
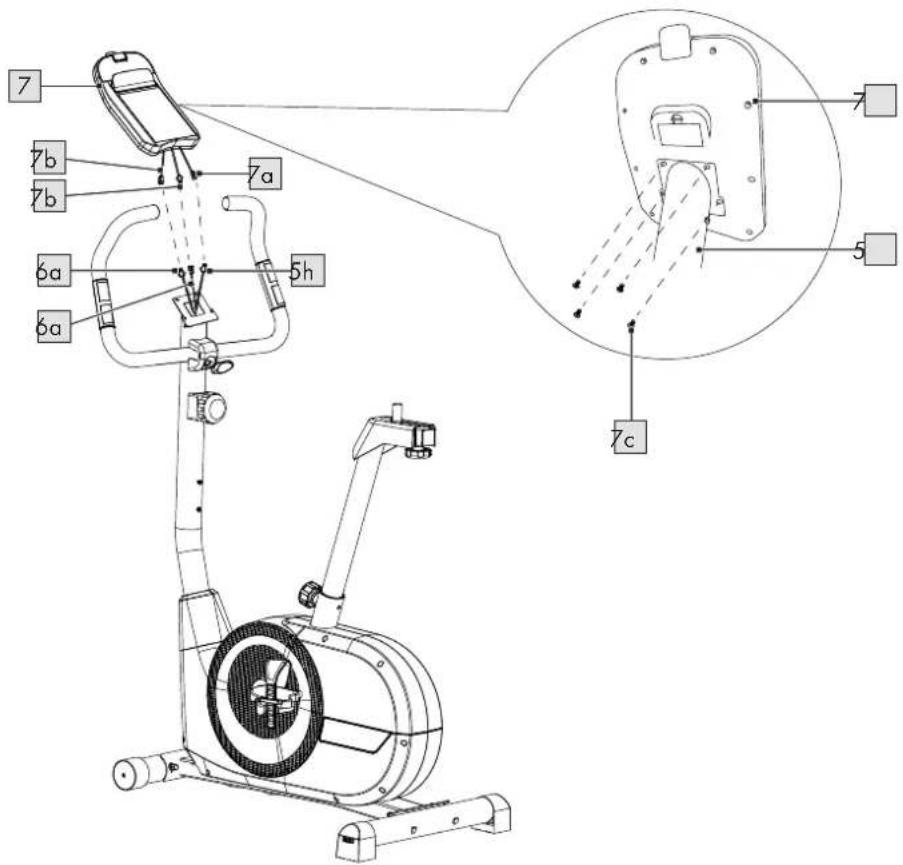
Step 6 (Fig. G)
- Hold the computer (7) against the steering column and connect the sensor cables (6a) from the steering column with the sensor cables (7b) from the computer.
Note: the sensor cables are labelled PULSE and SENSOR for better recognition. Connect the PULSE sensor cables. Make sure that the sensor cables are firmly connected.
- Connect the sensor cable (7a) with the sensor cable (5h).
Note: the sensor cables are labelled PULSE and SENSOR for better recognition. Connect the SENSOR sensor cables. Make sure that the sensor cables are firmly connected.
-
Insert the sensor cables into the steering column (5).
-
Remove the screws (7c) on the back of the computer (7), place the computer on the steering column (5) and reattach the screws (7c).
Note: make sure that you do not clamp the sensor cables.
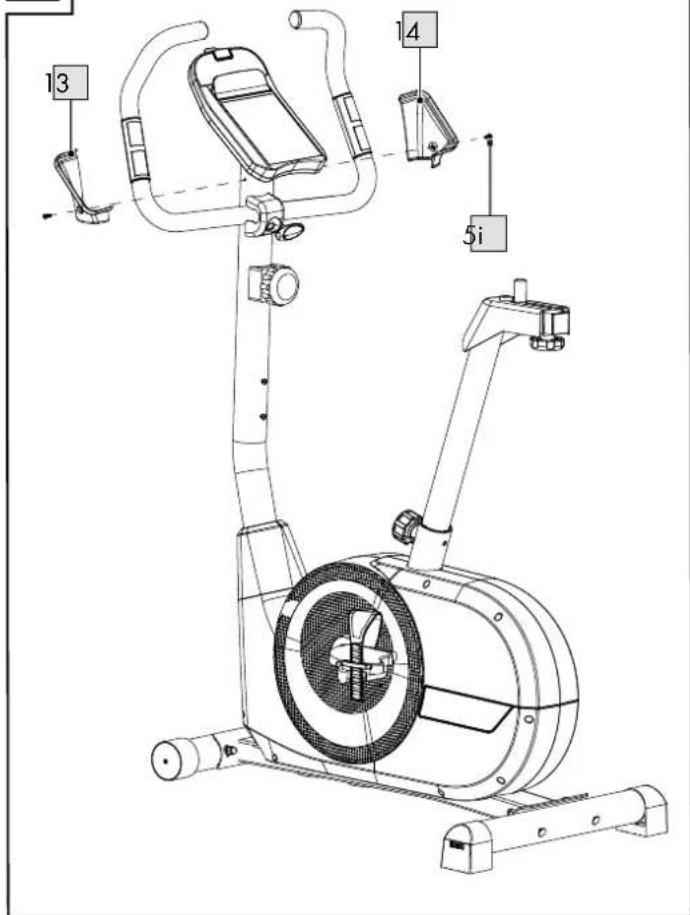
Step 7 (Fig. H)
- Place the left computer cover (13) and right computer cover (14) on the sides of the steering column (5) and fasten them both with the pre-mounted screws (5i).
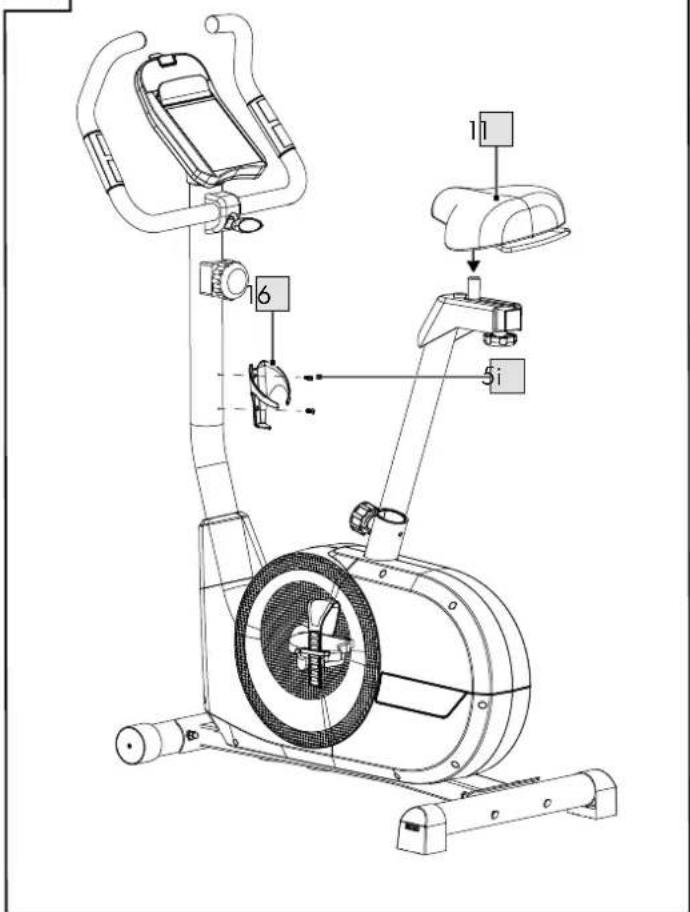
Step 8 (Fig. I)
-
Fasten the seat (11) to the seat adjustment track and align the seat horizontally.
-
Remove the pre-mounted screws (5i) from the steering column (5).
-
Fasten the water bottle holder (16) to the steering column (5) with the previously removed screws (5i).
Note: use of the water bottle holder is optional.
Disassembly
Proceed in the reverse order to disassemble the product.
Use
- Choose a training area of approx. 3.00 × 1.80m (L x W).
- Train on a flat, non-slip surface only.
Inserting and replacing the batteries (Fig. J)
WARNING! Observe the following instructions to avoid mechanical and electrical damage to the product.
The product comes with two batteries (26) that can be removed from the packaging and inserted into the computer (7) before using it for the first time.
When the batteries (26) are flat, you can replace them.
-
Open the battery compartment cover (7d).
-
Insert the batteries (26) in the battery compartment.
Note: pay attention to the plus/minus poles of the batteries and to their correct insertion. The batteries must be completely inside the battery holder.
-
Close the battery compartment cover (7d).
-
Follow the insertion instructions when replacing the batteries. First remove the flat batteries from the battery compartment.
Setting the seat, foot and handlebar position (Fig. L)
- Set the seat position so that your leg is outstretched when your heel is touching the pedal and your knee is behind the pedal axle. Use the adjusting screw (4a) to set the height, and the adjusting screw (4b) below the seat to bring it to the correct distance.
- Position your feet in the centre of the pedals. When training with the product, the movement comes from the balls of your feet so that you have better leverage and your movements are easier.
• Make sure that at least half the length of your foot is on the pedal during training.
- Tighten the safety straps on the pedals to ensure that your feet have a good grip.
- Use the T-handle screw (22) to adjust the handlebars so that your arms are fully outstretched when holding the handlebars.
- Use the resistance controller (5c) to set the pedal resistance suitable for you and your workout.
Using the smartphone or tablet holder
-
Place your smartphone or tablet on the smartphone or tablet holder.
-
Fasten your smartphone or tablet with the clip (7e) (Fig. K).
Operating the computer
Turning on the computer
-
Insert the batteries into the computer as described in the section 'Inserting and replacing the batteries'.
-
Press any button or use the pedals. The computer turns on automatically.
Setting up the computer
The calendar function is displayed when using the computer for the first time.
- Set the desired date with the buttons (7m, 7o).
Note: you lower the input with the button (7m) and increase the input with the button (7o).
- Confirm your respective input with 'ENTER' (7p) to switch between days, months and years.
Note: press the 'ENTER' button to confirm the input. You are automatically directed to the normal display view.
Changing the language
You have the option of changing the computer language. English is the pre-set default language. Proceed as follows to change the computer language to German:
- Press the 'RESET' and 'ENTER' buttons simultaneously.
Note: the display is reset and the calendar function is displayed.
- Set up the computer as described in the section 'Setting up the computer'.
Note: the normal display view appears and the computer language is now German.
- Repeat the steps to change the computer language back to English.
Display view (Fig. K)
The following information and functions are shown on the display:
- Current speed from 0.0 to 99.9km / h is displayed (7g).
• A training duration with pause mode of between 00:00 and 99:59 is displayed (7h).
- The distance pedalled from 0.0 to 99.9km is displayed (7i).
- Energy burn* of 0 to 9,999 kilojoules is displayed (7j).
- Depending on the display status, heart rate from 40 to 220 beats per minute is displayed (7k).
* The calculation is based on pre-programmed standard values that only serve as a guide.
Recovery measurement
The recovery measurement indicates whether your recovery heart rate lies within a healthy or less healthy range. After completing the recovery measurement, you will be given a score:
• F1 = very good heart rate recovery
• F6 = poor heart rate recovery
- After your workout has finished, press the 'RECOVERY' button (71) to measure your recovery heart rate.
- Place your palms on both hand pulse sensors.
- The time (7h) and heart rate (7k) are displayed. The time counts down from 00:60 to 00:00.
- Put your hands around the hand pulse sensors until the countdown from 60 seconds has finished. Your score is then displayed.
Note: a standard chest strap (not included in the package contents) can also be used.
- Press the 'RECOVERY' button (71) again to return to the main menu.
Resetting the display
To reset the display, delete saved settings or end a workout ahead of time, press the 'RESET' button (7n).
Turning off the computer
The computer turns itself off automatically after 4 minutes of inactivity (pushing buttons or cycling).
General training instructions
- Wear comfortable sportswear.
- Warm up before each training session and end the session gradually.
• Take sufficient breaks between the exercises and keep yourself sufficiently hydrated. - If you are a beginner, never train with too much intensity. Increase the intensity of the training sessions slowly.
- Perform all exercises smoothly, not jerkily or fast.
- Be sure to breathe steadily. Exhale during exertion and inhale upon release.
- Maintain correct body posture while exercising.
- Make sure that your feet are optimally positioned on the pedals.
- Hold the handlebars throughout your workout.
- Maintain an upright posture throughout your workout.
Full workout
Warming up
Take sufficient time before each training session to warm up.
Some simple exercises to do this are shown below.
You should repeat each exercise two to three times.
Neck muscles
-
Turn your head slowly to the left and to the right. Repeat this movement four to five times.
-
Rotate your head slowly, first in one direction, then in the other.
Arms and shoulders
- Clasp your hands behind your back and pull them carefully upwards. If you bend your upper body forwards at the same time, all your muscles will be maximally warmed up.
- Rotate both your shoulders forwards at the same time and then change direction after one minute.
- Pull your shoulders up to your ears and then let them drop again.
- Circle your right and left arms alternately forwards and then, after one minute, backwards.
Important: don't forget to keep breathing steadily!
Exercising
- Get on the product.
- Position your feet on the pedals and secure them with the safety straps.
- Hold the handlebars throughout the workout.
- Use the buttons to set your personal target values, or begin your workout directly.
Note: maintain an upright posture throughout the workout.
Recovering
- Ensure that you take sufficient time to recover during and after the workout.
- The recovery period should be longer for a beginner than it is for a fit athlete.
Intensity level of training
- Decide what your training goal is.
Note: training goals can include weight reduction or fat burning, or increasing your endurance.
2. Decide how often you want to train to achieve your training goal. The following training schedules are recommended:
• Basic health programme:
2–3 times/week for 20–30 minutes each time.
• Optimal health programme:
4–5 times/week for 45–60 minutes each time.
3. To increase the intensity level of your training, choose between the following training zones:
- Regeneration zone: In the regeneration zone you are training with 50–60% of the maximum heart rate. The effort level is light and relaxed. This zone is the base from which you will increase your performance. If you are a beginner or have a health condition, you should train in the regeneration zone.
- Fat-burning zone: In the fat-burning zone, you are training with 60–70% of the maximum heart rate. This zone strengthens your heart, while also being ideal for fat burning. This training is more effective the longer you do it.
- Aerobic zone: In the aerobic zone, you are training with 70–80% of the maximum heart rate. In this zone, you burn more carbohydrates than fat. The stress is higher. Heart and lungs are strengthened.
If you want to be faster, stronger and have more endurance, you should train in the aerobic zone.
- Anaerobic zone: In the anaerobic zone, you are training with 80–90% of the maximum heart rate. Training in the anaerobic zone is high-performance training, in which typical symptoms such as exhaustion, tiredness or heavy breathing arise.
- Warning zone: In the warning zone, you are training with 90–100% of the maximum heart rate. The warning zone is the zone with the highest intensity. If you are extremely fit and are experienced in high-performance training, train in the warning zone. Please be aware that training in this zone can easily lead to overexertion and injury.
Transportation
- Place your right foot on the front foot of the equipment with the rollers.
- Grab the product by the handlebars and carefully tilt the product toward yourself.
- Roll the product to the desired location and slowly return it to the upright position.
Note: keep your back straight while moving the equipment.
Take care with floors that are susceptible to damage!
The wheel axle can slip out of place easily when rolling over obstacles, which blocks the wheel and leaves marks on the floor.
Storage, cleaning
When not in use, always store the product dry, clean, without batteries and at room temperature.
The product must always be kept dry, and cleaned of any dirt after each use. Use a lightly dampened cloth to clean the equipment and the computer, and avoid contact with water.
IMPORTANT! Never clean the product with harsh cleaning agents!
Disposal

In the interest of protecting the environ- ment, do not throw your product into the household waste once you are finished with it, but rather take it to a specialty
disposal facility. Find out about collection sites and their hours of operation from your local authority.
Defective or used batteries must be recycled pursuant to Directive 2006/66/EC and changes to it. Return batteries and/or the product via the collecting sites provided. Packaging materials, such as plastic bags, must be kept away from children. Keep the packaging materials out of reach of children.

Environmental damage caused by improper disposal of batteries! Batteries may not be disposed of with household
waste. They may contain toxic heavy metals and are subject to hazardous waste treatment. The chemical symbols of the heavy metals are as follows: Cd = cadmium, Hg = mercury, Pb = lead. Dispose of used batteries at a municipal collection site.

Dispose of the product and packaging in an environmentally friendly manner.

Note the label on the packaging materials when separating waste, as these are labelled with abbreviations (a) and
numbers (b) with the following meaning: 1-7: plastics/20-22: paper and cardboard/80-98: composite materials.
The product and the packaging materials can be recycled, dispose of them separately for better treatment of waste. The Triman logo only applies to France. Find out how to dispose of the used product from your municipal or city administration.
Notes on the guarantee and service handling
The product was produced with great care and under constant supervision. You receive a three-year warranty for this product from the date of purchase. Please retain your receipt. The warranty applies only to material and workmanship and does not apply to misuse or improper handling. Your statutory rights, especially the warranty rights, are not affected by this warranty.
With regard to complaints, please contact the following service hotline or contact us by e-mail. Our service employees will advise as to the subsequent procedure as quickly as possible. We will be personally available to discuss the situation with you.
Any repairs under the warranty, statutory guarantees or through goodwill do not extend the warranty period. This also applies to replaced and repaired parts. Repairs after the warranty are subject to a charge.
IAN: 355244_2004
GB Service Great Britain
Tel.: 0800 404 7657
E-Mail: deltasport@lidl.co.uk