USER MANUAL WM14UUP9DN SIEMENS
3.2 CmHa Ha aacadnnaheI 7
3.2.1 CbajHe Ha facaHnaHen.. 7
3.2.2 MoNTIpaHHe Ha facadHnaHn 7
3.3 CmHa Ha YekMeJKeTo 3a nepuHn npenapat 8
3.3.1 CbajHe Ha YekMeJKeTo 3a nepnne npenapaT
3.3.2 MoHTupaHHe Ha YekMeDkeTo 3a nepIneH npenapaT.. 8
3.4 CmHa Ha dpbKaTa Ha YekMeJKeTo 3a nepuH npenapat.. 9
3.4.1 Cbajhe Ha dpbkkata Ha yekmeJeTo 3a nepuH npenapat.. 9
3.4.2 MoHTnpaHe Ha DpbXkKaTa Ha YekMeXdKeTo 3a nepnEn npenapat .9
3.5 CmHa Ha BpaTata 10
3.5.1 ⅡBaKaHa Ha BpaTaTa.. 10
3.5.2 MoHTnpaHe Ha BpaTaTa.. 10
3.6 CMraHa HA KOMnOHeHTnte Ha BpaTata 11
3.6.1 CbajHe Ha KOMnoHEHTte Ha BpaTaTa 11
3.6.2 MoHTIpaHe Ha KOMNOHEHTITe Ha BpaTaTa 11
3.7 CmHa Ha ynnbTHHeHMeTo Ha BpaTaTa 12
3.7.1 CbaJare Ha yIbTHHeHTo Ha BpaTaTa 12
3.7.2 MoHTIpaHe Ha yNbTHHeHMeTo Ha BpTaTa 15
3.8 CmHa Ha KIOUHa HbPaTaTa 16
3.8.1 CbaJIaHE Ha KIOUaIKaTa Ha BpaTata... 16
3.8.2 MoHTnpaHe Ha KIOUHAnKaTa Ha BpaTata 17
3.9 CMHa Ha ocBETJeHneTo Ha 6apa6aHa.. 18
3.9.1 CbaJrHe Ha oCBetJeHMeTo Ha 6apa6aHa 18
3.9.2 MoHTnpaHe Ha OCBeTJIeHMeTo Ha 6apa6aHa 18
CIMBOHTE3aONACHOCTCa CIMBOHNUH N3o6paXeHNA, KOHTO DaBaT INDINKAUHA 3a Bnda ONACHOCT.
BTo3n DOKyMeHCTe H3N013BaT CNEdHInTe CMBOIN 3a OnaCHOCT:
HakpaHHK Torx TX20 cOTBOP,6,30MM (14") 152MM,3a BHTOBc [00341272]
N3nCKBaHe:
YpeBte n3KIOUeH OT 3aXpaHbHeTo.
YpeBt E n3KJIOUeH OT BDOcHb6nITeHnHaT MpeXa.
3.1.1 CbānHe Ha ropHn pa6oTeH nIOT
1.CBaneTe BnHTOBete(1).
2.ИЗБУТАЕТЕ rOPнЯ pa6OTeH nNot KbM 3aДнЯ Край Ha ypeДа (2).
3. PpemecTeTe rOpHn pa60TeH nIOT Harope (3), 3a da ro cBaJIte.
3.1.2 MoHTnpaHe Ha ropHna pa6oTe Hnnot
MoHTnpaTaTe B o6paTeH peJ.

PemOH
3.2CMHaHaΦacHnaHn

BHNMATEJIHO
Octpn p6oBe Ha Kopnycal
HapaHbAHmO Tnp3BaHe
Hocete npedna3n pbkauu.

EDYNPPEKDEHNE
Ppnnb3BaHe Ha HAKNOHEn ypeNi!
KoctHn ppaKtpn/HapaHbAHHN O TnpMa3BaHe
YkpeneTe ypeDnTe cpeu npnnB3BaHe.

BHIMATEJIHO
Pnck OT naaun yactn npadn pa3xa6eHN BnHToBe!
JapahBaHe npaui nadaunact
3akpenete KOMnoHEHa, Taka Ye da He naHe.

BHIMAHHEI
Pnck OT naaun yactn npaepa3xna6eHN BnHTOBE!
NopeHa npTu qactn Ha ypeHa nnB Doma Ha KneHTa, Hap. bHo
2.
3akpenete KOMnoHeHTa, Taka Ye Da He naHe.
N3nCKBaHe:
YpeBt E N3KIOUeHOT 3aXpaHbHeTo.
YpeDbTe n3KIOUeH OT BDOOChA6nITeNHaT a MpeKa.
FopHnT pa6oTeH nnot eCBaneH.→6
YekmedkeTo3a nepunHn npenapat cBaneHo.→8
3.2.1 CbanyHe Ha fapaHnnaHn
- 1.CBANETEBHTOBETE(1).
2.Ocbo6oTe KpenexHnTe eJeMeHTn (2,3).
2.OCBO6OeTeUeCenHOTo CbeHNHeHHe Ha KOHTpONHnBnK
3.CbaneTe paacdHnaHen.
3.2.2 MoHTpaHHe Ha facaHnHaHEn
MoHTnpaTBeBobpaTeHpe.

PemOH
3.3CMHaHa YekMeDxKeTo 3a nepuHn npenapaT
N3nCKBaHe:
YpeBtE H3KNIOUeHOT 3axpaHBAHeTo.
YpeBt E n3KIOUeH OT BOOCha6DnTeHnHa MPeka.
3.3.1 CbIaHHe Ha YekMeJxKeTo 3a nepuHn npenapat
- ⅠnterTne TeyKMeDxkeTo 3a nepiHn npenapat.
2.1.HaTnCHete HADONY Bbpxy NOIIOKKaTa(1).
2.CbaneTe YekMeJKeTo 3a nepuInen npenapat (2).

3.3.2 MoThnpaHe Ha YekMeJKeTo 3a nepnien npenapat
MOnTnpaIteB06paTeHpeI.

PemOH
3.4 CmHa Ha dpbkkata Ha YekMeJKeTo 3a nepnneH npenapaT
N3nCKBaHe:
YpeIbTe N3KIOUeHOT 3aXpaHbHaHeTo.
YpeBt E n3KIOUeH OT BOOChA6DITENHaT MpeXa.
YekmeJeKeTo 3a nepuHnI npenapat e cBaaneHo. 8
3.4.1 CbAJIHe Ha dpBxKkata Ha YekMeJKeTo 3a nepuJeH npenapat
1.OcbobodTe Kpenexhnte enemHTN.

2.CBaIeTe pBxKkTaHa YekMeJKeTo 3a nepuHn npenapat.
3.4.2 MoTHnpaHe Ha DpBkkKaTa Ha YekMeXdKeTo 3a nepnne npenapat
MOHTnpaTBeB ObaPteH peI.

PemOH
3.5 CMHa Ha BpTaTa


BHIMATEJIHO
OTBOpTe 0bnaTtHa naHTnTe!
Ppema3BaHe/3axBaUaHHe Hn pbcTNTe
He nocaire Te KbM oBnaCTTa Ha naHTnte.
Hocete npedna3HN pKabu.
N3nCKBaHe:
YpeBte n3KNIOUeHOT 3aXpaHbHeTo.
YpeIbTe N3KJIoueHOT BOIOChA6nITeNHaTaMpexa.
Bpatata e otbopeha.
3.5.1 NbBaxDaHe Ha BpaTata
1.

BHIMAHHEI
PnCK OT napaun Yacnt npapn pa3xa6eHN BnHTOBE!
IbpeHa npyrHuactn Ha ypeDa nnB DomHa KNHeHTa, HnP. dHbTO.
3akpenete KOMNOHHTa. Taka ye da He naDHe.

BHIMATEENHO
Pnck OT npdaun yactn nopadpa3xa6eHN BuHToBe!
Hapahrahe npadn nadaaun yactn.
3akpenTe KOMnoHEHTa, Taka Ye da He naDHe.
CbaTe BHTOBete(1).
2.ИЗБАДЕТЕВРАТАНОРЕ.
3.5.2 MoHTIpaHe Ha BpaTaTa
MoHTnpaTBeBobpaTeHpeI.

PemOH
3.6CMHaHa KOMNoHEnTHe Ha BpaTaTa
BHIMATEJIHO
OTBOpTe 06nactTa Ha naHTnte!
Ppema3BaHe/3axBaUaHHe Hn pbcTNTe
He nocaire Te KbM oBnaCTTa Ha naHTnte.
Hocete npedna3Hn pbkABuN.
N3nCKBaHe:
YpeBte n3KNIOUeHOT 3aXpaHbHeTo.
YpeIbTe n3KJIoueH OT BoDcHa6nTEnHaTa MpeXa.
Bparatae cbaneha. 10
3.6.1 CbAJaHe Ha KOMnOHeHTNe Ha BpaTaTa
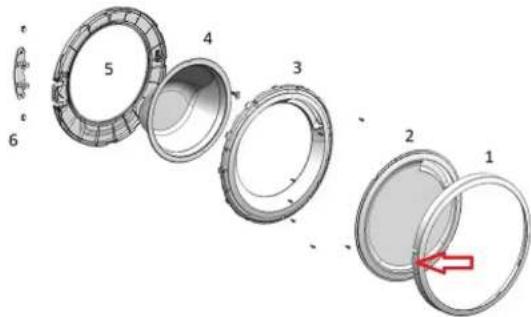
Pa3rno6eTe BpaTata OTBbH HABbTpco.
3.6.2 MoHTnpaHe Ha KOMNOHEHTUte Ha BpaTaTa
MOHTnpaTBeB o6paTeH peI.

PemOH
3.7CMHaHa yyIbTHHeHMeTo Ha BpaTaTa

BHNMATEJIHO
Octpn y6b0e HaopnHbAHHoT o npor3BaHe
Hocete npedna3n pbkabu.

BHIMATEJIHO
Pnck O T npaun qactn nopadn pa3xna6eHn BnHTOBe!
HapaHbAHe npaPi ndaun YacTn.
3akpenete KOMnoHEHTa, Taka Ye da He naHe.

BHIMAHINE!
Pnck ot nadaun yactn nopadn pa3xna6eHH BHTOBe! Npbepa HApnyr hactn Ha ypea Hb DOMA HKnHENT TO.
3akpenete KOMNOHeHTa, Taka Ye Da He naHe.
N3nCKBaHe:
YpeDbTe N3KJIIOUeHOT 3aXpaHbHaHeTO.
YpeBt E N3KJIoueH OT BODOChA6DNTenHaTa MpeJa.
YekmengkeTo 3a nepunHnnpenapaTe cBaaneHo.→8
BpataTa e cBaeneHa.→10
KanakbHaHnOMnTa eCBaneH,→19
3.7.1 CbJIaHe Ha yIyIbTHHeHnETo Ha BpaTaTa
1.


PNEyPEXDEHNE
Ppnn3BaHe Ha KaNoHenuypeeni!
KoctHn dpaektpn/HapaRaHHn OT npema3BaHe
Ykpenete ypeDnTe cpeu npnnb3BaHe.
NoBnHHeTe ypea Otnpe.
- Paxna6e BnHToBte B DonHa TaC HnpeHnnaHn (1).
3.CnycheTe ypeDaHaonny.

PemOH
- OTePahETe BnHToBete B 6bnaCTa Ha nomnata (2).5.1. Pa3Xna6e BnHToBete ot3ad Ha ypeDa (1).
2.CBane roponpaaboHnnot (2,3).
Pnck OT naaun yactn nopadn Hnpabunen MOHTax!
HapaHbBaHe nn nobpeXdaHe Ha ypeHa.
HaterHete npTnCKaunna pBCTen Ha yNtHeHMeTo Ha bpaTaTa 3.4 Nm.
MoHTnpaTBeBobpaTeHpe.

PemOH
3.8CMHaHaKJIOHaBaPaTaTa
Kato npo3BODIeH NHE CME 3aBbJIeHN Da npoeOCTaBM HA noTpe6NIteNtE Kato
peepBa HAcT KIOUAnJa 3a Bpata, BIKIOENTENHO IHCTpyKJy3a 3ePOEMHT B cBOT-
BETCTNE C PernAmHe (EC) 2019/2023. BxMxNCAnH DA otB6eKHM O6ae, 4e
CneL CMHATA Ha KNIOChkATA Ha Bpata, e Heo6XoDmO Da ce H3BbpHn ENEKTPO
TEXHHNECKA NPOBepKa 3a BeOnaOHCT ON KBANPHINAP HEnKTPOTeXHK, Pnpd ype
Bt Da 6bde Ncchat B EKCNNoaATuqr. ToBA Nlue TpRaBA Da 6bde CnotBpDeHa KBA
fHnKCaHcua CBnAcho CneCuHnHnHTe 3a CTPaHAta 3aKOHn, paoNpeDn C tAHApTn
OTIACHOCT
Pnck OT TKOB ydap npaH nuactn noHanpeKeHne!
OnachocT 3a Jxmbota ot TokOB ynap B cnuyaHa HenpaBnneH peMOHT
EneKtpnue TaeTn Tp8Ba da ce pmoHTnpaT OT KbaHnHnPAH neneKtpoTeKHn
CnepemOnTaT6BaJaCeN3BbPmI npOBepKa 3a 6E30NaCHOCTcBrlacHO VDE0701 mB CbOTBeTCTBHe CbC nEuHHTe 3a cTpaHata paope6M.
BHNMATEJIHO
Octpn p6oBe Ha Kopnycal HapaHaaHnO t np3BaHe Hocete npedanshpKaBn
PTEUYPTPEJDEHNE
Ppnnn3BaHa He HaknoHneH ypeDn! KocTHn fpaKtpyn/HapaHbAaBn ot npMa3BaHe Ykpenete ypeDncrepuy npnnBbae.
BHNMATEJIHO
Pck ot nadaa qactn npadpa3xna6eHN BHTOBe! Hapanahe npadn nadaa qactn. 3akpenete KOMPOHETA, taKa ye da He naHe.
BHMAHHE!
Pnck O T nadaun yactn nopadn pa3xnaabeH BNHTOBe!
Pnpeda Hn pyrnn cactn Ha ypea nn B DOMa Ha KNHeTA, HAp. DbHO- 3akpenete KOMnoHETa, Taka Ye Na He naHe.
m3nckbaHe:
YpeBt en3KNIOueHOT 3aXpaHbAHeTO.
YpeBt en3KIOHcH OT BOIOCHA6dIeNTHaT MaPexa.
Ypeinte ca CBO6oHNO DOCTbHN.
TogHnT paoboteH nnot e CBaneH.→6
ΦacadHnT nHaen e CBaHeN.
BpaTaTa e cBanHe.→10
O6Tgauunr npbctHe cBaeH.
PpeHnT nHeI e cBaeH.
YnnbTheHHeTo Ha BpaTaTa e CBAneHO.
3.8.1 CbānHe Ha KlnouaKaTa Ha BpaTaTa
1.ИЗкючeteцencelaHaKIOUAnkataHaBpaTaTa.
2.Ocbo6oJeTe KIOHAnKaTa Ha BpaTata.

3.CbaneTe KIOHuaKata Ha BpaTata.

PemOH
3.8.2 MoHTmpeHa KJIIOUaJIkAraHa BpaTaTa
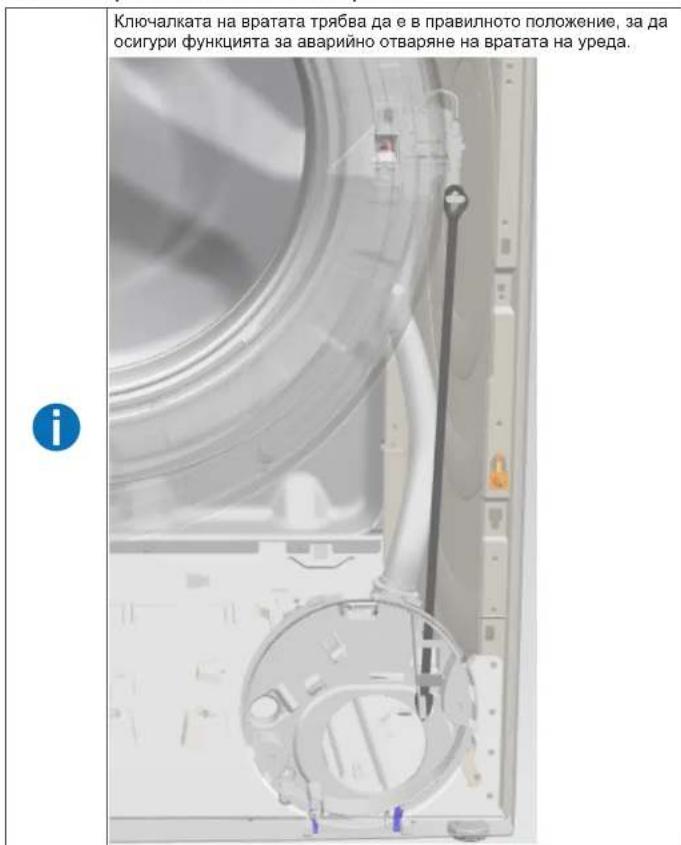
MOHTnpaTBeBobpaTeHpe.
MOnHTnpaIteB06paTeHpeI.

PemOH
3.10 CMHa Ha kanaka Ha nomnTa
N3nCKBaHe:
YpeBbTe H3KnIOueHOT 3axpaHBAHeTo.
YpeBtE n3KNIOueH OT BOOCHa6nTENHa Mpeka.
3.10.1 CbajrHe Ha kanaka Ha nomnata
MoHTnpaIeB06paTeHpei.

PemOH
3.11 CMnHa Ha npedHnaHn

BHIMATEJIHO
Octpn p6bOBe h kopnycA HaparabHnAn OTO npra38aHe
Hocete npedna3Hn pKabu.
M3nCKBaHe:
YpeDbTe N3KJIoueHOT 3aXpaHbHaHeTo.
YpeIbTe H3KNIOUeHOT BOIOOChA6DNTENHaTAt MPexa.
YekMedjKeTo 3a nepuHnna npenapat e cBaaneHo.→8
Bpatatae cbaneha.→10
YnnbTHHeHMeTo Ha BpaTaTa e CbaJeHo.
KanaKaT Ha NOMNaTa e CBaJeH.→19
3.11.1 CbAJIHe Na npEaHn naHEn
1.


PDEUYPEXKDEHNE
Ppnnn3BaHe Ha KaHNOHeH ypei! KocTHn cpaKtpyn/HapaNBAHOn OT npMa3BaHe Uykenete ypeJeTce pseU npnn3BaHe.
NoBdHHeTe ypea Otnpei.
2.CBaneTe BnHToBeTe OToIy(1).

3.CnycheTe ypeHaHaoNy.

PemOH
4.1.CBANETE BINTOBETE(1).
- M3b7aIte rOpHNA pa6oTeH NIO T KbM 3aDmH KpA h Na ypeA (2). 3.PnemEte rOpHNA pa6oTeH NIO T HArOPE (3), 3a Da o CBAHNTe,

5.1.Canete BHTOBete(1)
2.OcbobodeTe KpeenexHnTe eIemehtn (2,3).
6.CBaIeTe paacdHnaHn.

7.

BHUMATEJHO
PCKOTndaanu chaTn npaRn pa3xaBcHn BHTOBe! Haparbahe no npaRnndaanu chaTn.
3akpenete KOMnoHEHTa, Taka Ye da He naHe.

PemOH

BHIMAHNEI
Pnck OT naaun nactn nopda pa3xna6ehn BnHOBe! NobpeHa npyn nactn Ha ypeDa HmB dOma Ha KInHeHTa, HAnp. dbHOTo.
3akpenete KOMNOHHTa, TaKa Ye Da He naDHe.
CbaIeTe BnHTOBeTe Otnpei, KaTo 3anOuHHeTe OTdony Harope (2, 3).
- CbaTe npednnaHn
3.11.2 MoNTIpaHHe Ha npEaHnnaHEn
MOnTnpaIeB06paTeH peI.
Poraneni padajicimi dily.
Zajistete Jednotlivé soucasti préd padem.


Nebezpeci padajicich dilu kvuli uvolnemyn smrobum!
Poskozeni jin'ych caski spotfebe nebo prvku domacnosti zakaznika, napr. podlachy.
Zajistetejednotlive soucasti prdf padem.
Požadavek:
Sorg for at sikre apparater mod at glide.


Fare for nedfaldende dele pga. Iosnede skruer!
ersonskade pga. nedfaldende dele.
Sorg for at sikre componenten mod at falde ned.
Sorg for at sikre componenten mod at falde ned.
Preindstilling:
- Abn pumpens afdaekning.
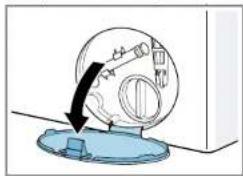
- Fjern pumpens afdaekning.
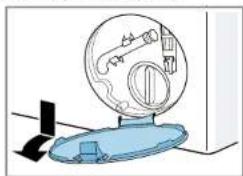
Sorg for at sikre apparater mod at glide
Loft apparentopifronten.
- Fjern skruerne foreden (1).

- Sænk apparatet ned.

Reparation
4.1.Fjernskruerne (1).
- Skub toppladen bagud pa apparatet (2).
- Bevag toppladen opad (3) for at fjerne den.

5.1.Fjernskruerne (1).
- Frigor laseelementerne (2, 3).
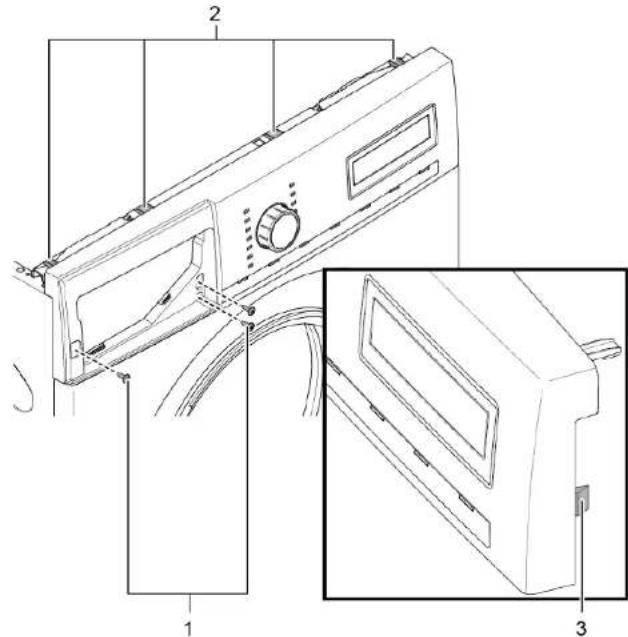
- Fjern betjeningspanelet.

7.
PASPAI
Fare for neddalfende dele pga. lnsnede skrurer! Personskade pga, neddalfende dele.
Sorg for at sikre componenten mod at falde ned.

Reparation

BEMERKI
Fare for nedfaldende dele pga. Isnnde skruer!
Sorg for at sikre componenten mod at falde ned.
Fjern skruerne pa fronten ved at starte nedefra og op (2, 3).
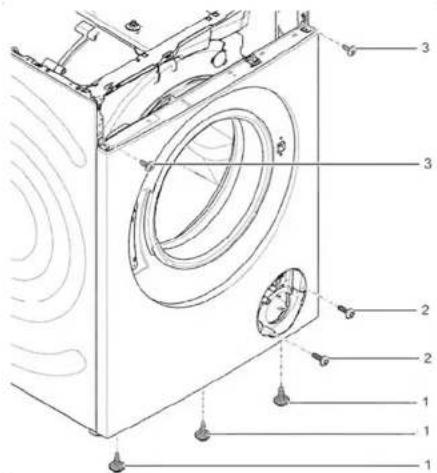
- Fjern frontpanelet.
3.11.2 Montering af frontpanel
Repair hints - Washing machine
1 Concerning this document. 108
1.1 Important information 108
1.1.1 Purpose 108
1.2 Explanation of symbols 108
1.2.1 Danger levels 108
1.2.2 Hazard symbols 108
1.2.3 Structure of the warnings.. 109
1.2.4 General symbols 109
Tools and aids. 110
Repair 111
3.1 Replacing worktop 111
3.1.1 Removing worktop 111
3.1.2 Installing worktop 111
3.2 Replacing fascia panel 112
3.2.1 Removing fascia panel 112
3.2.2 Installing fascia panel 112
3.3 Replacing detergent drawer 113
3.3.1 Removing detergent drawer 113
3.3.2 Installing detergent drawer 113
3.4 Replacing detergent drawer handle 114
3.4.1 Removing detergent drawer handle 114
3.4.2 Installing detergent drawer handle 114
3.5 Replacing door 115
3.10 Replacing pump cover 124
3.10.1 Removing pump cover 124
3.10.2 Installing pump cover 124
3.11 Replacing front panel 125
3.11.1 Removing front panel 125
3.11.2 Installing front panel 127
Concerning this document
1.1.1 Purpose
These repair hints support consumer to repair appliances by himself according to the applicable eco-design regulation (as of 03/2021).
They contain information how to exchange defined spare parts including warnings and risks.
In case of questions, please contact our customer service. We will only be liable for damages if the repair hints have been followed properly.
1.2 Explanation of symbols
1.2.1 Danger levels
The warning levels consist of a symbol and a signal word. The signal word indicates the severity of the danger.
Table 1: Danger levels
| Warning level Meaning |
| Danger | Non-observation of the warning message will result in death or serious injuries. |
| Warning | Non-observation of the warning message could result in death or serious injuries. |
| Caution | Non-observation of the warning message could result in minor injuries. |
| Notice | Non-observation of the warning message could result in damage to property. |
1.2.2 Hazard symbols
Hazard symbols are symbolic representations which give an indication of the kind of danger.
The following hazard symbols are used in this document:
| Hazard symbol Meaning | |
| ! | General warning message |
| Danger from electrical voltage |
| Risk of explosion |
| Danger of cuts |
| Danger of crushing |
Concerning this document
| Hazard symbol Meaning | |
| Danger from hot surfaces |
| Danger from strong magnetic field |
| Danger from non-ionizing radiation |
Table 2: Hazard symbols
1.2.3 Structure of the warnings
Warnings in this document have a standardised appearance and a standardised structure.

Danger
Type and source of danger!
Possible consequences of ignoring the danger / warning.
Measures and prohibitions for preventing the danger.
The following example shows a warning that warns against electric shock due to live parts. The measure for avoiding the danger is mentioned.

Danger
Risk of electric shock due to live parts!
Death by electrocution
- Disconnect appliances from electrical supply at least 60 seconds before starting repairs.
1.2.4 General symbols
The following general symbols are used in this document:
| Gen. symbol Meaning | |
| 1 | Identification of a special tip (text and/or graphic) |
| i | Identification of a simple tip (only text) |
| Identification of a link to a video tutorial |
Table 3: General symbols
| Gen. symbol Meaning | |
| Identification of required tools |
| Identification of required preconditions |
| Identification of a condition (if ..., then ...) |
| Identification of a result |
| [Start]Identification of a key or button | |
| [00123456] Identification of a material number |
| Status Identification of displayed text / window(in the appliance's display) |

| Designation Details Images | |
| Auxiliary tool [15000155] | Tool for loosening out of plastic parts | |
| Screwdriver Torx T20 with bore hole [00340764] | 100 mm, for screws with safety pin | |
| Torque spanner [15000441] | Torque spanner 20 - 100 Nm | |
| Slot screwdriver [00340854] | Blade 3.5 mm x 0.6 mm x 100 mm, Protective Insulation 1000 V AC | |
| Slot screwdriver [00340855] | Blade 5.5 mm x 1.0 mm x 125 mm, Protective Insulation 1000 V AC | |
| Needle-nose pliers, angled pattern [00341269] | Length 200 mm | |
| Side-cutting pliers [00342182] | Length: 200 mm | |
| Designation Details Images | |
| Combination wrench [00340811] | Wrench size 10°mm, M6 | |
| Combination wrench [00340814] | Wrench size 13°mm, M8 | |
| Combination wrench [00340817] | Wrench size 17 mm, M10 | |
| Combination wrench [15000459] | Wrench size 16°mm, M10 | |

Repair
3.1 Replacing worktop
Required tools:
Torx Bit TX20 with hole, long 6.3^ (1/4^) 152^ , for screws [00341272] with safety pin
Prerequisite:
Appliance is disconnected from power supply.
Appliance is disconnected from water supply.
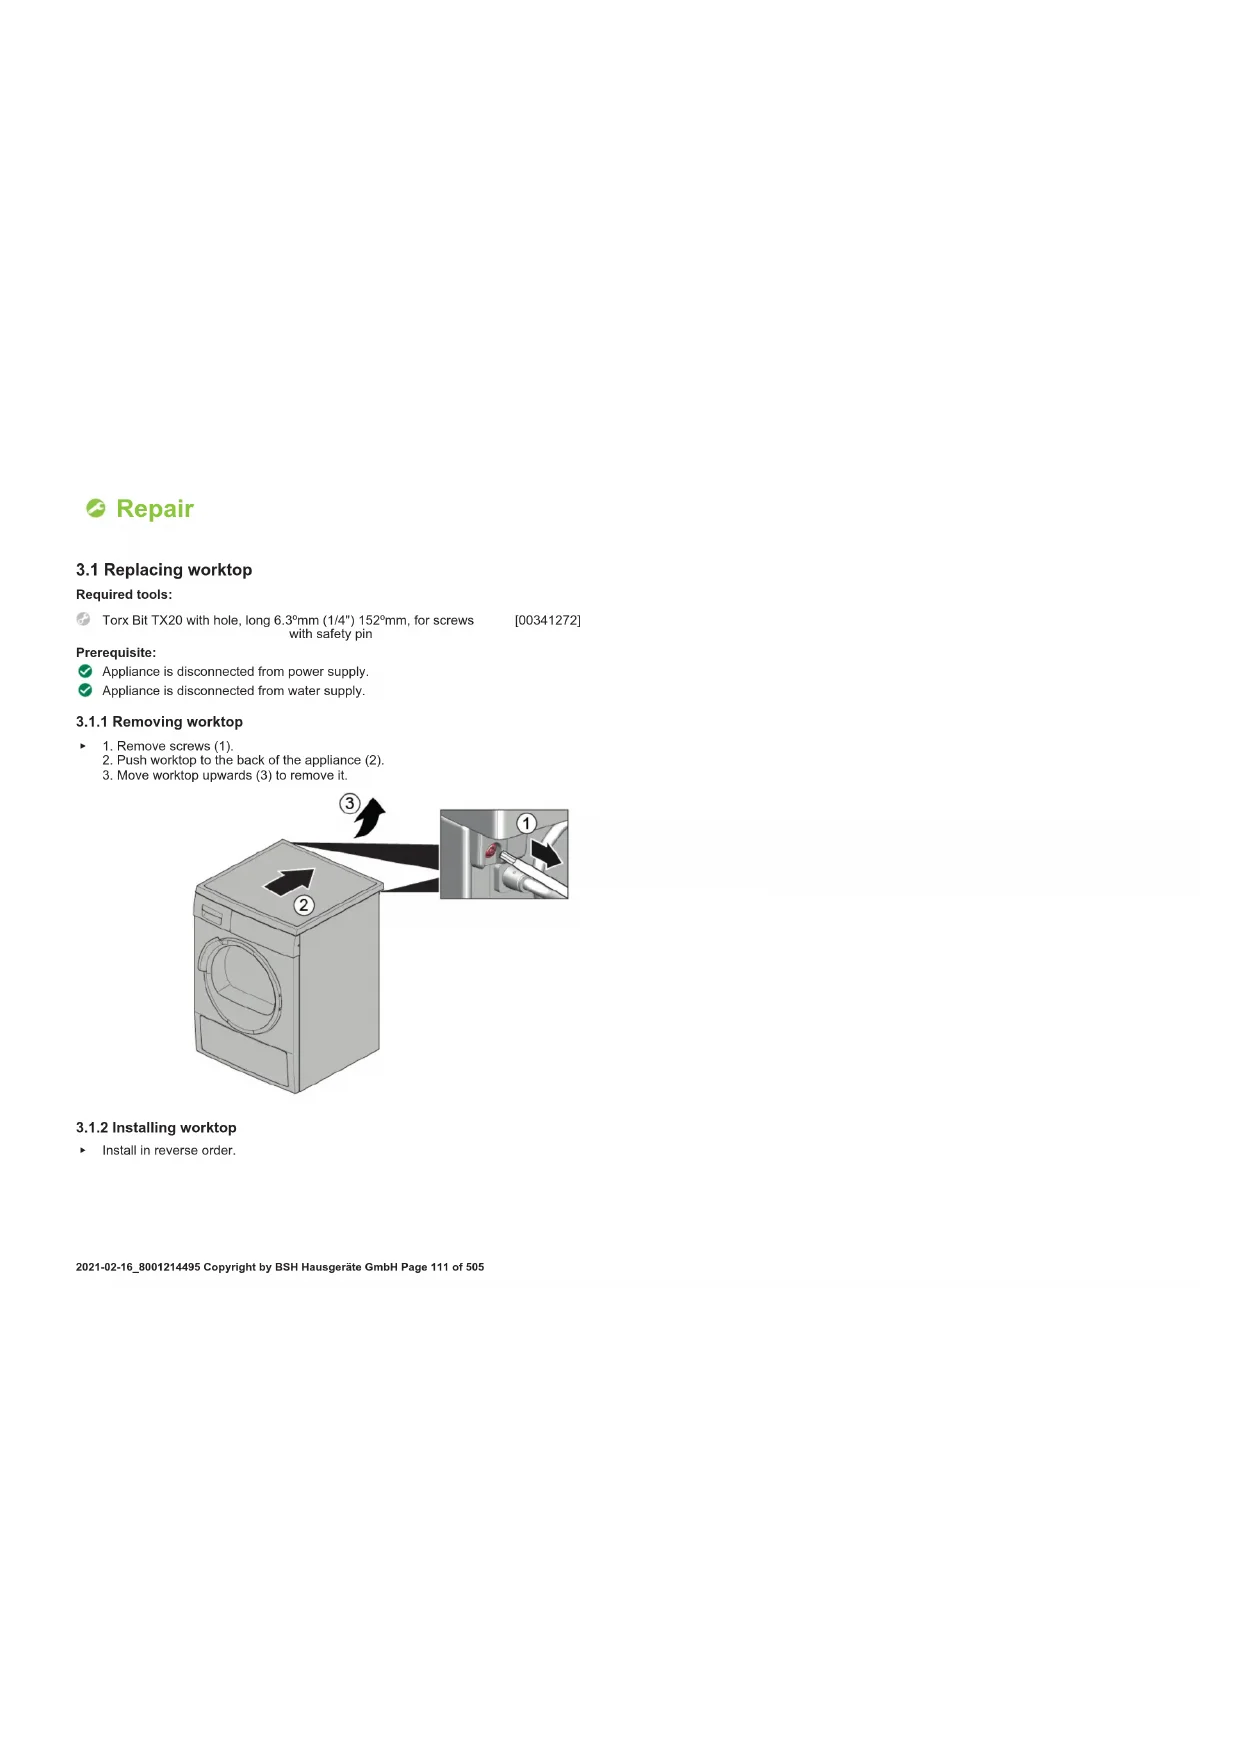
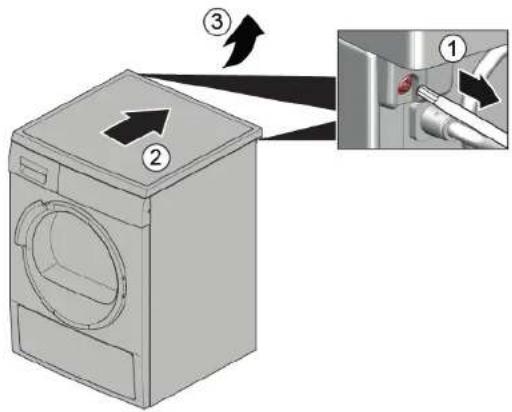
3.1.1 Removing worktop
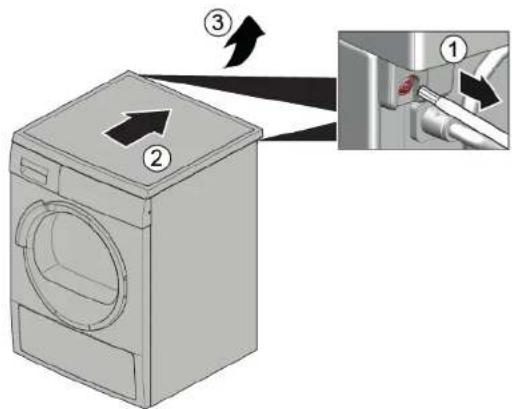
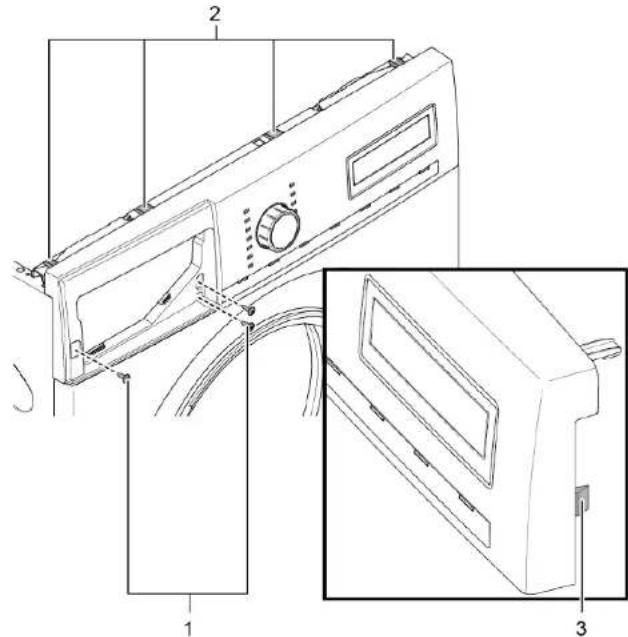
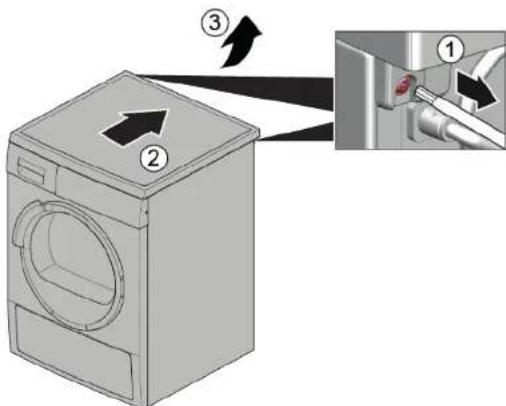
- Remove screws (1).
- Push worktop to the back of the appliance (2).
- Move worktop upwards (3) to remove it.
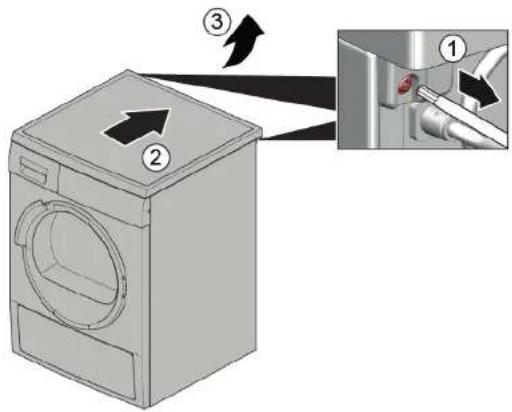
3.1.2 Installing worktop
Install in reverse order.

Repair
3.2 Replacing fascia panel

Sharp housing edges!
Cut injuries
Wear protective gloves.

Slipping of tilted appliances!
Bone fractures / crush injuries
Secure appliances against slipping.

Risk of falling parts due to released screws!
Injury because of falling parts
Secure component from falling down.

Risk of falling parts due to released screws!
Damage to other parts of the appliance or at customers home e.g. bot
tom.
Secure component from falling down.
Prerequisite:
Appliance is disconnected from power supply.
Appliance is disconnected from water supply.
Worklop has been removed. Page 111
Detergent drawer has been removed. Page 113
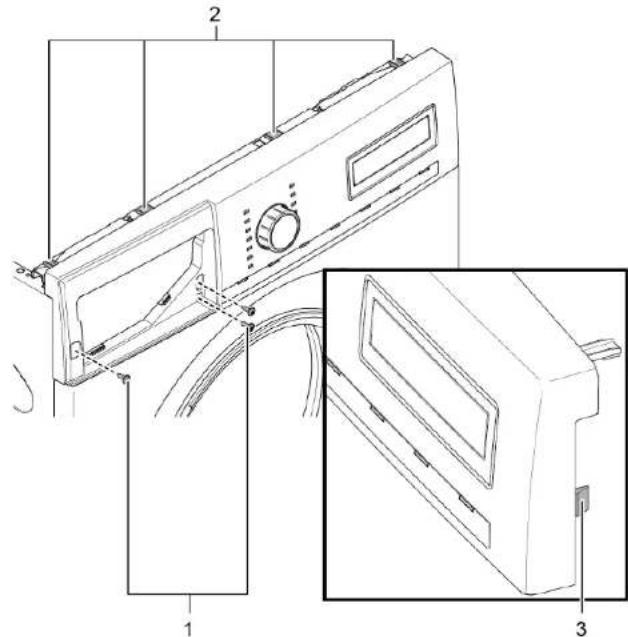
3.2.1 Removing fascia panel
-
- Remove screws (1).
-
Release catch elements (2, 3).
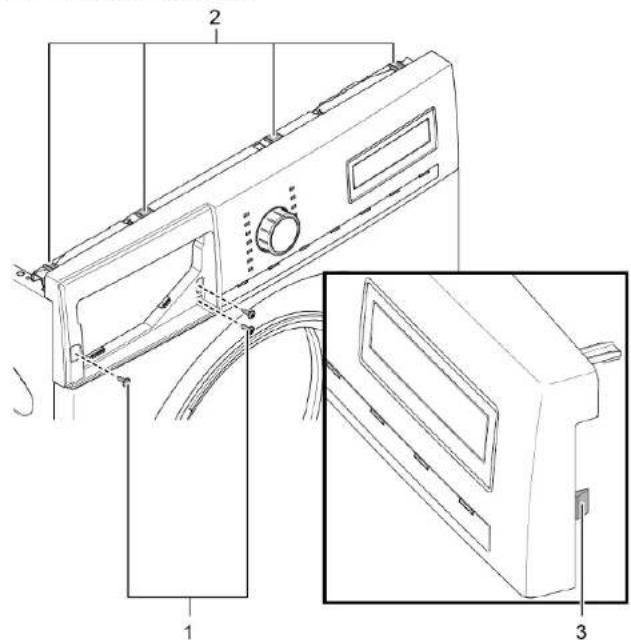
- Release plug contact of control unit.
- Remove fascia panel.
3.2.2 Installing fascia panel
Install in reverse order.

Repair
3.3 Replacing detergent drawer
Prerequisite:
Appliance is disconnected from power supply.
Appliance is disconnected from water supply.
3.3.1 Removing detergent drawer
- Pull out detergent drawer.
2.1. Press down on insert (1)

2. Remove detergent drawer (2).
3.3.2 Installing detergent drawer
Install in reverse order.

Repair
3.4 Replacing detergent drawer handle
Prerequisite:
Appliance is disconnected from power supply.
Appliance is disconnected from water supply.
Detergent drawer has been removed. Page 113
3.4.1 Removing detergent drawer handle
- Release catch elements.
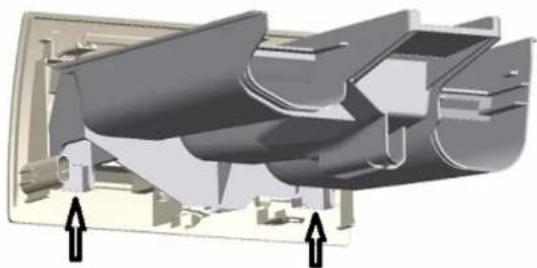
- Remove detergent drawer handle.
3.4.2 Installing detergent drawer handle
Install in reverse order.

Repair
3.5 Replacing door
Caution
Open hinge area!
Finger crushing / entrapment
Do not reach into the hinge area.
Wear protective gloves.
Prerequisite:
Appliance is disconnected from power supply.
Appliance is disconnected from water supply.
Door is opened.
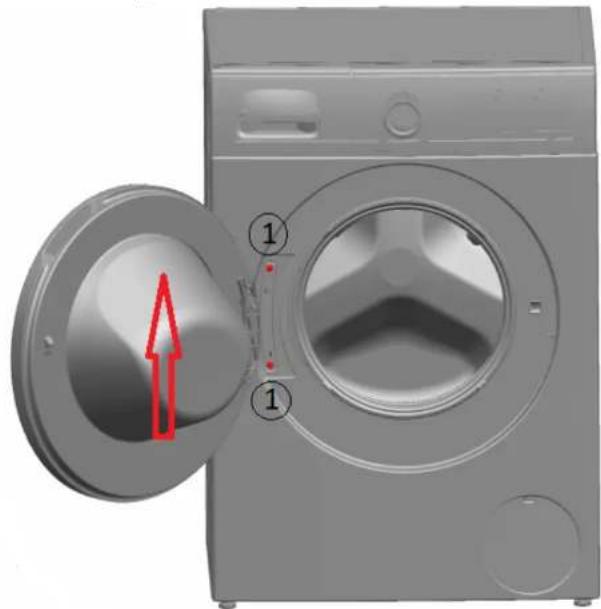
3.5.1 Removing door
1.

Notice
Risk of falling parts due to released screws!
Damage to other parts of the appliance or at customers home e.g. bottom.
- Secure component from falling down.

Caution
Risk of falling parts due to released screws!
Injury because of falling parts.
- Secure component from falling down.
Remove screws (1).
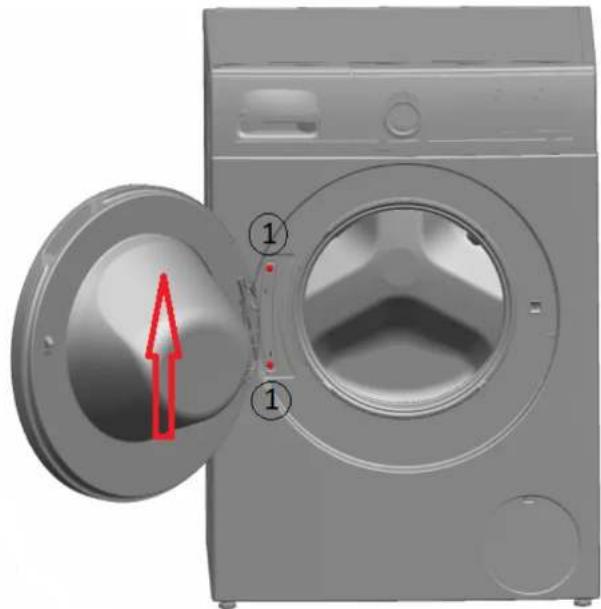
- Remove door upwards.
Install in reverse order.

Repair
3.6 Replacing door components
Caution
Open hinge area!
Finger crushing / entrapment
Do not reach into the hinge area.
Wear protective gloves.
Prerequisite:
Appliance is disconnected from power supply.
Appliance is disconnected from water supply.
Door has been removed. Page 115
3.6.1 Removing door components
Disassemble door from outside to inside.
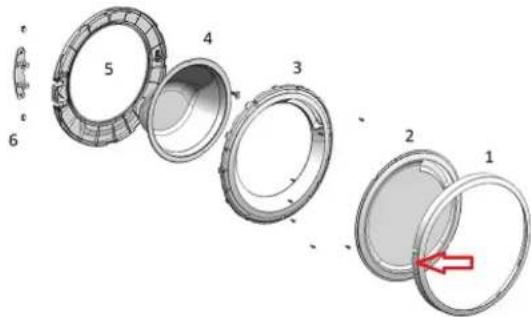
3.6.2 Installing door components
Install in reverse order.

Repair
3.7 Replacing door seal


Sharp housing edges!
Cut injuries
Wear protective gloves.


Risk of falling parts due to released screws!
Injury because of falling parts.
- Secure component from falling down.

Risk of falling parts due to released screws!
Damage to other parts of the appliance or at customers home e.g. bot
tom.
Secure component from falling down.
Prerequisite:
Appliance is disconnected from power supply.
Appliance is disconnected from water supply.
Detergent drawer has been removed. Page 113
Door has been removed. Page 115
Pump cover has been removed. Page 124
Slipping of tilted appliances!
Bone fractures / crush injuries
Secure appliances against slipping.
Lift up appliance at front.
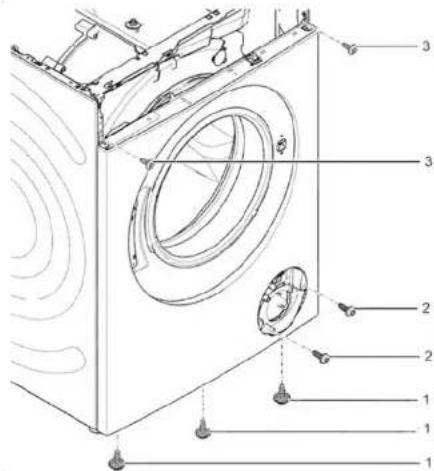
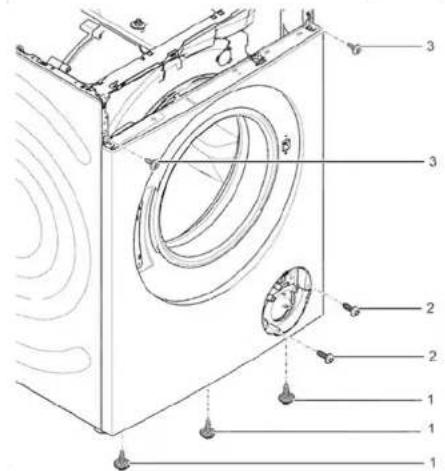
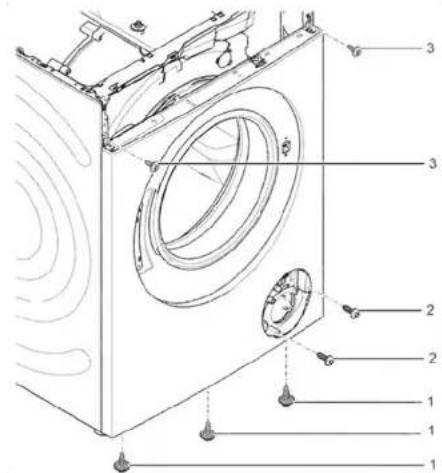
- Release screws at bottom of front panel (1).

- Lower appliance down.

Repair
- Remove screws in pump area (2). 5. 1. Release screws at back of appliance (1).
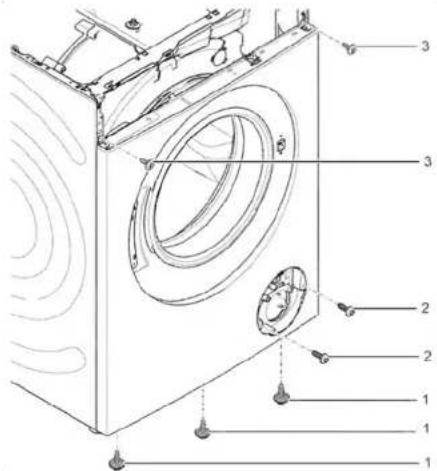
- Remove worktop (2, 3).

Repair
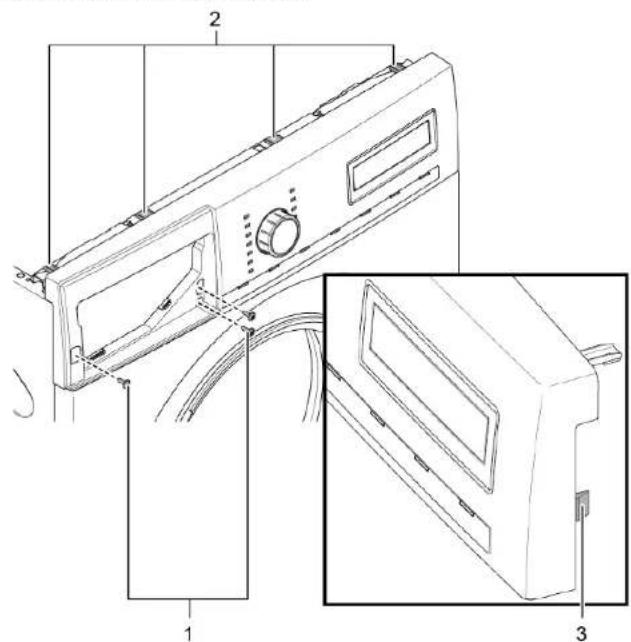
6.1. Remove screws (1).
- Release cat elements of fascia panel (2, 3).
- Release screws of dispenser housing.
-
Remove fascia panel.
-
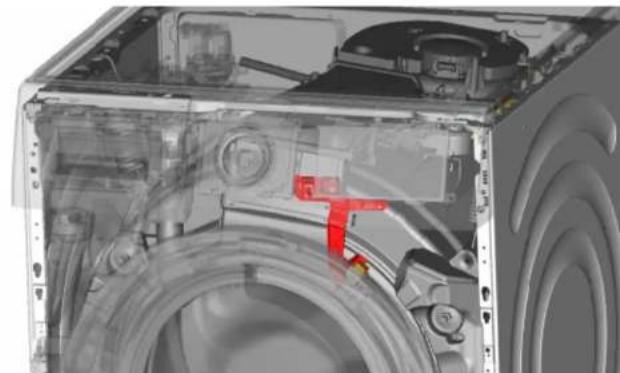
Remove drum light holder at top.


Notice
Risk of damaged surface! Surface of appliance can be scratched by using wrong tools. Only use plastic tools to replace the tension ring.
Remove tension ring from gasket with a plastic tool.
- Release door seal from front panel.
- Release cable connector from door lock.

Repair
- Release screws on top of front panel (3).
-
Remove front panel.
-
Release all hose connections.

- Remove door seal.
Risk of falling parts due to incorrect installation! Injury or damage to the appliance.
Tighten tension ring of boot gasket with 3,4 Nm.
Install in reverse order.

Repair
3.8 Replacing door lock
As a manufacturer, we are obliged to provide consumers with the spare part door lock including repair instructions in accordance with Regulation (EU) 2019/2023. However, we would like to point out that after replacing a door lock, an electrotechnical safety test by a qualified electrician is required before the device is put into operation. This person must be verifiably qualified according to the country-specific laws, regulations and standards.

Risk of electric shock due to live parts!
Danger to life through electric shock in case of improper repair
After the repair have a safety test according VDE 0701 or country-specific regulations performed.

Sharp housing edges!
Cut injuries
Wear protective gloves.


Slipping of tilted appliances!
Bone fractures / crush injuries
Secure appliances against slipping.

Risk of falling parts due to released screws!
Injury because of falling parts.
- Secure component from falling down.

Risk of falling parts due to released screws!
Damage to other parts of the appliance or at customers home e.g. bottom.
- Secure component from falling down.
Prerequisite:

Appliance is disconnected from power supply.

Appliance is disconnected from water supply.
Appliances is freely accessible
Worktop has been removed. Page 111
Fascia panel has been removed.
Door has been removed. Page 115
Tension ring has been removed.
Front panel has been removed.
Door seal has been removed.
- Disconnect door lock plug.
- Release door lock.

- Remove door lock.

Repair
Install in reverse order.

Repair
3.9 Replacing drum light


Sharp housing edges!
Cut injuries
Wear protective gloves.

Slipping of tilted appliances!
Bone fractures / crush injuries
Secure appliances against slipping.

Risk of falling parts due to released screws!
Injury because of falling parts
- Secure component from falling down.

Risk of falling parts due to released screws!
Damage to other parts of the appliance or at customers home e.g. bot
tom.
Secure component from falling down.
Prerequisite:
Appliance is disconnected from power supply.
Appliance is disconnected from water supply.
Appliances is freely accessible.
Worktop has been removed. Page 111
Detergent drawer has been removed. Page 113
Fascia panel has been removed.
3.9.1 Removing drum light
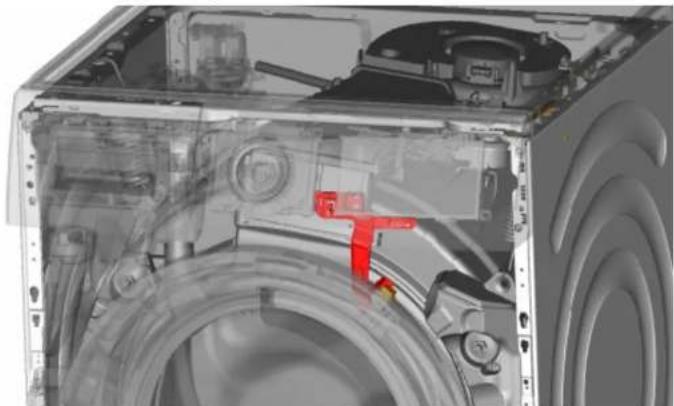
- Pull drum light holder out of appliance.
- Disconnect electrical connections.
- Remove drum light from drum light holder.
3.9.2 Installing drum light
Install in reverse order.

Repair
3.10 Replacing pump cover
Prerequisite:
Appliance is disconnected from power supply.
Appliance is disconnected from water supply.
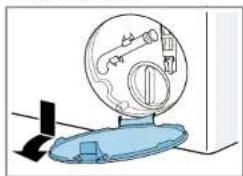
3.10.1 Removing pump cover
- Open pump cover.

- Remove pump cover.
3.10.2 Installing pump cover
Install in reverse order.

Repair
3.11 Replacing front panel

Prerequisite:
Appliance is disconnected from power supply.
Appliance is disconnected from water supply.
Detergent drawer has been removed. Page 113
Door has been removed. Page 115
Door seal has been removed.
Pump cover has been removed. Page 124
3.11.1 Removing front panel
1.

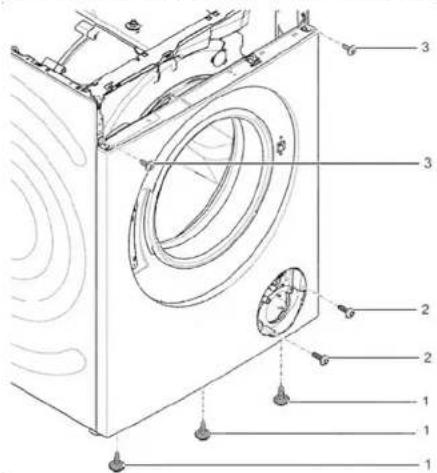
Lift up appliance at front.
- Remove screws at bottom (1).

- Lower appliance down.

Repair
4.1. Remove screws (1).
- Push worktop to the back of the appliance (2).
- Move worktop upwards (3) to remove it.

5.1. Remove screws (1).
- Release catch elements (2, 3).
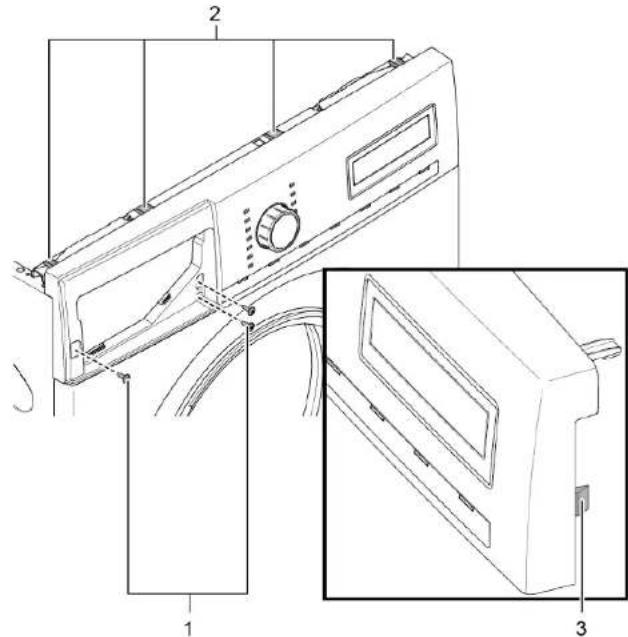
- Remove fascia panel.

7.

Caution
Risk of falling parts due to released screws! Injury because of falling parts.
Secure component from falling down.

Repair
Notice
Risk of falling parts due to released screws! Damage to other parts of the appliance or at customers home e.g. bottom.
Remove screws at front beginning from bottom to top (2, 3).
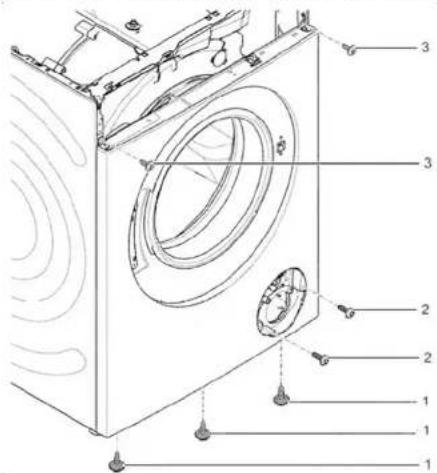
- Remove front panel.
3.11.2 Installing front panel
Install in reverse order.
Remonditeave - Pesumasin
1 Selle dokumendiga seoses 129
1.1 Tahtis teave 129
1.1.1 Eesmärk 129
1.2 Sumbolite selgitus 129
1.2.1 Ohutased 129
1.2.2 Ohusumbolid 129
1.2.3 Hoiatuste struktuur 130
1.2.4 Üldised sumbolid 130
Tooriistad ja abinoud. 131
Remont. 132
3.1 Toopinna yahetamine 132
3.1.1 Toopinna eemaldamine 132
3.1.2 Toopinna paigaldamine 132
3.2 Valispaneeli vahetamine 133
3.2.1 Valispaneeli eemaldamine 133
3.2.2 Valispaneeli paigaldamine 133
3.3 Pesuaine sahtli vahetamine 134
3.3.1 Pesuaine sahtli eemaldamine 134
3.3.2 Pesuaine sahtli paigaldamine 134
3.4 Pesuaine sahtli kaepideme vahetamine 135
3.4.1 Pesuaine sahtli käepideme eemaldamine 135
3.4.2 Pesuaine sahtli kaepideme paigaldamine 135
3.5 Ukse vahetamine 136
3.5.1 Ukse eemaldamine 136
3.5.2 Ukse paigaldamine 136
Tabel 1: Ohutasedmed
1.2.2 Ohusumbolid
m = 311 ;
PERIGO
m = 311
Risco deCHOque eltrico devidao a partes sob tensao!
- Remova o painei frontal.
3.11.2 Instalar o painei frontal