
Keypad - Alarm system eufy - Free user manual and instructions
Find the device manual for free Keypad eufy in PDF.
| Product Type | Wireless Alarm Keypad |
| Brand | eufy |
| Model | Keypad |
| Power Supply | Rechargeable 2600 mAh battery, charges via micro USB (5V=1A) |
| Battery Life | Up to 6 months (full battery) |
| Security Modes | Away, Home, Custom, Disarmed |
| Wireless Communication | Sub-GHz, frequency 866-866.8 MHz |
| Compatibility | eufy Security HomeBase |
| Maximum Keypads per System | 3 |
| Maximum Access Codes | 6 |
| LED Indicator | Blue, red, white (blinking or solid depending on state) |
| Built-in Motion Sensor | Yes |
| Emergency Alarm Button | Yes, press and hold for 3 seconds |
| Mounting | 3M adhesive or screws (mounting bracket included) |
| Operating Temperature | -10°C to 50°C |
| Storage Temperature | -20°C to 60°C |
| Warranty | 12 months |
| Box Contents | Keypad, micro USB charging cable, 3M adhesive, stickers x2, welcome card, mounting bracket |
Frequently Asked Questions - Keypad eufy
User questions about Keypad eufy
0 question about this device. Answer the ones you know or ask your own.
Ask a new question about this device
Download the instructions for your Alarm system in PDF format for free! Find your manual Keypad - eufy and take your electronic device back in hand. On this page are published all the documents necessary for the use of your device. Keypad by eufy.
USER MANUAL Keypad eufy
Anker Innovations Limited. All rights reserved. eufy Security and eufy Security Logo are trademarks of Anker Innovations Limited, registered in the United States and other countries. All other trademarks are the property of their respective owners.
Model: T8960
51005002528 V03
| English | 01 |
| Deutsch | 17 |
| Español | 33 |
| Français | 48 |
| Italiano | 63 |
| Nederlands | 78 |
| Português | 92 |
| لعربيya | 106 |
TABLE OF CONTENTS
| What's Included | 02 | 12 | Charging Your Keypad |
| Product Overview | 03 | 12 | OTA Update |
| Adding the Keypad to the System | 04 | 13 | Resetting Your Keypad |
| Mounting Your Keypad | 05 | 13 | Specification |
| Using the Keypad | 07 | 13 | Troubleshooting |
| Operating on the eufy Security App | 11 | 14 | Notice |
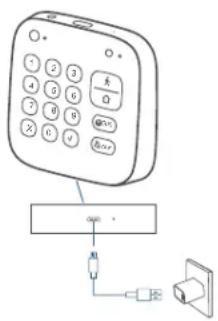
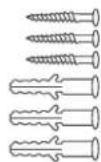
WHAT'S INCLUDED
For Keypad Installation
Keypad T8960
Mounting Screws
User Manual
Charging Cable

3M Adhesive Sticker * 2
Welcome Card
PRODUCT OVERVIEW
Keypad
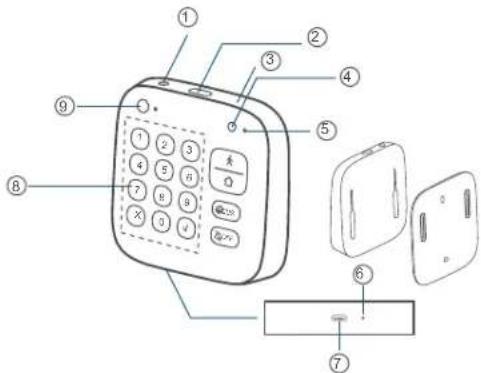
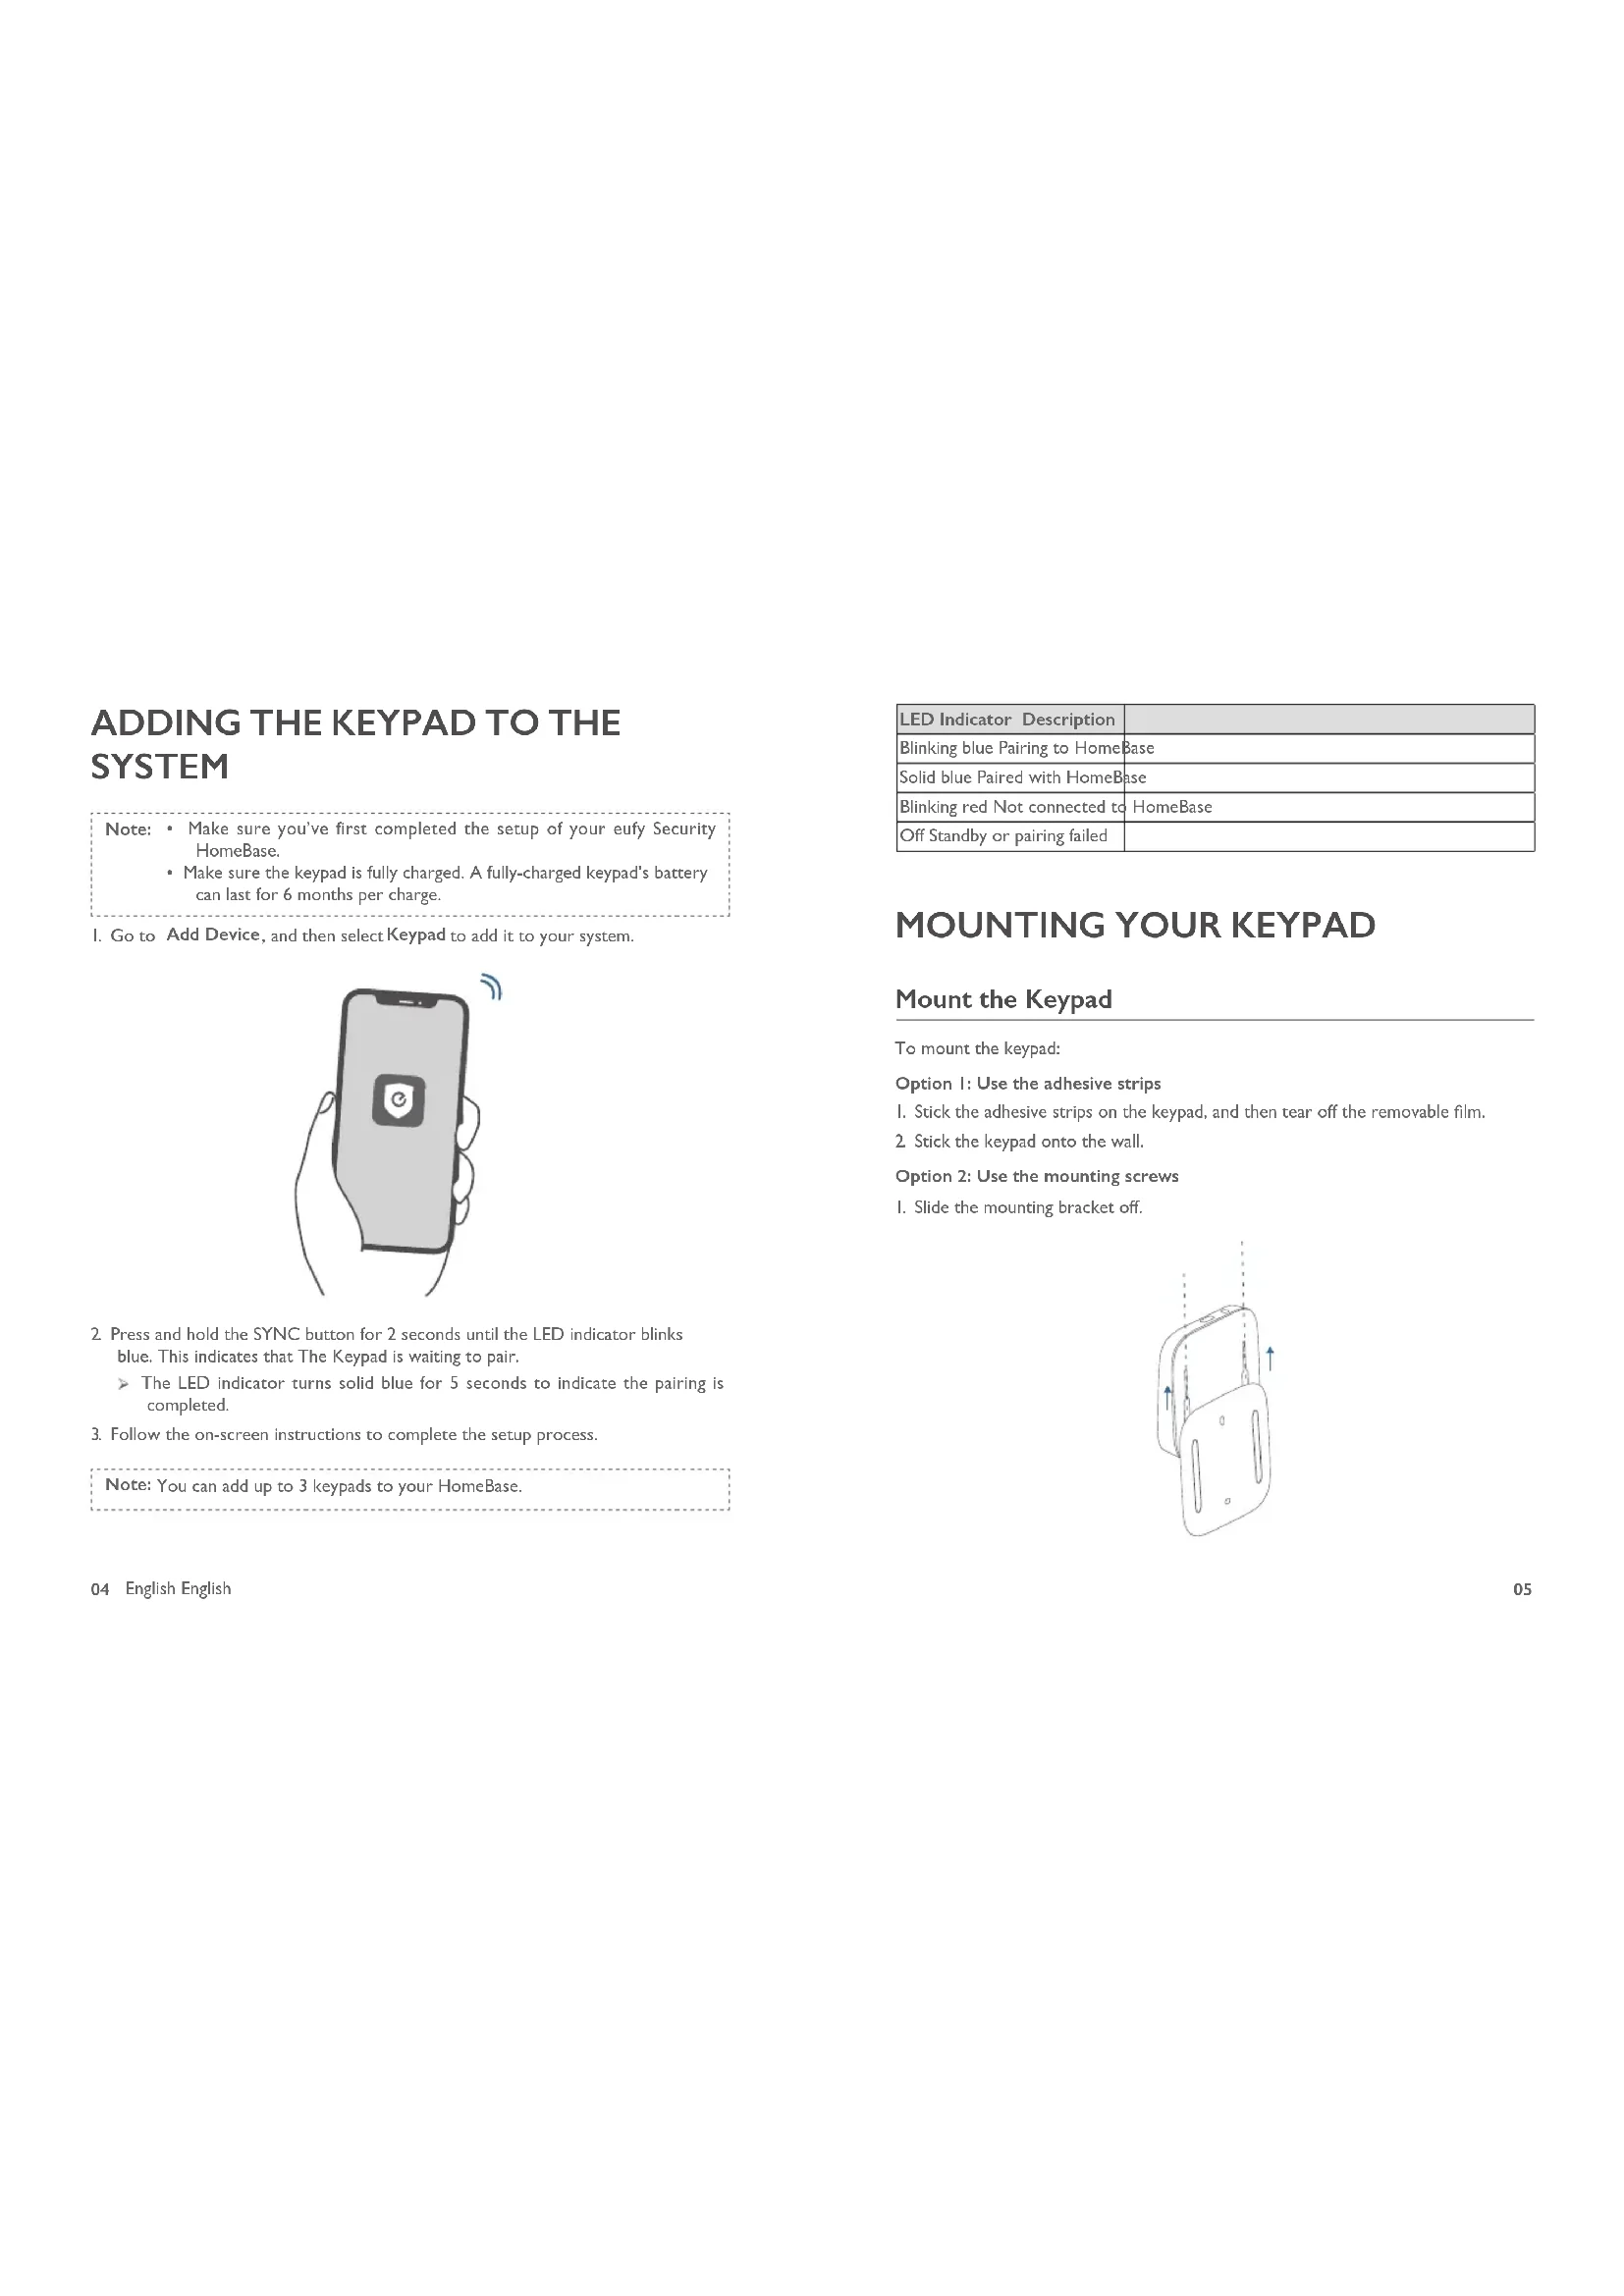
① Panic Button
• Press and hold for 3 seconds to trigger the alarm
② SYNC Button
• Press and hold for 2 seconds to pair with HomeBase
③ Reset
④ LED Indicator
⑤ Buzzer
⑥ Power Indicator
⑦ Micro-USB Charging Port
⑧ Keypad Buttons
⑨ Motion Sensor
ADDING THE KEYPAD TO THE SYSTEM
Note: • Make sure you've first completed the setup of your eufy Security HomeBase.
- Make sure the keypad is fully charged. A fully-charged keypad's battery can last for 6 months per charge.
- Go to Add Device, and then select Keypad to add it to your system.
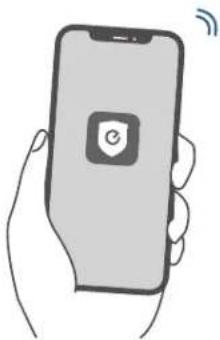
natural_image
Illustration of a hand holding a smartphone with a shield icon and wireless signal waves (no text or symbols)- Press and hold the SYNC button for 2 seconds until the LED indicator blinks blue. This indicates that The Keypad is waiting to pair.
The LED indicator turns solid blue for 5 seconds to indicate the pairing is completed.
- Follow the on-screen instructions to complete the setup process.
Note: You can add up to 3 keypads to your HomeBase.
| LED Indicator Description | |
| Blinking blue Pairing to HomeBase | |
| Solid blue Paired with HomeBase | |
| Blinking red Not connected to HomeBase | |
| Off Standby or pairing failed | |
MOUNTING YOUR KEYPAD
Mount the Keypad
To mount the keypad:
Option I: Use the adhesive strips
I. Stick the adhesive strips on the keypad, and then tear off the removable film.
- Stick the keypad onto the wall.
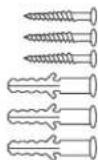
Option 2: Use the mounting screws
I. Slide the mounting bracket off.
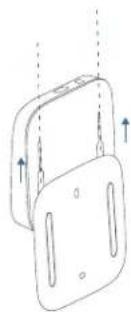
natural_image
Diagram of a mechanical component with two stacked parts and directional arrows indicating movement (no text or symbols)2 Place the mounting plate against the wall, matching UP and Down as indicated on the back of the mounting bracket. Push a pencil tip through the holes on the mounting bracket to mark the location for mounting the keypad.
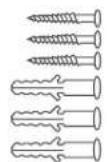
- Drill holes with a drill bit (15/64" / 6 mm) at each marking.
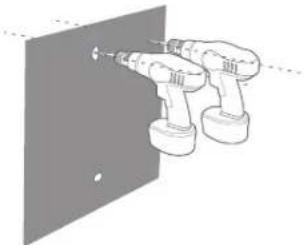
natural_image
Illustration of two electric drill heads mounted on a wall, no text or symbols present- Insert anchors into the holes, and fix the mounting bracket onto the wall with the provided screws. No anchors are needed on wooden walls.
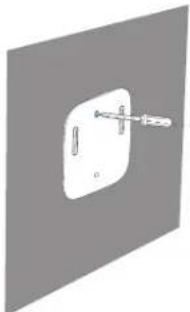
natural_image
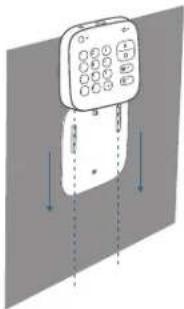
Simple 3D diagram of a rectangular object with a protruding rod, no text or symbols present- Slide the keypad down until it snaps perfectly onto the mounting bracket.
natural_image
Illustration of a mobile phone with control buttons and vertical arrows indicating signal or movement (no text or symbols)USING THE KEYPAD
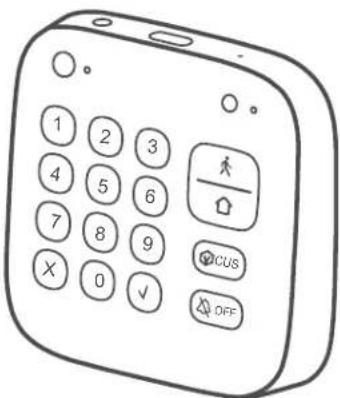
Keypad Mode Introduction
The Keypad features four modes: Away, Home, Customized and OFF, which are associated with four Keypad buttons respectively.
| Away mode: All sensors will be activated and your house will be monitored. The system is armed. Any movement will be detected and an alarm will be triggered. Recommended using when you are away from home. | |
| Home mode: Interior sensors are disabled, while the exterior sensors are activated. Recommended using when you are at home and want to be alerted about any break-ins outside the house. | |
| Customized mode: Recommended if you feel a customized security mode is needed to match your specific life requirements. | |
| OFF mode: No sensors are activated, while the camera is set to ON by default. |
Arm, Disarm and Turn off an Alarm
To arm the system, enter the access code and press the button.
To disarm all the sensors, enter the access code and press the button.
To turn off an alarm, enter the access code and pressy/. The on-going alarm will be turned off with the device's security mode unchanged. When you turn off the alarm, the alarms of all the devices connected to HomeBase will be turned off.
Set Customized Security Mode
To set a customized security mode using the eufy Security app:
-
Open the App homepage.
-
Tap the "Security" tab.
-
Tap the "Modes" tab and then tap "Customize" to add your personalized settings.
-
Follow the on-screen instructions to define the actions of sensors. When the customized mode is activated, the sensors will act as defined in the app.
-
Go to the Keypad homepage, tap "Button Allocation" and assign the customized mode to the Button.
For example, you could customize a "Sleep Mode" in which only certain sensors are monitored and alarms are triggered. When you press the button, "Sleep Mode" will be activated.
Switch between Away / Home / Customized / OFF modes
To switch between Away / Home / Customized / OFF modes:
I. Enter the access code, which is an optional setting on the eufy Security app.
2. Press / cusswachro the corresponding mode.
Note: Access code is recommended to use when you switch from Away to Off mode, while it is not necessary otherwise.
Device Bypass
Device bypass means that the system will ignore faulty sensors for a specific time while the system is armed.
When you switch to Home, Away or any customized security mode, the system will check if there are any issues with all your devices. You may need to bypass a particular sensor in the following scenarios:
• You want to leave a sensor off while the system is armed.
o Example: You arm the system but want to leave a window open.
o You are sleeping at home and want the room to be unmonitored.
- A sensor malfunctions and you don't have time to deal with it.
• A sensor is not connected to the HomeBase and cannot be detected.
If any issues are detected, the × and √ keypad buttons will flash simultaneously. You may need to:
- Select to bypass faulty devices. Then you can switch to the desired mode.
- Select × to cancel the operation. Then you cannot switch the current security mode.
Note: • Each time you switch the security mode, the system will re-check whether your devices are working properly.
• Make sure there is at least one active sensor in a mode that can arm the system, or you cannot switch the security mode.
Panic Alarm
The Panic alarm can be used in the case of an emergency. To trigger an emergency alarm, press and hold the Panic button for 3 seconds. Once the emergency alarm is triggered, the LED indicator blinks red quickly for 3 seconds, the alarm coming from HomeBase will be heard, and text notifications will be sent to you/the administrator via the eufy Security app and email.
LED Indication
| LED indicator Status Description | ||
| Numeric keypad area | Keypad indicator blinks white 3 times | Access code error |
| Only × and √ buttons blink white for 5s | Device faults detected that must be dealt with to switch to a certain mode | |
| Mode button / / cus | Solid blue The current mode is active | |
| Blinking blue | The current mode is active and the countdown has started for you to leave the house. | |
| Solid white | Device faults detected that must be dealt with to switch to a certain mode | |
| Blinking white Failed to switch mode | ||
Note: When the Away (Home (CUS) buttons blink blue simultaneously, it indicates that the current security mode is not associated with these buttons or specified on the app.
Buzzer Indication
| Scenario Buzzer Description | |
| Press any key on the keypad Buzzes once | |
| Operation error (access code / Mode switch error) | Buzzes three times |
| Countdown reminder Buzzes continuously until the end | |
| Waiting to bypass devices Buzzes for 5s | |
| Press Panic button for 3s | Buzzes quickly for 3s |
10 English English
OPERATING ON THE EUFY SECURITY APP
All operations, such as mode switch, alarm on / off, device bypass, OTA update can be performed on the eufy Security app.
Keypad Settings
On the eufy Security app, you can create the following settings:
- Set Away, Home, Customized, and Off security modes. Make sure the mode associates to the Keypad button accordingly.
- Change access code
- Create access codes for other family members or guests. Up to 6 access codes are supported. The access code should be 4 digits to 8 digits by default.
- Name the device
- Set emergency code. After entering the set code, the alarm will be disabled. A specified message will be sent to emergency contacts via the app.
- Synchronize the Keypad status: Connected, disconnected, charging, factory default.
Access Code Management
The eufy Security app allows you to assign an access code to your family members, friends or visitors.
To assign the access code to them, open the eufy Security app, go to the Keypad's Device page, enter the user name and assign a new access code.
You can set an expiration date for each access code. Access codes beyond the expiration date are invalid. This may be suitable for temporary visitors.
Note: Up to 6 access codes can be added on one HomeBase.
Before charging your keypad, check whether the Keypad power is low.
When the Keypad power is low:
The Keypad's LED indicator will flash red for 5 seconds when movement is detected nearby. On the eufy Security app, the Keypad power level icon will turn red.
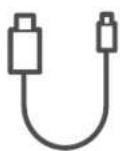
To charge your Keypad, use the micro USB cable and charger (not provided).
| Charging indicator | Solid red Charging | |
| Solid blue Fully charged |
OTA UPDATE
In some cases, the system may push OTA updates automatically. When the OTA update begins, the LED indicator keeps flashing red until the process is completed.
To make sure the software is always the latest version, check your software updates and follow the on-screen instructions to update the firmware manually.
12 English English
RESETTING YOUR KEYPAD
When a keypad malfunction occurs, use a sharp-pointed object (such as SIM card opener) to reset the keypad.
SPECIFICATION
Radio Frequency(SUB-IG): 866\~866.8MHz (For EU); 920\~920.8MHz (For US)
Cell Capacity: 2600 mAh
USB-A input: 5V=IA
Working temperature: -10°C - 50°C / 14°F - 104°F
Storage temperature: -20°C - 60°C / -4°F - 140°F
TROUBLESHOOTING
The keypad keeps blinking red.
This indicates the keypad is disconnected from the HomeBase.
- Check whether the HomeBase is charged.
- Reset the keypad
- Check whether there is wireless interference nearby.
• Take the keypad closer to the HomeBase
For troubleshooting, check the FAQ section in the eufy Security app.
NOTICE
FCC Statement
This device complies with Part 15 of the FCC Rules. Operation is subject to the following two conditions: (1) this device may not cause harmful interference, and (2) this device must accept any interference received, including interference that may cause undesired operation.
Warning: Changes or modifications not expressly approved by the party responsible for compliance could void the user's authority to operate the equipment.
Note: This equipment has been tested and found to comply with the limits for a Class B digital device, pursuant to Part 15 of the FCC Rules. These limits are designed to provide reasonable protection against harmful interference in a residential installation. This equipment generates uses and can radiate radio frequency energy and, if not installed and used in accordance with the instructions, may cause harmful interference to radio communications. However, there is no guarantee that interference will not occur in a particular installation. If this equipment does cause harmful interference to radio or television reception, which can be determined by turning the equipment off and on, the user is encouraged to try to correct the interference by one or more of the following measures: (1) Reorient or relocate the receiving antenna. (2) Increase the separation between the equipment and receiver. (3) Connect the equipment into an outlet on a circuit different from that to which the receiver is connected. (4) Consult the dealer or an experienced radio / TV technician for help.
FCC Radio Frequency Exposure Statement
The device has been evaluated to meet general RF exposure requirements. The device can be used in fixed/mobile exposure condition. The min separation distance is 20cm.
Notice: Shielded cables
All connections to other computing devices must be made using shielded cables to maintain compliance with FCC regulations.
The following importer is the responsible party:
Company Name: POWER MOBILE LIFE, LLC
Address: 400 108th Ave NE Ste 400, Bellevue, WA 98004-5541
Telephone: I-800-988-7973
14 English English
CE This product complies with the radio interference requirements of the European Community.
Declaration of Conformity
Hereby, Anker Innovations Limited declares that this device is in compliance with the essential requirements and other relevant provisions of Directive 2014/53/EU. For the declaration of conformity, visit the Web site https://uk.eufylife.com/.
Do not use the Device in the environment at too high or too low temperature, never expose the Device under strong sunshine or too wet environment.
The suitable temperature for the product and accessories is -10^ - 50^ .
RF exposure information: The Maximum Permissible Exposure (MPE) level has been calculated based on a distance of d=20 cm between the device and the human body.
To maintain compliance with RF exposure requirement, use product that maintains a 20cm distance between the device and the human body.
CAUTION RISK OF EXPLOSION IF BATTERY IS REPLACED BY AN INCORRECT TYPE. DISPOSE OF USED BATTERIES ACCORDING TO THE INSTRUCTIONS
SUB-IG Frequency range: 866 \~ 866.8MHz
Max Output Power: 11.746dBm
The following importer is the responsible party (contact for EU matters only)
This product is designed and manufactured with high quality materials and components, which can be recycled and reused.

This symbol means the product must not be discarded as household waste, and should be delivered to an appropriate collection facility for recycling. Proper disposal and recycling helps protect natural resources, human health and the environment. For more information on disposal and recycling of this product, contact your local municipality, disposal service, or the shop where you bought this product.
IC Statement
This device complies with Industry Canada licence-exempt RSS standard(s). Operation is subject to the following two conditions:
(1) this device may not cause interference, and
(2) this device must accept any interference, including interference that may cause undesired operation of the device."
This Class B digital apparatus complies with Canadian ICES-003.
When using the product, maintain a distance of 20cm from the body to ensure compliance with RF exposure requirements.
Anker Innovations Limited
Room 1318-19, Hollywood Plaza, 610 Nathan Road, Mongkok, Kowloon, Hong Kong
UK This product complies with the radio interference requirements of the United CA Kingdom.
Declaration of Conformity
Hereby, Anker Innovations Limited declares that the product type T8960 is in compliance with Radio Equipment Regulations 2017. The full text of the UK declaration of conformity is available at the following internet address: https://uk.eufylife.com
Anker Technology (UK) Ltd I Suite B, Fairgate House, 205 Kings Road, Tyseley, Birmingham, B11 2AA, United Kingdom
natural_image
Illustration of a hand holding a smartphone with a shield icon and wireless signal waves (no text or symbols)natural_image
Diagram of a mechanical clamp or bracket with two vertical supports and an upward force arrow (no text or symbols)natural_image
Diagram of two electric drill heads mounted on a wall, no text or symbols presentnatural_image
Illustration of a mobile phone with control buttons and vertical arrows indicating movement (no text or symbols)① Botón de pánico
natural_image
Illustration of a hand holding a smartphone with a shield icon and wireless signal waves (no text or symbols)natural_image
Diagram of a mechanical device with two plates and arrows indicating motion (no text or symbols)natural_image
Diagram of two electric drillers mounted on a wall, no text or symbols presentnatural_image
Pure diagram of a mechanical component with no text, numbers, or symbols38 Espanol Espanol
natural_image
Illustration of a mobile phone with keypad and control buttons, shown in 3D rendering (no text or symbols)USO DEL TECLADO
Clavier T8960
Vis de montage
natural_image
Illustration of a hand holding a smartphone with a shield icon and wireless signal waves (no text or symbols)natural_image
Diagram of two stacked electronic components with arrows indicating direction (no text or symbols)natural_image
Diagram of two robotic armshells mounted on a wall, no text or symbols presentnatural_image
Pure diagram of a switch or connector without any text, numbers, or symbolsnatural_image
Illustration of a mobile phone with control panel and directional arrows indicating movement (no text or symbols)UTILISATION DU CLAVIER
natural_image
Illustration of a hand holding a smartphone with a shield icon and wireless signal waves (no text or symbols)natural_image
Diagram of a mechanical device with two plates and arrows indicating direction (no text or symbols)natural_image
Diagram of two electric drill heads mounted on a wall, no text or symbols presentnatural_image
Pure diagram of a mechanical component with no text, numbers, or symbolsnatural_image
Illustration of a mobile phone with keypad and control buttons, shown in 3D rendering (no text or symbols)UTILIZZO DEL TASTIERINO
Toetsenblok T8960
Montageschroeven
natural_image
Illustration of a hand holding a smartphone with a circular app icon on the screen (no text or symbols)natural_image
Diagram of a mechanical component with two views and directional arrows, no text or symbols presentnatural_image
Line drawing of two electric drillers operating on a wall-mounted panel (no text or symbols)natural_image
Simple diagram of a switch or screwdriver inserted into a rectangular socket (no text or symbols)natural_image
Illustration of a mobile phone with control buttons and vertical arrows indicating signal or movement (no text or symbols)HET TOETSENBLOK GEBRUIKEN
Teclado T8960
natural_image
Illustration of a hand holding a smartphone with a shield icon and wireless signal waves (no text or symbols)natural_image
Diagram of two stacked electronic components with arrows indicating direction (no text or symbols)natural_image
Diagram of two electric drill heads mounted on a wall, no text or symbols presentnatural_image
Pure diagram of a mechanical component with a central shaft and mounting bracket, no text or symbols presentnatural_image
Illustration of a mobile phone with control buttons and vertical arrows indicating movement (no text or symbols)UTILIZAR O TECLADO
T8960 لوحة المفتيح
براغي لتركيب
دليل المستخدم
كابل الشحن
^① زر الطوارى
natural_image
Illustration of a hand holding a smartphone with a shield icon and wireless signal waves (no text or symbols)natural_image
Diagram of two stacked electronic components with arrows indicating direction (no text or symbols)natural_image
Diagram of two robotic arm heads operating near a panel (no text or symbols)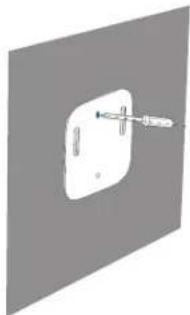
natural_image
Pure diagram of a wall-mounted switch or socket with a pointer, no text or symbols presentnatural_image
Illustration of a mobile phone with control buttons and two vertical arrows indicating movement (no text or symbols)12-month limited warranty
+1 (800) 988 7973 Mon-Fri 9AM-5PM (PT)
+44 (0) 1604 936 200 Mon-Fri 6AM-11AM (GMT)
+49 (0) 69 9579 7960 Mon-Fri 6:00-11:00

Customer Support: support@eufylife.com

@EufyOfficial

@EufyOfficial

eufyofficial
- WHAT'S INCLUDED
- PRODUCT OVERVIEW
- ADDING THE KEYPAD TO THE SYSTEM
- MOUNTING YOUR KEYPAD
- Mount the Keypad
- USING THE KEYPAD
- Keypad Mode Introduction
- Arm, Disarm and Turn off an Alarm
- Set Customized Security Mode
- Switch between Away / Home / Customized / OFF modes
- Device Bypass
- Panic Alarm
- OPERATING ON THE EUFY SECURITY APP
- Keypad Settings
- Access Code Management
- OTA UPDATE
- RESETTING YOUR KEYPAD
- SPECIFICATION
- TROUBLESHOOTING
- NOTICE
- FCC Statement
- FCC Radio Frequency Exposure Statement
- Declaration of Conformity
- IC Statement
- USO DEL TECLADO
- UTILISATION DU CLAVIER
- UTILIZZO DEL TASTIERINO
- HET TOETSENBLOK GEBRUIKEN
- UTILIZAR O TECLADO
Brand : eufy
Model : Keypad
Category : Alarm system