
KA6045SCR - Outdoor heating SILVERCREST - Free user manual and instructions
Find the device manual for free KA6045SCR SILVERCREST in PDF.

| Product Type | 2-in-1 Outdoor Heater |
| Brand | SilverCrest |
| Model | KA6045SCR |
| Power | 2000 W (max), 3 levels: 650 W / 1300 W / 2000 W |
| Power Supply | AC 220-240 V, 50/60 Hz |
| Protection Rating | IPX4 (protected against water splashes) |
| Dimensions (floor mounting) | 50 x 200 x 50 cm (L x H x D) |
| Dimensions (wall mounting, head) | 50 x 35 x 16 cm (L x H x D) |
| Tilt Angle | 0° to 45° approx. |
| Minimum Mounting Height | 1.80 m above ground |
| Lateral Safety Distance | 50 cm minimum from walls and flammable materials |
| Main Functions | 3 heat levels, cord switch, display screen, adjustable angle |
| Mounting | Floor (stand) or wall (bracket included) |
| Package Contents | Heating unit, base, 3 rods, screws, wall plugs, plastic cover, manual |
| Maintenance and Cleaning | Unplug and wait for cooling; clean with a damp cloth; vacuum the grille |
| Safety | Overheat protection (do not cover); automatic shut-off in case of tipping (vertical detection); do not use in rain |
| Warranty | 3 years |
| After-Sales Service | Teknihall (Belgium) – toll-free number 00800 333 00 888 |
| Repairability | Contact customer service for repairs; spare parts not listed, consult customer service |
| Intended Use | Outdoor areas protected from weather, household use only |
Frequently Asked Questions - KA6045SCR SILVERCREST
User questions about KA6045SCR SILVERCREST
0 question about this device. Answer the ones you know or ask your own.
Ask a new question about this device
Download the instructions for your Outdoor heating in PDF format for free! Find your manual KA6045SCR - SILVERCREST and take your electronic device back in hand. On this page are published all the documents necessary for the use of your device. KA6045SCR by SILVERCREST.
USER MANUAL KA6045SCR SILVERCREST
text_image
PDF ONLINE www.lidl-service.comTERRASSENHEIZER 2IN1 / 2-IN-1 PATIO HEATER / CHAUFFAGE D'EXTÉRIEUR 2 EN 1
DE AT CH
TERRASSENHEIZER2IN1
Assembly, operating and safety instructions
NL BE
TERRASVERWARMER2-IN-1
Before reading, unfold both pages containing illustrations and familiarise yourself with all functions of the device.
FR BE
GB / IE Assembly, operating and safety instructions Page 13
natural_image
Circular metallic object with concentric rings and central hole, resting on a wooden deck (no text or symbols visible)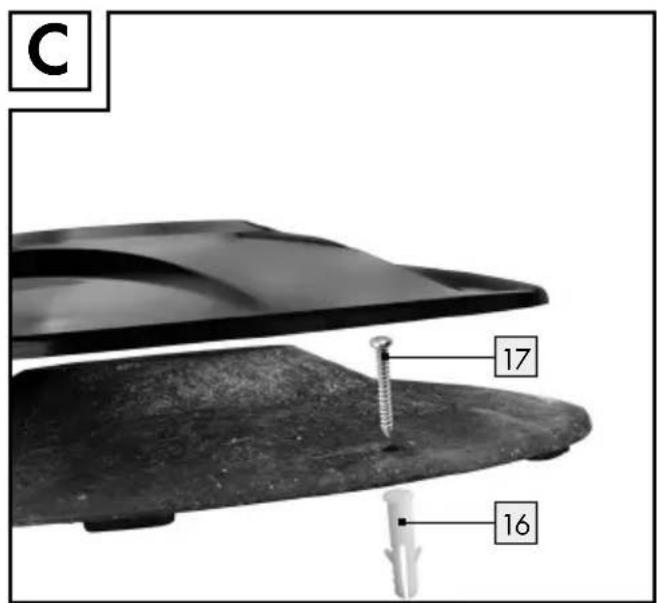
text_image
C 17 16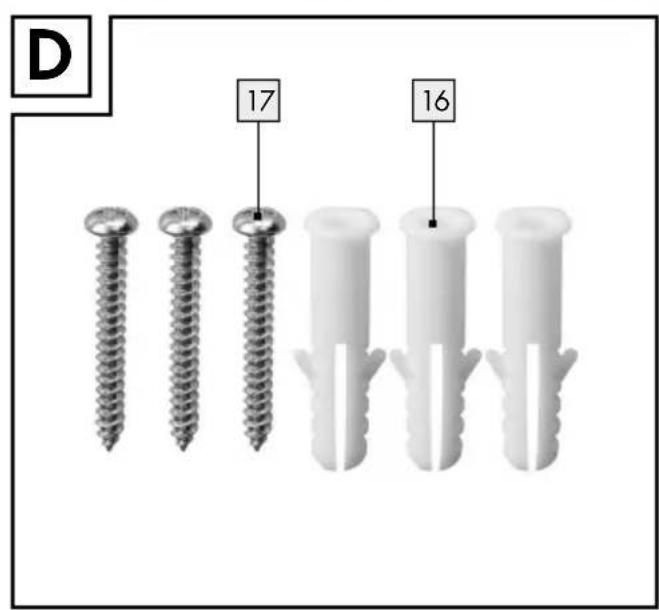
text_image
D 17 16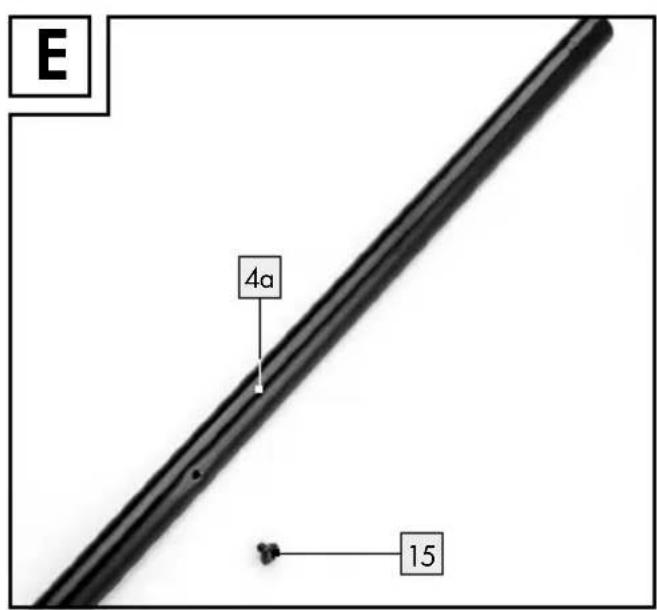
text_image
E 4a 15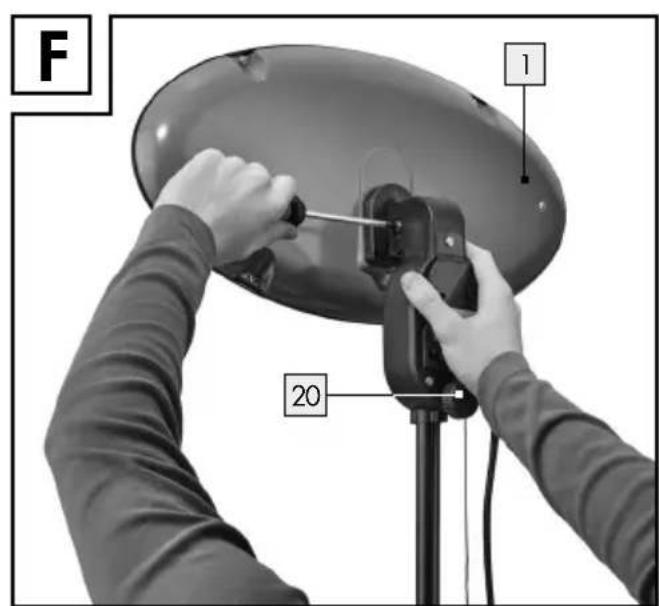
text_image
F 1 20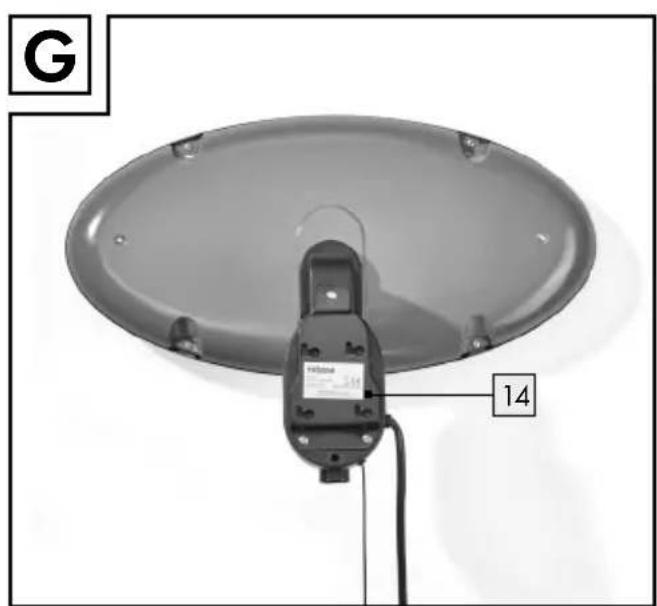
text_image
G 14text_image
FSC® MIX Verpackung FSC® C131499List of pictograms used....Page 14
Introduction......Page 14
Intended use Page 14
Parts description Page 14
Delivery contents......Page 14
Technical data......Page 15
Safety information......Page 15
Before first use....Page 17
Installation......Page 17
Installation with stand Page 17
Setting the tilt angle Page 17
Wall mounting......Page 17
Initial use....Page 18
Cleaning and care....Page 18
Disposal Page 18
Warranty and service......Page 19
Warranty Page 19
Service address......Page 19
Importer Page 19
| List of pictograms used | |||
 | Read the instructions! |  | Danger to life and risk of accidents for infants and children! |
 | Volts (alternating voltage) |  | Avoid the risk of fatal injury from electric shock |
 | Hertz (frequency) Splash-proof |  | |
 | Observe warnings and safety information! |  | Dispose of the packaging and device in an environmentally friendly manner! |
2-in-1 Patio Heater
- Introduction

We congratulate you on the purchase of your new product. You have chosen a high quality product. The instructions for
use are part of the product. They contain important information concerning safety, use and disposal. Before using the product, please familiarise yourself with all of the safety information and instructions for use. Only use the product as described and for the specified applications. If you pass the product on to anyone else, please ensure that you also pass on all the documentation with it.
Intendeduse
This product is a heating device for a weather-protected outdoor area. Any other use or product modification is prohibited and will result in damage. The manufacturer does not assume any liability for damage arising from improper use. The product is not intended for commercial use.
Partsdescription
| 1 | Heating unit |
| 2 | Display |
| 3 | Plastic sheath |
| 4a | Upper rod |
| 4b | Middle rod |
| 4c | Lower rod |
| 5 | Cable guide clip |
| 6 | Screw (rods) |
| 7 | Plastic cover |
| 8 | Screw (base) |
| 9 | Flange |
| 10 | Base |
| 11 | Mains plug |
| 12 | Cord switch |
| 13 | Mains cable |
| 14 | Wall bracket |
| 15 | Fixing screw (upper rod) |
| 16 | Dowel (ground mounting) |
| 17 | Screw (ground mounting) |
| 18 | Stencil for wall mounting |
| 19 | Screw (decorative plate) |
| 20 | Locating screw (heating unit) |
●Deliverycontents
1 x Heating unit
1 x Base
3 x Rod
8 x Screw (base)
1 x Plastic cover
9 x Screw (rod)
3 x Screw (for ground mounting the base)
3 x Dowel (for ground mounting the base)
1 x Assembly, operating and safety instructions
- Technical data
Model designation: KA-6045SCR
3 Heat levels: 650 W, 1300 W and 2000 W
Tilt angle: 0-approx. 45°
Dimensions: Stand set-up: 50 x 200 x
$$ 5 0 \mathrm{cm} (\mathrm{L} \times \mathrm{W} \times \mathrm{H}) $$
Wall mounting: Heating head: 50 x 35 x
$$ 1 6 \mathrm{cm} (\mathrm{L} \times \mathrm{W} \times \mathrm{H}) $$
Output: 2000 W
Protection type: IPX4 (splash-proof)
Operating voltage: AC 220-240V, 50-60Hz


Safety information


WARNING!
DANGER TO LIFE AND
RISK OF ACCIDENTS FOR INFANTS AND CHILDREN!
This product may be used by children age 8 years and up, by persons with reduced physical, sensory or intellectual capacities, or by persons lacking experience or knowledge, so long as they are supervised by someone who is responsible for their safety, or instructed in the safe use of the device and have understood the
associated risks. Do not allow children to play with the product. Do not allow children to clean or perform user maintenance without supervision.
- Do not leave the product or packaging material lying unattended. Plastic film/bags, plastic parts, etc. are dangerous for children to play with.
The manufacturer cannot be held liable for damages due to non-compliance with the safety information.
If the mains cable is damaged it must be replaced by the manufacturer, its service agent or a similarly qualified person, in order to avoid hazards.
■ Never move the product by pulling on the mains cable, and ensure that the mains cable does not become tangled.
■ The product must be positioned on a flat, stable surface.
■ The product must not be left unattended whilst it is connected to the mains power supply.
This product may only be used for household purposes and for the purpose for which it was manufactured.
■ To prevent an electric shock, never immerse the mains cable,
the plug or the product in water or other liquids.
■ The product must not be used in the rain.
ATTENTION! In order to prevent the heating
device from overheating, it must not be covered.
■ CAUTION! Some parts of the product can get very hot and cause burns. Take particular care when children and people in need of protection are present.
- Keep children under 3 years away unless they are constantly supervised.
Children between 3 and 8 years of age may only switch the device on and off under supervision or if they have been instructed in the safe use of the device and have understood the associated risks, provided the device is positioned or installed in its normal operating position. Children between 3 and 8 years of age must not connect the plug to the socket, change the device settings, clean the device and / or perform user maintenance.
- Do not use the product with a programming device, timer, separate remote control, or any
other device to automatically switch the heating device on.
■ Never use the product in the direct vicinity of a bath, shower or swimming pool.
■ Joists, beams and rafters must not be sawn or carved for the installation of the product.
- Set up the heating unit in a place at least 50 cm away from walls and flammable materials (furniture, curtains etc.). Failure to observe this could cause fire.
■ Under no circumstances can the product be covered with insulating material or a similar material.
The heating device must be installed at least 1.8 m above the ground.
■ Never set up the product immediately under a plug socket.
■ Never use the product when it is raining or when the weather is bad; immediately remove the mains plug from the socket and store the product in a dry place.
■ Make sure that children, people with intellectual handicaps and animals never get close to the heating device. Never touch the heating unit; it is extremely hot and you could injure yourself badly!
■ The terrace heater is not controlled by thermostat and emits heat
uninterrupted until it is turned off. Always keep an eye on the terrace heater while it is turned on.
■ Connect the product in such a way that the switch and other controls are out of the reach of someone in the bath or shower.
- Before first use
- Check whether the device voltage and the mains voltage correspond. Operating voltage: AC 220-240V 50Hz
☐ Remove the product and the accessories from the packaging.
☐ Remove the adhesive label, the protective film and the plastic packaging from the product.
- Installation
• Installation with stand
Note: consult the manufacturer's operating manual before using the drill.
Note: for stone patio floors, the included installation material is suitable for use with dowels 16 or screws 17; for wooden floors, only use the screws 17.
☐ Undo the eight screws 8, 19.
□ Remove the base's decorative plate 10.
☐ Select a suitable installation area on the floor, and mark three holes for the base 10.
☐ Make 7cm-deep holes in the marked places using a drill ( 8 mm) (see fig. B–D).
☐ Insert the dowels 16 into the three holes.
☐ Attach the base 10 to the floor using the screws 17.
Place the decorative plate back on the base 10 and fasten it using the 4 screws 19.
Place the lower rod 4c with the flange 9 on the base 10, and tighten it with the screws 8.
☐ Place the plastic cover 7 over the connection between the base 10 and the lower rod 4c.
Note: in the upper rod 4a with the plastic sheath 3, there is a thin rod with a screw hole. Pull out the thin rod and screw the fixing screw 15 into the screw hole as far as it will go before you install the upper rod 4a. This is to guarantee that it does not fall below a total height of 1.80 m (see fig. E).
Place the other two rods 4a, 4b on the lower rod 4c and tighten them with the screws 6. Place cable guide clips 5 between each of them and fasten them using the screws. Make sure that the upper rod 4a has been installed with the plastic sheath 3 pointing upwards.
☐ Install the heating unit 1 on the top rod 4a and tighten the screw.
☐ Pass the cable 13 down through the two cable guide clips 5 on the rods 4a-4c. The product is now ready to use.
Important: please make sure that the product was installed / stands straight. If the product is not straight, it will not heat up! This is a safety precaution intended to stop the product emitting heat if it tips over.
- Setting the tilt angle
The heating unit 1 does not remain permanently in the set tilt angle.
☐ Adjust to your desired tilt angle and tighten the screw on the back of the heating unit 1 (see fig. F).
- Wall mounting
Required tools and materials
The specified tools and materials are not included. The information and values specified are non-binding and are only provided as a reference.
The nature of the material is determined by the specific local conditions.
- Pencil / marking tool
- Cross-tip screwdriver
- Drill
Note: consult the manufacturer's operating manual before using the drill.
Before installation, familiarise yourself with all the instructions and illustrations in this manual, as well as with the product itself.
Note: if the heating unit 1 is to be mounted on the wall, the rods 4 and base 10 are not required. The locating screw 20 must also be removed (see fig. G).
Note: mount the included wall bracket 14 on a solid, straight wall.
Note: position the heating unit 1 at a height of at least 180 cm.
☐ Mark drill holes using the included stencil 18. You will find this on the last page of these instructions.
Now drill the fixing holes. Make sure that you do not damage any water pipes during installation.
☐ Insert the appropriate dowels (not included) into the drilled holes.
☐ Attach the wall bracket 14 complete with the heating unit 1 to the wall using appropriate screws (not included). Ensure that there is 50 cm of free space around the heating unit 1.
- Initial use
□ Connect the product to an earthed power socket.
☐ Set up the heating unit 1 in a place at least 50 cm away from walls and flammable materials (furniture, curtains etc.).
☐ Pull on the cord switch 12 until the desired heating mode appears in the display 2. The following table lists the different heating settings:
| Symbol on display 2 | Heating mode | Output |
| 0 Off 0 Watt | ||
| 1 Low 650 Watt | ||
| 2 Medium 1300 Watt | ||
| 3 High 2000 Watt |
☐ To switch the product off, pull on the cord switch 12 until the symbol 0 appears on the display 2.
■ Attention! If you are using the product connected to a power supply system with a low current, such as for example at a campsite, only use it in heating mode 1. To switch the device off, positions 2 and 3 will still have to be selected first, which can overload the power supply system.
- Cleaning and care
Before cleaning, unplug the mains plug 11 and wait until the device has cooled down.
- Never use strong or abrasive cleaning agents, scourers or steel wool. These would damage the product.
■ Never clean the product with water and never submerge it in water or other liquids.
□ Clean the product with a damp cloth.
☐ Regularly remove dirt and insects from behind the heater grille, using a vacuum cleaner.
●Disposal
The packaging is made entirely of recyclable materials, which you may dispose of at local recycling facilities.
Observe the marking of the packaging materials for waste separation, which are marked with abbreviations (a) and numbers (b) with following meaning: 1-7: plastics / 20-22: paper and fibre-board/80-98: composite materials.

The product and packaging materials are recyclable, dispose of it separately for better waste treatment. The Triman logo is valid in France only.
Contact your local refuse disposal authority for more details of how to dispose of your worn-out product.
To help protect the environment, please dispose of the product properly when it has reached the end of its useful life and not in the household waste. Information on collection points and their opening hours can be obtained from your local authority.
● Warranty and service
Warranty
The product has been manufactured to strict quality guidelines and meticulously examined before delivery. In the event of product defects you have legal rights against the retailer of this product. Your legal rights are not limited in any way by our warranty detailed below.
The warranty for this product is 3 years from the date of purchase. Should this product show any fault in materials or manufacture within 3 years from the date of purchase, we will repair or replace it – at our choice – free of charge to you.
The warranty period begins on the date of purchase. Please keep the original sales receipt in a safe location. This document is required as your proof of purchase. This warranty becomes void if the product has been damaged, or used or maintained improperly.
The warranty applies to defects in material or manufacture. This warranty does not cover product parts subject to normal wear, thus possibly considered consumables (e.g. batteries) or for damage to fragile parts, e.g. switches, rechargeable batteries or glass parts.
• Service address
Please have your receipt and the item number (IAN 316750) ready as your proof of purchase when enquiring about your product.
CE
- Importer
Tristar Europe B.V.
Jules Verneweg 87
5015 BH Tilburg
NETHERLANDS
Standards and directives used:
German version EN 60335-1:2012/A11:2014
German version EN 60335-2-30:2009/
A11:2012
text_image
FSC® MIX Verpackung Packaging Emballage FSC® C131499text_image
FSC® MIX Packaging FSC® C131499text_image
FSC® MIX Packaging FSC® C131499text_image
FSC® MIX Packaging FSC® C131499text_image
FSC® MIX Verpackung Packaging Emballage FSC® C131499text_image
FSC® MIX Verpackung Packaging Emballage FSC® C131499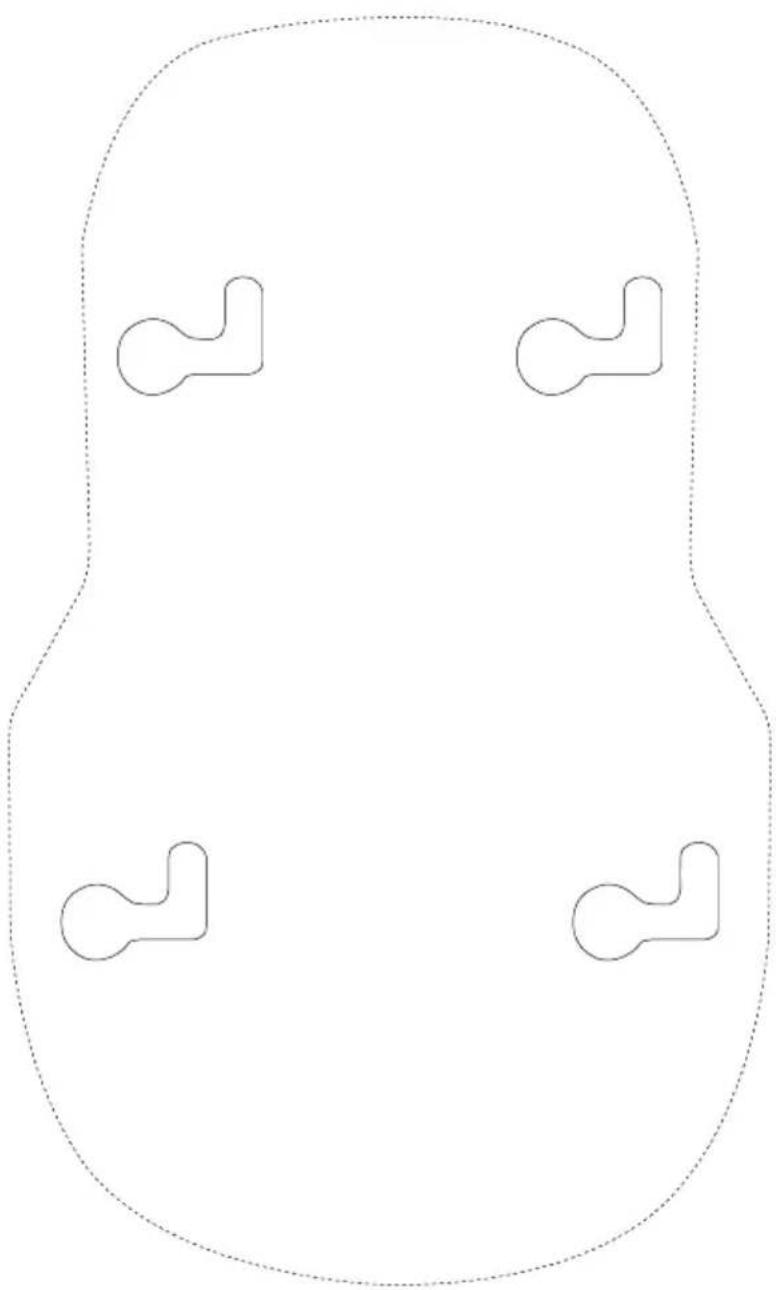
natural_image
Pure geometric diagram with four symmetrical shapes inside a dashed boundary (no text or symbols)18

Tristar Europe B.V.
Jules Verneweg 87
NL-5015 BH Tilburg
THE NETHERLANDS