
SDD 1600 A1 - Steamer SILVERCREST - Free user manual and instructions
Find the device manual for free SDD 1600 A1 SILVERCREST in PDF.


| Product type | Steamer |
| Brand | SilverCrest |
| Model | SDD 1600 A1 |
| Power supply | 220-240 V~, 50-60 Hz |
| Power | 1510-1800 W |
| Water tank capacity | 1.6 L (max), 250 ml (min) |
| Rice bowl capacity | 1 L |
| Lower container capacity | 5.3 L |
| Upper container capacity | 5.7 L |
| Timer | Adjustable from 1 to 99 minutes |
| Cooking presets | 7 presets (eggs, fish, vegetables, meat, poultry, rice, keep warm) |
| Keep warm function | Up to 20 minutes after cooking |
| Dry evaporation alarm | Yes, with Refill icon |
| Automatic descaling | Indication after 15 hours of operation |
| Automatic shut-off | Yes, after inactivity and after keep warm |
| Warranty | 3 years |
| Maintenance | Clean removable parts with soapy water; descale with white vinegar |
| Included accessories | 2 containers, 2 separating plates, rice bowl, drip tray, lid |
Frequently Asked Questions - SDD 1600 A1 SILVERCREST
User questions about SDD 1600 A1 SILVERCREST
0 question about this device. Answer the ones you know or ask your own.
Ask a new question about this device
Download the instructions for your Steamer in PDF format for free! Find your manual SDD 1600 A1 - SILVERCREST and take your electronic device back in hand. On this page are published all the documents necessary for the use of your device. SDD 1600 A1 by SILVERCREST.
USER MANUAL SDD 1600 A1 SILVERCREST
Operation and safety notes
FR BE
CUISEUR VAPEUR
GB/IE Operation and safety notes Page 24


Intended use......Page 25
Part description......Page 25
Technical data....Page 26
Scope of delivery....Page 26
Safety notices......Page 26
Before use......Page 31
Dividing plate Page 31
Initial setup....Page 32
Use Page 32
Setting the steaming time....Page 32
Prepare whole meals Page 33
Pre-set steaming times....Page 34
Pause during steaming......Page 34
Removing food from the product......Page 34
Boil dry alarm....Page 34
Refilling the water tank during use....Page 35
Cooking rice and liquids....Page 35
Cooking eggs....Page 35
Care and cleaning......Page 35
Descaling......Page 36
Recipes......Page 36
Steaming guide......Page 38
Vegetable Page 39
Fish and seafood....Page 40
Poultry Page 40
Meat and type sausages....Page 41
Rice Page 41
Eggs Page 41
Disposal Page 42
Warranty Page 42
| List of pictograms used | |||
 | Observe caution and safety notes! Indoor |  only. only. | |
 | Caution - Hot surface! Danger - Risk of ele |  hock! hock! | |
 | Risk of fire Food-safe! |  | |
 | Voltage (alternating current) Hertz (main |  Jency) Jency) | |
 | Watts (effective power) | ||
STEAMER
- Introduction
We congratulate you on the purchase of your new product. You have chosen a high quality product. The instructions for use are part of the product. They contain important information concerning safety, use and disposal. Before using the product, please familiarise yourself with all of the safety information and instructions for use. Only use the product as described and for the specified applications. If you pass the product on to anyone else, please ensure that you also pass on all the documentation with it.
- Intended use
The product is only designed for food steaming. It may only be used in dry and confirmed space. The product is only intended for use indoors. It is not intended for commercial use or for any other use. The manufacturer is not liable for damage caused by improper use.
This product is intended to be used in household only.
Part description
1 Lid handle
2 Steam vent
3 Lid
4 Rice tray
5 Dividing plate (round top shape, for top container)
6 Top container (number 2, can be found on the handle of container)
7 Dividing plate (square shape, for bottom container)
8 Bottom container (number 1, can be found on the handle of container)
9 Drip tray
10 Water tank
11 Water inlet filler
12 Main unit
13 Control panel
14 MIN mark
15 MAX mark
16 Filter
17 Steam diffuser
18 On/Off button
19 Food icons (Left Compartment)
20 Timer (Left compartment)
21 Refill icon
22 Timer (Right compartment)
23 Food icons (Right compartment)
24 Descale icon
25 Right menu button
26 Steaming icon (Right compartment)
27 Start/Pause button
28 Steaming icon (Left compartment)
29 Left menu button
30 Decrease button (-)
31 Increase button (+)
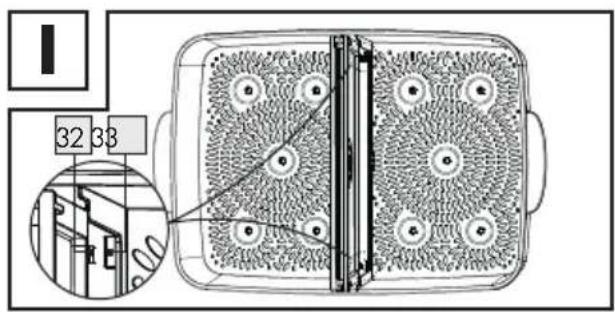
32 Locking tabs
33 holes
34 Tongues (underneath the drip tray)
35 Slots
Food types 19/23
36 Vegetable
37 Meat
38 Fish
39 Poultry
40 Eggs
41 Rice
Status of steaming icons 26/28
42 Steam icon
43 Keep warm icon
44 Water gauge
- Technical data
Nominal voltage: 220-240 V\~ (alternating current), 50-60 Hz
Nominal power: 1510-1800 W
Steam container
capacity: max. 5.3 l (number 1)
max. 5.71 (number 2)
Rice bowl capacity: max 1 l
Water tank capacity: max 1.6l/min 250ml
- Scope of delivery
Immediately after unpacking, please check the package contents for completeness and if the product and all parts are in good condition. Remove all packaging materials before use.
1 Main unit
1 Top container (number 2)
1 Bottom container (number 1)
1 Drip tray
1 Dividing plate (round top shape, for top container)
1 Dividing plate (number 2, can be found on the handle of container)
1 Rice tray
1 Lid

Safety notices
Read all safety advices and instructions. Non-observance of the safety advices and instructions may cause electric shock, fire and/or injuries.
KEEP ALL SAFETY NOTICES AND INSTRUCTIONS FOR FUTURE REFERENCE!

DANGER TO LIFE AND RISK OF ACCI-
DENTS FOR INFANTS AND
CHILDREN! Never leave children unsupervised with the packaging materials. The packaging material poses a suffocation hazard. Children frequently underestimate the dangers. Always keep children away from the packaging material.
■ CAUTION! This product is not a toy for children! Children are not aware of the dangers associated with handling electrical products.
This product can be used by children aged form 8 years and above if they have been given supervision or instruction concerning use of the product in a safe way and if they understand the hazards involved.
■ Cleaning and user maintenance shall not be made by children unless they are aged from 8 years and above and supervised.
- Keep the product and its cord out of reach of children aged less than 8 years.
This product can be used by persons with reduced physical, sensory or mental capabilities or lack of experience and knowledge if they have been given supervision or instruction concerning use of the product in a safe way and if they understand the hazards involved.
■ Children shall not play with the product.
Do not operate the product in explosive environments, where inflammable liquids or gases are located.
■ Never let the supply cord becomes a trip hazard, that no-one can get tangled in it or tread on it.
■ ATTENTION! Never leave the product unattended during operation.
WARNING! Misuse can cause injury!
ATTENTION! HOT SURFACE! The product will become very hot during use. Beware of getting in contact with the ascending steam or the hot food.
- Be aware that hot steam escapes from steam vents 2. Never cover these openings, otherwise steam might build up in the product and escape violently when it is opened.
- Do not open the lid 3 during the steaming process.
Before removing the lid, press the start/pause button 27 to pause the steaming process. Always lift the lid 3 with the lid handle 1.
■ Move the lid 3 underside away from you and let the steam exhaust backwards. - Do not bend over the product during steam generation. Use mittens when touching the lid 3 and the containers 6/8 or trays 4/9. Use a long fork or tongs when checking if the food is done.
- Allow the product to cool down before moving it to a different location.
■ The heating element is subject to residual heat after use.
■ Pull the mains plug after each use.
■ Never let the supply cord hang down over the edge of the work surface so that the product cannot be pulled down accidentally.
- Let the product completely cool down, before you remove the remaining water from the main unit 12 or drip tray 9.
■ Only use clean drinking water to generate steam.
ATTENTION! HAZARD OF FIRE!
Do not operate the product in the proximity of or below curtains, wall cupboards or other inflammable materials.
Place the product on a heat resistant surface (no varnished tables, no table cloths). Do not operate it in the vicinity of other sources of heat (oven, gas flame). Otherwise, the product and / or pieces of furniture may be damaged.
- Place the product on an even, stable surface at a safe distance to walls and cupboards in order to avoid any damage caused by steam rising.
■ Always fill the water tank 10 with sufficient water for the period of steaming. Do not cover the main unit 12 /drip tray 9 with aluminium foil or any other material. If not observed, this can lead to an overheating of the product. Damage of the product is the consequence.
■ Ensure the water level is between minimum and maximum marking. Do not overfill the product otherwise hot water may be ejected.
■ Never operate the product without water in the water tank 10.
■ Never immerse the main unit 12 in water and always pull the mains plug before cleaning or transporting it.
- Avoid using extension cables. These may only be used under very specific conditions:
- the extension cable must be able to handle the amount of current drawn by the product,
- the extension cable must not be "suspended". Keep children away from it and ensure that it does not present a trip hazard,
- under no circumstances use a damaged extension cable,
- do not connect any other product to the mains power socket, since it could cause an overload (do not use multiple sockets of any kind).

Avoid the hazard of life by electric shock
■ Never use a damaged product.
■ Never touch the product, the supply cord or the mains plug with wet hand.
■ Make sure that the details on the rating label are in conformity with your mains voltage. Only connect the product to alternating current with an earthing contact as this provide protection against electric shock.
- Do not operate this product with an external timer or a separate remote control system, such as a wireless remote control socket.
- Check the supply cord regularly for damage or deterioration.
- Do not operate the product when the supply cord or the mains plug is damaged.
■ ATTENTION! A damaged supply cord presents a hazard of life by electric shock. Have products, which do not work faultlessly or which are damaged, immediately and only checked and repaired by qualified personal.
■ Never let the supply cord become wet or damp during operation.
- Do not pull the supply cord for unplugging the product. Unplug the product by pulling out the plug.
- Keep the supply cord away from hot surfaces, sharp edges and mechanical forces. Damaged or entangled supply cord increase the risk of an electric shock.
If the supply cord is damaged, it must be replaced by the manufacturer, its service agent or similarly qualified persons in order to avoid a hazard.
■ Never place containers filled with liquid, such as drinking glasses, vases etc. on the product.
■ Never use in very humid environments.
■ Never use in the immediate vicinity of a kitchen sink, bath, shower or a swimming pool, as water may splash into the product. If liquid should enter the product, unplug the mains plug immediately and have the product repaired by a qualified technician.
■ Only use accessories and additional equipment stated in this instruction manual. The use of other products or accessories than recommended in the instruction manual may present a risk of injuries for you.
FOOD-SAFE! The taste and smell of your food are not detrimentally affected by this product.
- Before use
- Remove all packaging material before use. - It is important to clean the product before first use or if it has not been used for a long period of time. See the "Care And Cleaning" section for more information.
It is essential that the product is descaled at regular intervals to maintain optimum steam and extend the life of the unit. See the "Descaling" section for more information.
During the first use, you may notice some smoke / vapour emitting from the rear of the main unit 12. It is normal as grease is usually applied on some parts of the product during the manufacturing process. After serval use of the product, it will no longer occur. This is not dangerous and will not contaminate or flavour food during use.
• Dividing plate 5/7
☐ The top/bottom containers 8 can be separated into two compartments each with the dividing plates 5/7. To do so, place the dividing plate 5/7 into the designated rails.
To setup a larger single steaming compartment, remove the dividing plates 5/7 from the top/bottom containers 6/8. Note: The dividing plate (square shape, for bottom container) 7 can only be inserted in one direction. Ensure both locking tabs 32 engage both holes 33 on the bottom container 8.
- Initial setup
☐ Check and ensure that the mains voltage of the mains power socket is according to the "Technical Data" section.
Place the main unit on a stable, even surface.
Fill the water tank with cold water to the maximum level (see Fig A and G).
Note: The water tank 10 has to be filled with water at least up to the MIN mark 14.
ATTENTION! HOT SURFACE!

Make sure that the water does not exceed the MAX mark 15.
Otherwise, hot water may spurt out of the product during operation.
☐ ATTENTION! Do not add anything like seasonings etc. to the water. This may affect the steam flow and / or damage the surface of the water tank 10 and the heating element.
First place the drip tray onto the main unit 12, ensure the tongues 34 are aligned with the slots 35.
Then place the bottom container with inserted dividing plate 7 onto the drip tray 9.
Now place food in the compartment of bottom container 8. Use the dividing plate 7 to ensure food do not mix.
If necessary, put the top container on the bottom container 8, place food in the compartment of top container 6, use the dividing plate 5 to ensure food do not mix.
☐ ATTENTION! Never use bowls or other parts, not especially produced for this product. Otherwise, there may be the risk of injuries and / or damage of the product.
Place the centrically so that the top container 6 is completely closed and no steam can exhaust.
☐ Ensure that all parts are positioned correctly before switching on the product.
☐ Connect the mains plug to a suitable mains power socket.
☐ The product will beep and the control panel will show "00100" (see Fig. F).
Now the product is ready to use.
Note: The product will switch off automatically if idled for a minute.
Use
- Setting the steaming time
To set the steaming time, press the left menu button 29 or right menu button 25 repeatedly and select desired food type 36 - 41 from relevant food icon (left compartment) / (right compartment) 19 / 23. The steam icon 42 will appear.
While the relevant timer 20/22 is flashing (within 3 seconds), press the increase button 31 or decrease button 30 to adjust the steaming time (if necessary).
☐ Repeat above steps for the other compartment (if required).
Note: The steaming time of each food type can be adjust between 1 minute and 99 minutes.
Note: In case the steaming time of both left and right compartments are set to be different, the compartment with longer steaming time will start first.
Note: To steam without the dividing plate 5/7, food is recommended to be placed and steamed evenly under the same amount of time. To achieve follow below steps.
Press and hold the left menu button until both timers 20/22 flash together.
☐ If required, adjust the steaming time for the product using the increase button 31 or decrease button 30
Press the start / pause button The product will beep, the steam icon 42 will flash and the timer 20/22 will start counting down.
When the timer reaches zero the alarm will beep twice. The product will automatically switch to keep warm for 20 minutes. The keep warm icon 43 appears.
☐ When 20 minutes keep warm finished, the product will beep 5 times before switch off automatically.
Note: Water refilling is necessary if the steaming time is longer, refer to Refill The Water tank 10 During Use for detail.
☐ Frequently monitor on the water gauge if necessary.

ATTENTION! HOT SURFACE!
Make sure that the water does not exceed the MAX mark 15
Otherwise, hot water may spurt out of the product during operation.

ATTENTION! HOT SURFACE!
The product will become hot during use. Beware of getting in
contact with the ascending steam or any components.
When finished steaming, press the On/Off button 18, and pull the mains plug from the mains power socket. Carefully lift the lid 3 with the lid handle 1. Move the lid 3 underside away from you and let the steam exhaust backwards.
□

ATTENTION! HOT SURFACE!
Do not bend over the product during steam generation. Use
mittens when touching the lid 3 and the containers 6/8 or trays 4/9 To check whether the food is done, use a long fork or tongs.
□
Carefully remove the cooked food from the top/bottom container 6/8
•
Prepare whole meals
□
To prepare a whole meal, both top/bottom container 6/8 can be used.
Hint:
- the heaviest food or food taking longest steam time should be placed in the bottom container 8
- the steam works most effectively in the bottom container 8 and less so when it travels upwards, steaming time in the top container 6 is extended by a few minutes.
- evenly stir or rearrange the steaming food occasionally with a long cooking fork or tongs.
Exception: raw meat, poultry, fish and seafood are recommended to be steamed in the bottom container 8 to prevent juices dripping onto other food.
Note: Never steam frozen meat, poultry or seafood direct from freezer. Always thaw thoroughly first.
□
Put bottom container on the product and start steaming (see "Initial setup" and "Setting the steaming time").
□
Fill top container with food which will take a moderate time to steam.
Before! WARNING!
removing the lid, press the start/pause button 27 to pause the steaming process. A cloud of hot steam may escape if you remove the lid 3 without sufficient caution during the steaming process.
Carefully lift the lid with the lid handle 1. Move the lid 3 underside away from you and let the steam exhaust backwards.
Take the bd right off.
Put top container on bottom container 8 and close the lid 3 again to continuous steaming.
- Pre-set steaming times
The product has 7 pre-set steaming times. These can be adjusted using the increase button 31 and decrease button 30.
To select the pre-set steaming time, press the left menu button 29 or right menu button 25 repeatedly and select desired food type 36 - 41.
☐ Pre-set steaming times as follows:
Egg 40 - 12 minutes
Fish 38 - 15 minutes
Vegetables 36 - 20 minutes
Meat 37 - 30 minutes
Poultry 39 - 35 minutes
Rice 41 - 40 minutes
Keep Warm 43 - 10 minutes (Do not use this setting to steam food).
Press the start/pause button to start steaming.
- Pause during steaming
To pause the steaming process press the start/pause button 27, the steam icon 42 stops flashing and the timer 20/22 stops. To resume press the start/pause button 27 again.
Whilst the product is paused, it is possible to adjust the steaming time. Press the left menu button 29 or right menu button 25 once, depends on the timer of which compartment to be change, use increase button 31 or decrease button 30 to set the new steaming time while relevant timer 20/22 is flashing.
- Removing food from the product
WARNING! Use mittens to remove the lid 3 and container 6/8, ensure to lift the lid 3 with the lid handle 1. Move the lid 3 underside away from you and let the steam exhaust backwards.
Do not remove the drip tray until it has completely cooled.
- Boil dry alarm
This product has a boil dry alarm. The alarm warns you if there is too little water in the product. Too high temperatures and damages to the product may occur.
When the water level is lower than the "MIN" level the product will beeps continuously and the refill icon 21 will flash continuously. Refill the water tank 10 with water as soon as possible.
Use the water inlet filler to refill the water tank 10 as described in "Refilling the water tank during use".
If the product is filled with too little water during use, it will beep continuously. Refill the water tank 10 with water as soon as possible or switch it off by pressing the On/Off button 18.
Refilling the water tank during use
Use the water inlet filler to refill the water tank 10 during steaming.
Gently pull the water inlet filler out from the side of the product. Refill water through the water inlet filler 11 carefully using a jug (not supplied) (see fig. H).
The buzzer will stop automatically and the refill icon 21 will disappear.
Frequently monitor on the water gauge if necessary.
Cooking rice and liquids
Set up the product as described in "Initial setup with dividing plate" and "Setting the steaming time".
Pour 1 cup of uncooked rice and 1 12 cups of water into the rice tray 4 and stir gently.
Place the rice tray into the compartment of a container 6 / 8 and place the lid 3 on the product.
Note: If you are using both top and bottom containers 6 / 8, the rice tray 4 should be placed in the top container 6 so that nothing drips into the rice.
Set the steaming time for the compartment to the Rice preset (40 minutes) and press the start/pause button 27 to start steaming.
Before removing the lid, press the start/pause button 27 to pause the steaming process. Carefully lift the lid 3 with the lid handle 1. Move the lid 3 underside away from you and let the steam exhaust backwards.
Stir the rice occasionally.
Sauces, other liquids and fruit can also be heated and steamed using rice tray 4. Follow the process described above.
Cookingeggs
The product can be used to cook hard boiled eggs.
Follow description in "Initial setup" to setup the drip tray 9 and bottom container 8 and/or top container 6.
Place the eggs individually into the dimples within the bottom container 8 and/or top container 6.
Replace the bld.
Set the steaming time and steam as described in "Setting the steaming time".
The product has a preset 'Eggs' setting of 12 minutes. This can be manually adjusted using the increase button 31 or decrease button 30 for personal preference.
Care and cleaning
Never immerse the main unit 12, supply cord or mains plug into water.
Unplug from the mains power socket and leave the product to cool completely before cleaning.
Rinse thoroughly the water tank then wipe the main unit 12 with a damp cloth.
□ Wash the 10, rice tray 4, containers 6/8 and dividing plates 5/7 in warm water and washing-up liquid.
☐ Pull the filter and steam diffuser 17 out and clean in warm water and washing-up liquid. Replace them after cleaning.
☐ To clean the main unit 2 use a dry, lint-free cloth.
□ Clean your product after each use.
Note: Please note that none of the included parts is suitable for dishwashers.
• Descaling
☐ The product is required to be descaled regularly to maintain optimum steam and extend the life of the product. After every 15 hours of steaming usage, the descale icon 24 will appears to remind you to descale the product.
Fill the water tank with at least 650 ml of white vinegar but should not more than the MAX mark 15. (Not brown vinegar)
☐ IMPORTANT: Do not use any other chemical or commercial descale agent.
Correctly position the drip tray, container 6/8 and lid 3, onto the water tank 10 before connecting to the mains power socket.
Set the timer / 22 for 25 minutes for both compartments and press start/pause button 27.
WARNING! If the white vinegar solution begins to boil over the edge of the main unit 12, switch off the timer and pull the mains plug. Reduce the quantity of white vinegar slightly. Do not try to move the product whilst the vinegar is still hot.
When the steaming completed, unplug the product from the mains power socket and wait for being cooled completely before pouring out vinegar.
☐ Rinse the water tank several times with clean water.
Fill the water tank to the MAX mark 15 with clean water. Place the drip tray 9, bottom container 8, top container 6 and lid 3 onto the water tank 10 and then connect the product to the mains power socket.
☐ Switch on the product and start steaming on any setting for 10 minutes. Switch off and wait for being cooled completely before pouring out the remaining water.
- Recipes
Ratatouille
4 Servings
Ingredients:
2 Peppers (red, yellow or green)
1 Eggplant (approx. 250 g)
1 Zucchini (approx. 250 g)
250g Tomatoes
1 Onion
2 Garlic cloves
Salt & pepper
Tabasco
Herbs de provence
100g Tomato ketchup
2 Tbsps. Tomato puree
Directions:
Rinse and chop peppers, eggplant, zucchini, tomatoes, onion and garlic into cubes. Mix all ingredients together and season with salt, pepper, tabasco, ketchup and tomato puree and herbs de Provence. Cover the bottom of bottom container 8 with a cling wrap and place the mixed ingredients on top of the cling wrap. Choose the vegetable program 36 and steam for approx. 12 minutes.
Side dish: Rice
Also great as a side for meat dishes or (cold) to accompany a buffet.
Mini chocolate cakes
6 Servings
Ingredients:
100 ml Milk
125 g Flour
1 tsp. Baking powder
2 tbsp Heaped cocoa
1 Egg
50g Butter
50g Sugar
1 Splash of rum
Directions:
Place all ingredients into a bowl and mix it for approx. 3 minutes with a hand mixer. Place the dough into six silicon muffin baking dishes and place into the product for approx. 14 minutes using the Eggs program 40
Remove the mini chocolate cakes immediately from the baking dishes after steaming and let them cool on a rack.
Pears in chocolate sauce
2 Servings
Ingredients:
1 Pear
1/2 Cup of cream
50g Chocolate (plain)
Chopped pistachios
Directions:
Peel and cut the pears into halves and remove the core.
Break the chocolate into pieces and place into the rice tray 4 together with the cream.
Place pears and chocolate into the product and use the vegetable program 36 for approx. 10 minutes.
Remove the pears and place onto a plate. Stir the sauce until it gets dark and the chocolate is distributed evenly. Then pour over the pears and decorate with some chopped pistachios.
Leek-Ham-Pinwheels
8 Servings
Ingredients:
4 Leeks
8 Slices of boiled ham
40g Butter
40g Flour
2 Wedges of soft cheese
1 | Vegetable stock
Directions:
Cut the leek in half (crossway) and steam it in the product for approx. 5-7 minutes using vegetable program 36. Wrap the leek into the boiled ham slices and place them in a greased casserole dish. Prepare a light sauce made of butter and flour (roux) as well as the vegetable stock and add the soft cheese.
Season to taste. Pour the sauce over the leek-hampinwheels and overbake at 200 °C for approx. 20 minutes in the oven.
Vanilla chicken fillet with honey-glazed carrots
2 Servings
Ingredients:
2 Chicken fillets, without skin (around 300g)
1/2 Vanilla bean, cut in half (crossway)
2 tbsps. Grape seed oil
16 Baby carrots, peeled
2 tbsp. Butter
3 tbsp. Honey
Pinch of salt
Pinch of black pepper, ground
Directions:
Place the chicken fillet with the oil, the vanilla bean and the pepper into a bag and marinate it for at least 2 hours. Also marinate each 8 carrots with 1 tsp. butter and 1.5 tbsps. honey.
Steam the chicken in poultry program 39 for approx. 10 minutes. Remove it from the bag and sear in a pre-heated pan. Season with salt afterwards. Steam the carrots in vegetable program 36 for approx. 20 minutes. Then place into a pre-heated pan and fry until the honey is caramelized. Salt and pepper to taste.
Side dish: Couscous or polenta
Salmon trout with vegetables
2 Servings
Ingredients:
1 Salmon trout
2 Peppers (red and yellow)
3 Carrots
1 Cloves of garlic
1 Onion
3 tbsps. Natural yoghurt
3 tbsps. Crème Fraîche
1 tbsp. Dill, dried
3 tbsps. Lemon juice
Salt & Pepper
Directions:
Clean the salmon trout well, season the in- and outside with salt and pepper. Clean the vegetables and cut into small cubes. Cover the bottom of the bottom container 8 with a cling warp. Fill the fish with the vegetables and place into the product. Place the additional vegetables thereunto. Sprinkle some dill onto the vegetables. Steam in fish program 38 approx. 25-30 minutes. Mix the crème fraîche, yoghurt, lemon juice and dill into a dip and season with salt and pepper. Add into the product for the last 10 - 15 minutes.
- Steaming guide
Steaming times and portion sizes mentioned in the table are an approximate guide only when using the bottom container 8 only. Adjust cooking time may require due to the size of the food, the spacing of the food in the container, position of container, the freshness of food and personal preference.
- Vegetable
Salt and season vegetables after steaming if required.
Frozen vegetables should not be thawed before steaming.
☐ Cut thick stems from broccoli, cauliflower and cabbage in small pieces.
☐ Shorten time should be used if steam leafy, green vegetables as they loose colour easily.
| Vegetable Type | 1 Serving 2 | Servings 3 Servings 4 Servings | |||
| Artichokes fresh 2 | 5 Min. | (1 medium size) | 30 Min.(2 medium size) | 30 Min.(3 medium size) | 32 Min.(4 medium size) |
| Asparagus fresh 9 | Min. | (200 g) | 10 Min.(400 g) | 12 Min.(600 g) | 12 Min.(800 g) |
| frozen 9 Min. | (200 g) | 10 Min.(400 g) | 12 Min.(600 g) | 12 Min.(800 g) | |
| Beans, green | fresh 14 Min. | (200 g) | 15 Min.(400 g) | 17 Min.(600 g) | 17 Min.(800 g) |
| frozen | 14 Min.(200 g) | 15 Min.(400 g) | 20 Min.(600 g) | 20 Min.(800 g) | |
| Broccoli | fresh 8 Min. | (200 g) | 8 Min.(400 g) | 10 Min.(600 g) | 10 Min.(800 g) |
| frozen | 10 Min.(200 g) | 10 Min.(400 g) | 14 Min.(600 g) | 15 Min.(800 g) | |
| Brussels sprouts | fresh 16 Min. | (200 g) | 18 Min.(400 g) | 20 Min.(600 g) | 20 Min.(800 g) |
| Carrots | fresh, sliced | 14 Min.(200 g) | 20 Min.(400 g) | 20 Min.(600 g) | 20 Min.(800 g) |
| Corn on the cob | fresh, whole | 10 Min.(1 piece) | 10 Min.(2 pieces) | 12 Min.(3 pieces) | 15 Min.(4 pieces) |
| Cauliflower | fresh, florets | 8 Min.(200 g) | 8 Min.(400 g) | 12 Min.(600 g) | 12 Min.(800 g) |
| frozen 9 Min. | (200 g) | 12 Min.(400 g) | 14 Min.(600 g) | 14 Min.(800 g) | |
| Green, squashes | fresh, in slices | 13 Min.(200 g) | 14 Min.(400 g) | 16 Min.(600 g) | 18 Min.(800 g) |
| Mushrooms | fresh 10 Min. | (100 g) | 10 Min.(200 g) | 12 Min.(300 g) | 12 Min.(400 g) |
| Peas | frozen 8 Min. | (200 g) | 8 Min.(400 g) | 12 Min.(600 g) | 14 Min.(800 g) |
| Potatoes | Peeled and chopped | 20 Min.(450 g) | 20 Min.(900 g) | 20 Min.(1350 g) | 20 Min.(1800 g) |
| New potatoes | Fresh, whole | 28 Min.(200 g) | 30 Min.(400 g) | 30 Min.(600 g) | 36 Min.(800 g) |
| Vegetable Type 1 Serving 2 | Servings 3 Servings 4 Servings | ||||
| Spinach fresh 5 Min. | (125 g) | 5 Min.(250 g) | 6 Min.(375 g) | 8 Min.(500 g) | |
Fish and seafood
Fish is done when its colour turns opaque.
☐ Defrosting may not require if frozen fish is
separated before steaming and steaming time extended.
| Fish and seafood | Type 1 Serving 2 Servings | 3 Servings 4 Servings | |||
| Lobster, tails fresh | 11 Min. | (1 piece) | 11 Min.(2 pieces) | 13 Min.(3 pieces) | 13 Min.(4 Stück) |
| Fish, fillets | fresh 10 Min. | (125 g) | 13 Min.(250 g) | 13 Min.(375 g) | 14 Min.(500 g) |
| frozen | 15 Min.(125 g) | 15 Min.(250 g) | 17 Min.(375 g) | 17 Min.(500 g) | |
| Fish, thick steaks | Salmon | 14 Min.(200 g) | 15 Min.(400 g) | 20 Min.(600 g) | 20 Min.(800 g) |
| Tuna 14 Min. | (133 g) | 17 Min.(267 g) | 20 Min.(400 g) | 22 Min.(533 g) | |
| Mussels | fresh | 6 Min.(200 g) | 10 Min.(400 g) | 14 Min.(600 g) | 14 Min.(800 g) |
| Oysters | fresh 11 Min. | (3 pieces) | 15 Min.(6 pieces) | 15 Min.(9 pieces) | 15 Min.(12 pieces) |
| Prawns | fresh | 7 Min.(200 g) | 8 Min.(400 g) | 10 Min.(600 g) | 12 Min.(800 g) |
Poultry
| Poultry | Type 1 Serving | 2 Servings | 3 Servings | 4 Servings | |
| Chicken | Boneless breast | 11 Min. (200 g) | 15 Min. (400 g) | 17 Min. (600 g) | 18 Min. (800 g) |
| Drumsticks | 25 Min. (200 g) | 25 Min. (400 g) | 28 Min. (600 g) | 28 Min. (800 g) |
- Meat and type sausages
| Meat and type sausage | Type 1 Serving | 2 Servings | 3 Servings | 4 Servings | |
| Beef In slices, fillet | steak or roast beef | 18 Min. (125 g) | 18 Min. (250 g) | 25 Min. (375 g) | 25 Min. (500 g) |
| Lamb Chops with | or without bones | 10 Min. (2 chops) | 10 Min. (4 chops) | 12 Min. (6 chops) | 12 Min. (8 chops) |
| Pork Fillet, loin | steak or loin chops | 10 Min. (100 g/ 1 chop) | 10 Min. (200 g/ 2 chops) | 12 Min. (300 g/ 3 chops) | 12 Min. (400 g/ 4 chops) |
| Sausages Beef or | pork sausages (e.g. frank-furter) | 7 Min. (200 g) | 8 Min. (400 g) | 10 Min. (600 g) | 11 Min. (800 g) |
Rice
☐ Use provided rice tray and add required rice and water.
Place the rice tray in top container 6 in the top most container as the flavours of other food not dripping on it.
| Rice Type 1 Serving 2 Servings 3 Servings 4 Servings | |||||
| Rice | white | 35 Min.(100g + 150ml water) | 35 Min.(200g + 300ml water) | 40 Min.(225g + 340ml water) | 40 Min.(300g + 600ml water) |
| brown 55 | Min.(75g + 150ml water) | 55 Min.(150g + 300ml water) | 60 Min.(225g + 450ml water) | 60 Min.(300g + 600ml water) | |
| Rice pudding | Rice pudding | 99 Min.(50g rice + 15g caster sugar + 190ml warm milk) | 99 Min.(100g rice + 30g caster sugar + 380ml warm milk) | 109 Min.(150g rice + 45g caster sugar + 570ml warm milk) | 109 Min.(200g rice + 60g caster sugar + 760ml warm milk) |
Eggs
☐ If steaming soft-boiled eggs, set steaming time to 12 minutes and take out steamed eggs timely.
| Eggs Type 1 Serving 2 Servings 3 Servings 4 Servings max. | quantity | |||||
| Eggs soft-boiled | 12 Min.(1 piece) | 12 Min.(2 pieces) | 12 Min.(3 pieces) | 12 Min.(4 pieces) | 12 Min.(10 pieces) | |
| hard-boiled | 18 Min.(1 piece) | 18 Min.(2 pieces) | 18 Min.(3 pieces) | 18 Min.(4 pieces) | 18 Min.(10 pieces) | |
●Disposal

The packaging is made entirely of recyclable materials, which you may dispose of at local recycling facilities. The Green Dot is not valid for Germany.

Observe the marking of the packaging materials for waste separation, which are marked with abbreviations (a) and numbers (b) with following meaning: 1–7: plastics / 20–22: paper and fibreboard/80–98: composite materials.

The product and packaging materials are recyclable, dispose of it separately for better waste treatment. The Triman logo is valid in France only.

Contact your local refuse disposal authority for more details of how to dispose of your worn-out product.

To help protect the environment, please dispose of the product properly when it has reached the end of its useful life and not in the household waste. Information on collection points and their opening hours can be obtained from your local authority.
- Warranty
The product has been manufactured to strict quality guidelines and meticulously examined before delivery. In the event of product defects you have legal rights against the retailer of this product. Your legal rights are not limited in any way by our warranty detailed below.
The warranty for this product is 3 years from the date of purchase. Should this product show any fault in materials or manufacture within 3 years from the date of purchase, we will repair or replace it – at our choice – free of charge to you. The warranty period begins on the date of purchase. Please keep the original sales receipt in a safe location. This document is required as your proof of purchase. This warranty becomes void if the product has been damaged, or used or maintained improperly.
The warranty applies to defects in material or manufacture. This warranty does not cover product parts subject to normal wear, thus possibly considered consumables (e.g. batteries) or for damage to fragile parts, e.g. switches, rechargeable batteries or glass parts.

2 Paprika's (rood, geel of groen)
1 Aubergine (ong. 250 g)
1 Courgette (ong. 250 g)
250 g Tomaten
1 Ui
2 Teentjes knoflook
Zout & peper
Tabasco
Herbs de Provence
100 g Tomatenketchup
2 Eetlepels tomatenpuree
Aanwijzingen:
2 Kipfilets, zonder vel (ongeveer 300 g)
50 g Chocolate (normal)
Pistachos troceados
Instrucciones:

- CUISEUR VAPEUR
- Safety notices......Page 26
- Before use......Page 31
- Use Page 32
- Care and cleaning......Page 35
- Recipes......Page 36
- Steaming guide......Page 38
- Disposal Page 42
- Warranty Page 42
- STEAMER
- - Introduction
- - Intended use
- Part description
- Food types 19/23
- Status of steaming icons 26/28
- - Technical data
- - Scope of delivery
- Safety notices
- KEEP ALL SAFETY NOTICES AND INSTRUCTIONS FOR FUTURE REFERENCE!
- DANGER TO LIFE AND RISK OF ACCI-
- DENTS FOR INFANTS AND
- ATTENTION! HAZARD OF FIRE!
- Avoid the hazard of life by electric shock
- - Before use
- • Dividing plate 5/7
- - Initial setup
- ATTENTION! HOT SURFACE!
- Use
- - Setting the steaming time
- Prepare whole meals
- Hint:
- Before! WARNING!
- - Pre-set steaming times
- - Pause during steaming
- - Removing food from the product
- - Boil dry alarm
- Refilling the water tank during use
- Cooking rice and liquids
- Cookingeggs
- Care and cleaning
- • Descaling
- - Recipes
- Ratatouille
- Ingredients:
- Directions:
- Side dish: Rice
- Mini chocolate cakes
- Pears in chocolate sauce
- Leek-Ham-Pinwheels
- Vanilla chicken fillet with honey-glazed carrots
- Side dish: Couscous or polenta
- Salmon trout with vegetables
- - Steaming guide
- - Vegetable
- Fish and seafood
- Poultry
- - Meat and type sausages
- Rice
- Eggs
- ●Disposal
- - Warranty
- Aanwijzingen:
- Instrucciones:
Brand : SILVERCREST
Model : SDD 1600 A1
Category : Steamer